- New and Changed Information
- Preface
- Overview
- Installing and Launching the DCNM Server
- Installing and Launching the DCNM Client
- Using the DCNM Client
- Administering DCNM Authentication Settings
- Administering Device Discovery
- Administering Devices and Credentials
- Administering DCNM Licensed Devices
- Working with Topology
- Managing Events
- Working with Inventory
- Configuring SPAN
- Managing Device Operating Systems
- Working with Configuration Change Management
- Administering Auto-Synchronization with Devices
- Administering Statistical Data Collection
- Administering DCNM Server Log Settings
- Maintaining the DCNM Database
- Troubleshooting DCNM
Cisco DCNM Fundamentals Configuration Guide, Release 4.2
Bias-Free Language
The documentation set for this product strives to use bias-free language. For the purposes of this documentation set, bias-free is defined as language that does not imply discrimination based on age, disability, gender, racial identity, ethnic identity, sexual orientation, socioeconomic status, and intersectionality. Exceptions may be present in the documentation due to language that is hardcoded in the user interfaces of the product software, language used based on RFP documentation, or language that is used by a referenced third-party product. Learn more about how Cisco is using Inclusive Language.
- Updated:
- May 29, 2009
Chapter: Administering DCNM Authentication Settings
- Information About Administering DCNM Authentication Settings
- Licensing Requirements for Administering DCNM Authentication Settings
- Prerequisites for Administering DCNM Authentication Settings
- Guidelines and Limitations for Administering DCNM Authentication Settings
- Configuring DCNM Authentication Settings
- Configuring the Authentication Mode
- Adding a Cisco DCNM Local User
- Changing the Password of a Cisco DCNM Local User
- Changing the Full Name, Role, or Description of a Cisco DCNM Local User
- Deleting a Cisco DCNM Server User
- Adding Authentication Servers
- Changing Authentication Server Settings
- Removing an Authentication Server
- Viewing Cisco DCNM Local Users
- Verifying Authentication Server Settings
- Field Descriptions for DCNM Authentication Settings
- Additional References
- Feature History for DCNM Authentication Settings
Administering DCNM Authentication Settings
This chapter describes how to administer Cisco Data Center Network Manager (DCNM) authentication settings.
This chapter includes the following topics:
- Information About Administering DCNM Authentication Settings
- Licensing Requirements for Administering DCNM Authentication Settings
- Prerequisites for Administering DCNM Authentication Settings
- Guidelines and Limitations for Administering DCNM Authentication Settings
- Configuring DCNM Authentication Settings
- Viewing Cisco DCNM Local Users
- Field Descriptions for DCNM Authentication Settings
- Additional References
- Feature History for DCNM Authentication Settings
Information About Administering DCNM Authentication Settings
Cisco DCNM authentication settings determine how a Cisco DCNM server authenticates users who attempt to access the server with the Cisco DCNM client. They also determine the user role for the user, which affects what the user can configure in the Cisco DCNM client.
This section contains the following topics:
- Users and User Roles
- Local Authentication and Cisco DCNM Local Users
- RADIUS and TACACS+ Authentication
- User Role Assignment by RADIUS and TACACS+
- Fallback to Local Authentication
- Password Recovery
- Users and Device Credentials
- Virtualization Support
Users and User Roles
Cisco DCNM implements user-based access to allow you to control who can access a Cisco DCNM server by using the Cisco DCNM client. User access is secured by a password. Cisco DCNM supports strong passwords.
When you ensure that each person who accesses Cisco DCNM has a unique user account, user-based access allows you to determine what actions are taken by each user.
In addition, Cisco DCNM allows you to assign a role to each user. Roles determine what actions a user can take in the Cisco DCNM client. As described in Table 5-1 , Cisco DCNM supports two user roles.
Local Authentication and Cisco DCNM Local Users
The Cisco DCNM database contains any Cisco DCNM local users that you create.

Note Cisco DCNM server users are local to the Cisco DCNM server. Creating, changing, and removing Cisco DCNM server users has no effect on user accounts on managed devices.
A Cisco DCNM server uses local users to grant access in the following cases:
- When the authentication mode is local
- When no authentication server for the current authentication mode is reachable.
You can use local authentication as the primary authentication mode. If you specify RADIUS or TACACS+ as the primary authentication mode, the Cisco DCNM server always falls back to local authentication if no authentication server for the current authentication mode is reachable.
RADIUS and TACACS+ Authentication
You can configure Cisco DCNM to authenticate users with either the RADIUS or TACACS+ AAA protocol.
Cisco DCNM supports primary, secondary, and tertiary authentication servers for RADIUS and TACACS+. Only a primary server is required. For each authentication server, you can specify the port number that the server listens to for authentication requests.
During authentication, if the primary server for the current authentication mode does not respond to the authentication request, the Cisco DCNM server sends the authentication request to the secondary server. If the secondary server does not respond, Cisco DCNM sends the authentication request to the tertiary server.
If none of the servers configured for the current authentication mode responds to an authentication request, the Cisco DCNM server falls back to local authentication.
User Role Assignment by RADIUS and TACACS+
Cisco DCNM supports the assignment of a user role by the RADIUS or TACACS+ server that grants a user access to the Cisco DCNM client. The user role assigned to a user is in effect for the current session in the Cisco DCNM client only.
To assign a Cisco DCNM user role by RADIUS, configure the RADIUS server to return the RADIUS vendor-specific attribute 26/9/1, which is the Cisco-AV-Pair attribute. To assign a Cisco DCNM user role by TACACS+, the TACACS+ server must return a cisco-av-pair attribute-value pair. If an authentication response does not assign the user role, Cisco DCNM assigns the User role. Table 5-2 shows the supported attribute-value pair values for each Cisco DCNM user role.
Fallback to Local Authentication
Local authentication always is the fallback method for RADIUS and TACACS+ authentication modes. If none of the servers configured for the current authentication mode is available, the Cisco DCNM server uses the local database to authenticate a login requests. This behavior is designed to help you prevent accidental lockout from Cisco DCNM.
For users who need fallback support, the usernames of their local user accounts must be identical to their usernames on the authentication servers. Also, we recommend that their passwords in the local user accounts should be identical to their passwords on the authentication servers. This provides transparent fallback support. Because the user cannot determine whether an authentication server or the local database is providing the authentication service, using usernames and passwords on authentication servers that are different than the usernames and passwords in the local database means that the user cannot be certain which username and password should be given.
Password Recovery
If no one can log into the Cisco DCNM client as a user with a Cisco DCNM Administrator role, reinstall the Cisco DCNM server, which allows you to specify the username and password for a local user account that is assigned the Administrator role. For more information, see the “Reinstalling the Cisco DCNM Server” section.
Users and Device Credentials
Each Cisco DCNM server user has unique device credentials, regardless of whether the user authenticates with a local user account or an account on a RADIUS or TACACS+ server. This allows you to maintain accounting logs on managed devices that reflect the actions of each Cisco DCNM server user. For more information, see the “Information About Devices and Credentials” section.
Licensing Requirements for Administering DCNM Authentication Settings
The following table shows the licensing requirements for this feature:
Administering Cisco DCNM authentication settings requires no license. Any feature not included in a license package is bundled with the Cisco DCNM and is provided at no charge to you. For information about obtaining and installing a Cisco DCNM LAN Enterprise license, see the “Installing Licenses” section. |
Prerequisites for Administering DCNM Authentication Settings
Administering Cisco DCNM server users has the following prerequisites:
Guidelines and Limitations for Administering DCNM Authentication Settings
Administering Cisco DCNM authentication settings has the following configuration guidelines and limitations:
- Create a Cisco DCNM user account for each person who uses the Cisco DCNM client. Do not allow people to share a user account.
- Delete unused Cisco DCNM user accounts.
- Grant an administrator user account only to those who need to perform administrator tasks in the Cisco DCNM client.
- We recommend that you use strong passwords. Common guidelines for strong passwords include a minimum password length of eight characters and at least one letter, one number, and one symbol. For example, the password Re1Ax@h0m3 has ten characters and contains uppercase and lowercase letters in addition to one symbol and three numbers.
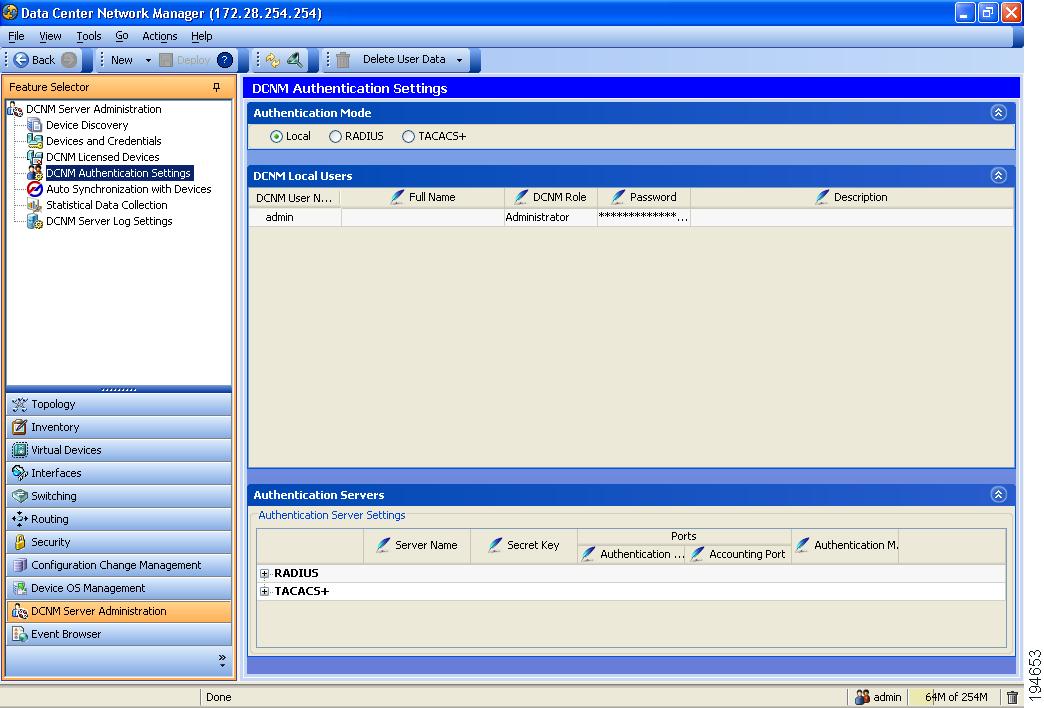
Configuring DCNM Authentication Settings
Figure 5-1 shows the DCNM Authentication Settings content pane.
Figure 5-1 DCNM Authentication Settings Content Pane
This section includes the following topics:
- Configuring the Authentication Mode
- Adding a Cisco DCNM Local User
- Changing the Password of a Cisco DCNM Local User
- Changing the Full Name, Role, or Description of a Cisco DCNM Local User
- Deleting a Cisco DCNM Server User
- Adding Authentication Servers
- Changing Authentication Server Settings
- Removing an Authentication Server
Configuring the Authentication Mode
You can configure the mode that the Cisco DCNM server uses to authenticate Cisco DCNM client users.
BEFORE YOU BEGIN
Log into the Cisco DCNM client with a user account that has the Administrator user role.
If you want to enable RADIUS or TACACS+ authentication mode, you must configure at least one authentication server for the desired authentication mode.
DETAILED STEPS
To configure the authentication mode, follow these steps:
Step 1 From the Feature Selector pane, choose DCNM Server Administration > DCNM Authentication Settings .
Step 2 If necessary, expand the Authentication Mode section.
Step 3 Choose the authentication mode.
Step 4 From the menu bar, choose File > Deploy to apply your changes to the Cisco DCNM server.
Step 5 Restart the Cisco DCNM server. For more information, see the “Stopping the Cisco DCNM Server” section and the “Starting the Cisco DCNM Server” section.
Adding a Cisco DCNM Local User
You can add a Cisco DCNM local user account.
Note Adding a Cisco DCNM local user account does not affect the user account configuration on any Cisco NX-OS device.
BEFORE YOU BEGIN
Log into the Cisco DCNM client with a user account that has the Administrator user role.
Determine the username and password for the new Cisco DCNM local user account.
Note We recommend that you use a strong password. Common guidelines for strong passwords include a minimum password length of eight characters and at least one letter, one number, and one symbol. For example, the password Re1Ax@h0m3 has ten characters and contains uppercase and lowercase letters in addition to one symbol and three numbers.
DETAILED STEPS
To add a Cisco DCNM local user, follow these steps:
Step 1 From the Feature Selector pane, choose DCNM Server Administration > DCNM Authentication Settings .
Step 2 If necessary, expand the DCNM Local Users section.
A table of users appears in the DCNM Local Users section.
Step 3 From the menu bar, choose Actions > Add User .
A new row appears at the bottom of the list of users. By default, all fields in the new row are blank.
Step 4 In the DCNM User Name column of the new row, enter the username. The username can be 1 to 198 characters. Entries can contain case-sensitive letters, numbers, and symbols.
Step 5 (Optional) In the Full Name column, double-click the entry and add a name. For example, enter the real name of the person who will use the Cisco DCNM local user account. The maximum length is 255 case-sensitive letters, numbers, and symbols.
Step 6 In the DCNM Role column, double-click the entry and choose the role. By default, the role is User.
Step 7 In the Password column, double-click the entry and then click the down-arrow button.
Step 8 In the New Password field and the Confirm Password field, enter the password. The password can be 1 to 255 characters. Entries can contain case-sensitive letters, numbers, and symbols.
Step 10 (Optional) In the Description column, double-click the entry and add a description of the user account. For example, you could use this entry to provide e-mail and telephone contact details of the person who will be using this Cisco DCNM server user account. The maximum length is 255 case-sensitive letters, numbers, and symbols.
Step 11 From the menu bar, choose File > Deploy to apply your changes to the Cisco DCNM server.
BEFORE YOU BEGIN
An Administrator role is required if you want to change the password of a local user account other than the account that you use to log into the Cisco DCNM client. If your user account is a local user account and it has the User role, you can change the password of your account only.
Determine what the new password should be.
Note We recommend that you use a strong password. Common guidelines for strong passwords include a minimum password length of eight characters and at least one letter, one number, and one symbol. For example, the password Re1Ax@h0m3 has ten characters and contains uppercase and lowercase letters in addition to one symbol and three numbers.
DETAILED STEPS
To change the password of a Cisco DCNM local user, follow these steps:
Step 1 From the Feature Selector pane, choose DCNM Server Administration > DCNM Server Authentication Settings .
Step 2 If necessary, expand the DCNM Local Users section.
A table of users appears in the DCNM Local Users section.
Step 3 In the User Name column, click the username for the user account that you want to change.
The row of the username that you clicked is highlighted.
Step 4 In the Password column, double-click the entry and then click the down-arrow button.
Step 5 In the New Password field and the Confirm Password field, enter the new password. The password can be 1 to 255 characters. Entries can contain case-sensitive letters, numbers, and symbols.
Step 7 From the menu bar, choose File > Deploy to apply your changes to the Cisco DCNM server.
Changing the Full Name, Role, or Description of a Cisco DCNM Local User
You can change the full name, role, or description of a Cisco DCNM local user.
Note You cannot change the username. Instead, add a local user account with the desired username and remove the local user account with the unwanted username.
BEFORE YOU BEGIN
Determine what the new full name or description should be.
An Administrator role is required if you want to change the full name, role, or description of a local user account other than the local user account that you use to log into the Cisco DCNM client. If your user account is a local user account and it has the User role, you can change the full name and description for your account only.
DETAILED STEPS
To change the full name or description of a Cisco DCNM local user, follow these steps:
Step 1 From the Feature Selector pane, choose DCNM Server Administration > DCNM Authentication Settings .
Step 2 If necessary, expand the DCNM Local Users section.
A table of users appears in the DCNM Local Users section.
Step 3 In the User Name column, click the username of the local user account that you want to change.
The row of the username that you clicked is highlighted.
Step 4 (Optional) In the Full Name column, double-click the entry and enter the new name. The maximum length is 255 case-sensitive letters, numbers, and symbols.
Step 5 (Optional) In the DCNM Role column, double-click the entry and choose the new role. You can choose Administrator or User.
Step 6 (Optional) In the Description column, double-click the entry and enter the new description of the user account. The maximum length is 255 case-sensitive letters, numbers, and symbols.
Step 7 From the menu bar, choose File > Deploy to apply your changes to the Cisco DCNM server.
BEFORE YOU BEGIN
Log into the Cisco DCNM client with a user account that has the Administrator user role.
Ensure that you are removing the correct Cisco DCNM local user account.
DETAILED STEPS
To delete a Cisco DCNM local user account, follow these steps:
Step 1 From the Feature Selector pane, choose DCNM Server Administration > DCNM Authentication Settings .
Step 2 If necessary, expand the DCNM Local Users section.
A table of users appears in the DCNM Local Users section.
Step 3 In the User Name column, click the username of the user account that you want to remove.
The row of the username that you clicked is highlighted.
Step 4 From the menu bar, choose Actions > Delete User .
Step 5 From the menu bar, choose File > Deploy to apply your changes to the Cisco DCNM server.
Adding Authentication Servers
You can add RADIUS and TACACS+ servers to the Cisco DCNM authentication settings.
BEFORE YOU BEGIN
Ensure that you have the following information about each authentication server that you want to add:
- AAA protocol: RADIUS or TACACS+
- Server IPv4 address or DNS name that can be resolved by the Cisco DCNM server.
- Secret key.
- Port number on which the server accepts authentication requests.
- (RADIUS only) Port number on which the server accepts accounting messages.
- Authentication protocol: PAP, CHAP, MSCHAP, or ASCII.
- (Optional) Username and password of a valid user account on the server for server verification.
Determine whether the server should be a primary, secondary, or tertiary server, which depends upon your authentication server failover strategy.
DETAILED STEPS
To add authentication servers, follow these steps:
Step 1 From the Feature Selector pane, choose DCNM Server Administration > DCNM Authentication Settings .
Step 2 If necessary, expand the Authentication Servers section.
The Authentication Server Settings table shows RADIUS and TACACS+ server settings.
Step 3 If necessary, expand the RADIUS or TACACS+ server rows.
Step 4 For each authentication server that you want to add, follow these steps:
a. Choose the row in which you want to add the server.
Note The Cisco DCNM client does not allow you to add a secondary server if you have not added a primary server. In addition, you cannot add a tertiary server if you have not added a secondary server.
b. Double-click the Server Name field and enter the server IPv4 address or DNS host name.
Note If you enter a host name that the Cisco DCNM server cannot resolve, the Server Name field is highlighted in red.
c. Double-click the Secret Key field and enter the secret key (sometimes called a shared secret) of the authentication server.
d. (Optional) If you need to change the default Authentication Port or Accounting Port (RADIUS only), double-click the applicable port field and enter the new port number.
e. Double-click the Authentication Method field and choose the authentication protocol that Cisco DCNM must use when sending authentication requests to the authentication server.
Step 5 (Optional) If you want to verify that the Cisco DCNM server can authenticate a user with a new authentication server, follow these steps:
a. To the right of the row for the authentication server that you want to verify, click Verify .
A Verification dialog box appears.
b. Enter a username and password for a valid user account on the authentication server.
The Cisco DCNM client displays a message indicating whether the verification attempt succeeded or failed. Verification failure may mean that the authentication server is unavailable or that the authentication settings are incorrect.
Step 6 From the menu bar, choose File > Deploy to apply your changes to the Cisco DCNM server.
Changing Authentication Server Settings
You can change the settings for authentication servers that you have already configured in the Cisco DCNM client. If you have more than one RADIUS or TACACS+ server, you can change which server is primary, secondary, or tertiary.
DETAILED STEPS
To change authentication server settings, follow these steps:
Step 1 From the Feature Selector pane, choose DCNM Server Administration > DCNM Authentication Settings .
Step 2 If necessary, expand the Authentication Servers section.
The Authentication Server Settings table shows RADIUS and TACACS+ server settings.
Step 3 If necessary, expand the RADIUS or TACACS+ server rows.
Step 4 (Optional) If you want to change the settings of an authentication server, double-click each field that you need to change and enter the changes.
Step 5 (Optional) If you want to reorder RADIUS or TACACS+ servers, right-click a server and choose Move Up or Move Down , as needed.
Step 6 (Optional) If you want to verify that the Cisco DCNM server can authenticate a user with an authentication server, follow these steps:
a. To the right of the row for the authentication server that you want to verify, click Verify .
A Verification dialog box appears.
b. Enter a username and password for a valid user account on the authentication server.
The Cisco DCNM client displays a message indicating whether the verification attempt succeeded or failed. Verification failure may mean that the authentication server is unavailable or that the authentication settings are incorrect.
Step 7 From the menu bar, choose File > Deploy to apply your changes to the Cisco DCNM server.
Removing an Authentication Server
You can remove a RADIUS or TACACS+ authentication server from the Cisco DCNM authentication settings.
BEFORE YOU BEGIN
You cannot remove all authentication servers for the current authentication mode. Instead, change the authentication mode first and then remove all the authentication servers.
DETAILED STEPS
To remove an authentication server, follow these steps:
Step 1 From the Feature Selector pane, choose DCNM Server Administration > DCNM Authentication Settings .
Step 2 If necessary, expand the Authentication Servers section.
The Authentication Server Settings table shows RADIUS and TACACS+ server settings.
Step 3 If necessary, expand the RADIUS or TACACS+ server rows.
Step 4 Right-click the authentication server that you want to remove and choose Remove Server .
Step 5 From the menu bar, choose File > Deploy to apply your changes to the Cisco DCNM server.
Viewing Cisco DCNM Local Users
To view Cisco DCNM server user accounts, from the Feature Selector pane, choose DCNM Server Administration > DCNM Authentication Settings and then, if necessary, expand the DCNM Local Users section.
Cisco DCNM server user accounts, including usernames and descriptions, appear in the Contents pane. Passwords appear masked for security. For information about the fields that appear, see the “Field Descriptions for DCNM Authentication Settings” section.
Verifying Authentication Server Settings
You can verify that the Cisco DCNM server can authenticate a user with a particular authentication server that you have configured.
DETAILED STEPS
To verify settings for an authentication server, follow these steps:
Step 1 From the Feature Selector pane, choose DCNM Server Administration > DCNM Authentication Settings .
Step 2 If necessary, expand the Authentication Servers section.
The Authentication Server Settings table shows RADIUS and TACACS+ server settings.
A Verification dialog box appears.
Step 4 Enter a username and password for a valid user account on the authentication server.
Step 5 To the right of the row for the authentication server that you want to verify, click Verify .
The Cisco DCNM client displays a message indicating whether the verification attempt succeeded or failed. Verification failure may mean that the authentication server is unavailable or that the authentication settings are incorrect.
Field Descriptions for DCNM Authentication Settings
This section includes the following field descriptions for the DCNM Authentication Settings feature:
Authentication Mode Section
DCNM Local Users Section
Display only. Name of the Cisco DCNM server user account. This name can be used to log into the Cisco DCNM client when the authentication mode is local or when no authentication server for the current authentication mode is reachable. Entries are case sensitive. Valid characters are all letters, numbers, and symbols. The minimum length is 1 character. The maximum length is 198 characters. |
|
Other name for the user account, such as the name of the person who uses the Cisco DCNM server user account. This name cannot be used to log into the Cisco DCNM client. Valid characters are all letters, numbers, and symbols. The maximum length is 255 characters. This field is blank by default. |
|
Role of the user account. Valid values are User and Administrator. For more information, see Table 5-1 . By default, a Cisco DCNM server user account is assigned the role of User. |
|
Password for the Cisco DCNM server user. This field is always masked for security. Entries are case sensitive. Valid characters are all letters, numbers, and symbols. The minimum length is 1 character. The maximum length is 255 characters. |
|
Description of the Cisco DCNM server user. Valid characters are all letters, numbers, and symbols. The maximum length is 255 characters. This field is blank by default. |
Authentication Servers Section
Additional References
For additional information related to administering Cisco DCNM authentication settings, see the following sections:
Feature History for DCNM Authentication Settings
Table 5-6 lists the release history for this feature.
 Feedback