Cisco Virtual Switch Update Manager Release 2.x Getting Started Guide for Cisco Nexus 1000V
Bias-Free Language
The documentation set for this product strives to use bias-free language. For the purposes of this documentation set, bias-free is defined as language that does not imply discrimination based on age, disability, gender, racial identity, ethnic identity, sexual orientation, socioeconomic status, and intersectionality. Exceptions may be present in the documentation due to language that is hardcoded in the user interfaces of the product software, language used based on RFP documentation, or language that is used by a referenced third-party product. Learn more about how Cisco is using Inclusive Language.
Migrating Hosts to
Cisco Nexus 1000V Using
Cisco VSUM
This chapter contains the following sections:
Information About
Migrating Hosts to the
Cisco Nexus 1000V Switch Using
Cisco VSUM
You can use the
Cisco VSUM
GUI to migrate hosts from the VMware vSwitch and VMware distributed virtual
switch (DVS) to the
Cisco Nexus 1000V switch.
Cisco VSUM
enables you to do the following:
Add hosts and
migrate multiple hosts.
Migrate each
VMware port group or kernel NIC to the correct port profile.
Migrate each
physical NIC from the VMware vSwitch or VMware DVS to the correct uplink on the
Cisco Nexus 1000V.
Migrate VM NICs
from the VMware vSwitch or VMware DVS to the corresponding uplink on the
Cisco Nexus 1000V.
See the
Cisco Nexus 1000V
and VMware Compatibility Information for more information on the
compatibility information for
Cisco Nexus 1000V.
Prerequisites for
Migrating Hosts to the
Cisco Nexus 1000V
Using
Cisco VSUM
The migration of hosts
to the
Cisco Nexus 1000V
using
Cisco VSUM
has the following prerequisites:
The host must have
one or more physical NICs on each VMware vSwitch/VMware DVS in use.
You must have
administrative privileges for the vCenter server.
You must have the distributed switch—Create and Modify privilege permission enabled on the vCenter server.
You must have Cisco Nexus 1000V distributed switch in Layer 3 mode.
Guidelines and
Limitations for Migrating Hosts to the
Cisco Nexus 1000V
Using
Cisco VSUM
When you move the
ESX/ESXi host that runs
the VSM from the VMware vSwitch or VMware DVS to the
Cisco Nexus 1000V,
the connectivity might be lost. In that situation, both active and standby VSMs
assume the active role.
The reboot of the VSM
is based on the following conditions:
The number of
modules attached to the VSM
If a VSM has
more modules attached than the other VSMs, and there is no virtual channel (VC)
connectivity on either VSM, the VSM that has fewer modules is rebooted.
If modules are
attached to both VSMs and one VSM has VC connectivity, the VSM without
connectivity is rebooted.
VC connectivity
Note
This option is
invoked when the previous condition is not met.
If both VSMs
have the same number of modules or no modules, the software makes a selection
that is based on the VC connectivity status.
Last configuration
change
Note
This condition
is invoked when the previous two conditions are not met.
If both VSMs
have the same number of modules and no VC connectivity, the VSM with the latest
configuration remains active and the other VSM is rebooted.
Last active VSM
If the
previous three conditions are not met, the VSM that became active most recently
is rebooted.
Migrating Hosts to the Cisco Nexus 1000V Using Cisco VSUM
You can install a Cisco Nexus 1000V VEM using Cisco VSUM. When Cisco VSUM installs VEMs, it migrates all VM kernels and their corresponding VM NICs across vSwitches to the Cisco Nexus 1000V VEMs.
Before you begin
Know the following
information about the switch:
vCenter IP
address
vCenter user
ID
vCenter
password
Cisco Nexus
1000V switch username
Cisco Nexus
1000V switch password
Procedure
Step 1
Log in to the
VMware vSphere Web Client.
Step 2
In the vSphere Client, choose Home > Cisco Virtual Switch Update Manager > Nexus 1000V > Configure.
Step 3
Choose a data
center and a distributed virtual switch, and then click
Manage.
Note
If the switch is not managed by Cisco VSUM, you are prompted to enter the switch credentials in the Make Managed window. For more information, see Managing an Existing Cisco Nexus 1000V Switch.
Step 4
If you are using vCenter 6.5a, choose Cisco Nexus 1000V.
Step 5
In the switch
pane, click
Add
Host.
Step 6
(Optional) In case of
multiple vCenter Servers, choose
Home > Cisco Virtual Switch Update
Manager > vCenter Server
> Configure.
Step 7
(Optional) You can also access Cisco VSUM in the vSphere Client by navigating to vCenter > Distributed Switches.
Step 8
(Optional) In the switch
pane, click
Manage > Cisco Nexus 1000V
> Add Host.
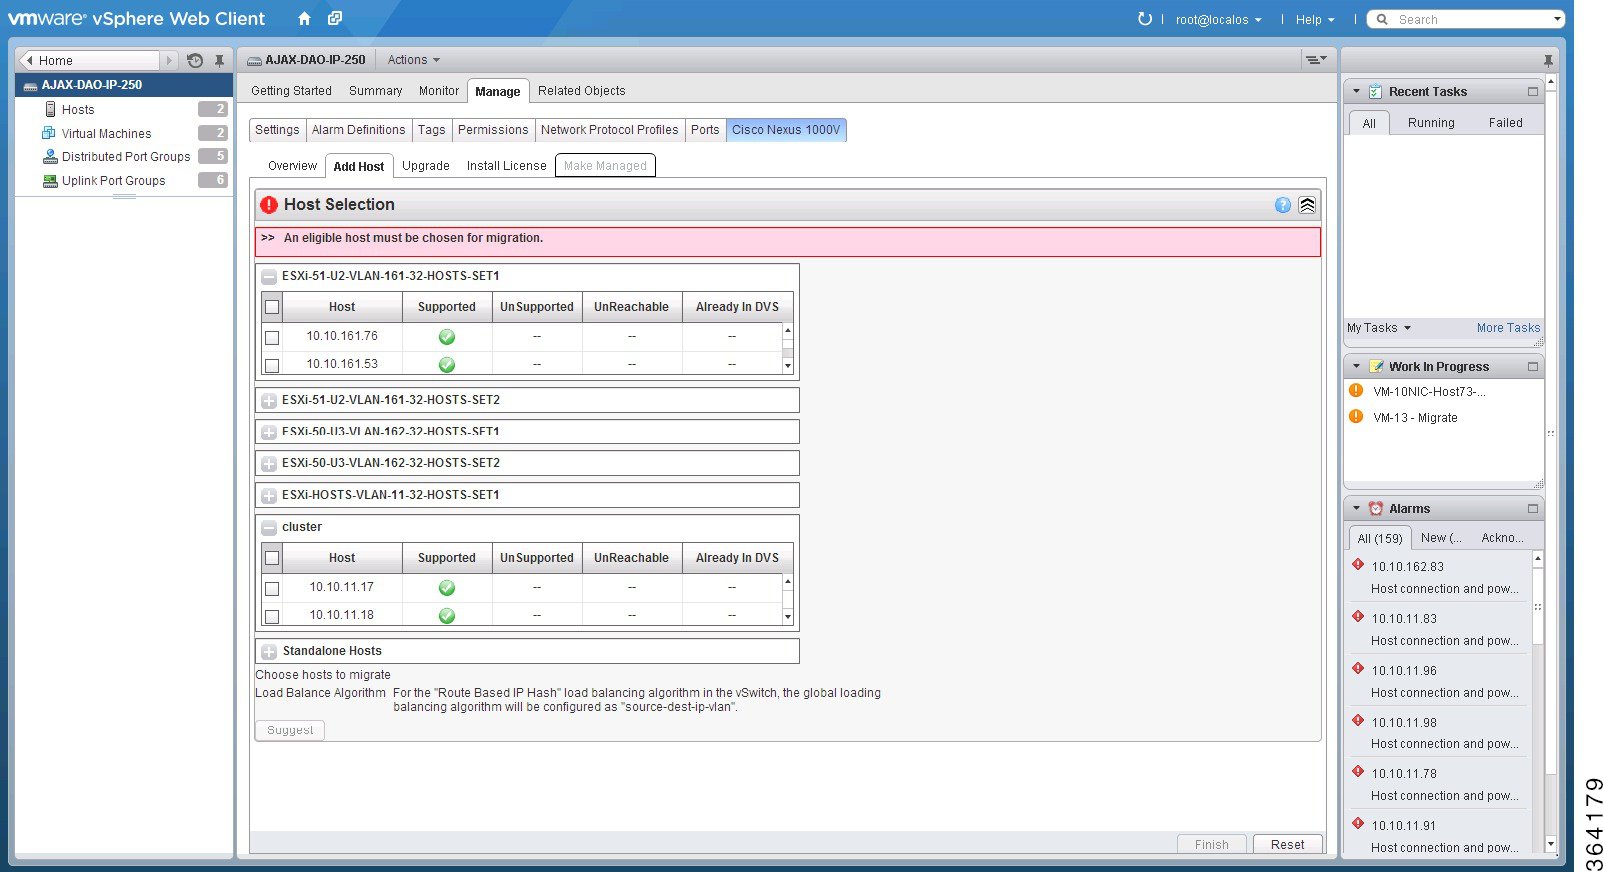
Figure 1. Cisco VSUM—Migrating Hosts
Step 9
In the
Host
Selection area, review the following fields.
Name
Description
Cluster
Lists all
the hosts that are in an HA pair. Check the check box next to the hosts to
migrate.
Standalone Hosts
Lists the
standalone hosts. Check the check box next to the hosts to migrate.
Supported
If
checked, the host can be migrated to the current version of the
Cisco Nexus 1000V.
UnSupported
If
checked, the host cannot be migrated to the current version of the
Cisco Nexus 1000V.
For information on supported hosts, see the Cisco Nexus 1000V and VMware Compatibility Information.
UnReachable
If
checked, the host is in an unreachable state.
Already in DVS
If
checked, the host is already migrated to the
Cisco Nexus 1000V.
Step 10
Click
Suggest.
Cisco VSUM displays a list of existing and proposed port profiles and suggests appropriate port profiles for each VMKNIC, VM NIC, and
physical NIC.
Step 11
Review the
port profile populated in the
Port
Profile Editor area. You can edit the fields based on your
requirements. To edit the fields, you must use the
Port
Profile Editor.
The port profiles that are already available on the VSM are not editable. You can edit only those port profiles that Cisco VSUM suggests. Click Duplicate to create a new port profile from an existing or a suggested port profile.
Step 12
In the
Port
Profile Editor area, complete the following fields.
Name
Description
Port Profile
Editor
The list
of existing port profiles or new port profiles is displayed. Choose the port
profile.
vEthernet Port-Profiles
Ethernet Port-Profiles
Uplink
If
checked, displays the uplink associated with the port profile.
Trunk
If
checked, displays the trunk associated with the port profile.
L3 Capable
If
checked, the L3 capability is associated with the port profile.
ISCSI Multipath
If
checked, the ISCSI multipath is associated with the port profile.
Neither L3 nor
ISCSI
If
checked, then neither the L3 nor the ISCSI is associated with the port profile.
Channel-group auto mode
on
If
checked, the channel group auto mode is associated with the port profile.
Mac-pinning
If
checked, the channel group auto mode on MAC pinning is associated with the port
profile.
Name
The name
of the port profile.
VLANs
Choose the
VLAN.
Native VLAN
The native
VLAN associated with the port profile.
Duplicate
Clones an
existing port profile configuration to create a new port profile.
Step 13
Scroll down to
view the host profile populated in the
Physical NIC Migration area.
Step 14
In the
Physical
NIC Migration area, review the following fields.
Name
Description
Physical NIC
Review the
physical NIC that has been automatically selected by the Cisco VSUM.
Check/uncheck to select/deselect the VM NICs for the migration. You must ensure
that at least one physical NIC is selected for the migration.
Profile
Review the
port profile associated with the physical NICs.
Alternatively, you can choose the required port profile from the
profile drop-down list, to associate it with the physical NIC. You must ensure
that all the necessary VLANs are allowed in the selected port profile.
Source
The
vSwitch or VDS port group that the PNIC is currently assigned to.
Select All
Migrates
all the physical NICs associated with the host.
Select None
Deselects
all the selected values for the physical NICs associated with the host.
Step 15
Scroll down to
view the host profile populated in the
VM
Kernel NIC Setup area.
Step 16
In the
VM Kernel
NIC Setup area, complete the following fields.
Name
Description
VM Kernel NIC
If
checked, displays the port profile configuration that will be created on the
Cisco Nexus 1000V and associated with the VMkernel NIC.
Review
the selected VMkernel NICs. You can also uncheck the VMkernel NIC check boxes
if you do not want the VMKs to be migrated to the Cisco Nexus 1000V.
You must
ensure that at least one VMkernel NIC is selected to migrate to the Cisco Nexus
1000V that will carry the L3 traffic.
Note
Do
not uncheck any of the VMkernel NIC check boxes, unless the required VMkernel
NIC is associated with the Layer 3 port profile.
L3 Capable
Displays
whether the VMkernel NIC is Layer-3 capable. Only one VMkernel NIC is Layer-3
capable. By default, the VMK0 is selected as the Layer 3 control.
Note
To
change the VMkernel to Layer 3 port profile, do the following:
From the
Port Profile drop-down list, choose the non Layer 3
port profile for VMk0. In absence of non Layer3 veth profile, you can create
non Layer 3 port profiles as follows:
Select the Layer 3 port profile and click
Duplicate.
Check the
Neither L3 nor ISCSI radio button and click
OK. You can edit the list of supported VLANs.
Select the Layer 3 enabled port profile to use for Layer 3
control traffic.
Profile
Choose
the port profile associated with the VMkernel NIC.
Source Profile
Displays
the vSwitch or VDS port group that the VMkernel NIC is currently assigned to.
Select None
Deselects
all the selected VMkernel NICs associated with the host.
New
Adds a new
VMkernel NIC for Layer 3 control. Enter the IP address and net mask for the new
VMkernel NIC and click
OK.
After you
create a new VMKernel NIC, complete the following steps:
Select the row for the original VMkernel NIC.
Uncheck the original VMkernel NIC check box.
Select the row for the new
VMkernel NIC.
Check the new VMkernel NIC check box.
Choose a port profile from the drop-down menu in the row for the
new VMkernel NIC.
Note
Ensure
that the host is selected before you create the new VMkernel NIC.
Edit
Edits the
IP address and subnet mask for a newly created VMkernel NIC.
Step 17
Scroll down to
view the host profile populated in the
VM
Migration area.
Step 18
In the
VM
Migration area, review the following fields.
Area
Action
Virtual Machine
NICs
If
checked, displays the VSMs and the network adapters associated with the VM.
Profile
Choose the
port profile associated with the virtual NIC.
Source Profile
The source
associated with the port profile.
Select None
Deselects
all the VMs associated with the host.
Step 19
Click
Finish to migrate the host from the VMware vSwitch
to the Cisco Nexus 1000V switch.
You might see a Warning dialog box telling you that VMs are on the host that you want to migrate and asking if you want to manually use VMware VMotion
to move the VMs to another host before proceeding with the migration. You see this dialog box only if you have VMs or switch
VMs on the host that you want to migrate.
Step 20
Check the
status of adding the host by completing the following steps:
In the
Recent Tasks pane to the right of the work pane,
click
More Tasks.
The
Task Console appears in the work pane, displaying a
list of tasks with the most recent task at the top.
Find the
task in the
Task Name column and then view the status in the
Status column.
The
Status column shows whether the task is complete or
in progress. You can click the refresh icon to display new tasks and learn how
much of the task is complete.
Note
Several tasks might appear above the primary task you just performed. They might be associated with your primary task.
The host
addition is confirmed when the primary task
Add
hosts to Cisco DVS has the status
Completed.
If you close
the browser and want to view the history of the task, log in to the web client,
and click
Tasks in the navigation pane to display the lists of
tasks in the work pane.

 Feedback