OpenStack 1.1 for Cisco DFA Install Guide for Using Pre-Built OpenStack for Cisco DFA Images
Bias-Free Language
The documentation set for this product strives to use bias-free language. For the purposes of this documentation set, bias-free is defined as language that does not imply discrimination based on age, disability, gender, racial identity, ethnic identity, sexual orientation, socioeconomic status, and intersectionality. Exceptions may be present in the documentation due to language that is hardcoded in the user interfaces of the product software, language used based on RFP documentation, or language that is used by a referenced third-party product. Learn more about how Cisco is using Inclusive Language.
- Updated:
- June 3, 2014
Chapter: Servers/UCS Topology and OpenStack for DFA Installation
Servers/UCS Topology and OpenStack for DFA Installation
- UCS Resources Required
- Servers/UCS Topology
- Installation
- Images for Launching a VM
- Configuration in the Leaf or DCNM
UCS Resources Required
- One UCS is dedicated for the puppet build server.
- One UCS is dedicated for the OpenStack Controller where the dashboard Horizon is running for doing orchestration.
- As many UCS as the number of Computes are needed. VM's run in the Computes.
- Ensure that all the nodes are configured with CIMC and they are reachable.
Servers/UCS Topology
A sample topology is shown below. This is a critical step as it lays down your foundation so it is highly recommended that users follow the same wiring scheme.
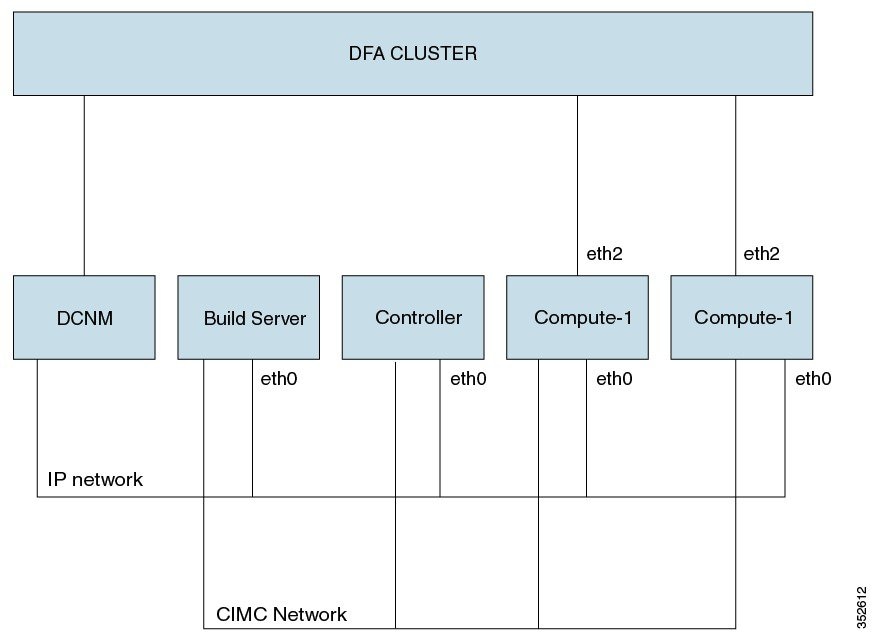
Ensure that all the UCS’ are connected to each other. The sample topology has the build server, the controller and the computes connected through eth0. This is referred as the COI network.
The computes must have their uplink interface(s) connected to the DFA cluster.
All the CIMC ports of the OpenStack nodes including the build server must be connected to the CIMC network.
The DCNM also must bave IP connectivity to the OpenStack control node. This is needed when verifying the OpenStack for DFA functionality after the installation is completed.
Installation
The installation procedure described here includes the following major steps. But more precisely, you don’t specifically install COI-DFA. It is the pre-built/cloned images that already have a COI OpenStack for DFA installation and the procedure described here takes you to bring them up on your target UCS servers for OpenStack.
-
Copy the 3 cloned
images and the Clonezilla utility (iso image) to a repository server (any Linux
machine with about 80G free disk space and SSH daemon running) that can be
reached by the target UCSs. The prebuilt/cloned images are at:
http://software.cisco.com/download/release.html?mdfid=281722751&flowid=36334&softwareid=282088134&release=7.0(2)&relind=AVAILABLE&rellifecycle=&reltype=latest
The open source
Clonezilla s/w for restoring the cloned/pre-built images is at:
http://www.clonezilla.org/downloads.php (we used
clonezilla-live-20131125-saucy-amd64.iso)
Then extract the
build_node, control and compute node .tgz files using
tar –xvzf
file
name.
To make the same
files owner as the account owner, please use the
no-same-owner
option as shown below:
tar zxvf openstack_dfa_1_1_build_node.tgz --no-same-owner
- Please follow Quick Guide to Clonezilla for how to restore a cloned UCS image to a target UCS system. From the repository server above, launch the browser and remotely access to the CIMC port IP address (http;//<your UCS’s CIMC port IP address>) of your target UCS, then use Cisco Integrated Management Controller for UCS to proceed. Assuming the UCS’s are all wired correctly, their connectivity is good and the steps described below are followed strictly, restoring a cloned UCS system each will take about 15-20 minutes. So if you have two compute nodes to install, then the total number of target systems will be four and that can take about 1 hour if the restoring execution is done here flawlessly. But this is not really related to OpenStack installation and it is simply a cloning restoring process.
The following steps are done after the clonezilla restoration and after rebooting the nodes:
- Restore Target UCS Host Names (for all nodes)
- Reboot the UCS OpenStack Nodes (for all nodes)
- Generate Site.pp
- Invoke Scripts to Restore Nodes (All Nodes)
- Reboot the Nodes
Restore Target UCS Host Names (for all nodes)
Edit /etc/hosts: On all nodes, add one entry per node in the following setup:
<ip> <hostname.domain.name> <hostname> <build ip address> <build hostname.domain.name> <build hostname> <controller ip address> <controller hostname.domain.name> <controller hostname> <compute ip address> <compute hostname.domain.name> <compute hostname>
Edit /etc/hostname: On all nodes, modify the hostname to new one.
Edit /etc/network/interfaces: On all nodes, add network IP address for public interface.
Here is an example:
auto eth2
iface eths inet static
					address 172.28.12.88
					netmask 255.255.255.0
					network 172.28.12.0
					broadcast 172.28.12.255
					gateway 172.28.12.1
# dns -* options are impletmented by the resolvconf package, if installed
					dns - nameservers 172.28.12.131
					dns - search cisco.com
 Note | For control node and compute nodes, you can use build node IP address as the DNS nameservers because dnsmasq is running on the build node. |
Reboot the UCS OpenStack Nodes (for all nodes)
After rebooting, you should be able to ping outside from your UCS node.
Generate Site.pp
Go to /etc/puppet/manifests, edit site.config:
Following is a sample file site.config:
vinci-ucs07:~/openstackscripts> cat site.config
# general config, input domain name, ntp server, and general password for keystone, mysql, nova....
# the user can modify site.pp if they want password to be different in each component, seach $mypasswd...
[general]
domain_name = cisco.com
ntp_servers = ntp.esl.cisco.com
password = cisco123

######### input dcnm ip address, account name and password and tunnel base address, this is the segment id starting value
# gateway_mac is the mac you configured in the dcnm poap
[dcnm]
node_ip = 172.28.11.155
user_account = root
user_passwd = cisco123
dhcp_server=10.10.10.152  // specify the external dhcp_server ip address
			  // so you won't need input it into the DCNM software (start 7.0.2 release)
gateway_mac = 20:20:00:00:00:AA //This should be the same as what you configured in dcnm
dfa_tunnel_base = 90000 //This is the start of the segment ID base. Recommended min value is 8k.  Ensure that this doesn't conflict
                        // with other orchestrators segment ID or segment_id_range in DCNM (under Admin/DFA/Settings)

# fill in hostname and ip of build node
[build]
node_name = vinci-ucs36
node_ip = 172.28.12.99

# fill in hostname and ip/network of control node
[control]
node_name = vinci-ucs34
node_ip = 172.28.12.97
node_network = 172.28.12.0

# There can be more than one compute nodes, list their corresponding node name, ip, and uplink interfaces.
# Uplink interface is the interface which connects to leaf
# for example, for 3 compute nodes:
# node_name = name1,name2,name3
# node_ip = ip1,ip2,ip3
# node_uplink = uplink1, uplink2, uplink3
[compute]
node_name = vinci-ucs05,vinci-ucs06
node_ip = 172.28.12.68, 172.28.12.69
node_uplink = eth2,eth2
Invoke sudo ./generate_site at dir /etc/puppet/manifests.
Invoke Scripts to Restore Nodes (All Nodes)
- Invoke restore_openstack on Build Server Node
- Invoke restore_openstack on Control and Compute Nodes
- Confirm Keystone Started
Invoke restore_openstack on Build Server Node
Invoke the /home/localadmin/restore_openstack, and when prompted, give the full qualified domain name of build server node and decide if you want to apply site.pp.
An example follows:
sudo –H bash
root@vinci-ucs29:/home/localadmin# ./restore_openstack
please input FQDN of build node: vinci-ucs29.cisco.com
……
Would you like to apply site.pp (y/n)? y
Type y if your site.pp is ready. Type n if your site.pp is not ready and you want to manually edit it.
After your site.pp is ready (or the previous apply site.pp is errored out from the script), enter the following:
puppet apply -v /etc/puppet/manifests/site.pp
This step takes a short while to complete so be patient. Verify that apache2 is running by entering the following:
- service appache2 status
Restart dnsmasq, by running the following on the build node :
service dnsmasq restart
Invoke restore_openstack on Control and Compute Nodes
Invoke the /home/localadmin/restore_openstack as sudo, and when prompted, give the full qualified domain name of build server node:
sudo –H bash
root@vinci-ucs138:/home/localadmin# ./restore_openstack
please input FQDN of build node: vinci-ucs29.cisco.com
If you plan to deploy a service router VM (CSR), please apply the iptable firewall patch on each compute node, as follows:
1. 1.	cp /usr/share/pyshared/quantum/agent/linux/iptables_firewall.py_new
/usr/share/pyshared/quantum/agent/linux/iptables_firewall.py
2. Edit /etc/quantum/quantum.conf (as sudo)
sudo –H bash
vi /etc/quantum/quantum.conf
[keystone_authtoken]
auth_host = (control node ip)
admin_tenant_name = services
admin_user = quantum
admin_password = cisco123
Confirm Keystone Started
Next, confirm that keystone has started correctly.
Ensure openrc has the following line:
export OS_AUTH_URL=http://<your controller ip address>:5000/v2.0/)
Enter the following:
source /root/openrc

keystone service-list  -  has output
tkeystone endpoing-list  -  has output
Reboot the Nodes
Reboot the nodes, using the following sequence:
- Power down the compute nodes.
- Reboot the control node.
- Check that you can login from your Chrome browser using admin/cisco123 as the username and password.
- Power on the compute nodes.
After the compute node reboots and is up, wait for the puppet to run and then ensure that the daemons LLDPAD and Packet Capture are running as follows (also wait for the puppet run to complete as given above):
pidof lldpad
pidof pktcpt
Images for Launching a VM
One of the following images can be used tp launch an instance from the image list:
Configuration in the Leaf or DCNM
Leaf Interface Configuration and Global Configuration
You must connect the leaf interface to the UCS server and accomplish the global configuration by the following steps:
-
You connect the
leaf interface to the UCS server, by entering the “fabric forwarding
port-tracking” configuration:
int e1/35
switchport mode trunk
-
Set the speed of
the interface connected to compute node correctly (currently DCNM PoAP screen
does not allow you to configure this), by entering the following:
fabric forwarding port-tracking
speed 1000
no shut
-
Enter the
following global command:
evb batch-response disable
-
The leaf node
connected to the OpenStack compute node must have the same anycast gateway MAC
as in the site.pp file of the build server. Verify this by entering the
following command, which is shown with a sample display below:
N6k-23# sh run | inc anycast
fabric forwarding anycast-gateway-mac 0000.DEAD.BEEF
You might see some modules on which the interface connecting the leaf and UCS does not come up. If this should occur, take the following steps:
DHCP Configuration in DCNM
For DHCP configuration in DCNM:
-
Fill the DFA backbone VLAN subnet value in the Settings of the Dynamic Fabric Automation (DFA) section under the Admin tab in the DCNM console. Figure 3. Admin Tab 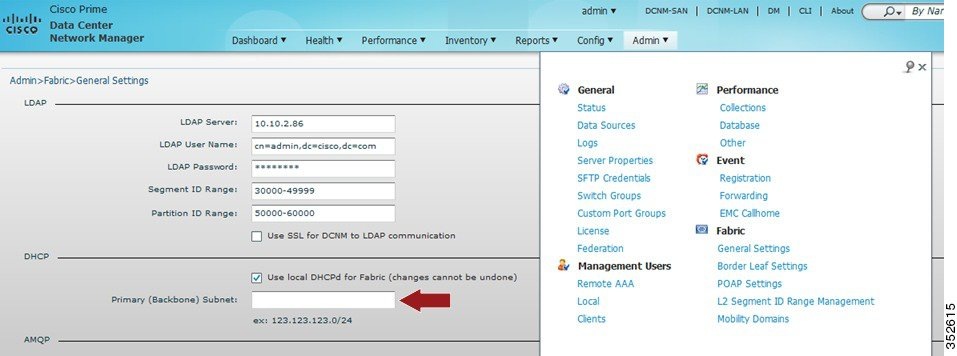
-
Ensure that Primary (Backbone) subnet with Use local DHCPd for DFA checked is consistent with the backbone VLAN subnet for the leaf and spine nodes in the DFA fabric. If the fabric is brought up from PoAP in DCNM, the configuration screen will look like the following: Figure 4. PoAP Definitions 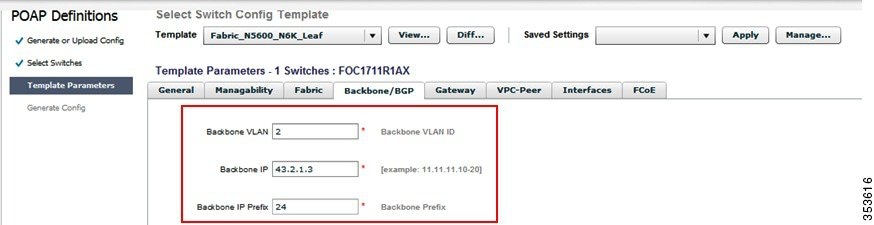
 Feedback