Cisco Connected Grid Design Suite (CGDS) - Substation Workbench Installation and Configuration Guide
Bias-Free Language
The documentation set for this product strives to use bias-free language. For the purposes of this documentation set, bias-free is defined as language that does not imply discrimination based on age, disability, gender, racial identity, ethnic identity, sexual orientation, socioeconomic status, and intersectionality. Exceptions may be present in the documentation due to language that is hardcoded in the user interfaces of the product software, language used based on RFP documentation, or language that is used by a referenced third-party product. Learn more about how Cisco is using Inclusive Language.
- Updated:
- October 9, 2013
Chapter: Installing and Configuring the CGDS Designer
Installing and Configuring the CGDS Designer
This chapter provides instructions on how to install the CGDS Designer.
•![]() Updating the Server, WSMA, and Database Details
Updating the Server, WSMA, and Database Details
About the CGDS Designer
The CGDS Designer enables utilities to create a standard deployment plan, design, and simulate the network for detailed reviews; calibrate and debug it during construction and testing; and efficiently test and monitor each system upon activation. It also supports the seamless sharing of design files among multiple engineering teams. With complete information about the energy delivery network configurations and the IEC 61850 protection schemas, the tool automates much of the communications network design process.
The engineers access the CGDS Designer to create models for substation designs that utilize original or imported common information models (CIMs) and IEC 61850 IED substation configuration language (SCL) files. The tool visually demonstrates the exact relationship between substation electrical equipment and IP-based network devices enabling a more reliable design process.
Prerequisites
•![]() Oracle 11g server.
Oracle 11g server.
•![]() Gather the information as specified in the "Collecting Required Information" section before you start your installation.
Gather the information as specified in the "Collecting Required Information" section before you start your installation.
Installing the CGDS Designer
The InstallAnywhere installer is used to install the CGDS Designer on a Windows 7 based system.
To install the CGDS Designer, perform the following steps:
Step 1 ![]() Insert the CGDS CD in to the computer.
Insert the CGDS CD in to the computer.

Tip ![]() You will need to have the following information available before you start the installation process - the CGDS server IP address, and a valid user name and password.
You will need to have the following information available before you start the installation process - the CGDS server IP address, and a valid user name and password.
Step 2 ![]() Copy the installer executable file from the CGDS CD to the local machine.
Copy the installer executable file from the CGDS CD to the local machine.
Step 3 ![]() Double click the installer executable file.
Double click the installer executable file.
The InstallAnywhere installer begins the installation of the CGDS.
Step 4 ![]() Click Next.
Click Next.
The CGDS License page appears.
Step 5 ![]() Select the I accept the terms of the License Agreement radio button.
Select the I accept the terms of the License Agreement radio button.
Step 6 ![]() Click Next.
Click Next.
The default destination folder for the CGDS Designer installation appears.
Step 7 ![]() (Optional) Choose a destination folder for the installation.
(Optional) Choose a destination folder for the installation.
Step 8 ![]() Click Next.
Click Next.
The Pre-Installation Summary page appears with the following details:
–![]() Product name
Product name
–![]() Installation folder path
Installation folder path
–![]() Shortcut folder path
Shortcut folder path
–![]() Available and required disk space for installation
Available and required disk space for installation
Step 9 ![]() Click Install to launch the installation of JRE, the CGDS Designer Client package, and the other required software.
Click Install to launch the installation of JRE, the CGDS Designer Client package, and the other required software.
Once the installation begins, the progress is displayed on the installation page.When the installation is completed, the CGDS Server Configuration page appears.
Figure 3-1 CGDS Designer — CGDS Server Configuration Page
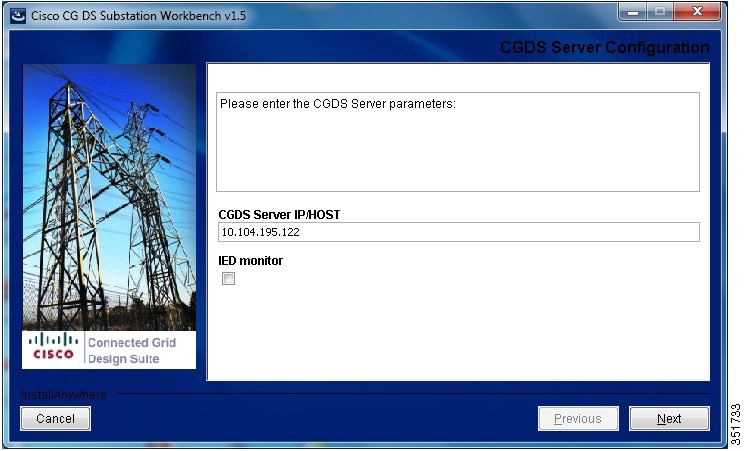
Step 10 ![]() Enter the CDGS server IP address in the CGDS Server IP/HOST text box.
Enter the CDGS server IP address in the CGDS Server IP/HOST text box.

Note ![]() You can leave the IED monitor check box unselected.
You can leave the IED monitor check box unselected.
The CGDS Designer is installed on a client computer that connects to the CGDS Server using Ethernet. This requires an IP address, which is configured using the CGDS Server Configuration page. Even if the client exists within the server (for instance, by running on a virtual machine), it is still necessary to provide an IP address.
In addition to client-to-server communications, the CGDS Designer communicates with network devices using the Web Services Management Agent (WSMA). WSMA is a function of the Cisco IOS through which network devices can be fully managed. WSMA operates in both listener mode (connections are initiated by external applications.) and initiator mode (WSMA initiates the connections).
WSMA performs the following functions:
•![]() Supports HTTP, HTTPS, Secure Shell Version 2 (SSHv2), and TLS transports.
Supports HTTP, HTTPS, Secure Shell Version 2 (SSHv2), and TLS transports.
•![]() Provides an XML-encoded model for configuration and operational data.
Provides an XML-encoded model for configuration and operational data.
•![]() Publishes schemas for the web services.
Publishes schemas for the web services.
•![]() Avoids screen scraping.
Avoids screen scraping.
•![]() Allows faster NMS application development.
Allows faster NMS application development.
•![]() Provides faster response times compared to traditional telnet-based access mechanisms. WSMA also requires IP addresses.
Provides faster response times compared to traditional telnet-based access mechanisms. WSMA also requires IP addresses.
Step 11 ![]() Click Next.
Click Next.
The CGDS Database Configuration page appears.
Figure 3-2 CGDS Designer — CGDS Database Configuration Page
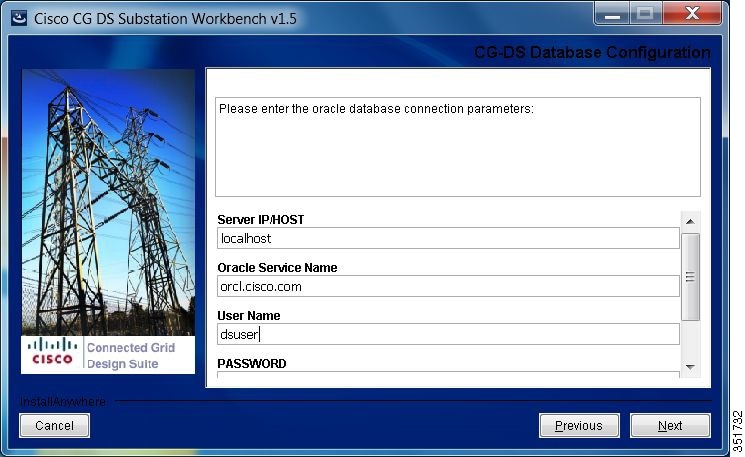
Step 12 ![]() Enter the following Oracle database connection parameters:
Enter the following Oracle database connection parameters:
•![]() Server IP address or host name
Server IP address or host name
•![]() Oracle service name
Oracle service name
•![]() Credentials to access the Oracle database.
Credentials to access the Oracle database.
•![]() Port number of the Oracle database.
Port number of the Oracle database.
Step 13 ![]() Click Next.
Click Next.
The installer removes the backup files.
Once the installation is completed, the Install Complete screen appears.
Step 14 ![]() Select the Yes, restart my system radio button.
Select the Yes, restart my system radio button.
Step 15 ![]() Click Done.
Click Done.
The system restarts and completes the installation of the CGDS Designer.
Updating the Server, WSMA, and Database Details
If you have provided incorrect details for the CGDS Monitor server, WSMA, or the Oracle database in the installer, you can update these details after the installation.
1. ![]() To update the CGDS Monitor server and WSMA details, open the CG-DS.exe file with the notepad. Navigate to the client tag and update the WSMA details.
To update the CGDS Monitor server and WSMA details, open the CG-DS.exe file with the notepad. Navigate to the client tag and update the WSMA details.
2. ![]() To update the Monitor server details, navigate to the appSettings tag and update the details, such as the IP address, user name, and password.
To update the Monitor server details, navigate to the appSettings tag and update the details, such as the IP address, user name, and password.
3. ![]() To update the database details, open the LocalConfig.xml file with the notepad and update the database details, such as the hostname, port, user name, and password. You can control the monitoring function and IED monitor function by setting one of the following values in the MonitorFuncs and IEDMonitor tags:
To update the database details, open the LocalConfig.xml file with the notepad and update the database details, such as the hostname, port, user name, and password. You can control the monitoring function and IED monitor function by setting one of the following values in the MonitorFuncs and IEDMonitor tags:
–![]() 0—To disable the monitoring function.
0—To disable the monitoring function.
–![]() 1—To enable the monitoring function.
1—To enable the monitoring function.
Note ![]() Ensure that the CGDS Designer is closed when you are updating the server, WSMA, and database details.
Ensure that the CGDS Designer is closed when you are updating the server, WSMA, and database details.
 Feedback