Prime Service Catalog OpenShift Integration 1.0 Design and Implementation Guide
Bias-Free Language
The documentation set for this product strives to use bias-free language. For the purposes of this documentation set, bias-free is defined as language that does not imply discrimination based on age, disability, gender, racial identity, ethnic identity, sexual orientation, socioeconomic status, and intersectionality. Exceptions may be present in the documentation due to language that is hardcoded in the user interfaces of the product software, language used based on RFP documentation, or language that is used by a referenced third-party product. Learn more about how Cisco is using Inclusive Language.
- Updated:
- May 23, 2014
Chapter: System Implementaion
System Implementation
The primary focus of this document is the integration between Cisco PSC and Red Hat OpenShift PaaS. Most of this work involves development of PSC extensions leveraging PSC Request Center and ServiceLink components. Almost no changes occurred on the OpenShift side because the majority of management and monitoring operations are exposed via Restful management API on OpenShift Broker.
For this testbed, a fully built and configured CIAC 3.1.1 virtual appliance running Windows 2008R2 is used. Active Directory is set up and configured as part of the virtual appliance.
For the infrastructure, a fully populated UCS 5108 chassis connected to UCS 6248UP Fabric Interconnects are used. Up links on FIs are connected to the Nexus 5K switch. Two VLANs are used to the servers group—a management VLAN with subnet 172.29.87.224/28 and a public VLAN with subnet 172.29.87.240/28.

Note User familiarity with UCS hardware configuration via UCS Manager is required so documents that detail UCS Manager configurations only are referenced.
Red Hat OpenStack Deployment
The following configurations were used in Red Hat OpenStack testbed deployment.
–![]() Installing and Configuring Controller Node
Installing and Configuring Controller Node
–![]() Installing OpenStack Identity
Installing OpenStack Identity
–![]() Installing OpenStack Image Service
Installing OpenStack Image Service
Controller Node Configuration
The following instructions provide guidance for configuring controller node.
The controller node is assigned to node01.ctocllab.cisco.com (172.29.87.229).
Installing and Configuring Controller Node
The following instructions provide guidance for installing and configuring controller node.
The controller node is assigned to [node01.ctocllab.cisco.com (172.29.87.229)].
Register system with Red Hat Network for a pre-registered user id.
List available or consumed subscriptions for registered system.
Attach the system to a given Pool Id for RHOS 4 (Havana).
Install yum-utils to enable relevant openstack rpms for openstack-4.0.
Install and configure the Database server.
Configure firewall to allow tcp traffic for msql (add the following line to /etc/sysconfig/iptables).
Set the database administrator password.
Install and configure the Message Broker (qpid).
Configure firewall to allow tcp traffic for qpid (add the following line to /etc/sysconfig/iptables).
Installing OpenStack Identity
The following instructions provide guidance for installing the OpenStack identity service.
Keystone Configuration (/etc/keystone/keystone.conf).
Certain python package dependencies for openstack-keystone need to be explicitly installed.
Configure firewall (add the following line to /etc/sysconfig/iptables).
Installing OpenStack Image Service
The following instructions provide guidance for installing OpenStack image service.
Configure firewall (add the following line to /etc/sysconfig/iptables).
Verify Glance service installation.
Download image and add to glance.
Installing OpenStack Compute Service
Refer to Installing the OpenStack Compute Service .
Install and Configure VNC Proxy.
Configure firewall (add the following line to /etc/sysconfig/iptables).
Create Compute Service Database and Identity Records.
Compute Services to start and chkconfig.
Install and Configure Block Storage.
Volume Service Specific Configuration: The block storage driver used in this configuration is LVM. It uses a file mounted via a loop device where a LVM has been created.
Check the loop device associated with /os_scratch/cinder-volumes.
Installing and Configuring Neutron Services
The neutron plugin used in this configuration is Open vSwitch (openstack-neutron-openvswitch). L3 agent abstracts the router that can connect to provide gateway services for L2 networks. The Compute node in this configuration hosts the network services for L3 agent, DHCP agent, and the neutron metadata agent that proxies to the nova metadata service. The neutron server is hosted on the Controller node and the L3-agent, L2-agent, DHCP agent and Metadata agent run on the compute node.
Installing Networking Pre-requisites on the Controller
The following instructions provide guidance for installing networking pre-requisites on the controller.
[Create the Openstack Networking Database|[https://access.redhat.com/site/documentation/en-US/Red_Hat_Enterprise_Linux_OpenStack_Platform/4/html/Installation_and_Configuration_Guide/sect-Networking_Prerequisite_Configuration.html]]
[Create the Networking identity Records|https://access.redhat.com/site/documentation/en-US/Red_Hat_Enterprise_Linux_OpenStack_Platform/4/html/Installation_and_Configuration_Guide/Creating_the_Service_Endpoint.html]
Common Networking Configuration.
Install the relevant packages.
Configure the firewall (add entry to /etc/sysconfig/iptables).
Installing Horizon Dashboard
The following instructions provide guidance for installing Horizon Dashboard.
Configure connections and logging.
Edit /etc/openstack-dashboard/local_settings.
Configure local memory cache settings.
Allow connections from httpd service to the Identity server if SELinux is configured in 'Enforcing or 'Permissive' mode
Configure firewall (add the following line to /etc/sysconfig/iptables).
Validate dashboard installation: http://172.29.87.229/dashboard.
Install Openstack Orchestration Service.
Install Openstack Telemetry Service (Ceilometer).
Install and Configure Compute and Network Node (node02.ctocllab.cisco.com (172.29.87.230).
Installing and Configuring Compute Node
The following instructions provide guidance for installing and configuring compute node.
Register system with Red Hat Network for a pre-registered userid.
List available or consumed subscriptions for registered system.
Attach the system to a given Pool Id for RHOS 4 (Havana).
Install yum-utils to enable relevant openstack rpms for openstack-4.0.
Check hardware virtualization support by checking presence of svm or vmx CPU extensions.
Verify kvm modules are loaded.
Output must include kvm_intel or kvm_amd.
Install and Configure Network.
Verify that openvswitch package is installed.
The host running Open vSwitch agent requires that the ovs bridge named br-int be created.
Configure external network access by creating an external bridge.
The external bridge to the interface on the compute node (ensure it is running in promiscuous mode).
Red Hat OpenShift Deployment
The ability to spin up OpenShift Node infrastructure on-demand forms the basis for advanced features such as auto-scaling the PaaS infrastructure.
When deployed on OpenStack, OpenShift is able to provision and de-provision Node VMs without manual provisioning steps using Heat templates.
This provides the ability to auto-scale up and down. Currently scaling decisions are made within the broker using platform agnostic scaling scripts. OpenShift applies a push approach in which it initiates the scale events based on the information is has already gathered.
As the Node comes on line and starts the MCollective service, it becomes available to pick up messages from the broker.
Installing the Broker and Node Infrastructure
The following instructions provide guidance for installing the broker and node infrastructure.
Download the latest qcow2 RHEL 6.5 Guest Image from RHN.
Red Hat Common (for RHEL 6 Server x86_64).
Download the latest heat templates for OpenShift Enterprise (Broker and Node).
Use diskimage-builder to prepare the RHEL 6.5 image.
The heat templates used to spin up the broker and the node will require enterprise licenses and pool ids for subscriptions to register the systems for the broker and the node at the time of instantiation.
Prepare to run diskimage-builder.
Export path to the do DIB elements for OpenShift Enterprise.
Host the downloaded file on a local httpd server since builder uses an http endpoint to download the image and remote image locations on RHN tend to update the ISO images on frequently.
Do not set DIB_RHSM_USER and DIB_RHSM_PASSWORD. It fails during subscription manager register phase. The OSE Pool Id should suffice.
Unit subscriptions do not get removed from systems that fail builds in the midst. The outcome is that at some point, the build will exhaust them and error out with no more subscriptions available from pool.
Remove subscriptions attached to the build server from https://access.redhat.com/management/consumers (All Units)
Bug tracked at https://bugzilla.redhat.com/show_bug.cgi?id=1004483
Run the diskimage-builder for the broker to generate a rhel image using DIBs for openshift-enterprise-broker
Run the diskimage-builder for the node to generate a rhel image using DIBs for openshift-enterprise-node.
Openstack VM boot time console logs do not show up, and needs to be added to grub command line in the image, however grub is currently not enabled on rhel 6.5, but is in progress.
Openstack Metadata service is exclusively used by cloud-init scripts in the broker/node images to run user data passed on during boot time. Enabling config drive has no effect. In fact, the broker wait conditions also exclusively use the Metadata service of Openstack to communicate cloud-init completion.
Automated Deployments using Heat Templates
Spin up the broker and the node instances using subscription manager on a given network with heat cli
The broker and node will take several minutes to complete cloud-init configuration.
Once completed, access the VM via the VNC console and run oo-diagnostics on the broker and the node.
OpenShift AD Configuration
Perform the following procedure to configure OpenShift AD.
Step 1![]() Log on to the OpenShift broker server.
Log on to the OpenShift broker server.
Step 2![]() Edit broker HTTPD configuration file at:
Edit broker HTTPD configuration file at:
/var/www/openshift/broker/httpd/conf.d/openshift-origin-auth-remote-user.conf
Step 3![]() Add the following configuration:
Add the following configuration:
Step 4![]() Restart OpenShift broker service:
Restart OpenShift broker service:
Step 5![]() Edit console configuration file at:
/var/www/openshift/console/httpd/conf.d/openshift-origin-auth-remote-user.conf
Edit console configuration file at:
/var/www/openshift/console/httpd/conf.d/openshift-origin-auth-remote-user.conf
Step 6![]() Add the following configuration:
Add the following configuration:
Step 7![]() Restart OpenShift console service:
Restart OpenShift console service:
Creating OpenShift District
Districts define a set of node hosts within which gears can be reliably moved to manage the resource usage of those nodes. While not strictly required for a basic OpenShift installation, their use is recommended where administrators might ever need to move gears between nodes. It's also possible to create multiple districts and designate different security level on each district by leveraging network firewall and access control policies associated with node network address.
To use districts, the broker's MCollective plugin must be configured to enable districts.
Step 1![]() Edit the /etc/openshift/plugins.d/openshift-origin-msg-broker-mcollective.conf configuration file and confirm the following parameters are set:
Edit the /etc/openshift/plugins.d/openshift-origin-msg-broker-mcollective.conf configuration file and confirm the following parameters are set:
Step 2![]() Execute the following command on the broker host:
Execute the following command on the broker host:
Where small_district is the name of the new district and small is the profile of the gears that will be provisioned on this district.
Step 3![]() Add node host to small_district that was created:
Add node host to small_district that was created:
It is important to note that the server identity (node.example.com here) is the node's hostname as configured on that node, which could be different from the PUBLIC_HOSTNAME configured in /etc/openshift/node.conf on the node. The PUBLIC_HOSTNAME is used in CNAME records and must resolve to the host via DNS; the hostname could be something completely different and may not resolve in DNS at all.
CIAC Configuration
CIAC needs to be configured to create services and portals outlined in the design section. The following instructions lay out the necessary configurations.
Active Directory Integration
Perform the following procedure to create integrate active directory.
Step 1![]() Launch Cisco Service Portal in browser with administration user.
Launch Cisco Service Portal in browser with administration user.
Step 2![]() Sample URL: http://<PSC-HOST>/RequestCenter.
Sample URL: http://<PSC-HOST>/RequestCenter.
Step 3![]() From the Administration module in the module selection drop down, click Directories.
From the Administration module in the module selection drop down, click Directories.
Step 4![]() Click Add to add a new data source.
Click Add to add a new data source.
Step 5![]() Enter a name for Data Source Name.
Enter a name for Data Source Name.
Step 6![]() Select LDAP for the Protocol.
Select LDAP for the Protocol.
Step 7![]() Select MS Active Directory for Server Product.
Select MS Active Directory for Server Product.
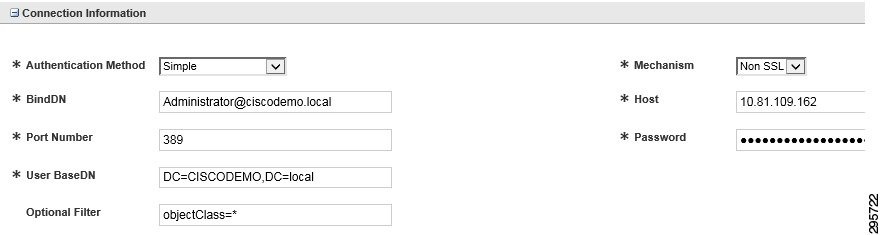
Step 8![]() Set the connection information, as shown in Figure 4-1.
Set the connection information, as shown in Figure 4-1.
Step 9![]() Click the Mappings tab (right side).
Click the Mappings tab (right side).
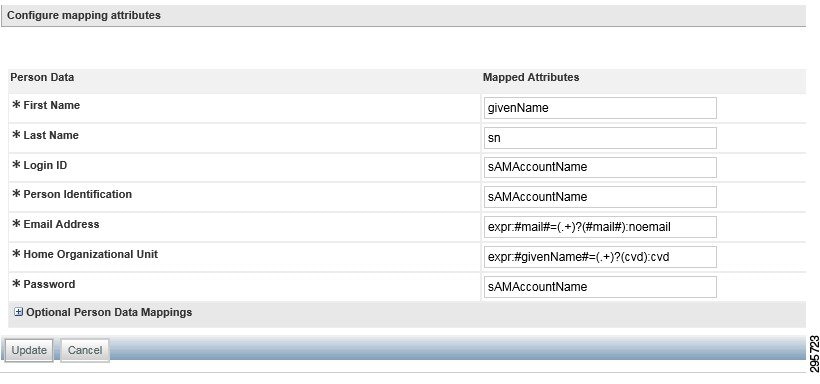
Step 11![]() Configure mapping attributes, as shown in Figure 4-2.
Configure mapping attributes, as shown in Figure 4-2.
Figure 4-2 Configure Mapping Attributes
Step 12![]() Click the Events tab (right side).
Click the Events tab (right side).
Step 13![]() Click Edit at Login event.
Click Edit at Login event.
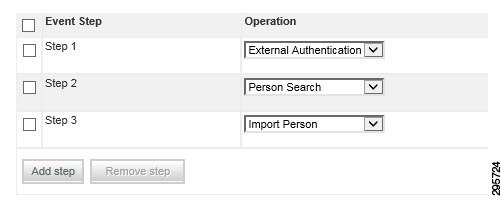
Step 14![]() Add the steps as shown in Figure 4-3.
Add the steps as shown in Figure 4-3.
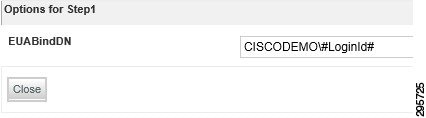
a.![]() For Step 1, click Options and set the value as shown in Figure 4-4.
For Step 1, click Options and set the value as shown in Figure 4-4.
Figure 4-4 Set Values for Step 1
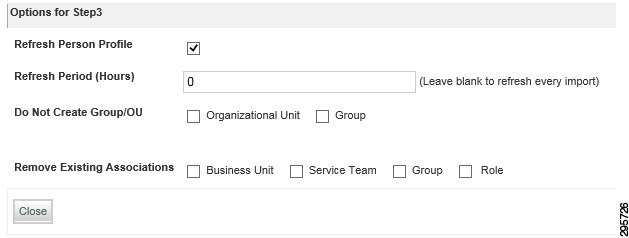
b.![]() For Step 3, click Options and set the value as shown in Figure 4-5.
For Step 3, click Options and set the value as shown in Figure 4-5.
Figure 4-5 Set Values for Step 3
Step 15![]() Click the Settings tab (on the top).
Click the Settings tab (on the top).
Step 16![]() Turn on directory integration by selecting the radio button, as shown in Figure 4-6, and then click Update.
Turn on directory integration by selecting the radio button, as shown in Figure 4-6, and then click Update.
Figure 4-6 Turn on Directory Integration

Creating a New “PAAS Application” Service
Perform the following procedure to create a new PAAS application service.
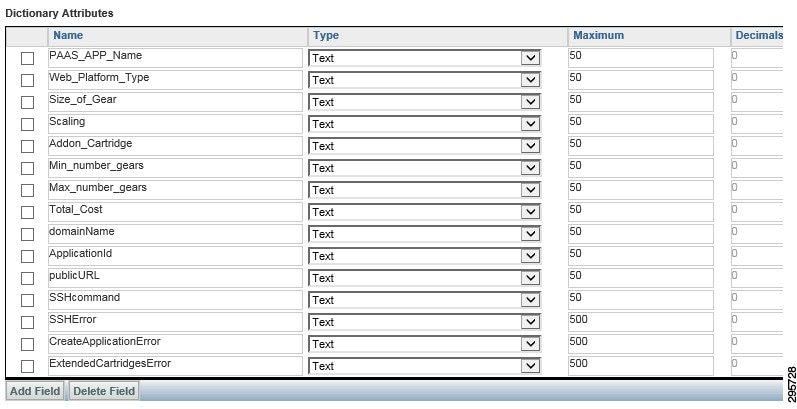
Step 1![]() Create a dictionary using the interface shown in Figure 4-7.
Create a dictionary using the interface shown in Figure 4-7.
Figure 4-7 Create a Dictionary
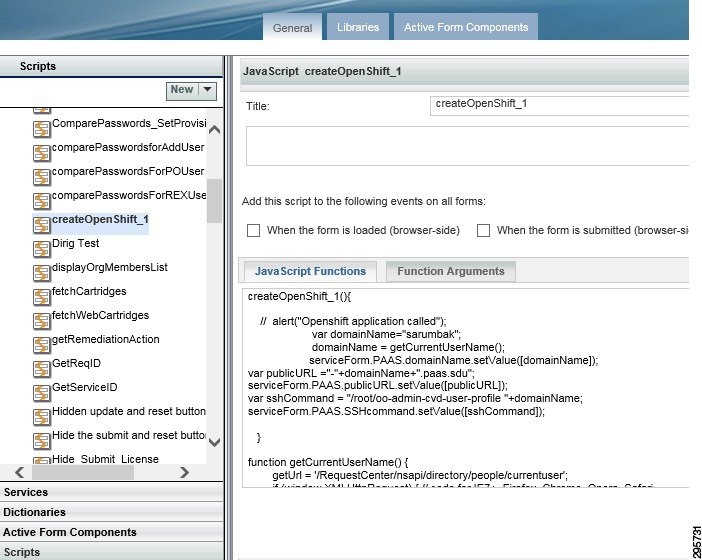
Step 2![]() Create the necessary Javascripts as shown in Figure 4-8, Figure 4-9, and Figure 4-10.
Create the necessary Javascripts as shown in Figure 4-8, Figure 4-9, and Figure 4-10.
Figure 4-8 Create the Necessary Javascripts 1
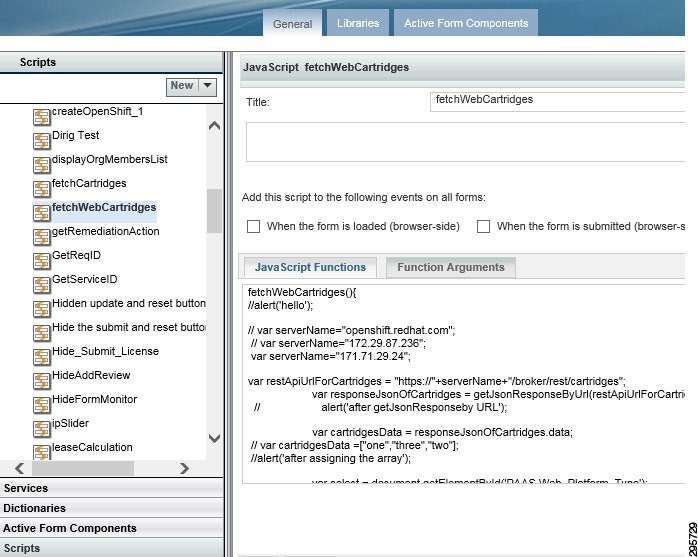
Figure 4-9 Create the Necessary Javascripts 2
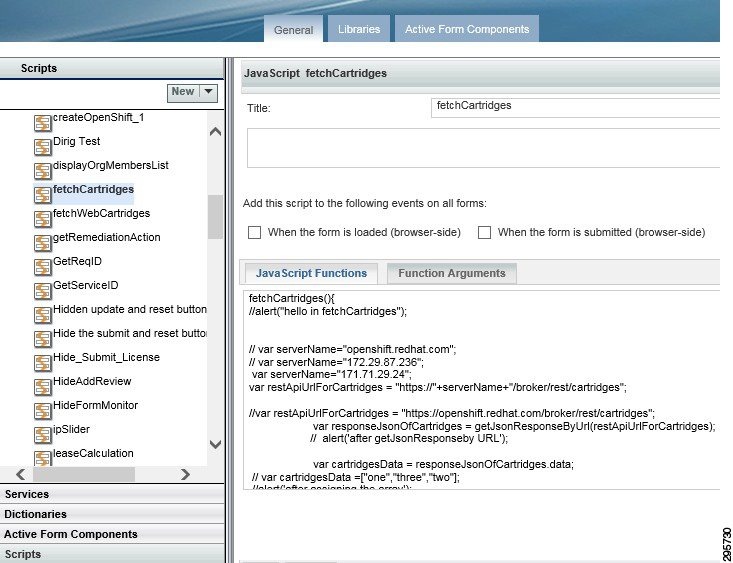
Figure 4-10 Create the Javascripts Needed 3
Creating an Active Form Component
Perform the following procedure to create an active form component.
Step 1![]() Add the dictionary that was created in the first step.
Add the dictionary that was created in the first step.
Step 2![]() Set the display properties of each field.
Set the display properties of each field.
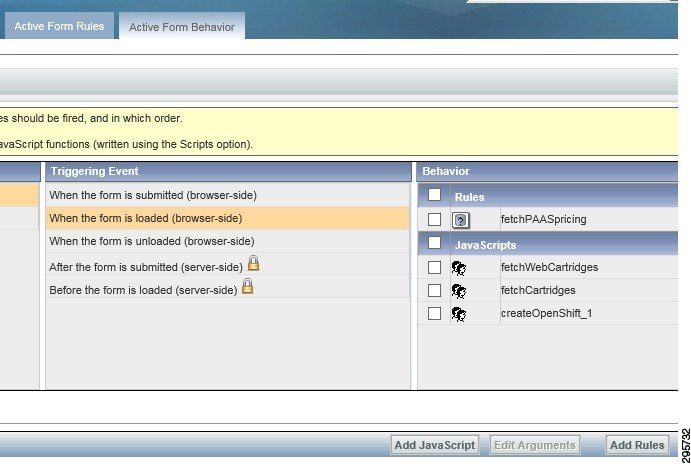
Step 3![]() Set the Active Form behavior; add the scripts (that were created in the previous step), as shown in Figure 4-11:
Set the Active Form behavior; add the scripts (that were created in the previous step), as shown in Figure 4-11:
Creating a Service
Perform the following procedure to create a service.
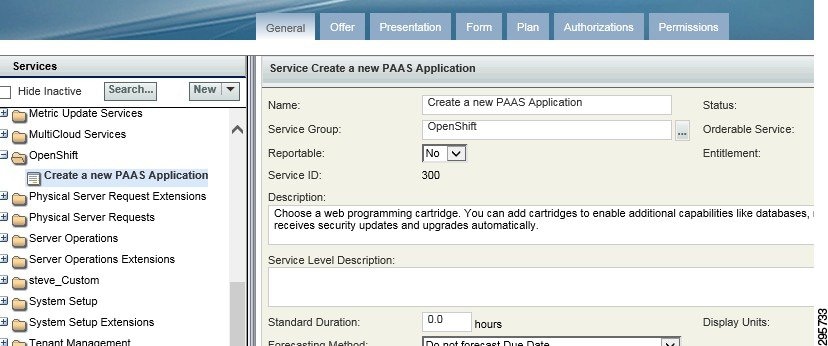
Step 1![]() Create a service with desired name and set the description as shown in Figure 4-12.
Create a service with desired name and set the description as shown in Figure 4-12.
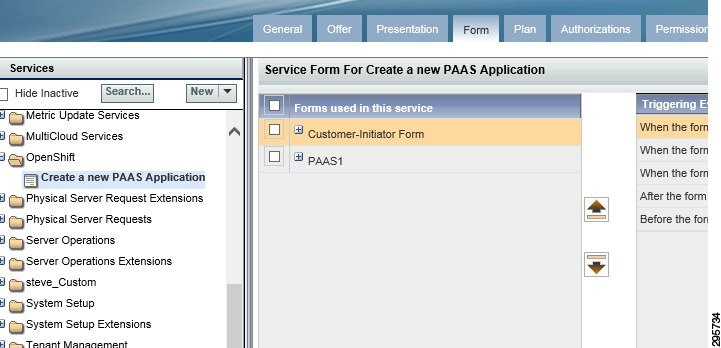
Step 2![]() Add the Active form component that was created to this service, as shown in Figure 4-13.
Add the Active form component that was created to this service, as shown in Figure 4-13.
Figure 4-13 Add Active Form Component
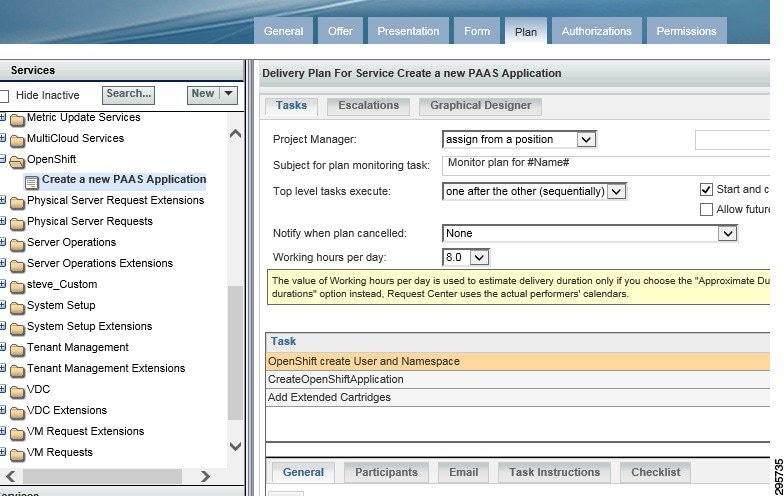
Step 3![]() Set the delivery plan, as shown in Figure 4-14.
Set the delivery plan, as shown in Figure 4-14.
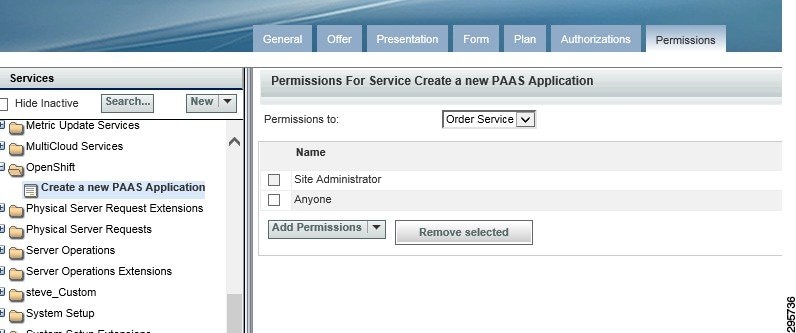
Step 4![]() Set permissions, as shown in Figure 4-15.
Set permissions, as shown in Figure 4-15.
OpenShift SSH Agent
Perform the following procedure to configure OpenShift SSH Agent.
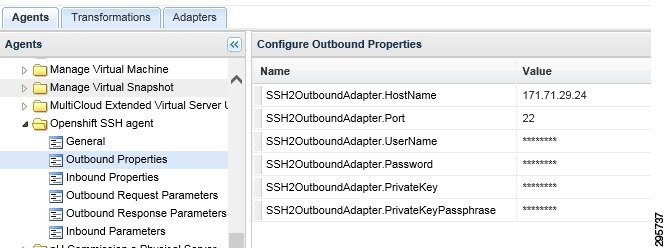
Step 1![]() Configure ServiceLink agent Outbound Properties, as shown in Figure 4-16.
Configure ServiceLink agent Outbound Properties, as shown in Figure 4-16.
Figure 4-16 Configure ServiceLink Agent Outbound Properties
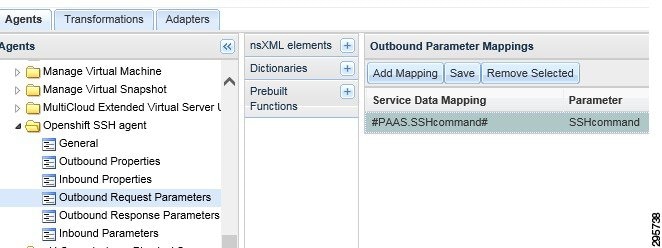
Step 2![]() Configure Outbound Request parameters, as shown in Figure 4-17.
Configure Outbound Request parameters, as shown in Figure 4-17.
Figure 4-17 Configure Outbound Request Parameters
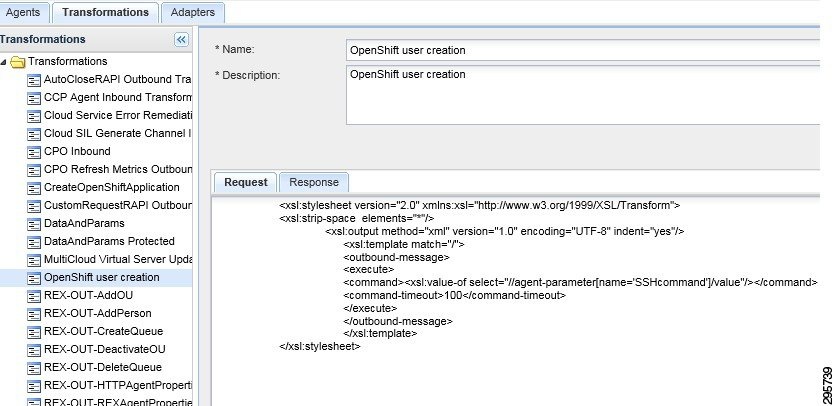
Step 3![]() Configure Outbound Transformation request, as shown in Figure 4-18.
Configure Outbound Transformation request, as shown in Figure 4-18.
Figure 4-18 Configure Outbound Transformation Request
Creating an OpenShift Application Agent
Perform the following procedure to create an OpenShift application agent.
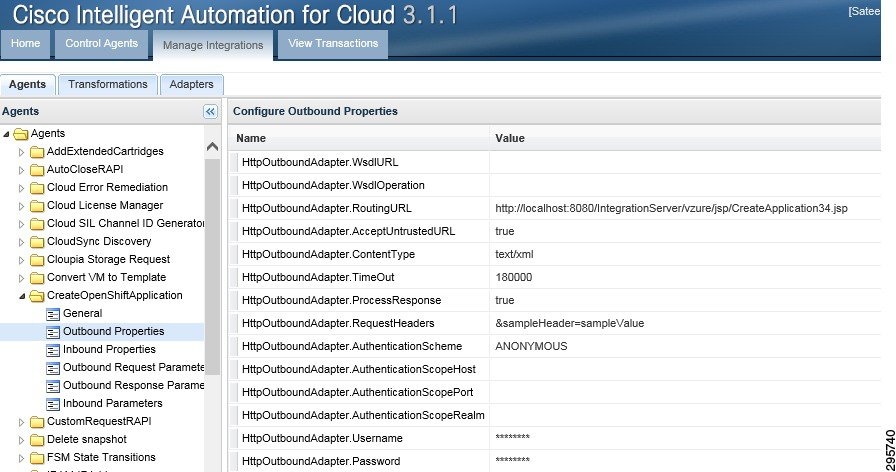
Step 1![]() Configure ServiceLink agent Outbound Properties, as shown in Figure 4-19.
Configure ServiceLink agent Outbound Properties, as shown in Figure 4-19.
Figure 4-19 Configure ServiceLink Agent Outbound Properties
Step 2![]() Configure Outbound Request parameters, as shown in Figure 4-20.
Configure Outbound Request parameters, as shown in Figure 4-20.
Figure 4-20 Configure Outbound Request Parameters

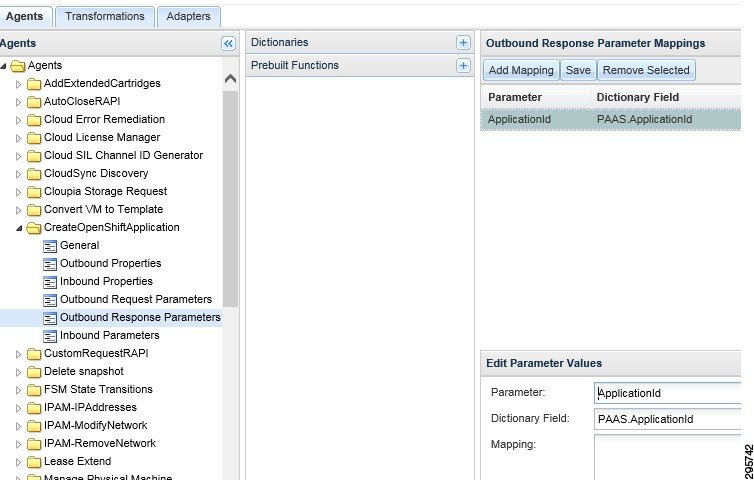
Step 3![]() Configure Outbound Response Parameters, as shown in Figure 4-21.
Configure Outbound Response Parameters, as shown in Figure 4-21.
Figure 4-21 Configure Outbound Response Parameters
Add Extended Cartridges Agent
Perform the following procedure to add extended cartridges agent.
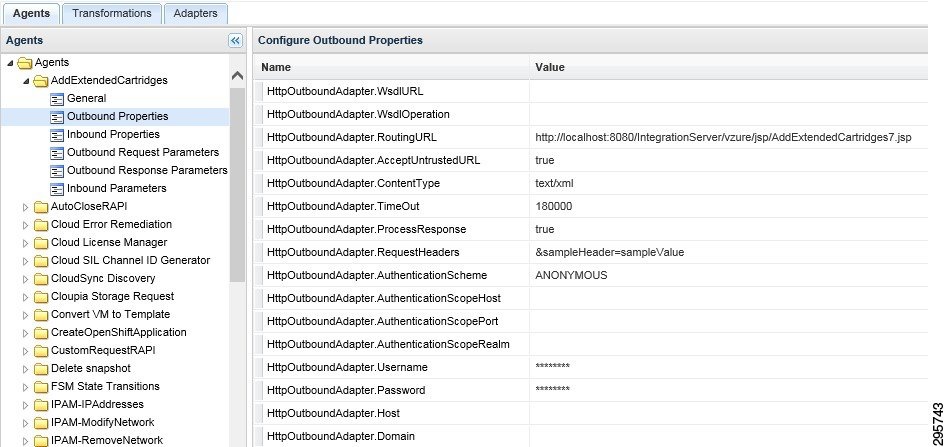
Step 1![]() Configure ServiceLink agent Outbound Properties, as shown in Figure 4-22.
Configure ServiceLink agent Outbound Properties, as shown in Figure 4-22.
Figure 4-22 Configure ServiceLink Agent Outbound Properties
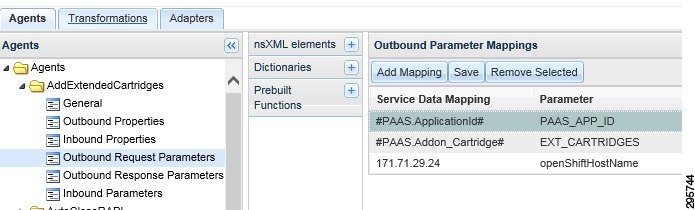
Step 2![]() Configure Outbound Request parameters, as shown in Figure 4-23.
Configure Outbound Request parameters, as shown in Figure 4-23.
Figure 4-23 Configure Outbound Request Parameters
Creating Portal Pages
Perform the following procedure to create portal pages.
Step 1![]() Log in to Portal Designer module and create a new Portal Page Group.
Log in to Portal Designer module and create a new Portal Page Group.
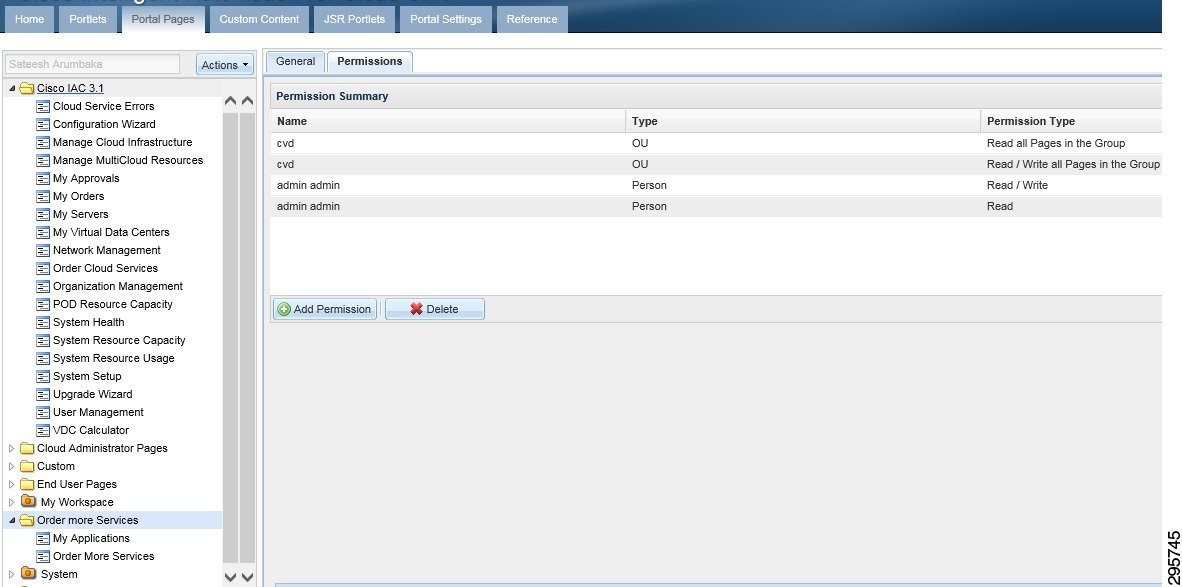
Step 2![]() Set the permissions so that the Organization Unit has read and write permissions to all the pages in the Portal Page group.
Set the permissions so that the Organization Unit has read and write permissions to all the pages in the Portal Page group.
Step 3![]() Create two Portal pages in this group (Figure 4-24).
Create two Portal pages in this group (Figure 4-24).
Figure 4-24 Create Portal Pages
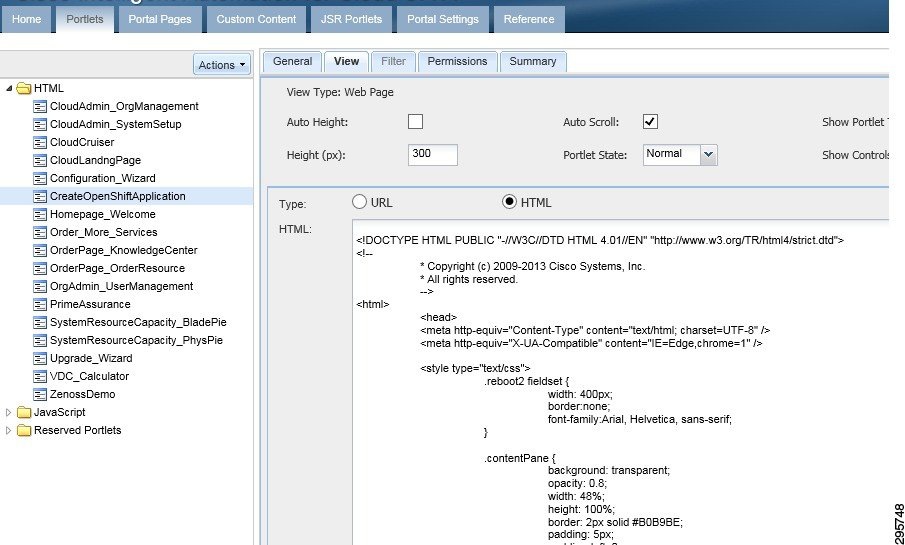
Step 4![]() Create three portlets, as shown in Figure 4-25, Figure 4-26, and Figure 4-27.
Create three portlets, as shown in Figure 4-25, Figure 4-26, and Figure 4-27.
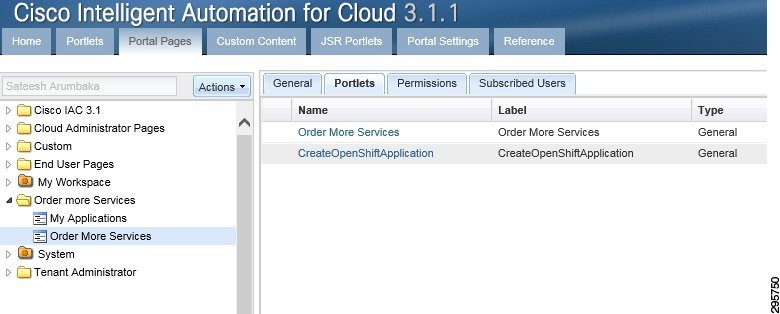
Step 5![]() Set the permissions on all three of the Portlets so that the Organization Unit has read and write permissions. Add these portlets to the portal pages, as shown in Figure 4-28 and Figure 4-29.
Set the permissions on all three of the Portlets so that the Organization Unit has read and write permissions. Add these portlets to the portal pages, as shown in Figure 4-28 and Figure 4-29.
Figure 4-28 Add Portlets to Portal Pages 1
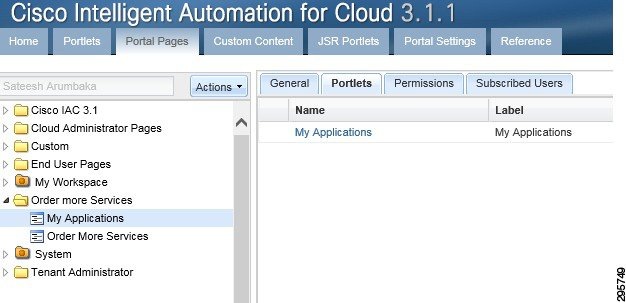
Figure 4-29 Add Portlets to Portal Pages 2
Deploy Java Server Page (JSP)
Perform the following procedure to deploy a Java server page.
Step 1![]() Log on to the Cisco Prime Catalog server.
Log on to the Cisco Prime Catalog server.
Step 2![]() Deploy the attached JSPs to the following locations:
Deploy the attached JSPs to the following locations:
- C:\jboss-as-7.1.1.Final\standalone\deployments\RequestCenter.war\vzure\jsp
- C:\jboss-as-7.1.1.Final\standalone\deployments\ServiceLink.war\vzure\jsp
OpenShift Broker admin Script
Perform the following procedure to execute an OpenShift admin script.
Step 1![]() Log on to the Broker host.
Log on to the Broker host.
Add osadmin to the openshift broker as a user
Step 2![]() Change osadmin user to allow a large number of domains and gears. All domains are going to be owned by osadmin. Domains for users are assigned to osadmin, and the user is granted edit access to the domains. This allows the user to create/delete/manage applications in their domain.
Change osadmin user to allow a large number of domains and gears. All domains are going to be owned by osadmin. Domains for users are assigned to osadmin, and the user is granted edit access to the domains. This allows the user to create/delete/manage applications in their domain.
Step 3![]() Add the attaché oo-admin-user-profile profile creation scripts into the broker hosts—this is required for PSC to log into the broker host to create openshift users and assign them domains. This script does the following:
Add the attaché oo-admin-user-profile profile creation scripts into the broker hosts—this is required for PSC to log into the broker host to create openshift users and assign them domains. This script does the following:
3.![]() Assigns the domain to osadmin.
Assigns the domain to osadmin.
4.![]() Assigns the user edit access to the domain.
Assigns the user edit access to the domain.
5.![]() Limits the max number of gears for the user to 0.
Limits the max number of gears for the user to 0.
6.![]() Limits the max number of domains for the user to 0.
Limits the max number of domains for the user to 0.
Testing
The methodology used for testing and validating the functionality was based on test cases per use case for the use cases outlined in the System Overview section.
Use Case 1: Integrated Provisioning for IaaS and PaaS
The following procedure is performed for configuring integrated provisioning for IaaS and PaaS.
Step 1![]() Add users to the Active Directory installation in the specified OU of the implementation section.
Add users to the Active Directory installation in the specified OU of the implementation section.
Step 3![]() From the Portal selection dropdown, choose My Workspace.
From the Portal selection dropdown, choose My Workspace.
Step 4![]() From the workspace, click the Order more services tab.
From the workspace, click the Order more services tab.
Step 5![]() On the Platform As A Service Portlet, click Create a new PAAS Application.
On the Platform As A Service Portlet, click Create a new PAAS Application.
Use Case 2: Application Stack Creation
The following procedure is performed for configuring application stack creation.
Step 1![]() Verify the order form shows up after step 5 in Use Case 1: Integrated Provisioning for IaaS and PaaS.
Verify the order form shows up after step 5 in Use Case 1: Integrated Provisioning for IaaS and PaaS.
Step 2![]() Enter the application name that you want to create, e.g. rubyapp.
Enter the application name that you want to create, e.g. rubyapp.
Step 3![]() Choose platform type (eg.g python-2.7).
Choose platform type (eg.g python-2.7).
Step 4![]() Choose Gear Profile Small.
Choose Gear Profile Small.
Step 5![]() Click False on the Scaling type.
Click False on the Scaling type.
Step 7![]() Close the order confirmation form.
Close the order confirmation form.
Use Case 3: Single Pane Management of Application Stack
The following procedure is performed for configuring single pane management of application stack.
Step 1![]() On the workspace page, click the My Applications tab.
On the workspace page, click the My Applications tab.
Step 2![]() On the list of applications, click the application name just created in Use Case 2: Application Stack Creation.
On the list of applications, click the application name just created in Use Case 2: Application Stack Creation.
Step 3![]() In the Take Action section:
In the Take Action section:
a.![]() Click View App to take you to the application URL.
Click View App to take you to the application URL.
Step 4![]() For scaled application type, click View Status.
For scaled application type, click View Status.
Step 5![]() Use git clone to clone the application repository shown in the Application Details section.
Use git clone to clone the application repository shown in the Application Details section.
Step 6![]() In the Take Action section, click Delete application.
In the Take Action section, click Delete application.
Step 7![]() Repeat Use Case 2: Application Stack Creation steps, click Scaled Application, and submit order.
Repeat Use Case 2: Application Stack Creation steps, click Scaled Application, and submit order.
Step 8![]() Repeat Use Case 2: Application Stack Creation steps and create a few different applications with different application stacks.
Repeat Use Case 2: Application Stack Creation steps and create a few different applications with different application stacks.
Step 9![]() On the list of applications, verify Steps 3 through 7 for each application.
On the list of applications, verify Steps 3 through 7 for each application.
Use Case 4: Integrated Provisioning for IaaS and PaaS
The following procedure is performed for configuring integrated provisioning for IaaS and PaaS.
Step 1![]() Refer to Use Case 1: Integrated Provisioning for IaaS and PaaS and Use Case 2: Application Stack Creation, where a direct order for both IaaS and PaaS resources can be placed from a single pane. Validate this use case.
Refer to Use Case 1: Integrated Provisioning for IaaS and PaaS and Use Case 2: Application Stack Creation, where a direct order for both IaaS and PaaS resources can be placed from a single pane. Validate this use case.
Note Ordering of IaaS resources comes with the PSC solution and is not validated separately.
Use Case 5: Network-based Segmentation of PaaS Districts for Security
The following procedure is performed for configuring network-based segmentation of PaaS districts for security.
Step 1![]() Repeat steps 1, 2 and 3 in Use Case 2: Application Stack Creation.
Repeat steps 1, 2 and 3 in Use Case 2: Application Stack Creation.
Step 2![]() Choose Small-Secure* Gear profile.
Choose Small-Secure* Gear profile.
Step 4![]() Repeat steps 1 through 8 in Use Case 3: Single Pane Management of Application Stack for the secure network application.
Repeat steps 1 through 8 in Use Case 3: Single Pane Management of Application Stack for the secure network application.
Step 5![]() Log in to OpenShift node in secure network as admin/root via ssh and verify that application was created.
Log in to OpenShift node in secure network as admin/root via ssh and verify that application was created.
Summary
The following recommended implementation was conducted:
- Use of OpenStack for IaaS.
- Deployment of OpenShift Enterprise into OpenStack using HEAT templates.
- Deployment of two separate network segments in OpenStack to house secure and standard OpenShift nodes.
- Creation of PaaS ordering Services that talk to OpenShift Broker in PSC.
- Creation of PaaS Application management portal pages in Prime Services Catalog.
- Binding OpenShift and OpenStack authentication to LDAP (AD) directory.
 Feedback