Cisco Enterprise Mobility Services Platform Studio Configuration Guide
Bias-Free Language
The documentation set for this product strives to use bias-free language. For the purposes of this documentation set, bias-free is defined as language that does not imply discrimination based on age, disability, gender, racial identity, ethnic identity, sexual orientation, socioeconomic status, and intersectionality. Exceptions may be present in the documentation due to language that is hardcoded in the user interfaces of the product software, language used based on RFP documentation, or language that is used by a referenced third-party product. Learn more about how Cisco is using Inclusive Language.
- Updated:
- February 16, 2016
Chapter: Developing sites
Developing Mobile Sites
This chapter provides information on how to develop mobile sites using the Enterprise Mobility Services Platform Studio.
Mobile Sites Window
The Mobile Sites window is the main window of the Enterprise Mobility Services Platform Studio. This window lists all the mobile site projects and within each project, the list of mobile sites along with their states, the number of users currently working on a site, and their names.
Page Editor Window
When you double-click a mobile site in the Mobile Sites window, the Page Editor window appears. You can use the Page Editor window to edit the pages of your mobile site.
The Page Editor window consists of the following panels:
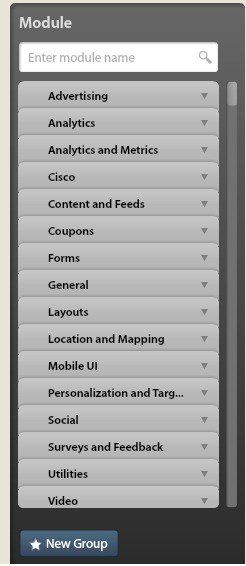
Module Panel
The Module panel in the Enterprise Mobility Services Platform Studio main window consists of various modules which are used to add features to a mobile site. The modules are ready-to-use functional UI elements that are customizable. The modules are grouped under various module groups. The modules available in the Enterprise Mobility Services Platform Studio can be distinguished as custom modules and Out-of-Box modules.
You can add these modules into a site page to add features to a mobile site. For more information on the Studio modules, see the Cisco Enterprise Mobility Platform Studio Modules Guide.
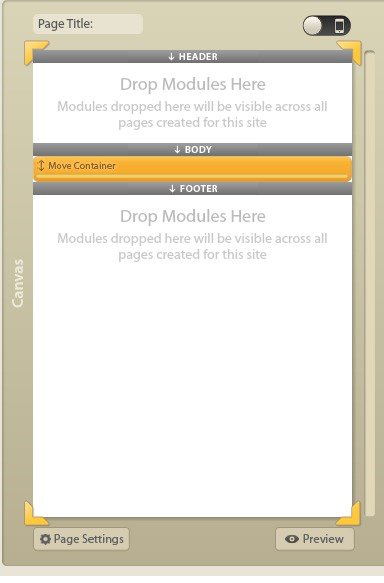
Canvas Panel
The Canvas is a panel in the Enterprise Mobility Services Platform Studio main window where you can design the layout of your mobile site and add content to it using the Studio modules. This panel provides visual experience of the modules. The Canvas consists of the following sections: Header, Body, and Footer. The modules added to the header and footer appear on all the pages of the site. The modules are dragged and dropped into these sections as per the requirement for the mobile site.
The Canvas panel has a Preview button that provides the preview of the site when modules are added into it. The Canvas has the following two types of modes: Touch Mode and Non Touch Mode.
Edit Panel
The Edit panel is used to define the properties of the pages and modules. You can configure the properties of a module such as, style, layout, background, border, paddings, and so on in this panel.
Developing Sites
The Enterprise Mobility Services Platform Studio enables you to create mobile sites. You can create a new mobile site, define layout for the site, add content using the modules, and configure the properties of the modules.
To develop a mobile site in the Enterprise Mobility Services Platform, perform the following steps:
2.![]() Configuring the Site Properties
Configuring the Site Properties
4.![]() Configuring the Page properties
Configuring the Page properties
5.![]() Enhancing the Site Page with the Studio Modules
Enhancing the Site Page with the Studio Modules
Creating a New Site
The Enterprise Mobility Services Platform enables you to create mobile sites that perform consistently on multiple mobile devices. You can also use these sites as splashing page for your Wi-Fi connections.
To create a new site, perform the following steps:
Step 1![]() In the Mobile Sites page, click Create New Site.
In the Mobile Sites page, click Create New Site.
Step 2![]() In the Create New Site window that appears, perform the following steps:.
In the Create New Site window that appears, perform the following steps:.
a.![]() In the Site Name text field, enter the site name.
In the Site Name text field, enter the site name.
b.![]() From the Project drop-down list, choose the project in which you want to create the site.
From the Project drop-down list, choose the project in which you want to create the site.

Note![]() If you have the admin rights to create projects, a Create New Project check box appears in the window. When you select this check box, the Project drop-down list gets replaced with the Project text field.
If you have the admin rights to create projects, a Create New Project check box appears in the window. When you select this check box, the Project drop-down list gets replaced with the Project text field.
Configuring the Site Properties
The Site Settings window enables you to configure the site details such as, site name, site description, keywords, estimated page views, and so on. You can define a custom URL for the site and add favicon images.You can also configure style properties for the site.
To configure the site properties, perform the following steps:
Step 1![]() In the Mobile Sites window, right-click the site for which you want to configure the properties.
In the Mobile Sites window, right-click the site for which you want to configure the properties.
Step 3![]() In the Site Settings window, configure the various properties for the site in the respective fields.
In the Site Settings window, configure the various properties for the site in the respective fields.
Site Properties
The following table lists the site properties
Adding Pages to a Site
The mobile pages are created within the sites. Normally, a mobile site is a set of site pages. When you create a new site, only the home page is created by default. If you want to add more pages to the site, you need to create those pages.
To create a new page, perform the following steps:
Step 1![]() Open the site to which you want add the page, and click New Page.
Open the site to which you want add the page, and click New Page.
The Create New Page window appears.
Step 2![]() In the Page Name text field, enter the name for the page, and click Create.
In the Page Name text field, enter the name for the page, and click Create.
A new page is created for your site.
Configuring the Page properties
After adding a page to a site, you must configure the required properties for that page. The page settings window enables you to do the following:
- Define page properties such as page name, page title, and Page Path URL.
- Use Page Metadata option to declare certain variables and their values that can be used in modules such as Omniture, Dart, Menu Bar Container, and Stories.
- Configure the style properties for the entire page.
To configure the page properties, perform the following steps:
Step 1![]() Open the page for which you want configure the properties.
Open the page for which you want configure the properties.
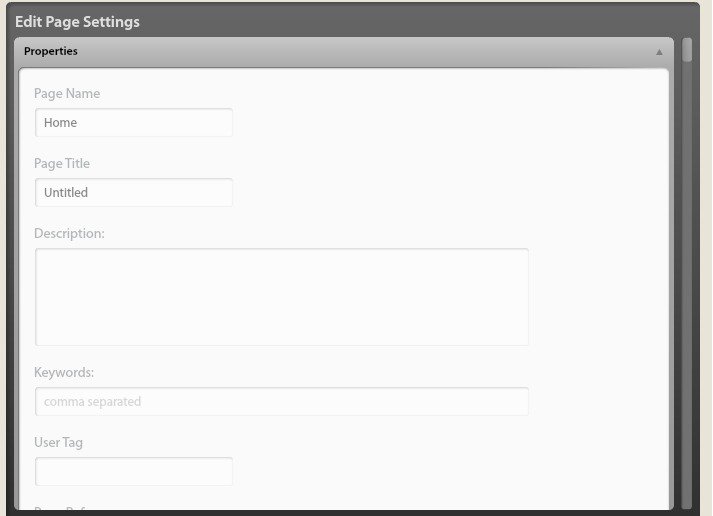
Step 2![]() In the Canvas panel, click Page Settings.
In the Canvas panel, click Page Settings.
Step 3![]() In the Edit Page Settings panel that appears in the right of the Canvas panel, configure the page properties:
In the Edit Page Settings panel that appears in the right of the Canvas panel, configure the page properties:
Page Properties
The following table lists the page properties
Enhancing the Site Page with the Studio Modules
The modules are ready-to-use functional UI elements that are customizable. They are reusable and have been optimized for touch and non-touch experiences on any device. They handle content, layouts, and functionality based on the device capability. You can add content to your web page using Enterprise Mobility Services Platform modules.
Out- of- Box and Custom Modules
The Enterprise Mobility Services Platform Studio includes a set of out-of-the-box (OOB) modules that enable the site producer to build and manage sites.
The OOB modules are readily available modules that can be added to a site page to build a site. The OOB modules are categorized under various module groups.
The Custom modules are created by Cisco based on the customer requirement. These modules are usually provided only to that particular customer. The custom modules are upgraded only based on enhancement requests from the customer.
You can create your own module groups with the modules that you frequently use or want to reuse. For example, if you want to use a Picture Gallery module in various sites that you create, after configuring the picture gallery for a site page you can save it under a module group. Next time when you need a picture gallery module, you can use this configured module. This avoids making the same configurations repeatedly.
Note![]() You cannot edit the OOB module groups.
You cannot edit the OOB module groups.
Some of the modules available in the Enterprise Mobility Services Platform Studio are:
- Google Analytics
- Picture Gallery
- Barcode Generator
- Form Container
- Grid Layout
- Context Aware Container
- Micello Wayfinding
The Enterprise Mobility Services Platform Studio consists of various modules that enable to add the following features to your mobile site:
- Analyze data and generate reports.
- Display advertisements on the mobile sites.
- Display pictures from albums in the mobile sites.
- Create table to display data in rows and columns.
- Add forms to the mobile sites to collect data.
- Control layout of the sites.
- Add way-locators and maps in the mobile sites.
- Personalize the content available in the site.
- Configure to show or hide the content on your site based on conditions.
- Access various social networking sites from the mobile sites.
- Conduct surveys.
- Enhance the user interface features of the site page.
- Enhance portals created using the WiFi Engage.
For more information on the EMSP Studio OOB modules, see the Cisco Enterprise Mobility Services Platform Studio Modules Guide.
To add a module to a site page, perform the following steps:
Step 1![]() Open the site page in which you want to add the module.
Open the site page in which you want to add the module.
Step 2![]() In the Module panel, enter the name of the module that you want to add to the page.
In the Module panel, enter the name of the module that you want to add to the page.
Step 3![]() Drag and drop the module in to the page in the Canvas panel.
Drag and drop the module in to the page in the Canvas panel.
The Module settings panel appears.
Step 4![]() Configure the properties of the module in the respective fields.
Configure the properties of the module in the respective fields.
Note![]() The content and layout of the header and footer of the Home page is reused by all the pages of your mobile site. Any change you make here affects all other pages on your mobile site. However, you can hide individual modules on a specific page. For more information, see the “Hiding a Module” section.
The content and layout of the header and footer of the Home page is reused by all the pages of your mobile site. Any change you make here affects all other pages on your mobile site. However, you can hide individual modules on a specific page. For more information, see the “Hiding a Module” section.
Previewing a Site Page
After adding all the required modules to a page, preview the page to know how the page appears to the end user. Previewing the page enables you to ensure that the layout and content of the page are appropriate. You can preview the page for the following devices and dimensions:
- iPhone (640*1136 Pixels)
- Nexus 4 (768*1280 Pixels)
- Galaxy S4 (1080*1920 Pixels)
- Lumia 520 (480*800 Pixels)
- Blackberry Q10 (720*720 Pixels)
To preview a page, perform the following steps:
Step 1![]() Open the page of which you want to view the preview.
Open the page of which you want to view the preview.
Step 2![]() In the Page Editor window, click Preview.
In the Page Editor window, click Preview.
Step 3![]() From the drop-down list on the right, choose the type of phone for which you want to view the preview.
From the drop-down list on the right, choose the type of phone for which you want to view the preview.
The preview for the page appears.
Note![]() The default view is Portrait. You can choose to view your site in landscape mode by switching the Orientation button in the Preview page.
The default view is Portrait. You can choose to view your site in landscape mode by switching the Orientation button in the Preview page.
Linking the Pages
After creating all the required pages and adding necessary modules to the, you must link the pages in a site using the various link modules available in the Studio.You can use link modules such as Links, Link Button, and so on. For example, if you have two pages in your site, the home page and another page p2, link the home page to p2 using the Links module so that the p2 appears when you click the link for the P2 in the home page.
To link the two pages of a site, perform the following steps:
Step 1![]() Open the page from which you to link to the other page.
Open the page from which you to link to the other page.
Step 2![]() In the Module panel, enter Links.
In the Module panel, enter Links.
Step 3![]() Drag and drop the Links module in to the page.
Drag and drop the Links module in to the page.
Step 4![]() In the Edit Links panel that appears, expand the Main window.
In the Edit Links panel that appears, expand the Main window.
Step 5![]() In the Link Label text field, enter a name for the link.
In the Link Label text field, enter a name for the link.
Step 6![]() In the Target Link field, enter the path to the target page.
In the Target Link field, enter the path to the target page.
Use the Browse button to locate the target page.
Similarly, you can link the site pages to one another based on your requirement.
Previewing a Site
After adding all the required pages to a site, preview the site to verify the layout and appearance of the modules.
You can preview the mobile site for the following devices and dimensions:
- iPhone (640*1136 Pixels)
- Nexus 4 (768*1280 Pixels)
- Galaxy S4 (1080*1920 Pixels)
- Lumia 520 (480*800 Pixels)
- Blackberry Q10 (720*720 Pixels)
To preview a mobile site, perform the following steps:
Step 1![]() In the Mobile Sites window, right-click the site that you want to preview.
In the Mobile Sites window, right-click the site that you want to preview.
Step 3![]() From the drop-down list on the right, choose the type of phone for which you want to view the preview.
From the drop-down list on the right, choose the type of phone for which you want to view the preview.
The preview for the site appears.
Publishing the Site
You can make the sites available to the users by publishing the sites. We recommend you to preview the site to verify the content and layout before publishing the site.
To publish a site created in the Studio, perform the following steps:
Step 1![]() Open the site that you want to publish.
Open the site that you want to publish.
Step 2![]() In the Page Editor window, click the Draft icon.
In the Page Editor window, click the Draft icon.
Step 3![]() Click Make Site Live to publish the site.
Click Make Site Live to publish the site.
Note![]() The published mobile sites are usually locked to prevent the users from making unwanted changes.
The published mobile sites are usually locked to prevent the users from making unwanted changes.
Viewing a Site URL
For each site you create, an URL is generated by the Studio. You can use this URL to view the site. The Studio enables you to send the URL of a site through e-mail. You can also generate QR code for site pages.
To view the URL for a mobile site, perform the following steps:
Step 1![]() In the Mobile Sites window, right-click the site for which you want to view the URL.
In the Mobile Sites window, right-click the site for which you want to view the URL.
Step 3![]() In the Preview window, the URL for the site appears in the URL field.
In the Preview window, the URL for the site appears in the URL field.
Note![]() To preview the URL for a page, view the preview window for that page.
To preview the URL for a page, view the preview window for that page.
 Feedback