Cisco Smart+Connected Spaces User Guide
Bias-Free Language
The documentation set for this product strives to use bias-free language. For the purposes of this documentation set, bias-free is defined as language that does not imply discrimination based on age, disability, gender, racial identity, ethnic identity, sexual orientation, socioeconomic status, and intersectionality. Exceptions may be present in the documentation due to language that is hardcoded in the user interfaces of the product software, language used based on RFP documentation, or language that is used by a referenced third-party product. Learn more about how Cisco is using Inclusive Language.
- Updated:
- October 20, 2013
Chapter: Cisco Smart+Connected Spaces Kiosks
Cisco Smart+Connected Spaces Kiosks
This chapter describes the kiosk interface and the features that you can access using Cisco Smart+Connected Spaces (Smart+Connected Spaces) kiosks and the web portal.
•![]() Understanding the Kiosk Interface
Understanding the Kiosk Interface
•![]() Smart+Connected Spaces Web Portal
Smart+Connected Spaces Web Portal
Understanding the Kiosk Interface
Figure 2-1 shows the interface displayed on the kiosk.
Figure 2-1
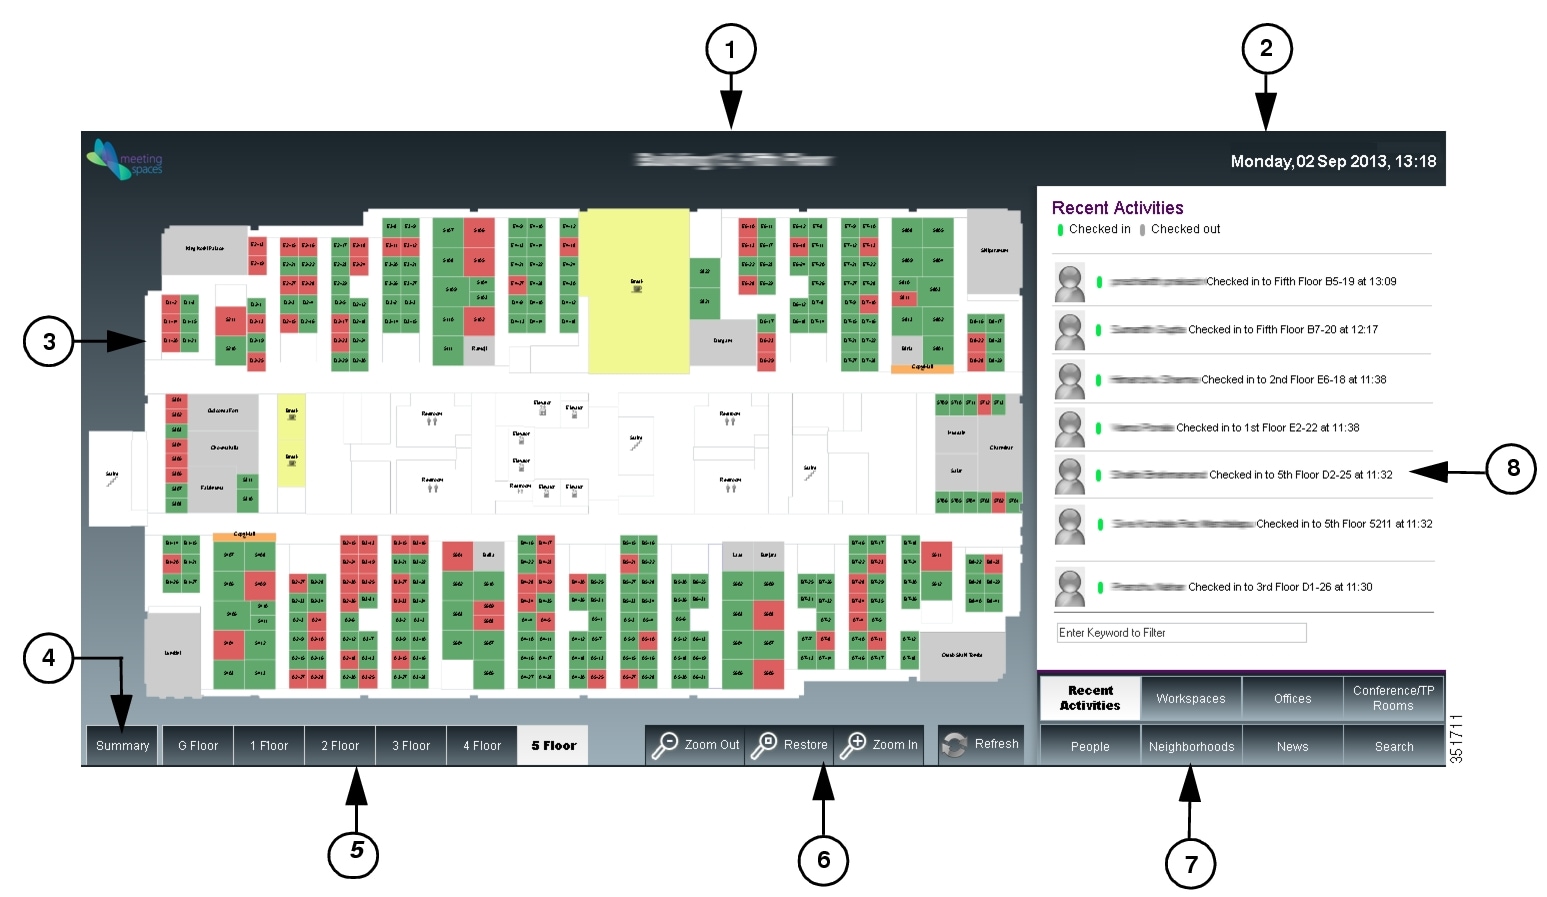
Kiosk Interface
The kiosk interface displays the following information:
•![]() Location—By default, the interface displays the name of the building and the floor where the kiosk is placed, as a header. This is the location for which the floor plan and other details are displayed unless changed. When you navigate to another building or floor using the floor plan view or the search feature, the location title gets updated accordingly.
Location—By default, the interface displays the name of the building and the floor where the kiosk is placed, as a header. This is the location for which the floor plan and other details are displayed unless changed. When you navigate to another building or floor using the floor plan view or the search feature, the location title gets updated accordingly.
•![]() Day, Date, and Time—The day of the week and the current date and time at the location where the kiosk is placed are displayed in the top-right corner of the kiosk interface.
Day, Date, and Time—The day of the week and the current date and time at the location where the kiosk is placed are displayed in the top-right corner of the kiosk interface.
•![]() Floor Plan—All of the available workspaces, conference/TP rooms, and other facilities on the floor are displayed as a map or a graphical representation. This element takes up a major part of the kiosk screen. All of the available workspaces appear in green, while the unavailable workspaces appear in red. Tapping on a workspace opens a dialog box which shows the workspace name/ID, availability status and icon, and the check-in option if the workspace is available. For occupied workspaces, details of the person who has occupied it are displayed.
Floor Plan—All of the available workspaces, conference/TP rooms, and other facilities on the floor are displayed as a map or a graphical representation. This element takes up a major part of the kiosk screen. All of the available workspaces appear in green, while the unavailable workspaces appear in red. Tapping on a workspace opens a dialog box which shows the workspace name/ID, availability status and icon, and the check-in option if the workspace is available. For occupied workspaces, details of the person who has occupied it are displayed.

Note ![]() The conference rooms on the floor are not highlighted and appear in grey on the floor plan that is shown by default, with the Recent Activities tab selected. Use the Conference/TP Rooms tab to view the details of these rooms and book them.
The conference rooms on the floor are not highlighted and appear in grey on the floor plan that is shown by default, with the Recent Activities tab selected. Use the Conference/TP Rooms tab to view the details of these rooms and book them.
•![]() Summary—Tap this button to view the building summary. The building summary displays the following details:
Summary—Tap this button to view the building summary. The building summary displays the following details:
–![]() Table depicting each floor in the building as a row and the conference/TP room and workspace availability status as columns. The number of available, checked in, and booked conference/TP rooms and workspaces on every floor are listed and represented by different colors. Tap any resource number provided for any floor to load the floor plan with that resource highlighted.
Table depicting each floor in the building as a row and the conference/TP room and workspace availability status as columns. The number of available, checked in, and booked conference/TP rooms and workspaces on every floor are listed and represented by different colors. Tap any resource number provided for any floor to load the floor plan with that resource highlighted.
–![]() Legend mentioning what the colors indicate is provided below the table. The date and time (along with the timezone) at which the Summary was last updated are also provided.
Legend mentioning what the colors indicate is provided below the table. The date and time (along with the timezone) at which the Summary was last updated are also provided.
To return to the floor plan view, tap the Close button.
•![]() Floor Navigation Controls—Below the floor plan, controls are provided to navigate to the different floors in a building. Tap these controls to view the plan for a particular floor. Once the changed floor plan is displayed, you can perform the required tasks by using any of the function tabs and book a conference/TP room or check into a workspace on that floor.
Floor Navigation Controls—Below the floor plan, controls are provided to navigate to the different floors in a building. Tap these controls to view the plan for a particular floor. Once the changed floor plan is displayed, you can perform the required tasks by using any of the function tabs and book a conference/TP room or check into a workspace on that floor.
•![]() View Controls—The Zoom In and Zoom Out buttons allow you to adjust the magnification level of the floor plan. Tap restore to resize the floor plan to the default display size on the kiosk. The Refresh button updates the floor plan and changes the kiosk view to display the default function tab, that is, the Recent Activities tab. This tab is refreshed to show the updated data.
View Controls—The Zoom In and Zoom Out buttons allow you to adjust the magnification level of the floor plan. Tap restore to resize the floor plan to the default display size on the kiosk. The Refresh button updates the floor plan and changes the kiosk view to display the default function tab, that is, the Recent Activities tab. This tab is refreshed to show the updated data.
•![]() Function Tabs—These tabs allow you to perform various tasks using the kiosk. When you tap a tab, the pane above the tab area displays the details for it and provides a filtering option.
Function Tabs—These tabs allow you to perform various tasks using the kiosk. When you tap a tab, the pane above the tab area displays the details for it and provides a filtering option.
Note ![]() The filtering option is available for all the tabs except Search.
The filtering option is available for all the tabs except Search.
–![]() Recent Activities tab—Selected by default, it lists the people who have checked in and checked out on the floor during the last two hours.
Recent Activities tab—Selected by default, it lists the people who have checked in and checked out on the floor during the last two hours.
–![]() Workspaces tab—Highlights the available workspaces in the floor plan and lists the available, occupied, and available soon workspaces.
Workspaces tab—Highlights the available workspaces in the floor plan and lists the available, occupied, and available soon workspaces.
–![]() Offices—Highlights the available office spaces in the floor plan and lists the available, occupied, and available soon office spaces.
Offices—Highlights the available office spaces in the floor plan and lists the available, occupied, and available soon office spaces.
–![]() Conference/TP Rooms tab—Highlights the available conference and TP rooms in the floor plan and lists the available and occupied rooms.
Conference/TP Rooms tab—Highlights the available conference and TP rooms in the floor plan and lists the available and occupied rooms.
–![]() People tab—Lists all of the people who have checked in on the current floor.
People tab—Lists all of the people who have checked in on the current floor.
–![]() Neighborhoods tab—Lists the different neighborhoods/zones of a floor. The workspaces in each zone are displayed in a different color in the floor plan.
Neighborhoods tab—Lists the different neighborhoods/zones of a floor. The workspaces in each zone are displayed in a different color in the floor plan.
–![]() News—Displays the latest news and top headlines that are relevant to the geographical region the user is located in. You can tap a headline listed to read the entire article, while remaining within the application.
News—Displays the latest news and top headlines that are relevant to the geographical region the user is located in. You can tap a headline listed to read the entire article, while remaining within the application.
–![]() Search—Allows you to search for buildings, people, workspaces, and conference/TP rooms anywhere in the enterprise.
Search—Allows you to search for buildings, people, workspaces, and conference/TP rooms anywhere in the enterprise.
•![]() Tab Details—The interface for the selected function tab is displayed above the tab area. This area lists the information related to the tab and allows you to perform the tasks for the tab.
Tab Details—The interface for the selected function tab is displayed above the tab area. This area lists the information related to the tab and allows you to perform the tasks for the tab.
Smart+Connected Spaces Web Portal
The Smart+Connected Spaces web portal has an interface and functionality similar to the Smart+Connected Spaces kiosks. To access the portal you need to login using your employee ID or user ID, as configured by the administrator. The login password is your active directory or LDAP password.
The portal allows you to book conference/TP rooms, check into workspaces, use the search and filtering features, and so on, in a manner similar to the kiosks. In addition to these features, the following options are available in the web portal:
•![]() Locate Button—Loads the plan for the floor where you have checked in and displays the dialog box that indicates your location on the floor plan. The dialog box also provides information about you.
Locate Button—Loads the plan for the floor where you have checked in and displays the dialog box that indicates your location on the floor plan. The dialog box also provides information about you.
•![]() Check-in Location—The building, floor, and name of the workspace you have checked into.
Check-in Location—The building, floor, and name of the workspace you have checked into.
•![]() Do not publish my location option—This option is available only if it is configured by the administrator. If you choose not to publish your details, the workspace you check into is shown as occupied but your details are not displayed. Also, your location is not shown:
Do not publish my location option—This option is available only if it is configured by the administrator. If you choose not to publish your details, the workspace you check into is shown as occupied but your details are not displayed. Also, your location is not shown:
–![]() When someone searches for you
When someone searches for you
–![]() In the Recent Activities list
In the Recent Activities list
–![]() In the People list
In the People list
•![]() Check-out Button—Allows you to check out at any point of time from the workspace that you are checked into.
Check-out Button—Allows you to check out at any point of time from the workspace that you are checked into.
Note ![]() You can access these options from the drop-down list that appears when you click the arrow button located on the top-right corner of the page, beside your name. Additionally, the check-in/check-out button are also available when you click a workspace on the floor plan.
You can access these options from the drop-down list that appears when you click the arrow button located on the top-right corner of the page, beside your name. Additionally, the check-in/check-out button are also available when you click a workspace on the floor plan.
 Feedback