VPN Service Adapter (VSA) Installation and Configuration Guide
Bias-Free Language
The documentation set for this product strives to use bias-free language. For the purposes of this documentation set, bias-free is defined as language that does not imply discrimination based on age, disability, gender, racial identity, ethnic identity, sexual orientation, socioeconomic status, and intersectionality. Exceptions may be present in the documentation due to language that is hardcoded in the user interfaces of the product software, language used based on RFP documentation, or language that is used by a referenced third-party product. Learn more about how Cisco is using Inclusive Language.
- Updated:
- August 3, 2007
Chapter: Configuring the Service Adapter
- Overview
- Configuration Tasks
Configuring the VSA
This chapter contains the information and procedures needed to configure the C7200-VSA (VPN Services Adapter). This chapter contains the following sections:
•![]() Basic IPSec Configuration Illustration
Basic IPSec Configuration Illustration
•![]() Monitoring and Maintaining the VSA
Monitoring and Maintaining the VSA
Overview
The VSA in the I/O controller slot provides encryption services for the I/O controller port in the Cisco 7204VXR or Cisco 7206VXR router with a NPE-G2 processor. If you have previously configured IPSec on the router and you install a VSA, the VSA automatically performs encryption services.

Note ![]() The Cisco 7204VXR and the 7206VXR routers support a single VSA.
The Cisco 7204VXR and the 7206VXR routers support a single VSA.
There are no interfaces to configure on the VSA.
This section only contains basic configuration information for enabling encryption and IPSec tunneling services. Refer to the "IP Security and Encryption" part of the Security Configuration Guide and the Security Command Reference guide for detailed configuration information on IPSec, IKE, and CA.
Configuration Tasks
On power up, the VSA is fully functional and does not require any configuration commands. However, for the VSA to provide encryption services, you must complete the steps in the following sections:
•![]() Using the EXEC Command Interpreter (required)
Using the EXEC Command Interpreter (required)
•![]() Configuring an IKE Policy (required)
Configuring an IKE Policy (required)
•![]() Configuring a Transform Set (required)
Configuring a Transform Set (required)
•![]() Configuring IPSec (required)
Configuring IPSec (required)
•![]() Disabling VSA (Optional) (optional)
Disabling VSA (Optional) (optional)
•![]() Verifying IKE and IPSec Configurations (optional)
Verifying IKE and IPSec Configurations (optional)
•![]() Configuring IPSec Configuration Example (optional)
Configuring IPSec Configuration Example (optional)
Note ![]() You can configure a static crypto map, create a dynamic crypto map, or add a dynamic crypto map into a static crypto map. Refer to the configuration examples and tech notes located online at: http://www.cisco.com/en/US/products/sw/secursw/ps2308/prod_configuration_examples_list.html.
You can configure a static crypto map, create a dynamic crypto map, or add a dynamic crypto map into a static crypto map. Refer to the configuration examples and tech notes located online at: http://www.cisco.com/en/US/products/sw/secursw/ps2308/prod_configuration_examples_list.html.
Optionally, you can configure certification authority (CA) interoperability (refer to the "Configuring Certification Authority Interoperability" chapter in the Security Configuration Guide).
Using the EXEC Command Interpreter
You modify the configuration of your router through the software command interpreter called the EXEC (also called enable mode). You must enter the privileged level of the EXEC command interpreter with the enable command before you can use the configure command to configure a new interface or change the existing configuration of an interface. The system prompts you for a password if one has been set.
The system prompt for the privileged level ends with a pound sign (#) instead of an angle bracket (>). At the console terminal, use the following procedure to enter the privileged level:
Step 1 ![]() At the user-level EXEC prompt, enter the enable command. The EXEC prompts you for a privileged-level password as follows:
At the user-level EXEC prompt, enter the enable command. The EXEC prompts you for a privileged-level password as follows:
Router> enable
Password:
Step 2 ![]() Enter the password (the password is case sensitive). For security purposes, the password is not displayed.
Enter the password (the password is case sensitive). For security purposes, the password is not displayed.
When you enter the correct password, the system displays the privileged-level system prompt (#):
Router#
This completes the procedure for entering the privileged level of the EXEC command interpreter.
Configuring an IKE Policy
If you do not specify a value for a parameter, the default value is assigned. For information on default values, refer to the "IP Security and Encryption" chapter of the Security Command Reference publication.
To configure an IKE policy, use the following commands beginning in global configuration mode:
For detailed information on creating IKE policies, refer to the "Configuring Internet Key Exchange Security Protocol" chapter in the Security Configuration Guide publication.
Disabling VSA (Optional)
The VSA is enabled by default.
To disable the VSA, use the following commands, starting in global configuration mode:
This completes the procedure for disabling and preparing to enable VSA after the next system reboot.
Configuring a Transform Set
See the Advanced Encryption Standard (AES) feature module for more information on configuring a transform set.
This section includes the following topics:
•![]() Selecting Appropriate Transforms
Selecting Appropriate Transforms
•![]() The Crypto Transform Configuration Mode
The Crypto Transform Configuration Mode
A transform set is an acceptable combination of security protocols, algorithms, and other settings to apply to IPSec protected traffic. During the IPSec security association (SA) negotiation, the peers agree to use a particular transform set when protecting a particular data flow.
Defining a Transform Set
A transform set is a combination of security protocols and algorithms. During the IPSec security association negotiation, peers agree to use a specific transform set to protect a particular data flow.
To define a transform set, use the following commands, starting in global configuration mode:
Note ![]() The clear commands in Step 4 below are in EXEC or enable mode (see "Using the EXEC Command Interpreter" section for more details).
The clear commands in Step 4 below are in EXEC or enable mode (see "Using the EXEC Command Interpreter" section for more details).
|
|
|
|
|---|---|---|
Step 1 |
Router(config)# crypto ipsec transform-set transform-set-name transform1 [transform2 [transform3]] |
Defines a transform set and enters crypto transform configuration mode. • • |
Step 2 |
Router(cfg-crypto-tran)# mode [tunnel | transport] |
(Optional) Changes the mode associated with the transform set. The mode setting is only applicable to traffic whose source and destination addresses are the IPSec peer addresses; it is ignored for all other traffic. (All other traffic is in tunnel mode only.) |
Step 3 |
end |
Exits the crypto transform configuration mode to enabled mode. |
Step 4 |
Router# clear crypto sa |
Clears existing IPSec security associations so that any changes to a transform set take effect on subsequently established security associations (SAs). (Manually established SAs are reestablished immediately.) Using the clear crypto sa command without parameters clears out the full SA database, which clears out active security sessions. You may also specify the peer, map, or spi keywords to clear out only a subset of the SA database. |
Table 4-1shows allowed transform combinations for the AH and ESP protocols.
Examples of acceptable transform combinations are as follows:
•![]() ah-md5-hmac
ah-md5-hmac
•![]() esp-des
esp-des
•![]() esp-3des and esp-md5-hmac
esp-3des and esp-md5-hmac
•![]() ah-sha-hmac and esp-des and esp-sha-hmac
ah-sha-hmac and esp-des and esp-sha-hmac
The parser will prevent you from entering invalid combinations; for example, once you specify an AH transform it will not allow you to specify another AH transform for the current transform set.
IPSec Protocols: AH and ESP
Both the AH and ESP protocols implement security services for IPSec.
AH provides data authentication and antireplay services.
ESP provides packet encryption and optional data authentication and antireplay services.
ESP encapsulates the protected data—either a full IP datagram (or only the payload)—with an ESP header and an ESP trailer. AH is embedded in the protected data; it inserts an AH header immediately after the outer IP header and before the inner IP datagram or payload. Traffic that originates and terminates at the IPSec peers can be sent in either tunnel or transport mode; all other traffic is sent in tunnel mode. Tunnel mode encapsulates and protects a full IP datagram, while transport mode encapsulates/protects the payload of an IP datagram. For more information about modes, refer to the mode (IPSec) command description.
Selecting Appropriate Transforms
The following tips may help you select transforms that are appropriate for your situation:
•![]() If you want to provide data confidentiality, include an ESP encryption transform.
If you want to provide data confidentiality, include an ESP encryption transform.
•![]() If you want to ensure data authentication for the outer IP header as well as the data, include an AH transform. (Some consider the benefits of outer IP header data integrity to be debatable.)
If you want to ensure data authentication for the outer IP header as well as the data, include an AH transform. (Some consider the benefits of outer IP header data integrity to be debatable.)
•![]() If you use an ESP encryption transform, also consider including an ESP authentication transform or an AH transform to provide authentication services for the transform set.
If you use an ESP encryption transform, also consider including an ESP authentication transform or an AH transform to provide authentication services for the transform set.
•![]() If you want data authentication (either using ESP or AH) you can choose from the MD5 or SHA (HMAC keyed hash variants) authentication algorithms. The SHA algorithm is generally considered stronger than MD5 but is slightly slower.
If you want data authentication (either using ESP or AH) you can choose from the MD5 or SHA (HMAC keyed hash variants) authentication algorithms. The SHA algorithm is generally considered stronger than MD5 but is slightly slower.
•![]() Note that some transforms might not be supported by the IPSec peer.
Note that some transforms might not be supported by the IPSec peer.
Note ![]() If a user enters an IPSec transform that the hardware (the IPSec peer) does not support, a warning message will be displayed immediately after the crypto ipsec transform-set command is entered.
If a user enters an IPSec transform that the hardware (the IPSec peer) does not support, a warning message will be displayed immediately after the crypto ipsec transform-set command is entered.
•![]() In cases where you need to specify an encryption transform but do not actually encrypt packets, you can use the esp-null transform.
In cases where you need to specify an encryption transform but do not actually encrypt packets, you can use the esp-null transform.
Suggested transform combinations follow:
•![]() esp-aes and esp-sha-hmac
esp-aes and esp-sha-hmac
•![]() ah-sha-hmac and esp-aes and esp-sha-hmac
ah-sha-hmac and esp-aes and esp-sha-hmac
The Crypto Transform Configuration Mode
After you issue the crypto ipsec transform-set command, you are put into the crypto transform configuration mode. While in this mode, you can change the mode to tunnel or transport. (These are optional changes.) After you have made these changes, type exit to return to global configuration mode. For more information about these optional changes, refer to the match address (IPSec) and mode (IPSec) command descriptions.
Changing Existing Transforms
If one or more transforms are specified in the crypto ipsec transform-set command for an existing transform set, the specified transforms will replace the existing transforms for that transform set.
If you change a transform set definition, the change is only applied to crypto map entries that reference the transform set. The change will not be applied to existing SAs, but will be used in subsequent negotiations to establish new SAs. If you want the new settings to take effect sooner, you can clear all or part of the SA database by using the clear crypto sa command.
Transform Example
The following example defines two transform sets. The first transform set will be used with an IPSec peer that supports the newer ESP and AH protocols. The second transform set will be used with an IPSec peer that only supports the older transforms.
crypto ipsec transform-set newer esp-3des esp-sha-hmac
crypto ipsec transform-set older ah-rfc-1828 esp-rfc1829
Configuring IPSec
This section includes the following topics:
•![]() Ensuring That Access Lists Are Compatible with IPSec (required)
Ensuring That Access Lists Are Compatible with IPSec (required)
•![]() Setting Global Lifetimes for IPSec Security Associations (required)
Setting Global Lifetimes for IPSec Security Associations (required)
•![]() Creating Crypto Access Lists (required)
Creating Crypto Access Lists (required)
•![]() Creating Crypto Map Entries (required)
Creating Crypto Map Entries (required)
•![]() Creating Dynamic Crypto Maps (required)
Creating Dynamic Crypto Maps (required)
•![]() Applying Crypto Map Sets to Interfaces (required)
Applying Crypto Map Sets to Interfaces (required)
•![]() Verifying the Configuration (optional)
Verifying the Configuration (optional)
For IPSec configuration examples, refer to the "Configuring IPSec Configuration Example" section.
See the "Configuring IPSec Network Security" of the Cisco IOS Security Configuration Guide for more information on configuring IPSec.
Ensuring That Access Lists Are Compatible with IPSec
IKE uses UDP port 500. The IPSec Encapsulating Security Payload (ESP) and Authentication Header (AH) protocols use protocol numbers 50 and 51. Ensure that your interface access lists are configured so that protocol numbers 50, 51, and UDP port 500 traffic are not blocked at interfaces used by IPSec. In some cases you might need to add a statement to your access lists to explicitly permit this traffic.
Setting Global Lifetimes for IPSec Security Associations
You can change the global lifetime values which are used when negotiating new IPSec security associations. (These global lifetime values can be overridden for a particular crypto map entry).
These lifetimes only apply to security associations established via IKE. Manually established security associations do not expire.
To change a global lifetime for IPSec security associations, use one or more of the following commands:
Note ![]() The clear commands in Step 5 below are in EXEC or enable mode (see "Using the EXEC Command Interpreter" section for more details).
The clear commands in Step 5 below are in EXEC or enable mode (see "Using the EXEC Command Interpreter" section for more details).
Creating Crypto Access Lists
Crypto access lists define which IP traffic will be protected by encryption. (These access lists are not the same as regular access lists, which determine what traffic to forward or block at an interface.) For example, access lists can be created to protect all IP traffic between Subnet A and Subnet Y or Telnet traffic between Host A and Host B.
To create crypto access lists, use the following command in global configuration mode:
|
|
|
|
|---|---|---|
Step 1 |
Router(config)# access-list access-list-number {deny | permit} protocol source source-wildcard destination destination-wildcard [log] or Router(config)# ip access-list extended name |
Specifies conditions to determine which IP packets will be protected.1 (Enable or disable crypto for traffic that matches these conditions.) We recommend that you configure "mirror image" crypto access lists for use by IPSec and that you avoid using the any keyword. |
Step 2 |
Add permit and deny statements as appropriate. |
Adds permit or deny statements to access lists. |
Step 3 |
End |
Exits the configuration command mode. |
1 You specify conditions using an IP access list designated by either a number or a name. The access-list command designates a numbered extended access list; the ip access-list extended command designates a named access list. |
For detailed information on configuring access lists, refer to the "Configuring IPSec Network Security" chapter in the Security Configuration Guide publication.
Creating Crypto Map Entries
You can apply only one crypto map set to a single interface. The crypto map set can include a combination of IPSec/IKE and IPSec/manual entries. Multiple interfaces can share the same crypto map set if you want to apply the same policy to multiple interfaces.
To create crypto map entries that do not use IKE to establish the security associations, use the following commands, starting in global configuration mode:
To create crypto map entries that will use IKE to establish the security associations, use the following commands starting in global configuration mode:
Creating Dynamic Crypto Maps
A dynamic crypto map entry is a crypto map entry with some parameters not configured.The missing parameters are later dynamically configured (as the result of an IPSec negotiation). Dynamic crypto maps are only available for use by IKE.
Dynamic crypto map entries are grouped into sets. A set is a group of dynamic crypto map entries all with the same dynamic-map-name, each with a different dynamic-seq-num.
To create a dynamic crypto map entry, use the following commands starting in global configuration mode:
To add a dynamic crypto map set into a crypto map set, use the following command in global configuration mode:
|
|
|
|---|---|
Router(config)# crypto map map-name seq-num ipsec-isakmp dynamic dynamic-map-name |
Adds a dynamic crypto map set to a static crypto map set. |
Applying Crypto Map Sets to Interfaces
Apply a crypto map set to each interface through which IPSec traffic will flow. Crypto maps instruct the router to evaluate the interface traffic against the crypto map set and use the specified policy during connection or security association negotiation on behalf of traffic to be protected by crypto.
To apply a crypto map set to an interface, use the following command in interface configuration mode:
|
|
|
|---|---|
Router(config-if)# crypto map map-name |
Applies a crypto map set to an interface. |
To specify redundant interfaces and name an identifying interface, use the following command in global configuration mode:
|
|
|
|---|---|
Router(config)# crypto map map-name local-address interface-id |
Permits redundant interfaces to share the same crypto map, using the same local identity. |
Monitoring and Maintaining IPSec
To clear (and reinitialize) IPSec security associations, use one of the following commands in EXEC or enable mode (see "Using the EXEC Command Interpreter" section for more details):
To view information about your IPSec configuration, use one or more of the following commands in EXEC mode:
Verifying IKE and IPSec Configurations
To view information about your IPSec configurations, use the show crypto ipsec transform-set EXEC command.
Note ![]() If a user enters an IPSec transform that the hardware (the IPSec peer) does not support, a warning message will be displayed in the show crypto ipsec transform-set command output.
If a user enters an IPSec transform that the hardware (the IPSec peer) does not support, a warning message will be displayed in the show crypto ipsec transform-set command output.
The following sample output from the show crypto ipsec transform-set command displays a warning message after a user tries to configure an IPSec transform that the hardware does not support:
Router# show crypto ipsec transform-set
Transform set transform-1:{esp-256-aes esp-md5-hmac}
will negotiate = {Tunnel, },
WARNING:encryption hardware does not support transform
esp-aes 256 within IPSec transform transform-1
To view information about your IKE configurations, use show crypto isakmp policy EXEC command.
Note ![]() If a user enters an IKE encryption method that the hardware does not support, a warning message will be displayed in the show crypto isakmp policy output.
If a user enters an IKE encryption method that the hardware does not support, a warning message will be displayed in the show crypto isakmp policy output.
The following sample output from the show crypto isakmp policy command displays a warning message after a user tries to configure an IKE encryption method that the hardware does not support:
Router# show crypto isakmp policy
Protection suite of priority 1
encryption algorithm: AES - Advanced Encryption Standard (256 bit keys).
WARNING:encryption hardware does not support the configured
encryption method for ISAKMP policy 1
hash algorithm: Secure Hash Standard
authentication method: Pre-Shared Key
Diffie-Hellman group: #1 (768 bit)
lifetime: 3600 seconds, no volume limit
Verifying the Configuration
Some configuration changes take effect only after subsequent security associations are negotiated. For the new settings to take effect immediately, clear the existing security associations.
To clear (and reinitialize) IPSec security associations, use one of the commands in Table 4-2 in EXEC or enable mode (see "Using the EXEC Command Interpreter" section for more details):
The following steps provide information on verifying your configurations:
Step 1 ![]() Enter the show crypto ipsec transform-set command to view your transform set configuration:
Enter the show crypto ipsec transform-set command to view your transform set configuration:
Router# show crypto ipsec transform-set
Transform set combined-des-md5: {esp-des esp-md5-hmac}
will negotiate = {Tunnel,},
Transform set t1: {esp-des esp-md5-hmac}
will negotiate = {Tunnel,},
Transform set t100: {ah-sha-hmac}
will negotiate = {Transport,},
Transform set t2: {ah-sha-hmac}
will negotiate = {Tunnel,},
{esp-des}
will negotiate = {Tunnel,},
Step 2 ![]() Enter the show crypto map [interface interface | tag map-name] command to view your crypto map configuration:
Enter the show crypto map [interface interface | tag map-name] command to view your crypto map configuration:
Router# show crypto map
Crypto Map: "router-alice" idb: Ethernet0 local address: 172.21.114.123
Crypto Map "router-alice" 10 ipsec-isakmp
Peer = 172.21.114.67
Extended IP access list 141
access-list 141 permit ip
source: addr = 172.21.114.123/0.0.0.0
dest: addr = 172.21.114.67/0.0.0.0
Current peer: 172.21.114.67
Security-association lifetime: 4608000 kilobytes/120 seconds
PFS (Y/N): N
Transform sets={t1,}
Step 3 ![]() Enter the show crypto ipsec sa [map map-name | address | identity | detail | interface] command to view information about IPSec security associations:
Enter the show crypto ipsec sa [map map-name | address | identity | detail | interface] command to view information about IPSec security associations:
Router# show crypto ipsec sa
interface: Ethernet0
Crypto map tag: router-alice, local addr. 172.21.114.123
local ident (addr/mask/prot/port): (172.21.114.123/255.255.255.255/0/0)
remote ident (addr/mask/prot/port): (172.21.114.67/255.255.255.255/0/0)
current_peer: 172.21.114.67
PERMIT, flags={origin_is_acl,}
#pkts encaps: 10, #pkts encrypt: 10, #pkts digest 10
#pkts decaps: 10, #pkts decrypt: 10, #pkts verify 10
#send errors 10, #recv errors 0
local crypto endpt.: 172.21.114.123, remote crypto endpt.: 172.21.114.67
path mtu 1500, media mtu 1500
current outbound spi: 20890A6F
inbound esp sas:
spi: 0x257A1039(628756537)
transform: esp-des esp-md5-hmac,
in use settings ={Tunnel,}
slot: 0, conn id: 26, crypto map: router-alice
sa timing: remaining key lifetime (k/sec): (4607999/90)
IV size: 8 bytes
replay detection support: Y
inbound ah sas:
outbound esp sas:
spi: 0x20890A6F(545852015)
transform: esp-des esp-md5-hmac,
in use settings ={Tunnel,}
slot: 0, conn id: 27, crypto map: router-alice
sa timing: remaining key lifetime (k/sec): (4607999/90)
IV size: 8 bytes
replay detection support: Y
outbound ah sas:
interface: Tunnel0
Crypto map tag: router-alice, local addr. 172.21.114.123
local ident (addr/mask/prot/port): (172.21.114.123/255.255.255.255/0/0)
remote ident (addr/mask/prot/port): (172.21.114.67/255.255.255.255/0/0)
current_peer: 172.21.114.67
PERMIT, flags={origin_is_acl,}
#pkts encaps: 10, #pkts encrypt: 10, #pkts digest 10
#pkts decaps: 10, #pkts decrypt: 10, #pkts verify 10
#send errors 10, #recv errors 0
local crypto endpt.: 172.21.114.123, remote crypto endpt.: 172.21.114.67
path mtu 1500, media mtu 1500
current outbound spi: 20890A6F
inbound esp sas:
spi: 0x257A1039(628756537)
transform: esp-des esp-md5-hmac,
in use settings ={Tunnel,}
slot: 0, conn id: 26, crypto map: router-alice
sa timing: remaining key lifetime (k/sec): (4607999/90)
IV size: 8 bytes
replay detection support: Y
inbound ah sas:
outbound esp sas:
spi: 0x20890A6F(545852015)
transform: esp-des esp-md5-hmac,
in use settings ={Tunnel,}
slot: 0, conn id: 27, crypto map: router-alice
sa timing: remaining key lifetime (k/sec): (4607999/90)
IV size: 8 bytes
replay detection support: Y
outbound ah sas:
For a detailed description of the information displayed by the show commands, refer to the "IP Security and Encryption" chapter of the Security Command Reference publication.
Configuration Examples
This section provides the following configuration examples:
•![]() Configuring IKE Policies Example
Configuring IKE Policies Example
•![]() Configuring IPSec Configuration Example
Configuring IPSec Configuration Example
•![]() Basic IPSec Configuration Illustration
Basic IPSec Configuration Illustration
Configuring IKE Policies Example
In the following example, two IKE policies are created, with policy 15 as the highest priority, policy 20 as the next priority, and the existing default priority as the lowest priority. It also creates a preshared key to be used with policy 20 with the remote peer whose IP address is 192.168.224.33.
crypto isakmp policy 15
encryption 3des
hash md5
authentication rsa-sig
group 2
lifetime 5000
crypto isakmp policy 20
authentication pre-share
lifetime 10000
crypto isakmp key 1234567890 address 192.168.224.33
Configuring IPSec Configuration Example
The following example shows a minimal IPSec configuration where the security associations will be established via IKE:
An IPSec access list defines which traffic to protect:
access-list 101 permit ip 10.0.0.0 0.0.0.255 10.2.2.0 0.0.0.255
A transform set defines how the traffic will be protected. In this example, transform set "myset1" uses DES encryption and SHA for data packet authentication:
crypto ipsec transform-set myset1 esp-des esp-sha
Another transform set example is "myset2," which uses Triple DES encryptions and MD5 (HMAC variant) for data packet authentication:
crypto ipsec transform-set myset2 esp-3des esp-md5-hmac
A crypto map joins together the IPSec access list and transform set and specifies where the protected traffic is sent (the remote IPSec peer):
crypto map toRemoteSite 10 ipsec-isakmp
match address 101
set transform-set myset2
set peer 10.2.2.5
The crypto map is applied to an interface:
interface Serial0
ip address 10.0.0.2
crypto map toRemoteSite
Note ![]() In this example, IKE must be enabled.
In this example, IKE must be enabled.
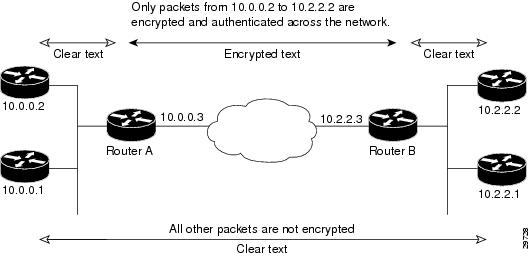
Basic IPSec Configuration Illustration
The following is an example of an IPSec configuration in which the security associations are established through IKE. In this example, an access list is used to restrict the packets that are encrypted and decrypted. In this example, all packets going from IP address 10.0.0.2 to IP address 10.2.2.2 are encrypted and decrypted and all packets going from IP address 10.2.2.2 to IP address 10.0.0.2 are encrypted and decrypted. Also, one IKE policy is created.
Figure 4-1 Basic IPSec Configuration
Router A Configuration
Specify the parameters to be used during an IKE negotiation:
Update to 3DES/AES
crypto isakmp policy 15
encryption des
hash md5
authentication pre-share
group 2
lifetime 5000
crypto isakmp key 1234567890 address 10.2.2.3
crypto isakmp identity address
Note ![]() In the preceding example, the encryption DES of policy 15 would not appear in the written configuration because this is the default value for the encryption algorithm parameter.
In the preceding example, the encryption DES of policy 15 would not appear in the written configuration because this is the default value for the encryption algorithm parameter.
A transform set defines how the traffic will be protected:
crypto ipsec transform-set auth1 ah-md5-hmac esp-des esp-md5-hmac
mode tunnel
Note ![]() In the preceding example, the mode tunnel would not appear in the written configuration because this is the default value for the transform-set.
In the preceding example, the mode tunnel would not appear in the written configuration because this is the default value for the transform-set.
A crypto map joins the transform set and specifies where the protected traffic is sent (the remote IPSec peer):
crypto map toRemoteSite 10 ipsec-isakmp
match address 101
set peer 10.2.2.3
set transform-set auth1
The crypto map is applied to an interface:
interface Serial0
ip address 10.0.0.3
crypto map toRemoteSite
An IPSec access list defines which traffic to protect:
access-list 101 permit ip host 10.0.0.2 host 10.2.2.2
access-list 101 permit ip host 10.0.0.3 host 10.2.2.3
Router B Configuration
Specify the parameters to be used during an IKE negotiation:
crypto isakmp policy 15
encryption des
hash md5
authentication pre-share
group 2
lifetime 5000
crypto isakmp key 1234567890 address 10.0.0.3
crypto isakmp identity address
A transform set defines how the traffic will be protected:
crypto ipsec transform-set auth1 ah-md5-hmac esp-des ah-md5-hmac
mode tunnel
Note ![]() In the preceding example, the parameter "mode tunnel" would not appear in the written configuration because this is the default value for this configuration.
In the preceding example, the parameter "mode tunnel" would not appear in the written configuration because this is the default value for this configuration.
A crypto map joins the transform set and specifies where the protected traffic is sent (the remote IPSec peer):
crypto map toRemoteSite 10 ipsec-isakmp
match address 101
set peer 10.0.0.3
set transform-set auth1
The crypto map is applied to an interface:
interface Serial0
ip address 10.2.2.3
crypto map toRemoteSite
An IPSec access list defines which traffic to protect:
access-list 101 permit ip host 10.2.2.2 host 10.0.0.2
access-list 101 permit ip host 10.2.2.3 host 10.0.0.3
Troubleshooting Tips
To verify that Cisco IOS software has recognized the VSA, enter the show diag command and check the output. In the following example, the IOS software recognizes the C7200-VSA, which is found in slot 0 in the router.
Router# show diag 0
Slot 0:
VSA IPsec Card Port adapter
Port adapter is analyzed
Port adapter insertion time 00:23:25 ago
EEPROM contents at hardware discovery:
PCB Serial Number : PRTA4404055
Product (FRU) Number : C7200-VSA
EEPROM format version 4
EEPROM contents (hex):
0x00: 04 FF C1 8B 50 52 54 41 34 34 30 34 30 35 35 40
0x10: 05 0D CB 94 43 37 32 30 30 2D 56 53 41 20 20 20
0x20: 20 20 20 20 20 20 20 20 D9 03 C1 40 CB FF FF FF
0x30: FF FF FF FF FF FF FF FF FF FF FF FF FF FF FF FF
0x40: FF FF FF FF FF FF FF FF FF FF FF FF FF FF FF FF
0x50: FF FF FF FF FF FF FF FF FF FF FF FF FF FF FF FF
0x60: FF FF FF FF FF FF FF FF FF FF FF FF FF FF FF FF
0x70: FF FF FF FF FF FF FF FF FF FF FF FF FF FF FF FF
To see if the VSA is currently processing crypto packets, enter the show crypto engine accelerator statistic 0 command. The following is sample output:
Router# show crypto engine accelerator statistic 0
Device: VSA
Location: Service Adapter: 0
VSA Traffic Statistics
Inbound rate: 0pps 0kb/s Outbound rate: 0pps 0kb/s
TXR0 PKT: 0x00000000000028B2 Byte: 0x000000000006ACF6 Full: 0x0000000000000000
RXR0 PKT: 0x00000000000028B2 Byte: 0x0000000000A86398
TXR1 PKT: 0x0000000000000000 Byte: 0x0000000000000000 Full: 0x0000000000000000
RXR1 PKT: 0x0000000000000000 Byte: 0x0000000000000000
TXR2 PKT: 0x0000000000000000 Byte: 0x0000000000000000 Full: 0x0000000000000000
RXR2 PKT: 0x0000000000000000 Byte: 0x0000000000000000
Inbound Traffic:
Decrypted PHY I/F:0x0000000000000000 TUNNEL I/F: 0x0000000000000000
SPI Error PHY I/F:0x0000000000000000 TUNNEL I/F: 0x0000000000000000
Pass clear PHY I/F:0x0000000000000000 TUNNEL I/F: 0x0000000000000000
SPD Drop: 0x0000000000000000 IKE Bypass: 0x0000000000000000
Outbound Traffic:
Encry CEF: 0x0000000000000000 FS: 0x0000000000000000 PROC: 0x0000000000000000
Pass CEF: 0x0000000000000000 FS: 0x0000000000000000 PROC: 0x0000000000000000
ICMP Unreachable: 0x0000000000000000 ICMP Unreach Fail: 0x0000000000000000
SPD Drop: 0x0000000000000000
Special Traffic:
VAM mode PKT: 0x0000000000000000 Exception: 0x0000000000000000
N2 Message: : 0x00000000000028B2 Exception: 0x0000000000000000
IP PKT Exception: 0x0000000000000000 DJ Overflow: 0x0000000000000000
RAE Report PKT:: 0x0000000000000000 PKT Consumed: 0x0000000000000000
TCAM WR: 0x0000000000000001 TCAM RD: 0x0000000000000000
SARAM WR: 0x0000000000008422 SARAM RD: 0x0000000000000000
RAE WR: 0x0000000000080000 RAE RD: 0x0000000000000000
Warnings:
N2 interrupt: 0x0000000000000000 Invalid Op: 0x0000000000000000
RX CTX error: 0x0000000000000000 TX CTX low: 0x0000000000000000
PKT CTX Low: 0x0000000000000000 PKT Info Low: 0x0000000000000000
PKT Header Low: 0x0000000000000000 Particle Low: 0x0000000000000000
Missing SOP: 0x0000000000000000 Missing EOP: 0x0000000000000000
TX Drop IB: 0x0000000000000000 TX Drop OB: 0x0000000000000000
MSG Unknown: 0x0000000000000000 MSG too Big: 0x0000000000000000
MSG Empty: 0x0000000000000000 MSG No Buffer: 0x0000000000000000
PKT Info Missing: 0x0000000000000000 IB SB Error: 0x0000000000000000
TX Drop Fastsend: 0x0000000000000000 IDMA Full: 0x0000000000000000
Particle Fallback: 0x0000000000000000 STATISTIC: 0x0000000000000000
Elrond statistic:
TXDMA PKT Count: 0x00000000000028B2 Byte Count: 0x000000000006ACF6
RXDMA PKT Count: 0x00000000000028B2 Byte Count: 0x0000000000A86398
IPPE PKT Count: 0x00000000000028B2 EPPE PKT Count:0x00000000000028B2
PL3TX PKT Count: 0x00000000000028B2 Byte Count: 0x000000000009DADE
PL3RX PKT Count: 0x00000000000028B2 Byte Count: 0x0000000000A86398
CAM search IPPE: 0x0000000000000000 EPPE: 0x0000000000000000
SARAM Req IPPE: 0x0000000000000000 EPPE: 0x0000000000000000
RAE Frag Req IPPE: 0x0000000000000000 EPPE: 0x0000000000000000
RAE ReAssembly: 0x0000000000000000 Re-Ordering: 0x0000000000000000
REA Frag Finished: 0x0000000000000000
Frag Drop Count:
IPPE: 0x0000000000000000 EPPE: 0x0000000000000000
FIFO: 0x0000000000000000 RAE: 0x0000000000000000
VSA RX Exception statistics:
IRH Not valid : 0 Invalid SA : 0
SA configuration error : 0 Enc Dec mismatch : 0
Insufficient Push : 0 Next Header mismatch : 0
Pad mismatch : 0 MAC mismatch : 0
Atomic OP failed : 0 L2 UDD GE 256 : 0
Max BMI Read too small : 0 Max BMI Read No payload : 0
Anti replay failed : 0 Enc Seq num overflow : 0
Dec IPver mismatch : 0 Enc IPver mismatch : 0
TTL Decr : 0 Selector checks : 0
UDP mismatch : 0 Reserved : 0
Soft byte lifetime : 0 hardbyte lifetime : 0
IP Parse error : 0 Fragmentation Error : 0
Unknown Exception : 0
When the VSA processes packets, the "packets in" and "packets out" counter changes. Counter "packets out" represents the number of packets directed to the VSA. Counter "packets in" represents the number of packets received from the VSA.
To see if the IKE/IPSec packets are being redirected to the VSA for IKE negotiation and IPSec encryption and decryption, enter the show crypto eli command. The following is sample output when Cisco IOS software redirects packets to the VSA:
Router# show crypto eli
Hardware Encryption : ACTIVE
Number of hardware crypto engines = 1
CryptoEngine VSA details: state = Active
Capability : DES, 3DES, AES, RSA
IKE-Session : 0 active, 5120 max, 0 failed
DH : 0 active, 5120 max, 0 failed
IPSec-Session : 0 active, 10230 max, 0 failed
When the software crypto engine is active, the show crypto eli command yields no output.
When the Cisco IOS software agrees to redirect crypto traffic to the VSA, it prints a message similar to the following:
%ISA-6-INFO:Recognised crypto engine (0) at slot-0
...switching to hardware crypto engine
To disable the VSA, use the configuration mode no crypto engine accelerator <slot> command, as follows:
Router(config)# no crypto engine accelerator 0
...switching to SW crypto engine
Router(config)#
*Feb  6 11:57:26.763: %VPN_HW-6-INFO_LOC: Crypto engine: slot 0  State changed to:
Disabled
*Feb 6 11:57:26.779: %PA-3-DEACTIVATED: port adapter in bay [0] powered off.
*Feb 6 11:57:26.779: %CRYPTO-6-ISAKMP_ON_OFF: ISAKMP is OFF
Router(config)#end
Monitoring and Maintaining the VSA
This section includes the following topics:
•![]() Using Deny Policies in Access Lists
Using Deny Policies in Access Lists
•![]() Monitor and Maintenance Commands
Monitor and Maintenance Commands
Using Deny Policies in Access Lists
Specifying a deny address range in an access list results in "jump" behavior. When a denied address range is hit, it forces the search to "jump" to the beginning of the access list associated with the next sequence on a crypto map and continue the search. If you want to pass clear traffic on these addresses, you must insert a deny address range for each sequence on a crypto map. In turn, each permit list of addresses inherits all the deny address ranges specified in the access list. A deny address range causes the software to do a subtraction of the deny address range from a permit list, and creates multiple permit address ranges that need to be programmed in hardware. This behavior can cause repeated address ranges to be programmed in the hardware for a single deny address range, resulting in multiple permit address ranges in a single access list.
The crypto ipsec ipv4 deny-policy {jump | clear | drop} command helps you avoid this problem. The clear keyword allows a deny address range to be programmed in hardware, the deny addresses are then filtered out for encryption and decryption. When a deny address is hit, the search is stopped and traffic is allowed to pass in the clear (unencrypted) state. The drop keyword causes traffic to be dropped when a deny address is hit. These two new keywords are used to prevent repeated address ranges from being programmed in the hardware, resulting in more efficient space utilization.
Configuration Guidelines and Restrictions
•![]() The crypto ipsec ipv4 deny-policy {jump | clear | drop} command is a global command that can be applied to a VSA module. The specified keyword (jump, clear, or drop) is propagated to the ACE software of the VSA module. The default behavior is jump.
The crypto ipsec ipv4 deny-policy {jump | clear | drop} command is a global command that can be applied to a VSA module. The specified keyword (jump, clear, or drop) is propagated to the ACE software of the VSA module. The default behavior is jump.
•![]() If you apply the specified keyword (jump, clear, or drop) when crypto maps are already configured on the VSA module, all existing IPSec sessions are temporarily removed and restarted which impacts traffic on your network.
If you apply the specified keyword (jump, clear, or drop) when crypto maps are already configured on the VSA module, all existing IPSec sessions are temporarily removed and restarted which impacts traffic on your network.
•![]() The number of deny entries that can be specified in an access list are dependent on the keyword specified:
The number of deny entries that can be specified in an access list are dependent on the keyword specified:
–![]() jump—Supports up to 8 deny entries in an access list
jump—Supports up to 8 deny entries in an access list
–![]() clear—Supports up to 1000 deny entries in an access list
clear—Supports up to 1000 deny entries in an access list
–![]() drop—Supports up to 1000 deny entries in an access list
drop—Supports up to 1000 deny entries in an access list
Monitor and Maintenance Commands
Use the commands that follow to monitor and maintain the VSA:
 Feedback