About Duo Multi-Factor Authentication
Duo Multi-Factor Authentication (MFA) is a security measure to protect against unauthorized access to digital accounts and systems. It requires users to provide two or more forms of authentication before granting access, typically a combination of something they know (such as a password or PIN) and something they have (such as a smartphone or security token).
You can configure MFA using Cisco Secure Firewall Management Center for remote workers connecting through a remote access VPN headend.
Is this Guide for You?
This use case is intended primarily for network administrators who use the secure firewall management center to configure Duo MFA for remote workers connecting to their organization’s network using remote access VPN.
This document covers the following use cases:
-
Duo MFA using RADIUS as the primary authentication server.
-
Duo MFA using Microsoft Active Directory as primary authentication server.
Scenario
Nik is a network administrator of an organization. Nik is responsible for setting up a remote access VPN for employees connecting to the organization's network from anywhere. For several reasons, a remote work environment can increase the risk of a cyber-attack. Their username and password cannot be the only authentication identifier for accessing the network through VPN as they can be easily compromised.
Therefore, Nik decides to use Duo MFA, which mandates remote workers to provide their username and password, plus additional information, such as a Duo passcode, to access the organization network safely.
Benefits of Using Duo MFA
-
Compliance requirements: Many industries and organizations have compliance requirements that mandate using MFA to protect sensitive data and systems. Duo MFA can help meet these requirements. Duo offers FedRAMP Authorized authentication tailored to meet your security needs for Federal and public sector organizations.
-
Protection against phishing attacks: Duo MFA can help protect against phishing attacks, where attackers steal the login credentials of remote workers. With Duo MFA, the attacker would still need the second factor to gain access even if a user falls for a phishing attack and enters their password.
-
User convenience: Duo MFA can be configured to remember trusted devices, reducing the need for users to enter their second factor every time they log in. This can make the authentication process more convenient for users while maintaining security.
-
Easy to configure: Duo is a cloud-based solution that makes it easy to enroll remote workers and their details on them.
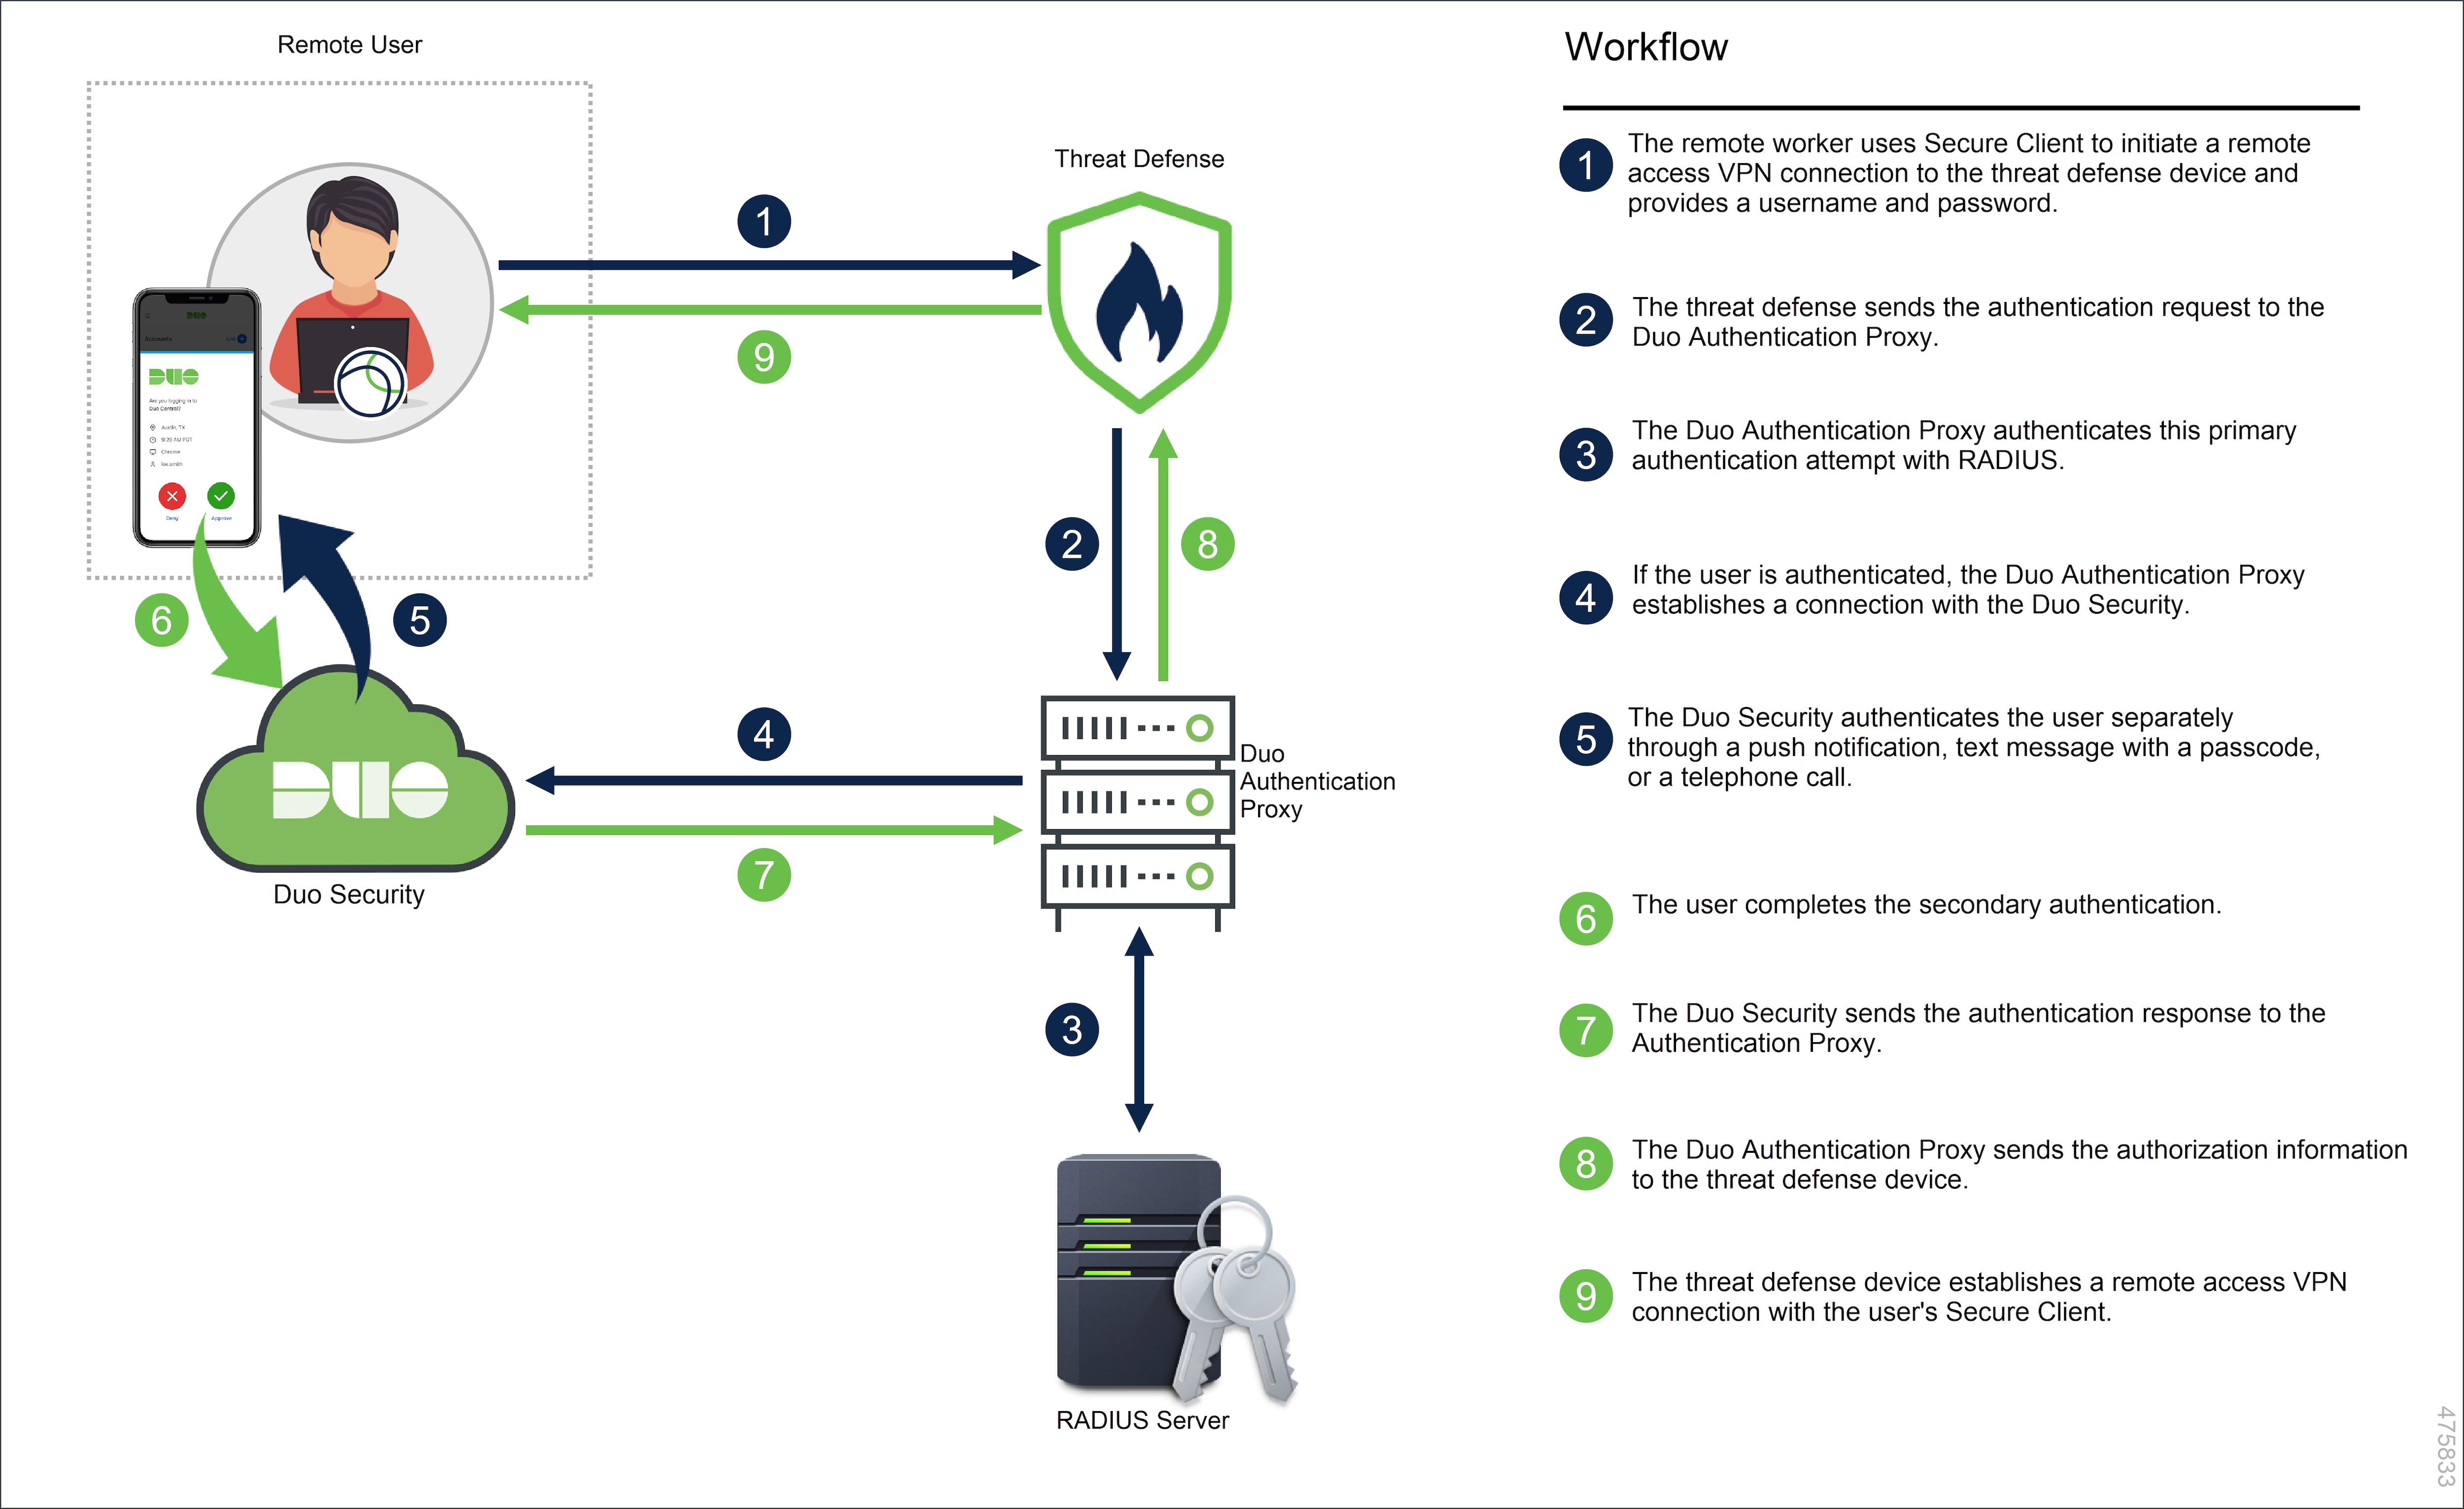
How Does the System Work?
The remote workers must authenticate using their credentials followed by one of the Duo passcode configured – push, phone call, passcode, or sms.
The Duo Multi-factor configuration comprises the following components:
-
Secure Firewall Management Center: This is the on-premise manager for configuring remote access VPN policies and monitoring the live sessions.
-
Secure Firepower Threat Defense: This device creates a VPN tunnel for remote workers to connect to their organization network.
-
Cisco Secure Client: This utility is installed on a remote worker’s device for establishing VPN sessions with the threat defense device.
-
Primary Authentication Server: The primary authentication server is a database that stores user credentials. You can configure the RADIUS or AD server as the primary authentication agent.
-
Duo Authentication Proxy: The Duo Authentication Proxy is an on-premises software service that receives authentication requests from threat defense to perform primary authentication and then contacts Duo for secondary authentication.
End-to-End Procedure
The following illustration shows the tasks to configure Duo MFA for your remote workers.

|
Step |
Application |
Description |
|---|---|---|
|
1 |
Prerequisites |
Configure a fully functional remote access VPN configuration. See Prerequisites. |
|
2 |
Prerequisites |
Install Duo Authentication Proxy. See Prerequisites. |
|
3 |
Prerequisites |
Create a Duo Administrator account. See Prerequisites. |
|
4 |
Duo Admin Panel |
|
|
5 |
Duo Admin Panel |
Create a Duo-protected application to generate integration details. See Create a Duo-protected Application |
|
6 |
Duo Authentication Proxy |
Configure the Duo Authentication Proxy Manager application to modify the “authproxy.cfg” file. See Configure Duo Authentication Proxy. |
|
7 |
Duo Authentication Proxy |
Start the Duo Authentication proxy service. See Configure Duo Authentication Proxy. |
|
8 |
Management Center |
Create a RADIUS Server object. See Create a RADIUS Server Object for Duo. |
|
9 |
Management Center |
Assign the RADIUS Server object to the connection profile. See Assign RADIUS Server Object to Connection Profile using Management Center. |
|
10 |
Management Center |
Deploy the configuration to the device. See Assign RADIUS Server Object to Connection Profile using Management Center. |
Prerequisites
Ensure that you have:
-
Configured remote access VPN on an FMC-managed threat defense device.
-
Installed the Duo Authentication Proxy server on the Windows/Linux host. For more information, see Duo Authentication Proxy Reference.
 Note |
It is recommended to install the Proxy Manager for seamless configuration. |
-
Created a Duo administrator account. See Getting Started with Duo Security.
Note |
Use your new account to log in to the Duo Admin Panel and click Billing to upgrade to any plan you want. |
Add Users in Duo Admin Panel
Procedure
|
Step 1 |
Log in to the Duo Admin Panel. |
|
Step 2 |
Enroll the users of your organization in Duo. See Enroll Users.
|
Create a Duo-protected Application
A Duo-protected application is a service that integrates Duo and secure firewall threat defense remote access VPN.
Procedure
|
Step 1 |
Log in to the Duo Admin Panel. |
|
Step 2 |
Choose . |
|
Step 3 |
Search Cisco Firepower Threat Defense VPN in the applications list and click Protect. 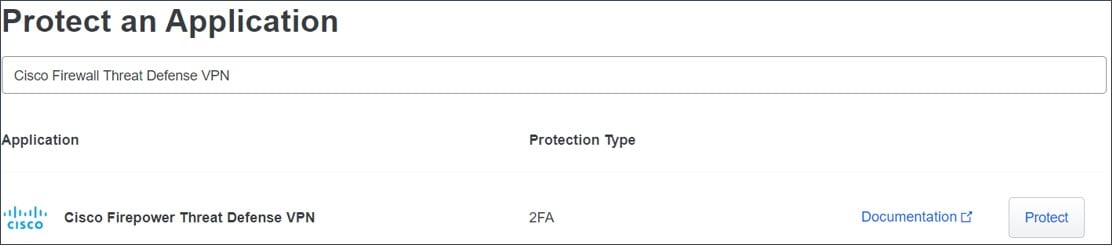
The application generates an Integration key,Secret key, andAPI hostname.You must specify this information to complete your Duo Authentication proxy setup. See Protecting Applications for more information about protecting applications in Duo and additional application options. |
|
Step 4 |
Scroll down the page until you see Save. |
|
Step 5 |
Click Save. |
Configure Duo Authentication Proxy with RADIUS or AD Server Details
You can use either RADIUS or Active Directory to perform the primary authentication.
Procedure
|
Step 1 |
Log in to the host where Duo Authentication Proxy is installed. |
||||||||||||||||||||||||
|
Step 2 |
Open the Duo Authentication Proxy Manager application. It may contain some sample content that can be removed. |
||||||||||||||||||||||||
|
Step 3 |
To use the RADIUS as your primary authenticator, modify the authoproxy.cfg file to the following configuration: 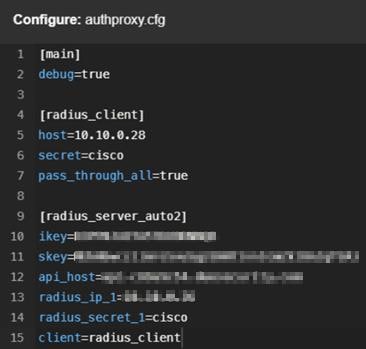
For additional optional configuration, see RADIUS configuration. |
||||||||||||||||||||||||
|
Step 4 |
To use the AD server as your primary authenticator, modify the authoproxy.cfg file to the following configuration: 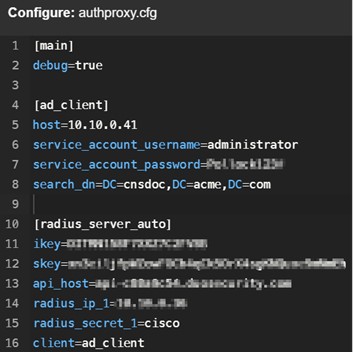
For additional optional configuration, see Active Directory configuration. |
||||||||||||||||||||||||
|
Step 5 |
Click Save. |
||||||||||||||||||||||||
|
Step 6 |
Click the Start Service button at the top of the proxy manager window to start the service. |
||||||||||||||||||||||||
|
Step 7 |
Click Validate to test your configuration. If the window reports any configuration issues, you must read the log file to troubleshoot them. See Troubleshoot Duo Authentication Proxy Configuration. |
Verify Duo Authentication Proxy Configuration
Procedure
|
Step 1 |
Start the PowerShell application on the Windows host. You can execute the same command on a Linux host. |
|
Step 2 |
Execute the invoke-webrequest https://api-host/auth/v2/ping command. Replace api-host with the Duo API hostname generated from the Duo-protected application. If the configuration is correct, you must see a similar response.  |
Create a RADIUS Server Object for Duo
You must create a RADIUS Server object with information about the Windows/Linux machine where the Duo Authentication Proxy is installed. Use this object as the authentication server in the AAA server configuration page.
Procedure
|
Step 1 |
Log in to the management center that manages your threat defense headend. |
||||||||||||
|
Step 2 |
Create a Duo RADIUS server object with Duo proxy server details.
|
Assign RADIUS Server Object to Connection Profile using Management Center
Procedure
|
Step 1 |
On the management center, choose . |
||
|
Step 2 |
Select an existing remote access VPN policy in the list and click the corresponding Edit icon.
|
||
|
Step 3 |
Change the primary authentication method to Duo RADIUS in remote access VPN configuration.
|
||
|
Step 4 |
Deploy the configuration changes. See the Deploy Configuration Changes section in the Configuration Deployment chapter of Cisco Secure Firewall Management Center Device Configuration Guide, X.Y. |
Test Your Connection
Procedure
|
Step 1 |
Launch the Cisco Secure AnyConnect client and select the VPN profile that now uses Duo RADIUS or Active Directory authentication. |
|
Step 2 |
Enter the username and password and click OK. You will receive an automatic passcode, push, sms, or phone call. 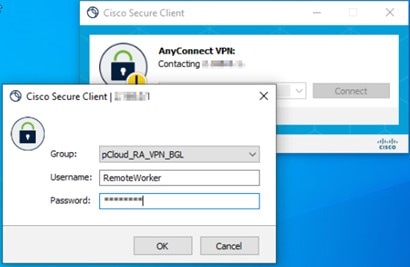
|
|
Step 3 |
Approve the Duo authentication request. The client is connected to the VPN. |
Monitor Remote Access VPN Live Sessions on the Management Center
The management center provides a dashboard to monitor real-time data from active remote access VPN sessions on the devices. You can quickly determine problems related to user sessions and mitigate the problems for your network and users.
On the management center, choose .
The active session appears on the dashboard.

Troubleshoot Duo Authentication Proxy Configuration
Read the log file to resolve configuration issues.
Remote Worker is Unable to Connect to VPN
This section provides some diagnostic steps for remediating the connectivity issue faced by a remote worker.
-
Check whether the Duo Admin Panel is receiving user authentication logs. See View Authentication Log Report in the Duo Admin Panel.
-
Check whether the remote worker is receiving a notification from Duo. See Verify User Configuration with Duo Push.
-
Check whether the threat defense can reach the primary authentication server. See Determine Threat Defense Connectivity with Authentication Server.
Note
View Authentication Log Report in the Duo Admin Panel
The Duo Admin Panel provides a dashboard showing whether the user's MFA authentication has passed or failed. These logs show where and how users authenticate, with usernames, location, time, type of authentication factor, and more.
Procedure
|
Step 1 |
Log in to the Duo Admin Panel. |
|
Step 2 |
Click Dashboard. |
|
Step 3 |
In the Authentication Log section, you can see the authentication logs. 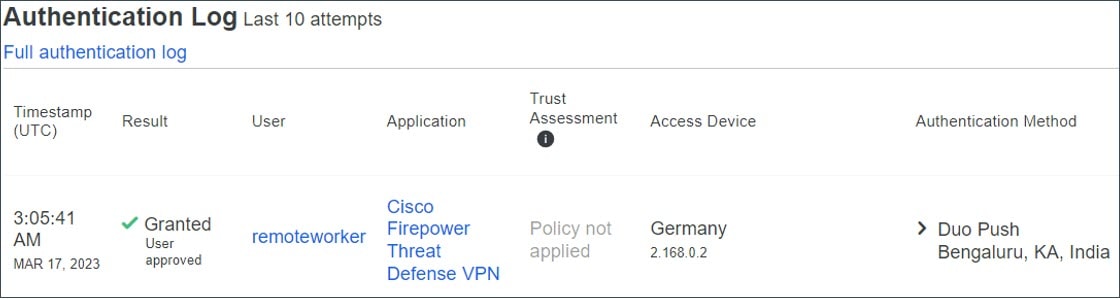
|
Verify User Configuration with Duo Push
You can send a Duo push token to a remote worker’s smartphone from the Duo Admin Panel to verify whether their details are configured correctly.
Procedure
|
Step 1 |
Log in to the Duo Admin Panel. |
|
Step 2 |
Click Users and searchfor the remote worker you want. 
|
|
Step 3 |
Click the user name link to open the user details page. |
|
Step 4 |
If the user has a smartphone attached with Duo Mobile activated, you will see a Send Duo Push link. If you don't see the link, you may need to assist the remote worker with activating their phone for Duo Push. |
|
Step 5 |
Click the Send Duo Push link.  |
|
Step 6 |
Confirm the remote worker can access their device with Duo mobile application and then click Send. The remote worker receives a notification on their smartphone if configured correctly. |
|
Step 7 |
Once the remote worker confirms the request, you will receive a confirmation message. 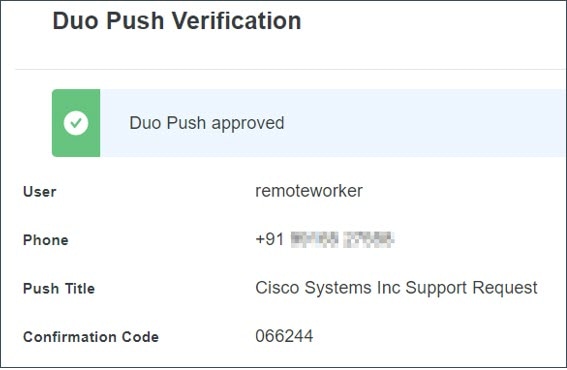 |
Determine Threat Defense Connectivity with Authentication Server
Before you begin
This may occur when the threat defense cannot reach the primary authentication server.
For troubleshooting purposes, create a temporary user account in the authentication server and Duo Admin panel.
Procedure
|
Step 1 |
Log in to the threat defense CLI. |
||||
|
Step 2 |
Execute system support diagnostic-cli. |
||||
|
Step 3 |
Execute show run aaa-server. |
||||
|
Step 4 |
Copy the radius server object name. In this example, “Duo_RADIUS” is the name of the radius server object that contains the host information where the Duo Authentication Proxy is installed. |
||||
|
Step 5 |
Execute test aaa authentication <radius server object name> host <host_ip_address>.
|
||||
|
Step 6 |
Enter the username and password of the temporary user account. |
||||
|
Step 7 |
You will receive a notification. |
||||
|
Step 8 |
If the device can reach the server, the following message appears: INFO: Authentication Successful
|
 Feedback