- Title Page
- Introduction & Preface
- Logging into the FireSIGHT System
- Using Objects and Security Zones
- Managing Devices
- Setting Up an IPS Device
- Setting Up Virtual Switches
- Setting Up Virtual Routers
- Setting Up Aggregate Interfaces
- Setting Up Hybrid Interfaces
- Using Gateway VPNs
- Using NAT Policies
- Getting Started with Access Control Policies
- Blacklisting Using Security Intelligence IP Address Reputation
- Tuning Traffic Flow Using Access Control Rules
- Controlling Traffic with Network-Based Rules
- Controlling Traffic with Reputation-Based Rules
- Controlling Traffic Based on Users
- Controlling Traffic Using Intrusion and File Policies
- Understanding Traffic Decryption
- Getting Started with SSL Policies
- Getting Started with SSL Rules
- Tuning Traffic Decryption Using SSL Rules
- Understanding Intrusion and Network Analysis Policies
- Using Layers in Intrusion and Network Analysis Policies
- Customizing Traffic Preprocessing
- Getting Started with Network Analysis Policies
- Using Application Layer Preprocessors
- Configuring SCADA Preprocessing
- Configuring Transport & Network Layer Preprocessing
- Tuning Preprocessing in Passive Deployments
- Getting Started with Intrusion Policies
- Tuning Intrusion Rules
- Tailoring Intrusion Protection to Your Network Assets
- Detecting Specific Threats
- Limiting Intrusion Event Logging
- Understanding and Writing Intrusion Rules
- Blocking Malware and Prohibited Files
- Logging Connections in Network Traffic
- Working with Connection & Security Intelligence Data
- Analyzing Malware and File Activity
- Working with Intrusion Events
- Handling Incidents
- Configuring External Alerting
- Configuring External Alerting for Intrusion Rules
- Introduction to Network Discovery
- Enhancing Network Discovery
- Configuring Active Scanning
- Using the Network Map
- Using Host Profiles
- Working with Discovery Events
- Configuring Correlation Policies and Rules
- Using the FireSIGHT System as a Compliance Tool
- Creating Traffic Profiles
- Configuring Remediations
- Using Dashboards
- Using the Context Explorer
- Working with Reports
- Understanding and Using Workflows
- Using Custom Tables
- Searching for Events
- Managing Users
- Scheduling Tasks
- Managing System Policies
- Configuring Appliance Settings
- Licensing the FireSIGHT System
- Updating System Software
- Monitoring the System
- Using Health Monitoring
- Auditing the System
- Using Backup and Restore
- Specifying User Preferences
- Importing and Exporting Configurations
- Purging Discovery Data from the Database
- Viewing the Status of Long-Running Tasks
- Command Line Reference
- Security, Internet Access, and Communication Ports
- Third-Party Products
- glossary
FireSIGHT System User Guide Version 5.4.1
Bias-Free Language
The documentation set for this product strives to use bias-free language. For the purposes of this documentation set, bias-free is defined as language that does not imply discrimination based on age, disability, gender, racial identity, ethnic identity, sexual orientation, socioeconomic status, and intersectionality. Exceptions may be present in the documentation due to language that is hardcoded in the user interfaces of the product software, language used based on RFP documentation, or language that is used by a referenced third-party product. Learn more about how Cisco is using Inclusive Language.
- Updated:
- February 23, 2015
Chapter: Using Gateway VPNs
Using Gateway VPNs
A virtual private network (VPN) is a network connection that establishes a secure tunnel between endpoints via a public source, such as the Internet or other network. You can configure the FireSIGHT System to build secure VPN tunnels between the virtual routers of Cisco managed devices. The system builds tunnels using the Internet Protocol Security (IPSec) protocol suite.
Only Cisco managed devices can be used as endpoints in Cisco VPN deployments. Third-party endpoints are not supported.
After the VPN connection is established, the hosts behind the local gateway can connect to the hosts behind the remote gateway through the secure VPN tunnel. A connection consists of the IP addresses and host names of the two gateways, the subnets behind them, and the shared secrets for the two gateways to authenticate to each other.
The VPN endpoints authenticate to each other with either the Internet Key Exchange (IKE) version 1 or version 2 protocol to create a security association for the tunnel. The system uses either the IPSec authentication header (AH) protocol or the IPSec encapsulating security payload (ESP) protocol to authenticate the data entering the tunnel. The ESP protocol encrypts the data as well as providing the same functionality as AH.
If you have access control policies in your deployment, the system does not send VPN traffic until it has passed through access control. In addition, the system does not send tunnel traffic to the public source when the tunnel is down.
To configure and apply VPN deployments, you must have a VPN license enabled on each of your target managed devices. Additionally, VPN features are only available on Series 3 devices.
See the following sections for more information on creating and managing VPN deployments:
Understanding IPSec
The IPSec protocol suite defines how IP packets across a VPN tunnel are hashed, encrypted, and encapsulated in the ESP or AH security protocol. The FireSIGHT System uses the hash algorithm and encryption key of the Security Association (SA), which becomes established between the two gateways by the Internet Key Exchange (IKE) protocol.
Security associations (SA) establish shared security attributes between two devices and allow VPN endpoints to support secure communication. An SA allows two VPN endpoints to handle the parameters for how the VPN tunnel is secured between them.
The system uses the Internet Security Association and Key Management Protocol (ISAKMP) during the initial phase of negotiating the IPSec connection to establish the VPN between endpoints and the authenticated key exchange. The IKE protocol resides within ISAKMP. See Understanding IKE for more information about the IKE protocol.
The AH security protocol provides protection for packet headers and data, but it cannot encrypt them. ESP provides encryption and protection for packets, but it cannot secure the outermost IP header. In many cases, this protection is not required, and most VPN deployments use ESP more frequently than AH because of its encryption capabilities. Since VPN only operates in tunnel mode, the system encrypts and authenticates the entire packet from Layer 3 and up in the ESP protocol. ESP in tunnel mode encrypts the data as well as providing the latter’s encryption capabilities.
Understanding IKE
The FireSIGHT System uses the IKE protocol to mutually authenticate the two gateways against each other as well as to negotiate the SA for the tunnel. The process consists of two phases.
IKE phase 1 establishes a secure authenticated communication channel by using the Diffie-Hellman key exchange to generate a pre-shared key to encrypt further IKE communications. This negotiation results in a bidirectional ISAKMP security association. The system allows you to perform the authentication using a pre-shared key. Phase 1 operates in main mode, which seeks to protect all data during the negotiation, while also protecting the identity of the peers.
During IKE phase 2, the IKE peers use the secure channel established in phase 1 to negotiate security associations on behalf of IPSec. The negotiation results in a minimum of two unidirectional security associations, one inbound and one outbound.
Understanding VPN Deployments
A VPN deployment specifies the endpoints and networks that are included in a VPN and how they connect to each other. After you configure a VPN deployment, you can then apply it to your managed devices or devices managed by another Defense Center.
The system supports three types of VPN deployments: point-to-point, star, and mesh. See the following sections for more information about these VPN deployments:
- Understanding Point-to-Point VPN Deployments
- Understanding Star VPN Deployments
- Understanding Mesh VPN Deployments
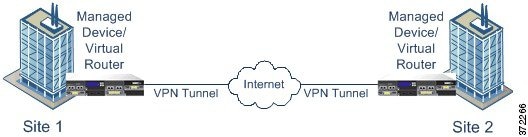
Understanding Point-to-Point VPN Deployments
In a point-to-point VPN deployment, two endpoints communicate directly with each other. You configure the two endpoints as peer devices, and either device can initiate the secured connection. Each of the devices in this configuration must be a VPN-enabled managed device.
The following diagram displays a typical point-to-point VPN deployment.
See Configuring Point-to-Point VPN Deployments for more information.
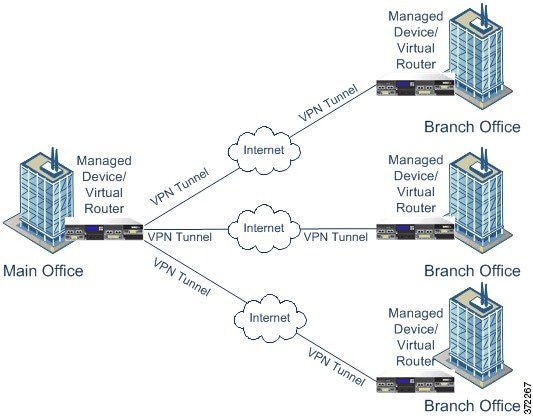
Understanding Star VPN Deployments
In a star VPN deployment, a central endpoint (hub node) establishes a secure connection with multiple remote endpoints (leaf nodes). Each connection between the hub node and an individual leaf node is a separate VPN tunnel. The hosts behind any of the leaf nodes can communicate with each other through the hub node.
Star deployments commonly represent a VPN that connects an organization’s main and branch office locations using secure connections over the Internet or other third-party network. Star VPN deployments provide all employees with controlled access to the organization’s network.
In a typical star deployment, the hub node is located at the main office. Leaf nodes are located at branch offices and initiate most of the traffic. Each of the nodes must be a VPN-enabled managed device.
Note that star deployments only support IKE version 2.
The following diagram displays a typical star VPN deployment.
See Configuring Star VPN Deployments for more information.
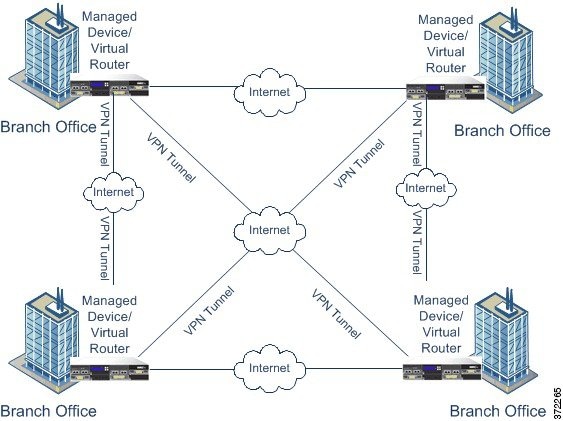
Understanding Mesh VPN Deployments
In a mesh VPN deployment, all endpoints can communicate with every other endpoint by means of an individual VPN tunnel. The mesh deployment offers redundancy so that when one endpoint fails, the remaining endpoints can still communicate with each other. This type of deployment commonly represents a VPN that connects a group of decentralized branch office locations. The number of VPN-enabled managed devices you deploy in this configuration depends on the level of redundancy you require. Each of the endpoints must be a VPN-enabled managed device.
The following diagram displays a typical mesh VPN deployment.
See Configuring Mesh VPN Deployments for more information.
Managing VPN Deployments
On the VPN page ( Devices > VPN ) you can view all of your current VPN deployments by name and the endpoints contained in the deployment. Options on this page allow you to view the status of a VPN deployment, create a new deployment, apply a deployment, and edit or delete a deployment.

Caution If you select the default access control policy when registering a device to your Defense Center, the default access control rule blocks all traffic. If you configure a VPN deployment on the device, the deployment fails.
Note that when you register a device to a Defense Center, applied VPN deployments sync to the Defense Center during registration.
The following table describes the actions you can take to manage your deployments on the VPN page.
click Add . See Configuring VPN Deployments for more information. |
|
click the edit icon ( |
|
click the status icon. See Viewing VPN Deployment Status for more information. |
|
apply a VPN deployment to all devices targeted in the deployment |
click the apply icon ( |
click the delete icon ( |
 ), then click
Yes
, or click
No
if you decide not to delete the deployment.
), then click
Yes
, or click
No
if you decide not to delete the deployment.Configuring VPN Deployments
When you create a new VPN deployment you must, at minimum, give it a unique name, specify a deployment type, and designate a pre-shared key. You can select from three types of deployment, each containing a group of VPN tunnels:
- Point-to-point (PTP) deployments establish a VPN tunnel between two endpoints.
- Star deployments establish a group of VPN tunnels connecting a hub endpoint to a group of leaf endpoints.
- Mesh deployments establish a group of VPN tunnels among a set of endpoints.
Only Cisco managed devices can be used as endpoints in Cisco VPN deployments. Third-party endpoints are not supported.
You must define a pre-shared key for VPN authentication. You can specify a default key to use in all of the VPN connections you generate in a deployment. For point-to-point deployments, you can specify a pre-shared key for each endpoint pair.
See the following sections for more information on creating each type of VPN deployment:
Configuring Point-to-Point VPN Deployments
When configuring a point-to-point VPN deployment, you define a group of endpoint pairs and then create a VPN between the two nodes in each pair. For more information, see Understanding Point-to-Point VPN Deployments.
The following list describes the options you can specify in your deployment.
Give the deployment a unique name.
Click PTP to specify that you are configuring a point-to-point deployment.
Define a unique pre-shared key for authentication. The system uses this key for all the VPNs in your deployment, unless you specify a pre-shared key for each endpoint pair.
You can select a managed device, including a device stack or cluster, as an endpoint for your deployment. For Cisco managed devices not managed by the Defense Center you are using, select Other and then specify an IP address for the endpoint.
If you selected a managed device as your endpoint, select a virtual router that is currently applied to the selected device. You cannot select the same virtual router for more than one endpoint.
If you selected a managed device as your endpoint, select a routed interface that is assigned to the selected virtual router.
– If you selected a managed device as an endpoint, select an IP address that is assigned to the selected routed interface.
– If the managed device is a device cluster, you can only select from a list SFRP IP addresses.
– If you selected a managed device not managed by the Defense Center, specify an IP address for the endpoint.
Specify the networks in your deployment that are encrypted. Enter a subnet with CIDR block for each network. IKE version 1 only supports a single protected network.
Note that VPN endpoints cannot have the same IP address and that protected networks in a VPN endpoint pair cannot overlap. If a list of protected networks for an endpoint contains one or more IPv4 or IPv6 entry, the other endpoint's protected network must have at least one entry of the same type (i.e., IPv4 or IPv6). If it does not, then the other endpoint's IP address must be of the same type and must not overlap with the entries in the protected network. (Use /32 CIDR address blocks for IPv4 and /128 CIDR address blocks for IPv6). If both of these checks fail, the endpoint pair is invalid.
Select the check box if the endpoint resides behind a firewall with network address translation.
If you selected Internal IP , specify a public IP address for the firewall. If the endpoint is a responder, you must specify this value.
If you selected Internal IP , specify a single numerical value from 1 to 65535 for the UDP port on the firewall that is being port-forwarded to the internal endpoint. If the endpoint is a responder and the port on the firewall being forwarded is not 500 or 4500, you must specify this value.
Select the check box to use the pre-shared key defined for the deployment. Clear the check box to specify a pre-shared key for VPN authentication for this endpoint pair.
If you cleared the Use Deployment Key check box, specify a pre-shared key in this field.

Tip To edit an existing point-to-point deployment, click the edit icon ( ) next to the deployment. You cannot edit the deployment type after you initially save the deployment. Two users should not edit the same deployment simultaneously; however, note that the web interface does not prevent simultaneous editing.
To configure a point-to-point VPN deployment:
The Create New VPN Deployment pop-up window appears.
Step 3 Give the deployment a unique Name .
You can use all printable characters, including spaces and special characters.
Step 4 Ensure that PTP is selected as the Type .
Step 5 Give the deployment a unique Pre-shared Key .
Step 6 Next to
Node Pairs
, click the add icon ( ).
).
The Add New Endpoint Pair pop-up window appears.
Step 7 Configure the VPN deployment, as described earlier in this section.
Step 8 Under
Node A
, next to
Protected Networks
, click the add icon (
).
The Add Network pop-up window appears.
Step 9 Type a CIDR block for the protected network.
The protected network is added.
Step 11 Repeat step 8 through step 10 for Node B .
The endpoint pair is added to your deployment and the Create New VPN Deployment pop-up window appears again.
Step 13 Click Save to finish configuring your deployment and the VPN page appears again.
Note that you must apply the deployment for it to take effect; see Applying a VPN Deployment.
Configuring Star VPN Deployments
When configuring a star VPN deployment, you define a single hub node endpoint and a group of leaf node endpoints. You must define the hub node endpoint and at least one leaf node endpoint to configure the deployment. For more information, see Understanding Star VPN Deployments.
The following list describes the options you can specify in your deployment.
Give the deployment a unique name.
Click Star to specify that you are configuring a star deployment.
Define a unique pre-shared key for authentication.
You can select a managed device, including a device stack or cluster, as an endpoint for your deployment. For Cisco managed devices not managed by the Defense Center you are using, select Other and then specify an IP address for the endpoint.
If you selected a managed device as your endpoint, select a virtual router that is currently applied to the selected device. You cannot select the same virtual router for more than one endpoint.
If you selected a managed device as your endpoint, select a routed interface that is assigned to the selected virtual router.
– If you selected a managed device as an endpoint, select an IP address that is assigned to the selected routed interface.
– If the managed device is a device cluster, you can only select from a list SFRP IP addresses.
– If you selected a managed device not managed by the Defense Center, specify an IP address for the endpoint.
Specify the networks in your deployment that are encrypted. Enter a subnet with CIDR block for each network.
Note that VPN endpoints cannot have the same IP address and that protected networks in a VPN endpoint pair cannot overlap. If a list of protected networks for an endpoint contains one or more IPv4 or IPv6 entry, the other endpoint's protected network must have at least one entry of the same type (i.e., IPv4 or IPv6). If it does not, then the other endpoint's IP address must be of the same type and must not overlap with the entries in the protected network. (Use /32 CIDR address blocks for IPv4 and /128 CIDR address blocks for IPv6). If both of these checks fail, the endpoint pair is invalid.
Select the check box if the endpoint resides behind a firewall with network address translation.
If you selected Internal IP , specify a public IP address for the firewall. If the endpoint is a responder, you must specify this value.
If you selected Internal IP , specify a single numerical value from 1 to 65535 for the UDP port on the firewall that is being port-forwarded to the internal endpoint. If the endpoint is a responder and the port on the firewall being forwarded is not 500 or 4500, you must specify this value.
Tip To edit an existing star deployment, click the edit icon () next to the deployment. You cannot edit the deployment type after you initially save the deployment. To change the deployment type, you must delete the deployment and create a new one. Two users should not edit the same deployment simultaneously; however, note that the web interface does not prevent simultaneous editing.
To configure a star deployment:
The Create New VPN Deployment pop-up window appears.
Step 3 Give the deployment a unique Name .
You can use all printable characters, including spaces and special characters.
Step 4 Click Star to specify the Type .
Step 5 Give the deployment a unique Pre-shared Key .
Step 6 Next to
Hub Node
, click the add icon (
).
The Add Hub Node pop-up window appears.
Step 7 Configure the VPN deployment, as described earlier in this section.
Step 8 Next to
Protected Networks
, click the add icon (
).
The Add Network pop-up window appears.
Step 9 Type an IP address for the protected network.
The protected network is added.
The hub node is added to your deployment and the Create New VPN Deployment pop-up window appears again.
Step 12 Next to
Leaf Nodes
, click the add icon (
).
The Add Leaf Node pop-up window appears.
Step 13 Repeat step 7 through step 10 to complete the leaf node, which has the same options as the hub node.
The leaf node is added to your deployment and the Create New VPN Deployment pop-up window appears again.
Step 15 Click Save to finish configuring your deployment and the VPN page appears again.
Note that you must apply the deployment for it to take effect; see Applying a VPN Deployment.
Configuring Mesh VPN Deployments
When configuring a mesh VPN deployment, you define a group of VPNs to link any two points for a given set of endpoints. For more information, see Understanding Mesh VPN Deployments.
The following list describes the options you can specify in your deployment.
Give the deployment a unique name.
Click Mesh to specify that you are configuring a mesh deployment.
Define a unique pre-shared key for authentication.
You can select a managed device, including a device stack or cluster, as an endpoint for your deployment. For Cisco managed devices not managed by the Defense Center you are using, select Other and then specify an IP address for the endpoint.
If you selected a managed device as your endpoint, select a virtual router that is currently applied to the selected device. You cannot select the same virtual router for more than one endpoint.
If you selected a managed device as your endpoint, select a routed interface that is assigned to the selected virtual router.
– If you selected a managed device as an endpoint, select an IP address that is assigned to the selected routed interface.
– If the managed device is a device cluster, you can only select from a list SFRP IP addresses.
– If you selected a managed device not managed by the Defense Center, specify an IP address for the endpoint.
Specify the networks in your deployment that are encrypted. Enter a subnet with CIDR block for each network. IKE version 1 only supports a single protected network.
Note that VPN endpoints cannot have the same IP address and that protected networks in a VPN endpoint pair cannot overlap. If a list of protected networks for an endpoint contains one or more IPv4 or IPv6 entry, the other endpoint's protected network must have at least one entry of the same type (i.e., IPv4 or IPv6). If it does not, then the other endpoint's IP address must be of the same type and must not overlap with the entries in the protected network. (Use /32 CIDR address blocks for IPv4 and /128 CIDR address blocks for IPv6). If both of these checks fail, the endpoint pair is invalid.
Select the check box if the endpoint resides behind a firewall with network address translation.
If you selected Internal IP , specify a public IP address for the firewall. If the endpoint is a responder, you must specify this value.
If you selected Internal IP , specify a single numerical value from 1 to 65535 for the UDP port on the firewall that is being port-forwarded to the internal endpoint. If the endpoint is a responder and the port on the firewall being forwarded is not 500 or 4500, you must specify this value.
Tip To edit an existing mesh deployment, click the edit icon () next to the deployment. You cannot edit the deployment type after you initially save the deployment. To change the deployment type, you must delete the deployment and create a new one. Two users should not edit the same deployment simultaneously; however, note that the web interface does not prevent simultaneous editing.
To configure a mesh VPN deployment:
The Create New VPN Deployment pop-up window appears.
Step 3 Give the deployment a unique Name .
You can use all printable characters, including spaces and special characters.
Step 4 Click Mesh to specify the Type .
Step 5 Give the deployment a unique Pre-shared Key .
Step 6 Next to
Nodes
, click the add icon (
).
The Add Endpoint pop-up window appears.
Step 7 Configure the VPN deployment, as described earlier in this section.
Step 8 Next to
Protected Networks
, click the add icon (
).
The Add Network pop-up window appears.
Step 9 Type a CIDR block for the protected network.
The protected network is added.
The endpoint is added to your deployment and the Create New VPN Deployment pop-up window appears again.
Step 12 Repeat step 6 through step 11 to add more endpoints.
Step 13 Click Save to complete your deployment and the VPN page appears again.
Note that you must apply the deployment for it to take effect; see Applying a VPN Deployment.
Configuring Advanced VPN Deployment Settings
VPN deployments contain some common settings that can be shared among the VPNs in a deployment. Each VPN can use the default settings or you can override the default settings. Advanced settings typically require little or no modification and are not common to every deployment.
The following list describes the advanced options you can specify in your deployment.
Select the check box to enable auto negotiation to an algorithm not listed in the Algorithm list, but proposed by the remote peer.
Specify the phase one and phase two algorithm proposals to secure data in your deployment. Select Cipher , Hash , and Diffie-Hellman ( DH ) group authentication messages for both phases.
Specify a numerical value and select a time unit for the maximum IKE SA renegotiation interval. You can specify a minimum of 15 minutes and a maximum of 30 days.
Select the check box to specify that the system uses IKE version 2. This version supports the star deployment and multiple protected networks.
Specify a numerical value and select a time unit for the maximum SA renegotiation interval. You can specify a minimum of 5 minutes and a maximum of 24 hours.
Specify the number of packets that can be transmitted over an IPsec SA before it expires. You can use any integer between 0 and 18446744073709551615.
Specify the number of bytes that can be transmitted over an IPsec SA before it expires. You can use any integer between 0 and 18446744073709551615.
Select the check box to specify that the system uses the authentication header security protocol for the data to be protected. Clear the check box to use encryption service payload (ESP) protocol. See Understanding IPSec for guidance on when to use each protocol.
To configure advanced VPN deployment settings:
The Create New VPN Deployment pop-up window appears.
Step 3 Click the Advanced tab.
Step 4 Configure the advanced settings, as described earlier in this section.
Step 5 Next to
Algorithms
, click the add icon (
).
The Add IKE Algorithm Proposal pop-up window appears.
Step 6 Select Cipher , Hash , and Diffie-Hellman ( DH ) group authentication messages for both phases.
The IKE algorithm proposal is added.
Your changes are saved and the VPN page appears.
Note that you must apply the deployment for it to take effect; see Applying a VPN Deployment.
Applying a VPN Deployment
After configuring or making any changes to a VPN deployment, you must apply the deployment to one or more devices to implement the settings you designated for the deployment.
Caution Adding or removing a VPN on a Series 3 device restarts the Snort process when you apply your changes, temporarily interrupting traffic inspection. Whether traffic drops during this interruption or passes without further inspection depends on the model of the managed device and how it handles traffic. See How Snort Restarts Affect Traffic for more information.
Step 2 Click the apply icon ( ) next to the VPN deployment that you want to apply.
Step 3 When prompted, click Yes .
The VPN deployment is applied.
Tip Optionally, from the Apply VPN deployment dialog box, click View Changes. The VPN Comparison View page appears in a new browser window. For more information, see Using the VPN Deployment Comparison View.
You are returned to the VPN page.
Viewing VPN Deployment Status
After you configure a VPN deployment, you can view the status of your configured VPN tunnels. The VPN page displays a status icon for each applied VPN deployment:
 ) icon designates that all VPN endpoints are up.
 ) icon designates that all VPN endpoints are down.
 ) icon designates that some endpoints are up, while others are down.
You can click a status icon to view the deployment status along with basic information about the endpoints in the deployment, such as endpoint name and IP address. The VPN status updates every minute or when a status change occurs, such as an endpoint going down or coming up.
Step 2 Click the VPN status icon next to the deployment where you want to view the status.
The VPN Status pop-up window appears.
Step 3 Click OK to return to the VPN page.
Viewing VPN Statistics and Logs
After you configure a VPN deployment, you can view statistics about the data traversing your configured VPN tunnels. In addition, you can view the latest VPN system and IKE logs for each endpoint.
The system displays the following statistics.
The device path to the routed interface and IP address designated as the VPN endpoint.
Whether the VPN connection is up or down.
The protocol used for encryption, either ESP or AH.
The number of packets per interface the VPN tunnel receives during an IPsec SA negotiation.
The number of packets per interface the VPN tunnel transmits during an IPsec SA negotiation.
The number of bytes per interface the VPN tunnel receives during an IPsec SA negotiation.
The number of bytes per interface the VPN tunnel transmits during an IPsec SA negotiation.
The date and time the VPN connection was created.
The last time a user initiated a VPN connection.
If Yes is displayed, at least one of the VPN endpoints resides behind a device with network address translation.
The state of the IKE SA: connecting, established, deleting, or destroying.
The IKE SA event: reauthentication or rekeying.
The time in seconds the next event should occur.
The IKE algorithm being used by the VPN deployment.
The state of the IPSec SA: installing, installed, updating, rekeying, deleting, and destroying.
Notification of when the IPSec SA event is rekeying.
The time in seconds until the next event should occur.
IPSec algorithm being used by the VPN deployment.
Step 2 Click the VPN status icon next to the deployment where you want to view the VPN statistics.
The VPN Status pop-up window appears.
Step 3 Click the view statistics icon ( ).
).
The VPN Statistics pop-up window appears.
Step 4 Optionally, click Refresh to update the VPN statistics.
Step 5 Optionally, click View Recent Log to view the latest data log for each endpoint.
To view the log for clustered devices and stacked devices, you can select the link for either the active/primary or backup/secondary device.
Using the VPN Deployment Comparison View
The VPN deployment comparison view allows you to view the changes you have made to a deployment before you apply them. The report displays all differences between the current deployment and the proposed deployment. This gives you an opportunity to discover any potential configuration errors.
The comparison view displays both deployments in a side-by-side format, with each deployment identified by name in the title bar on the left and right sides of the comparison view. The time of last modification and the last user to modify are displayed with the deployment name.
Differences between the two deployments are highlighted:
- Blue indicates that the highlighted setting is different in the two deployments, and the difference is noted in red text.
- Green indicates that the highlighted setting appears in one deployment but not the other.
You can perform any of the actions in the following table.
 ) centered between the left and right sides moves, and the
Difference
number adjusts to identify which difference you are viewing.
) centered between the left and right sides moves, and the
Difference
number adjusts to identify which difference you are viewing. Feedback