Cisco Secure Firewall Management Center and SecureX Integration Guide
This guide provides instructions to integrate Secure Firewall Management Center (management center) with SecureX.
Is This Guide for You?
This guide is intended for existing Firepower users who are new to the SecureX platform. Use this guide only if you plan to perform a direct integration between the management center-managed Secure Firewall Threat Defense (threat defense) devices (version 6.6.1) and the SecureX platform.
For more information about other integration scenarios, see the Cisco Firepower and SecureX Integration Guide at https://www.cisco.com/c/en/us/td/docs/security/firepower/integrations/SecureX/firepower-and-securex-integration-guide.html.
About Secure Firewall Management Center and SecureX
SecureX is a simplified platform experience, connecting Cisco's integrated security portfolio with your existing infrastructure. It helps you unify visibility, enable automation, and strengthen security across your network, endpoints, cloud, and applications.
SecureX is included with your Cisco security product purchase, and you can view data from all of your threat defense devices in SecureX.
For more information about SecureX, see https://www.cisco.com/c/en/us/products/security/securex/index.html.
About Direct Integration between Secure Firewall Management Center and SecureX
You can configure your management center to allow managed threat defense devices to send supported events directly to the Security Services Exchange (SSE) in the Cisco cloud. Using SSE, you can automatically or manually promote events to appear as incidents in SecureX.
You can also view system status, such as whether your devices are running current software versions.
The direct integration supports the following event types:
-
Intrusion events
-
Security Intelligence connection events
-
File and malware events
How Does It Work
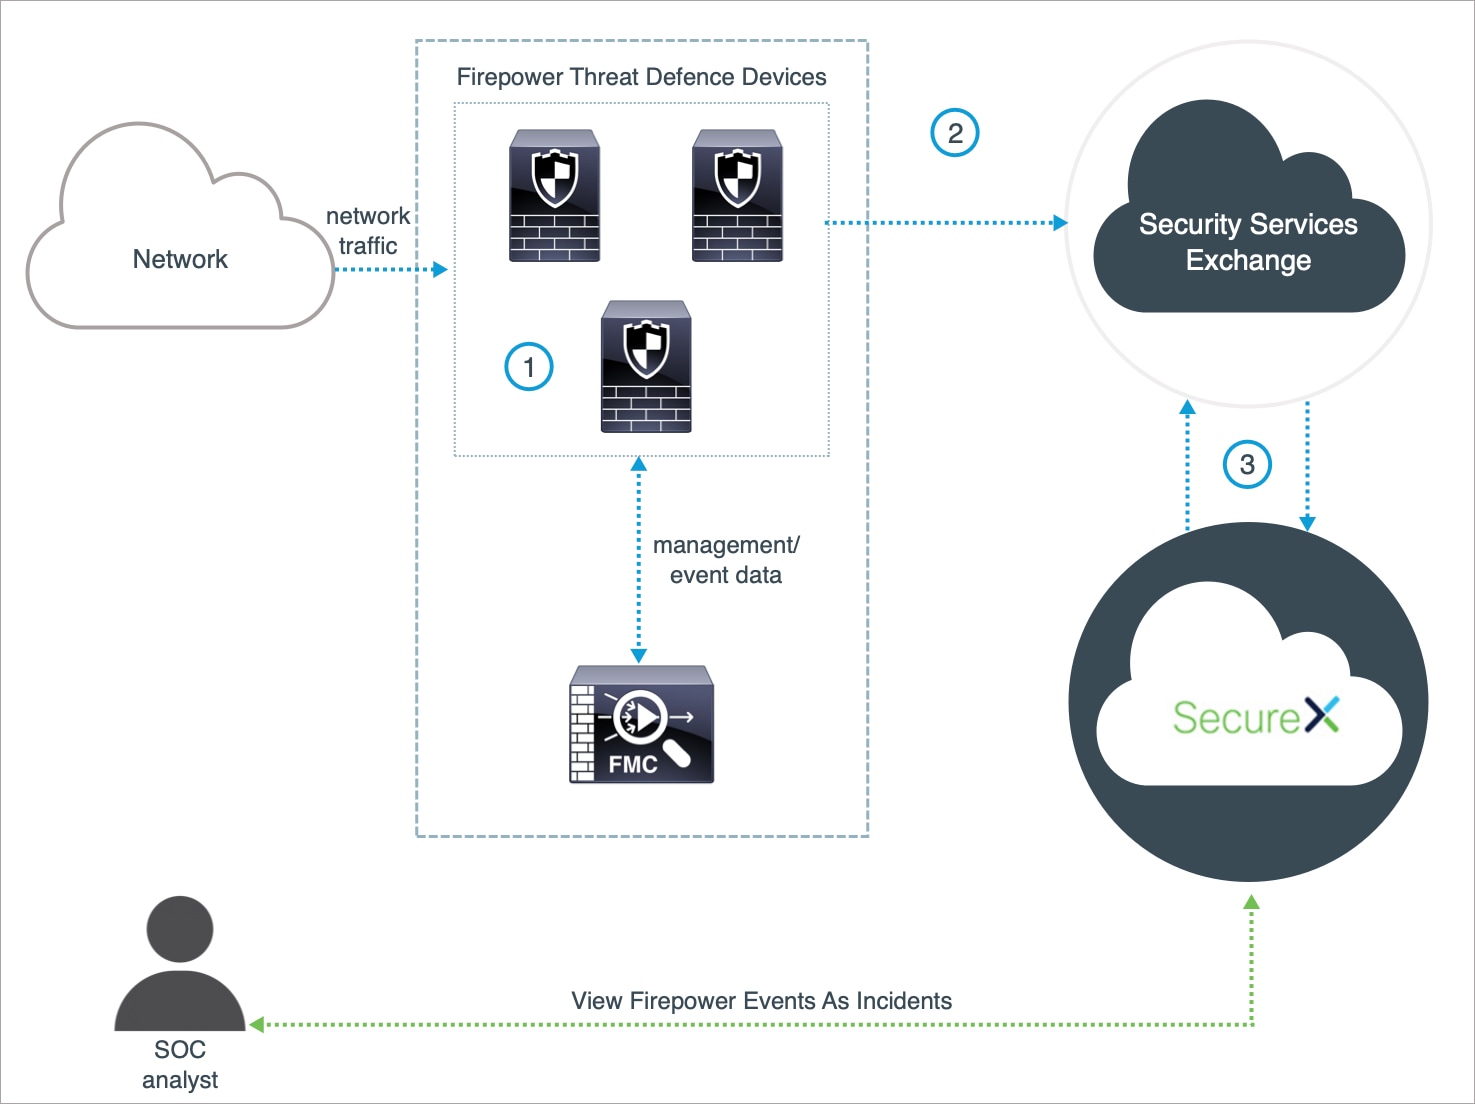
The following diagram shows how the direct integration works.
|
The management center-managed devices generate events. |
|
|
The threat defense devices send supported events to SSE. |
|
|
SecureX queries SSE for sightings related to the IP address being investigated and provides the SOC analyst with the additional context. The events are automatically or manually promoted to incidents that appear in SecureX. |
Key Components of This Integration
|
Component |
Description |
|---|---|
|
SecureX |
A simplified platform experience, connecting Cisco's integrated security portfolio with your existing infrastructure. It helps you unify visibility, enable automation, and strengthen security across your network, endpoints, cloud, and applications. |
|
Security Services Exchange (SSE) |
A secure intermediary cloud service that handles cloud-to-cloud and premise-to-cloud identification, authentication, and data storage for use in Cisco cloud security products. |
|
SecureX Sign-On |
A secure login page to access all your Cisco Security products, with one set of credentials, from any device. |
|
Cisco Success Network (CSN) |
A user-enabled cloud service that establishes a secured connection with the Security Service Exchange (SSE) cloud to stream Firepower usage information and statistics. |
| Cisco SecureX threat response | A cloud platform that helps you detect, investigate, analyze, and respond to threats using data aggregated from multiple products and sources. |
Prerequisites
|
Prerequisite Type |
Requirement |
|---|---|
|
Firepower Device |
threat defense devices managed by management center |
|
Firepower Version |
6.6.1 (both the management center and its managed devices) |
|
Licensing |
Register your management center with the Cisco Smart Software Manager. In the management center web interface, click System (
For instructions to register your management center with the Cisco Smart Software Manager, see https://www.cisco.com/c/en/us/td/docs/security/firepower/660/configuration/guide/fpmc-config-guide-v66/licensing_the_firepower_system.html. Keep in mind that:
|
|
Account |
|
|
Connectivity |
The management center and managed devices must be able to connect outbound on port 443 to the Cisco cloud at the following addresses:
|
|
For the SecureX tiles that display the device status |
To view SecureX tiles that show the system information such as whether your devices are running optimal versions, enable Cisco Success Network (CSN) in the management center web interface. To verify or enable this setting, click System ( It takes up to 24 hours for the device status tiles to update after you enable CSN. |
Integrate Secure Firewall Management Center with SecureX
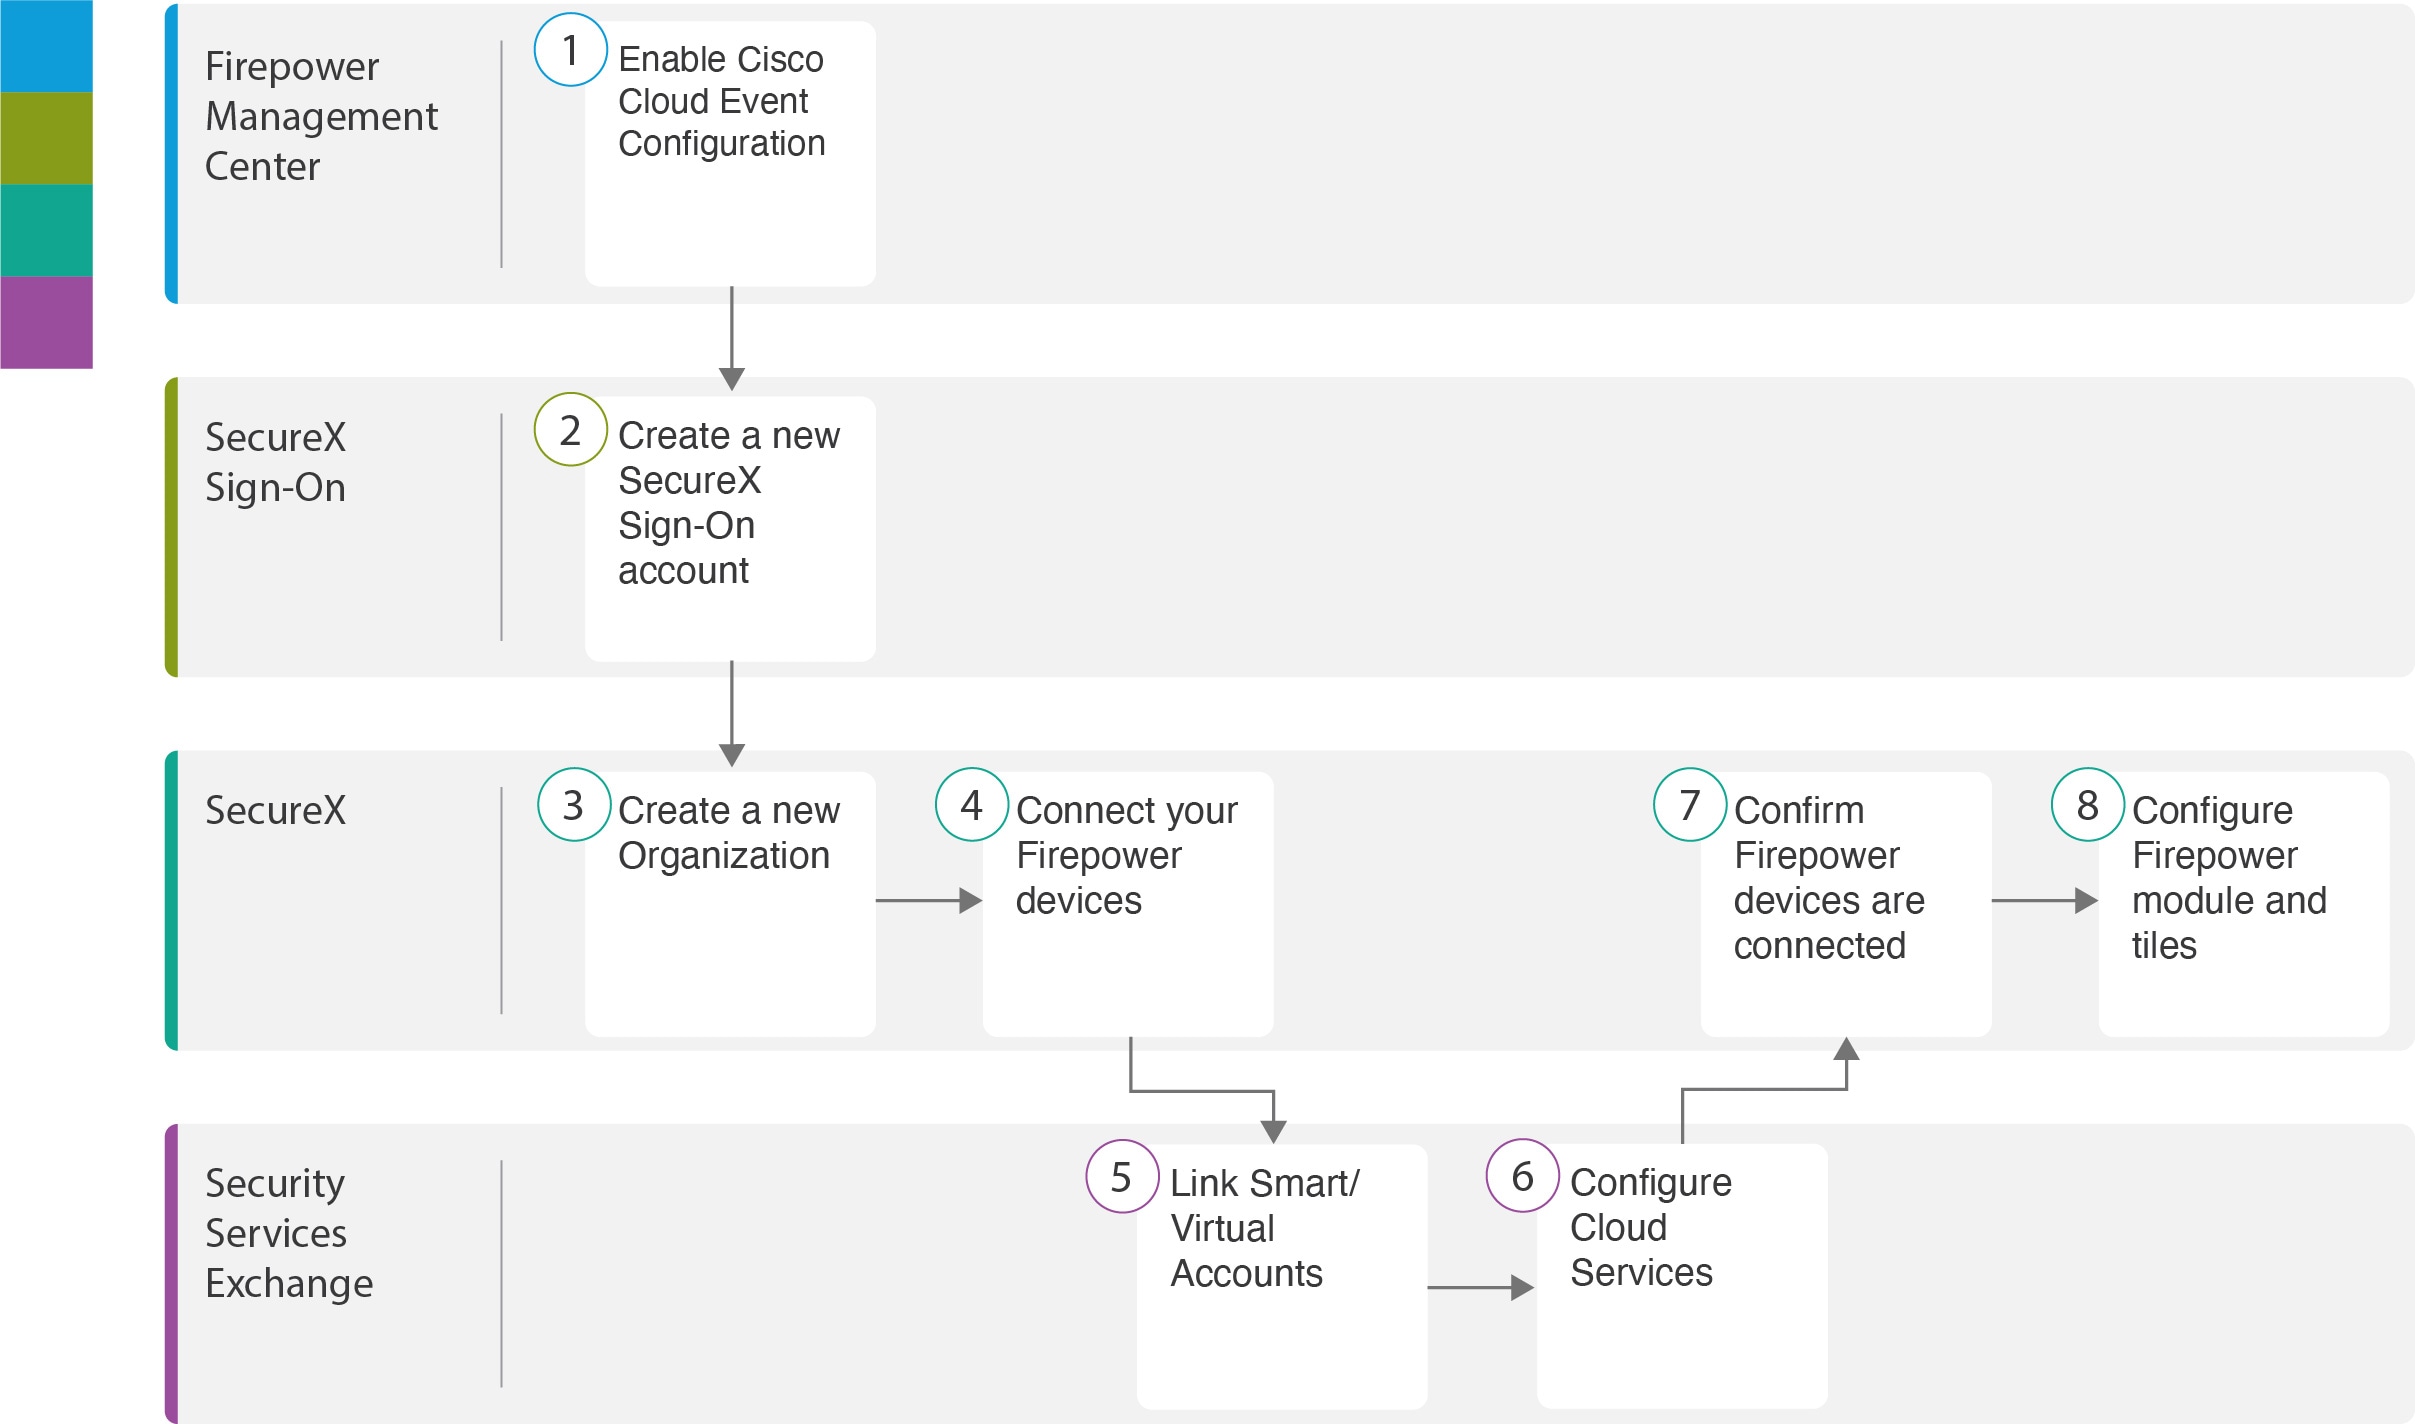
Perform the following tasks to integrate the management center and managed threat defense devices with SecureX.
|
Workspace |
Steps |
|
|---|---|---|
|
Secure Firewall Management Center |
Configure the Secure Firewall Management Center to Send Events to Security Services Exchange. |
|
|
SecureX Sign-On |
Set Up a New SecureX Sign-On Account: Create a new SecureX Sign-On account. |
|
|
SecureX |
Set Up a New SecureX Sign-On Account: Create a new organization. |
|
|
SecureX |
Activate the SecureX Sign-On Account: Connect your Firepower devices. |
|
|
Security Services Exchange |
Activate the SecureX Sign-On Account: Link Smart/Virtual Accounts. |
|
|
Security Services Exchange |
Activate the SecureX Sign-On Account: Configure Cloud Services. |
|
|
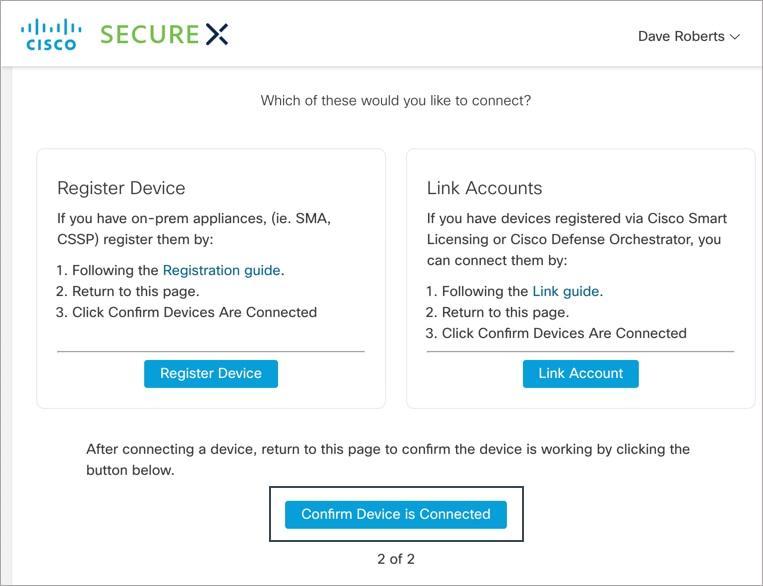
SecureX |
Activate the SecureX Sign-On Account: Confirm Firepower devices are connected. |
|
|
SecureX |
Configure the Secure Firewall Management Center to Send Events to Security Services Exchange
Configure your management center to have the managed threat defense devices send events directly to SSE.
Before you begin
In management center, do the following:
-
Click System (
 ) > Configuration, and assign your management center a unique name so it is clearly identified in the Devices list in the cloud.
-
Add your threat defense devices to the management center, assign licenses to them, and ensure that the system is working correctly. (That is, you have created the necessary policies, and events are being generated and display as expected in the management center web interface under the Analysis tab.)
Procedure
|
Step 1 |
In the management center web interface, click System ( |
||
|
Step 2 |
In the Cisco Cloud Region widget, from the Region drop-down list, choose a regional cloud, and click Save.  Before choosing a regional cloud, consider these important points:
|
||
|
Step 3 |
In the Cisco Cloud Event Configuration widget, configure the management center to send events to SSE. 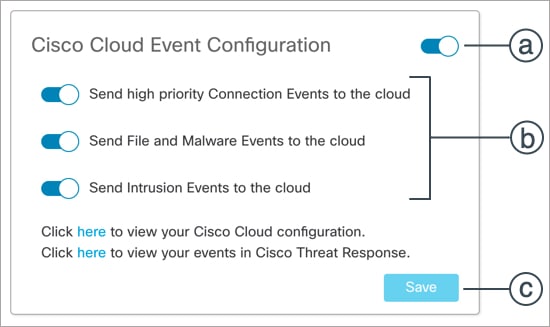
|
Set Up a New SecureX Sign-On Account
With the SecureX Sign-On account, you can easily access all your Cisco Security products, with one set of credentials, from any device.
Create a new SecureX Sign-On account to integrate the management center with SecureX.Before you begin
-
Verify whether you or your organization already has an account on the regional cloud you plan to use. If yes, use the existing account and skip the new account creation process.
-
Verify whether you or your organization already has an account on Cisco SecureX threat response. If yes, use the existing (Cisco Security Account or Threat Grid) account to log in to SecureX and skip the new account creation process.
For more information, see the Cisco Firepower and SecureX Integration Guide at https://www.cisco.com/c/en/us/td/docs/security/firepower/integrations/SecureX/firepower-and-securex-integration-guide.html.
-
If anyone else in your organization already has an account for a regional cloud, have the administrator of that account add an account for you. For more information, see the Cisco SecureX Getting Started Guide at https://www.cisco.com/c/en/us/support/security/securex/products-installation-and-configuration-guides-list.html.
Procedure
|
Step 1 |
SecureX Sign-On: Sign up for a new SecureX Sign-On account.
|
||
|
Step 2 |
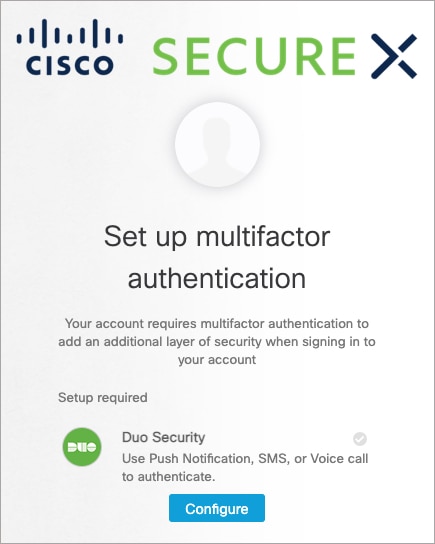
SecureX Sign-On: Set up multi-factor authentication (MFA) by configuring Duo Security.
|
||
|
Step 3 |
SecureX Sign-On: Configure account recovery options for your SecureX Sign-On Account.
|
||
|
Step 4 |
SecureX: Create a new organization in SecureX.
|
||
|
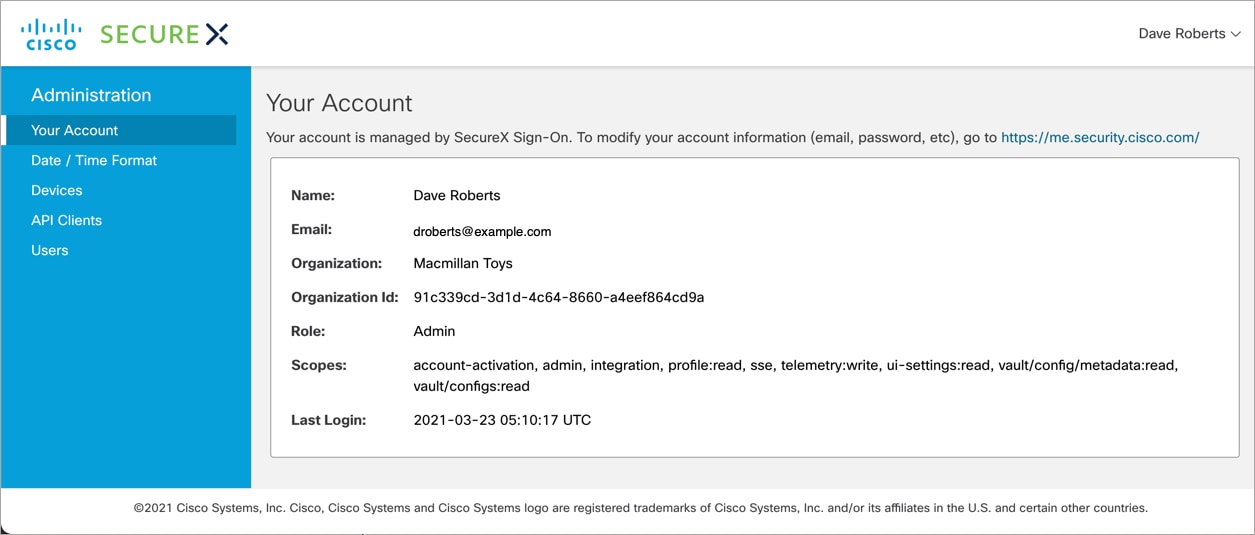
Step 5 |
SecureX: Verify the new account details on SecureX.
|


Activate the SecureX Sign-On Account
Before you begin
-
To link licensing accounts, you must have administrator-level Smart Account or Virtual Account privileges for all of the licensing accounts (from which your Firepower products are licensed) and for the account you use to access SecureX.
-
If you have linked accounts already for use with Cisco SecureX threat response, you do not need to link them again for SecureX and vice versa.
-
You will need your Cisco.com credentials to complete this procedure.
Procedure
|
Step 1 |
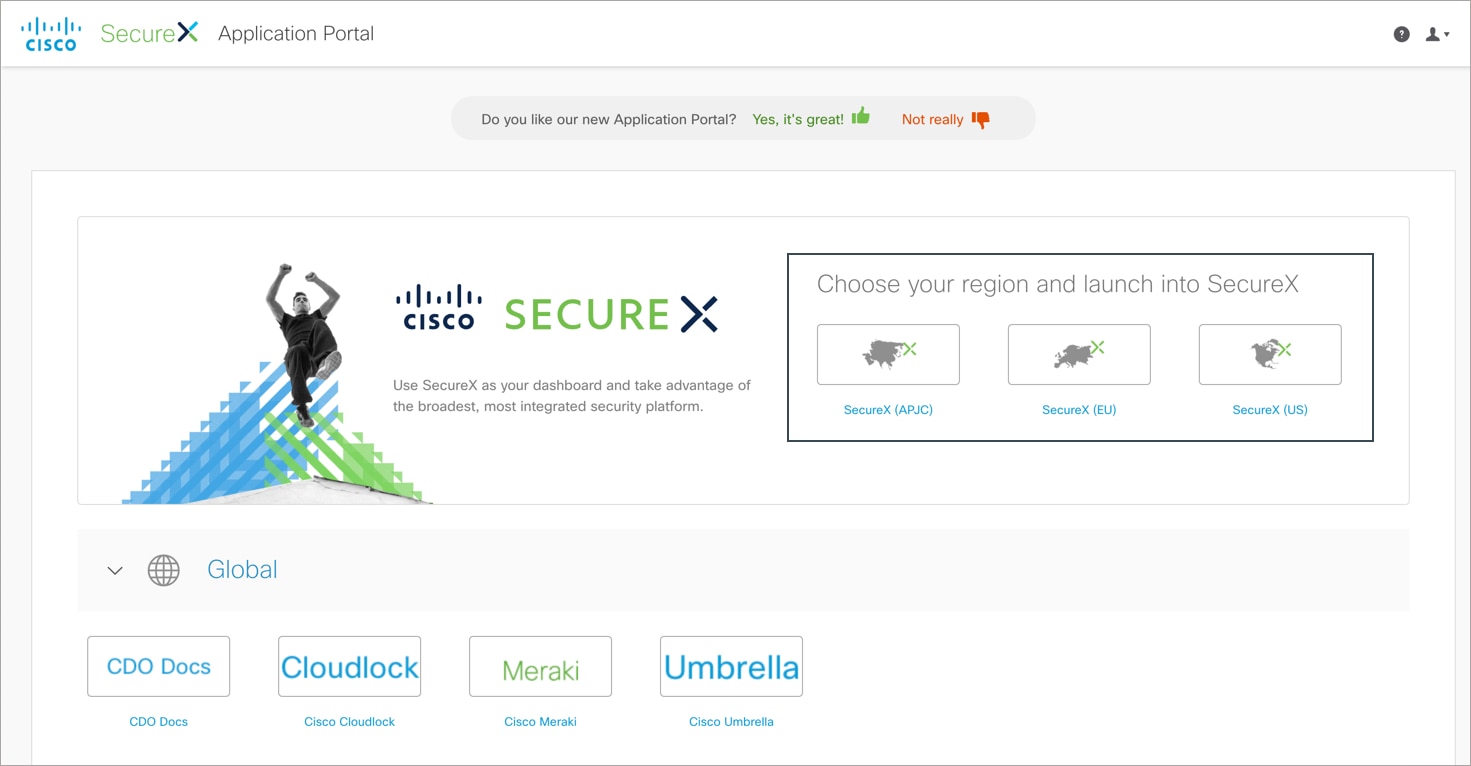
SecureX Sign-On: Access SecureX.
|
||
|
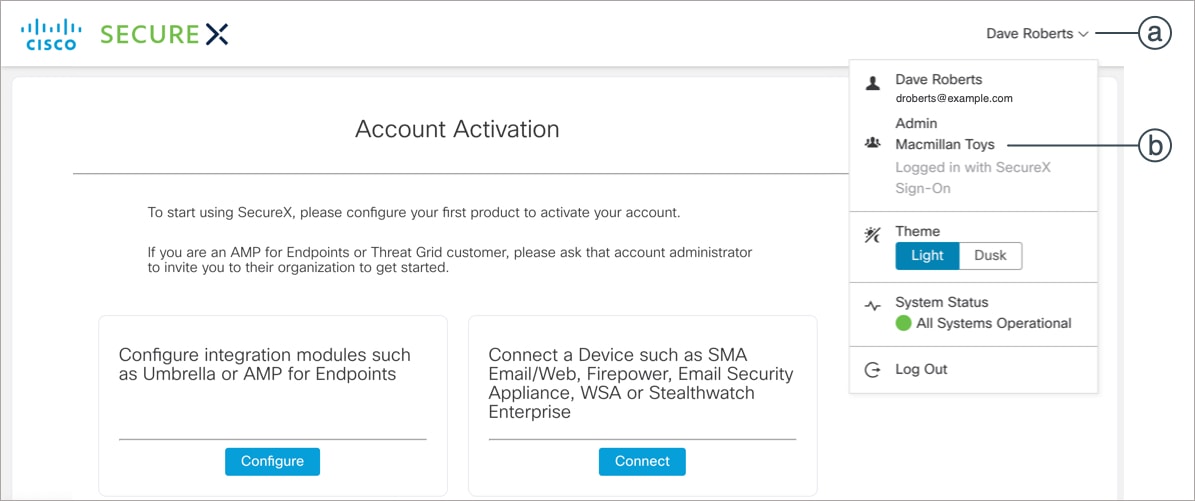
Step 2 |
SecureX: Initiate the SecureX account activation process.
|
||
|
Step 3 |
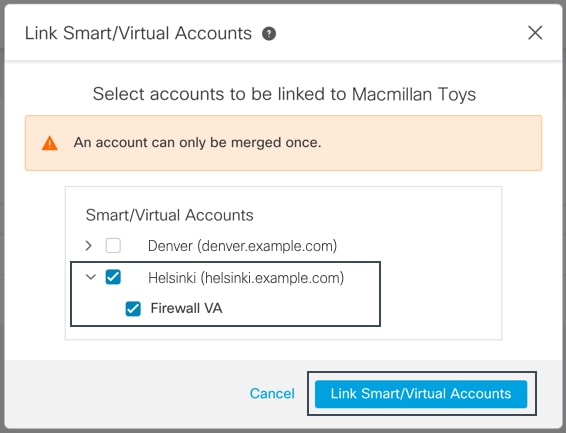
Security Services Exchange: To integrate products registered under different licensing Smart Accounts (or Virtual Accounts) into a single view in the cloud, you must link those licensing accounts to the account that you use to access SecureX.
|
||
|
Step 4 |
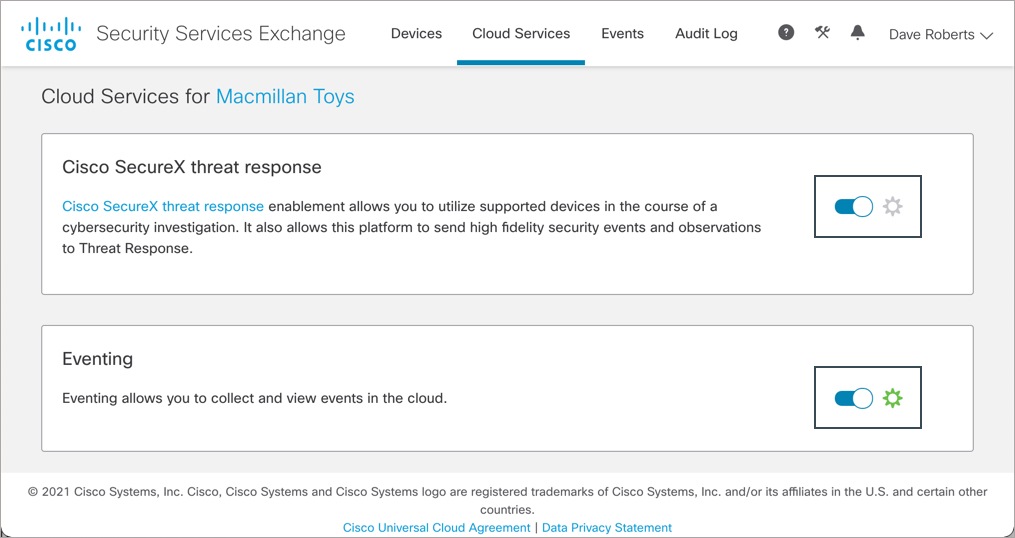
Security Services Exchange: Configure the Cloud Services settings in SSE.
|
||
|
Step 5 |
SecureX: Complete the SecureX account activation process.
|


 ) button, and choose
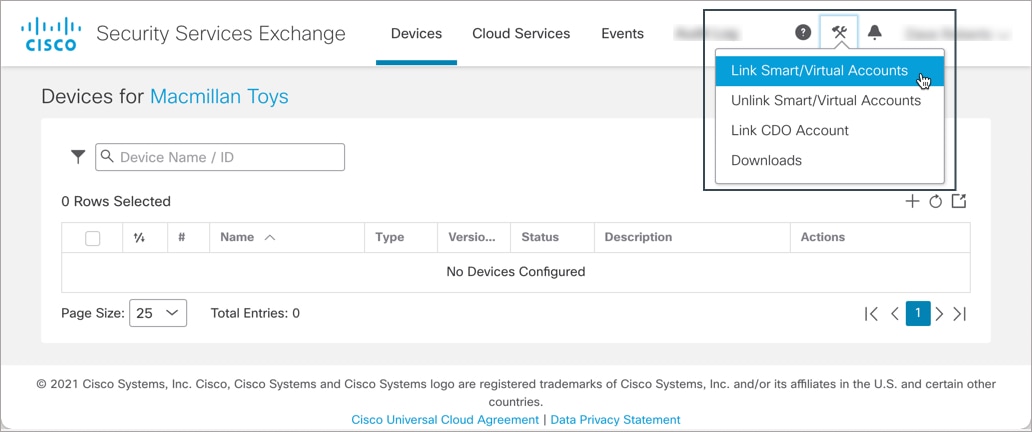


 under the
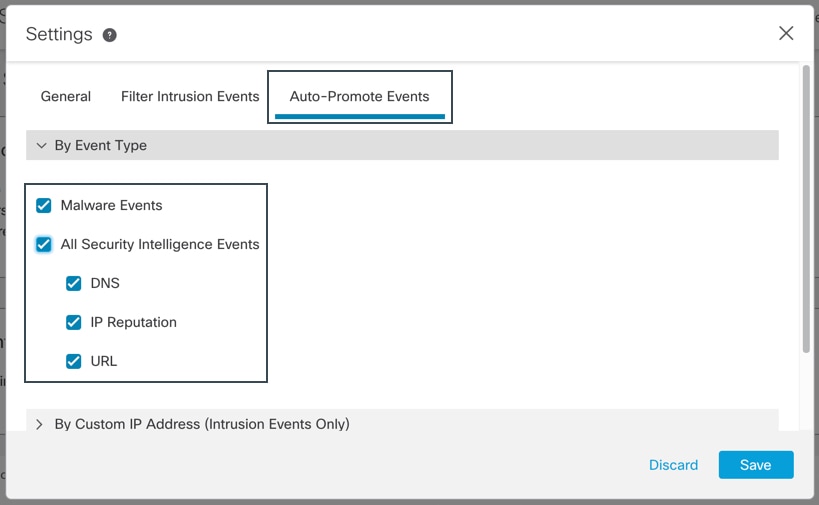
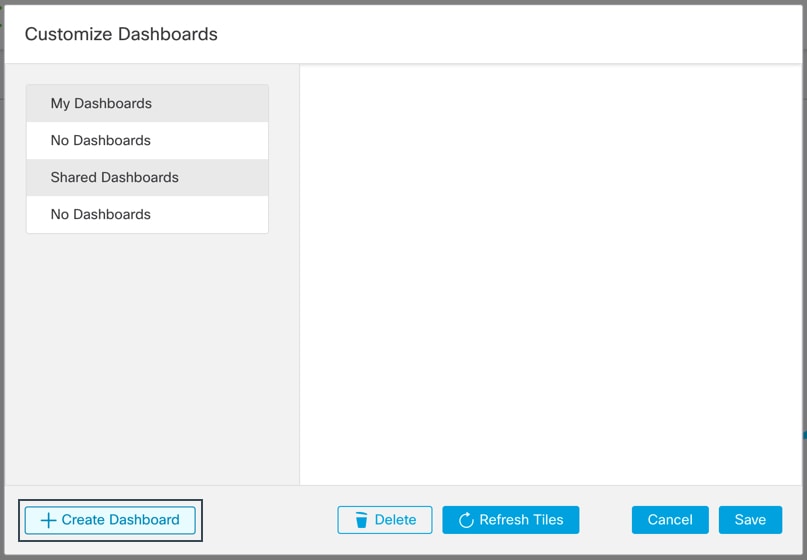
Configure Firepower Module and Tiles in SecureX
Cisco SecureX offers integration modules for Cisco security products and third-party solutions. You must configure a Firepower module so the data and response actions are available in SecureX.
The SecureX tiles present metrics and data from your Firepower products to provide visibility across your security environment and accelerate threat response. After adding a Firepower integration module in SecureX, you can add the Firepower tiles to your dashboard.
Before you begin
To view SecureX tiles that show the system information such as whether your devices are running optimal versions, enable Cisco Success Network (CSN) on your management center.
To verify or enable this setting, click System () > Smart Licenses in the management center web interface. For more information, search the management center online help for "Cisco Success Network."
It takes up to 24 hours for device status tiles to update after you enable CSN.
Procedure
|
Step 1 |
SecureX Sign-On: Access SecureX.
|
|
Step 2 |
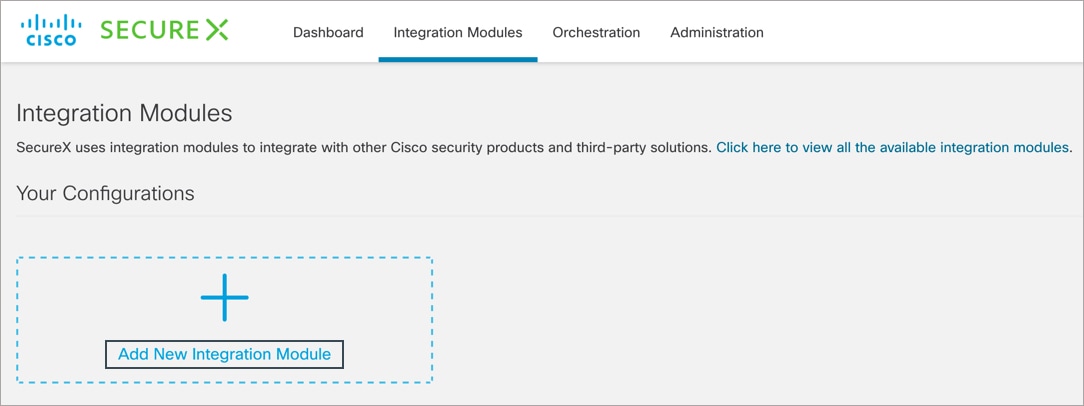
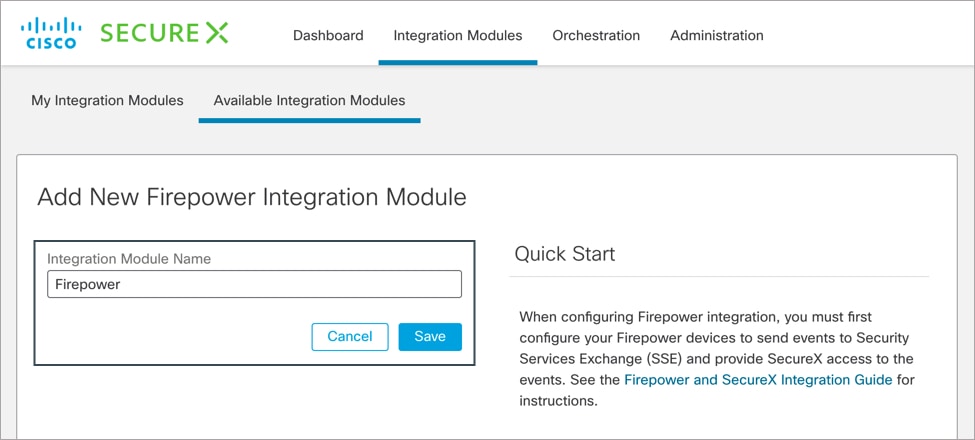
SecureX: Add a new Firepower integration module.
|
|
Step 3 |
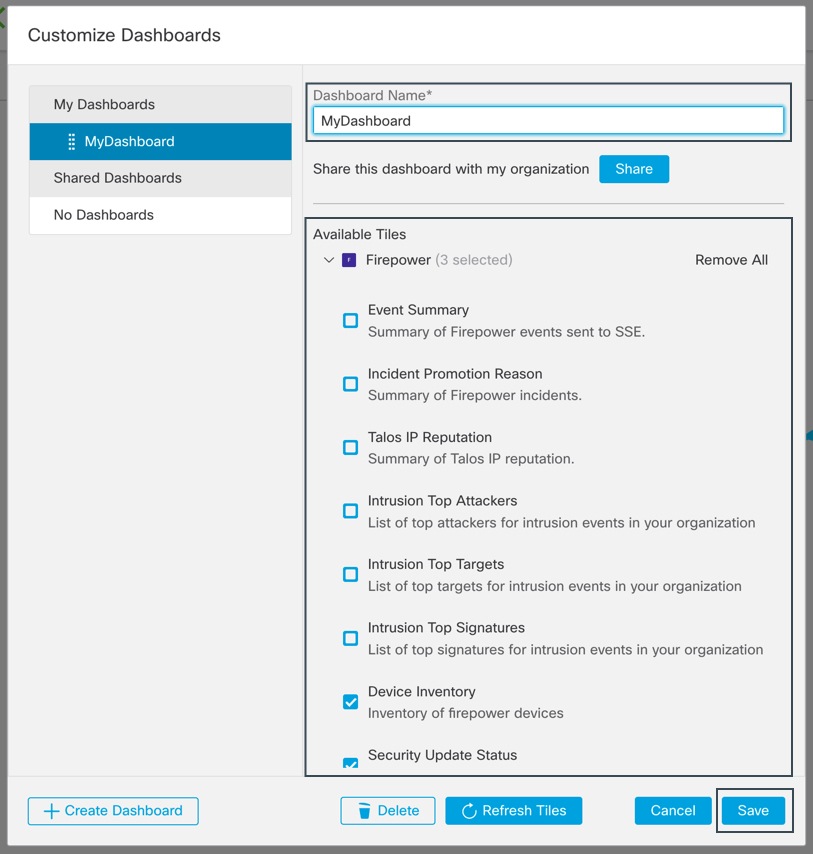
SecureX: Add the Firepower tiles.
|


What to do next
If you are an Admin user in SecureX,
-
Invite users to join your organization via SecureX.
-
Share the Firepower dashboard with other users within your organization.
For instructions, see the SecureX online help.
Troubleshooting a Direct Integration
Problems Accessing the Cloud
-
If you activate your cloud account immediately before attempting to configure this integration and you encounter problems implementing this integration, try waiting an hour or two and then log in to your cloud account.
-
Make sure you are accessing the correct URL for the regional cloud that is associated with your account.
Device Interface Shows the Integration as Enabled, but the Device Does Not Appear on the Devices Page in the Cloud
-
The device may be licensed using a Smart Account or virtual account that is not linked to your cloud account. Do one of the following:
-
In SSE, link the account from which the device was licensed.
-
License the device from a linked account:
Disable the integration on the management center, unregister the current license from the device, relicense the device from a linked account, then re-enable the integration in management center.
-
-
Make sure you are looking at the same regional cloud that you selected in your Firepower settings. If you didn't select a region when you started sending events to the cloud, try the North America cloud first.
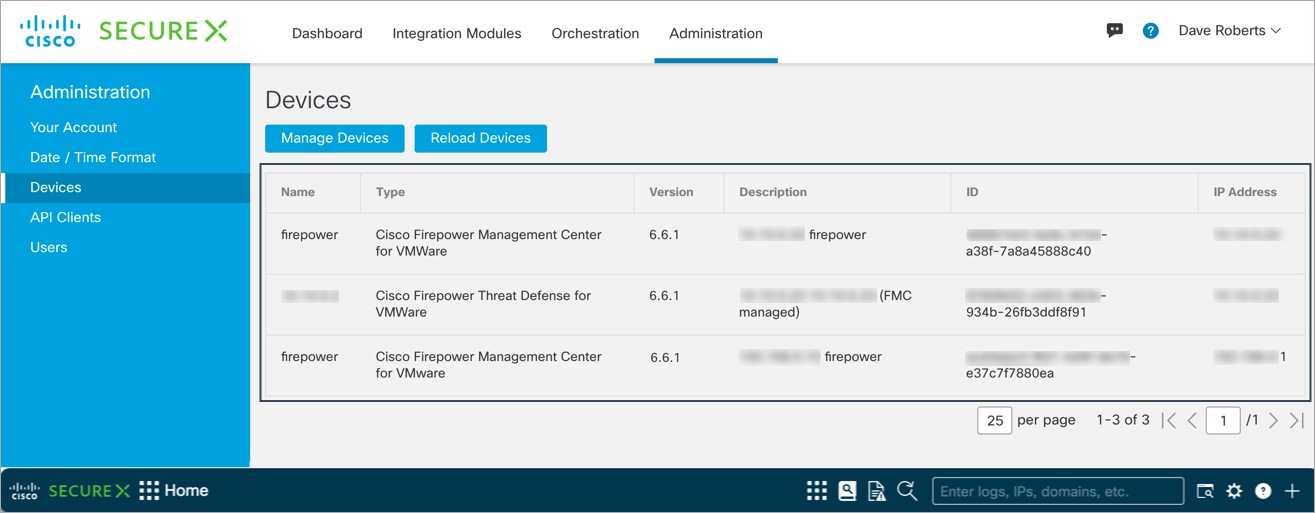
Device Managed by management center Is Not Listed Correctly on the SSE Devices Page
Device name is sent from management center to SSE only at initial registration to SSE and is not updated on SSE if the device name changes in FMC.
On the Devices Page in SSE, Previously Registered Devices Unexpectedly Show as Unregistered
If these devices are threat defense devices that are managed by device manager, and you enabled integration with CDO after you registered your devices with SSE for integration with SecureX, and you have not yet merged your accounts, complete the procedure Merge Your CDO and SecureX Accounts in the Cisco Firepower and SecureX Integration Guide (https://www.cisco.com/c/en/us/td/docs/security/firepower/integrations/SecureX/firepower-and-securex-integration-guide.html).
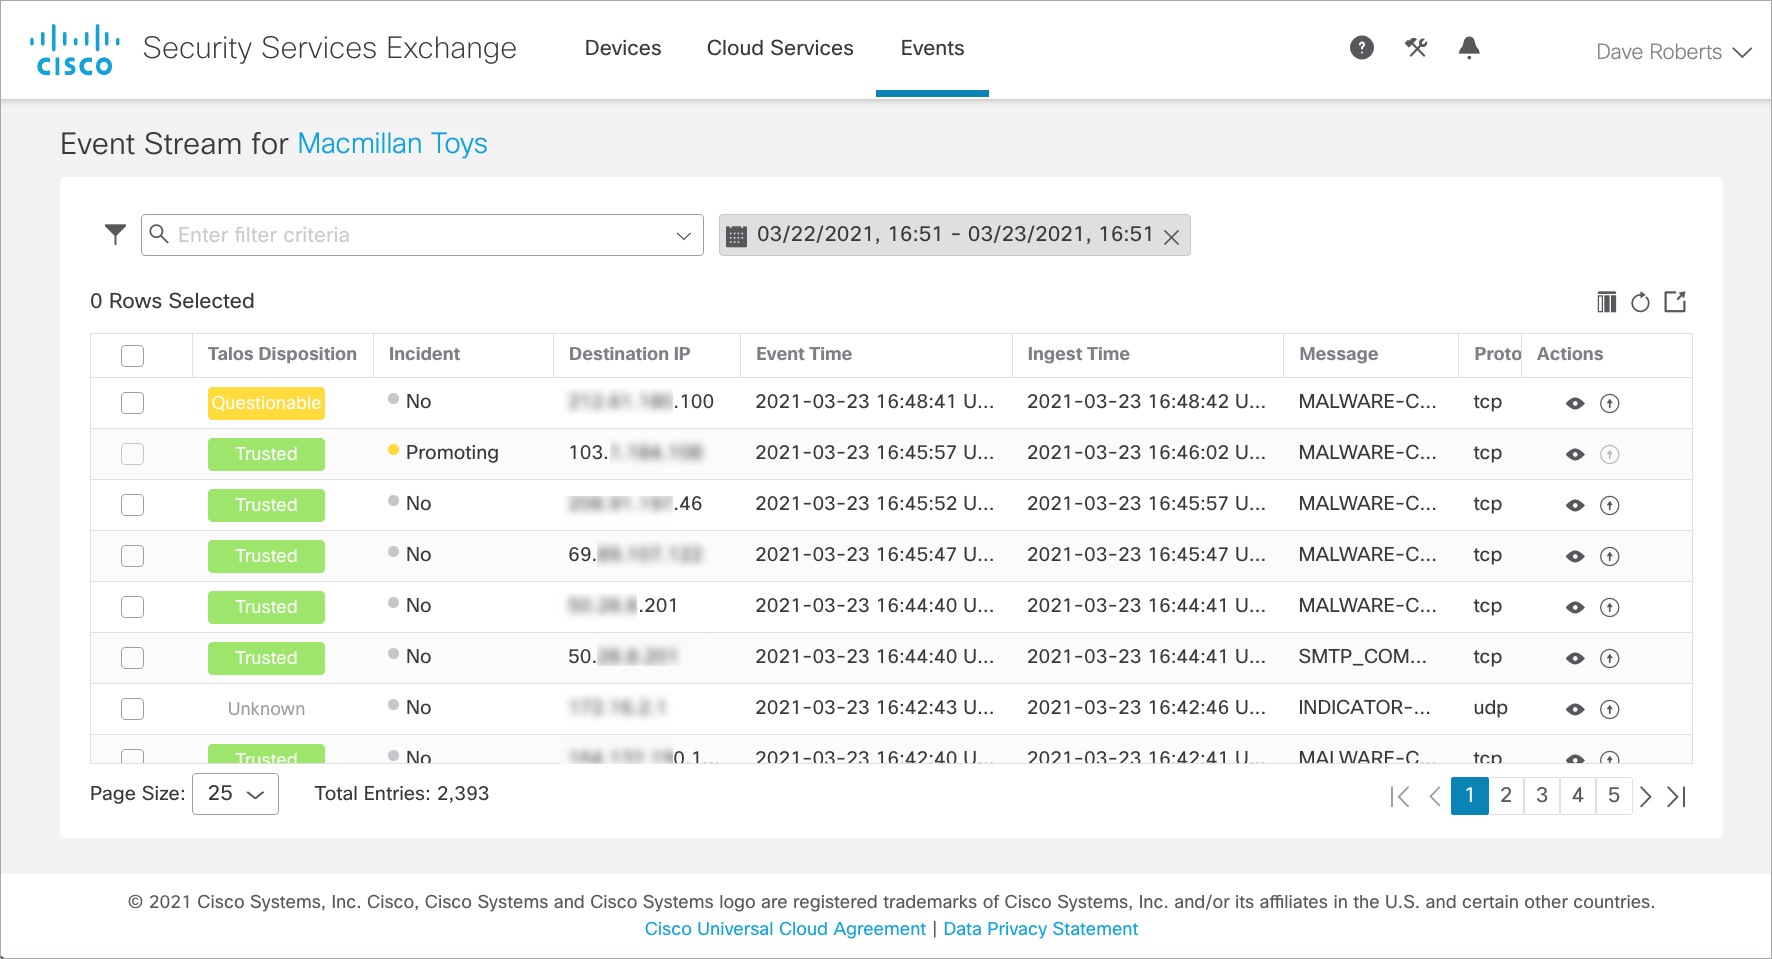
Expected Events Are Missing from the SSE Events List
-
Make sure you are looking at the correct regional cloud and account.
-
Make sure that your devices can reach the cloud and that you have allowed traffic through your firewall to all required addresses.
-
Click the Refresh button on the Events page to refresh the list.
-
Verify that the expected events appear in Firepower.
-
Check your configurations for automatic deletion (filtering out events) in the Eventing settings on the Cloud Services page in SSE.
-
For additional troubleshooting tips, see the online help in SSE.
Some Events Are Missing
-
If you send connection events, only Security Intelligence connection events are used; all other connection events are ignored.
-
If you are using custom Security Intelligence objects in management center, including global block or allow lists and Secure Firewall threat intelligence director, you must configure SSE to auto-promote events that are processed using those objects. See information in the SSE online help about promoting events to incidents.
 Feedback