Cisco WAE Coordinated Maintenance 1.1 User and Administration Guide
Bias-Free Language
The documentation set for this product strives to use bias-free language. For the purposes of this documentation set, bias-free is defined as language that does not imply discrimination based on age, disability, gender, racial identity, ethnic identity, sexual orientation, socioeconomic status, and intersectionality. Exceptions may be present in the documentation due to language that is hardcoded in the user interfaces of the product software, language used based on RFP documentation, or language that is used by a referenced third-party product. Learn more about how Cisco is using Inclusive Language.
- Updated:
- December 18, 2015
Chapter: Creating User-Defined Tests
Creating User-Defined Tests
Access: WAE Coordinated Maintenance > Settings > User-Defined Tests tab
In addition to the built-in tests, you can create customized tests for inclusion in evaluations. The communication between your API and the WAE Coordinated Maintenance application is achieved through the Settings > User-Defined Tests page. When an evaluation is run that contains a user-defined test, the application sends the API a set of parameters on which to conduct the test. In return, the API returns the results to the application for inclusion in the evaluation.
For an example start to finish, including an example API, see the Example section. The full script used in this example is in $WAE_HOME/mate/current/lib/web/apache-tomcat-6.0.37/webapps/ROOT/services/maintenance/samples. By default, $WAE_HOME is /opt/cariden/software.
|
|
|
|---|---|
2. |
Configure User-Defined Tests section |
3. |
Configuring Evaluations chapter |
Input
The input is passed to the custom test when the evaluation is run. The API must be able to take the following input in multipart/form-data format that will be passed using the HTTP POST method.
Example Input
In this example, one node, two circuits, and two ports are passed to the custom test. The start time is July 7, 2016 at 10:00 AM (local time), and the duration is three hours. These are entered when adding the event.
The operand is 80, and the operator is > (greater than). These are specified in the UI when adding the custom test to the UI.
"planFile": (as a file attachment)
"origFile": (as a file attachment)
"nodes":[{"name":"AM_ATL_ER2"}],
"circuits":[{"nodeAName":"192.168.249.0/24:BgpPsn","nodeBName":"ASN65300:192.168.30.1","intfA":"TenGigE0/0/0/2","intfB":"to_EU_AMS_AMSIX"},{"nodeAName":"192.168.243.0/24:BgpPsn","nodeBName":"ASN65370:192.168.37.1","intfA":"xe-1/0/1","intfB":"to_AM_NYC2_EQUINIX"}],
"ports":[{"nodeAName":"AM_DC_NORTH_BB1","nodeBName":"AM_DC_NORTH_BB2","portA":"TenGigE1/0/1","portB":"TenGigE1/0/4"},{"nodeAName":"AM_DC_NORTH_BB1","nodeBName":"AM_DC_NORTH_BB2","portA":"TenGigE1/0/2","portB":"TenGigE0/0/4"}],
"startTime":"2016-07-07 10:00:00",
"stopTime":"2016-07-07 13:00:00",
Output
The custom test’s output is passed to the application’s evaluation process once the test completes. The API must be able to produce text/plain and application/JSON. The API for the custom test must return these values to the application.
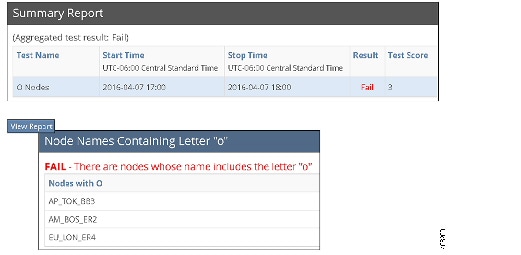
This information appears in the UI in the Summary Report section. The “details” are shown when you click the View Report button next to a failed test.
Example Output
Pass —The test passed with a score of 47.58. No report is added.
{"result":"pass","score":47.58,"details":""}
Fail —The test failed with a score of 118.77. The report includes one row of headings and one row of data for the circuit that caused the test to fail.
{"result":"fail","score":118.77,"details":"[[\"Node\",\"Circuits\",\"Utilization\",\"Traffic Level\",\"Start Time\",\"Stop Time\"],[\"AM_BOS_ER2\",\"TenGigE0/0/1\",\"118.77\",\"Default\",\"2015-04-07 10:00:00\",\"2015-04-07 13:00:00\"]]
Configure User-Defined Tests
Once the API that executes the custom test is created, you must configure the Settings > User-Defined Tests page to set up communication between the API and the application.
General
Resource
This section defines how the application communicates with the API.
- URI—Full name of the resource used by the application to reach the API. The URI format is as follows. For scheme, only http and https are supported.
Required format: scheme:[//[host[:port]][/]path
Example: https://172.12.123.0:8888/opt/acme/tests
Format with optional query and fragment: scheme:[//[host[:port]][/]path[?query][#fragment]
Example: https://172.12.123.0:8888/opt/acme/tests?event=23#results
–![]() Type—Only Basic authentication is supported.
Type—Only Basic authentication is supported.
–![]() Username and password—Username and password that secures the access to the URI.
Username and password—Username and password that secures the access to the URI.
Test Results
- Score Label—Label that appears next to the score in the evaluation report to identify what that score represents.
- Pass Message—(Optional) Message that appears next to the word “Pass” in the evaluation report.
- Fail Message—(Optional) Message that appears next to the word “Fail” in the evaluation report. This message is particularly useful when other users are generating evaluations with a custom test that they did not develop.
Report
- Name—Name of the report included in the evaluation results.
- Display only if failed—If selected, display the report only if the test fails.
- Require original plan—The application always passes the API a plan file that represents the network during the maintenance event. By selecting this option, you are telling the application to also pass the API the original plan file that represents the network prior to the maintenance event. This original plan can be useful when comparing plan files before and during the event.
Example
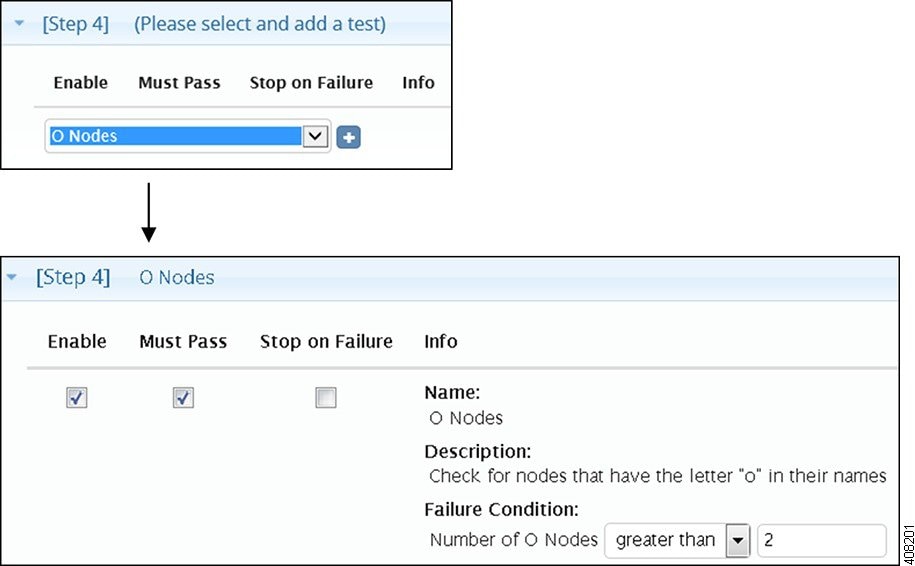
This example user-defined test is an over simplified way of demonstrating the most basic components of creating a custom test. The test itself looks for nodes that have the letter “o” in their names. If more than two nodes are found that meet this failure condition, the test fails.
Example API
This section of an API focuses on the handler section of code that takes the application input, loads it into the API framework, and returns results back to the application. This example is using a Tornado python web application package, which must be separately installed. Comments as to what this handler is doing are inline.
Example Input
Following is the input passed to the user-defined test as a result of the UI input shown in Figure 6-1 and Figure 6-2.
"planFile": (as a file attachment)
"nodes":[{"name":"AM_ATL_ER1"},{"name":"AP_BEI_ER4"},{"name":"AP_TOK_BB3"},{"name":"AM_BOS_ER2"},{"name":"EU_LON_ER4"}]
"startTime":"2016-04-07 17:00:00",
"stopTime":"2016-04-07 18:00:00",
Figure 6-1 Example UI Input When Adding Event
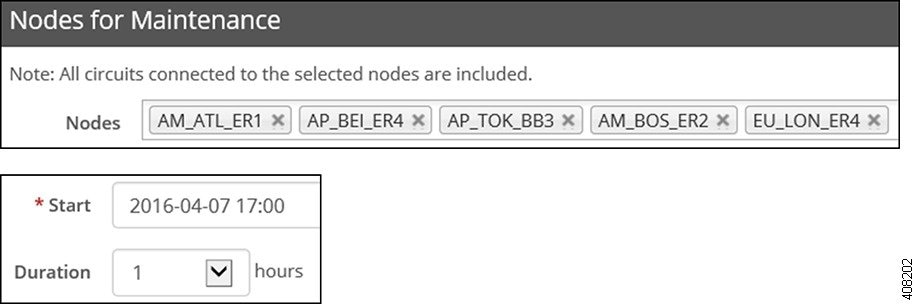
Figure 6-2 Example UI Input When Adding User-Defined Test
Example Output
In the above API, the score, result, and details are these lines. Figure 6-3 shows how these results appear in the UI.
Figure 6-3 Example UI Output from User-Defined Test
 Feedback