Cisco WAE 6.3 Server Installation Guide
Bias-Free Language
The documentation set for this product strives to use bias-free language. For the purposes of this documentation set, bias-free is defined as language that does not imply discrimination based on age, disability, gender, racial identity, ethnic identity, sexual orientation, socioeconomic status, and intersectionality. Exceptions may be present in the documentation due to language that is hardcoded in the user interfaces of the product software, language used based on RFP documentation, or language that is used by a referenced third-party product. Learn more about how Cisco is using Inclusive Language.
- Updated:
- December 21, 2015
Chapter: Cisco WAE Live Datastore
Cisco WAE Live Data Store
This chapter describes how to install, upgrade, back up, and restore a WAE Live data store.
- Installing the mld Server
- Upgrading the Data Store to a New Server
- Starting and Restarting the mld Server
- Stopping the mld Server and Getting Current Status
- Backing Up the Data Store
- Restoring the Data Store
If you need to migrate a WAE Live data store from 5.4 or an earlier release, contact your support representative.
Many references in the documentation explicitly identify directories in which the software is installed. Otherwise, references to where the software resides are as follows:
If the defaults were used during installation, $CARIDEN_ROOT is the same as /opt/cariden.
-
$CARIDEN_HOME—Sub-directory of$CARIDEN_ROOTthat contains the WAE Design, WAE Live, and WAE Collector executables and binaries.
If the defaults were used during installation, $CARIDEN_HOME is the same as /opt/cariden/software/mate/current.

mld -diag -c | egrep ROOTPATH

Note![]() The mld server is started, restarted, and stopped as the
The mld server is started, restarted, and stopped as the wae-mld service. However, it is not monitored like the other WAE services are. For information on services, see the Cisco WAE System Administration Guide.
Note![]() Before starting, restarting, upgrading, or installing the mld server, you must stop other services. If you chose to migrate the Collector server files during the installation process, verify those files have been copied before stopping the web server.
Before starting, restarting, upgrading, or installing the mld server, you must stop other services. If you chose to migrate the Collector server files during the installation process, verify those files have been copied before stopping the web server.
Installing the mld Server
The mld tool installs both the mld server and an empty data store directory, and it automatically starts the mld server.
- The
-demoor-storageand-memoryoptions are required. For more information on mld command options, see Table 10-1 . - Best practices
–![]() Use the
Use the -backup option to change the default backup directory to one that is on a different physical disk.
–![]() For better performance, create a separate ext2 partition for the directory specified with the
For better performance, create a separate ext2 partition for the directory specified with the -datastore option.
Step 1![]() Stop the web server and all other services.
Stop the web server and all other services.
Example: service wae-web-server stop
Step 2![]() Enter command to install the data store. To change the default directories or view more mld option information, see Table 10-1 .
Enter command to install the data store. To change the default directories or view more mld option information, see Table 10-1 .
Example 1: To be prompted through installation and obtain sizing recommendations:
Example 2: To install mld with a demo data store size, enter the following command:
mld -action install -demo true
Example 3: To install a small mld server into $CARIDEN_ROOT/data/matelive, reserve 2 CPUs, reserve 542 GB of disk storage and allocate 2.2 GB (2200 MB) of memory:
mld -action install -mldata /data/matelive -cpus 2 -storage 1:1:540 -memory 200:55:2000
Step 3![]() Start the web server and if needed, start other services.
Start the web server and if needed, start other services.
service <service_name> start
Example: service wae-web-server start
|
|
|
|
|---|---|---|
|
||
Prompts you through installation and gives sizing recommendations. |
||
|
(If an option is not given, the installation will perform the same tasks as |
||
| Note If both |
||
Allocates the disk and memory based on the anticipated data store size, where <n:n:n> is data:indices:timeseries in GB. For details and recommended values, use Note If the data store is larger than the demo size, this option is required when using |
||
Allocates the requested memory of the data store, where <n:n:n> is data:indices:timeseries in MB. For details and recommended values, use |
||
Specifies directory where all application data is stored. This includes the data store, report output, and other application data. |
||
Specifies directory where the data store is initialized. Once set, this directory cannot be changed. You can, however, use symbolic links. |
||
Reserves the number of CPUs for the data store and the mld server. |
||
|
|
||
Specifies directory where the mld server is installed. Once set, this directory cannot be changed. You can, however, use symbolic links. |
||
Specifies directory for saving data store backups. You can override this for a single backup. See Backing Up the Data Store. |
||
Upgrading the Data Store to a New Server
Note![]() The new server must have the same WAE Live software version as the original server before you upgrade.
The new server must have the same WAE Live software version as the original server before you upgrade.
If you are upgrading to another server, you must do the following:
Step 1![]() Perform a Level 0 (
Perform a Level 0 ( ml_backup -L 0) data store backup from the original server. For more information, see Backing Up the Data Store.
Step 2![]() Restore the backup from the original server to the new server. For more information, see Restoring the Data Store.
Restore the backup from the original server to the new server. For more information, see Restoring the Data Store.
Step 3![]() Install the latest WAE Live software on the new server. For more information, see the WAE Planning Software Installation chapter.
Install the latest WAE Live software on the new server. For more information, see the WAE Planning Software Installation chapter.
Step 4![]() Upgrade the data store. For more information, see Upgrading the Data Store.
Upgrade the data store. For more information, see Upgrading the Data Store.
Upgrading the Data Store
The mld tool upgrades the WAE Live data store from one release to another, and also starts the mld server.
Note![]() To upgrade the data store, you must use the same username as when you installed the mld server.
To upgrade the data store, you must use the same username as when you installed the mld server.
Step 1![]() Stop the web server and all other services.
Stop the web server and all other services.
service <service_name> stop
Example: service wae-web-server stop
service wae-mld stop
Step 3![]() Enter the following command to upgrade the data store. To change the default mld server directory or backup directory, use the options described in Table 10-1 .
Enter the following command to upgrade the data store. To change the default mld server directory or backup directory, use the options described in Table 10-1 .
Minimal requirement: mld -action upgrade
Step 4![]() Start the web server and if needed, start other services.
Start the web server and if needed, start other services.
service <service_name> start
Example: service wae-web-server start
Starting and Restarting the mld Server
Start and restart the mld server as the wae-mld service. Upgrading and installing the mld server also start it.
Note![]() To start or restart the mld server, you must use the same username as when you installed it.
To start or restart the mld server, you must use the same username as when you installed it.
Step 1![]() Stop the web server and all other services.
Stop the web server and all other services.
service <service_name> stop
Example: service wae-web-server stop
Step 2![]() To start or restart the mld server, enter these
To start or restart the mld server, enter these service commands.
Restart: service wae-mld restart
Step 3![]() Start the web server and if needed, start other services.
Start the web server and if needed, start other services.
service <service_name> start
Example: service wae-web-server start
Stopping the mld Server and Getting Current Status
To stop the data store or get its current status, enter these service commands:
Backing Up the Data Store
WAE Live backs up the time-series derived data from plan files. It does not back up transaction logs or other WAE Live data, such as application data and report data.
Backups require approximately 1 TB of space.
Best Practices
- Perform the backup to a different disk drive, or copy the backup to a different physical device once you finish the backup.
- Perform backups outside of peak traffic hours.
- Use a backup directory that is on a different physical disk, and set this when you first install the mld server and data store. Doing so sets the default backup directory for all backups.
mld -action install -backup <backup_directory>
- The backup process makes a copy of the data store, but it does not back up other WAE Live data, such as application data and report data. Therefore, with some regularity, copy this other data to a safe location, such as to a different physical disk.
- Perform a full backup at least weekly or monthly, with numerous incremental backups in between them.
- Rather than running manual backups, call
ml_backupfrom a cron job. - Perform only one backup at a time so that their schedules do not overlap. Ensure there is at least one hour between each backup. Once completed, verify that the backup was completed within the hour.
Backup Steps
Note![]() Keep both the data store (
Keep both the data store (wae-mld) and the web server (wae-web-server) running.
mld -diag -c | egrep ROOTPATH
You can execute ml_backup to run a manual backup at any time.
The default backup directory is $CARIDEN_ROOT/data/mldata/backup unless this was changed when installing the data store.
The ml_backup tool enables you to perform multiple levels of backups to save disk space, though the first time using these levels, you must perform backups in this sequence.
|
|
|
|
|---|---|---|
Back up everything since the most recent level 0 backup was performed. |
||
Back up everything since the most recent level 1 backup was performed. |
To run a backup using all defaults, you need only enter the following. This uses the default backup directory, and creates a full backup.
ml_backup
- To override the default backup directory, use the
-directoryoption. - To set a different backup level, use the
-Loption.
Example: This example sets the backup directory to $CARIDEN_ROOT/data/waelive/backups and backs up only data that is new since the last level 0 backup was run. This assumes that you have run ml_backup one time using the default level of 0.
ml_backup -directory /data/waelive/backups -L 1
Additional Backups
A best practice is to back up the following directories by making copies of them. By default, these are located in $CARIDEN_ROOT/data/mldata. Otherwise, they are stored in the directory specified upon installation ( mld -mldata < directory>).
Note![]() Before copying, stop the mld server. Remember to immediately restart the mld server when you are finished copying.
Before copying, stop the mld server. Remember to immediately restart the mld server when you are finished copying.
- archive—Stores the template (template.pln) and plan files used in the Map. Note that files sizes can be large, depending on the size of the network and how long the collection has been running.
- appdata—Application data, such as report definitions, user parameters, and report history.
- datastore—WAE Live data store, which contains network measurements accumulated over time.
- jobs—Error log files for plan file insertions.
- plans—Queue of plan files waiting to be inserted.
- reports—Every report that can be run caches its output in this directory for quick retrieval.
Additionally, it is a best practice to make copies of the following:
Restoring the Data Store
Note![]() This section references collection methods. For information on collecting data from WAE Collector, see the Cisco WAE Platform Configuration Guide.
This section references collection methods. For information on collecting data from WAE Collector, see the Cisco WAE Platform Configuration Guide.
Prerequisites
- To restore a data store, you must have a backup of it. See the Backing Up the Data Store section.
- Ensure you have a proper disk and disk space. For example, if your data was corrupted, you would need a new disk. If the restoration is due to a space issue, add more space to the existing disk.
- If you have a single-device configuration, the collection of data will be interrupted during the restoration of a WAE Live data store. Note that this affects the WAE Design Archive application if you are running it in addition to WAE Live.
- If the backup data store resides on a different device, ensure the following prerequisites are met.
–![]() The username and user ID (uid) of both devices must be the same.
The username and user ID (uid) of both devices must be the same.
–![]() The backup data store name uses a hostname as a portion of its name. This hostname portion of the backup data store name must be changed to be the same as the hostname on the device to which it is being restored.
The backup data store name uses a hostname as a portion of its name. This hostname portion of the backup data store name must be changed to be the same as the hostname on the device to which it is being restored.
Example: The backup data store name is akdobi.acme.com_1_L0. The hostname on the device on which the data store is being restored is akgudei.acme.com. In this case, change the backup data store name to akgudei.acme.com_1_L0.
Restoration Steps
Figure 10-1 Data Store Restoration Workflow
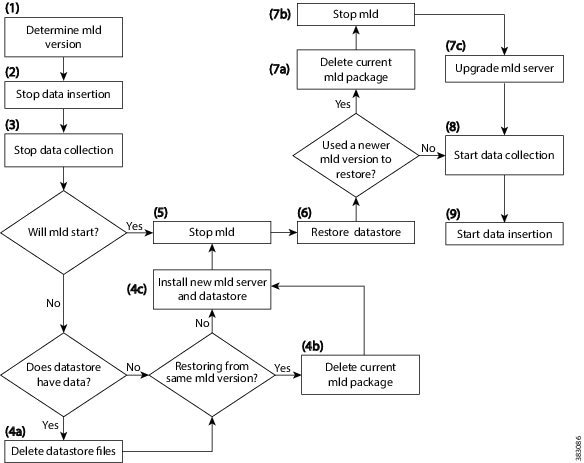
Step 1![]() Determine the version of the mld software package. If you have only one version, it is listed in
Determine the version of the mld software package. If you have only one version, it is listed in /opt/cariden/software/mld. If you have multiple versions, determine which one is currently being used by entering the following from /opt/cariden/software/mld.
ls -l | grep current
Step 2![]() Stop the insertion of data.
Stop the insertion of data.
- If using augmented or manual snapshots, disable the insertion using the following command within the snapshot. Note that currently running insertions continue until completion.
ml_insert_ctl -disable-scheduler
- If insertion is configured through the WAE Live UI, open this UI and stop the insertion from the Settings page. Set the Data Collection option to None, and click Apply.
Step 3![]() Stop the collection of data.
Stop the collection of data.
- If using augmented or manual snapshots, after the most recent snapshot has finished, stop further snapshots from running by disabling the cron job (using comments #). To determine if a snapshot has finished, check the system process table or check the log file, which by default is in
$CARIDEN_ROOT/logs. - If collection is configured solely through the WAE Collector UI or if using augmented snapshots, open the WAE Collector UI. Stop the collection from the Collection > Schedule page by clicking the Stop button. Then stop the web server.
service wae-web-server stop
If the mld server will start, skip to step 5.
Step 4![]() If the mld server will not start, follow these steps.
If the mld server will not start, follow these steps.
a.![]() If you have data, delete the data files. If there is no data, such as when restoring to a new disk, skip to step 4b.
If you have data, delete the data files. If there is no data, such as when restoring to a new disk, skip to step 4b.
rm -rf /opt/cariden/data/mldata/datastore/*
b.![]() If using the same mld version that was used to generate the restored data store, delete the current mld package. If using a newer mld version than was used to generate the data store, skip to Step 4c.
If using the same mld version that was used to generate the restored data store, delete the current mld package. If using a newer mld version than was used to generate the data store, skip to Step 4c.
rm -rf /opt/cariden/software/mld/<package_name>
c.![]() Install a new mld server and data store. This action also starts the mld server.
Install a new mld server and data store. This action also starts the mld server.
mld -action install -storage <n:n:n>
service wae-mld stop
Step 6![]() Restore the data store data.
Restore the data store data.
- If you used the default backup directory when setting up the backups, you do not need to give
-directorya value. - If you did not use the default backup directory, the
-directoryvalue must be the same as configured when installing the data store or the same as configured in the config.xml file (in$CARIDEN_ROOT/etc/configs).
ml_restore -directory <backup_data_store_directory>
Step 7![]() If you used a newer mld version than was used to generate the data store, follow these steps.
If you used a newer mld version than was used to generate the data store, follow these steps.
a.![]() Delete the current mld package.
Delete the current mld package.
rm -rf /opt/cariden/software/mld/<package_name>
c.![]() Upgrade the mld server. See Table 10-1 for information on the two available options:
Upgrade the mld server. See Table 10-1 for information on the two available options: -mld <directory> and -backup <directory>.
mld -action upgrade
Step 8![]() Restart the collection of data.
Restart the collection of data.
- If using augmented or manual snapshots, test the snapshot process by running it as a single instance.
Augmented: snapshot -config-file /opt/cariden/etc/snapshot_augment_collector.txt
Manual: snapshot -config-file /opt/cariden/etc/snapshot.txt
If you are satisfied that the data is valid, restart the cron job. To determine if a snapshot has finished, check the system process table or check the log file, which by default is in $CARIDEN_ROOT/logs.
- If collection is configured solely through the WAE Collector UI or if using augmented snapshots, start the web server.
Open the WAE Collector UI, and start the collection from the Collection > Schedule page.
Step 9![]() Restart the insertion of data.
Restart the insertion of data.
- If using augmented or manual snapshots, enable the insertion using the following command within the snapshot.
ml_insert_ctl -enable-scheduler
- If insertion is configured through the WAE Live UI, open this UI and stop the insertion from the Settings page. Set the Data Collection option to the appropriate server or archive, and click Apply.
 Feedback