- Installation Overview
- Installation Requirements
- Preparing for Installation
- Preparing the Oracle External Database
- Installing the Prime Network Gateway and Units Using the Installation Wizard
- Installing the Prime Network Gateway Using CLI
- Installing Prime Network Units
- Installing the Vision, Events, and Administration Clients
- Installing the Prime Network Integration Layer
- Upgrading and Rolling Back Prime Network
- Uninstalling Prime Network
- Next Steps
- Using Chinese Characters in Business Tags
Cisco Prime Network Installation Guide, 5.2
Bias-Free Language
The documentation set for this product strives to use bias-free language. For the purposes of this documentation set, bias-free is defined as language that does not imply discrimination based on age, disability, gender, racial identity, ethnic identity, sexual orientation, socioeconomic status, and intersectionality. Exceptions may be present in the documentation due to language that is hardcoded in the user interfaces of the product software, language used based on RFP documentation, or language that is used by a referenced third-party product. Learn more about how Cisco is using Inclusive Language.
- Updated:
- July 18, 2017
Chapter: Upgrading and Rolling Back Prime Network
- Prime Network Upgrade Overview
- Preparing to Upgrade Prime Network (Pre-Upgrade Checklist)
- Upgrading to Prime Network5.2 from 5.1, 5.0, 4.3.2, 4.3.1, 4.3 (Intermediate Steps)
- Upgrading to Prime Network 5.2 and Oracle 12.2.0.1
- Upgrading to Prime Network 5.2 in Suite Mode
- Upgrading or Downgrading OS in HA Environment
- Configuring Clusters for Pacemaker and Corosync Setup
- Verifying the Prime Network Operations Reports Upgrade from 4.0 to 5.2
- Rolling Back to Earlier Prime Network Version from Prime Network 5.2 Including Oracle Rollback
- Upgrading the Prime Network Integration Layer (PN-IL)
- Enable Units to Restart Automatically After they are Rebooted
- Restoring Customized Crontabs
- Restarting Crontab Jobs for NAT Units
- Fixing the Database Entry for Vision Clients with NAT
- Updating the Port Watchdog (AVM Protection) Scripts
- Restore Links Between Devices and Cloud VNEs
- Support for Third-Party VNEs
- Command Builder Scripts
- Gathering DB Statistics in First 24Hours
- Integration Changes
Upgrading and Rolling Back Prime Network
This section covers tasks on how to upgrade from Prime Network 4.2.2, 4.2.3, 4.3, 4.3,1, 4.3.2, 5.0, or 5.1 to 5.2 or roll back from Prime Network 5.2 to 5.1, 5,0, 4.3.2, 4.3.1, or 4.3. If you want to upgrade from an earlier version of Prime Network, you must first upgrade to Prime Network 4.0 and then you can upgrade to Prime Network 5.2.
To upgrade 4.0 from earlier versions of Prime Network, refer Prime Network 4.0 DVD contents. For the upgrade procedure, see Cisco Prime Network 4.0 Installation Guide.
This section contains the following topics:
- Prime Network Upgrade Overview
- Preparing to Upgrade Prime Network (Pre-Upgrade Checklist)
- Upgrading to Prime Network 5.2 from 5.1, 5.0, 4.3.2, 4.3.1, 4.3 (Intermediate Steps)
- Upgrading to Prime Network 5.2 and Oracle 12.2.0.1
–![]() In-line RHEL Upgrade of 6.7, 6.8, 6.9, 6.10, 7.4, and 7.5 with Prime Network 5.2 and Oracle 12.2.0.1
In-line RHEL Upgrade of 6.7, 6.8, 6.9, 6.10, 7.4, and 7.5 with Prime Network 5.2 and Oracle 12.2.0.1
–![]() Major RHEL Upgrade from 5.x to 6.x and 6.x to 7.x
Major RHEL Upgrade from 5.x to 6.x and 6.x to 7.x
–![]() Upgrading to Prime Network 5.2 in Suite Mode
Upgrading to Prime Network 5.2 in Suite Mode
- Verifying the Prime Network Operations Reports Upgrade from 4.0 to 5.2
- Rolling Back to Earlier Prime Network Version from Prime Network 5.2 Including Oracle Rollback
- Upgrading the Prime Network Integration Layer (PN-IL)
- Prime Network Post-upgrade Tasks
- Configuring Clusters for Pacemaker and Corosync Setup
Prime Network Upgrade Overview
The upgrade procedure backs up the existing user directory and then adds any new Prime Network 5.2 libraries, files, and code to the existing installation. Any changes to the database are made automatically as part of the upgrade. The majority of your customizations and user-defined information remain intact and available after upgrading. A list of what is migrated is provided in Table 10-1.
If Operations Reports is installed, it will be upgraded automatically during the upgrade process.
The amount of time required to upgrade Prime Network depends on your deployment size and system performance. During upgrade, the system will be down. Contact your Cisco account representative for an estimated upgrade duration.
Table 10-1 shows the components affected by the Prime Network upgrade and whether those components are upgraded automatically. If they are not updated automatically, the manual procedure you must perform is provided.
|
|
|
|
|
|---|---|---|---|
Prime Network supports third-party devices through Cisco Advanced Services engagement. As of release 5.2, Prime Network will not natively support third-party devices, and a Cisco Advanced Services contract will be required for their enablement and support. |
|||
Add, change, or remove database schema tables to meet the Cisco Prime Network 5.2 schema definition |
|||
Migrates the old data representation to the Cisco Prime Network 5.2 representation, where applicable |
All tickets and events are available after upgrading. All other data (such as maps, users, and so on) are preserved and migrated. |
||
You must retain the same database type after migration. In other words, you cannot upgrade from: |
|||
The Cisco-EPM-NOTIFICATION-MIB structure includes a running index in the object identifier (OID) suffix, instead of a constant number as in previous releases. For more information, contact Cisco Advanced Services. |
|||
IMOs might change between versions to support new features. For more information, contact Cisco Advanced services. |
|||
Review IMO changes to verify that the OID associated with the business object did not change. |
|||
Soft properties remain backward compatible and are available in Prime Network 5.2 after upgrading. |
|||
The upgrade procedure updates the built-in changes and removes scripts that are no longer part of the product. See Prime Network Post-upgrade Tasks to understand which commands require installation after the upgrade. |
|||
Prime Network crontabs are configured as part of the installation |
If you have user-defined cron jobs, place them in PRIME_NETWORK_HOME /local/cron/crontab.user.list. The upgrade will automatically add the user-defined cron jobs. User-defined cron jobs that are not placed in this directory will be removed. See Prime Network Post-upgrade Tasks. |
||
Review IMO changes to verify that the OID associated with the launch command did not change. |
|||
New Prime Network 5.2 registry files are available automatically after the upgrade. Customizable registry files, including avm+.xml and site*, are available and upgraded automatically. Review any customized registry configurations in site.xml and avm*.xml to understand whether they are relevant to Prime Network 5.2. Contact your Cisco account representative, if necessary. |
|||
User with database administrator permissions who can run maintenance tasks—such as gathering statistics—on the other Prime Network database schemas. |
|||
Prime Network SSL keystore and truststore keys, SSH keys, and registry encryption keys |
Prime Network SSL keystore and truststore keys are maintained. These keys are used by all SSL sockets, including BQL and PTP clients. Prime Network SSH keys and registry encryption keys are also maintained. |
||
Standby units complete their upgrade when they are restarted by the gateway (when an active unit goes down and the standby unit is brought online). |
|||
If you had an installed client, you need to reinstall it after upgrade. If you access the clients via Web Start, no action is required. |
|||
Cisco Prime Network Activation functionality is no longer available in Prime Network 5.2. Transaction Manager replaces the Prime Network Workflow and Activation features that were available in previous releases. For details on setting up Transaction Manager, see Setting Up Transaction Manager. For information on how to use Transaction Manager, see the Cisco Prime Network 5.2 Customization Guide. |
|||
All the software and device configuration changes are retained as part of the upgrade. |
|||
Upgrades for RHCS/Oracle Active Data Guard gateway high availability |
If you have gateway high availability, move the Prime Network and Oracle services to maintenance mode before you run the upgrade, then move them back to normal mode after it. |
||
All user defined reports created prior to the upgrade will be available post-upgrade. |
Preparing to Upgrade Prime Network (Pre-Upgrade Checklist)
Table 10-2 shows the pre-upgrade tasks that must be performed before upgrading to Prime Network 5.2.
|
|
|
|
|---|---|---|
If you are managing third-party devices, make note of them. You will need to give this information to your Cisco representative to enable the support after the upgrade. |
Prime Network supports third-party devices through Cisco Advanced Services engagement. As of release 5.2, Prime Network will not natively support third-party devices, and a Cisco Advanced Services contract will be required for their enablement and support. |
|
Copy these files from the DVD to the temporary upgrade directory you created: |
||
Familiarize yourself with the upgrade process and identify areas that may require manual changes. |
Components affected by upgrade are listed in Table 10-1 . |
|
a. b. For information on emdbctl utility used in the above procedure, refer to the Cisco Prime Network 5.2 Administrator Guide. 
Note |
||
Verify that the server machines comply with the system hardware and software requirements. |
Gateway: CPU and Memory Requirements for Different Network Sizes |
|
Verify that the backup directory has at least 6000 MB of free space for pnuser. |
||
Verify that the database has at least 8 GB of RAM available (the minimum requirement). |
For the database storage sizing guidelines, contact your Cisco account representative. |
|
Make sure all database sessions (such as TOAD, SQL, and so on) are closed. |
Other TOAD/SQL sessions apart from Prime Network established session should be closed. |
|
Place any customized crontab files in PRIME_NETWORK_HOME /local/cron/crontab.user.list. User-defined cron jobs that are not placed in this directory will be removed. |
||
(External database only) Restart Prime Network and the Oracle database. |
1. 2. 3. |
|
Verify that the gateway and units are powered up and connected by opening an SSH session between gateway and all units. |
||
Prior to Prime Network 5.2 upgrade, run the below query in Data base (DB): 1. a. |
||
(Only for NAT units) Stop the Prime Network application and remove the current crontab. |
Enter the following commands on each of the NAT units: Note To restart the crontab later, see Restarting Crontab Jobs for NAT Units. |
|
(Local and geographic gateway high availability) Verify that the gateways and units with Red Hat installed have rsync 3.0.6 or newer. |
Verify the rsync version installed on the gateway/units using the command: |
|
If using an external database, verify your database settings. Note Prime Network 5.2 requires the Oracle JVM and partitioning options. |
||
If you are running RHEL 7.x, ensure that the following three RPMs are installed: |
See Required Red Hat Services and RPMs
Note |
Supported Prime Network Upgrade and Rolling back versions
Refer the following table for supported Prime Network Upgrade and rolling back versions.
Table 10-3 Supported Prime Network Upgrade and Rolling back versions
Upgrading to Prime Network 5.2 from 5.1, 5.0, 4.3.2, 4.3.1, 4.3 (Intermediate Steps)
Note![]() The steps provided below are intermediate steps that are to be followed while Upgrading to Prime Network 5.2 and Oracle 12.2.0.1.
The steps provided below are intermediate steps that are to be followed while Upgrading to Prime Network 5.2 and Oracle 12.2.0.1.
After upgrading to Prime Network 5.2 you must also upgrade to Oracle 12.2.0.1 version. No other Oracle version must be used with Prime Network 5.2.
If you are running Prime Network with RHEL 5.8 before upgrading Prime Network 5.2, upgrade the RHEL version to RHEL 6.x or 7.x version based on your current Prime Network RHEL version support.

- Before you begin the upgrade, perform the pre-upgrade tasks in Preparing to Upgrade Prime Network (Pre-Upgrade Checklist).
- As Oracle user, take a backup of the file sqlnet.ora available at the following location without changing its permission:
(for Oracle 12.1.0.2) $ORACLE_BASE/product/12.1.0.2/db_1/network/admin
(for Oracle 12.1.0.1) $ORACLE_BASE/product/12.1.0.1/db_1/network/admin
Note![]() While upgrading Prime Network in a HA setup, you should always start the upgrade from the Primary gateway as active gateway. The active gateway should not be the secondary gateway when starting the upgrade process.
While upgrading Prime Network in a HA setup, you should always start the upgrade from the Primary gateway as active gateway. The active gateway should not be the secondary gateway when starting the upgrade process.
To upgrade the Prime Network gateway:
Step 1![]() Create a temporary upgrade directory on the gateway.
Create a temporary upgrade directory on the gateway.
Note![]() Make sure that upgrade directory is not a subdirectory of $PRIME_NETWORK_HOME (which is /export/home/pnuser by default).
Make sure that upgrade directory is not a subdirectory of $PRIME_NETWORK_HOME (which is /export/home/pnuser by default).
Step 2![]() Insert Disk 3: Upgrade Files into the DVD drive.
Insert Disk 3: Upgrade Files into the DVD drive.
Step 3![]() Copy these files from the DVD to the temporary upgrade directory you created:
Copy these files from the DVD to the temporary upgrade directory you created:
Step 4![]() Assign pnuser:pngroup owner permissions to the Prime_Network_upgrade directory and its contents:
Assign pnuser:pngroup owner permissions to the Prime_Network_upgrade directory and its contents:
Step 5![]() To verify the group name, run the following command as pnuser: id --group --name
To verify the group name, run the following command as pnuser: id --group --name
Step 6![]() As pnuser, move to the following location in your temporary upgrade directory:
As pnuser, move to the following location in your temporary upgrade directory:
Step 7![]() If you have not upgraded from fresh install of Prime Network 5.1, 5.0, 4.3.2, 4.3.1, 4.3, 4.2.3, or 4.2.2 to Prime Network 5.2, as PN user, run status command to check if Compliance Manager is UP, if not, run:
If you have not upgraded from fresh install of Prime Network 5.1, 5.0, 4.3.2, 4.3.1, 4.3, 4.2.3, or 4.2.2 to Prime Network 5.2, as PN user, run status command to check if Compliance Manager is UP, if not, run:
Note![]() Compliance server should be up and running for performing the upgrading process.
Compliance server should be up and running for performing the upgrading process.
Note![]() While exporting custom policies, if you are prompted with the following message,
While exporting custom policies, if you are prompted with the following message,
Export failed, Do you want to continue (YES/NO),
then you can follow the below conditions based on your requirements:
Choose NO to stop the upgrading process and exit, or YES to continue.
When you choose YES, the following message appears:
Warning ! All the custom policies has been wiped out, Do you want to continue (YES/NO).
Choose NO to stop the upgrading process and exit, or YES to continue the upgrade process.
Step 9![]() Enter the required information as shown in the following table.
Enter the required information as shown in the following table.
|
|
|
|
|---|---|---|
| In a high availability environment, you will be required to enter the OS root user for each machine in the setup. |
||
This prompt is to check whether you have recently completed database backup. Default is yes. If you enter no, the upgrade process will stop and will ask you to back up the database. For information on backing up your database, see Step 4 in the pre-upgrade checklist. |
||
Destination location for backing up the existing installation tar file |
Specify a directory with at least 6000 MB of free space. Verify that the backup directory is available for pnuser. The backup directory needs write permission. Enter the following command to add write permission to the backup directory: |
|
Configuration Audit is deprecated and replaced by Compliance Audit. If you still want to use Configuration Audit, enter no and it will remain available from Change and Configuration Management. |
||
Provide the full pathname to the temporary upgrade location from Step 1. |
||
The root password used to log into the Prime Network GUI applications. |
Step 10![]() After the upgrade is complete, Prime Network restarts. Log in as pnuser for the environment changes to take effect.
After the upgrade is complete, Prime Network restarts. Log in as pnuser for the environment changes to take effect.
Note![]() While importing the custom policies, if the number of custom policies exported is zero, then the importing process is skipped with a message No Custom Policies to import. If the custom policies exported is not zero and if the compliance server is up, then the importing process begins. If the compliance server is not up within 30 seconds, the following message is prompted to the user:
While importing the custom policies, if the number of custom policies exported is zero, then the importing process is skipped with a message No Custom Policies to import. If the custom policies exported is not zero and if the compliance server is up, then the importing process begins. If the compliance server is not up within 30 seconds, the following message is prompted to the user:
Failed : Run <PN_Home>/utils/independent/compliance/bin/importPolicies.sh manually
Step 11![]() If any of the preceding steps fail, the following error message is shown:
If any of the preceding steps fail, the following error message is shown:
In the error message, hook-type and hook-name are the type and name of the procedure that failed.
a.![]() Check the upgrade log ( PRIME_NETWORK_HOME /Main/upgrade- timestamp.log) to identify the reason for the failure.
Check the upgrade log ( PRIME_NETWORK_HOME /Main/upgrade- timestamp.log) to identify the reason for the failure.
b.![]() If you can identify the problem and fix it manually, do so; then, choose option 2 to rerun the hook. The upgrade procedure continues from the procedure that failed.
If you can identify the problem and fix it manually, do so; then, choose option 2 to rerun the hook. The upgrade procedure continues from the procedure that failed.
c.![]() If you cannot fix the problem, choose option 1 to cancel the upgrade. After canceling the upgrade, Prime Network cannot be started. Contact your Cisco account representative to fix the problem; then, rerun the upgrade. The upgrade procedure continues from the procedure that failed.
If you cannot fix the problem, choose option 1 to cancel the upgrade. After canceling the upgrade, Prime Network cannot be started. Contact your Cisco account representative to fix the problem; then, rerun the upgrade. The upgrade procedure continues from the procedure that failed.
Note![]() If you decide not to rerun the upgrade, you must roll back to your base Prime Network environment, including rolling back the database. See Rolling Back to Earlier Prime Network Version.
If you decide not to rerun the upgrade, you must roll back to your base Prime Network environment, including rolling back the database. See Rolling Back to Earlier Prime Network Version.
Step 12![]() If you upgraded a gateway configured with local high availability, take the ana and oracle_db services out of maintenance mode:
If you upgraded a gateway configured with local high availability, take the ana and oracle_db services out of maintenance mode:
Step 13![]() Clear the web browser cache.
Clear the web browser cache.
Step 14![]() Perform the necessary tasks listed in Prime Network Post-upgrade Tasks.
Perform the necessary tasks listed in Prime Network Post-upgrade Tasks.
Note![]() To remove previous device package reference errors in avm file: 11.out, execute the following command as a Prime Network user: networkctl restart –avm 11.
To remove previous device package reference errors in avm file: 11.out, execute the following command as a Prime Network user: networkctl restart –avm 11.
After the upgrade of Prime Network, you can implement SNMPv2 protocol on all devices. Follow the below steps to run the script:
1.![]() Navigate to ‘<PRIME_NETWORK_HOME>/local/scripts’ directory in the GateWay (GW).
Navigate to ‘<PRIME_NETWORK_HOME>/local/scripts’ directory in the GateWay (GW).
2.![]() Run the script as pnuser from the GW.
Run the script as pnuser from the GW.
Note![]() To run script, Prime Network should be down in both GW and Units. This condition is applicable for all VNEs and not applicable to a specific VNE.
To run script, Prime Network should be down in both GW and Units. This condition is applicable for all VNEs and not applicable to a specific VNE.
3.![]() Run the script file using the command below:
Run the script file using the command below:
Note![]() Valid SnmpVer parameters for the above script are v1,v2,v2 only and the parameters are case sensitive. The log files are available in the following path; ‘<PRIME_NETWORK_HOME>/SnmpVerchange_logs’ in the GW.
Valid SnmpVer parameters for the above script are v1,v2,v2 only and the parameters are case sensitive. The log files are available in the following path; ‘<PRIME_NETWORK_HOME>/SnmpVerchange_logs’ in the GW.
4.![]() Start the Prime Network to reflect the changes.
Start the Prime Network to reflect the changes.
Upgrading to Prime Network 5.2 and Oracle 12.2.0.1
In-line RHEL Upgrade of 6.7, 6.8, 6.9, 6.10, 7.4, and 7.5 with Prime Network 5.2 and Oracle 12.2.0.1
To perform the in-line upgrade from RHEL 6.x to 6.7, 6.8, 6.9, 6.10, and from 7.4 to 7.5 with Prime Network 5.2 and Oracle 12.2.0.1, follow the procedure provided below:
Step 1![]() Upgrade to Prime Network 5.2 using Prime_Network_upgrade directory from Disk 3 to the temporary upgrade directory you created. See Upgrading to Prime Network 5.2 from 5.1, 5.0, 4.3.2, 4.3.1, 4.3 (Intermediate Steps).
Upgrade to Prime Network 5.2 using Prime_Network_upgrade directory from Disk 3 to the temporary upgrade directory you created. See Upgrading to Prime Network 5.2 from 5.1, 5.0, 4.3.2, 4.3.1, 4.3 (Intermediate Steps).
Step 2![]() Upgrade embedded Oracle 12 using the embedded_upgrade_12.2 directory from Disk 3. See Upgrading the Embedded Database to Oracle 12.2.0.1.
Upgrade embedded Oracle 12 using the embedded_upgrade_12.2 directory from Disk 3. See Upgrading the Embedded Database to Oracle 12.2.0.1.
Step 3![]() To perform the in-line upgrade from 6.x to 6.7, 6.8, 6.9, 6.10 and from 7.4 to 7.5 with latest Open ssl package, contact your System Admin for RHEL in-line upgrade.
To perform the in-line upgrade from 6.x to 6.7, 6.8, 6.9, 6.10 and from 7.4 to 7.5 with latest Open ssl package, contact your System Admin for RHEL in-line upgrade.
Step 4![]() After upgrading the RHEL, login with pnuser and verify the web server status and the compliance engine status.
After upgrading the RHEL, login with pnuser and verify the web server status and the compliance engine status.
Step 5![]() Login as pnuser and restart AVM11 using the following command:
Login as pnuser and restart AVM11 using the following command:
Note![]() If you have Unit server attached with Gateway, first upgrade the Gateway as mentioned in the above steps.
If you have Unit server attached with Gateway, first upgrade the Gateway as mentioned in the above steps.
Major RHEL Upgrade from 5.x to 6.x and 6.x to 7.x
To upgrade the RHEL, follow the below steps:
Step 1![]() Note down the pnuser name and Password, and Oracle username and Database profile that you had selected while installing Prime Network lower version.
Note down the pnuser name and Password, and Oracle username and Database profile that you had selected while installing Prime Network lower version.
Step 2![]() Upgrade to Prime Network 5.2 from Prime Network lower version using Prime_Network_upgrade directory from Disk 3. See Upgrading to Prime Network 5.2 from 5.1, 5.0, 4.3.2, 4.3.1, 4.3 (Intermediate Steps).
Upgrade to Prime Network 5.2 from Prime Network lower version using Prime_Network_upgrade directory from Disk 3. See Upgrading to Prime Network 5.2 from 5.1, 5.0, 4.3.2, 4.3.1, 4.3 (Intermediate Steps).
Step 3![]() Upgrade embedded Oracle 12 using the embedded_upgrade_12.2 directory from Disk 3. See Upgrading the Embedded Database to Oracle 12.2.0.1.
Upgrade embedded Oracle 12 using the embedded_upgrade_12.2 directory from Disk 3. See Upgrading the Embedded Database to Oracle 12.2.0.1.
Step 4![]() Login as pnuser and backup the embedded oracle database and Prime Network data using the commands below:
Login as pnuser and backup the embedded oracle database and Prime Network data using the commands below:
Note![]() If you have operations reports in Gateway, uninstall it before performing PN Database backup.
If you have operations reports in Gateway, uninstall it before performing PN Database backup.
Step 5![]() Copy the latest backup folder in $ Prime_Network_Home/backup to your local server (for example, other than the server you are currently using).
Copy the latest backup folder in $ Prime_Network_Home/backup to your local server (for example, other than the server you are currently using).
Step 6![]() Re-image the Gateway server to RHEL 6.x or 7.x version based on your current Prime Network RHEL version support. If you have a Unit server attached in the Gateway, re-image the Unit server to RHEL 6.x or 7.x version based on your current Prime Network RHEL version support.
Re-image the Gateway server to RHEL 6.x or 7.x version based on your current Prime Network RHEL version support. If you have a Unit server attached in the Gateway, re-image the Unit server to RHEL 6.x or 7.x version based on your current Prime Network RHEL version support.
Note![]() After you complete the re-imaging of the Gateway server to RHEL 6.x or 7.4, ensure to restore the backup data.
After you complete the re-imaging of the Gateway server to RHEL 6.x or 7.4, ensure to restore the backup data.
Step 7![]() Install the Prime Network 5.2 Gateway, Oracle 12.2.0.1 and the Unit server. If you have unit Gateway setup in PN lower version, use the pnuser name and Password, and Oracle username and Database profile that you had chosen while installing PN Gateway lower version.
Install the Prime Network 5.2 Gateway, Oracle 12.2.0.1 and the Unit server. If you have unit Gateway setup in PN lower version, use the pnuser name and Password, and Oracle username and Database profile that you had chosen while installing PN Gateway lower version.
Note![]() If you have installed the embedded Oracle in remote server for Prime Network lower version, install embedded database 12.2.0.1 on the same server for Prime Network 5.2.
If you have installed the embedded Oracle in remote server for Prime Network lower version, install embedded database 12.2.0.1 on the same server for Prime Network 5.2.
Step 8![]() Once installation is complete, login as a Prime user, back up the Prime network Gateway data and embedded database $ PRIME_NETWORK_HOME/Main/scripts/embedded_db # emdbctl --backup . Please refer Prime Network 5.2 Administrator guide to know more on how to back up the Gateway data and the embedded database.
Once installation is complete, login as a Prime user, back up the Prime network Gateway data and embedded database $ PRIME_NETWORK_HOME/Main/scripts/embedded_db # emdbctl --backup . Please refer Prime Network 5.2 Administrator guide to know more on how to back up the Gateway data and the embedded database.
Step 9![]() Navigate to $ANA_HOME/backup location, and remove the back up file folder in the location.
Navigate to $ANA_HOME/backup location, and remove the back up file folder in the location.
Step 10![]() Paste the backup file folder which you already have in your local machine to the location $ANA_HOME/backup.
Paste the backup file folder which you already have in your local machine to the location $ANA_HOME/backup.
Step 11![]() Provide the group owner permissions to the backup file directory and its contents as follows:
Provide the group owner permissions to the backup file directory and its contents as follows:
Step 12![]() Login as pnuser and restore the embedded oracle database and Prime Network data using the commands below:
Login as pnuser and restore the embedded oracle database and Prime Network data using the commands below:
run: restore.pl restore-folder
Step 13![]() Once the restoring process is completed, check the status of Prime Network using the command:
Once the restoring process is completed, check the status of Prime Network using the command:
Step 14![]() Ensure that the status of both compliance engine and web server is up using the commands:
Ensure that the status of both compliance engine and web server is up using the commands:
Step 15![]() Start the Unit server as a pnuser using the command:
Start the Unit server as a pnuser using the command:
Upgrading to Prime Network 5.2 in Suite Mode
To upgrade to Prime Network 5.2 in suite mode, follow the procedure provided below:
Step 1![]() Follow the upgrade procedures described below:
Follow the upgrade procedures described below:
Upgrading to Prime Network 5.2 from 5.1, 5.0, 4.3.2, 4.3.1, 4.3 (Intermediate Steps)
In-line RHEL Upgrade of 6.7, 6.8, 6.9, 6.10, 7.4, and 7.5 with Prime Network 5.2 and Oracle 12.2.0.1
Step 2![]() Integrate Prime Network in suite mode with Prime Central 2.1. Refer to the Integrating Prime Network with Prime Central topic of the Cisco Prime Central Quick Start Guide.
Integrate Prime Network in suite mode with Prime Central 2.1. Refer to the Integrating Prime Network with Prime Central topic of the Cisco Prime Central Quick Start Guide.
Step 3![]() Upgrade to Prime Network Integration Layer 2.2.0 from PN-IL earlier release. Refer to the Appendix 10, “Upgrading PN-IL in Standalone Mode” e topic of the Cisco Prime Network 5.2 Installation Guide
Upgrade to Prime Network Integration Layer 2.2.0 from PN-IL earlier release. Refer to the Appendix 10, “Upgrading PN-IL in Standalone Mode” e topic of the Cisco Prime Network 5.2 Installation Guide
Step 4![]() Integrate Prime Network Integration Layer 2.2.0 in suite mode with Prime Central 2.1. Refer to the Integrating the Prime Network Integration Layer with Prime Central topic of the Cisco Prime Central Quick Start Guide.
Integrate Prime Network Integration Layer 2.2.0 in suite mode with Prime Central 2.1. Refer to the Integrating the Prime Network Integration Layer with Prime Central topic of the Cisco Prime Central Quick Start Guide.
Upgrading or Downgrading OS in HA Environment
You can upgrade or downgrade RHEL version on the local cluster and install HA on all VMs. For example, you can install VM1 and VM2 in a local cluster and VM3 as Geo/DR in a Local with Geographical setup or Install VM1 in a local cluster and VM3 as Geo/DR in a Geo only setup. VM1 is considered as Local or Primary VM, VM2 as secondary local cluster VM where both PN and oracle services not running, and VM3 as standby and distant Geo/DR.
Upgrade of OS in HA Environment
To perform the upgrade, follow the steps:
Step 1![]() Install HA on a Local cluster VM with Geographical setup or Geographical only setup that has RHEL5.8 or 6.x on all VMs.
Install HA on a Local cluster VM with Geographical setup or Geographical only setup that has RHEL5.8 or 6.x on all VMs.
Step 2![]() Shutdown the Primary VM (VM1) in case of both Local+HA local clusters without loss of generality.
Shutdown the Primary VM (VM1) in case of both Local+HA local clusters without loss of generality.
Step 3![]() Execute the following script on the StandBy VM (VM3):
Execute the following script on the StandBy VM (VM3):
Note![]() After execution, VM3 will be your new Primary, and either VM1 or VM2 will be your new Geo/DR.
After execution, VM3 will be your new Primary, and either VM1 or VM2 will be your new Geo/DR.
Step 4![]() Upgrade the RHEL from 5.8 to 6.x or 7.5 on the local cluster.
Upgrade the RHEL from 5.8 to 6.x or 7.5 on the local cluster.
Upgrade the RHEL from 6.x to 7.5 on the local cluster.
a.![]() Take the backup of Prime Network, re-image the server with RHEL 6.x or RHEL 7.5, install the Prime Network 5.2, and then restore the Prime Network backup.
Take the backup of Prime Network, re-image the server with RHEL 6.x or RHEL 7.5, install the Prime Network 5.2, and then restore the Prime Network backup.
b.![]() In case, if you are re-imaging the server with RHEL 7.5, ensure to configure the cluster with Pacemaker. For more information, see Configuring Clusters for Pacemaker and Corosync Setup.
In case, if you are re-imaging the server with RHEL 7.5, ensure to configure the cluster with Pacemaker. For more information, see Configuring Clusters for Pacemaker and Corosync Setup.
Note![]() In Prime Network 5.2, in-line upgrade is supported from RHEL 6.9 to RHEL 6.10. For support on new RHEL 6.10 installation with Prime Network 5.2, contact the account manager and the Advance Services representative.
In Prime Network 5.2, in-line upgrade is supported from RHEL 6.9 to RHEL 6.10. For support on new RHEL 6.10 installation with Prime Network 5.2, contact the account manager and the Advance Services representative.
Step 5![]() Setup VM cluster (VM1 or VM2) for HA installation as shown below:
Setup VM cluster (VM1 or VM2) for HA installation as shown below:
b.![]() Set permissions for both /tmp and /etc/shadow
Set permissions for both /tmp and /etc/shadow
d.![]() Mount again various 4 disk partitions without loss of generality on the primary VM as shown below:
Mount again various 4 disk partitions without loss of generality on the primary VM as shown below:
–![]() mount/dev/sdb1/export1/ana-home/ana
mount/dev/sdb1/export1/ana-home/ana
–![]() mount/dev/sdb4/datafiles/dbf
mount/dev/sdb4/datafiles/dbf
Step 6![]() Log in to the Primary VM (VM1) without loss of generality, and then navigate to /tmp path to unzip RH_ha.zip.
Log in to the Primary VM (VM1) without loss of generality, and then navigate to /tmp path to unzip RH_ha.zip.
Note![]() Your new Geo/DR VM will be the new DR.
Your new Geo/DR VM will be the new DR.
Step 7![]() Navigate to /tmp/RH_ha path and then execute the following script on VM1:
Navigate to /tmp/RH_ha path and then execute the following script on VM1:
Note![]() When the script fails, do the following:
When the script fails, do the following:
a. Add OVERRIDE_SWAP=true to the file /tmp/RH_ha/auto_install_RH.ini
b. Execute perl install_Prime_HA.pl-autoconf auto_install_RH.ini
Step 8![]() Execute perl resumeFromFailOver.pl --reconfigure_setup also on the primary VM1.
Execute perl resumeFromFailOver.pl --reconfigure_setup also on the primary VM1.
Step 9![]() Log in to standby VM (VM3) and navigate to /tmp/RH_ha path.
Log in to standby VM (VM3) and navigate to /tmp/RH_ha path.
Step 10![]() Execute “perl resumeFromFailOver.pl --setup_replication” on the standby VM (VM3).
Execute “perl resumeFromFailOver.pl --setup_replication” on the standby VM (VM3).
Step 11![]() To upgrade OS on your new primary VM(VM3) to RHEL 6.5 or 6.7 or 6.8 or 7.4, repeat steps 2 through 10.
To upgrade OS on your new primary VM(VM3) to RHEL 6.5 or 6.7 or 6.8 or 7.4, repeat steps 2 through 10.
a.![]() Shutdown VM3 and execute perl primeha –fail script on Local VM (VM1).
Shutdown VM3 and execute perl primeha –fail script on Local VM (VM1).
b.![]() Upgrade OS on VM3 to 6.7, 6.8, 6.9, 6.10, 7.4, or 7.5.
Upgrade OS on VM3 to 6.7, 6.8, 6.9, 6.10, 7.4, or 7.5.
Note![]() In Prime Network 5.2, in-line upgrade is supported from RHEL 6.9 to RHEL 6.10. For support on new RHEL 6.10 installation with Prime Network 5.2, contact the account manager and the Advance Services representative.
In Prime Network 5.2, in-line upgrade is supported from RHEL 6.9 to RHEL 6.10. For support on new RHEL 6.10 installation with Prime Network 5.2, contact the account manager and the Advance Services representative.
c.![]() Setup VM3 to install HA If VM3.
Setup VM3 to install HA If VM3.
d.![]() Execute the scripts perl resumeFromFailOver.pl –-reinstall_setup and perl resumeFromFailOver.pl --reconfigure_setup on VM3.
Execute the scripts perl resumeFromFailOver.pl –-reinstall_setup and perl resumeFromFailOver.pl --reconfigure_setup on VM3.
e.![]() Execute perl resumeFromFailOver.pl --setup_replication on VM1.
Execute perl resumeFromFailOver.pl --setup_replication on VM1.
Downgrade OS in HA Environment
To perform the downgrade follow the steps:
Step 1![]() Install HA on a Local cluster VM with Geographical setup or Geographical only setup that has RHEL 6.5, 6.7, 6.8, 7.4, or 7.5 on all VMs.
Install HA on a Local cluster VM with Geographical setup or Geographical only setup that has RHEL 6.5, 6.7, 6.8, 7.4, or 7.5 on all VMs.
Step 2![]() Shutdown the Primary VM without loss of generality in case of both Local +HA clusters.
Shutdown the Primary VM without loss of generality in case of both Local +HA clusters.
Step 3![]() Execute the following script on the StandBy VM (VM3):
Execute the following script on the StandBy VM (VM3):
Note![]() After execution, VM3 will be your new Primary, and either VM1 or VM2 will be your new Geo/DR.
After execution, VM3 will be your new Primary, and either VM1 or VM2 will be your new Geo/DR.
Step 4![]() Downgrade the RHEL from 7.5 to 6.x on the local cluster.
Downgrade the RHEL from 7.5 to 6.x on the local cluster.
Note![]() Downgrade to RHEL 5.8 is not supported.
Downgrade to RHEL 5.8 is not supported.
Step 5![]() Setup VM cluster for the HA installation as shown below:
Setup VM cluster for the HA installation as shown below:
b.![]() Set permissions for both /tmp and /etc/shadow
Set permissions for both /tmp and /etc/shadow
d.![]() Mount again various 4 disk partitions without loss of generality on the primary VM as shown below:
Mount again various 4 disk partitions without loss of generality on the primary VM as shown below:
–![]() mount/dev/sdb1/export1/ana-home/ana
mount/dev/sdb1/export1/ana-home/ana
–![]() mount/dev/sdb4/datafiles/dbf
mount/dev/sdb4/datafiles/dbf
Step 6![]() Login to the Primary VM without loss of generality, and then navigate to /tmp path to unzip RH_ha.zip.
Login to the Primary VM without loss of generality, and then navigate to /tmp path to unzip RH_ha.zip.
Note![]() Your new Geo/DR VM will be the new DR.
Your new Geo/DR VM will be the new DR.
Step 7![]() Navigate to /tmp/RH_ha path and then execute the following script:
Navigate to /tmp/RH_ha path and then execute the following script:
Note![]() When the script fails, do the following:
When the script fails, do the following:
a. Add OVERRIDE_SWAP=true to the file /tmp/RH_ha/rf_auto_install_RH.ini
b. Execute perl install_Prime_HA.pl-autoconf rf_auto_install_RH.in
Step 8![]() Execute perl resumeFromFailOver.pl --reconfigure_setup also on the primary VM.
Execute perl resumeFromFailOver.pl --reconfigure_setup also on the primary VM.
Step 9![]() Login to standby VM and navigate to /tmp/RH_ha path.
Login to standby VM and navigate to /tmp/RH_ha path.
Step 10![]() Execute perl resumeFromFailOver.pl--setup_replication on the standby VM.
Execute perl resumeFromFailOver.pl--setup_replication on the standby VM.
Step 11![]() To downgrade OS on your new primary VM to RHEL6.x, repeat steps 2 through 10.
To downgrade OS on your new primary VM to RHEL6.x, repeat steps 2 through 10.
a.![]() Shutdown VM3 and execute perl primeha –fail script on Local VM (VM1)
Shutdown VM3 and execute perl primeha –fail script on Local VM (VM1)
b.![]() Downgrade OS on VM3 to RHEL 6.x
Downgrade OS on VM3 to RHEL 6.x
d.![]() Execute the scripts perl resumeFromFailOver.pl –-reinstall_setup and perl resumeFromFailOver.pl --reconfigure_setup on VM3
Execute the scripts perl resumeFromFailOver.pl –-reinstall_setup and perl resumeFromFailOver.pl --reconfigure_setup on VM3
e.![]() Execute perl resumeFromFailOver.pl --setup_replication on VM1.
Execute perl resumeFromFailOver.pl --setup_replication on VM1.
Configuring Clusters for Pacemaker and Corosync Setup
From RHEL7.2 onwards Pacemaker is the default cluster resource manager. Pacemaker provides maximum availability for your cluster services and resources by detecting and recovering node and resource-level failures. It uses messaging and membership capabilities provided by Corosync to keep the resource availability on any of the cluster nodes
Corosync is the open source cluster engine that manages cluster interconnect and maintains the same cluster configuration across all the cluster nodes. All the configuration changes will be replicated to other node using corosync cluster engine. Pacemaker and Corosync are powerful open source technologies that completely replaces the CMAN and RGManager technologies from previous Redhat cluster releases.
Use the following procedure to configure clusters:
Step 1![]() Install the required packages for Pacemaker on both nodes.
Install the required packages for Pacemaker on both nodes.
Step 2![]() (Optional) Verify Pacemaker /Corosync /pcs is available or not-a | grep pacemaker.
(Optional) Verify Pacemaker /Corosync /pcs is available or not-a | grep pacemaker.
Step 3![]() Stop the firewalld services and Network Manager on both nodes.
Stop the firewalld services and Network Manager on both nodes.
Step 4![]() Disable selinux on both nodes.
Disable selinux on both nodes.
Step 5![]() (Optional) Verify Hostnames on both nodes.
(Optional) Verify Hostnames on both nodes.
Step 6![]() (Optional) Verify system configurations.
(Optional) Verify system configurations.
Step 7![]() Add Hostnames, IP addresses and Virtual IPs on both nodes (Vi /etc/hosts)
Add Hostnames, IP addresses and Virtual IPs on both nodes (Vi /etc/hosts)
Step 8![]() Set the cluster password on both the nodes.
Set the cluster password on both the nodes.
Step 9![]() Start and enable the pcsd sevice on both nodes.
Start and enable the pcsd sevice on both nodes.
Step 10![]() Authenticate and authorize the nodes, any one node
Authenticate and authorize the nodes, any one node
Step 11![]() Start the cluster on one of the nodes. Execute the below command:
Start the cluster on one of the nodes. Execute the below command:
Note![]() Node1 and Node2 can accept hostname and is case sensitive. For example, pcs cluster setup --start --name hacluster pn52-qa2-ha-01 pn52-qa2-ha-02
Node1 and Node2 can accept hostname and is case sensitive. For example, pcs cluster setup --start --name hacluster pn52-qa2-ha-01 pn52-qa2-ha-02
Step 12![]() Enable a cluster with the specified command on both nodes.
Enable a cluster with the specified command on both nodes.
Step 13![]() Log in to the Cluster GUI.
Log in to the Cluster GUI.
a.![]() Enter the username and password.
Enter the username and password.
b.![]() Click Login o access the HAcluster. The High Availability Management window appears.
Click Login o access the HAcluster. The High Availability Management window appears.
Figure 10-1 High Availability Login Screen

Step 14![]() To add a Hostname to an existing Cluster GUI, follow the below steps:
To add a Hostname to an existing Cluster GUI, follow the below steps:
a.![]() Click the MANAGE CLUSTERS tab, and then click Add Existing.
Click the MANAGE CLUSTERS tab, and then click Add Existing.
Figure 10-2 Add Existing Clusters
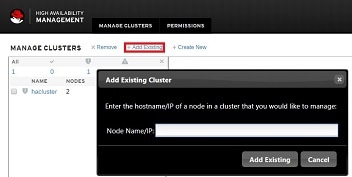
b.![]() In the Add Existing Cluster dialog box, enter the relevant hostname/IP of a node, and then click Add Existing.
In the Add Existing Cluster dialog box, enter the relevant hostname/IP of a node, and then click Add Existing.
Note![]() To create a new cluster, click Create New.
To create a new cluster, click Create New.
Step 15![]() To view individual Cluster information, follow the below steps:
To view individual Cluster information, follow the below steps:
a.![]() In the Left pane, check a cluster name to view the nodes, resources, and fence-devices information of the selected cluster.
In the Left pane, check a cluster name to view the nodes, resources, and fence-devices information of the selected cluster.

Note![]() Prime Network installation does not support fencing. Fencing can be configured manually as per the instructions in RHEL documentation.
Prime Network installation does not support fencing. Fencing can be configured manually as per the instructions in RHEL documentation.
Step 16![]() In the right pane, under the Nodes area, click any one node and view the Cluster Status in GUI or in CLI.
In the right pane, under the Nodes area, click any one node and view the Cluster Status in GUI or in CLI.
Verifying the Prime Network Operations Reports Upgrade from 4.0 to 5.2
Note![]() This section is applicable only for users who has purchased the Prime Network Operation Reports tool prior to May 2018 and are upgrading from previous releases.
This section is applicable only for users who has purchased the Prime Network Operation Reports tool prior to May 2018 and are upgrading from previous releases.
When upgrading the Prime Network Operations Reports from 4.0 to 5.2, you must manually enter the following URL of Operations Reports in the Address field:
Gateway-IP—gateway IP of the Operations Reports portal.
Port-number—SSL port number that was configured during installation. The default SSL port is 8445.
Note![]() In Prime Network, Operations reports application uses TSL 1.0. This is because Pentaho does not allow TSL 1.1 and 1.2 versions and SSL 3.0 and 2.0 versions with RHEL 6.8.
In Prime Network, Operations reports application uses TSL 1.0. This is because Pentaho does not allow TSL 1.1 and 1.2 versions and SSL 3.0 and 2.0 versions with RHEL 6.8.
Rolling Back to Earlier Prime Network Version from Prime Network 5.2 Including Oracle Rollback
This section describes the procedure to rollback to earlier versions of Prime Network and Oracle from Prime Network 5.2 and Oracle 12.2.0.1.
Note![]() You must do Oracle rollback before rolling back to an earlier Prime Network version.
You must do Oracle rollback before rolling back to an earlier Prime Network version.
Refer the following table to decide which Oracle version to rollback to:
Table 10-4 Oracle Rollback Procedures
|
|
|
|
|---|---|---|
After completing Oracle rollback, rollback to an earlier Prime Network version. Refer Rolling Back to Earlier Prime Network Version.
Rolling Back to Earlier Oracle Version
Prerequisites
Step 1![]() Gateway Pre-Upgrade Tasks.
Gateway Pre-Upgrade Tasks.
Step 2![]() Execute the following command as root user to switch to oracle user:
Execute the following command as root user to switch to oracle user:
Step 3![]() Change directory to $ORACLE_BASE/backup and record the time stamp of earlier Prime Network version backup (which is Year: 2019 Month: 02 Date: 26 HR:15 MIN: 54 in the example below) and the file name.
Change directory to $ORACLE_BASE/backup and record the time stamp of earlier Prime Network version backup (which is Year: 2019 Month: 02 Date: 26 HR:15 MIN: 54 in the example below) and the file name.
Note![]() For Oracle rollback in Geo DR and Local HA, the path for backup file is /ora/opt/ora1/backup.
For Oracle rollback in Geo DR and Local HA, the path for backup file is /ora/opt/ora1/backup.
oracle@pn-sgw-02-lnx [~]#cd $ORACLE_BASE/
oracle@pn-sgw-02-lnx [~]# cd backup
Step 4![]() (Applicable only for Local HA and Local HA + Geo DR)
(Applicable only for Local HA and Local HA + Geo DR)
On Active server, freeze the cluster configured services (ana and oracle_db) by executing the following command as the root user:
clusvcadm -Z <service-name> (for RHEL 6.x)
pcs resource unmanage <service-name> (for RHEL 7.x)
Step 5![]() (Applicable only for Local HA + Geo DR)
(Applicable only for Local HA + Geo DR)
a.![]() On both Active and Standby server, navigate to the location
On both Active and Standby server, navigate to the location
(for Oracle 12.1.0.2) cd /ora/opt/ora1/oracle/product/12.1.0.2/db_1/network/admin/
(for Oracle 12.1.0.1) cd /ora/opt/ora1/oracle/product/12.1.0.1/db_1/network/admin/
and edit the file tnsnames.ora to match the below content:
Note![]() The line to be edited in file tnsnames.ora is shown in bold below.
The line to be edited in file tnsnames.ora is shown in bold below.
-----------------------------------------------------------------------------------------------------------
# tnsnames.ora Network Configuration File: /ora/opt/ora1/oracle/product/12.1.0.2/db_1/network/admin/tnsnames.ora
# Generated by Oracle configuration tools.
(ADDRESS = (PROTOCOL = TCP)(HOST = 10.56.57.214)(PORT = 1521))
(ADDRESS = (PROTOCOL = TCP)(HOST = 10.56.57.199)(PORT = 1521))
----------------------------------------------------------------------------------------------------------
b.![]() On Standby server, navigate to the location
On Standby server, navigate to the location
(for Oracle 12.1.0.2) cd /ora/opt/ora1/oracle/product/12.1.0.2/db_1/network/admin/
(for Oracle 12.1.0.1) cd /ora/opt/ora1/oracle/product/12.1.0.1/db_1/network/admin/
and edit the file listener.ora to match the below content:
Note![]() The line to be added in file listener.ora are shown in bold below.
The line to be added in file listener.ora are shown in bold below.
-----------------------------------------------------------------------------------------------------------
# listener.ora Network Configuration File: /ora/opt/ora1/oracle/product/12.1.0.2/db_1/network/admin/listener.ora
# Generated by Oracle configuration tools.
(ADDRESS = (PROTOCOL = IPC)(KEY = EXTPROC1521))
(ADDRESS = (PROTOCOL = TCP)(HOST = pn-ha-qa-pn50-dr.cisco.com)(PORT = 1521))
(ORACLE_HOME= /ora/opt/ora1/oracle/product/12.1.0.2/db_1)
(ORACLE_HOME= /ora/opt/ora1/oracle/product/12.1.0.2/db_1)
ADR_BASE_LISTENER = /ora/opt/ora1/oracle
-----------------------------------------------------------------------------------------------------------
Standalone and Local HA: Rollback to Oracle 12.1.0.2
Step 1![]() Execute the following commands as a pnuser to stop the Prime Network gateway:
Execute the following commands as a pnuser to stop the Prime Network gateway:
Step 2![]() To rollback Oracle 12.2.0.1 to Oracle 12.1.0.2:
To rollback Oracle 12.2.0.1 to Oracle 12.1.0.2:
a.![]() Execute the following commands:
Execute the following commands:
startup downgrade pfile=<pfilename>;
To retrieve the pfilename, switch to oracle user and go to pfile location:
Note In case of Local HA rolback, the path for pfile will be
cd /ora/opt/ora1/oracle/admin/anadb/pfile/
oracle@pn-sgw-02-lnx [~]# cd /export/home/oracle/admin/anadb/pfile/
oracle@pn-sgw-02-lnx [~/admin/anadb/pfile]# ls
<pfilename> = /export/home/oracle/admin/anadb/pfile/init.ora.1242019133348
SQL> startup downgrade pfile=/export/home/oracle/admin/anadb/pfile/init.ora.1242019133348
b.![]() Copy the three files, namely cshrc, inventory.xml, and oratab, and execute source command as follows:
Copy the three files, namely cshrc, inventory.xml, and oratab, and execute source command as follows:
oracle@pn-sgw-02-lnx [~]# cd /etc
oracle@pn-sgw-02-lnx [/etc]# ls -la | grep oratab
-rw-rw-r--. 1 oracle dba 791 Feb 26 12:03 oratab
-rw-r--r--. 1 root root 789 Feb 26 12:03 oratab.12.1.0.2
oracle@pn-sgw-02-lnx [/etc]# cp oratab.12.1.0.2 oratab
oracle@pn-sgw-02-lnx [/etc]# cd
oracle@pn-sgw-02-lnx [~]# ls -la | grep.cshrc
-rw-r--r--. 1 oracle oinstall 1306 Feb 26 12:03.cshrc
-rw-r--r--. 1 root root 1304 Feb 26 12:03.cshrc.12.1.0.2
oracle@pn-sgw-02-lnx [~]# cp.cshrc.12.1.0.2.cshrc
oracle@pn-sgw-02-lnx [~]# cd oraInventory/ContentsXML/
oracle@pn-sgw-02-lnx [~/oraInventory/ContentsXML]# ls -la | grep inventory.xml
-rw-rw----. 1 oracle dba 573 Feb 26 12:00 inventory.xml
-rw-rw----. 1 oracle dba 478 Feb 26 11:59 inventory.xml.12.1.0.2
oracle@pn-sgw-02-lnx [~/oraInventory/ContentsXML]# cp inventory.xml.12.1.0.2 inventory.xml
oracle@pn-sgw-02-lnx [~/oraInventory/ContentsXML]# cd
oracle@pn-sgw-02-lnx [~]# source.cshrc
c.![]() Replace the sqlnet.ora file available at location $ORACLE_BASE/product/12.1.0.2/db_1/network/admin with the backup file that you took in Before You Begin of Upgrading to Prime Network 5.2 from 5.1, 5.0, 4.3.2, 4.3.1, 4.3 (Intermediate Steps).
Replace the sqlnet.ora file available at location $ORACLE_BASE/product/12.1.0.2/db_1/network/admin with the backup file that you took in Before You Begin of Upgrading to Prime Network 5.2 from 5.1, 5.0, 4.3.2, 4.3.1, 4.3 (Intermediate Steps).
d.![]() Execute the following commands:
Execute the following commands:
e.![]() Switch to Prime Network user and execute the following commands:
Switch to Prime Network user and execute the following commands:
pn432@pn-sgw-02-lnx [~]% cd Main/scripts/embedded_db/
pn432@pn-sgw-02-lnx [~/Main/scripts/embedded_db]% emdbctl --update_oracle_home
pn432@pn-sgw-02-lnx [~]% networkctl start
f.![]() Switch to oracle user and restart the lsnrctl status:
Switch to oracle user and restart the lsnrctl status:
Step 3![]() Rollback Prime Network and restore the database as described in Rolling Back to Earlier Prime Network Version.
Rollback Prime Network and restore the database as described in Rolling Back to Earlier Prime Network Version.
Step 4![]() (Applicable only for Local HA)
(Applicable only for Local HA)
Unfreeze the cluster configured services (ana and oracle_db) by executing the following command as the root user:
Standalone and Local HA: Rollback to Oracle 12.1.0.1
Step 1![]() Execute the following commands as a pnuser to stop the Prime Network gateway:
Execute the following commands as a pnuser to stop the Prime Network gateway:
Step 2![]() To rollback Oracle 12.2.0.1 to Oracle 12.1.0.1:
To rollback Oracle 12.2.0.1 to Oracle 12.1.0.1:
a.![]() Execute the following commands:
Execute the following commands:
startup downgrade pfile=<pfilename>;
To retrieve the pfilename, switch to oracle user and go to pfile location:
Note In case of Local HA rolback, the path for pfile will be
cd /ora/opt/ora1/oracle/admin/anadb/pfile/
oracle@pn-sgw-02-lnx [~]# cd /export/home/oracle/admin/anadb/pfile/
oracle@pn-sgw-02-lnx [~/admin/anadb/pfile]# ls
<pfilename> = /export/home/oracle/admin/anadb/pfile/init.ora.1242019133348
SQL> startup downgrade pfile=/export/home/oracle/admin/anadb/pfile/init.ora.1242019133348
b.![]() Copy the three files, namely cshrc, inventory.xml, and oratab, and execute source command as follows:
Copy the three files, namely cshrc, inventory.xml, and oratab, and execute source command as follows:
oracle@pn-sgw-02-lnx [~]# cd /etc
oracle@pn-sgw-02-lnx [/etc]# ls -la | grep oratab
-rw-rw-r--. 1 oracle dba 791 Feb 26 12:03 oratab
-rw-r--r--. 1 root root 789 Feb 26 12:03 oratab.12.1.0.1
oracle@pn-sgw-02-lnx [/etc]# cp oratab.12.1.0.1 oratab
oracle@pn-sgw-02-lnx [/etc]# cd
oracle@pn-sgw-02-lnx [~]# ls -la | grep.cshrc
-rw-r--r--. 1 oracle oinstall 1306 Feb 26 12:03.cshrc
-rw-r--r--. 1 root root 1304 Feb 26 12:03.cshrc.12.1.0.1
oracle@pn-sgw-02-lnx [~]# cp.cshrc.12.1.0.1.cshrc
oracle@pn-sgw-02-lnx [~]# cd oraInventory/ContentsXML/
oracle@pn-sgw-02-lnx [~/oraInventory/ContentsXML]# ls -la | grep inventory.xml
-rw-rw----. 1 oracle dba 573 Feb 26 12:00 inventory.xml
-rw-rw----. 1 oracle dba 478 Feb 26 11:59 inventory.xml.12.1.0.1
oracle@pn-sgw-02-lnx [~/oraInventory/ContentsXML]# cp inventory.xml.12.1.0.1 inventory.xml
oracle@pn-sgw-02-lnx [~/oraInventory/ContentsXML]# cd
oracle@pn-sgw-02-lnx [~]# source.cshrc
c.![]() Replace the sqlnet.ora file available at location $ORACLE_BASE/product/12.1.0.1/db_1/network/admin with the backup file that you took in Before You Begin of Upgrading to Prime Network 5.2 from 5.1, 5.0, 4.3.2, 4.3.1, 4.3 (Intermediate Steps)
Replace the sqlnet.ora file available at location $ORACLE_BASE/product/12.1.0.1/db_1/network/admin with the backup file that you took in Before You Begin of Upgrading to Prime Network 5.2 from 5.1, 5.0, 4.3.2, 4.3.1, 4.3 (Intermediate Steps)
d.![]() Execute the following commands:
Execute the following commands:
e.![]() Switch to Prime Network user and execute the following commands:
Switch to Prime Network user and execute the following commands:
pn432@pn-sgw-02-lnx [~]% cd Main/scripts/embedded_db/
pn432@pn-sgw-02-lnx [~/Main/scripts/embedded_db]% emdbctl --update_oracle_home
pn432@pn-sgw-02-lnx [~]% networkctl start
f.![]() Switch to oracle user and restart the lsnrctl status:
Switch to oracle user and restart the lsnrctl status:
Step 3![]() Rollback Prime Network and restore the database as described in Rolling Back to Earlier Prime Network Version.
Rollback Prime Network and restore the database as described in Rolling Back to Earlier Prime Network Version.
Step 4![]() (Applicable only for Local HA)
(Applicable only for Local HA)
Unfreeze the cluster configured services (ana and oracle_db) by executing the following command as the root user:
Geo DR and Local HA + Geo DR: Rollback to Oracle 12.1.0.2
Step 1![]() Execute the following commands to move the Standby server from OPEN_MODE to MOUNTED mode:
Execute the following commands to move the Standby server from OPEN_MODE to MOUNTED mode:
select open_mode from v$database;
Step 2![]() Execute the following commands as pnuser to stop the Prime Network gateway on both Active and Standby server:
Execute the following commands as pnuser to stop the Prime Network gateway on both Active and Standby server:
Step 3![]() To rollback Oracle 12.2.0.1 to Oracle 12.1.0.2:
To rollback Oracle 12.2.0.1 to Oracle 12.1.0.2:
Note![]() After logging in to SQL, the following three additional commands must be executed on both servers after each SQL command to ensure that the sequence generated in Active server is synced with the Standby server:
After logging in to SQL, the following three additional commands must be executed on both servers after each SQL command to ensure that the sequence generated in Active server is synced with the Standby server:
On Active server:
select thread#, max(sequence#) "Last Primary Seq Generated" from v$archived_log val, v$database vdb where val.resetlogs_change# = vdb.resetlogs_change# group by thread# order by 1;
On Standby server:
select thread#, max(sequence#) "Last Standby Seq Received" from v$archived_log val, v$database vdb where val.resetlogs_change# = vdb.resetlogs_change# group by thread# order by 1;
select thread#, max(sequence#) "Last Standby Seq Applied" from v$archived_log val, v$database vdb where val.resetlogs_change# = vdb.resetlogs_change# and val.applied in ('YES','IN-MEMORY') group by thread# order by 1;
a.![]() Execute the following commands on both servers unless stated otherwise:
Execute the following commands on both servers unless stated otherwise:
startup downgrade pfile=<pfilename>;
To retrieve the pfilename, switch to oracle user and go to pfile location:
oracle@pn-sgw-02-lnx [~]# cd /ora/opt/ora1/oracle/admin/anadb/pfile/
oracle@pn-sgw-02-lnx [~/admin/anadb/pfile]# ls
<pfilename> = /ora/opt/ora1/oracle/admin/anadb/pfile/init.ora.1242019133348
SQL> startup downgrade pfile= /ora/opt/ora1 /oracle/admin/anadb/pfile/init.ora.1242019133348
@catdwgrd.sql [execute this command only on Active server]
b.![]() Copy the three files on both servers, namely cshrc, inventory.xml, and oratab, and execute source command on both servers as follows:
Copy the three files on both servers, namely cshrc, inventory.xml, and oratab, and execute source command on both servers as follows:
oracle@pn-sgw-02-lnx [~]# cd /etc
oracle@pn-sgw-02-lnx [/etc]# ls -la | grep oratab
-rw-rw-r--. 1 oracle dba 791 Feb 26 12:03 oratab
-rw-r--r--. 1 root root 789 Feb 26 12:03 oratab.12.1.0.2
oracle@pn-sgw-02-lnx [/etc]# cp oratab.12.1.0.2 oratab
oracle@pn-sgw-02-lnx [/etc]# cd
oracle@pn-sgw-02-lnx [~]# ls -la | grep.cshrc
-rw-r--r--. 1 oracle oinstall 1306 Feb 26 12:03.cshrc
-rw-r--r--. 1 root root 1304 Feb 26 12:03.cshrc.12.1.0.2
oracle@pn-sgw-02-lnx [~]# cp.cshrc.12.1.0.2.cshrc
oracle@pn-sgw-02-lnx [~]# cd oraInventory/ContentsXML/
oracle@pn-sgw-02-lnx [~/oraInventory/ContentsXML]# ls -la | grep inventory.xml
-rw-rw----. 1 oracle dba 573 Feb 26 12:00 inventory.xml
-rw-rw----. 1 oracle dba 478 Feb 26 11:59 inventory.xml.12.1.0.2
oracle@pn-sgw-02-lnx [~/oraInventory/ContentsXML]# cp inventory.xml.12.1.0.2 inventory.xml
oracle@pn-sgw-02-lnx [~/oraInventory/ContentsXML]# cd
oracle@pn-sgw-02-lnx [~]# source.cshrc
c.![]() Replace the sqlnet.ora file available at location $ORACLE_BASE/product/12.1.0.1/db_1/network/admin with the backup file that you took in Before You Begin of Upgrading to Prime Network 5.2 from 5.1, 5.0, 4.3.2, 4.3.1, 4.3 (Intermediate Steps)
Replace the sqlnet.ora file available at location $ORACLE_BASE/product/12.1.0.1/db_1/network/admin with the backup file that you took in Before You Begin of Upgrading to Prime Network 5.2 from 5.1, 5.0, 4.3.2, 4.3.1, 4.3 (Intermediate Steps)
d.![]() Execute the following commands on both servers unless stated otherwise:
Execute the following commands on both servers unless stated otherwise:
@catrelod.sql [execute this command only on Active server]
STARTUP [execute this command only on Active server]
STARTUP MOUNT [execute this command only on Standby server]
@utlrp.sql [execute this command only on Active server]
Note![]() Before performing Step 4, execute the three SQL commands mentioned in the note of To rollback Oracle 12.2.0.1 to Oracle 12.1.0.2: to ensure that the sequence generated in Active server is synced with the Standby server.
Before performing Step 4, execute the three SQL commands mentioned in the note of To rollback Oracle 12.2.0.1 to Oracle 12.1.0.2: to ensure that the sequence generated in Active server is synced with the Standby server.
Step 4![]() Check if the sequence number is same on both servers and execute the following commands only on Standby server to move the server from OPEN_MODE to READ ONLY:
Check if the sequence number is same on both servers and execute the following commands only on Standby server to move the server from OPEN_MODE to READ ONLY:
ALTER DATABASE RECOVER MANAGED STANDBY DATABASE USING CURRENT LOGFILE DISCONNECT FROM SESSION;
ALTER DATABASE RECOVER MANAGED STANDBY DATABASE CANCEL;
ALTER DATABASE OPEN READ ONLY;
ALTER DATABASE RECOVER MANAGED STANDBY DATABASE USING CURRENT LOGFILE DISCONNECT FROM SESSION;
Step 5![]() Exit SQL and Oracle user on both servers.
Exit SQL and Oracle user on both servers.
Step 6![]() On Active server, login as pnuser and execute the following commands under /Main/scripts/embedded_db:
On Active server, login as pnuser and execute the following commands under /Main/scripts/embedded_db:
pn432@pn-sgw-02-lnx [~/Main/scripts/embedded_db]% emdbctl --update_oracle_home
pn432@pn-sgw-02-lnx [~]% networkctl start
Step 7![]() Switch to oracle user and restart the lsnrctl status on both servers:
Switch to oracle user and restart the lsnrctl status on both servers:
Step 8![]() Rollback Prime Network and restore the database as described in Rolling Back to Earlier Prime Network Version.
Rollback Prime Network and restore the database as described in Rolling Back to Earlier Prime Network Version.
Step 9![]() (Applicable only for Local HA + Geo DR)
(Applicable only for Local HA + Geo DR)
Unfreeze the cluster configured services (ana and oracle_db) by executing the following command as the root user:
Geo DR and Local HA + Geo DR: Rollback to Oracle 12.1.0.1
Step 1![]() Execute the following commands to move the Standby server from OPEN_MODE to MOUNTED mode:
Execute the following commands to move the Standby server from OPEN_MODE to MOUNTED mode:
select open_mode from v$database;
Step 2![]() Execute the following commands as pnuser to stop the Prime Network gateway on both Active and Standby server:
Execute the following commands as pnuser to stop the Prime Network gateway on both Active and Standby server:
Step 3![]() To rollback Oracle 12.2.0.1 to Oracle 12.1.0.1:
To rollback Oracle 12.2.0.1 to Oracle 12.1.0.1:
Note![]() After logging in to SQL, the following three additional commands must be executed on both servers after each SQL command to ensure that the sequence generated in Active server is synced with the Standby server:
After logging in to SQL, the following three additional commands must be executed on both servers after each SQL command to ensure that the sequence generated in Active server is synced with the Standby server:
On Active server:
select thread#, max(sequence#) "Last Primary Seq Generated" from v$archived_log val, v$database vdb where val.resetlogs_change# = vdb.resetlogs_change# group by thread# order by 1;
On Standby server:
select thread#, max(sequence#) "Last Standby Seq Received" from v$archived_log val, v$database vdb where val.resetlogs_change# = vdb.resetlogs_change# group by thread# order by 1;
select thread#, max(sequence#) "Last Standby Seq Applied" from v$archived_log val, v$database vdb where val.resetlogs_change# = vdb.resetlogs_change# and val.applied in ('YES','IN-MEMORY') group by thread# order by 1;
a.![]() Execute the following commands on both servers unless stated otherwise:
Execute the following commands on both servers unless stated otherwise:
startup downgrade pfile=<pfilename>;
To retrieve the pfilename, switch to oracle user and go to pfile location:
oracle@pn-sgw-02-lnx [~]# cd /ora/opt/ora1/oracle/admin/anadb/pfile/
oracle@pn-sgw-02-lnx [~/admin/anadb/pfile]# ls
<pfilename> = /ora/opt/ora1/oracle/admin/anadb/pfile/init.ora.1242019133348
SQL> startup downgrade pfile= /ora/opt/ora1 /oracle/admin/anadb/pfile/init.ora.1242019133348
@catdwgrd.sql [execute this command only on Active server]
b.![]() Copy the three files on both servers, namely cshrc, inventory.xml, and oratab, and execute source command on both servers as follows:
Copy the three files on both servers, namely cshrc, inventory.xml, and oratab, and execute source command on both servers as follows:
oracle@pn-sgw-02-lnx [~]# cd /etc
oracle@pn-sgw-02-lnx [/etc]# ls -la | grep oratab
-rw-rw-r--. 1 oracle dba 791 Feb 26 12:03 oratab
-rw-r--r--. 1 root root 789 Feb 26 12:03 oratab.12.1.0.1
oracle@pn-sgw-02-lnx [/etc]# cp oratab.12.1.0.1 oratab
oracle@pn-sgw-02-lnx [/etc]# cd
oracle@pn-sgw-02-lnx [~]# ls -la | grep.cshrc
-rw-r--r--. 1 oracle oinstall 1306 Feb 26 12:03.cshrc
-rw-r--r--. 1 root root 1304 Feb 26 12:03.cshrc.12.1.0.1
oracle@pn-sgw-02-lnx [~]# cp.cshrc.12.1.0.1.cshrc
oracle@pn-sgw-02-lnx [~]# cd oraInventory/ContentsXML/
oracle@pn-sgw-02-lnx [~/oraInventory/ContentsXML]# ls -la | grep inventory.xml
-rw-rw----. 1 oracle dba 573 Feb 26 12:00 inventory.xml
-rw-rw----. 1 oracle dba 478 Feb 26 11:59 inventory.xml.12.1.0.1
oracle@pn-sgw-02-lnx [~/oraInventory/ContentsXML]# cp inventory.xml.12.1.0.1 inventory.xml
oracle@pn-sgw-02-lnx [~/oraInventory/ContentsXML]# cd
oracle@pn-sgw-02-lnx [~]# source.cshrc
c.![]() Replace the sqlnet.ora file available at location $ORACLE_BASE/product/12.1.0.1/db_1/network/admin with the backup file that you took in Before You Begin of Upgrading to Prime Network 5.2 from 5.1, 5.0, 4.3.2, 4.3.1, 4.3 (Intermediate Steps).
Replace the sqlnet.ora file available at location $ORACLE_BASE/product/12.1.0.1/db_1/network/admin with the backup file that you took in Before You Begin of Upgrading to Prime Network 5.2 from 5.1, 5.0, 4.3.2, 4.3.1, 4.3 (Intermediate Steps).
d.![]() Execute the following commands on both servers unless stated otherwise:
Execute the following commands on both servers unless stated otherwise:
@catrelod.sql [execute this command only on Active server]
STARTUP [execute this command only on Active server]
STARTUP MOUNT [execute this command only on Standby server]
@utlrp.sql [execute this command only on Active server]
Note![]() Before performing Step 4, execute the three SQL commands mentioned in the note of To rollback Oracle 12.2.0.1 to Oracle 12.1.0.1: to ensure that the sequence generated in Active server is synced with the Standby server.
Before performing Step 4, execute the three SQL commands mentioned in the note of To rollback Oracle 12.2.0.1 to Oracle 12.1.0.1: to ensure that the sequence generated in Active server is synced with the Standby server.
Step 4![]() Check if the sequence number is same on both servers and execute the following commands only on Standby server to move the server from OPEN_MODE to READ ONLY:
Check if the sequence number is same on both servers and execute the following commands only on Standby server to move the server from OPEN_MODE to READ ONLY:
ALTER DATABASE RECOVER MANAGED STANDBY DATABASE USING CURRENT LOGFILE DISCONNECT FROM SESSION;
ALTER DATABASE RECOVER MANAGED STANDBY DATABASE CANCEL;
ALTER DATABASE OPEN READ ONLY;
ALTER DATABASE RECOVER MANAGED STANDBY DATABASE USING CURRENT LOGFILE DISCONNECT FROM SESSION;
Step 5![]() Exit SQL and Oracle user on both servers.
Exit SQL and Oracle user on both servers.
Step 6![]() On Active server, login as pnuser and execute the following commands under /Main/scripts/embedded_db:
On Active server, login as pnuser and execute the following commands under /Main/scripts/embedded_db:
pn432@pn-sgw-02-lnx [~/Main/scripts/embedded_db]% emdbctl --update_oracle_home
pn432@pn-sgw-02-lnx [~]% networkctl start
Step 7![]() Switch to oracle user and restart the lsnrctl status on both servers:
Switch to oracle user and restart the lsnrctl status on both servers:
Rollback Prime Network and restore the database as described in Rolling Back to Earlier Prime Network Version.
Step 8![]() (Applicable only for Local HA + Geo DR)
(Applicable only for Local HA + Geo DR)
Unfreeze the cluster configured services (ana and oracle_db) by executing the following command as the root user:
Rolling Back to Earlier Prime Network Version
Rollback to Prime Network 5.1, 5.0, 4.3.2, 4.3.1, or 4.3 is available if you encounter problems during the upgrade, or if you want to roll back to the previous version after the upgrade completes.
- Verify that the gateway and units are powered up and connected; that is, you can open an SSH session between the gateway and all units.
- Disconnect standby and NAT units from the gateway using the Administration GUI.
- Verify that the Prime Network application is not running with networkctl status.
- Before performing the rollback, stop PN integration layer and watchdog monitoring process. For stopping the Integration layer, refer Chapter 9, “Installing the Prime Network Integration Layer”.
- Rollback Oracle version, refer Table 10-4 Oracle Rollback Procedures.
To Roll back Prime Network gateway:
Step 1![]() If your deployment has units that are connected to the gateway, roll back the units (before rolling back the gateway). The rollback will remove redundant units from the registry and the golden source.
If your deployment has units that are connected to the gateway, roll back the units (before rolling back the gateway). The rollback will remove redundant units from the registry and the golden source.
Step 2![]() Configure all units using the following command:
Configure all units using the following command:
Step 3![]() Enter no at the prompt to start the unit.
Enter no at the prompt to start the unit.
Step 4![]() Restore the backed-up database and start the database services and the listener. Because the database table structure changes after the upgrade, the database is backed up as part of the upgrade process. The old table structure must be recovered.
Restore the backed-up database and start the database services and the listener. Because the database table structure changes after the upgrade, the database is backed up as part of the upgrade process. The old table structure must be recovered.
Note![]() If you have a gateway high availability deployment, the services ana and oracle_db services should be moved to maintenance state.
If you have a gateway high availability deployment, the services ana and oracle_db services should be moved to maintenance state.
–![]() Log into the gateway as pnuser.
Log into the gateway as pnuser.
–![]() Change to the directory PRIME_NETWORK_HOME /Main/scripts/embedded_db:
Change to the directory PRIME_NETWORK_HOME /Main/scripts/embedded_db:
–![]() Restore the embedded database to the latest backup taken as per Step 1 of Prerequisites:
Restore the embedded database to the latest backup taken as per Step 1 of Prerequisites:
Note While executing emdctl --restore_db, enter the time stamp and ensure that your restore is from the time stamp you recorded in Step 3 of Prerequisites (which is Year: 2019 Month: 02 Date: 26 HR:15 MIN: 54 in the step’s example).
For more information on prompts that appear while restoring an embedded database, see the
Cisco Prime Network 5.2 Administrator Guide.
After restoring the database, enter no at the prompt to start Prime Network.
Step 5![]() As pnuser, move to the temporary upgrade directory (created in Step 1
As pnuser, move to the temporary upgrade directory (created in Step 1![]() of the procedure in Upgrading to Prime Network 5.2 from 5.1, 5.0, 4.3.2, 4.3.1, 4.3 (Intermediate Steps)).
of the procedure in Upgrading to Prime Network 5.2 from 5.1, 5.0, 4.3.2, 4.3.1, 4.3 (Intermediate Steps)).
Step 6![]() Enter the following command to change to the upgrade directory:
Enter the following command to change to the upgrade directory:
Step 7![]() Enter the following command on the gateway (only):
Enter the following command on the gateway (only):
Step 8![]() Perform the rollback by entering the required information as shown in the following table.
Perform the rollback by entering the required information as shown in the following table.
|
|
|
|
|---|---|---|
Confirm that you have restored the database. Note If you have not restored the database, enter no and exit the script. Restore the database and begin again. |
||
Confirm that you performed Step 3. Note If you have not rolled back the units, enter no and exit the script. Rollback the units and begin again. |
||
Location of the backup file (it is not deleted during the rollback). An example is: |
Step 9![]() When the rollback is complete, log in as the pnuser to apply the environment changes.
When the rollback is complete, log in as the pnuser to apply the environment changes.
Step 11![]() Reconnect standby and NAT units to the gateway using the Administration GUI.
Reconnect standby and NAT units to the gateway using the Administration GUI.
Note![]() 1. Rollback logs can be found in the Prime_Network_upgrade folder under PRIME_NETWORK_HOME.
1. Rollback logs can be found in the Prime_Network_upgrade folder under PRIME_NETWORK_HOME.
2. If you are rolling back in Geo DR, after performing the rollback, execute the following command as pnuser:
webcontrol start
If you get the following error:
(98)Address already in use: make_sock: could not bind to address [::]:1311
(98)Address already in use: make_sock: could not bind to address 0.0.0.0:1311
Execute the following command to list the webserver processes:
grep webserver
Kill the running processes using the kill command.
Re-check the error by executing webcontrol start command.
Upgrading the Prime Network Integration Layer (PN-IL)
If the PN-IL is installed on your system, you can upgrade using the instructions in these topics:
Note![]() If the PN-IL is not installed on your system, you can install it using the instructions in Installing the PN-IL (CLI Method)
If the PN-IL is not installed on your system, you can install it using the instructions in Installing the PN-IL (CLI Method)
Upgrading PN-IL in Standalone Mode
Perform these tasks as pnuser:
- Disable the health monitor to disable the PN-IL services permanently otherwise the services will start automatically after a delay of 3 minutes.
To upgrade a standalone PN-IL:
Step 1![]() As the root user, launch a terminal on the Prime Network gateway server where you want to install PN-IL.
As the root user, launch a terminal on the Prime Network gateway server where you want to install PN-IL.
Step 2![]() Insert Disk 3: Upgrade Files in the DVD drive.
Insert Disk 3: Upgrade Files in the DVD drive.
Step 3![]() Mount the inserted DVD using mount and move to the mount location.
Mount the inserted DVD using mount and move to the mount location.
Step 5![]() Create a temporary PN-IL upgrade directory.
Create a temporary PN-IL upgrade directory.
Step 6![]() Copy the PN-IL upgrade tar file from the mount location to the pnilupgrade directory.
Copy the PN-IL upgrade tar file from the mount location to the pnilupgrade directory.
Step 7![]() Navigate to the directory in which the tar file was copied and extract the PN-IL upgrade tar.
Navigate to the directory in which the tar file was copied and extract the PN-IL upgrade tar.
Step 8![]() Navigate to the extracted files directory.
Navigate to the extracted files directory.
cd PNIntegrationLayerUpgrade_1.0.0.0-2.2.0
Step 10![]() Enter yes at the prompt to continue the upgrade process. The upgrade process is completed and the log file directory changes based on the PNIL versions changes.
Enter yes at the prompt to continue the upgrade process. The upgrade process is completed and the log file directory changes based on the PNIL versions changes.
Step 11![]() Perform the following post-upgrade tasks:
Perform the following post-upgrade tasks:
a.![]() As pnuser, reload the user profile:
As pnuser, reload the user profile:
b.![]() Configure the PN-IL in standalone mode:
Configure the PN-IL in standalone mode:
Upgrading PN-IL in Suite Mode
If you have been working with Prime Network 5.2, you will have PN-IL 2.1 installed on your system. The procedure for upgrading to PN-IL 2.1 in suite mode is the same as upgrading in standalone mode. See Upgrading PN-IL in Standalone Mode.
If you have been working with a release prior to Prime Network 5.2, follow the instructions below to upgrade to PN-IL 2.1.
Step 1![]() Upgrade PN-IL in standalone mode as described in Upgrading the Prime Network Integration Layer (PN-IL).
Upgrade PN-IL in standalone mode as described in Upgrading the Prime Network Integration Layer (PN-IL).
Step 2![]() Perform these tasks on the Prime Central Server to create a backup of the PN-IL configuration data.
Perform these tasks on the Prime Central Server to create a backup of the PN-IL configuration data.
a.![]() Log in to the Prime Central server as root.
Log in to the Prime Central server as root.
b.![]() Create Prime Central upgrade directory
Create Prime Central upgrade directory
c.![]() Copy the PN-IL upgrade tar file (example: PNIntegrationLayerUpgrade_1.0.0.0-2.2.0.tar.gz) from the upgrade directory on the Prime Network server to the upgrade directory on the Prime Central server.
Copy the PN-IL upgrade tar file (example: PNIntegrationLayerUpgrade_1.0.0.0-2.2.0.tar.gz) from the upgrade directory on the Prime Network server to the upgrade directory on the Prime Central server.
e.![]() Run the PN-IL upgrade utility script to create a backup tar file in $PRIMEHOME/backup.
Run the PN-IL upgrade utility script to create a backup tar file in $PRIMEHOME/backup.
Step 3![]() Perform these tasks on the Prime Network server to restore the PN-IL configuration.
Perform these tasks on the Prime Network server to restore the PN-IL configuration.
a.![]() As pnuser, copy the backup tar from the Prime Central upgrade directory to Prime Network server.
As pnuser, copy the backup tar from the Prime Central upgrade directory to Prime Network server.
c.![]() Run the PN-IL utility script to restore the PN-IL configuration:
Run the PN-IL utility script to restore the PN-IL configuration:
Step 4![]() Perform these tasks on Prime Central as described in C isco Prime Central Quick Start Guide.
Perform these tasks on Prime Central as described in C isco Prime Central Quick Start Guide.
Step 5![]() Start the upgraded PN-IL:
Start the upgraded PN-IL:
Prime Network Post-upgrade Tasks
After the upgrade to Prime Network 5.2 is complete, perform the post-upgrade tasks that apply to your deployment.
- Enable Units to Restart Automatically After they are Rebooted
- Restoring Customized Crontabs
- Restarting Crontab Jobs for NAT Units
- Fixing the Database Entry for Vision Clients with NAT
- Updating the Port Watchdog (AVM Protection) Scripts
- Restore Links Between Devices and Cloud VNEs
- Support for Third-Party VNEs
- Command Builder Scripts
- Gathering DB Statistics in First 24 Hours
- Integration Changes
Enable Units to Restart Automatically After they are Rebooted
After upgrade, you need to perform the following steps on each unit in your setup otherwise the units will not restart automatically after they are rebooted.
Step 1![]() Log into the unit as pnuser.
Log into the unit as pnuser.
Step 2![]() Copy rootdeploy.cmd from the gateway, as follows:
Copy rootdeploy.cmd from the gateway, as follows:
Step 3![]() Switch to the root user:
Switch to the root user:
As the root user, execute the root deploy command:
Restoring Customized Crontabs
If you saved user-defined cron jobs in PRIME_NETWORK_HOME /local/cron/crontab.user.list, they are restored. User-defined cron jobs that are not placed in this directory must be manually recreated.
Restarting Crontab Jobs for NAT Units
Cron jobs on NAT units must be manually restarted.
Step 1![]() Log into the unit as pnuser.
Log into the unit as pnuser.
Step 2![]() Copy the upgrade_restart_crons.pl script from the gateway, as follows:
Copy the upgrade_restart_crons.pl script from the gateway, as follows:
Step 3![]() Run the upgrade_restart_crons.pl script. It will display output similar to the following:
Run the upgrade_restart_crons.pl script. It will display output similar to the following:
Step 4![]() Verify that the crontab list is not empty:
Verify that the crontab list is not empty:
Step 5![]() The upgrade is now complete. Run the status command and check the version number to make sure that the upgrade has been successful.
The upgrade is now complete. Run the status command and check the version number to make sure that the upgrade has been successful.
Fixing the Database Entry for Vision Clients with NAT
If you are using network address translation (NAT) with the Prime Network Vision client, update the database host in the Prime Network registry to contain the hostname instead of the IP address.
If you already use a hostname instead of an IP address, you do not have to repeat this procedure.
Step 1![]() Make sure Prime Network is running.
Make sure Prime Network is running.
Step 2![]() Verify that the client workstations have the correct Domain Name System (DNS) mapping.
Verify that the client workstations have the correct Domain Name System (DNS) mapping.
Step 3![]() From PRIME_NETWORK_HOME/Main, run the following commands:
From PRIME_NETWORK_HOME/Main, run the following commands:
Step 4![]() Enter the following command to restart Prime Network:
Enter the following command to restart Prime Network:
Updating the Port Watchdog (AVM Protection) Scripts
After upgrading to Prime Network 5.2, copy the port watchdog scripts to /var/adm/cisco/prime-network/scripts. Enter the following commands as the root user:
Restore Links Between Devices and Cloud VNEs
If your deployment had cloud VNEs that were connected to devices with static links, the connection between the cloud VNE and the device may be lost after the upgrade. Delete and recreate the link using the Administration GUI.
Support for Third-Party VNEs
Prime Network supports third-party devices through Cisco Advanced Services engagement. As of release 5.0, Prime Network will not natively support third-party devices, and a Cisco Advanced Services contract will be required for their enablement and support.
Command Builder Scripts
If you had customized Command Builder scripts (which you should have uninstalled), you may need to update your scripts if your deployment:
- Executes command scripts using the Prime Network northbound APIs (for example, BQL)
- Includes references to IMOs or to the Prime Network internal model
Verify whether the command names, parameters, or IMO references have changed, in which case you must update your scripts. The reinstall your customized scripts.
Gathering DB Statistics in First 24 Hours
The pnuser _admin user performs maintenance tasks—such as gathering statistics—on the other Prime Network database schemas. After this user is created, a cron job runs every 24 hours to gather statistics on the Fault Database tables.
However, if you expect a high scale in the first 24 hours, you might need to manually force statistics gathering twice during the first day, 1 and 5 hours after noise start. To force statistics gathering, enter the following UNIX command as pnuser :
If you deploy Prime Network to handle a high event rate, disabling Oracle’s automatic maintenance jobs is recommended. Automatic maintenance significantly affects Oracle performance and increases event processing time. See Disabling Automatic Maintenance Jobs.
Prime Network supports the resetVneSSHv2Algorithms.pl to clean up the ‘algorithms’ key in avm registry files.
It is recommended to run this script if you are managing the VNE’s from Prime Network3.7 or earlier.
To run the script, follow the below steps:
Step 1![]() Navigate to ‘<PRIME_NETWORK_HOME>/local/scripts’ directory in GW.
Navigate to ‘<PRIME_NETWORK_HOME>/local/scripts’ directory in GW.
–![]() Script runs as PN user from the GW.
Script runs as PN user from the GW.
–![]() PN should be down in both GW and Units.
PN should be down in both GW and Units.
Step 2![]() Run the script file using the below command:
Run the script file using the below command:
Integration Changes
Adding Managed Elements to the Database Manually for PC-FM Resync
After upgrading Prime Network, you can execute BQL commands to invoke a VNE insert operation in a new MANAGED ELEMENTS table for all the existing MANAGED ELEMENTS.
Execute the below BQL commands, which has a VNE name “CopyAllManagedElementsToDB” and IP “0.0.0.0”.
Note![]() Make sure to execute the BQL command before restarting PNIL. BQL execution will not introduce any new VNE, but only performs DB refreshing for all the existing VNE’s; inserts all Managed Elements to DB.
Make sure to execute the BQL command before restarting PNIL. BQL execution will not introduce any new VNE, but only performs DB refreshing for all the existing VNE’s; inserts all Managed Elements to DB.
Note![]() Replace X.X.X.X in the above BQL with Gateway IP Address.
Replace X.X.X.X in the above BQL with Gateway IP Address.
To terminate the further processing of BQL, an Exception that will be returned as part of the response to the BQL must be invoked (Invocation of this Exception is an already available approach used for Validating the input values while creating a new VNE through Modelling tabs.)
Note![]() The below exception message is expected after executing the BQL:
The below exception message is expected after executing the BQL:
“<Description type="String">ERROR (5133): The VNE's name contains invalid characters. valid chars are: A-Z, a-z, 0-9, _, '@', '!', '~', '.', ' '.</Description>”
For details on BQL and other integrations after the upgrade, refer to the Cisco Developer Network at https://developer.cisco.com/site/prime-network/.
Upgrading the Embedded Database to Oracle 12.2.0.1
- Copy the following Oracle installation.zip files from Prime Network 5.2, Disk 4 : Database Binaries to a directory on the machine on which the embedded database is installed (either on the local gateway server or a remote server):
- Copy the embedded_upgrade_12.2 folder from the Prime Network 5.2, Disk 3 in to the directory of the gateway server.
- Ensure that there is a minimum of 12 GB free disk space. This space is freed up after the upgrade has completed successfully.
- Ensure that database backup and restore are enabled. See “Enabling Embedded Oracle Database Backups” section in the Cisco Prime Network Administration Guide.
Step 1![]()
If your setup has cluster, freeze the cluster configured services (ana and oracle_db) using the following command:
clusvcadm -Z service
Example-Upgrading the Embedded Database to Oracle 12.2.0.1
Step 1![]() In the database server, perform the following steps:
In the database server, perform the following steps:
a.![]() Copy the zip file to /tmp/upg12c.
Copy the zip file to /tmp/upg12c.
b.![]() Copy the embedded_upgrade_12.2 to /tmp/upg12c.
Copy the embedded_upgrade_12.2 to /tmp/upg12c.
c.![]() Create the staging directory by entering the following commands:
Create the staging directory by entering the following commands:
d.![]() As a root user, grant full permission for perl file:
As a root user, grant full permission for perl file:
chmod 777 upgrade_embedded_oracle_12.1.0.2_to_12.2.0.1.pl
e.![]() Upgrade to Oracle 12.2.0.1 by entering the following command:
Upgrade to Oracle 12.2.0.1 by entering the following command:
Step 2![]() Enter the required information as shown in the following table.
Enter the required information as shown in the following table.
Step 3![]() Login to Oracle, and restart the embedded Oracle by following command:
Login to Oracle, and restart the embedded Oracle by following command:
Upgrading the Embedded Database to Oracle 12.2.0.1 in a HA Setup with Geographical Redundancy and Oracle ADG
- To be performed on both primary and standby gateway servers: Copy the following Oracle installation.zip files from Prime Network 5.2 Disk 4: Database Binaries to a directory on the machines on which the embedded database is installed (both the primary and standby gateway servers):
- Copy the embedded_upgrade_12.2 folder from the Prime Network 5.2, Disk 3 in to the directory of the gateway server.
- Ensure that there is a minimum of 12 GB free disk space on each of the servers. This space is freed up after the upgrade has completed successfully.
- Verify that database replication works properly prior to starting the database upgrade by performing the geographical verification tests described in the Cisco Prime Network 5.2 High Availability Guide.
Step 1![]() On the standby gateway server, run the Oracle software upgrade and prepare the standby server for database upgrade.
On the standby gateway server, run the Oracle software upgrade and prepare the standby server for database upgrade.
Navigate to the upgrade scripts directory and enter the following command:
Step 2![]() On the primary gateway server, start the database upgrade by entering the following command:
On the primary gateway server, start the database upgrade by entering the following command:
Step 3![]() Enter the required information as shown in the following table.
Enter the required information as shown in the following table.
Step 4![]() On the primary gateway server, verify that the Oracle listener is running by entering the following command as the root user:
On the primary gateway server, verify that the Oracle listener is running by entering the following command as the root user:
Step 5![]() On the standby gateway server, set back the replication redo apply by executing the following command:
On the standby gateway server, set back the replication redo apply by executing the following command:
Example-Upgrading the Embedded Database to Oracle 12.2.0.1 in a HA Setup with Geographical Redundancy and Oracle ADG
Step 1![]() Stop the Prime Network.
Stop the Prime Network.
Step 2![]() Verify if the replication between databases work.
Verify if the replication between databases work.
Step 3![]() On Active and Standby server, perform the following steps:
On Active and Standby server, perform the following steps:
a.![]() Navigate to the location where the embedded Oracle software is available.
Navigate to the location where the embedded Oracle software is available.
b.![]() Copy the zip file to /tmp/upg12c:
Copy the zip file to /tmp/upg12c:
c.![]() Copy the embedded_upgrade_12.2 to /tmp/upg12c from Prime Network 5.2, Disk 3.
Copy the embedded_upgrade_12.2 to /tmp/upg12c from Prime Network 5.2, Disk 3.
d.![]() Create the staging directory by entering the following commands:
Create the staging directory by entering the following commands:
e.![]() On both Active and Standby server, as a root user, grant full permission for perl files:
On both Active and Standby server, as a root user, grant full permission for perl files:
chmod 777 upgrade_embedded_oracle_12.1.0.2_to_12.2.0.1.pl
chmod 777 standby_db_prepare_for_upgrade12.1.0.2_to_12.2.0.1.pl
chmod 777 standby_db_post_upgrade12.1.0.2_to_12.2.0.1.pl
f.![]() On the Standby gateway server, run the Oracle software upgrade and prepare the standby server for database upgrade. Navigate to the upgrade scripts directory and enter the following command:
On the Standby gateway server, run the Oracle software upgrade and prepare the standby server for database upgrade. Navigate to the upgrade scripts directory and enter the following command:
Step 4![]() On Active server, perform the following steps:
On Active server, perform the following steps:
a.![]() Navigate to the location where the embedded Oracle software is available.
Navigate to the location where the embedded Oracle software is available.
b.![]() Copy zip file to /tmp/upg12c:
Copy zip file to /tmp/upg12c:
c.![]() Create the staging directory by entering the following commands:
Create the staging directory by entering the following commands:
d.![]() Start the database upgrade by executing the following command:
Start the database upgrade by executing the following command:
Step 5![]() In the Standby database server, perform the following steps:
In the Standby database server, perform the following steps:
a.![]() Enter the following command:
Enter the following command:
b.![]() Set back the replication redo by executing the following command:
Set back the replication redo by executing the following command:
 Feedback