- About This Book
- Using the Prime Fulfillment Graphical User Interface
- Setting Up Prime Fulfillment Services
- Managing Carrier Ethernet and L2VPN Services
- Managing RAN Backhaul Services
- Managing MPLS VPN Services
- Managing MPLS Transport Profile Services
- Managing MPLS Traffic Engineering Services
- Managing Service Requests
- Managing Templates and Data Files
- Monitoring
- Performing Diagnostics
- Using the Topology Tool
- Using Inventory Manager
- Administration Tasks
- Cisco Configuration Engine Server
- Property Settings
- WatchDog Commands
- XML Reference
- Terminating an Access Ring on Two N-PEs
- Repository Views
- Inventory - Discovery
- Adding Additional Information to Services
Cisco Prime Fulfillment User Guide 6.2
Bias-Free Language
The documentation set for this product strives to use bias-free language. For the purposes of this documentation set, bias-free is defined as language that does not imply discrimination based on age, disability, gender, racial identity, ethnic identity, sexual orientation, socioeconomic status, and intersectionality. Exceptions may be present in the documentation due to language that is hardcoded in the user interfaces of the product software, language used based on RFP documentation, or language that is used by a referenced third-party product. Learn more about how Cisco is using Inclusive Language.
- Updated:
- March 20, 2015
Chapter: Managing Templates and Data Files
- Overview
- Basic Template and Data File Tasks
- Viewing the Templates Tree and Data Pane
- Creating Folders and Subfolders
- Copying Folders or Subfolders
- Creating Templates
- Creating Data Files
- Editing Templates and Data Files
- Deleting Templates and Data Files
- Listing Service Requests Associated with a Data File
- Listing Policies Associated with a Data File
- Using Templates with Policies
- Using Templates with Service Requests
- How do I split a string?
- How do I obtain address information from the given IP address?
- How do I obtain the octets from the given IP address?
- How do I call a subtemplate in a template?
- How do I concatenate two strings?
- How can I convert a string to an integer and how can I increase the last octet of the IP address by one?
- Can I use nested if statements?
- How can I perform basic arithmetic operations?
- How can I retrieve data from a two-dimensional array and what is the use of $velocityCount?
- How can I print $a instead of its value?
- What is the difference between #include() and #parse()?
- What is a macro and how is it used?
- What is a range operator and how can I use it?
- How can I split strings containing special characters?
- How can I use repository variables?
- How can I use a variable as a dynamic URL?
- Can I see more examples?
Managing Templates and Data Files
This chapter explains the use of templates and data files in Prime Fulfillment. It contains the following sections:
•![]() Basic Template and Data File Tasks
Basic Template and Data File Tasks
•![]() Using Templates with Policies
Using Templates with Policies
•![]() Using Templates with Service Requests
Using Templates with Service Requests
•![]() Summary of Repository Variables
Summary of Repository Variables
•![]() Importing and Exporting Templates
Importing and Exporting Templates
Overview
Templates provide a means to deploy commands and configurations not normally supported by Cisco Prime Fulfillment to a device. Templates are written in the Velocity Template Language (VTL) and are generally comprised of IOS and IOS XR device CLI configurations.
Templates support the browsing, creation, and deletion of Template Folders, Templates, and Data Files and it supports the viewing of Template-generated configurations. This is applicable to both IOS and IOS XR. For IOS XR devices the configlet generated from template data files are CLI commands, not XML commands.
The configuration created from the template and data file can be downloaded to devices. When creating a Service Request, you can select from the list of templates and data files and associate them with the Service Request. At Deploy time, the template and data file are instantiated and the configuration is appended or prepended to the configlet generated by Prime Fulfillment. Another method is to use the Device Console feature to download templates independent of Service Requests, as explained in the "Download Template" section.
Prime Fulfillment provides a way to integrate a template with Prime Fulfillment configlets.
For a given customer edge router and/or provider edge router, you specify the following:
•![]() template name
template name
•![]() template data file name
template data file name
•![]() whether the template configuration file should be appended or prepended to the Prime Fulfillment configlet
whether the template configuration file should be appended or prepended to the Prime Fulfillment configlet
•![]() whether the template configuration file is active or inactive for downloading to the edge device
whether the template configuration file is active or inactive for downloading to the edge device
The template data files are tightly linked with the corresponding template (a data file cannot be linked to more than one template). You can use a data file and its associated template to create a template configuration file. The template configuration file is merged with (either appended or prepended to) the Prime Fulfillment configlet. Prime Fulfillment downloads the combined Prime Fulfillment configlet and template configuration file to the edge device router.
•![]() You can download a template configuration file to a router.
You can download a template configuration file to a router.
•![]() You can apply the same template to multiple edge routers, assigning the appropriate template data file for each device. Each template data file includes the specific data for a particular device (for example, the management IP address or hostname of each device).
You can apply the same template to multiple edge routers, assigning the appropriate template data file for each device. Each template data file includes the specific data for a particular device (for example, the management IP address or hostname of each device).
Template commands are treated independently from those associated with a service creation (Multi Protocol Label Switching (MPLS), Layer 2 Virtual Private Network (L2VPN), Virtual Private LAN Service (VPLS), Traffic Engineering (TE), and so on). Consequently, template commands must be removed separately from the device(s) during a service decommission. To remove prior template commands, a separate template is needed during a decommission process. Decommissioning a service request does not automatically remove the original template commands. A separate negate template needs to be added to the decommission process and the original templates must be removed. The negate template must contain the necessary NO commands to successfully remove any unwanted IOS commands added by the original template.
Summary of Template Manager Features
This section highlights key features of template and data file support in Prime Fulfillment, especially those that have an impact on working with policies and service requests.
Template Attributes
The Prime Fulfillment template mechanism allows you to differentiate templates by specifying (optional) attributes on a template, including:
•![]() Device type
Device type
•![]() Line card type
Line card type
•![]() Port type
Port type
•![]() Software version (IOS or IOS XR)
Software version (IOS or IOS XR)
These attributes are set through a drop-down list when setting up the template in Template Manager. Prime Fulfillment uses these attributes to automatically select the template/data file that most closely matches the device defined within the service request.
Associating Templates at the Policy Level
Prime Fulfillment supports the association of templates and data files in policies.
Selective Determination of Templates for U-PE and PE-AGG Device Roles
For added flexibility, Prime Fulfillment allows you to selectively apply templates to U-PE and PE-AGG devices (for example, in a ring environment) based on whether the devices have a UNI interface.
Enhanced Subtemplate Support
A new attribute in the Template Editor allows subtemplates to be associated with a template. Prime Fulfillment supports dynamic instantiation of subtemplates based on device attributes. While creating the subtemplates, values for these identifiers must be provided by the operator.
Dynamic Data File Creation
The user can create a data file during service request creation and associate it to the template copied from the associated policy. This functionality extends data file creation from the Template wizard to doing so directly from the service request wizard Template Association screen. In addition, you can modify any or all variables that are part of the template/date file attached to a service request and apply the updated template/data file without removing the entire service.
Automatic Application of Negate Templates
To remove a configuration created from a template/data file, a negate template must be applied to the existing service. This is no longer a manual process in Prime Fulfillment. You create both the positive and negate template. You can assign a positive template/data file to a policy. Prime Fulfillment calls the appropriate negate template at the appropriate time, as the negate template has a direct relationship with the deploy template. Prime Fulfillment determines which negate template to use, based on the service request action requested (for example, deploying or decommissioning a service). The negate template has the same name as the template, with the addition of the suffix .Negate. The negate template does not share the data file of the deploy template. The negate template must have its own data file defined.
Compatibility of the Template Mechanism with Previous Prime Fulfillment Releases
Prime Fulfillment maintains compatibility with the template mechanism in previous Prime Fulfillment releases. Templates created in earlier versions of Prime Fulfillment work "as is," without any modifications to the templates or the workflow. In the case of a policy in the system that was created in an earlier Prime Fulfillment release, the GUI workflow for associating templates/data files is not visible. In such a case, the operator adds the template and data files during service deployment, as in previous releases of Prime Fulfillment.
Template Support for IOS and IOS XR
The template mechanism is supported for both IOS and IOS XR devices. For IOS XR devices, the configlet generated from templates/data files contains CLI commands and not XML statements. For IOS XR devices, template support is provided as CLI commands. For IOS devices, the operator can download a template configlet using the device console.

Note ![]() Note the following known issue in the case of IOS XR devices. When a service request is deployed with templates that contain improper or unsupported configurations, the service request still goes to the DEPLOYED state. This because the IOS XR device does not issue an error report on the improper configuration(s) deployed.
Note the following known issue in the case of IOS XR devices. When a service request is deployed with templates that contain improper or unsupported configurations, the service request still goes to the DEPLOYED state. This because the IOS XR device does not issue an error report on the improper configuration(s) deployed.
RBAC Support for Template Usage
Templates and data files are only accessible to users with the proper RBAC role. A permission type for data files has been added. The permissions allowed for the data files are view, create, modify, and delete. Operators cannot view templates/data files assigned to other roles, and are not permitted to deploy templates/data files to which they do not have access.
Template Variables
Template variables support most Prime Fulfillment repository variables for MPLS, L2VPN, VPLS, and FlexUNI/EVC. For a list of supported repository variables, see Summary of Repository Variables.
DCPL Properties
There are a few Dynamic Component Properties Library (DCPL) properties governing templates. These DCPL properties affect when a template is applied, whether negate templates are appended or prepended, whether templates are applied in the case when an service has multiple lines, only one of which have been edited, etc. For documentation on DPLC properties related to templates, see "Property Settings."
Importing and Exporting Templates
Prime Fulfillment provides a mechanism to import and export templates and data files. See Template Examples, for more information.
Template and Data File Workflow
This section summarizes the basic operations involved in setting up and using templates, data files, and negate templates in Prime Fulfillment.
Basic Template Manager Functions
•![]() Create templates and negate templates for different configurations.
Create templates and negate templates for different configurations.
•![]() Specify device attributes for the templates.
Specify device attributes for the templates.
•![]() Associate subtemplates to templates, if applicable
Associate subtemplates to templates, if applicable
•![]() Create data files for the subtemplates.
Create data files for the subtemplates.
•![]() Create a negate template for each subtemplate.
Create a negate template for each subtemplate.
•![]() Create data files for the negate templates.
Create data files for the negate templates.
•![]() Create a super template and attach subtemplates to it.
Create a super template and attach subtemplates to it.
These basic Template Manager functions are documented in other sections of this chapter.
Policy-Level Template Functions
•![]() Create a policy and enable template support for the policy.
Create a policy and enable template support for the policy.
•![]() Associate templates and (optionally) data files to the policy, if desired.
Associate templates and (optionally) data files to the policy, if desired.
For information on how to associate templates and data files at the policy level, see the section Using Templates with Policies, in this chapter.
Service Request-Level Template Functions
Note ![]() When a policy is only associated with a template and no data file, then during creation of a service request using that policy, automatic selection of a data file for that template takes place, if the template has only one data file. If the template does not have a data file, then one must be created for that template and associated to the service request before saving is permitted.
When a policy is only associated with a template and no data file, then during creation of a service request using that policy, automatic selection of a data file for that template takes place, if the template has only one data file. If the template does not have a data file, then one must be created for that template and associated to the service request before saving is permitted.
•![]() Create a service request and associate template(s) to a link.
Create a service request and associate template(s) to a link.
•![]() Deploy the service request on a device (for example, a 7600).
Deploy the service request on a device (for example, a 7600).
•![]() The subtemplate and corresponding data file for the 7600 are autoselected for deployment.
The subtemplate and corresponding data file for the 7600 are autoselected for deployment.
•![]() A configlet is generated from the subtemplate.
A configlet is generated from the subtemplate.
•![]() Decommission the service request.
Decommission the service request.
•![]() The negate template for the subtemplate is autoselected and deployed.
The negate template for the subtemplate is autoselected and deployed.
For information on how to use templates and data files is service requests, see the section Using Templates and Data Files in the Service Request Workflow.
Basic Template and Data File Tasks
This section describes basic tasks you can perform with templates and data files. These include:
•![]() Viewing the Templates Tree and Data Pane
Viewing the Templates Tree and Data Pane
•![]() Creating Folders and Subfolders
Creating Folders and Subfolders
•![]() Copying Folders or Subfolders
Copying Folders or Subfolders
•![]() Editing Templates and Data Files
Editing Templates and Data Files
•![]() Deleting Templates and Data Files
Deleting Templates and Data Files
•![]() Listing Service Requests Associated with a Data File
Listing Service Requests Associated with a Data File
•![]() Listing Policies Associated with a Data File
Listing Policies Associated with a Data File
Viewing the Templates Tree and Data Pane
To use Templates, follow these steps:
Step 1 ![]() Choose Service Design > Templates > Template Manager and you receive a window as shown in Figure 9-1,
Choose Service Design > Templates > Template Manager and you receive a window as shown in Figure 9-1,
Figure 9-1 Templates Manager
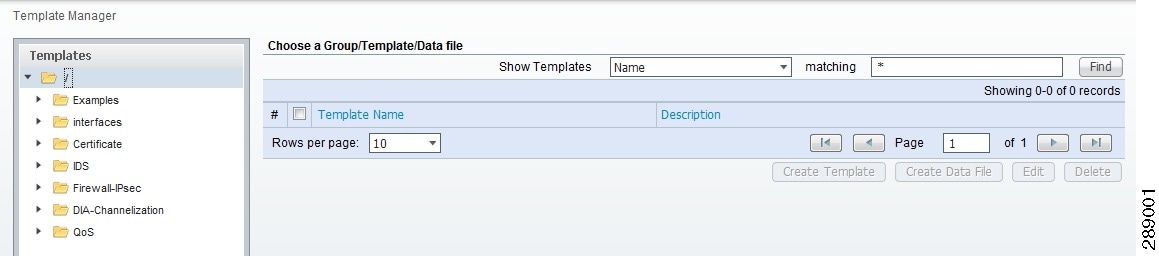
The Templates tree is in the left column. You can continue clicking the arrow sign next to each created folder and subfolder until you get to the last level of information. The last possible level is the template name. Data file information is not kept in the tree.
The right section of the window is the data pane. The name of the folder or template is in the upper-left corner. When you check the check box next to the template or data file information, the Create Template, Create Data File, Edit, or Delete buttons are enabled as described in the following sections.
When there are many templates in a folder or many data files in a template, the Show Templates matching or Show Data Files matching filter in the upper right-hand corner of the data pane can be very useful. For example, you can click the drop-down list for Show Templates or Show Data Files and choose to match (matches are case-sensitive) the Name or Description and then in the matching box you can choose to work with templates or data files, respectively, that start with abc. In this case, enter abc* in the field and then click the Show button. Only the templates or data files, respectively, that start with abc appear. For more information about filters, see Filters.
Note ![]() The template search facility applies to the folder currently selected and not across all folders.
The template search facility applies to the folder currently selected and not across all folders.
Note ![]() The data file search applies to the template currently selected and not across all folders and templates.
The data file search applies to the template currently selected and not across all folders and templates.
You can also View configurations when the table displays data files.
Step 2 ![]() Then you can do begin performing basic tasks with templates and data files, as described in the following sections.
Then you can do begin performing basic tasks with templates and data files, as described in the following sections.
Creating Folders and Subfolders
To create a new folder or subfolder, follow these steps:
Step 1 ![]() Choose Service Design > Templates > Template Manager.
Choose Service Design > Templates > Template Manager.
Step 2 ![]() In the Template Manager tree, right-click in the white area and choose New > Folder to create a new folder or right-click on an existing folder or subfolder and choose New > Folder to create a subfolder.
In the Template Manager tree, right-click in the white area and choose New > Folder to create a new folder or right-click on an existing folder or subfolder and choose New > Folder to create a subfolder.
Note ![]() There is no limit to the number of levels of folders and subfolders you can create.
There is no limit to the number of levels of folders and subfolders you can create.
Step 3 ![]() In the new text field that appears in the Template Manager tree, enter the new folder or subfolder name.
In the new text field that appears in the Template Manager tree, enter the new folder or subfolder name.
Copying Folders or Subfolders
To copy a folder or subfolder and paste it into another folder or subfolder, follow these steps:
Step 1 ![]() Choose a folder or subfolder and then right-click and you receive the opportunity to copy. Click Copy.
Choose a folder or subfolder and then right-click and you receive the opportunity to copy. Click Copy.
Step 2 ![]() Right-click on the folder or subfolder into which you want to paste the copied folder or subfolder and all its content and click Paste.
Right-click on the folder or subfolder into which you want to paste the copied folder or subfolder and all its content and click Paste.
You will see the new folder or subfolder and all its content in the selected location. You can edit from there.
Creating Templates
You can either create a new template in an existing folder or you can create a new folder first and then create the template. To create a new folder, see the section "Creating Folders and Subfolders".
To create a new template, follow these steps:
Step 1 ![]() Choose Service Design > Templates > Template Manager.
Choose Service Design > Templates > Template Manager.
Step 2 ![]() In the Template Manager tree, click on the folder in which you want to create a new template.
In the Template Manager tree, click on the folder in which you want to create a new template.
A window appears as shown in Figure 9-2.
Figure 9-2 Folder with Existing Templates
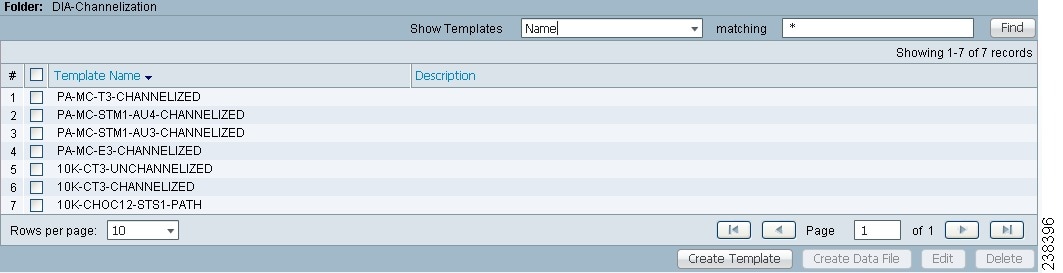
Step 3 ![]() You can use the Show Templates drop-down list to choose whether to view the templates alphabetically by Name or by Description. Then click the Show button to activate how you view the templates. If you enter characters in the matching field before you click the Show button, you minimize the list of templates that appear either by Name or by Description. For more details, see Viewing the Templates Tree and Data Pane.
You can use the Show Templates drop-down list to choose whether to view the templates alphabetically by Name or by Description. Then click the Show button to activate how you view the templates. If you enter characters in the matching field before you click the Show button, you minimize the list of templates that appear either by Name or by Description. For more details, see Viewing the Templates Tree and Data Pane.
Step 4 ![]() Click the Create Template button and you receive a window as shown in Figure 9-3.
Click the Create Template button and you receive a window as shown in Figure 9-3.
Figure 9-3 Template Editor
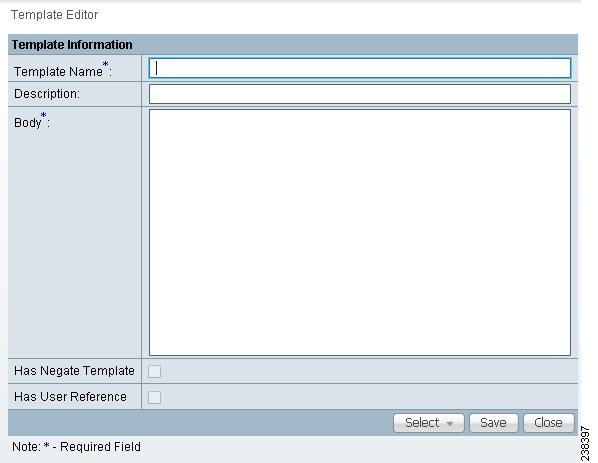
Step 5 ![]() Enter the following:
Enter the following:
•![]() Template Name (required)—This must be a unique name within a folder. This name must begin with an alphabetic character and can only contain alphanumeric characters, underscores, and hyphens.
Template Name (required)—This must be a unique name within a folder. This name must begin with an alphabetic character and can only contain alphanumeric characters, underscores, and hyphens.
•![]() Description (optional) —You can enter any description here.
Description (optional) —You can enter any description here.
•![]() Body (required)—Enter the configuration text, Velocity Template Language (VTL) directives, and variables that you want included.
Body (required)—Enter the configuration text, Velocity Template Language (VTL) directives, and variables that you want included.
Note ![]() The VTL is the mark-up language used to describe the template. The VTL is explained at http://velocity.apache.org. For more specific information, you might like to navigate to http://velocity.apache.org/engine/devel/user-guide.html or http://velocity.apache.org/engine/devel/vtl-reference-guide.html.
The VTL is the mark-up language used to describe the template. The VTL is explained at http://velocity.apache.org. For more specific information, you might like to navigate to http://velocity.apache.org/engine/devel/user-guide.html or http://velocity.apache.org/engine/devel/vtl-reference-guide.html.
Step 6 ![]() Click the Select drop-down list, and choose from the following:
Click the Select drop-down list, and choose from the following:
These tasks are described in the following subsections.
Negate Template
To remove a configuration created from a template or data file, you must apply Negate to the existing service. The negate template is saved as <TemplateName>.Negate in the same folder as the original template. When a template is removed, the negate template is also deleted. You can also delete the negate template separately. Data files can be associated for the negate template.
When a template is associated in a service Policy and Service Request, the negate template is automatically associated (see the Cisco Prime Fulfillment User Guide 6.2).
During decommissioning, a negate template is used for deployment. If you change a template, the negate template automatically changes to the negate template of the newly selected template.
Do the following after clicking the Select drop-down list in Step 6 of the "Creating Templates" section:
Step 1 ![]() Choose Negate and then click the Go button and you receive a window as in Figure 9-4.
Choose Negate and then click the Go button and you receive a window as in Figure 9-4.
Figure 9-4 Negate Template Editor
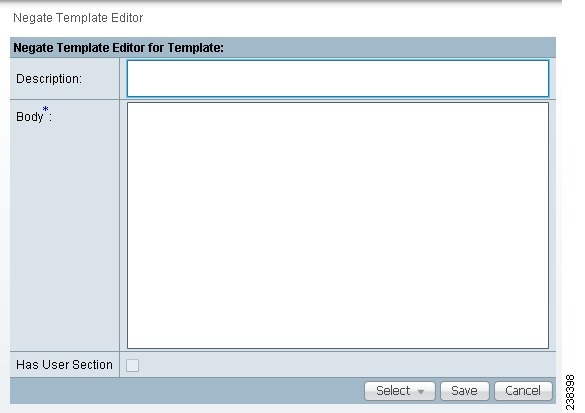
Step 2 ![]() Optionally add the name of the negate template in Description.
Optionally add the name of the negate template in Description.
Step 3 ![]() Enter the template information in the required Body block. Enter no to indicate negate before each line of information, corresponding to the lines in the template.
Enter the template information in the required Body block. Enter no to indicate negate before each line of information, corresponding to the lines in the template.
User Reference
You can keep information about this template by using User Reference.
Do the following after clicking the Select drop-down list in Step 6 of the "Creating Templates" section:
Step 1 ![]() Choose User Reference and then click the Go button and you receive a window as in Figure 9-5.
Choose User Reference and then click the Go button and you receive a window as in Figure 9-5.
Figure 9-5 User Reference Editor
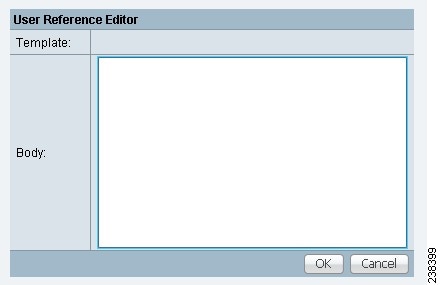
Step 2 ![]() In Figure 9-5, you can add information in the available fields, Template and Body.
In Figure 9-5, you can add information in the available fields, Template and Body.
Step 3 ![]() When you click the OK button, the information updates in Figure 9-3. When you click Cancel, you return to Figure 9-3 without updates.
When you click the OK button, the information updates in Figure 9-3. When you click Cancel, you return to Figure 9-3 without updates.
Optional Attributes
When you choose Optional Attributes, you can view the predefined Device Type, Card Type, Port Type, and Software Version (IOS and IOS XR) populated from the Prime Fulfillment repository. When no attribute value is provided for any of the four categories, the attribute is applicable for all in that type. For example, if the drop-down list for Port Type has no choices, the attribute value is applicable for all Port Types. Each combination of attributes should match. Each combination of attributes is called an attribute set, and templates can have multiple attributes, for example, a template can be applicable for the 7600 series and the 3500 series.
Do the following after clicking the Select drop-down list in Step 6 of the "Creating Templates" section:
Step 1 ![]() Choose Optional Attributes and then click the Go button and you receive a window as in Figure 9-6.
Choose Optional Attributes and then click the Go button and you receive a window as in Figure 9-6.
Figure 9-6 Optional Template Attribute List
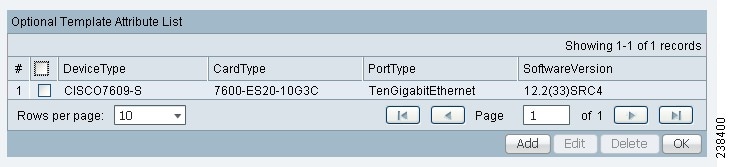
Step 2 ![]() You can view the predefined Device Type, Card Type, Port Type, and Software Version (IOS and IOS XR) populated from the Prime Fulfillment repository. When no attribute value is provided for any of the four categories, the attribute is applicable for all in that type. Templates can have multiple attributes. You are required to create different templates based on roles and associate them to a Policy and Service Request (see the Cisco Prime Fulfillment User Guide 6.2).
You can view the predefined Device Type, Card Type, Port Type, and Software Version (IOS and IOS XR) populated from the Prime Fulfillment repository. When no attribute value is provided for any of the four categories, the attribute is applicable for all in that type. Templates can have multiple attributes. You are required to create different templates based on roles and associate them to a Policy and Service Request (see the Cisco Prime Fulfillment User Guide 6.2).
Step 3 ![]() Check the check box for the attribute set (row of information) for which you want to do the following (except for Add, when you should not check a check box):
Check the check box for the attribute set (row of information) for which you want to do the following (except for Add, when you should not check a check box):
•![]() Click the Add button to open the optional attributes editor for adding attributes. The added attribute set is then reflected in the attribute list page.
Click the Add button to open the optional attributes editor for adding attributes. The added attribute set is then reflected in the attribute list page.
•![]() Click the Edit button to open the optional template attributes editor for modifying attributes. Multiple editing in one process is not allowed.
Click the Edit button to open the optional template attributes editor for modifying attributes. Multiple editing in one process is not allowed.
•![]() Click the Delete button and the selected attributes are deleted. You can delete multiple selected attributes at the same time.
Click the Delete button and the selected attributes are deleted. You can delete multiple selected attributes at the same time.
•![]() Click the OK button and the window closes and you return to the previous page.
Click the OK button and the window closes and you return to the previous page.
Step 4 ![]() When you click the Add or Edit button, a popup window appears in which you can enter the optional identifiers, as shown in Figure 9-7.
When you click the Add or Edit button, a popup window appears in which you can enter the optional identifiers, as shown in Figure 9-7.
Note ![]() Before clicking the Edit button, you must check the check box for the one attribute set (row of information) in Figure 9-6 that you want to edit. You cannot edit multiple rows at the same time.
Before clicking the Edit button, you must check the check box for the one attribute set (row of information) in Figure 9-6 that you want to edit. You cannot edit multiple rows at the same time.
Figure 9-7 Optional Template Attributes Editor
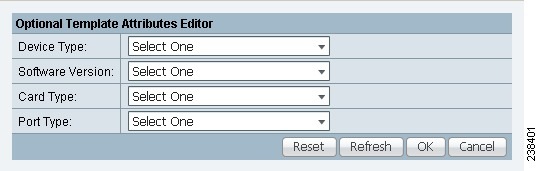
Step 5 ![]() In Figure 9-7, click the drop-down list for each of Device Type, Software Version, Card Type, and Port Type.
In Figure 9-7, click the drop-down list for each of Device Type, Software Version, Card Type, and Port Type.
Note ![]() The drop-down lists are intelligently filtered based on selection in the previous attribute. For example, if you have selected the 7600 for the Device Type, then the Card Type choices are related to the 7600.
The drop-down lists are intelligently filtered based on selection in the previous attribute. For example, if you have selected the 7600 for the Device Type, then the Card Type choices are related to the 7600.
Step 6 ![]() Click one of the following buttons:
Click one of the following buttons:
•![]() Reset—Allows you to start over in this selection process.
Reset—Allows you to start over in this selection process.
•![]() Refresh—Refreshes the option list from the database and from the user-defined file. The user-defined attributes are read from the usertemplateattr.xml file.
Refresh—Refreshes the option list from the database and from the user-defined file. The user-defined attributes are read from the usertemplateattr.xml file.
Note ![]() The user-defined attribute file name usertemplateattr.xml can be changed by using the DCPL property: TemplateManger\userTemplateAttrFile. (See "Property Settings" for more details.)
The user-defined attribute file name usertemplateattr.xml can be changed by using the DCPL property: TemplateManger\userTemplateAttrFile. (See "Property Settings" for more details.)
Note ![]() The Refresh process can take some time. Just be aware of this.
The Refresh process can take some time. Just be aware of this.
•![]() OK—Accepts your selected template attributes, adds them as a set, and returns you to an updated Figure 9-6 with an added attribute set (row of information).
OK—Accepts your selected template attributes, adds them as a set, and returns you to an updated Figure 9-6 with an added attribute set (row of information).
•![]() Cancel—Returns you to the previous window without any changes.
Cancel—Returns you to the previous window without any changes.
Sub-Template
A template using other templates is called a super-template. The template being used is called the sub-template. The super-template instantiates all required sub-templates by passing values for the variables in the sub-template. After instantiation, the super-template puts the sub-template generated configlet into the super-template.
Do the following after clicking the Select drop-down list in Step 6 of the "Creating Templates" section:
Step 1 ![]() Choose Sub-Template and then click the Go button and you receive a window as in Figure 9-8.
Choose Sub-Template and then click the Go button and you receive a window as in Figure 9-8.
Figure 9-8 Sub-Template Editor
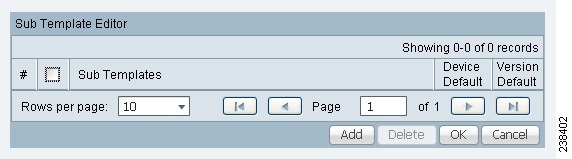
Step 2 ![]() Check the check box for the sub-template (row of information) for which you want to do the following (except for Add, when you should not check a check box):
Check the check box for the sub-template (row of information) for which you want to do the following (except for Add, when you should not check a check box):
•![]() Click the Add button to add a new row. Then under the Sub Templates column, click Add link and a new pop-up appears from which you can choose the new subtemplates. Default check boxes are unselected. The changes are not persisted until saved by clicking the Ok button.
Click the Add button to add a new row. Then under the Sub Templates column, click Add link and a new pop-up appears from which you can choose the new subtemplates. Default check boxes are unselected. The changes are not persisted until saved by clicking the Ok button.
•![]() Click the Delete button to delete selected rows. You can delete multiple selected rows at the same time. The changes are not persisted until saved by clicking the Ok button.
Click the Delete button to delete selected rows. You can delete multiple selected rows at the same time. The changes are not persisted until saved by clicking the Ok button.
•![]() Click the OK button and all changes will be saved on the form. The window closes and you return to the previous page.
Click the OK button and all changes will be saved on the form. The window closes and you return to the previous page.
•![]() Click the Cancel button and all the changes are discarded. The window closes and you return to the previous page.
Click the Cancel button and all the changes are discarded. The window closes and you return to the previous page.
Step 3 ![]() You can associate a sub-template with a super-template. When the templates are instantiated during service provisioning (see the Cisco Prime Fulfillment User Guide 6.2), the appropriate sub-templates are used based on the run time information on the device, line card, role, port, and device software versions. Appropriate sub-template attributes provided by the user are instantiated during deployment based on the attributes. The following are some points to be aware of:
You can associate a sub-template with a super-template. When the templates are instantiated during service provisioning (see the Cisco Prime Fulfillment User Guide 6.2), the appropriate sub-templates are used based on the run time information on the device, line card, role, port, and device software versions. Appropriate sub-template attributes provided by the user are instantiated during deployment based on the attributes. The following are some points to be aware of:
•![]() Only one level of sub-template is supported, but there are no checks for depth of sub-templates.
Only one level of sub-template is supported, but there are no checks for depth of sub-templates.
•![]() No validations occur to check if super-template and sub-template structure is cyclic.
No validations occur to check if super-template and sub-template structure is cyclic.
•![]() When you try to delete a sub-template that is referenced by a super-template, a warning message appears. You can modify a sub-template.
When you try to delete a sub-template that is referenced by a super-template, a warning message appears. You can modify a sub-template.
•![]() Sub-templates can be attached to multiple super-templates.
Sub-templates can be attached to multiple super-templates.
•![]() Data files are not supported for sub-templates. If multiple data files are found, the first available data file is chosen based on the alphabetic sorting during deployment.
Data files are not supported for sub-templates. If multiple data files are found, the first available data file is chosen based on the alphabetic sorting during deployment.
Step 4 ![]() You can mark a sub-template as default. There will be a default for the Device type and the Software version attribute types. When no attributes are marked for the templates, the template is treated as a default template. These templates have lower preference than default sub-templates for an attribute type. When multiple subtemplates have no attributes marked, no subtemplate is selected. For more infomation on using sub-templates, see Associating Subtemplates During Service Provisioning.
You can mark a sub-template as default. There will be a default for the Device type and the Software version attribute types. When no attributes are marked for the templates, the template is treated as a default template. These templates have lower preference than default sub-templates for an attribute type. When multiple subtemplates have no attributes marked, no subtemplate is selected. For more infomation on using sub-templates, see Associating Subtemplates During Service Provisioning.
Variables
Do the following after clicking the Select drop-down list in Step 6 of the "Creating Templates" section:
Step 1 ![]() Choose Variables and then click the Go button and you receive a window as in Figure 9-9.
Choose Variables and then click the Go button and you receive a window as in Figure 9-9.
Figure 9-9 Template Variables

Step 2 ![]() Click the radio button for the Variable you want to edit and click Edit.
Click the radio button for the Variable you want to edit and click Edit.
You receive a Variable Definition window.
Step 3 ![]() Click the drop-down list for Type to receive the following choices:
Click the drop-down list for Type to receive the following choices:
•![]() String—Proceed to Step 4.
String—Proceed to Step 4.
•![]() Integer—Proceed to Step 5.
Integer—Proceed to Step 5.
•![]() Float—Proceed to Step 6.
Float—Proceed to Step 6.
•![]() IPv4 Address—Proceed to Step 7.
IPv4 Address—Proceed to Step 7.
•![]() Sub-Template—Proceed to Step 8.
Sub-Template—Proceed to Step 8.
Step 4 ![]() The default Type to appear is String, a combination of ASCII characters considered as a group. The resulting Variable Definition window for Type String is shown and its attributes are as follows:
The default Type to appear is String, a combination of ASCII characters considered as a group. The resulting Variable Definition window for Type String is shown and its attributes are as follows:
•![]() Description (optional)—You can enter any descriptive statement about this variable here.
Description (optional)—You can enter any descriptive statement about this variable here.
•![]() Required—Leave the default of the checked check box if this variable is required. Otherwise, uncheck it.
Required—Leave the default of the checked check box if this variable is required. Otherwise, uncheck it.
•![]() Dimension—Choose 0 (default), which indicates a scalar or enum variable; choose 1, in which case the variable becomes a one-dimensional array; or choose 2, in which case the variable becomes a two-dimensional array.
Dimension—Choose 0 (default), which indicates a scalar or enum variable; choose 1, in which case the variable becomes a one-dimensional array; or choose 2, in which case the variable becomes a two-dimensional array.
•![]() Pattern (optional)—Specify a regular expression pattern of the string. For example, a pattern of isc[0-9]+ defines a string that starts with isc followed by one or more digits from 0 to 9.
Pattern (optional)—Specify a regular expression pattern of the string. For example, a pattern of isc[0-9]+ defines a string that starts with isc followed by one or more digits from 0 to 9.
•![]() Minimum Length (optional) —f you specify a minimum length, the string cannot be less than the length specified here.
Minimum Length (optional) —f you specify a minimum length, the string cannot be less than the length specified here.
•![]() Maximum Length (optional)—If you specify a maximum length, the string cannot exceed the length specified here.
Maximum Length (optional)—If you specify a maximum length, the string cannot exceed the length specified here.
•![]() Default radio button (optional)—If there is a default value for the specified variable, specify it here.
Default radio button (optional)—If there is a default value for the specified variable, specify it here.
•![]() Available Values radio button (optional)—Enter string values for this variable. Separate the values by commas.
Available Values radio button (optional)—Enter string values for this variable. Separate the values by commas.
After you enter all the data, click OK to accept this information for the specified variable; continue editing all variables you want to change in this same way, then click OK in a window such as Figure 9-9, which now includes these updated variables; click Save and then Close or click Close and when asked, agree to Save for a window such as Figure 9-3. Create a Data File is shown in the "Creating Data Files" section, Edit is shown in the "Editing Templates and Data Files" section, and Delete is shown in the "Deleting Templates and Data Files" section.
Step 5 ![]() When you choose the Type Integer, a whole number, the resulting Variable Definition window for Type Integer is shown and its attributes are as follows:
When you choose the Type Integer, a whole number, the resulting Variable Definition window for Type Integer is shown and its attributes are as follows:
•![]() Description (optional)—You can enter any descriptive statement about this variable here.
Description (optional)—You can enter any descriptive statement about this variable here.
•![]() Required—Leave the default of the checked check box if this variable is required. Otherwise, uncheck it.
Required—Leave the default of the checked check box if this variable is required. Otherwise, uncheck it.
•![]() Dimension—Choose 0 (default), which indicates a scalar or enum variable; choose 1, in which case the variable becomes a one-dimensional array; or choose 2, in which case the variable becomes a two-dimensional array.
Dimension—Choose 0 (default), which indicates a scalar or enum variable; choose 1, in which case the variable becomes a one-dimensional array; or choose 2, in which case the variable becomes a two-dimensional array.
•![]() Minimum Value (optional)—If you specify a minimum value, the integer cannot be less than the value specified here.
Minimum Value (optional)—If you specify a minimum value, the integer cannot be less than the value specified here.
•![]() Maximum Value (optional)—If you specify a maximum value, the integer cannot exceed the value specified here.
Maximum Value (optional)—If you specify a maximum value, the integer cannot exceed the value specified here.
•![]() Default radio button (optional)—If there is a default value for the specified variable, specify it in the field after the radio button.
Default radio button (optional)—If there is a default value for the specified variable, specify it in the field after the radio button.
•![]() Available Values radio button (optional)—Enter string values for this variable in the field after the radio button. Separate the values by commas.
Available Values radio button (optional)—Enter string values for this variable in the field after the radio button. Separate the values by commas.
After you enter all the data, click OK to accept this information for the specified variable; continue editing all variables you want to change in this same way, then click OK in a window such as Figure 9-9, which now includes these updated variables; click Save and then Close or click Close and when asked, agree to Save for a window such as Figure 9-3. Create a Data File is shown in the "Creating Data Files" section, Edit is shown in the "Editing Templates and Data Files" section, and Delete is shown in the "Deleting Templates and Data Files" section.
Step 6 ![]() When you choose the Type Float, a number that has no fixed number of digits before or after the decimal point, the resulting Variable Definition window for Type Float is shown and its attributes are as follows:
When you choose the Type Float, a number that has no fixed number of digits before or after the decimal point, the resulting Variable Definition window for Type Float is shown and its attributes are as follows:
•![]() Description (optional)—You can enter any descriptive statement about this variable here.
Description (optional)—You can enter any descriptive statement about this variable here.
•![]() Required—Leave the default of the checked check box if this variable is required. Otherwise, uncheck it.
Required—Leave the default of the checked check box if this variable is required. Otherwise, uncheck it.
•![]() Dimension—Choose 0 (default), which indicates a scalar or enum variable; choose 1, in which case the variable becomes a one-dimensional array; or choose 2, in which case the variable becomes a two-dimensional array.
Dimension—Choose 0 (default), which indicates a scalar or enum variable; choose 1, in which case the variable becomes a one-dimensional array; or choose 2, in which case the variable becomes a two-dimensional array.
•![]() Minimum Value (optional)—If you specify a minimum value, the floating point value cannot be less than the value specified here.
Minimum Value (optional)—If you specify a minimum value, the floating point value cannot be less than the value specified here.
•![]() Maximum Value (optional)—If you specify a maximum value, the floating point value cannot exceed the value specified here.
Maximum Value (optional)—If you specify a maximum value, the floating point value cannot exceed the value specified here.
•![]() Default radio button (optional)—If there is a default value for the specified variable, specify it here.
Default radio button (optional)—If there is a default value for the specified variable, specify it here.
•![]() Available Values radio button (optional)—Enter string values for this variable. Separate the values by commas.
Available Values radio button (optional)—Enter string values for this variable. Separate the values by commas.
After you enter all the data, click OK to accept this information for the specified variable; continue editing all variables you want to change in this same way, then click OK in a window such as Figure 9-9, which now includes these updated variables; click Save and then Close or click Close and when asked, agree to Save for a window such as Figure 9-3. Create a Data File is shown in the "Creating Data Files" section, Edit is shown in the "Editing Templates and Data Files" section, and Delete is shown in the "Deleting Templates and Data Files" section.
Step 7 ![]() When you choose the Type IPv4 Address, the resulting Variable Definition window for Type IPv4 Address is shown and its attributes are as follows:
When you choose the Type IPv4 Address, the resulting Variable Definition window for Type IPv4 Address is shown and its attributes are as follows:
•![]() Description (optional)—You can enter any descriptive statement about this variable here.
Description (optional)—You can enter any descriptive statement about this variable here.
•![]() Required—Leave the default of the checked check box if this variable is required. Otherwise, uncheck it.
Required—Leave the default of the checked check box if this variable is required. Otherwise, uncheck it.
•![]() Dimension—Choose 0 (default), which indicates a scalar or enum variable; choose 1, in which case the variable becomes a one-dimensional array; or choose 2, in which case the variable becomes a two-dimensional array.
Dimension—Choose 0 (default), which indicates a scalar or enum variable; choose 1, in which case the variable becomes a one-dimensional array; or choose 2, in which case the variable becomes a two-dimensional array.
•![]() Subnet Mask (optional)—Enter a valid subnet mask.
Subnet Mask (optional)—Enter a valid subnet mask.
•![]() Class (optional)—Enter the class of the IP address. The options are: Undefined, A, B, or C.
Class (optional)—Enter the class of the IP address. The options are: Undefined, A, B, or C.
•![]() Default radio button (optional)—If there is a default value for the specified variable, specify it here.
Default radio button (optional)—If there is a default value for the specified variable, specify it here.
•![]() Available Values radio button (optional)—Enter string values for this variable. Separate the values by commas.
Available Values radio button (optional)—Enter string values for this variable. Separate the values by commas.
After you enter all the data, click OK to accept this information for the specified variable; continue editing all variables you want to change in this same way, then click OK in a window such as Figure 9-9, which now includes these updated variables; click Save and then Close or click Close and when asked, agree to Save for a window such as Figure 9-3. Create a Data File is shown in the "Creating Data Files" section, Edit is shown in the "Editing Templates and Data Files" section, and Delete is shown in the "Deleting Templates and Data Files" section.
Step 8 ![]() When you choose the Type Sub-Template, you instantiate one subtemplate into the Main template. The resulting Variable Definition window for Type Sub-Template is shown and its attributes are as follows:
When you choose the Type Sub-Template, you instantiate one subtemplate into the Main template. The resulting Variable Definition window for Type Sub-Template is shown and its attributes are as follows:
•![]() Description (optional)—You can enter any descriptive statement about this variable here.
Description (optional)—You can enter any descriptive statement about this variable here.
•![]() Required—Leave the default of the checked check box if this variable is required. Otherwise, uncheck it.
Required—Leave the default of the checked check box if this variable is required. Otherwise, uncheck it.
•![]() Location (required)—Enter the full path name of the parent template. For example /test2/testyy.
Location (required)—Enter the full path name of the parent template. For example /test2/testyy.
The variable varName is defined as the subtemplate type (by selecting Variables and clicking Go). The Sub-Template defined earlier is called and you must provide the subtemplate path. The syntax is as follows:
$<varName>.callWithDatafile(<DatafileName>)
After you enter all the data, click OK to accept this information for the specified variable; continue editing all variables you want to change in this same way, then click OK, which now includes these updated variables; click Save and then Close or click Close and when asked, agree to Save for a window such as Figure 9-3. Create a Data File is shown in the "Creating Data Files" section, Edit is shown in the "Editing Templates and Data Files" section, and Delete is shown in the "Deleting Templates and Data Files" section.
Validate
To validate the information you entered in Figure 9-3 (see Step 5), do the following after clicking the Select & Click Go drop-down list in Step 6 of the "Creating Templates" section:
Step 1 ![]() Choose Validate and then click the Go button.
Choose Validate and then click the Go button.
Step 2 ![]() For a successful validation, you will receive a information window appears.
For a successful validation, you will receive a information window appears.
Creating Data Files
You can create a new data file from an existing template. If the template you want is not available, go to the "Creating Templates" section.
To create a data file, follow these steps:
Step 1 ![]() Choose Service Design > Templates > Template Manager.
Choose Service Design > Templates > Template Manager.
Step 2 ![]() In the Template Manager tree in the left part of your window, do one of the following
In the Template Manager tree in the left part of your window, do one of the following
1. ![]() Left-click on the folder or subfolder in which the template for which you want to create a data file exists or
Left-click on the folder or subfolder in which the template for which you want to create a data file exists or
2. ![]() Click on the arrow next to the folder of choice and then click on the template for which you want to create a data file.
Click on the arrow next to the folder of choice and then click on the template for which you want to create a data file.
Step 3 ![]() If you chose 1. in Step 2, a window appears as shown in Figure 9-2.
If you chose 1. in Step 2, a window appears as shown in Figure 9-2.
Check the check box for the template for which you want to create a data file and click Create Data File. Then proceed to .
Otherwise, proceed to Step 4.
Step 4 ![]() If you chose 2. in Step 2, the buttons appear as shown in Figure 9-10.
If you chose 2. in Step 2, the buttons appear as shown in Figure 9-10.
Figure 9-10 Choose Existing Template, Another Way

Click Create Data File. An example of a window that appears is shown in Figure 9-11.
Figure 9-11 Template Data File Editor

Step 5 ![]() In the General area, fill in the following:
In the General area, fill in the following:
•![]() Data File Name (required)—This must be a unique name. This name must begin with an alphabetic character and can only contain alphanumeric characters and the underscore.
Data File Name (required)—This must be a unique name. This name must begin with an alphabetic character and can only contain alphanumeric characters and the underscore.
•![]() Description (optional)—Enter any description that helps you identify this data file.
Description (optional)—Enter any description that helps you identify this data file.
In the example in Figure 9-11, in the Variables area, cntrlName is a string variable (Dimension defined when the template was created was 0); you can also create a one-dimensional array (Dimension defined when the template was created was 1); and t1-list is a two-dimensional array (Dimension defined when the template was created was 2).
If t1-list is a Dynamic Java Class variable, you must enter the entire Java Class package name. For example: com.cisco.isc.class_name.
Note ![]() cntrlName can only be a string variable.
cntrlName can only be a string variable.
Step 6 ![]() If you click Vars as shown in Figure 9-11, you receive a window as shown in Figure 9-12.
If you click Vars as shown in Figure 9-11, you receive a window as shown in Figure 9-12.
Figure 9-12 Template Data File Editor
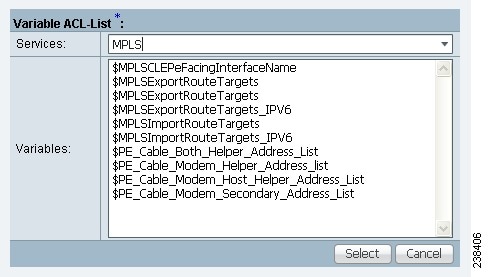
Click the Services drop-down list to have access to variables for:
•![]() MPLS
MPLS
•![]() L2VPN
L2VPN
•![]() VPLS
VPLS
•![]() VRF
VRF
•![]() FlexUNI
FlexUNI
Then click the entry in Variables that you want to use and click Select.
If you have a 0 dimensional entry (set as Dimension 0 when creating a template), you can only enter variables in the provided field.
Step 7 ![]() When you click Edit, as shown in Figure 9-11, the resulting window depends on whether you are editing a 1 or 2 dimensional array.
When you click Edit, as shown in Figure 9-11, the resulting window depends on whether you are editing a 1 or 2 dimensional array.
Proceed to Step 8 for information about a 1 dimensional array.
Proceed to Step 11 for information about a 2 dimensional array.
Step 8 ![]() For a one-dimensional array (set as Dimension 1 when creating the template), when you click Edit, you receive a window.
For a one-dimensional array (set as Dimension 1 when creating the template), when you click Edit, you receive a window.
Step 9 ![]() To add a variable, click Add and a window appears in which you can add the variable. Then click OK.
To add a variable, click Add and a window appears in which you can add the variable. Then click OK.
Step 10 ![]() To edit or delete a variable, highlight the variable and click Edit or Delete. For Edit, you receive a window appears. Then click OK. For Delete, be sure you want to delete. After you click Delete, it automatically occurs and the window is updated. Proceed to Step 16.
To edit or delete a variable, highlight the variable and click Edit or Delete. For Edit, you receive a window appears. Then click OK. For Delete, be sure you want to delete. After you click Delete, it automatically occurs and the window is updated. Proceed to Step 16.
Step 11 ![]() For a two-dimensional array (set as Dimension 2 when creating the template), when you click Edit, you receive a window appears.
For a two-dimensional array (set as Dimension 2 when creating the template), when you click Edit, you receive a window appears.
Step 12 ![]() Click Add Row and a window appears. Enter a value and click OK.
Click Add Row and a window appears. Enter a value and click OK.
Step 13 ![]() Click Add Column and a window appears.
Click Add Column and a window appears.
Step 14 ![]() Enter a value and click OK. A resulting window appears.
Enter a value and click OK. A resulting window appears.
Step 15 ![]() You can check any of the check boxes (toggles) and you can then Edit or Delete that row or column. You can also continue to Add Row and Add Column as shown in Step 13 and Step 14, respectively.
You can check any of the check boxes (toggles) and you can then Edit or Delete that row or column. You can also continue to Add Row and Add Column as shown in Step 13 and Step 14, respectively.
Step 16 ![]() When you complete setting up your two-dimensional array, click OK. A window as shown in Figure 9-11 is updated to reflect the new data file information.
When you complete setting up your two-dimensional array, click OK. A window as shown in Figure 9-11 is updated to reflect the new data file information.
Step 17 ![]() You can then click Save and then Close to save this information and close this file; click Configure to show the configuration file; or click Close and then be sure to click OK, if you want to save the information you have created. If you do not want to save this information, click Close and then click Cancel.
You can then click Save and then Close to save this information and close this file; click Configure to show the configuration file; or click Close and then be sure to click OK, if you want to save the information you have created. If you do not want to save this information, click Close and then click Cancel.
Editing Templates and Data Files
To edit a Template or Data File, follow these steps:
Step 1 ![]() Choose Service Design > Templates > Template Manager.
Choose Service Design > Templates > Template Manager.
Step 2 ![]() In the Template Manager tree, left-click on the folder or subfolder in which the template you want to edit exists or the template in which the data file you want to edit exists. Alternatively, when the name in the upper left corner of the data pane is a template, you can click on the template name to edit the template.
In the Template Manager tree, left-click on the folder or subfolder in which the template you want to edit exists or the template in which the data file you want to edit exists. Alternatively, when the name in the upper left corner of the data pane is a template, you can click on the template name to edit the template.
To edit a template, a window appears as shown in Figure 9-2. To edit a data file, a window appears as shown in Figure 9-10.
Step 3 ![]() You can use the Show Templates or Show Data Files drop-down list to choose whether to view the templates or data files alphabetically by Name or by Description. Then click the Show button to activate how you view the templates or data files. If you enter characters in the matching field before you click the Show button, you minimize the list of templates or data files that appear either by Name or by Description. For more details, see the Show Templates matching or Show Data Files matching filter in the upper right-hand corner of the data pane can be very useful. For example, you can click the drop-down list for Show Templates or Show Data Files and choose to match (matches are case-sensitive) the Name or Description and then in the matching box you can choose to work with templates or data files, respectively, that start with abc. In this case, enter abc* in the field and then click the Show button. Only the templates or data files, respectively, that start with abc appear. For more information about filters, see Viewing the Templates Tree and Data Pane.
You can use the Show Templates or Show Data Files drop-down list to choose whether to view the templates or data files alphabetically by Name or by Description. Then click the Show button to activate how you view the templates or data files. If you enter characters in the matching field before you click the Show button, you minimize the list of templates or data files that appear either by Name or by Description. For more details, see the Show Templates matching or Show Data Files matching filter in the upper right-hand corner of the data pane can be very useful. For example, you can click the drop-down list for Show Templates or Show Data Files and choose to match (matches are case-sensitive) the Name or Description and then in the matching box you can choose to work with templates or data files, respectively, that start with abc. In this case, enter abc* in the field and then click the Show button. Only the templates or data files, respectively, that start with abc appear. For more information about filters, see Viewing the Templates Tree and Data Pane.
Step 4 ![]() Check the check box for the template or data file you want to edit.
Check the check box for the template or data file you want to edit.
Note ![]() For a data file, there is a Configlet column in which you can click View to view the configuration file.
For a data file, there is a Configlet column in which you can click View to view the configuration file.
Step 5 ![]() Click Edit.
Click Edit.
Step 6 ![]() When editing a template, you receive a window as shown in Figure 9-3. Then proceed as in Step 5 in the Creating Templates section. When editing a data file, you receive a window as shown in Figure 9-10. Then proceed as in in the Creating Data Files section.
When editing a template, you receive a window as shown in Figure 9-3. Then proceed as in Step 5 in the Creating Templates section. When editing a data file, you receive a window as shown in Figure 9-10. Then proceed as in in the Creating Data Files section.
Deleting Templates and Data Files
To delete a Template or Data File, follow these steps:
Step 1 ![]() Choose Service Design > Templates > Template Manager.
Choose Service Design > Templates > Template Manager.
Step 2 ![]() In the Templates tree, left-click on the folder or subfolder in which the template you want to delete exists or the template in which the data file you want to delete exists.
In the Templates tree, left-click on the folder or subfolder in which the template you want to delete exists or the template in which the data file you want to delete exists.
To delete a template, a window appears as shown in Figure 9-2. To delete a data file, a window appears as shown in Figure 9-10.
Step 3 ![]() You can use the Show Templates or Show Data Files drop-down list to choose whether to view the templates or data files alphabetically by Name or by Description. Then click the Show button to activate how you view the templates or data files. If you enter characters in the matching field before you click the Show button, you minimize the list of templates or data files that appear either by Name or by Description. For more details, see the Show Templates matching or Show Data Files matching filter in the upper right-hand corner of the data pane can be very useful. For example, you can click the drop-down list for Show Templates or Show Data Files and choose to match (matches are case-sensitive) the Name or Description and then in the matching box you can choose to work with templates or data files, respectively, that start with abc. In this case, enter abc* in the field and then click the Show button. Only the templates or data files, respectively, that start with abc appear. For more information about filters, see Viewing the Templates Tree and Data Pane.
You can use the Show Templates or Show Data Files drop-down list to choose whether to view the templates or data files alphabetically by Name or by Description. Then click the Show button to activate how you view the templates or data files. If you enter characters in the matching field before you click the Show button, you minimize the list of templates or data files that appear either by Name or by Description. For more details, see the Show Templates matching or Show Data Files matching filter in the upper right-hand corner of the data pane can be very useful. For example, you can click the drop-down list for Show Templates or Show Data Files and choose to match (matches are case-sensitive) the Name or Description and then in the matching box you can choose to work with templates or data files, respectively, that start with abc. In this case, enter abc* in the field and then click the Show button. Only the templates or data files, respectively, that start with abc appear. For more information about filters, see Viewing the Templates Tree and Data Pane.
Step 4 ![]() Check the check box for the template or data file you want to delete.
Check the check box for the template or data file you want to delete.
Note ![]() For a data file, there is a Configlet column in which you can click View to view the configuration file.
For a data file, there is a Configlet column in which you can click View to view the configuration file.
Step 5 ![]() Click the Delete button.
Click the Delete button.
A confirmation window appears prompting you to confirm the deletion. Before deleting a data file, make sure it is not associated with a service request, by checking that the In SR Use column is set to No. When deleting a folder or a template, make sure that none of the data files they contain are associated with a service request. By clicking OK, you continue the deletion, and by clicking Cancel, you cancel the deletion.
You receive an updated window as shown in Figure 9-2, or Figure 9-10, with the deleted template or data file no longer available.
Listing Service Requests Associated with a Data File
In the In SR Use column, as shown in Figure 9-10, Yes indicates that the data file is in use and No indicates that the data file is not in use. If Yes appears, you can click on it and you receive a list of all the associated service requests. If Yes appears, a List All SRs button is enabled in the bottom row. If you click the List All SRs button, all the service requests associated with the selected data file(s) appears, as shown in Figure 9-13. If No appears in the In SR Use column, the List All SRs button is disabled.
From Figure 9-13, if you click the Close button, the previous window appears.
Figure 9-13 List All SRs

Note ![]() The only data files listed in the Data File Name column are those selected previously by the user to get to this window. The service request might be associated with other data files that are not displayed.
The only data files listed in the Data File Name column are those selected previously by the user to get to this window. The service request might be associated with other data files that are not displayed.
Listing Policies Associated with a Data File
In the In Policy Use column, as shown in Figure 9-13, Yes indicates that the data file is in use and No indicates that the data file is not in use. If Yes appears, you can click on it and you receive a list of all the associated policies. If Yes appears, a List All Policies button is enabled in the bottom row. If you click the List All Policies button, all the policies associated with the selected data file(s) appears. If No appears in the In Policy Use column, the List All Policies button is disabled.
If you click the Close button for the newly created window, the previous window appears.
Note ![]() The only data files listed in the Data File Name column are those selected previously by the user to get to this window. The policy might be associated with other data files that are not displayed.
The only data files listed in the Data File Name column are those selected previously by the user to get to this window. The policy might be associated with other data files that are not displayed.
Using Templates with Policies
This section provides information on how to enable template support and associate templates/data files with Prime Fulfillment policies. It contains the following sections:
•![]() Associating Templates and Data Files to a Policy
Associating Templates and Data Files to a Policy
Overview
Prime Fulfillment supports associating templates/data files to a service policy. This minimizes steps in the provisioning workflow and also reduces potential errors that can occur if an incorrect template/data file is selected during service creation. In the Policy Editor workflow, after the policy attributes are set, a new Templates Association window appears. The Enable Templates check box that appears in this window allows you to enable template association for the policy and to specify templates/data files to be available for service requests based on the policy. More than one template/data file can be associated to the policy. Each template/data file can be associated to a device role. The available device roles are determined by the policy type. In the case of U-PE and PE-AGG device roles, templates/data files can be selectively determined based on whether the device has a UNI interface. Later, at the time of service request creation, templates are only available if the device type matches the role type specified for the template within the policy or role type along with (or without) the presence of UNI interface in the policy.
Associating Templates and Data Files to a Policy
This section describes how to associate templates and data files to an Prime Fulfillment policy. These features also apply in the case of editing a policy.
After the policy attributes are set for a policy, the Template Association window appears in the workflow.
This window is where you associate the templates/data files as a final step before clicking the Finish button and saving the policy settings.
To associate template(s)/data file(s) with the policy, perform the following steps.
Step 1 ![]() Check the Template Enable check box to enable template use in service requests based on this policy. This check box is unchecked by default.
Check the Template Enable check box to enable template use in service requests based on this policy. This check box is unchecked by default.
The GUI updates with fields allowing you to associate templates/data files to the policy.
Step 2 ![]() Click the Add button to add a row in which to specify associated templates/data files.
Click the Add button to add a row in which to specify associated templates/data files.
A new row appears in the GUI, providing fields to set the role type, specify templates/data files, and specify if the template/data file is editable within service requests based on the policy.
Step 3 ![]() In the Role Type column, choose a device role from the drop-down list.
In the Role Type column, choose a device role from the drop-down list.
The role selections might include:
•![]() N-PE
N-PE
•![]() PE-AGG
PE-AGG
•![]() U-PE
U-PE
•![]() CE (MULTI_VRF)
CE (MULTI_VRF)
•![]() CE (MANAGED)
CE (MANAGED)
•![]() MVRF
MVRF
Note ![]() The available device roles in the drop-down list are determined by the policy type.
The available device roles in the drop-down list are determined by the policy type.
Step 4 ![]() To add a template/data file click the Add link in the Template/Data File column.
To add a template/data file click the Add link in the Template/Data File column.
The Add/Remove Templates window appears.
Step 5 ![]() Click the Add button to select a template/data file to associate with the policy.
Click the Add button to select a template/data file to associate with the policy.
Note ![]() If the device role is specified as U-PE or PE-AGG, templates can be selectively added based on whether the device has a UNI interface. For details on this feature, see Selectively Determining Templates for U-PE and PE-AGG Device Roles. The actual steps for adding templates/data files are the same as in the following steps.
If the device role is specified as U-PE or PE-AGG, templates can be selectively added based on whether the device has a UNI interface. For details on this feature, see Selectively Determining Templates for U-PE and PE-AGG Device Roles. The actual steps for adding templates/data files are the same as in the following steps.
The Template Datafile Chooser window appears.
This is a standard Template Manager window used to navigate to and choose templates and (optionally) data files in Prime Fulfillment.
Note ![]() The following steps involving the Template Datafile Chooser window assume a familiarity with the functionality of the window. For additional information about Template Manager and how templates and data files are created and managed in Prime Fulfillment, see Overview The steps shown here are for example purposes. You must modify the steps as required for your environment. For example, you might want to choose only a template file or both a template file and a data file to associate with the policy. Both scenarios are supported.
The following steps involving the Template Datafile Chooser window assume a familiarity with the functionality of the window. For additional information about Template Manager and how templates and data files are created and managed in Prime Fulfillment, see Overview The steps shown here are for example purposes. You must modify the steps as required for your environment. For example, you might want to choose only a template file or both a template file and a data file to associate with the policy. Both scenarios are supported.
Step 6 ![]() Navigate to a template in the folder tree and click it to select it.
Navigate to a template in the folder tree and click it to select it.
The template is listed in the right side of the GUI, along with any data files that are associated with it.
Step 7 ![]() Check the check box to the left of a data file name and click the Accept button.
Check the check box to the left of a data file name and click the Accept button.
Note ![]() You can select only the template or both template and data file at this stage, depending on your needs, and whether or not a data file exists for the template.
You can select only the template or both template and data file at this stage, depending on your needs, and whether or not a data file exists for the template.
The Template Datafile Chooser window closes and the selected template/data file appears listed in the Add/Remove Templates window.
If you did not choose a data file, then the Datafile column is blank.
Step 8 ![]() Check the check box to the left of the template name to choose the template.
Check the check box to the left of the template name to choose the template.
Step 9 ![]() Under Action, use the drop-down list and choose APPEND or PREPEND.
Under Action, use the drop-down list and choose APPEND or PREPEND.
Append tells Prime Fulfillment to append the template-generated CLIs to the regular Prime Fulfillment (non-template) CLIs (configlet). Prepend is the reverse (adds the template to the beginning of the configlet).
Step 10 ![]() Choose Active to use this template for service requests based on this policy.
Choose Active to use this template for service requests based on this policy.
If you do not choose Active, the template is not used.
Step 11 ![]() To associate additional templates/data files with the policy click Add in the Add/Remove Templates window and repeat the appropriate steps to add other templates/data files.
To associate additional templates/data files with the policy click Add in the Add/Remove Templates window and repeat the appropriate steps to add other templates/data files.
Step 12 ![]() To remove a template row from the window, check a template and click the Remove button to remove the template from the list.
To remove a template row from the window, check a template and click the Remove button to remove the template from the list.
Step 13 ![]() When you are satisfied with the selections in the Add/Remove Templates window, click OK.
When you are satisfied with the selections in the Add/Remove Templates window, click OK.
The Template Association window appears with the template(s)/data file(s) listed as active link(s). If you have added more than one template/data file, they appear in a comma-separated list of links.
You can click on any link to return to the Add/Remove Templates window, in order to edit/update the template/data file information.
Step 14 ![]() Check the Edit check box to make the template/data file attributes editable in service requests based on the policy.
Check the Edit check box to make the template/data file attributes editable in service requests based on the policy.
Step 15 ![]() To add additional templates/data files for a given role to the policy, you can click the Add button in the Template Association window and repeat the steps outlined above.
To add additional templates/data files for a given role to the policy, you can click the Add button in the Template Association window and repeat the steps outlined above.
Step 16 ![]() To delete templates/data files that have been associated to the policy, check a template/data file to choose it.
To delete templates/data files that have been associated to the policy, check a template/data file to choose it.
Then click the Delete button to delete it from the Template Association window.
Step 17 ![]() When you are finished associating the template(s)/data file(s) to the policy, click the Finish button in the Template Association window.
When you are finished associating the template(s)/data file(s) to the policy, click the Finish button in the Template Association window.
The attributes for the policy are saved and the policy creation or modification is complete.
Selectively Determining Templates for U-PE and PE-AGG Device Roles
Prime Fulfillment provides the capability to selectively determine which U-PE and PE-AGG devices (for example, in a ring environment) to apply templates/data files. During template association in the service policy workflow, the U-PE and PE-AGG device roles have two options to associate templates/data files. These options are:
•![]() Devices with UNI. This option causes templates/data files to be configured on devices of the specified role with a UNI interface.
Devices with UNI. This option causes templates/data files to be configured on devices of the specified role with a UNI interface.
•![]() All other devices. This option causes templates/data files to be configured on all devices of the specified role, including those with a UNI interface.
All other devices. This option causes templates/data files to be configured on all devices of the specified role, including those with a UNI interface.
Usage notes:
•![]() The templates/data files are selected by clicking on the Add link next to the desired option. The subsequent steps are the same as provided in Associating Templates and Data Files to a Policy.
The templates/data files are selected by clicking on the Add link next to the desired option. The subsequent steps are the same as provided in Associating Templates and Data Files to a Policy.
•![]() This features is not applicable for device roles other than U-PE and PE-AGG. The N-PE role only displays a single Add link in the Template/Data File column.
This features is not applicable for device roles other than U-PE and PE-AGG. The N-PE role only displays a single Add link in the Template/Data File column.
•![]() For backward compatibility, when editing or viewing old and existing policies, for U-PE and PE-AGG devices, associated templates/data files will display under the All other Devices option.
For backward compatibility, when editing or viewing old and existing policies, for U-PE and PE-AGG devices, associated templates/data files will display under the All other Devices option.
•![]() When you copy an existing policy, you can copy associated templates/data files (if any) from the All other Devices or Devices with UNI options of the existing policy into the new policy. This is similar to normal Prime Fulfillment behavior.
When you copy an existing policy, you can copy associated templates/data files (if any) from the All other Devices or Devices with UNI options of the existing policy into the new policy. This is similar to normal Prime Fulfillment behavior.
•![]() You can associate templates (without data files) for either the All other Devices or Devices with UNI options or both.
You can associate templates (without data files) for either the All other Devices or Devices with UNI options or both.
•![]() Selective determination of templates is supported in all L2VPN and FlexUNI/EVC policy types and service requests. For MPLS VPN, only MPLS PE-CE and MPLS PE-NoCE policies and service requests are supported. For the MPLS VPN PE-CE policy type, this feature is applicable if the PE is or is not associated with an NPC.This feature is not available for Multi-VRFCE policies and service requests.
Selective determination of templates is supported in all L2VPN and FlexUNI/EVC policy types and service requests. For MPLS VPN, only MPLS PE-CE and MPLS PE-NoCE policies and service requests are supported. For the MPLS VPN PE-CE policy type, this feature is applicable if the PE is or is not associated with an NPC.This feature is not available for Multi-VRFCE policies and service requests.
The following notes describe how this feature is supported in the service request workflow:
•![]() During service request creation, selective templates are differentiated based on the devices having a UNI interface or having both UNI and NNI interfaces for the U-PE and PE-AGG device roles. Templates in the policy are copied to the respective devices functioning in the specified roles. There is no behavioral change for devices of other roles.
During service request creation, selective templates are differentiated based on the devices having a UNI interface or having both UNI and NNI interfaces for the U-PE and PE-AGG device roles. Templates in the policy are copied to the respective devices functioning in the specified roles. There is no behavioral change for devices of other roles.
•![]() The selective determination of templates is not applicable for service request modification scenarios, as after the service request is created, it is the user's decision to make any changes for templates configured on devices.
The selective determination of templates is not applicable for service request modification scenarios, as after the service request is created, it is the user's decision to make any changes for templates configured on devices.
Using Templates with Service Requests
This section provides information on templates and data files with a service request. It contains the following sections:
•![]() Using Templates and Data Files in the Service Request Workflow
Using Templates and Data Files in the Service Request Workflow
Overview
This section provides overview information about template usage in service requests. It covers the following topics:
•![]() Associating Templates to a Service Request
Associating Templates to a Service Request
•![]() Associating Subtemplates During Service Provisioning
Associating Subtemplates During Service Provisioning
•![]() Creating Data Files During Service Request Creation
Creating Data Files During Service Request Creation
•![]() Using Negate Templates to Decommission Template Configurations
Using Negate Templates to Decommission Template Configurations
•![]() Using Templates and Data Files in the Service Request Workflow
Using Templates and Data Files in the Service Request Workflow
For details on how these features are implemented in the Prime Fulfillment GUI, see the section Using Templates and Data Files in the Service Request Workflow.
Associating Templates to a Service Request
The template mechanism in Prime Fulfillment provides a way to add additional configuration information to a device configuration generated by a service request. To use the template mechanism, the policy on which the service request is based must have been set to enable templates. Optionally, templates and data files to be used by the service request can be specified in the policy. During service request creation, templates/data files can be added to a device configuration if the operator has the appropriate RBAC permission to do so. See the section Choosing a Template in the Service Request Workflow, for how to choose templates/data files in the service request workflow.
Associating Subtemplates During Service Provisioning
All templates can be used by other templates as building blocks. The template using other templates is called a super template. The template being used is called a subtemplate. A new attribute in the Template Editor allows subtemplates to be associated with a super template. The super template instantiates all required subtemplates by passing values for the variables in the subtemplate. After instantiation, the super template puts the configlets generated for the subtemplate into the super template. Prime Fulfillment branches templates into subtemplates based on device type, line card type, port type, role type, and software versions. These optional attributes are set while creating the subtemplates. The subtemplates are selected based on the following matching criteria:
•![]() Only exact matches are recognized for the card type and port type attributes. No wild card match is allowed for these attributes.
Only exact matches are recognized for the card type and port type attributes. No wild card match is allowed for these attributes.
•![]() Only an exact match is recognized for the device type attribute.
Only an exact match is recognized for the device type attribute.
•![]() For the software version attribute, the match is done for a software version equal to the current version, if available. If not, the previous highest version is matched.
For the software version attribute, the match is done for a software version equal to the current version, if available. If not, the previous highest version is matched.
•![]() If exact matching attributes are not found, then the match proceeds with the criteria described in Table 9-1. An information message listing the exactly matched subtemplates of the super-template is shown if and only if any of the matching criteria are met.
If exact matching attributes are not found, then the match proceeds with the criteria described in Table 9-1. An information message listing the exactly matched subtemplates of the super-template is shown if and only if any of the matching criteria are met.
•![]() If none of the attributes are matched, then the default subtemplate is applied.
If none of the attributes are matched, then the default subtemplate is applied.
•![]() If no default subtemplate exists, a subtemplate with all null attribute values is matched.
If no default subtemplate exists, a subtemplate with all null attribute values is matched.
•![]() If none of the rows specified in the table match, then Prime Fulfillment looks for subtemplates that are marked as device default, or else version default. If no subtemplates are marked as such, then no matching subtemplates are picked. A warning message is displayed.
If none of the rows specified in the table match, then Prime Fulfillment looks for subtemplates that are marked as device default, or else version default. If no subtemplates are marked as such, then no matching subtemplates are picked. A warning message is displayed.
The matching criteria are summarized in Table 9-1.
Additional usage notes for subtemplates:
•![]() Prime Fulfillment does not perform checks for the depth of subtemplates. Only one level of subtemplates is supported.
Prime Fulfillment does not perform checks for the depth of subtemplates. Only one level of subtemplates is supported.
•![]() No validations are done to check if the super template and subtemplate structures are cyclic.
No validations are done to check if the super template and subtemplate structures are cyclic.
•![]() When the operator attempts to delete a subtemplate that is referenced by a super template, a warning message is generated.
When the operator attempts to delete a subtemplate that is referenced by a super template, a warning message is generated.
•![]() Subtemplates can be modified.
Subtemplates can be modified.
•![]() Subtemplates can be attached to multiple super templates.
Subtemplates can be attached to multiple super templates.
•![]() In the current release, multiple data files are not supported for subtemplates. If multiple data files are found, the service request automatically chooses the first data file (from a list of available data files, sorted alphabetically).
In the current release, multiple data files are not supported for subtemplates. If multiple data files are found, the service request automatically chooses the first data file (from a list of available data files, sorted alphabetically).
Creating Data Files During Service Request Creation
The operator can create data files "on demand" during service request creation. If template(s) are attached to a service policy, and no data file(s) exist for the template(s), a wizard prompts the operator to enter values for variables. If data file(s) are created on demand during service request creation, it is possible to modify any or all of the variables during modification or redeployment of the service request.
The service request workflow supports dynamic creation of data files as follows:
•![]() If a template is marked as non-editable in the policy on which the service request is based, the operator cannot edit it during service request creation. However, the name of template and data files are still visible, even though they cannot be modified.
If a template is marked as non-editable in the policy on which the service request is based, the operator cannot edit it during service request creation. However, the name of template and data files are still visible, even though they cannot be modified.
•![]() If a template is marked as editable in the policy, then (assuming appropriate RBAC permission) the operator can change the template/data files during service request creation.
If a template is marked as editable in the policy, then (assuming appropriate RBAC permission) the operator can change the template/data files during service request creation.
The following points apply if the template is editable:
•![]() If a template is associated with a service policy, and at least one data file exists for the template, the operator can select the appropriate data file during service request creation.
If a template is associated with a service policy, and at least one data file exists for the template, the operator can select the appropriate data file during service request creation.
•![]() If only one data file exists for the template, it is automatically selected.
If only one data file exists for the template, it is automatically selected.
•![]() During service request creation, the operator can enter values for template variables.
During service request creation, the operator can enter values for template variables.
•![]() Optionally, if no data file exists for the template, the operator can create a new data file during service request creation. When the Datafile Chooser window is opened from Template Association window, a Create Datafile button is provided, which allows the new data file to be created.
Optionally, if no data file exists for the template, the operator can create a new data file during service request creation. When the Datafile Chooser window is opened from Template Association window, a Create Datafile button is provided, which allows the new data file to be created.
•![]() The Create Datafile button is only displayed if the operator has the appropriate RBAC permissions to create a data file.
The Create Datafile button is only displayed if the operator has the appropriate RBAC permissions to create a data file.
See the section Creating a Data File in the Service Request Workflow, for how to set up a data file in the service request workflow.
Using Negate Templates to Decommission Template Configurations
To remove a configuration created from a template/data file, a negate template must be applied to the existing service. Prime Fulfillment automatically applies the appropriate negate template during the decommission of the service request. For instructions on how to use the Prime Fulfillment Template Manager to create negate templates, see Negate Template
When a template is associated in a policy or service request, the negate template automatically gets associated. During decommission of the service, the negate template is used for deployment. When decommissioning a service request associated with a template/data file, the negate template is automatically picked up dynamically, by searching for a template name having the name of the original template followed by a suffix .Negate. This takes place at deployment time. Negate templates are dynamically instantiated based on the device attributes of the template to which it is associated.
Note ![]() Optional attributes (such as device type, line card type, port type, and software version) applied to a template automatically apply to the corresponding negate template. The optional attributes cannot be applied directly to negate templates.
Optional attributes (such as device type, line card type, port type, and software version) applied to a template automatically apply to the corresponding negate template. The optional attributes cannot be applied directly to negate templates.
When a service is decommissioned, the appropriate negate template is deployed. The data file for a negate template is selected during deployment as follows:
•![]() If the negate template has no valid data file, either because there is no data file under the negate template with the same name as that of the main template or there is no data file at all, an error is raised during service request deployment.
If the negate template has no valid data file, either because there is no data file under the negate template with the same name as that of the main template or there is no data file at all, an error is raised during service request deployment.
•![]() If only one data file is associated with the negate template, the data file is automatically selected. If there is a single data file for the negate template with a name that does not match that of the data file, then deployment will fail with errors and the service request will be moved to the INVALID state.
If only one data file is associated with the negate template, the data file is automatically selected. If there is a single data file for the negate template with a name that does not match that of the data file, then deployment will fail with errors and the service request will be moved to the INVALID state.
•![]() In case of multiple data files, only data files with names that match negate template names are chosen.
In case of multiple data files, only data files with names that match negate template names are chosen.
The following points cover the behavior of templates in various modification scenarios:
•![]() If you change the template associated with a service request, the negate template automatically changes to the negate template of the newly selected template. In this case, Prime Fulfillment executes the negate template of the previously associated template, as well as the newly associated template.
If you change the template associated with a service request, the negate template automatically changes to the negate template of the newly selected template. In this case, Prime Fulfillment executes the negate template of the previously associated template, as well as the newly associated template.
•![]() When a template or negate template is modified, the service request does not roll back the configuration changes made earlier through the template.
When a template or negate template is modified, the service request does not roll back the configuration changes made earlier through the template.
•![]() When a service request is modified, the template command is always deployed. (See the remaining bullet items for some additional clarifications.)
When a service request is modified, the template command is always deployed. (See the remaining bullet items for some additional clarifications.)
•![]() When a service request is modified without changing template/data file information, the template commands are not redeployed. The only a modification that triggers a change in template/data file results is the negation of the old template and the addition of new template commands in the device configlet.
When a service request is modified without changing template/data file information, the template commands are not redeployed. The only a modification that triggers a change in template/data file results is the negation of the old template and the addition of new template commands in the device configlet.
•![]() When the ForceTemplateDeploy DCPL property is turned ON then, irrespective of templates being modified, if a service request is modified, templates are re-deployed. However, negate templates are not necessarily re-deployed. Negate templates are deployed only when a link/attachment circuit in the service request is deleted, which implicitly means removing templates associated with the link being deleted as well. When the ForceTemplateDeploy DCPL property is turned OFF, negate templates are instantiated under the following conditions:
When the ForceTemplateDeploy DCPL property is turned ON then, irrespective of templates being modified, if a service request is modified, templates are re-deployed. However, negate templates are not necessarily re-deployed. Negate templates are deployed only when a link/attachment circuit in the service request is deleted, which implicitly means removing templates associated with the link being deleted as well. When the ForceTemplateDeploy DCPL property is turned OFF, negate templates are instantiated under the following conditions:
–![]() Deleting or decommissioning a link/attachment circuit in a service request.
Deleting or decommissioning a link/attachment circuit in a service request.
–![]() Modifying templates (for example, delete existing templates and adding new ones to a link, or deleting only existing ones).
Modifying templates (for example, delete existing templates and adding new ones to a link, or deleting only existing ones).
–![]() Rehoming links/devices in a service request that has associated templates.
Rehoming links/devices in a service request that has associated templates.
•![]() When a device is changed in a service request, the negate template is deployed for the old device, and the template is deployed for the new device.
When a device is changed in a service request, the negate template is deployed for the old device, and the template is deployed for the new device.
•![]() When a link in a service request is removed and a new link is added, a negate template is deployed for the deleted link and a template is deployed for the added link.
When a link in a service request is removed and a new link is added, a negate template is deployed for the deleted link and a template is deployed for the added link.
Using Templates and Data Files in the Service Request Workflow
This section describes tasks related to templates, data files, and negate templates that can be performed in the service request workflow. The following tasks are covered:
•![]() Choosing a Template in the Service Request Workflow
Choosing a Template in the Service Request Workflow
•![]() Creating a Data File in the Service Request Workflow
Creating a Data File in the Service Request Workflow
•![]() Decommissioning Service Requests with Added Templates
Decommissioning Service Requests with Added Templates
•![]() Viewing Templates from the Service Requests Window
Viewing Templates from the Service Requests Window
Choosing a Template in the Service Request Workflow
When creating a service request, the workflow involves selecting a policy on which to base the service request, setting interface and other attributes, and so on. The specific windows and attributes presented in the workflow depend on the type of service request, such as L2VPN, VPLS, MPLS, or FlexUNI/EVC.
To associate templates and data files in a service request, you must select a link in the appropriate window of the Service Request Editor window, usually by clicking the Add link for the device.
Note ![]() There is no choice of options to selectively determine templates for U-PE and PE-AGG devices during the service request workflow. Templates are automatically copied from the policy, based on the presence of a UNI interface on the devices functioning in U-PE and PE-AGG roles. See the section Selectively Determining Templates for U-PE and PE-AGG Device Roles, for more information on this feature.
There is no choice of options to selectively determine templates for U-PE and PE-AGG devices during the service request workflow. Templates are automatically copied from the policy, based on the presence of a UNI interface on the devices functioning in U-PE and PE-AGG roles. See the section Selectively Determining Templates for U-PE and PE-AGG Device Roles, for more information on this feature.
To choose the template(s)/data file(s) for the device(s), perform the following steps.
Step 1 ![]() Click the Add link in Template/Datafile column for a device.
Click the Add link in Template/Datafile column for a device.
The Add/Remove Templates window appears.
Step 2 ![]() Click the Add button.
Click the Add button.
The Add/Remove Templates window appears.
Step 3 ![]() Navigate to a template in the folder tree and select it.
Navigate to a template in the folder tree and select it.
The template is listed in the right side of the GUI, along with any data files that are associated with it.
At this point, you can either select an existing data file, or click the Create Data File button to create a data file dynamically in the workflow. The rest of the steps in this section cover the case of selecting an existing template and data file. For instructions on how to create a data file dynamically, see the section Creating a Data File in the Service Request Workflow.
Step 4 ![]() Check the check box of a data file to choose it.
Check the check box of a data file to choose it.
Step 5 ![]() Click the Accept button to confirm the choice.
Click the Accept button to confirm the choice.
The template/data file combination appears in the Add/Remove Templates window.
Step 6 ![]() To add additional templates/data files to the list, click the Add button and repeat the appropriate steps, as covered above.
To add additional templates/data files to the list, click the Add button and repeat the appropriate steps, as covered above.
Step 7 ![]() When you are satisfied with selection of templates/data files, click the OK button in the Add/Remove Templates window.
When you are satisfied with selection of templates/data files, click the OK button in the Add/Remove Templates window.
The templates/data files appear in the Template/Datafile column of the Template Association window.
If multiple templates/data files are selected for a device, they appear as a comma-separated list, as shown in the figure.
Step 8 ![]() Click the Finish button to create the service request with the template/data file selections you chose.
Click the Finish button to create the service request with the template/data file selections you chose.
If the template associated to the service request is a super template comprising of one or more subtemplates, Prime Fulfillment displays a message confirming this.
For information about how templates/data files are instantiated when the service is deployed, see the information provided in the section Associating Templates to a Service Request.
Creating a Data File in the Service Request Workflow
During the final stage of setting the link attributes for a service request, the Template Association window appears. The Template Association window lists the devices comprising the link, the device roles, and the template(s)/data file(s) associated with the devices. You can choose the template(s)/data file(s) to be associated with the devices, as described in the section Choosing a Template in the Service Request Workflow. If one of the templates selected in the Template Datafile Chooser window does not have an associated data file or if you would like create a new data file for it, you can do this dynamically in the workflow while setting up the service request.
To dynamically set up a new data file for a template, perform the following steps.
Step 1 ![]() In the Template Association window, click the Add link in the Template/Datafile column for a device.
In the Template Association window, click the Add link in the Template/Datafile column for a device.
(If a template was previously selected for a device, click the link for the template name.)
The Add/Remove Templates window appears.
Step 2 ![]() Click the Add button.
Click the Add button.
The Template Datafile Chooser window appears.
Step 3 ![]() Navigate to a template in the folder tree and select it.
Navigate to a template in the folder tree and select it.
The template is listed in the right side of the GUI, along with any data files that are associated with it. This example uses the AccessList1 template in the Examples directory.
Step 4 ![]() Click the Create Data File button to create a data file dynamically in the workflow.
Click the Create Data File button to create a data file dynamically in the workflow.
The Data File Editor window appears.
Step 5 ![]() At this point, you are in the standard workflow for creating a data file in Prime Fulfillment.
At this point, you are in the standard workflow for creating a data file in Prime Fulfillment.
In the Date File Editor window, you can specify a name and description for the data file, set variable values, view the configlet, and so on. For details on how to perform these steps, see Overview
Step 6 ![]() When you have completed setting the attributes for the new data file, click Save and then Close to save this information and close the file; click Configure to show the configuration file; or click Close and then be sure to click OK, if you want to save the information you have created.
When you have completed setting the attributes for the new data file, click Save and then Close to save this information and close the file; click Configure to show the configuration file; or click Close and then be sure to click OK, if you want to save the information you have created.
If you do not want to save this information, click Close and then click Cancel.
When the data file is saved, the Template Datafile Chooser window appears with the newly created data file listed.
Decommissioning Service Requests with Added Templates
This section describes how to decommission Prime Fulfillment service requests that have added templates.
Note ![]() For general information on how templates are used in Prime Fulfillment, see Overview
For general information on how templates are used in Prime Fulfillment, see Overview
Template commands are treated independently from those associated with a service creation. Consequently, template commands must be removed separately from the device(s) during a service decommission. To remove prior template commands, a separate template is needed during a decommission process. Decommissioning a service request does not automatically remove the original template commands. A separate negate template needs to be added to the decommission process and the original templates must be removed. The negate template must contain the necessary NO commands to successfully remove any unwanted IOS commands added by the original template.
The standard way to create a service request with a template added is as follows:
1. ![]() Define the service policy.
Define the service policy.
2. ![]() Build a template with a data file (and also a negate template and data file).
Build a template with a data file (and also a negate template and data file).
3. ![]() Create the service request with the template added. The steps to do this are covered in relevant chapters of this guide.
Create the service request with the template added. The steps to do this are covered in relevant chapters of this guide.
4. ![]() Deploy the service request to which the template was added.
Deploy the service request to which the template was added.
To decommission a deployed service request, including associated templates, you must perform the following steps.
1. ![]() Create a negate template with data file (if one does not exist). This is used to remove the commands imposed by the original template. For an explanation of negate templates, see Chapter 4, "Using Templates" in the Cisco Prime Fulfillment API Programmer Guide 6.2.
Create a negate template with data file (if one does not exist). This is used to remove the commands imposed by the original template. For an explanation of negate templates, see Chapter 4, "Using Templates" in the Cisco Prime Fulfillment API Programmer Guide 6.2.
2. ![]() Decommission the service request. The negate template will be picked up dynamically.
Decommission the service request. The negate template will be picked up dynamically.
The service request remains in the Requested state, but changed to an Operation Type of Delete.
3. ![]() Deploy the service request. This decommissions the service request and downloads the negate template, which removes the original template commands.
Deploy the service request. This decommissions the service request and downloads the negate template, which removes the original template commands.
Viewing Templates from the Service Requests Window
In the Service Request Manager window, a paper clip icon appears in the Data Files column if a service request has one or more templates associated with it.
Note ![]() You can use the Show Services with field to search for service requests that have a specific data or template file. Choose Data File Name or Template Name from the drop-down list and enter a search string in the matching field. The matching field is not case-sensitive and supports wildcards (*). You can further limit the search by using the of Type field to confine the search to a particular service type. When listing service requests using Template Name, provide the entire path of the template file location (for example: examples\template, where examples is the folder name and template implies the template name).
You can use the Show Services with field to search for service requests that have a specific data or template file. Choose Data File Name or Template Name from the drop-down list and enter a search string in the matching field. The matching field is not case-sensitive and supports wildcards (*). You can further limit the search by using the of Type field to confine the search to a particular service type. When listing service requests using Template Name, provide the entire path of the template file location (for example: examples\template, where examples is the folder name and template implies the template name).
To view the configlet(s) for the template(s) associated with a service request, perform the following steps.
Step 1 ![]() In the Service Request Manager window, check the check box for a service request with an associated template, as indicated by a paper clip icon in the Data Files column.
In the Service Request Manager window, check the check box for a service request with an associated template, as indicated by a paper clip icon in the Data Files column.
Step 2 ![]() Click the Details button.
Click the Details button.
The Service Request Details window appears.
The Associated data file(s) row displays a link for each data file associated with the service request, as shown in the figure.
Step 3 ![]() Click a data file link to display the configlet for the template.
Click a data file link to display the configlet for the template.
Step 4 ![]() After viewing the configlet, click OK to close the configlet display window.
After viewing the configlet, click OK to close the configlet display window.
Step 5 ![]() Click OK to close the Service Request Details window.
Click OK to close the Service Request Details window.
Step 6 ![]() As an alternative, you can access the data files associated with a service request by clicking on the paper clip icon in the Service Requests window.
As an alternative, you can access the data files associated with a service request by clicking on the paper clip icon in the Service Requests window.
The Data file Details for Service Request window appears.
The window displays only a list of the data files associated with the service request.
Step 7 ![]() Click a data file link to display the configlet for the template.
Click a data file link to display the configlet for the template.
Step 8 ![]() After viewing the configlet, click OK to close the configlet display window.
After viewing the configlet, click OK to close the configlet display window.
Step 9 ![]() Click Close to close the Service Request Datafile Details window and return to the Service Requests window.
Click Close to close the Service Request Datafile Details window and return to the Service Requests window.
Template Examples
To access template examples, choose Service Design > Templates > Template Manager and navigate through the folders in the Template pane. You can continue clicking the arrow sign next to each created folder and subfolder until you get to the last level of information. The last possible level is the template name.
Table 9-2 documents some of the available template examples. Refer to the Prime Fulfillment GUI for a complete listing of available examples.
Summary of Repository Variables
This section contains the following tables:
•![]() Table 9-4, "MPLS Repository Variables"
Table 9-4, "MPLS Repository Variables"
•![]() Table 9-3, "L2VPN Repository Variables"
Table 9-3, "L2VPN Repository Variables"
•![]() Table 9-7, "VRF Repository Variables"
Table 9-7, "VRF Repository Variables"
•![]() Table 9-5, "FlexUNI/EVC Repository Variables"
Table 9-5, "FlexUNI/EVC Repository Variables"
•![]() Table 9-6, "VPLS Repository Variables"
Table 9-6, "VPLS Repository Variables"
Table 9-3 provides a summary of the MPLS Repository variables available from Prime Fulfillment Templates.
Table 9-4 provides a summary of the L2VPN Repository variables available from Prime Fulfillment Templates.
Table 9-5 provides a summary of the VRF Repository variables available from Prime Fulfillment Templates.
Table 9-6 provides a summary of the FlexUNI/EVC Repository variables available from Prime Fulfillment Templates.
Table 9-7 provides a summary of the VPLS Repository variables available from Prime Fulfillment Templates.
Importing and Exporting Templates
The importExportTemplateDB tool is available to import and export templates into and from a Prime Fulfillment database.
Note ![]() If a Negate template is present, it is automatically imported or exported for every import or export template.
If a Negate template is present, it is automatically imported or exported for every import or export template.
You can import or export the complete or partial template database by specifying appropriate arguments. You can find this tool at: $PRIMEF_HOME/bin/importExportTemplateDB.sh.
Enter the following:
importExportTemplateDB.sh <admin_user_id> <password> [<other_arguments>]
where:
<admin_user_id> is user identifier for someone with the admin role.
<password> is the password for the one with the admin role.
<other_arguments> is any combination of the following arguments separated by a space:
-nooverwrite
If you choose to use this nooverwrite argument, to prevent the overwriting of existing templates in the database, it must precede all other arguments and must be in the third position after <admin_user_id> and <password>.
Note ![]() The default (when nooverwrite is not specified) is to overwrite the templates.
The default (when nooverwrite is not specified) is to overwrite the templates.
-exp_db <dest-dir>
Use this argument to export all templates and data files in the database, where <dest-dir> is the destination directory to which you want to export.
-imp_db <src-dir>
Use this argument to import all the files in <src-dir> into the database, where <src-dir> is the source directory from which you want to import. The files in <src-dir> are created by the exp_db process.
-exp_template_folder <src-folder-path> <dest-dir>
Use this argument to export a database template folder and its subfolders, where <src-folder-path> is the full path of the template folder to export and <dest-dir> is the directory where to place the exported files.
-imp_template_folder <src-dir> <dest-folder>
Use this argument to import all files in <src-dir> into the database, where <src-dir> is the source directory to import, and <dest-folder> is the destination import template folder.
-imp_template <srcfile> <dest-folder> <template-name>
Use this argument to import a template into the database, where <srcfile> is the full path of the template to import, <dest-folder> is the full path of the parent folder, and <template-name> is the template name in the database.
-imp_datafile <srcfile> <dest-template> <datafile-name>
Use this argument to import a template data file into the database, where <srcfile> is the full path of the datafile to import, <dest-template> is the full path of the parent template, and <datafile-name> is the data file name in the database.
-exp_template <template-pathname> <output-file>
Use this argument to export the database template to a file, where <template-pathname> is the full path of the template to export, and <output-file> is the output filename.
-exp_datafile <datafile-pathname> <output-file>
Use this argument to export a template data file to a file, where <datafile-pathname> is the full path of the template data file to export, and <output-file> is the output filename.
Known Issue with Importing Template Data Using the importExportTemplateDB.sh Script
Template data imported by using the importExportTemplateDB.sh script only shows up in the Template Manager GUI after the HTTPD or Prime Fulfillment processes are restarted.
One workaround is to manually create a template. Then all the previously imported templates and data files show up. With this workaround, there is no need to restart the HTTPD or Prime Fulfillment processes.
The steps to do this are as follows:
Step 1 ![]() Import the templates and data files.
Import the templates and data files.
Step 2 ![]() Check in Template Manager and verify if they show up.
Check in Template Manager and verify if they show up.
Refreshing the browser and logging out/in will not help.
Step 3 ![]() Manually create a simple template in Template Manager.
Manually create a simple template in Template Manager.
As soon as you save and click on Close, the Template Manager window gets all the data, and all the previously imported templates, data files now appear.
Frequently Asked Questions
The following sections provide questions and answers that can help you troubleshoot Template Manager issues:
•![]() How do I obtain address information from the given IP address?
How do I obtain address information from the given IP address?
•![]() How do I obtain the octets from the given IP address?
How do I obtain the octets from the given IP address?
•![]() How do I call a subtemplate in a template?
How do I call a subtemplate in a template?
•![]() How do I concatenate two strings?
How do I concatenate two strings?
•![]() Can I use nested if statements?
Can I use nested if statements?
•![]() How can I perform basic arithmetic operations?
How can I perform basic arithmetic operations?
•![]() How can I retrieve data from a two-dimensional array and what is the use of $velocityCount?
How can I retrieve data from a two-dimensional array and what is the use of $velocityCount?
•![]() How can I print $a instead of its value?
How can I print $a instead of its value?
•![]() What is the difference between #include() and #parse()?
What is the difference between #include() and #parse()?
•![]() What is a macro and how is it used?
What is a macro and how is it used?
•![]() What is a range operator and how can I use it?
What is a range operator and how can I use it?
•![]() How can I split strings containing special characters?
How can I split strings containing special characters?
•![]() How can I use repository variables?
How can I use repository variables?
•![]() How can I use a variable as a dynamic URL?
How can I use a variable as a dynamic URL?
How do I split a string?
Prime Fulfillment provides a function substringToDelim(), which can split the given string and return the substring based on the given delimiter.
Syntax:
substringToDelim (srcString, delimChar, 0/1)
where:
0 returns the string before the delimiter.
1 returns the string after the delimiter.
Usage: $b=$TMSystem.substringToDelim("10.11.230.145", ".230.145", "0")
Result: The value of $b is 10.11. If 1 is specified instead of 0, the value of $b is 230.145.
How do I obtain address information from the given IP address?
Prime Fulfillment provides the functions that can be used to get the address, mask, and reverse mask from the given IP address.
Usage:
$TMSystem.getAddr ("10.33.4.5/30") returns 10.33.4.5
$TMSystem.getMask ("10.33.4.5/30") returns 255.255.255.252
$TMSystem.getReverseMask ("10.33.4.5/30") returns 0.0.0.3
$TMSystem.getNetworkAddr ("10.33.4.5/30") returns 10.33.4.4
$TMSystem.GetClassfulNetworkAddr ("10.33.4.5/30") returns 10.0.0.0
$TMSystem.CurrentTimeInIOSFormat () returns hh:mm:ss day_of_month month_of_year year
How do I obtain the octets from the given IP address?
Prime Fulfillment provides the functions that can return the octets when called.
Usage:
$TMSystem.getOctet1($ipAddr) returns the first octet of ipAddr
$TMSystem.getOctet2($ipAddr) returns the second octet of ipAddr
$TMSystem.getOctet3($ipAddr) returns the third octet of ipAddr
$TMSystem.getOctet4($ipAddr) returns the fourth octet of ipAddr
How do I call a subtemplate in a template?
A subtemplate can be called in a main template. The subtemplate being called should be called with its data file. The variable is declared as a subtemplate. The location of the subtemplate is specified in the data file.
Usage: In the template body the subtemplate is declared as:
$a. callWithDatafile("data1")
where:
the variable a is declared as a subtemplate in the variables
data1 is the name of the data file of the subtemplate, and
in the data file the path of the subtemplate path is specified.
How do I concatenate two strings?
Concatenation of strings is simple.
For example:
where: $a=vpnsc and $b=properties
then: ${a}${b} concatenates these two strings and gives the result as vpnscproperties.
or, ${a}_${b} gives the result as vpnsc_properties.
How can I convert a string to an integer and how can I increase the last octet of the IP address by one?
The last octet of the IP address can be increased by using the following code:
#set($d=$TMSystem.getOctet1($c))
#set($e=$TMSystem.getOctet2($c))
#set($f=$TMSystem.getOctet3($c))
#set($g=$TMSystem.getOctet4($c))
#set($valueOfString = $g)
#set($valueOfCharsCount = $valueOfString.length() - 1)
#set($valueOfVector = "0123456789")
#set($valueOfBase = 1)
#set($valueOfInt = 0)
#foreach($valueOfCharIterator in $valueOfCharsCount..0)
#set($valueOfChar=$valueOfString.charAt($valueOfCharIterator).toString())
#set($valueOfInt = $valueOfInt +$valueOfVector.indexOf($valueOfChar) * $valueOfBase)
#set($valueOfBase = $valueOfBase * 10)
#end
#set($valueOfInt = $valueOfInt+1)
The incremental value is $d.$e.$f.$valueOfInt
Can I use nested if statements?
If statements can be nested. Proper care must be taken for indentation when nesting if statements. The following code shows the usage of nested if statements, elseif statements, and the comparisons made in the if clause.
#if($a=="a") // here: string comparison is made
--
#if($b || $d) // here: $b and $d are the Boolean expressions. || equals OR and && equals AND
--
#if(!$c) // here: $c can be integer, string, or Boolean.
---
#if($p<10)// here: $p is a integer.
#elseif($p==10)
#end
#end
#end
#end
How can I perform basic arithmetic operations?
Velocity Template Language (VTL) supports built-in mathematical functions that can be used in the templates with the set directives.
Usage:
#set($a = $b + 3)
#set($a = $b - 6)
#set($a = $b * 6)
#set($a = $b / 5)
#set($a = $b % 2)
Note ![]() Only integers are valid for performing mathematical operations in the VTL.
Only integers are valid for performing mathematical operations in the VTL.
How can I retrieve data from a two-dimensional array and what is the use of $velocityCount?
The default name for the loop counter variable reference, which is specified in the velocity.properties file, is $velocityCount. By default the counter starts at 1, but this can be set to either 0 or 1 in the velocity.properties file at: $PRIMEF_HOME/resources/webserver/tomcat/shared/lib/velocity-dep-VelocityVersion.jar (where the current VelocityVersion is 1.3.1-rc2). The associated settings are:
directive.foreach.counter.name=velocityCount
directive.foreach.counter.initial.value=1
Data from an array can be obtained by using get($i)
where: $i is the $velocityCount.
The following example illustrates the usage of the method get():
Usage: #foreach ($Acl in $ACL-List)
#set ($i = $velocityCount)
#foreach ($protocol in $Protocol-Lists.get($i))
#set ($j = $velocityCount)
access-list $Acl permit $protocol $Source-IP.get($i).get($j)
#end
#end
where:
$ACL-List is a one-dimensional array.
$Protocol-Lists and $Source-IP are two-dimensional arrays.
Here the $velocityCount is set to 1 by default. It can be changed in velocity.properties, if desired.
How can I print $a instead of its value?
Printing a value without processing is done by use of the character \ ,even if the value of the variable for a is defined.
Usage:
\$a gives output as $a if $a is defined. If $a is not defined, it is printed as \$a.
What is the difference between #include() and #parse()?
The #include("velocity.txt") directive allows you to import a file and then include the file in the location where it is defined. The content of the file is made available to the template engine. The *.vm files can also be called by using #include. The name of the file can also be passed by a variable. For security reasons, the file should be included under TEMPLATE_ROOT (/vob/ntg/dev/resources/templatesystem).
The #parse("velocity.vm") directive allows you to import a local file that contains VTL.Velocity will parse the VTL and render the template specified. The template that #parse references must be included under TEMPLATE_ROOT. The #parse directive only takes a single argument. VTL templates can have #parse statements referring to templates that in turn have #parse statements. The default value of the directive.parse.max.depth property is set to 10, in the velocity.properties file at: $PRIMEF_HOME/resources/webserver/tomcat/shared/lib/velocity-dep-VelocityVersion.jar (where the current VelocityVersion is 1.3.1-rc2) and can be modified, if desired.
Note ![]() If the directive.parse,max.depth property is not present in the velocity.properties file, the default is set to 10.
If the directive.parse,max.depth property is not present in the velocity.properties file, the default is set to 10.
Example:
In TEMPLATE_ROOT, the file velocity.vm has the following content:
welcome to the parse file
The count is $count
#set($count = $count - 1)
#set($cl-list="cl1","cl2","cl3")
#foreach($i in $cl-list)
ipcommunity-list permit $i 30:20
#end
The count is $count
returning from parse
The template body contains the following:
#set($count=8)
#include("velocity.vm")
--------------------------
#parse("velocity.vm")
---------------------------
welcome back to template
The value of count is $count
The following O/P is obtained:
welcome to the parse file
The count is $count
#set($count = $count - 1)
#set($cl-list="cl1","cl2","cl3")
#foreach($i in $cl-list)
ipcommunity-list permit $i 30:20
#end
The count is $count
returning from parse
--------------------------
welcome to the parse file
The count is 8
ipcommunity-list permit cl1 30:20
ipcommunity-list permit cl2 30:20
ipcommunity-list permit cl3 30:20
The count is 7
returning from parse
---------------------------
welcome back to template
The value of count is 7.
Note ![]() The previous examples clearly show that variables are parsed in the #parse directive and not in the #include directive.
The previous examples clearly show that variables are parsed in the #parse directive and not in the #include directive.
What is a macro and how is it used?
The directive macro is almost similar to a function. This has a set of statements, which can be called repetitively.
Example:
#macro(community $CL $bgp-list)
#foreach($bgp in $bgp-list)
ip $CL standard permit $bgp
#end
#end
#set($bgp_list ="20:10","30:10","40:10","50:10")
#set($CL = "community-list")
#community($CL $bgp_list)
Here, the macro name of community is defined. The macro takes two arguments $CL and $bgp-list. The macro is called at the end line.
The output of the previous template is:
ip community-list standard permit 20:10
ip community-list standard permit 30:10
ip community-list standard permit 40:10
ip community-list standard permit 50:10
What is a range operator and how can I use it?
The range operator can be used in conjunction with #set and #foreach statements. It is used to produce an object array containing integers. The range operator has the following construction n..m.
Example:
#set($a=0..2)
#foreach($b in $a)
$b
#end
#foreach($c in -2..2)
$c
#end
How can I split strings containing special characters?
#foreach ($i in $PE_Intf_Name.split('\.')) $i #end
here: In the first iteration, $i contains the string before the period, and in the second iteration, $i contains the string after the period.
How can I use repository variables?
Repository variables can be selected in the data file. When a template along with a data file is associated with a Service Request and the Service Request is deployed, then the value of the repository variable gets substituted.
How can I use a variable as a dynamic URL?
A variable declared as a dynamic URL can call the URL, by the method:
callUrl(String S)
For example: $a. callUrl("http://www.cisco.com")
Can I see more examples?
Examples are given for:
Usage of Strings
The body of the template contains:
## This example illustrates the usage of strings
#set($a="Fast")
#set($b="ethernet")
interface ${a}_${b}
#foreach ($i in $PE_Intf_Name.split('\.'))
$i
#end
#set($c="10.11.230.145")
#set($b=$TMSystem.substringToDelim($c, ".230.145", "0"))
interface Loopback1
description By VPN-SC
ip vrf forwarding V31:eigrpfm
ip address ${b}.20.34 255.255.255.255
no ip directed-broadcast
#set($b=$TMSystem.substringToDelim($c, ".230.145", "1"))
interface Loopback1
description By VPN-SC
ip vrf forwarding V31:eigrpfm
ip address 20.45.${b} 255.255.255.255
no ip directed-broadcast
#set($c="10.33.4.5/30")
#set($d=$TMSystem.getAddr($c))
The Address of $c is $d
#set($d=$TMSystem.getMask($c))
The mask of $c is $d
#set($d=$TMSystem.getReverseMask($c))
The Reverse mask of $c is $d
#set($d=$TMSystem.getNetworkAddr($c))
The network address of $c is $d
#set($e=$TMSystem.currentTimeInIOSFormat())
The current time in IOS format is : $e
-----------------------------------------------------
getting the octets from the ipaddress
#set($c="10.33.4.5")
#set($e=$TMSystem.getOctet1($c))
The first Octet of $c is $e
#set($e=$TMSystem.getOctet2($c))
The second Octet of $c is $e
#set($e=$TMSystem.getOctet3($c))
The third Octet of $c is $e
#set($e=$TMSystem.getOctet4($c))
The fourth Octet of $c is $e
The variables are declared as strings, integers, or sub-templates accordingly.
The Output of the above template body is:
interface Fast_ethernet
10
11
12
13
interface Loopback1
description By VPN-SC
ip vrf forwarding V31:eigrpfm
ip address 10.11.20.34 255.255.255.255
no ip directed-broadcast
interface Loopback1
description By VPN-SC
ip vrf forwarding V31:eigrpfm
ip address 20.45.230.145 255.255.255.255
no ip directed-broadcast
The Address of 10.33.4.5/30 is 10.33.4.5
The mask of 10.33.4.5/30 is 255.255.255.252
The Reverse mask of 10.33.4.5/30 is 0.0.0.3
The network address of 10.33.4.5/30 is 10.33.4.4
The current time in IOS format is: 00:17:01 21 Aug 2006
-----------------------------------------------------
getting the octets from the ipaddress
The first Octet of 10.33.4.5 is 10
The second Octet of 10.33.4.5 is 33
The third Octet of 10.33.4.5 is 4
The fourth Octet of 10.33.4.5 is 5
Usage of a Macro
The body of the template contains:
## This example illustrates the usage of macro
#macro(community $CL $bgp-list)
#foreach($bgp in $bgp-list)
ip $CL standard permit $bgp
#end
#end
#set($bgp_list = "20:10","30:10","40:10","50:10")
#set($CL = "community-list")
#community($CL $bgp_list)
The Output is obtained as:
ip community-list standard permit 20:10
ip community-list standard permit 30:10
ip community-list standard permit 40:10
ip community-list standard permit 50:10
Usage of Subtemplates
The body of the template is as follows:
## This example illustrates the usage of the sub-template
$a.callWithDatafile("data1")
The variable a is declared as a subtemplate. The data file provided here, data, must be a data file for the template a, which must also exist. In the data file of the main template, the path of the subtemplate is specified.
In the data file of the main template, the specified path of the subtemplate might be the same directory or a different directory.
 Feedback