Cisco Evolved Programmable Network Manager 2.1.2 User and Administrator Guide
Bias-Free Language
The documentation set for this product strives to use bias-free language. For the purposes of this documentation set, bias-free is defined as language that does not imply discrimination based on age, disability, gender, racial identity, ethnic identity, sexual orientation, socioeconomic status, and intersectionality. Exceptions may be present in the documentation due to language that is hardcoded in the user interfaces of the product software, language used based on RFP documentation, or language that is used by a referenced third-party product. Learn more about how Cisco is using Inclusive Language.
- Updated:
- August 21, 2017
Chapter: User Permissions and Device Access
- What Are Virtual Domains?
- How Virtual Domains Affect Cisco EPN Manager Features
- Create New Virtual Domains
- Import a List of Virtual Domains
- Add Network Devices to Virtual Domains
- Assign Virtual Domains to Users
- Edit a Virtual Domain
- Delete a Virtual Domain
- Use Cisco EPN Manager Virtual Domains with RADIUS and TACACS+
- Integrate Cisco EPN Manager with an LDAP Server
- Use RADIUS or TACACS+ for External Authentication
- Use Cisco ISE With RADIUS or TACACS+ for External Authentication
- Supported Versions of Cisco ISE in Cisco EPN Manager
- Add Cisco EPN Manager as a Client in Cisco ISE
- Create a User Group in Cisco ISE
- Create a User and Add the User to a User Group in Cisco ISE
- Create an Authorization Profile for RADIUS in Cisco ISE
- Create an Authorization Profile for TACACS+ in Cisco ISE
- Configure an Authorization Policy in Cisco ISE
- Create an Authentication Policy in Cisco ISE
- Use Cisco ACS With RADIUS or TACACS+ for External Authentication
- Supported Versions of Cisco ACS in Cisco EPN Manager
- Add Cisco EPN Manager as a Client in Cisco ACS
- Create a User Group in Cisco ACS
- Create a User and Add the User to a User Group in Cisco ACS
- Create an Authorization Profile for RADIUS in Cisco ACS
- Create an Authorization Profile for TACACS+ in Cisco ACS
- Create an Access Service for Cisco EPN Manager in Cisco ACS
- Create an Authorization Policy Rule in Cisco ACS
- Configure a Service Selection Policy in Cisco ACS
- Use SSO with External Authentication
User Permissions and
Device Access
User Interfaces, User Types, and How To Transition Between Them
These topics describe the GUI and CLI interfaces used by Cisco EPN Manager , and how to transition between the Cisco EPN Manager and Linux CLI interfaces.
- User Interfaces and User Types
- How to Transition Between the CLI User Interfaces in Cisco EPN Manager
User Interfaces and User Types
The following table describes the user interfaces employed by Cisco EPN Manager (CEPNM), and the types of users that can access each interface.
|
CEPNM User Interface |
Interface Description |
CEPNM User Types |
||
|---|---|---|---|---|
|
CEPNM web GUI |
Web interface that facilitates day-to-day and administration operations using the web GUI. These users can have varying degrees of privileges and are classified into role-based access control (RBAC) classes and subclasses. This interface provides a subset of operations that are provided by the Cisco EPN Manager CLI admin and CLI config users. |
Cisco EPN Manager web GUI everyday users—Created by web GUI root user . These users have varying degrees of privileges and are classified into role-based access control (RBAC) classes and subclasses called user groups (Admin, Super Users, Config Managers, and so forth). For information on the user groups, see Types of User Groups. Cisco EPN Manager web GUI root user—Created at installation and intended for first-time login to the web GUI, and for creating other user accounts. This account should be disabled after creating at least one web GUI user that has Admin privileges—that is, a web GUI user that belongs to the Admin or Super Users user group. See Disable and Enable the Web GUI root User.
|
||
|
CEPNM Admin CLI |
Cisco proprietary shell which provides secure and restricted access to the system (as compared with the Linux shell). This Admin shell and CLI provide commands for advanced Cisco EPN Manager administration tasks. These commands are explained throughout this guide. To use this CLI, you must have Cisco EPN Manager CLI admin user access. You can access this shell from a remote computer using SSH. |
Cisco EPN Manager CLI Admin user—Created at installation time and used for administration operations such as stopping and restarting the application and creating remote backup repositories. (A subset of these administration operations are available from the web GUI). To display a list of operations this user can perform, enter ? at the prompt. Some tasks must be performed in config mode. To transition to config mode, use the procedure in Transition Between the Cisco EPN Manager admin CLI and Cisco EPN Manager config CLI. (config) username username password role {admin|user} password
These users may have admin-like privilege/roles or lower level privileges as defined during creation time. To create a Cisco EPN Manager CLI user with admin privileges, run the username command with the admin keyword; otherwise, use the user keyword. |
||
|
CEPNM Config CLI |
Cisco proprietary shell which is restricted and more secure than the Linux shell. This Config shell and CLI provide commands for Cisco EPN Manager system configuration tasks. These commands are explained throughout this guide. To use this CLI, you must have admin-level user access (see the information in the User Types column of this table). You can access this shell from the Admin CLI shell. |
|||
|
Linux CLI |
Linux shell which provides all Linux commands. The Linux shell should only be used by Cisco technical support representatives. Regular system administrators should not use the Linux shell. You cannot reach this shell from a remote computer using SSH; you can only reach it through the Cisco EPN Manager admin shell and CLI. |
Linux CLI admin user—Created at installation time and used for Linux-level administration purposes. This admin user can get root-level privileges by following the procedure in Log In and Out as the Linux CLI root User. Tasks that require root-level permissions should only be performed by Cisco Support teams to debug product-related operational issues. For security purposes, the Linux CLI admin and root users should be disabled; see Disable and Enable the Linux CLI Users in Cisco EPN Manager 2.x. |
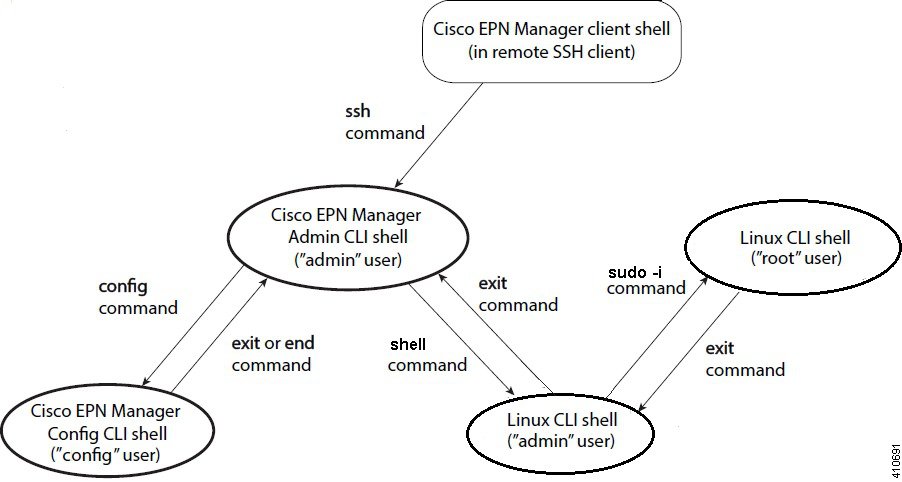
How to Transition Between the CLI User Interfaces in Cisco EPN Manager
The following figure illustrates how to transition between the Cisco EPN Manager and Linux CLI user interfaces on deployments running Cisco EPN Manager .
- Transition Between the Cisco EPN Manager admin CLI and Cisco EPN Manager config CLI
- Log In and Out as the Linux CLI root User
Transition Between the Cisco EPN Manager admin CLI and Cisco EPN Manager config CLI
To move from the Cisco EPN Manager admin CLI to the Cisco EPN Manager config CLI, enter config at the admin prompt.
(admin)# config
(config)#
To move from the config CLI back to the admin CLI, enter exit or end at the config prompt:
(config)# exit
(admin)#
Log In and Out as the Linux CLI root User
The Linux CLI has two shell users: One with administrative access (Linux CLI admin user), and another with root access (Linux CLI root user). The diagram in How to Transition Between the CLI User Interfaces in Cisco EPN Manager illustrates the flow for logging in and out as the various CLI users.
To log in as the Linux CLI root user, you will have to transition from being the Cisco EPN Manager CLI admin user to the Linux CLI admin user to the Linux CLI root user. The following procedure gives you the exact steps you must follow.
If the Linux CLI user is disabled, re-enable it. See Disable and Enable the Linux CLI Users in Cisco EPN Manager 2.x.
What to Do Next
For security purposes, disable the Linux CLI root user. See Disable and Enable the Linux CLI Users in Cisco EPN Manager 2.x.
Enable and Disable root Access for the Linux CLI and the Cisco EPN Manager Web GUI
As described in How to Transition Between the CLI User Interfaces in Cisco EPN Manager, after installation, you should disable the Cisco EPN Manager web GUI root user after creating at least one other web GUI user that has Admin or Super Users privileges. See Disable and Enable the Web GUI root User.
The Linux CLI root user is disabled after installation time. If you need to re-enable it, follow the procedure in Disable and Enable the Linux CLI Users in Cisco EPN Manager 2.x.
- Disable and Enable the Linux CLI Users in Cisco EPN Manager 2.x
- Disable and Enable the Web GUI root User
Disable and Enable the Linux CLI Users in Cisco EPN Manager 2.x
This procedure shows you how to disable and enable the Linux CLI admin shell in deployments running Cisco EPN Manager 2.x. When you disable the shell, you will no longer be able to log in as the Linux CLI admin or root users. When the shell is enabled, users can log in by following the procedure in How to Transition Between the CLI User Interfaces in Cisco EPN Manager.
Make sure you have the password for the Linux CLI admin user.
| Step 1 | Log in to Cisco EPN Manager as the Cisco EPN Manager CLI admin user. See Establish an SSH Session With the Cisco EPN Manager Server. |
| Step 2 | Disable the
Linux CLI admin shell (which disables the Linux CLI admin and root users):
shell disable Enter shell access password: passwd shell access is disabled |
| Step 3 | To re-enable the
Linux CLI admin shell (you must run this command as the
Cisco EPN Manager
CLI admin user):
shell Shell access password is not set Configure password for shell access Password: passwd Password again: passwd Shell access password is set Run the command again to enter shell |
Disable and Enable the Web GUI root User
| Step 1 | Log into the Cisco EPN Manager web GUI as root, and create another web GUI user that has root privileges—that is, a web GUI user that belongs to the Admin or Super Users user group. See Add Users and Manage User Accounts. Once this is done, you can disable the web GUI root account. |
| Step 2 | Disable the
Cisco EPN Manager
web GUI root user account. (The web GUI admin account, which remains active,
can perform all required CLI functions.)
ncs webroot disable |
| Step 3 | To re-enable the
account:
ncs webroot enable |
Control the Tasks Users Can Perform (User Groups)
Cisco EPN Manager user authorization is implemented through user groups. A user group contains a list of tasks that control which parts of Cisco EPN Manager a user can access and the tasks the user can perform in those parts.
While user groups control what the user can do, virtual domains control the devices on which a user can perform those tasks. Virtual domains are described in Create Virtual Domains to Control User Access to Devices.
Cisco EPN Manager provides several predefined user groups. If a user belongs to a user group, the user inherits all of the authorization settings for that group. A user is normally added to user groups when their account is created.
These topics explain how to manage user authorization:
- Types of User Groups
- View and Change the Tasks a User Can Perform
- View and Change the Groups a User Belongs To
- View User Groups and Their Members
- Create a Customized User Group
- View and Change the Tasks a Group Can Perform
- Use Cisco EPN Manager User Groups with RADIUS and TACACS+
Types of User Groups
Cisco EPN Manager provides the following predefined user groups:
For information about CLI users, see User Interfaces and User Types.
User Groups—Web UI
Cisco EPN Manager provides the default web GUI user groups listed in the following table. You can assign users to multiple groups, except for users that belong to the Monitor Lite user group (because Monitor Lite is meant for users who should have very limited permissions).
See View and Change the Tasks a Group Can Perform for information on the tasks that pertain to each user group and the default settings.
|
User Group |
Group Task Focus |
|---|---|
|
Root |
All operations. The group permissions are not editable. The root web UI user is available after installation and is described in User Interfaces and User Types. A best practice is to create other users with Admin or Super Users privileges, and then disable the root web UI user as described in Disable and Enable the Web GUI root User. |
|
Super Users |
All operations (similar to root). The group permissions are editable. |
|
Admin |
Administer the system and server. Can also perform monitoring and configuration operations. The group permissions are editable. |
|
Config Managers |
Configure and monitor the network (no administration tasks). The permissions assigned to this group are editable. |
|
System Monitoring |
Monitor the network (no configuration tasks). The group permissions are editable. |
|
Help Desk Admin |
Only has access to the help desk and user preferences related pages. Members of this user group cannot be members of any other user group. This is a special group which lacks access to the user interface. |
|
Lobby Ambassador |
User administration for Guest users only. Members of this user group cannot be members of any other user group. |
|
User–Defined 1–4 |
N/A; these are blank groups and can be edited and customized as needed. |
|
Monitor Lite |
View network topology and use tags. The group permissions are not editable. Members of this user group cannot be members of any other user group. |
|
NBI Credential |
The Northbound Interface Credential API. |
|
NBI Read |
The Northbound Interface Read API. |
|
NBI Write |
The Northbound Interface Write API. |
|
North Bound API |
Access to the SOAP APIs. |
|
User Assistant |
Local Net user administration only. Members of this user group cannot be members of any other user group. |
|
mDNS Policy Admin |
mDNS policy administration functions. |
User Groups—NBI
Cisco EPN Manager provides the default NBI user groups listed in the following table. The permissions in these groups are not editable.
See View and Change the Tasks a Group Can Perform for information on the tasks that pertain to each user group and the default settings.
|
User Group |
Provides access to: |
|---|---|
|
NBI Credential |
Credential management using MTOSI NBI. Can also belong to other NBI and web UI user groups. |
|
NBI Read |
MTOSI and RESTConf NBI read operations (HTTP GET). Can also belong to other NBI and web UI user groups. |
|
NBI Write |
MTOSI and RESTConf NBI write operations (HTTP PUT, POST, DELETE). Can also belong to other NBI and web UI user groups. |
View and Change the Tasks a User Can Perform
The tasks a user can perform is controlled by the user groups the user belongs to. Follow these steps to find out which groups a user belongs to and which tasks a user is authorized to perform.
 Note | If you want to check the devices a user can access, see Assign Virtual Domains to Users. |
| Step 1 | Choose and locate the user name. | ||
| Step 2 | Locate the user name and check the Member of column to find out which user groups the user belongs to. | ||
| Step 3 | Click a user
group hyperlink. The
Group
Detail window lists the tasks that group members can and cannot
perform.
The web GUI root and Monitor Lite groups, and the NBI groups, are not editable. | ||
| Step 4 | If you want to
change permissions, you have these choices:
|
View and Change the Groups a User Belongs To
The tasks users can perform is determined by the user groups they belong to. This is normally configured when a user account is created (see Add and Delete Users). User groups are described in Types of User Groups.
This procedure explains how to view the groups a user belongs to and, if necessary, change the user's group membership.
View User Groups and Their Members
Users can belong to multiple groups, unless they belong to a very restricted group such as Monitoring Lite. This procedure explains how to view existing user groups and their members.
| Step 1 | Choose
, then choose
User
Groups.
The User Groups page lists all existing user groups and a short list of their members. For a description of these groups, see Types of User Groups. |
| Step 2 | To view all members of a group, click a group hyperlink to open the Group Details window, then click the Members tab. |
| Step 3 | If you want to make changes to these groups, see: |
Create a Customized User Group
Cisco EPN Manager provides a set of predefined user groups that help you control user authorization. These groups are described in Types of User Groups and include four User Defined groups which you can customize to create a user group that is specific to your deployment. The following procedure explains how to create a customized group using one of the four predefined User Defined group templates.
| Step 1 | Choose , then choose User Groups. |
| Step 2 | Locate a User Defined group that has no members, then click its group name hyperlink. |
| Step 3 | Customize the group permissions by checking and unchecking tasks in the Group Detail window. If a task is greyed-out, it means you cannot adjust its setting. You cannot change the group name. |
| Step 4 | Click Save to save your group settings. |
| Step 5 | Add members to your group by editing the relevant user accounts and adding the user to your new group. See Add and Delete Users for information on adjusting user accounts. |
View and Change the Tasks a Group Can Perform
Follow these steps to get information about existing user groups and the tasks group members can perform. The predefined user groups are described in View User Groups and Their Members.
Note | If you want to change device access, see Assign Virtual Domains to Users. |
| Step 1 | Choose
, then choose
User
Groups.
The User Groups page lists all existing user groups. | ||
| Step 2 | Click a user
group hyperlink. The
Group
Detail window lists the group permissions.
The web GUI root and Monitor Lite groups, and the NBI groups, are not editable. | ||
| Step 3 | If you want to
change the group permissions—which will affect
all group
members—check and uncheck tasks, then click
Save.
|
Use Cisco EPN Manager User Groups with RADIUS and TACACS+
Your RADIUS or TACACS+ servers must be configured to recognize the user groups that exist in Cisco EPN Manager . You can do this using the procedure in Export the Cisco EPN Manager User Group and Task List Attributes for RADIUS and TACACS+.
Export the Cisco EPN Manager User Group and Task List Attributes for RADIUS and TACACS+
If you are using RADIUS or TACACS+, you must copy all Cisco EPN Manager user group and task information into your Cisco Access Control Server (ACS) or Cisco Identity Services Engine (ISE) server. You can do this using the Task List dialog box provided in the Cisco EPN Manager web GUI. If you do not export the data into your Cisco ACS or Cisco ISE server, Cisco EPN Manager will not allow users to perform their assigned tasks.
The following information must be exported, depending on the protocol you are using:
-
TACACS+—Requires virtual domain, role, and task information.
-
RADIUS—Requires virtual domain and role information (tasks are automatically added).
Information in the Task List dialog is preformatted for use with the Cisco ACS server.
Note | When you add tasks to the external server, be sure to add the Home Menu Access task. It is mandatory for all users. |
Make sure you have added the AAA server and configured the AAA mode as explained in Configure External Authentication.
Add Users and Manage User Accounts
- Create Web GUI Users with Administrator Privileges
- Add and Delete Users
- Disable (Lock) a User Account
- Change a User’s Password
Create Web GUI Users with Administrator Privileges
After installation, Cisco EPN Manager has a web GUI root account named root. This account is used for first-time login to the server to create:
- Web GUI users with Administrator privileges who will manage the product and features
- All other user accounts
You should not use the web GUI root account for normal operations. For security purposes, create a new web GUI user with Administrator privileges (and access to all devices), and then disable the web GUI root account.
| Step 1 | Choose , then choose Users. |
| Step 2 | From the Select a command drop-down list, choose Add User, then click Go. |
| Step 3 | Complete the required fields. |
| Step 4 | In the General tab under Groups Assigned to This User, click Admin. |
| Step 5 | Click the Virtual Domains tab to specify which devices the user can access. You should have at least one Admin web GUI user that has access to all devices (ROOT-DOMAIN). For more information on virtual domains, see Create Virtual Domains to Control User Access to Devices. |
| Step 6 | Click Save. |
What to Do Next
If you have not done so already, for security purposes, disable the web GUI root account as described in Disable and Enable the Web GUI root User.
Add and Delete Users
Before you create user accounts, create virtual domains to control device access so you can apply them during account creation. Otherwise you will have to edit the user account to add the domain access. See Create Virtual Domains to Control User Access to Devices.
If you want to temporarily disable an account (rather than delete it), see Disable (Lock) a User Account.
| Step 1 | Choose , then choose Users. |
| Step 2 | From the Select a command drop-down list, choose Add User, then click Go. |
| Step 3 | Configure the
user account.
|
| Step 4 | Click Save. |
| Step 5 | To delete a user account, select a user, choose Delete User from the Select a command drop-down list, then click Go. |
Disable (Lock) a User Account
Disable a user account when you temporarily want to disallow a user from logging in to the Cisco EPN Manager GUI. You might want to do this if a user is temporarily changing job functions. If the user tries to log in, Cisco EPN Manager displays a message saying the login failed because the account is locked. You can unlock the account later without having to re-create the user. If you want to delete a user account, see Add and Delete Users.
User accounts may be disabled automatically if the password is not changed before expiration. Only an administrator can reset the password in this case. See Change a User’s Password and Configure Global Password Policies for Local Authentication.
Change a User’s Password
You can force users to change their passwords on a regular basis using password rules (see Configure Global Password Policies for Local Authentication). Users can change their own passwords as described in Change Your Password. If you need to make an immediate change to a user's password, use this procedure.
Find Out Which Users Are Currently Logged In
Use this procedure to find out who is currently logged into the Cisco EPN Manager server. You can also view a historical list of the actions performed by the user in the current web GUI session and past sessions.
View the Tasks Performed By Users (Audit Trail)
Cisco EPN Manager maintains a history of all actions performed by users in active and past web GUI sessions. Follow these steps to view a historical list of tasks performed by a specific user or by all members of a specific user group. The audit information includes a description of the task, the IP address of the client from which the user performed the task, and the time at which the task was performed. If a task affects a managed device (for example, a user adds a new device), the affected device's IP address is listed in the Device IP Address column. If a change is made to multiple devices (for example, a user deploys a configuration template to 10 switches), Cisco EPN Manager displays an audit entry for each switch.
To find out which users are currently logged into the Cisco EPN Manager web GUI, see Find Out Which Users Are Currently Logged In.
To view audits that are not user-specific, see these topics:
Configure Job Approvers and Approve Jobs
Use job approval when you want to control jobs that could significantly impact the network. If a job requires approval, Cisco EPN Manager sends an e-mail to all users with Admin privileges and does not run the job until one of them approves it. If a job is rejected by an approver, the job is removed from the database. By default, all jobs do not require approval.
If job approval is already enabled and you want to view jobs that need approval, approve a job, or reject a job, choose , then choose .
To enable job approval and configure the jobs that require approval before running:
Configure Global Password Policies for Local Authentication
If you are using local authentication (Cisco EPN Manager 's authentication mechanism), you control the global password policies from the web GUI. If you are authenticating Cisco EPN Manager users using external authentication, the policies are controlled by an external application (see Set Up External Authentication Using the CLI).
By default, users are not forced to change passwords after any period of time. To enforce password changes and configure other password rules, choose , then choose Local Password Policy.
Configure the Global Timeout for Idle Users
Cisco EPN Manager provides two settings that control when and how idle users are automatically logged out:
-
User Idle Timeout—You can disable or configure this setting, which ends your user session automatically when you exceed the timeout. It is enabled by default and is set to 15 minutes.
-
Global Idle Timeout—The Global Idle Timeout setting overrides the User Idle Timeout setting. The Global Idle Timeout is enabled by default and is set to 15 minutes. Only users with administrative privileges can disable the Global Idle Timeout setting or change its time limit.
By default, client sessions are disabled and users are automatically logged out after 15 minutes of inactivity. This is a global setting that applies to all users. For security purposes, you should not disable this mechanism, but you can adjust the timeout value using the following procedure. To disable/change the timeout for an idle user, see Disable Idle User Timeout
Disable Idle User Timeout
By default, client sessions are disabled and users are automatically logged out after certain period of inactivity. This is a global setting that applies to all users. To avoid being logged out during the installation, it is recommended to disable automatic logout of idle users in the system settings using the following procedure.
Note | The Global Idle Timeout setting overrides the User Idle Timeout setting. To configure Global Idle Timeout settings, see Configure the Global Timeout for Idle Users. |
Create Virtual Domains to Control User Access to Devices
- What Are Virtual Domains?
- How Virtual Domains Affect Cisco EPN Manager Features
- Create New Virtual Domains
- Import a List of Virtual Domains
- Add Network Devices to Virtual Domains
- Assign Virtual Domains to Users
- Edit a Virtual Domain
- Delete a Virtual Domain
- Use Cisco EPN Manager Virtual Domains with RADIUS and TACACS+
What Are Virtual Domains?
Virtual domains are logical groupings of devices, sites, and other NEs, and are used to control who has access to those NEs. You choose which elements are included in a virtual domain and which users have access to that virtual domain. Virtual domains can be based on physical sites, device types, user communities, or any other designation you choose. All devices belong to ROOT-DOMAIN, which is the parent domain for all new virtual domains.
Virtual domains work in conjunction with user groups. Virtual domains control the devices a user can access, while user groups determine the actions a user can perform on those devices. Users with access to a virtual domain (depending on their privileges) can configure devices, view alarms, and generate reports for the NEs in their virtual domain.
You can create virtual domains after you have added devices to Cisco EPN Manager . Each virtual domain must have a name and can have an optional description, email address, and time zone. Cisco EPN Manager uses the email address and time zone that you specify to schedule and email domain-specific reports.
Users work in one virtual domain at a time. Users can change the current virtual domain by choosing a different one from the Virtual Domain drop-down list (see Work In a Different Virtual Domain).
Before you set up virtual domains, determine which users are responsible for managing particular areas of the network. Then organize your virtual domains according to those needs—for example, by geography, by device type, or by the user community served by the network.
How Virtual Domains Affect Cisco EPN Manager Features
Virtual domains are organized hierarchically. The ROOT-DOMAIN domain includes all virtual domains.
Because network elements are managed hierarchically, user views of devices—as well as some associated features and components—are affected by the user's virtual domain. The following topics describe the effects of virtual domains on these features.
- Reports and Virtual Domains
- Search and Virtual Domains
- Alarms and Virtual Domains
- Maps and Virtual Domains
- Configuration Templates and Virtual Domains
- Config Groups and Virtual Domains
- Email Notifications and Virtual Domains
Reports and Virtual Domains
Reports only include components that belong to the active virtual domain. A parent virtual domain cannot view reports from its child domains. New components are only reflected in reports that are generated after the components were added.
Search and Virtual Domains
Search results only include components that belong to the active domain. You can only view saved search results if you are in the same domain from which the search was performed and saved. When working in a parent domain, you cannot view the results of searches performed in child domains.
Alarms and Virtual Domains
When a component is added to a virtual domain, no previous alarms for that component are visible to that virtual domain . Only new alarms are visible. For example, if a network element is added to Cisco EPN Manager , and that network element generated alarms before and after it was added, its alarm history would only include alarms generated after it was added.
Note | For alarm email notifications, only the ROOT-DOMAIN virtual domain can enable Location Notifications, Location Servers, and Cisco EPN Manager email notifications. |
Maps and Virtual Domains
Maps only display network elements that are members of the active virtual domain.
Configuration Templates and Virtual Domains
When you create or discover a configuration template in a virtual domain, it can only be applied to network elements in that virtual domain. If you apply a template to a device and then add that device to a child domain, the template is also available to the same device in the child domain.
Note | If you create a child domain and then apply a configuration template to both network elements in the virtual domain, Cisco EPN Manager might incorrectly reflect the number of partitions to which the template was applied. |
Config Groups and Virtual Domains
A parent domain can view the network elements in a child domain's configuration groups. The parent domain can also edit the child domain's configuration groups.
Email Notifications and Virtual Domains
Email notifications can be configured per virtual domain.
For alarm email notifications, only the ROOT-DOMAIN can enable Location Notifications, Location Servers, and email notifications.
Create New Virtual Domains
To create a new virtual domain, use one of the following procedures depending on the desired hierarchy of the virtual domain.
|
To create a new virtual domain (new-domain) here: |
See this procedure: |
|
ROOT-DOMAIN > new-domain |
|
|
ROOT-DOMAIN > existing-domain > new-domain |
|
|
ROOT-DOMAIN > existing-domain > existing-domain > new-domain |
|
| (etc.) |
Create Virtual Domains Directly Under ROOT-DOMAIN
The following procedure creates an empty virtual domain under ROOT-DOMAIN. You can also create multiple virtual domains at one time by using the procedure in Import a List of Virtual Domains.
If a virtual domain already exists under ROOT-DOMAIN, and you want to create a new domain under it (a child domain), see Create Child Virtual Domains (Subdomains).
What to Do Next
Add devices to the virtual domain as described in Add Network Devices to Virtual Domains.
Create Child Virtual Domains (Subdomains)
The following procedure creates a child virtual domain (also called a subdomain). A child virtual domain is a domain that is not directly under ROOT-DOMAIN; it is under a domain that is under ROOT-DOMAIN.
Do not use this procedure if you want the new virtual domain to appear directly under ROOT- DOMAIN. In that case, see Create Virtual Domains Directly Under ROOT-DOMAIN.

What to Do Next
Add devices to the virtual domain as described in Add Network Devices to Virtual Domains.
Import a List of Virtual Domains
If you plan to create many virtual domains, or give them a complex hierarchy, you will find it easier to specify them in a properly formatted CSV file, and then import it. The CSV format allows you to specify a name, description, time zone, and email address for each virtual domain you create, as well as each domain's parent domain. Adding network elements to the virtual domains must be performed separately.
What to Do Next
Add devices to the virtual domains as explained in Add Network Devices to Virtual Domains.
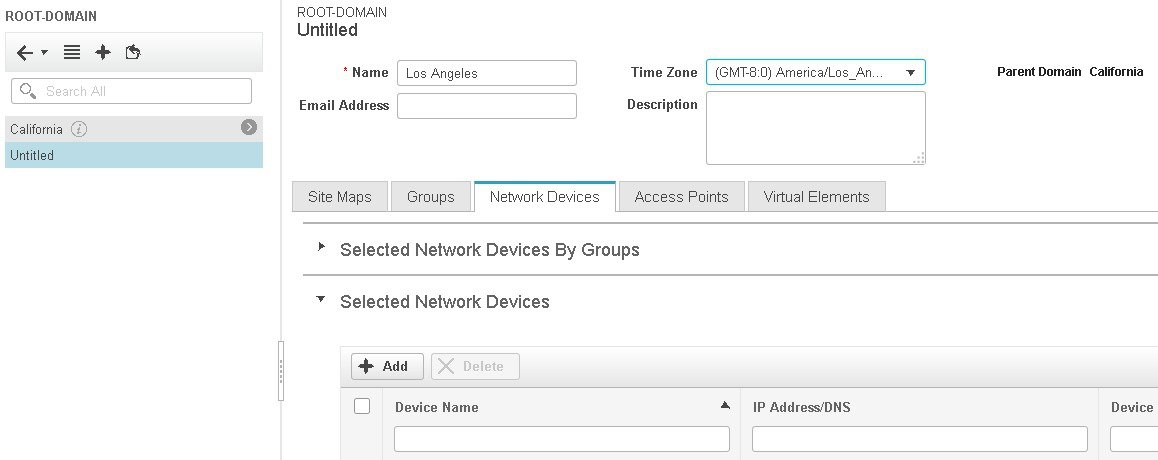
Add Network Devices to Virtual Domains
Use this procedure to add network devices to a virtual domain. When you add a new network device to an existing virtual domain, the device becomes immediately accessible to users with access to that domain (users do not have to restart the web GUI).
What to Do Next
Give users access to the virtual domain as described in Assign Virtual Domains to Users.
Assign Virtual Domains to Users
Once a virtual domain is assigned to a user account, the user is restricted to viewing and performing operations on the devices in their assigned domain(s).
Note | When using external AAA, be sure to add the custom attributes for virtual domains to the appropriate user or group configuration on the external AAA server. See Use Cisco EPN Manager Virtual Domains with RADIUS and TACACS+. |
Edit a Virtual Domain
To adjust a virtual domain, choose it from the Virtual Domain Hierarchy on the left sidebar menu to view or edit its assigned network devices. You cannot edit any of the settings for ROOT-DOMAIN.
| Step 1 | Choose . |
| Step 2 | Click the virtual domain you want to edit in the Virtual Domains sidebar menu. |
| Step 3 | To adjust the name, email address, time zone, or description, enter your changes in the text boxes. |
| Step 4 | To adjust device
members:
|
| Step 5 | Click Submit, then check the summary of your changes. |
| Step 6 | Click Save to apply and save your edits. |
Delete a Virtual Domain
Use this procedure to delete a virtual domain from Cisco EPN Manager . This procedure only deletes the virtual domain; it does not delete the network elements from Cisco EPN Manager (the network elements will continue to be managed by Cisco EPN Manager ).
You can only delete a virtual domain if:
Use Cisco EPN Manager Virtual Domains with RADIUS and TACACS+
Your RADIUS or TACACS+ servers must be configured to recognize the virtual domains that exist in Cisco EPN Manager . You can do this using the procedure in Export the Cisco EPN Manager Virtual Domain Attributes for RADIUS and TACACS+.
If your RADIUS or TACACS+ server does not have any virtual domain information for a user, the following occurs, depending on the number of virtual domains that are configured in Cisco EPN Manager :
Export the Cisco EPN Manager Virtual Domain Attributes for RADIUS and TACACS+
If you are using RADIUS or TACACS+, you must copy all Cisco EPN Manager virtual domain information into your Cisco ACS or Cisco ISE server. You can do this using the Virtual Domains Custom Attributes dialog box provided in the Cisco EPN Manager web GUI. If you do not export the data into your Cisco ACS or Cisco ISE server, Cisco EPN Manager will not allow users to log in.
The following information must be exported, depending on the protocol you are using:
-
TACACS+—Requires virtual domain, role, and task information.
-
RADIUS—Requires virtual domain and role information (tasks are automatically added).
When you create a child domain for an existing virtual domain, the sequence numbers for the RADIUS/TACACS+ custom attributes are also updated in the parent virtual domain. These sequence numbers are for representation only and do not impact AAA integration.
Information in the Virtual Domains Custom Attributes dialog is preformatted for use with Cisco ACS server.
Note | When you add tasks to the external server, be sure to add the Home Menu Access task. It is mandatory for all users. |
Make sure you have added the AAA server and configured the AAA mode as explained in Configure External Authentication.
| Step 1 | In
Cisco EPN Manager
:
|
| Step 2 | Paste the
information into your Cisco ACS or Cisco ISE server.
These steps show how to add the
information to an existing user group in Cisco ACS. If you have not yet
added this information to Cisco ACS or Cisco ISE, see:
|
Configure Local Authentication
Cisco EPN Manager uses local authentication by default, which means that user passwords are stored and verified from the Cisco EPN Manager database. To check the authentication mode that is being used, choose , then choose AAA Mode Settings. The selection is displayed on the AAA Mode Settings page. If you are using local authentication, be sure to configure strong password policies. See Configure Global Password Policies for Local Authentication.
If you want to use SSO with local authentication, see Use SSO With Local Authentication.
For information on external authentication, see Configure External Authentication.
Use SSO With Local Authentication
To use SSO with local authentication, you must add the SSO server and then configure Cisco EPN Manager to use SSO in local mode.
If you have deployed Cisco EPN Manager in a high availability environment where you have a primary and backup server, refer to the instructions in Configure an SSO Server in a High Availability Environment.
Cisco EPN Manager does not support localization on the SSO sign-in page.
The following topics describe how to configure SSO for external authentication, but you can use the same procedures to configure SSO for local authentication. The only difference is that when you configure the SSO mode on the Cisco EPN Manager server, choose Local mode (not RADIUS or TACACS+).
Configure External Authentication
Users with web GUI root user or SuperUser privileges can configure Cisco EPN Manager to communicate with external RADIUS, TACACS+, SSO, and LDAP servers for external authentication, authorization, and accounting (AAA). If you choose to configure external authentication, the user groups, users, authorization profiles, authentication policies, and policy rules must be created in the external server through which all access requests to Cisco EPN Manager will be routed.
You can use a maximum of three AAA servers. Users are authenticated on the second server only if the first server is not reachable or has network problems.
If you want to configure external authentication from the CLI, see Set Up External Authentication Using the CLI.
See the following topics for more information.
- Integrate Cisco EPN Manager with an LDAP Server
- Use RADIUS or TACACS+ for External Authentication
- Use Cisco ISE With RADIUS or TACACS+ for External Authentication
- Use Cisco ACS With RADIUS or TACACS+ for External Authentication
- Use SSO with External Authentication
Integrate Cisco EPN Manager with an LDAP Server
Cisco EPN Manager supports external authentication using an LDAP server. If you are interested in this configuration, contact your Cisco representative.
Use RADIUS or TACACS+ for External Authentication
These topics explain how to configure Cisco EPN Manager to use RADIUS or TACACS+ servers.
- Add a RADIUS or TACACS+ Server to Cisco EPN Manager
- Configure RADIUS or TACACS+ Mode on the Cisco EPN Manager Server
Add a RADIUS or TACACS+ Server to Cisco EPN Manager
To add a RADIUS or TACACS+ server to Cisco EPN Manager :
| Step 1 | Choose , then choose RADIUS Servers. | ||
| Step 2 | Select the type of server you want to add. | ||
| Step 3 | Enter the required information—IP address, DNS Name, and so forth. For Cisco EPN Manager to communicate with the external authentication server, the shared secret you enter on this page must match the shared secret configured on the RADIUS or TACACS+ server. You can use alphabets, numbers, and special characters except ‘ (single quote) and “ (double quote) while entering the shared secret key for a third-party TACACS+ or RADIUS server. | ||
| Step 4 | Select the
authentication type.
| ||
| Step 5 | If you have enabled the High Availability feature and configured a virtual IP address for the Local Interface IP, choose either the virtual IP address or the physical IP address of the primary server. (See the information on setting up and installing high availability on a secondary server in the Cisco Evolved Programmable Network Manager Installation Guide.)
| ||
| Step 6 | Click Save. |
Configure RADIUS or TACACS+ Mode on the Cisco EPN Manager Server
Use Cisco ISE With RADIUS or TACACS+ for External Authentication
Cisco Identity Services Engine (ISE) uses the RADIUS or TACACS+ protocols for authentication, authorization, and accounting (AAA). You can integrate Cisco EPN Manager with Cisco ISE to authenticate the Cisco EPN Manager users using the RADIUS or TACACS+ protocols. When you use external authentication, the details such as users, user groups, passwords, authorization profiles, authorization policies, and policy rules that are required for AAA must be stored and verified from the Cisco ISE database.
Complete the following tasks to use Cisco ISE with the RADIUS or TACACS+ protocol for external authentication:
|
Tasks to be completed to use Cisco ISE for external authentication |
For information, see: |
||
|
Make sure you are using a supported version of Cisco ISE |
|||
|
Add Cisco EPN Manager as an AAA client in Cisco ISE |
|||
|
Create a user group in Cisco ISE |
|||
|
Create a user in Cisco ISE and add the user to the user group that is created in Cisco ISE |
|||
|
|||
|
|||
|
Create an authorization policy in Cisco ISE and associate the policy with the user groups and authorization profile created in Cisco ISE |
|||
|
Create an authentication policy to define the protocols that Cisco ISE must use to communicate with Cisco EPN Manager , and the identity sources that it uses for authenticating users to Cisco EPN Manager |
|||
|
Add Cisco ISE as a RADIUS or TACACS+ server in Cisco EPN Manager |
|||
|
Configure the RADIUS or TACACS+ mode on the Cisco EPN Manager server |
Configure RADIUS or TACACS+ Mode on the Cisco EPN Manager Server |
- Supported Versions of Cisco ISE in Cisco EPN Manager
- Add Cisco EPN Manager as a Client in Cisco ISE
- Create a User Group in Cisco ISE
- Create a User and Add the User to a User Group in Cisco ISE
- Create an Authorization Profile for RADIUS in Cisco ISE
- Create an Authorization Profile for TACACS+ in Cisco ISE
- Configure an Authorization Policy in Cisco ISE
- Create an Authentication Policy in Cisco ISE
Supported Versions of Cisco ISE in Cisco EPN Manager
Cisco EPN Manager supports Cisco ISE 1.x and 2.x releases .
Add Cisco EPN Manager as a Client in Cisco ISE
Create a User Group in Cisco ISE
Create a User and Add the User to a User Group in Cisco ISE
Create an Authorization Profile for RADIUS in Cisco ISE
You create authorization profiles to define how different types of users are authorized to access the network. For example, you can define that a user attempting to access the network over a VPN connection is treated more strictly than a user attempting to access the network through a wired connection.
Note | For RADIUS, you can add the user role attributes without adding the task attributes. The tasks are automatically added with the user roles. |
For more information about Cisco ISE authorization profiles, see the information on managing authorization policies and profiles in the Cisco Identity Services Engine Administrator Guide.
To create an authorization profile for RADIUS in Cisco ISE:
Make sure you have the complete list of the following Cisco EPN Manager custom attributes for RADIUS. You will need to add this information to Cisco ISE in this procedure.
-
Cisco EPN Manager user roles and tasks—see Export the Cisco EPN Manager User Group and Task List Attributes for RADIUS and TACACS+
-
Cisco EPN Manager virtual domains—see Export the Cisco EPN Manager Virtual Domain Attributes for RADIUS and TACACS+
| Step 1 | Log in to Cisco ISE as the admin user. | ||
| Step 2 | Choose . | ||
| Step 3 | From the left sidebar, choose . | ||
| Step 4 | In the Standard Authorization Profiles page, click Add. | ||
| Step 5 | In the Authorization Profile page, enter the name and description of the authorization profile. | ||
| Step 6 | From the Access Type drop-down list, choose ACCESS_ACCEPT. | ||
| Step 7 | In the
Advanced
Attributes Settings area, paste in the complete list of RADIUS
custom attributes for:
| ||
| Step 8 | Click Submit. |
Create an Authorization Profile for TACACS+ in Cisco ISE
You create authorization profiles to define how different types of users are authorized to access the network. For example, you can define that a user attempting to access the network over a VPN connection is treated more strictly than a user attempting to access the network through a wired connection.
Note | For TACACS+, you must add the user role and task attributes. (Task attributes are not required for RADIUS.) |
For more information about Cisco ISE authorization profiles, see the information on managing authorization policies and profiles in the Cisco Identity Services Engine Administrator Guide.
To create an authorization profile for TACACS+ in Cisco ISE:
Make sure you have the complete list of the following Cisco EPN Manager custom attributes for TACACS+. You will need to add this information to Cisco ISE in this procedure.
-
Cisco EPN Manager user roles and tasks—see Export the Cisco EPN Manager User Group and Task List Attributes for RADIUS and TACACS+
-
Cisco EPN Manager virtual domains—see Export the Cisco EPN Manager Virtual Domain Attributes for RADIUS and TACACS+
| Step 1 | Log in to Cisco ISE as the admin user. | ||
| Step 2 | Choose . | ||
| Step 3 | From the left sidebar, choose . | ||
| Step 4 | In the Standard Authorization Profiles page, click Add. | ||
| Step 5 | In the Authorization Profile page, enter the name and description of the authorization profile. | ||
| Step 6 | From the Access Type drop-down list, choose ACCESS_ACCEPT. | ||
| Step 7 | In the
Advanced
Attributes Settings area, paste in the complete list of TACACS+
custom attributes for:
| ||
| Step 8 | Click Submit. |
Configure an Authorization Policy in Cisco ISE
An authorization policy consists of a rule or a set of rules that are user-defined and produce a specific set of permissions, which are defined in an authorization profile. Based on the authorization profile, access requests to Cisco EPN Manager are processed.
-
Standard—Standard policies are intended to be stable and are created to remain in effect for long periods of time, to apply to a larger group of users, devices, or groups that share a common set of privileges.
-
Exception—Exception policies are created to meet an immediate or short-term need, such as authorizing a limited number of users, devices, or groups to access network resources. An exception policy lets you create a specific set of customized values for an identity group, condition, or permission that are tailored for one user or a subset of users.
For more information about authorization policies, see the “Manage Authorization Policies and Profiles” chapter in the Cisco Identity Services Engine Administrator Guide.
To create an authorization policy in Cisco ISE:
| Step 1 | Log in to Cisco ISE as the admin user. |
| Step 2 | Choose . |
| Step 3 | In the Standard area, click the down arrow on the far right and select either Insert New Rule Above or Insert New Rule Below. |
| Step 4 | Enter the rule
name and choose identity group, condition, attribute, and permission for the
authorization policy.
For example, you can define a user group as Cisco EPN Manager -SystemMonitoring-Group and choose this group from the Identity Groups drop-down list. Similarly, define an authorization profile as Cisco EPN Manager -SystemMonitoring-authorization profile and choose this profile from the Permissions drop-down list. Now, you have defined a rule where all users belonging to the Cisco EPN Manager System Monitoring identity group receive an appropriate authorization policy with system monitoring custom attributes defined. |
| Step 5 | Click Done, and then click Save. |
Create an Authentication Policy in Cisco ISE
Authentication policies define the protocols that Cisco ISE uses to communicate with Cisco EPN Manager , and the identity sources that it uses for authenticating users to Cisco EPN Manager . An identity source is an internal or external database where the user information is stored.
For more information about authentication policies, see the "Manage Authentication Policies" chapter in the Cisco Identity Services Engine Administrator Guide.
To create an authentication policy in Cisco ISE:
Use Cisco ACS With RADIUS or TACACS+ for External Authentication
Cisco Secure Access Control System (ACS) uses RADIUS and TACACS+ protocol for authentication, authorization, and accounting (AAA).You can integrate Cisco EPN Manager with Cisco ACS to authenticate the Cisco EPN Manager users using the RADIUS or TACACS+ protocol. When you use an external authentication, the details such as users, user roles, passwords, authorization profiles, authorization policies, and policy rules that are required for AAA must be stored and verified from the Cisco ACS database.
Complete the following tasks to use Cisco ACS with the RADIUS or TACACS+ protocol for external authentication:
|
Tasks to be completed to use Cisco ACS for external authentication |
For information, see: |
||
|
Make sure you are using a supported version of Cisco ACS |
|||
|
Add Cisco EPN Manager as an AAA client in Cisco ACS |
|||
|
Create a user group in Cisco ACS |
|||
|
Create a user in Cisco ACS and add the user to the Cisco ACS user group |
|||
|
|||
|
|||
|
Create an access service in Cisco ACS and define a policy structure for the access service. |
|||
|
Create an authorization policy rule in Cisco ACS, and map the authorization or shell profile based on the access type (network access or device administration). |
|||
|
Configure a service selection policy in Cisco ACS and assign an access service to an incoming request. |
|||
|
Add Cisco ACS as a RADIUS or TACACS+ server in Cisco EPN Manager . |
|||
|
Configure the RADIUS or TACACS+ mode on the Cisco EPN Manager server. |
Configure RADIUS or TACACS+ Mode on the Cisco EPN Manager Server |
- Supported Versions of Cisco ACS in Cisco EPN Manager
- Add Cisco EPN Manager as a Client in Cisco ACS
- Create a User Group in Cisco ACS
- Create a User and Add the User to a User Group in Cisco ACS
- Create an Authorization Profile for RADIUS in Cisco ACS
- Create an Authorization Profile for TACACS+ in Cisco ACS
- Create an Access Service for Cisco EPN Manager in Cisco ACS
- Create an Authorization Policy Rule in Cisco ACS
- Configure a Service Selection Policy in Cisco ACS
Supported Versions of Cisco ACS in Cisco EPN Manager
Cisco EPN Manager supports Cisco ACS 5.x releases.
Add Cisco EPN Manager as a Client in Cisco ACS
| Step 1 | Log in to Cisco ACS as the admin user. | ||
| Step 2 | From the left sidebar, choose . | ||
| Step 3 | In the Network Devices page, click Create. | ||
| Step 4 | Enter the device name and IP address of the Cisco EPN Manager server. | ||
| Step 5 | Choose the
authentication option as
RADIUS or
TACACS+, and enter the shared secret.
| ||
| Step 6 | Click Submit. |
Create a User Group in Cisco ACS
Create a User and Add the User to a User Group in Cisco ACS
Create an Authorization Profile for RADIUS in Cisco ACS
You create authorization profiles to define how different types of users are authorized to access the network. For example, you can define that a user attempting to access the network over a VPN connection is treated more strictly than a user attempting to access the network through a wired connection.
Note | For RADIUS, you can add the user role attributes without adding the task attributes. The tasks are automatically added with the user roles. |
For more information about Cisco ACS authorization profiles and policies, see chapters on managing policy elements and access policies in the User Guide for Cisco Secure Access Control System.
To create an authorization profile for RADIUS in Cisco ACS:
Make sure you have the complete list of the following Cisco EPN Manager custom attributes for RADIUS. You will need to add this information to Cisco ACS in this procedure.
-
Cisco EPN Manager user roles and tasks—see Export the Cisco EPN Manager User Group and Task List Attributes for RADIUS and TACACS+
-
Cisco EPN Manager virtual domains—see Export the Cisco EPN Manager Virtual Domain Attributes for RADIUS and TACACS+
| Step 1 | Log in to Cisco ACS as the admin user. | ||
| Step 2 | From the left sidebar, choose . | ||
| Step 3 | Click Create. | ||
| Step 4 | On the General tab, enter the name and description of the authorization profile. | ||
| Step 5 | Click the
RADIUS
Attributes tab, and paste in the complete list of RADIUS custom
attributes for:
| ||
| Step 6 | Click Submit. |
Create an Authorization Profile for TACACS+ in Cisco ACS
Note | For TACACS+, you must add the user role and task attributes. (Task attributes are not required for RADIUS.) |
For more information about Cisco ACS authorization profiles and policies, see chapters on managing policy elements and access policies in the User Guide for Cisco Secure Access Control System.
To create an authorization profile for TACACS+ in Cisco ACS:
Make sure you have the complete list of the following Cisco EPN Manager custom attributes. You will need to add this information to Cisco ACS in this procedure.
-
Cisco EPN Manager user roles and tasks—see Export the Cisco EPN Manager User Group and Task List Attributes for RADIUS and TACACS+
-
Cisco EPN Manager virtual domains—see Export the Cisco EPN Manager Virtual Domain Attributes for RADIUS and TACACS+.
| Step 1 | Log in to Cisco ACS as the admin user. | ||
| Step 2 | From the left sidebar, choose . | ||
| Step 3 | Click Create. | ||
| Step 4 | On the General tab, enter the name and description of the authorization profile. | ||
| Step 5 | Click the
Custom
Attributes tab, and paste in the complete list of TACACS+ custom
attributes for:
| ||
| Step 6 | Click Submit. |
Create an Access Service for Cisco EPN Manager in Cisco ACS
Access services contain the authentication and authorization policies for access requests. You can create separate access services for different use cases; for example, device administration (TACACS+), network access (RADIUS), and so on.
When you create an access service in Cisco ACS, you define the type of policies and policy structures that it contains; for example, policies for device administration, network access, and so on.
Note | You must create access services before you define service selection rules, although you do not need to define the policies in the services. |
To create an access service for Cisco EPN Manager requests:
| Step 1 | Log in to Cisco ACS as the admin user. |
| Step 2 | From the left sidebar, choose . |
| Step 3 | Click Create. |
| Step 4 | Enter the name and description of the access service. |
| Step 5 | Choose one of
the following options to define a policy structure for the access service:
|
| Step 6 | Click Next. |
| Step 7 | Choose the authentication protocols that are allowed for the access service. |
| Step 8 | Click Finish. |
Create an Authorization Policy Rule in Cisco ACS
| Step 1 | Log in to Cisco ACS as the admin user. | ||
| Step 2 | From the left sidebar, choose . | ||
| Step 3 | Click Create. | ||
| Step 4 | Enter the name of the rule and then choose the rule status. | ||
| Step 5 | Configure the
required conditions for the rule.
For example, you can create a rule based on the location, device type, or user group that you have created. | ||
| Step 6 | If you are
creating an authorization policy rule for network access (RADIUS), choose the
required authorization profile(s) to map to the authorization policy rule.
Alternatively, if you are creating an authorization policy rule for device administration (TACACS+), choose the required shell profile(s) to map to the authorization policy rule.
| ||
| Step 7 | Click OK. |
Configure a Service Selection Policy in Cisco ACS
A service selection policy determines which access service applies to an incoming request. For example, you can configure a service selection policy to apply the device administration access service to any access request that uses the TACACS+ protocol.
To configure a service selection policy:
| Step 1 | Log in to Cisco ACS as the admin user. |
| Step 2 | From the left sidebar, choose . |
| Step 3 | If you want to
configure a simple service selection policy, click the
Single
result selection radio button, and then choose an access service to
apply to all requests.
Alternatively, if you want to configure a rule-based service selection policy, click the Rule based result selection radio button, and then click Create. |
| Step 4 | Enter the name of the rule and then choose the rule status. |
| Step 5 | Choose either RADIUS or TACACS+ as the protocol for the service selection policy. |
| Step 6 | Configure the required compound condition, and then choose an access service to apply to an incoming request. |
| Step 7 | Click OK, and then click Save Changes. |
Use SSO with External Authentication
To set up and use SSO (with or without a RADIUS or TACACS+ server), see these topics:
Cisco EPN Manager does not support localization on the SSO sign-in page.
Add the SSO Server
If you have deployed Cisco EPN Manager in a high availability environment where you have a primary and backup server, refer to the instructions in Configure an SSO Server in a High Availability Environment.
Cisco EPN Manager can be configured with a maximum of three AAA servers.
Configure SSO Mode on the Cisco EPN Manager Server
The SSO functionality distributes CA and self-signed certificate when the SSO server is added to the SSO client.
Cisco EPN Manager supports CA and self-signed certificates as long as the Common Name (CN) field of the certificate contains the Fully Qualified Domain Name (FQDN) of the server on both the SSO client and the SSO server. The server must be capable of name resolution from the IP address to the FQDN. In addition, the hostname must match the left-most component of the FQDN. SSO requires accurate DNS configuration. You must define the DNS with fully qualified domain name (FQDN). For example, the nslookup command and expected data when configuring DNS with FQDN is:
hostname CUSTOMER_HOSTNAME
nslookup CUSTOMER_HOSTNAME
Server:...
Address:...
Name: CUSTOMER_HOSTNAME.example.com
Address:....
For SSO operation, Cisco EPN Manager requires that the SSL/TLS certificate hold the FQDN in the CN field. To verify that the certificate used by your Cisco EPN Manager server has the FQDN in the CN field, use your browser to view the certificate. If the certificate does not contain the FQDN in the CN field, you must regenerate the certificate and redistribute it to all users that have the old certificate.
Note | If you are using this procedure to configure SSO but are using local authentication, choose Local in Step 2. |
 Feedback