Cisco Evolved Programmable Network Manager 2.0 Installation Guide
Available Languages
Table of Contents
Cisco Evolved Programmable Network Manager 2.0 Installation Guide
Log In and Out as the Linux CLI Users
How to Log In and Out as the Linux CLI User in Cisco EPN Manager2.x: Complete Workflow
How to Log In and Out as the Linux CLI User in Cisco EPN Manager1.2.x: Complete Workflow
Hardware and Software Requirements
Scale Requirements (Professional Installation Option)
Ports Used by Cisco EPN Manager
Prerequisites for OVA/VM Installations
Prerequisites for ISO/Bare Metal Installations
Verify the ISO Image or OVA Package
Install Cisco EPN Manager Using an OVA/VM
Overview of the OVA/VM Installation Process
Deploy the OVA from the VMware vSphere Client
Install Cisco EPN Manager on the Server
Synchronize the Hardware and NTP Clocks
Install Cisco EPN Manager Using an ISO/Bare Metal Image
Overview of the ISO/Bare Metal Installation Process
Configure the Bare Metal CiscoUCS Server
Install Cisco EPN Manager from an ISO Image
Cisco Evolved Programmable Network Manager 2.0 Installation Guide
Last Modified: November 8, 2016
Upgrade from an Earlier Version of Cisco EPN Manager
Installation Overview
- Installation Options
- Upgrade Options
- High Availability Overview
- Log In and Out as the Linux CLI Users
Installation Options
You can install Cisco EPN Manager 2.0 either on a virtual machine (VM) or bare metal server:
- OVA/VM installation—For a VM installation, install the provided Open Virtual Appliance (OVA) file on a dedicated server that complies with the requirements listed in OVA/VM Requirements. We recommend that you run only one Cisco EPN Manager VM instance per server hardware.
- ISO/bare metal installation—For a bare metal server installation, install the provided ISO image, which acts as a virtual boot that supports the Cisco Unified Computing System (UCS) server installation. The requirements are listed in Bare Metal Requirements. You can also use the ISO image to install Cisco EPN Manager on a VM. A built-in terminal or console server application called Cisco Integrated Management Controller (Cisco IMC) is used to install Cisco EPN Manager on the bare metal Cisco UCS server hardware.
For information on the advantages and disadvantages of each of these installation types, contact your Cisco representative.
Upgrade Options
If you are upgrading from previous releases of Cisco EPN Manager, you can use either of the following methods:

Note![]() Cisco EPN Manager does not support rolling back to the previous version after an upgrade.
Cisco EPN Manager does not support rolling back to the previous version after an upgrade.
- Automatic Upgrade—This upgrade option is normally chosen when you are not using new hardware; in other words, you are performing the upgrade on the machine that is running the earlier version of Cisco EPN Manager. This type of upgrade can cause a downtime, but after the upgrade, you do not have to restore your data from a backup. For more information, see Automatic Upgrade on page 28.
- Backup-Restore Upgrade—This upgrade option generally requires new hardware (although it is possible to use existing hardware). There is no downtime in this type of upgrade. Your current version of Cisco EPN Manager remains operational while you install the new version on the new hardware. However, after the installation, you must restore your data from a backup.
To use either of these upgrade options, your deployment must be running Cisco EPN Manager 1.2.7 (that is, Cisco EPN Manager 1.2 with Maintenance Pack 7). For information on how to install Cisco EPN Manager 1.2.7, see the release notes for that maintenance pack.
High Availability Overview
The Cisco EPN Manager high availability (HA) framework ensures continued system operation in case of failure. HA uses a pair of linked, synchronized Cisco EPN Manager servers to minimize or eliminate the impact of application or hardware failures that may take place on either server. Servers can fail due to issues in one or more of the following areas:
- Application processes—Server, TFTP, FTP, and other process failures.
- Database server—Database-related process failures (the database server runs as a service on Cisco EPN Manager).
- Network—Problems with network access or reachability.
- System—Problems with the server's physical hardware or operating system.
- Virtual machine—Problems with the VM environment on which the primary and secondary servers are installed.
The following figure shows the main components and process flows for an HA setup.
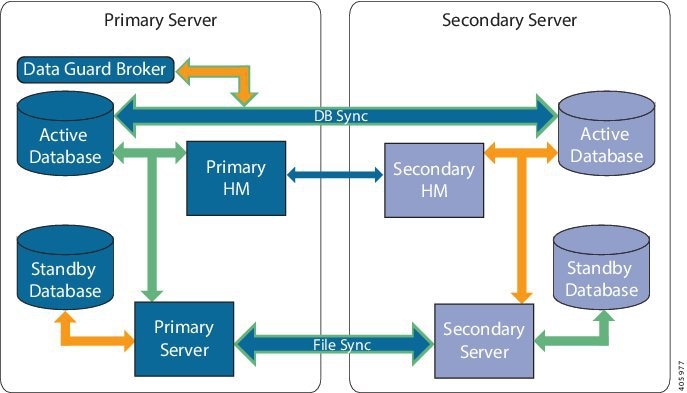
An HA deployment consists of a primary and a secondary server with Health Monitor (HM) instances (running as application processes) on both servers. When the primary server fails (either automatically or because it is manually stopped), the secondary server takes over and manages the network while you restore access to the primary server. If the deployment is configured for automatic failover, the secondary server takes over the active role within two to three minutes after the failover.
When issues on the primary server are resolved and the server is in a running state, it remains in standby mode and begins syncing its data with the active secondary server. When a failback is triggered, the primary server again takes over the active role. This role switching between the primary and secondary servers happens within two to three minutes.
Synchronizations between the primary and secondary servers fall under two categories:
- File changes—File changes are synchronized using the HTTPS protocol and include changes in report configurations, configuration templates, TFTP-root directory, administration settings, licensing files, the key store, and so forth. File synchronization is done in:
–![]() Batches—For files that are not updated frequently, such as license files. These files are synchronized once every 500 seconds.
Batches—For files that are not updated frequently, such as license files. These files are synchronized once every 500 seconds.
–![]() Near real-time—For files that are updated frequently. These files are synchronized once every 11 seconds.
Near real-time—For files that are updated frequently. These files are synchronized once every 11 seconds.
- Database changes—These changes are related to configuration, performance, and monitoring data. These are synchronized using Oracle Recovery Manager (RMAN), which creates the initial standby database, and Oracle Active Data Guard, which synchronizes the databases when a change occurs.
As part of the synchronization process, the primary and secondary servers exchange the following messages:
- Database Sync messages—Includes all the information necessary to ensure that the databases on the primary and secondary servers are running and synchronized.
- File Sync messages—Includes frequently-updated configuration files. These are synchronized in batches or near real-time, as explained previously.
- Process Sync messages—Includes information about whether the application- and database-related processes are running. These messages fall under the Heartbeat category.
- Health Monitor Sync messages—Includes information about reports, network, system, and Health Monitor failure conditions.
Standard HA installations have one distinct IP address/URL for the primary server and a second IP address/URL for the secondary server. In these deployments, you must configure your devices to forward events to both the primary and secondary server. Alternatively, for local HA deployment models, you can set up HA so that it uses a virtual IP address, which is a single IP address/URL that is always associated with the active server (primary or secondary). In this case, you only need to configure your devices to forward events to the single IP address/URL. For more information, see High Availability.
Whether your HA deployment uses a single IP address or not, users should always connect to the Cisco EPN Manager web GUI using the active server IP address/URL.
Log In and Out as the Linux CLI Users
In different parts of the installation process, you will have to log in as a Linux CLI. The login process is different between Cisco EPN Manager 2. x and Cisco EPN Manager 1.2. x. The Cisco EPN Manager 1.2. x procedures are included for deployments that plan to perform an upgrade.
How to Log In and Out as the Linux CLI User in Cisco EPN Manager 2.x: Complete Workflow
In Cisco EPN Manager 2.x, the Linux CLI has two shell users: One with administrative access (Linux CLI admin user), and another with root access (Linux CLI root user). The following diagram illustrates the flow for logging in and out as the various CLI users.

To log in as the Linux CLI root user, you will have to transition from being the Cisco EPN Manager CLI admin user to the Linux CLI admin user to the Linux CLI root user. The following procedure gives you the exact steps you must follow to log in as these users. For more information on these users, refer to the Cisco Evolved Programmable Network Manager User and Administrator Guide.
If the Linux CLI user is disabled, re-enable it. Refer to the user management procedures in the Cisco Evolved Programmable Network Manager User and Administrator Guide.
Step 1![]() To log in as the Linux CLI root user:
To log in as the Linux CLI root user:
a.![]() Start an SSH session with the Cisco EPN Manager server and log in as the Cisco EPN Manager CLI admin user.
Start an SSH session with the Cisco EPN Manager server and log in as the Cisco EPN Manager CLI admin user.
b.![]() As the Cisco EPN Manager CLI admin user, log in as the Linux CLI admin user:
As the Cisco EPN Manager CLI admin user, log in as the Linux CLI admin user:
shell
Enter shell access password: password
c.![]() Log in as the Linux CLI root user:
Log in as the Linux CLI root user:
By default, the Linux CLI shell prompt is the same for the Linux CLI admin and root user. You can use the whomai command to check the current user.
a.![]() Log out as the Linux CLI root user.
Log out as the Linux CLI root user.
You are now logged in as the Linux CLI admin user.
b.![]() Log out as the Linux CLI admin user:
Log out as the Linux CLI admin user:
You are now logged in as the Cisco EPN Manager CLI admin user.
For security purposes, disable the Linux CLI users. Refer to the user management procedures in the Cisco Evolved Programmable Network Manager User and Administrator Guide.
How to Log In and Out as the Linux CLI User in Cisco EPN Manager 1.2.x: Complete Workflow
In Cisco EPN Manager 1.2. x, the Linux CLI has one shell user that has root access (Linux CLI root user). The following diagram illustrates the flow for logging in and out as the various CLI users.

To log in as the Linux CLI root user, you will have to transition from being the Cisco EPN Manager CLI admin user to the Linux CLI root user. The following procedure gives you the exact steps you must follow. For more information on these users, refer to the Cisco Evolved Programmable Network Manager User and Administrator Guide.
If the Linux CLI user is disabled, re-enable it. Refer to the user management procedures in the Cisco Evolved Programmable Network Manager User and Administrator Guide.
Step 1![]() To log in as the Linux CLI root user:
To log in as the Linux CLI root user:
a.![]() Start an SSH session with the Cisco EPN Manager server and log in as the Cisco EPN Manager CLI admin user.
Start an SSH session with the Cisco EPN Manager server and log in as the Cisco EPN Manager CLI admin user.
b.![]() As the Cisco EPN Manager CLI admin user, log in as the Linux CLI root user:
As the Cisco EPN Manager CLI admin user, log in as the Linux CLI root user:
root
Enter shell access password: password
Step 2![]() To exit, log out as the Linux CLI root user:
To exit, log out as the Linux CLI root user:
You are now logged in as the Cisco EPN Manager CLI admin user.
For security purposes, disable the Linux CLI root user. Refer to the user management procedures in the Cisco Evolved Programmable Network Manager User and Administrator Guide.
System Requirements
- Hardware and Software Requirements
- Web Client Requirements
- Scale Requirements (Professional Installation Option)
- Ports Used by Cisco EPN Manager
Operating System Requirements
The following table summarizes the operating system requirements for Cisco EPN Manager.
|
Oracle Database Version
1
|
||
|---|---|---|
Oracle Database 11g Enterprise Edition Release 11.2.0.4.0 (64-bit production) |
||
Oracle Database 12c Enterprise Edition Release 12.1.0.2 (64-bit production) |
OVA/VM Requirements
The following table summarizes the OVA/VM system requirements for the Standard and Professional system size options. (Although Express and Express Plus system size options are also available, they should only be used for demo and lab purposes.)
Note![]() Due to the increase in services that are supported by Cisco EPN Manager, we recommend that you use the Professional system size option for both OVA/VM and ISO/bare metal installations.
Due to the increase in services that are supported by Cisco EPN Manager, we recommend that you use the Professional system size option for both OVA/VM and ISO/bare metal installations.
VMware ESXi version2 |
|||
Bare Metal Requirements
The following table summarizes the OVA/VM system requirements for the Standard and Professional system size options. (Although Express and Express Plus system size options are also available, they should only be used for demo and lab purposes.)
Note![]() Due to the increase in services that are supported by Cisco EPN Manager, we recommend that you use the Professional system size option for both OVA/VM and ISO/bare metal installations.
Due to the increase in services that are supported by Cisco EPN Manager, we recommend that you use the Professional system size option for both OVA/VM and ISO/bare metal installations.
For bare metal installations, Cisco EPN Manager can only be installed on the Cisco UCS server (Gen 2) as a rack-mounted server with the following requirements.
Bare Metal Requirements for Standard Deployments (No High Availability)
These requirements are for a standard deployment (no high availability).
Bare Metal Requirements for Remote High Availability Deployments
These requirements are for a remote high availability deployment. A remote deployment is one in which both servers are located on different subnets connected by a WAN. This is typical for deployments when the servers are geographically dispersed. For more information on high availability deployments, see High Availability.
Web Client Requirements
Cisco EPN Manager users access the product using a web browser client. The following lists the client and browser requirements.
Scale Requirements (Professional Installation Option)
The following table summarizes the maximum level of support for a system size deployment in both OVA/VM and ISO/bare metal installations.
Note![]() Support for WiFi access points and WiFi controllers has been deprecated. For more information about deprecated support for device families, refer to the release notes for the Cisco EPN Manager 2.0 maintenance packs.
Support for WiFi access points and WiFi controllers has been deprecated. For more information about deprecated support for device families, refer to the release notes for the Cisco EPN Manager 2.0 maintenance packs.
These scale numbers are for a Cisco EPN Manager Professional deployment that uses the default system settings.
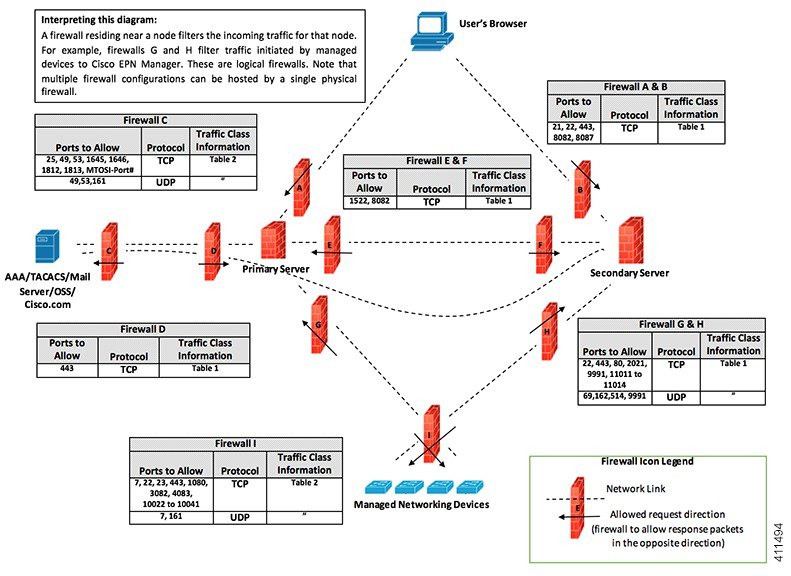
Ports Used by Cisco EPN Manager
Note![]() The installation process uses the server's eth0 and eth1 Ethernet ports. If you use a different port, the system might not work properly.
The installation process uses the server's eth0 and eth1 Ethernet ports. If you use a different port, the system might not work properly.
The following table lists the ports that Cisco EPN Manager uses to listen for connection requests from devices. For security hardening, this table also specifies whether it is safe to disable the port without any adverse effects to the product.
As a general policy, any ports that are not needed and are not secure should be disabled. You need to first know which ports are enabled, and then decide which of these ports can be safely disabled without disrupting the normal functioning of Cisco EPN Manager. You can do this by listing the ports that are open and comparing it with a list of ports that are safe to disable. The built-in firewall in Cisco EPN Manager does not expose some of the listening ports. To view a list of the ports used in your deployment, log in as a Cisco EPN Manager CLI admin user and run the show security-status command. To view a list of all open listening ports, including those that are blocked by the built-in firewall, log in as the Linux CLI admin user and run the netstat -aln command.
In addition to the built-in firewall, you can also deploy additional network firewalls to block other unused ports and their traffic.
The following table lists the destination ports on external devices that may be protected by a firewall. These ports are used by Cisco EPN Manager to connect to network devices. You must open the required ports to allow Cisco EPN Manager to connect to these devices.
Upload or download images and perform configuration backup-restore for Cisco NCS 2000 devices using HTTPS. |
||
Communicate between primary and secondary HA servers (allows Oracle JDBC traffic for Oracle database synchronization between primary and secondary servers). |
||
Communicate with Cisco Optical Networking System (ONS) and Cisco NCS 2000 series devices using Socket Secure (SOCKS) protocol. |
||
Communicate with Cisco ONS and Cisco NCS 2000 devices using TL1 protocol. |
||
Communicate with Cisco ONS and Cisco NCS 2000 series devices using TL1 protocol. |
||
Communicate between primary and secondary HA servers to monitor each other's health using HTTPS. |
||
Passive FTP file transfers (for example, device configurations and report retrievals). |
||
Listen at NBI client connected to the Cisco EPN Manager server (after this port is configured by NBI client system, a registration notification message containing the port number is sent to Cisco EPN Manager server); refer to the Cisco Evolved Programmable Network Manager MTOSI API Guide for OSS Integration for more information. |
The following figure illustrates the ports information listed in the previous tables. Use this illustration to decide on the appropriate firewall configuration (allowing correct incoming traffic) for your network infrastructure. To identify the class of traffic, refer to the Usage column in Table 1 . We recommend that you disable the ports that are used by services that are not supported in Cisco EPN Manager.
Prepare for Installation
- Licensing
- Prerequisites for OVA/VM Installations
- Prerequisites for ISO/Bare Metal Installations
- Verify the ISO Image or OVA Package
Licensing
Make sure you have the necessary licenses for your installation. Licenses determine the features you can use (such as the NBI or High Availability) and the type and number of devices that Cisco EPN Manager can manage. To purchase new licenses, go to the Product License Registration page. To install a new license, the original license must reside on the server. Do not create copies of licenses.
For more information on the types of licenses available for Cisco EPN Manager, see the information on viewing and managing licenses in the Cisco Evolved Programmable Network Manager User and Administrator Guide.
Prerequisites for OVA/VM Installations
Before installing Cisco EPN Manager on a virtual machine, ensure that:
- Your deployment meets the general hardware and software requirements listed in System Requirements.
- VMware ESX/ESXi is installed and configured on the machine you plan to use as the Cisco EPN Manager server. See the VMware documentation for information on setting up and configuring a VMware host.
- The installed VMware ESX/ESXi host is reachable.
- The VMware vSphere client is installed on a Windows host (or laptop). See the VMware documentation for information on how to install the VMware vSphere client. After the virtual host is available on the network, you can browse to its IP address to display a web-based interface from which you can install the VMware vSphere client. The VMware vSphere client is Windows-based, so you must download and install the client using a Windows PC.
- The Cisco EPN Manager OVA is saved to the same machine where your VMware vSphere client is installed.
- The downloaded OVA package has been verified as described in Verify the ISO Image or OVA Package.
Prerequisites for ISO/Bare Metal Installations
Before installing Cisco EPN Manager using an ISO image, ensure that:
- Your deployment meets the general hardware and software requirements listed in System Requirements.
- The following software is installed:
–![]() Java with JRE Version 1.6.0.14
Java with JRE Version 1.6.0.14
–![]() Flash Driver v9.0.246 or higher
Flash Driver v9.0.246 or higher
- The downloaded ISO image has been verified as described in Verify the ISO Image or OVA Package.
Verify the ISO Image or OVA Package
Before installing Cisco EPN Manager, you need to verify the ISO image or OVA package. You do not need to verify the individual UBF files that are bundled inside the ISO image or OVA package.
Step 1![]() If you do not have openssl installed, download and install it (see http://www.openssl.org).
If you do not have openssl installed, download and install it (see http://www.openssl.org).
Step 2![]() Download the following files from the Software Download site on Cisco.com, and place them in a temporary directory.
Download the following files from the Software Download site on Cisco.com, and place them in a temporary directory.
(The same certificate file (*.pem) is used to validate OVA and ISO files.)
Step 3![]() Move to the temporary directory and run the following command. You must run this command as the Linux CLI root user. (See How to Log In and Out as the Linux CLI User in Cisco EPN Manager 1.2.x: Complete Workflow. Be sure to use the procedures for Cisco EPN Manager 1.2. x.)
Move to the temporary directory and run the following command. You must run this command as the Linux CLI root user. (See How to Log In and Out as the Linux CLI User in Cisco EPN Manager 1.2.x: Complete Workflow. Be sure to use the procedures for Cisco EPN Manager 1.2. x.)
o penssl dgst -sha512 -verify cert-file -signature sig-file product-file
Step 4![]() If the result is Verified OK :
If the result is Verified OK :
- For an OVA package, proceed to Step 5.
- For an ISO file, go to Install Cisco EPN Manager 2.0.
Note![]() (ISO/bare metal automatic upgrades) If you are using this procedure to validate the patching_upgrade.pl script, return to Step 7 of Perform an Automatic Upgrade (High Availability) and run the script.
(ISO/bare metal automatic upgrades) If you are using this procedure to validate the patching_upgrade.pl script, return to Step 7 of Perform an Automatic Upgrade (High Availability) and run the script.
Step 5![]() (OVA packages only) Verify the publisher and certificate chain using the VMware vSphere client.
(OVA packages only) Verify the publisher and certificate chain using the VMware vSphere client.
a.![]() Verify that Cisco Systems is the publisher:
Verify that Cisco Systems is the publisher:
–![]() In the VMware vSphere client, choose F ile > Deploy OVF Template.
In the VMware vSphere client, choose F ile > Deploy OVF Template.
–![]() Browse to the OVA installation file (*.ova) and select it, then click Next.
Browse to the OVA installation file (*.ova) and select it, then click Next.
–![]() Check whether the Publisher field in the OVF Template Details window displays Cisco Systems, Inc with a green check mark next to it.
Check whether the Publisher field in the OVF Template Details window displays Cisco Systems, Inc with a green check mark next to it.
Note![]() Do not validate the image using the information in the Vendor field. This field does not authenticate Cisco Systems as the publisher.
Do not validate the image using the information in the Vendor field. This field does not authenticate Cisco Systems as the publisher.
Note![]() Do not proceed if the Publisher field displays No certificate present. This indicates that the image is not signed or the file is not from Cisco Systems or the file has been tampered with. Contact your Cisco representative.
Do not proceed if the Publisher field displays No certificate present. This indicates that the image is not signed or the file is not from Cisco Systems or the file has been tampered with. Contact your Cisco representative.
b.![]() Check the certificate chain:
Check the certificate chain:
–![]() In the OVF Template Details window, click the Cisco Systems, Inc. hyperlink in the Publisher field.
In the OVF Template Details window, click the Cisco Systems, Inc. hyperlink in the Publisher field.
–![]() In the Certificate window, click the Certification Path tab.
In the Certificate window, click the Certification Path tab.
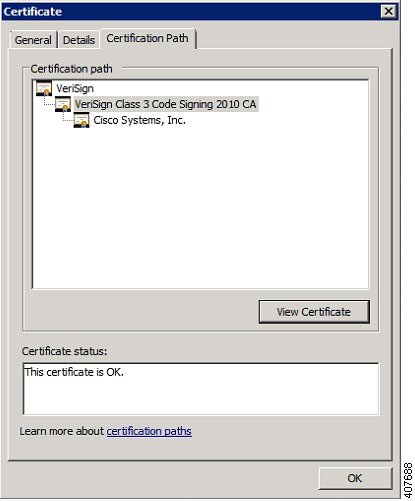
–![]() In the Certification Path tab (which lists the certificate chain), ensure that the Certification Path area displays Cisco Systems, Inc. and the Certificate Status displays The certificate is OK, as shown in the following figure.
In the Certification Path tab (which lists the certificate chain), ensure that the Certification Path area displays Cisco Systems, Inc. and the Certificate Status displays The certificate is OK, as shown in the following figure.
Install Cisco EPN Manager 2.0 as described in Install Cisco EPN Manager 2.0.
Note![]() (OVA/VM automatic upgrades) If you are using this procedure to validate the patching_upgrade.pl script, return to Step 7 of Perform an Automatic Upgrade (High Availability) and run the script.
(OVA/VM automatic upgrades) If you are using this procedure to validate the patching_upgrade.pl script, return to Step 7 of Perform an Automatic Upgrade (High Availability) and run the script.
Install Cisco EPN Manager 2.0
Overview of the OVA/VM Installation Process
1.![]() Makes sure your deployment meets the requirements in System Requirements.
Makes sure your deployment meets the requirements in System Requirements.
2.![]() Make sure your deployment meets the prerequisites in Prerequisites for OVA/VM Installations. This includes verifying the OVA package.
Make sure your deployment meets the prerequisites in Prerequisites for OVA/VM Installations. This includes verifying the OVA package.
3.![]() Deploy the OVA from the VMware vSphere Client.
Deploy the OVA from the VMware vSphere Client.
Deploy the OVA from the VMware vSphere Client
Step 1![]() Launch the VMware vSphere client.
Launch the VMware vSphere client.
Step 2![]() Choose File > Deploy OVF Template.
Choose File > Deploy OVF Template.
Step 3![]() In the Deploy OVF Template window, click Browse.
In the Deploy OVF Template window, click Browse.
Step 4![]() Navigate to the OVA file, select it, then click Next.
Navigate to the OVA file, select it, then click Next.
Step 5![]() Accept the End User License Agreement, and in the OVF Template Details window, and verify the OVA file details including the product name, version, and size. Then click Accept.
Accept the End User License Agreement, and in the OVF Template Details window, and verify the OVA file details including the product name, version, and size. Then click Accept.
Step 6![]() In the Name and Location window:
In the Name and Location window:
a.![]() Specify a name and location for the template that you are deploying. The name must be unique within the inventory folder, and can contain up to 80 characters.
Specify a name and location for the template that you are deploying. The name must be unique within the inventory folder, and can contain up to 80 characters.
b.![]() Select the configuration type as Standard or Professional based on your network size (see System Requirements).
Select the configuration type as Standard or Professional based on your network size (see System Requirements).
Step 7![]() Select the cluster or host on which to install the OVA, then click Next.
Select the cluster or host on which to install the OVA, then click Next.
Step 8![]() Select the destination storage for the OVA to be deployed, then click Next.
Select the destination storage for the OVA to be deployed, then click Next.
Step 9![]() Select the disk format as Thick Provision Lazy Zeroed or Thick Provision Eager Zeroed, then click Next.
Select the disk format as Thick Provision Lazy Zeroed or Thick Provision Eager Zeroed, then click Next.
Note![]() Cisco recommends you to select Thick Provision Eager Zeroed disk format. (There is also a Thin Provision choice, but it should only be used for lab or demo installations.)
Cisco recommends you to select Thick Provision Eager Zeroed disk format. (There is also a Thin Provision choice, but it should only be used for lab or demo installations.)
Step 10![]() Select the network mapping based on the configured IP address, then click Next.
Select the network mapping based on the configured IP address, then click Next.
Step 11![]() In the Ready to Complete window:
In the Ready to Complete window:
b.![]() (Optional) If you want the virtual machine to automatically start after the OVA deployment finished, check the Power on after deployment check box.
(Optional) If you want the virtual machine to automatically start after the OVA deployment finished, check the Power on after deployment check box.
This process might take a few minutes to complete. Check the progress bar in the Deploying Virtual Application window to monitor the task status. When the deployment task has successfully completed, a confirmation window appears.
Step 12![]() Click Close. The virtual appliance that you deployed is listed under the host, in the left pane of the VMware vSphere client.
Click Close. The virtual appliance that you deployed is listed under the host, in the left pane of the VMware vSphere client.
Proceed to Install Cisco EPN Manager on the Server.
Install Cisco EPN Manager on the Server
Step 1![]() If you did not specify that the virtual appliance should automatically start after deployment (in the previous procedure), manually start the VM. In the VMware vSphere client, right-click the deployed virtual appliance, then choose Power > Power On.
If you did not specify that the virtual appliance should automatically start after deployment (in the previous procedure), manually start the VM. In the VMware vSphere client, right-click the deployed virtual appliance, then choose Power > Power On.
Step 2![]() Click the Console tab, and at the localhost login prompt, enter setup.
Click the Console tab, and at the localhost login prompt, enter setup.
Step 3![]() Enter the following parameters as you are prompted for them:
Enter the following parameters as you are prompted for them:
IP address of the primary DNS server. The console will prompt you to add a secondary nameserver. Enter: |
|
IP address of the secondary DNS server you want to use if the primary server cannot be reached. |
|
IP address or host name of the primary Network Time Protocol server you want to use (the default is time.nist.gov). The console will prompt you to add a secondary NTP server. Enter: |
|
IP address of the secondary NTP server you want to use if the primary NTP server cannot be reached. |
|
The time zone you want to use. For a list of supported time zones, see the time zone reference in the Cisco Evolved Programmable Manager User and Administrator Guide. |
|
The clock time (based on the selected System Time Zone). The console will prompt you to change the system clock time. Enter: |
|
The name of the first administrative user (admin by default). This is the Cisco EPN Manager CLI admin user that logs into the Cisco EPN Manager server using SSH. |
|
The password for the first administrative user. The password must be at least 8 characters long, and contain at least one number and one upper-case letter. |
When you have entered the necessary values, the installer application tests the network configuration parameters you entered. If the tests are successful, it begins installing Cisco EPN Manager.
Step 4![]() When the application installation is complete, you will be prompted to choose whether you want the newly-installed server to act as a secondary server in an HA implementation.
When the application installation is complete, you will be prompted to choose whether you want the newly-installed server to act as a secondary server in an HA implementation.
- Enter yes if you are using HA and you want this server to be the secondary server. Do not continue with the next step; go to Install Cisco EPN Manager in a High Availability Deployment (Fresh Installation).
- Enter no if:
–![]() You are using HA but you want this server to be the primary server.
You are using HA but you want this server to be the primary server.
Note![]() Note: If any of the services do not start (such as the Health Monitor), right-click the virtual appliance and choose Power > Restart Guest.
Note: If any of the services do not start (such as the Health Monitor), right-click the virtual appliance and choose Power > Restart Guest.
Step 5![]() Enter the password for the Cisco EPN Manager web GUI root user (you will have to enter it twice). You will use this password to log into the web GUI for the first time and create other user accounts. (This account should be disabled after you create a new user account with the same level of privileges.)
Enter the password for the Cisco EPN Manager web GUI root user (you will have to enter it twice). You will use this password to log into the web GUI for the first time and create other user accounts. (This account should be disabled after you create a new user account with the same level of privileges.)
Step 6![]() Review your settings and:
Review your settings and:
Step 7![]() (ISO/Bare Metal deployments) When the installation is complete:
(ISO/Bare Metal deployments) When the installation is complete:
a.![]() After the server reboots and you are presented with a login prompt, log in using the Cisco EPN Manager CLI admin username and password you configured in Step 3.
After the server reboots and you are presented with a login prompt, log in using the Cisco EPN Manager CLI admin username and password you configured in Step 3.
b.![]() Synchronize the hardware and NTP clocks as described in Synchronize the Hardware and NTP Clocks.
Synchronize the hardware and NTP clocks as described in Synchronize the Hardware and NTP Clocks.
Note![]() Although this section is directed at OVA/VM installations, it includes information used when installing the product using an ISO/bare metal image.
Although this section is directed at OVA/VM installations, it includes information used when installing the product using an ISO/bare metal image.
Step 8![]() (OVA/VM deployments) When the installation is complete, the virtual machine reboots and you are presented with a login prompt. Log in to the virtual appliance using the Cisco EPN Manager CLI admin username and password you configured in Step 3.
(OVA/VM deployments) When the installation is complete, the virtual machine reboots and you are presented with a login prompt. Log in to the virtual appliance using the Cisco EPN Manager CLI admin username and password you configured in Step 3.
Proceed to Synchronize the Hardware and NTP Clocks.
Note![]() If you are using this procedure to install Cisco EPN Manager on a secondary server as part of an automatic HA upgrade, return to Step 15 in Perform an Automatic Upgrade (High Availability) to continue the HA installation. This applies to both OVA/VM and ISO/bare metal automatic HA upgrades.
If you are using this procedure to install Cisco EPN Manager on a secondary server as part of an automatic HA upgrade, return to Step 15 in Perform an Automatic Upgrade (High Availability) to continue the HA installation. This applies to both OVA/VM and ISO/bare metal automatic HA upgrades.
Synchronize the Hardware and NTP Clocks
This procedure synchronizes the hardware clock with the NTP clock using the hwclock command.
Step 1![]() Log in as the Linux CLI root user as described in How to Log In and Out as the Linux CLI User in Cisco EPN Manager 2.x: Complete Workflow. Be sure to use the procedures for Cisco EPN Manager 2.0.
Log in as the Linux CLI root user as described in How to Log In and Out as the Linux CLI User in Cisco EPN Manager 2.x: Complete Workflow. Be sure to use the procedures for Cisco EPN Manager 2.0.
Step 2![]() Check the NTP service status and ensure that NTP has obtained a stable time reference using the following commands. You should see output similar to the examples below.
Check the NTP service status and ensure that NTP has obtained a stable time reference using the following commands. You should see output similar to the examples below.
a.![]() Ensure that ntpd is running.
Ensure that ntpd is running.
service ntpd status
ntpd (pid 3290) is running...
If ntpd (pid 3290) is not running, start it using the following command (and then verify is running using the previous command):
b.![]() Ensure that NTP is receiving time from an NTP server:
Ensure that NTP is receiving time from an NTP server:
tpstat
 synchronised to NTP server (10.116.133.175) at stratum 3
 time correct to within 62 ms
 polling server every 1024 s
If you do not see output similar to this, then NTP synchronization has not yet occurred. Wait a few minutes and run ntpstat again. If synchronization does not happen within 10 minutes, contact your system administrator or Cisco support.
Step 3![]() Synchronize the hardware clock with NTP.
Synchronize the hardware clock with NTP.
You should see output similar to the following:
 hwclock from util-linux-ng 2.17.2
 Using /dev interface to clock.
 Last drift adjustment done at 1470117750 seconds after 1969
 Last calibration done at 1470117750 seconds after 1969
 Hardware clock is on local time
 Assuming hardware clock is kept in local time.
 Waiting for clock tick...
...got clock tick
 Time read from Hardware Clock: 2016/08/02 16:03:30
 Hw clock time : 2016/08/02 16:03:30 = 1470117810 seconds since 1969
 1470117810.500000 is close enough to 1470117810.500000 (0.000000 < 0.001000)
 Set RTC to 1470117810 (1470117810 + 0; refsystime = 1470117810.000000)
 Setting Hardware Clock to 16:03:30 = 1470117810 seconds since 1969
 ioctl(RTC_SET_TIME) was successful.
 Not adjusting drift factor because it has been less than a day since the last calibration.
Step 4![]() Verify that the hardware clock is synchronized with NTP.
Verify that the hardware clock is synchronized with NTP.
echo "hwclock is: $(hwclock --show)" ; echo "linux clock is: $(date)";
Step 5![]() Check the output and ensure that the two clocks are synchronized (to at least within a few seconds of each other):
Check the output and ensure that the two clocks are synchronized (to at least within a few seconds of each other):
 Hwclock is: Tue 26 Jul 2016 06:11:40 PM AEST -0.391028 seconds
 linux clock is: Tue Jul 26 18:11:40 AEST 2016
Step 6![]() Log out as the Linux CLI users and restart Cisco EPN Manager services.
Log out as the Linux CLI users and restart Cisco EPN Manager services.
Log in to the Cisco EPN Manager web GUI as described in Get Started with Cisco EPN Manager.
Overview of the ISO/Bare Metal Installation Process
1.![]() Makes sure your deployment meets the requirements in System Requirements.
Makes sure your deployment meets the requirements in System Requirements.
2.![]() Make sure your deployment meets the prerequisites in Prerequisites for ISO/Bare Metal Installations. This includes verifying the ISO/bare metal image.
Make sure your deployment meets the prerequisites in Prerequisites for ISO/Bare Metal Installations. This includes verifying the ISO/bare metal image.
3.![]() Configure the Cisco IMC Server.
Configure the Cisco IMC Server.
4.![]() Configure the Bare Metal Cisco UCS Server.
Configure the Bare Metal Cisco UCS Server.
Configure the Cisco IMC Server
Cisco Integrated Management Controller (Cisco IMC) is the server management application that you can use to remotely access, configure, administer, and monitor the Cisco EPN Manager server.
Step 1![]() To access the console, attach a keyboard and monitor to the USB ports on the rear panel of the appliance or by using a KVM cable and connector.
To access the console, attach a keyboard and monitor to the USB ports on the rear panel of the appliance or by using a KVM cable and connector.
Step 2![]() Power on the Cisco UCS server.
Power on the Cisco UCS server.
Step 3![]() Press F8 to enter the Cisco IMC configuration utility. You will need to press the function keys (F8, F6 and F2) more than once until the system responds. If you do not press F8 quickly enough and enter the EFI shell, press Ctrl-Alt-Del to reboot the system and press F8 again.
Press F8 to enter the Cisco IMC configuration utility. You will need to press the function keys (F8, F6 and F2) more than once until the system responds. If you do not press F8 quickly enough and enter the EFI shell, press Ctrl-Alt-Del to reboot the system and press F8 again.
Step 4![]() In the Cisco IMC Configuration Utility window, from the IPV4 (Basic) area, enter the following:
In the Cisco IMC Configuration Utility window, from the IPV4 (Basic) area, enter the following:
- DHCP Enabled—Select this option to enable DHCP for dynamic network settings. Before you enable DHCP, your DHCP server must be preconfigured with the range of MAC addresses for this server.
- Cisco IMC IP—Enter the IP address of Cisco IMC.
- Subnetmask—Enter the subnet mask to append to the Cisco IMC IP address. It must be in the same subnet as the host router.
- Gateway—Enter the IP address of the default gateway router.
Step 5![]() Press F5 to refresh the page and display the new settings.
Press F5 to refresh the page and display the new settings.
Step 6![]() (Optional) In the VLAN (Advanced) area, configure VLAN settings.
(Optional) In the VLAN (Advanced) area, configure VLAN settings.
Step 7![]() Enter the Cisco IMC password. If you leave the Username and Password fields blank, the system uses the following default login credentials:
Enter the Cisco IMC password. If you leave the Username and Password fields blank, the system uses the following default login credentials:
Step 8![]() When a prompt is returned, press F10 to save the configuration.
When a prompt is returned, press F10 to save the configuration.
Step 9![]() Update the following fields as specified:
Update the following fields as specified:
Step 10![]() Press F1 to view the additional settings.
Press F1 to view the additional settings.
Step 11![]() In the Additional Settings window, update the following fields:
In the Additional Settings window, update the following fields:
Step 12![]() Press F10 to save the settings.
Press F10 to save the settings.
Step 13![]() Open a browser and enter the following URL:
Open a browser and enter the following URL:
Where Cisco IMC_IP_address is the Cisco IMC IP address that you entered in Step 9.
Step 14![]() Log in to the Cisco IMC using the credentials that you entered Step 7.
Log in to the Cisco IMC using the credentials that you entered Step 7.
Proceed to Configure the Bare Metal Cisco UCS Server.
Configure the Bare Metal Cisco UCS Server
Step 1![]() From the left sidebar of the Cisco IMC web interface, click the Storage tab, and then click the Cisco 12G SAS Modular Raid Controller (SLOT-HBA) link.
From the left sidebar of the Cisco IMC web interface, click the Storage tab, and then click the Cisco 12G SAS Modular Raid Controller (SLOT-HBA) link.
Step 2![]() In the Cisco 12G SAS Modular Raid Controller (SLOT-HBA) pane, click the Controller Info tab.
In the Cisco 12G SAS Modular Raid Controller (SLOT-HBA) pane, click the Controller Info tab.
Step 3![]() In the Actions area, click Create Virtual Drive from the Unused Physical Drives link.
In the Actions area, click Create Virtual Drive from the Unused Physical Drives link.
Step 4![]() In the Create Virtual Drive from Unused Physical Drives window, choose 10 from the RAID Level drop-down list.
In the Create Virtual Drive from Unused Physical Drives window, choose 10 from the RAID Level drop-down list.
Step 5![]() In the Create Drive Groups area, select the physical drives listed under the Physical Drives area, then add them to the Drive Groups.
In the Create Drive Groups area, select the physical drives listed under the Physical Drives area, then add them to the Drive Groups.
Step 6![]() In the Virtual Drive Properties area, choose Write Back Good BBU from the Write Policy drop-down list.
In the Virtual Drive Properties area, choose Write Back Good BBU from the Write Policy drop-down list.
Step 7![]() Complete the required fields, then click Create Virtual Drive.
Complete the required fields, then click Create Virtual Drive.
Step 8![]() Click the Virtual Drive Info tab.
Click the Virtual Drive Info tab.
Step 9![]() Click Initialize. A popup window is displayed.
Click Initialize. A popup window is displayed.
Step 11![]() Follow the steps below to enable Auto-Negotiation to speed up the installation:
Follow the steps below to enable Auto-Negotiation to speed up the installation:
a.![]() From the left sidebar, click the Admin tab.
From the left sidebar, click the Admin tab.
c.![]() In the Network pane, click the Network Settings tab.
In the Network pane, click the Network Settings tab.
d.![]() In the Port Properties area, check the Auto Negotiation check box.
In the Port Properties area, check the Auto Negotiation check box.
Step 12![]() From the left sidebar, click the Admin tab.
From the left sidebar, click the Admin tab.
Step 13![]() In the Utilities pane, click the Actions area, then click Reboot Cisco IMC.
In the Utilities pane, click the Actions area, then click Reboot Cisco IMC.
Step 15![]() When prompted, press F2 to access the BIOS setup menu. The Aptio Setup Utility window appears, which provides the BIOS setup menu options.
When prompted, press F2 to access the BIOS setup menu. The Aptio Setup Utility window appears, which provides the BIOS setup menu options.
Step 16![]() In the Aptio Setup Utility window, click the Boot Options tab.
In the Aptio Setup Utility window, click the Boot Options tab.
Step 17![]() Enable UEFI Boot options, and then choose Bus PCI RAID Adapter for Boot Option #1.
Enable UEFI Boot options, and then choose Bus PCI RAID Adapter for Boot Option #1.
Step 18![]() Press F10 to save and exit.
Press F10 to save and exit.
The system is now prepared to boot from RAID. (For the first boot, however, you must do it from a remote virtual CD/DVD which is be mapped to the ISO image. That process is described in Install Cisco EPN Manager from an ISO Image.)
Proceed to Install Cisco EPN Manager from an ISO Image.
Install Cisco EPN Manager from an ISO Image
Step 1![]() Power up the Cisco UCS Server.
Power up the Cisco UCS Server.
Step 2![]() Log in to Cisco IMC Server using the credentials you entered in Step 7 in Configure the Cisco IMC Server.
Log in to Cisco IMC Server using the credentials you entered in Step 7 in Configure the Cisco IMC Server.
Step 3![]() Choose Server > Summary, then click Launch KVM Console to open the console (in a separate window).
Choose Server > Summary, then click Launch KVM Console to open the console (in a separate window).
Step 4![]() In the KVM Console window, choose Virtual Media > Activate Virtual Devices. A popup window is displayed.
In the KVM Console window, choose Virtual Media > Activate Virtual Devices. A popup window is displayed.
Step 5![]() Click the Accept this Session radio button, then click Apply.
Click the Accept this Session radio button, then click Apply.
Step 6![]() In the KVM Console window, choose Virtual Media > Map CD/DVD.
In the KVM Console window, choose Virtual Media > Map CD/DVD.
Step 7![]() In the Virtual Media - Map CD/DVD window, select the ISO file, then click Map Device.
In the Virtual Media - Map CD/DVD window, select the ISO file, then click Map Device.
Step 8![]() In the KVM Console window, choose Virtual Media and verify that the ISO filename.iso Mapped to CD/DVD option is displayed.
In the KVM Console window, choose Virtual Media and verify that the ISO filename.iso Mapped to CD/DVD option is displayed.
Step 9![]() Reboot the server by choosing Power > Reset System (warm boot).
Reboot the server by choosing Power > Reset System (warm boot).
Step 10![]() Enter the boot menu by pressing F6.
Enter the boot menu by pressing F6.
Step 11![]() From the boot device selection window, select Cisco vKVM-Mapped vDVD1.22, then press Enter.
From the boot device selection window, select Cisco vKVM-Mapped vDVD1.22, then press Enter.
Step 12![]() For the boot option, enter 1 for Keyboard/Monitor or 2 for Serial Console, then press Enter. The Cisco EPN Manager installer extracts the content.
For the boot option, enter 1 for Keyboard/Monitor or 2 for Serial Console, then press Enter. The Cisco EPN Manager installer extracts the content.
Step 13![]() After the extraction is complete, at the localhost login prompt, enter setup.
After the extraction is complete, at the localhost login prompt, enter setup.
Step 14![]() Go to Step 3 in Install Cisco EPN Manager on the Server to complete the installation.
Go to Step 3 in Install Cisco EPN Manager on the Server to complete the installation.
Upgrade from an Earlier Version of Cisco EPN Manager
These topics explain how to upgrade to Cisco EPN Manager 2.0 from an earlier version of Cisco EPN Manager.
If you are performing an upgrade in a high availability deployment, see Upgrade from an Earlier Version in a High Availability Deployment.
Prerequisites for Upgrades
Check the following information before you begin the upgrade.
- Verify that your version of Cisco EPN Manager is supported for upgrade. See Upgrade Options.
- Make sure your deployment meets the requirements in the relevant prerequisites topic:
–![]() Prerequisites for OVA/VM Installations. For OVA/VM deployments, the upgrade is run from the vmWare vSphere client.
Prerequisites for OVA/VM Installations. For OVA/VM deployments, the upgrade is run from the vmWare vSphere client.
–![]() Prerequisites for ISO/Bare Metal Installations. For ISO/bare metal deployments, the upgrade is run from Cisco IMC.
Prerequisites for ISO/Bare Metal Installations. For ISO/bare metal deployments, the upgrade is run from Cisco IMC.
- Back up your data. Refer to the backup topics in the Cisco Evolved Programmable Network Manager User and Administrator Guide.
- Make sure SCP is enabled on your client machine, and the required ports are open (see Ports Used by Cisco EPN Manager). You will need to use SCP to copy files from your client machine to the Cisco EPN Manager server.
Automatic Upgrade
These are the basic steps of the automatic upgrade procedure:
1.![]() Download the upgrade image and the patching upgrade script (and validation files) from Cisco.com to your client machine.
Download the upgrade image and the patching upgrade script (and validation files) from Cisco.com to your client machine.
2.![]() Copy the files from your client machine to the Cisco EPN Manager server.
Copy the files from your client machine to the Cisco EPN Manager server.
3.![]() Validate the patching_upgrade.pl script, then run the script. (The script ensures that optical devices are discovered correctly.)
Validate the patching_upgrade.pl script, then run the script. (The script ensures that optical devices are discovered correctly.)
5.![]() Perform the post-upgrade licensing, authentication, and web GUI tasks described in Post-Upgrade Tasks.
Perform the post-upgrade licensing, authentication, and web GUI tasks described in Post-Upgrade Tasks.
Make sure you have completed the tasks in Prerequisites for Upgrades.
Step 1![]() From the Software Download site on Cisco.com, locate and download the following files to your client machine.
From the Software Download site on Cisco.com, locate and download the following files to your client machine.
- CEPNM upgrade image—Contains the upgrade image. The file will have the prefix CEPNM-upgrade and the suffix .tar.gz. The numbers in the filename may not align to the current Cisco EPN Manager version, so be sure to check the file description.
- Patching Upgrade zip file—Contains the patching_upgrade.pl script, which ensures that optical devices are discovered correctly. You will run this script before performing the upgrade.
- Patching Upgrade signature file—Contains the patching_upgrade.pl.signature file, which you will use to validate the patching_upgrade.pl script.
- Cisco EPNM 2.0 pem file—Contains the CiscoEPNM 2.0.pem file, which you will use to validate the patching_upgrade.pl script.
Step 2![]() After the download completes, compare the upgrade image’s size on the Software Download site with its size on your client machine. On the Software Download site, hover your mouse cursor over the upgrade image to view its MD5 Checksum size in a popup window, then compare it against the size on your client machine.
After the download completes, compare the upgrade image’s size on the Software Download site with its size on your client machine. On the Software Download site, hover your mouse cursor over the upgrade image to view its MD5 Checksum size in a popup window, then compare it against the size on your client machine.
Step 3![]() Make sure the /localdisk/defaultRepo directory has enough space to copy the files.
Make sure the /localdisk/defaultRepo directory has enough space to copy the files.
a.![]() Start an SSH session with the Cisco EPN Manager server and log in as the Cisco EPN Manager CLI admin user.
Start an SSH session with the Cisco EPN Manager server and log in as the Cisco EPN Manager CLI admin user.
b.![]() Log in as the as Linux CLI root user as described in How to Log In and Out as the Linux CLI User in Cisco EPN Manager 1.2.x: Complete Workflow. Be sure to use the procedures for Cisco EPN Manager 1.2. x.
Log in as the as Linux CLI root user as described in How to Log In and Out as the Linux CLI User in Cisco EPN Manager 1.2.x: Complete Workflow. Be sure to use the procedures for Cisco EPN Manager 1.2. x.
c.![]() Verify that /localdisk/defaultRepo has enough space using the following command. If it does not, delete all files and directories to free up some space.
Verify that /localdisk/defaultRepo has enough space using the following command. If it does not, delete all files and directories to free up some space.
Step 4![]() Use SCP to retrieve the files from your client machine and copy them to the Cisco EPN Manager server’s default local repository (/localdisk/defaultRepo). You should run this command as the Linux CLI root user.
Use SCP to retrieve the files from your client machine and copy them to the Cisco EPN Manager server’s default local repository (/localdisk/defaultRepo). You should run this command as the Linux CLI root user.
scp clientUsername @ clientIP :/ fullpath-to-file /localdisk/defaultRepo
- clientUsername is your username on the client machine
- clientIP is the IP address of the client machine to which you downloaded the files in Step 1
- fullpath-to-file is the full pathname of upgrade file client machine
For example (the following command is one line):
scp jsmith@123.456.789.101:/temp/CEPNM-Upgrade-3.0.X_to_3.1.0.0.132.tar.gz /localdisk/defaultRepo
Step 5![]() After the file is transferred to the Cisco EPN Manager server, compare the MD5 Checksum size of the Cisco EPN Manager upgrade image against the value in Step 2 to ensure it has not been damaged.
After the file is transferred to the Cisco EPN Manager server, compare the MD5 Checksum size of the Cisco EPN Manager upgrade image against the value in Step 2 to ensure it has not been damaged.
Step 6![]() Validate the patching_upgrade.pl script. (That script ensures that optical devices are discovered correctly.)
Validate the patching_upgrade.pl script. (That script ensures that optical devices are discovered correctly.)
a.![]() Make sure you are logged in as the Linux CLI root user.
Make sure you are logged in as the Linux CLI root user.
b.![]() In the /localdisk/defaultRepo directory, unzip the Patching Upgrade zip file:
In the /localdisk/defaultRepo directory, unzip the Patching Upgrade zip file:
c.![]() Verify that these three files are in /localdisk/defaultRepo:
Verify that these three files are in /localdisk/defaultRepo:
–![]() patching_upgrade.pl.signature
patching_upgrade.pl.signature
d.![]() Validate the patching_upgrade.pl script by starting at Step 3 in the procedure Verify the ISO Image or OVA Package. If the result of the openssl command Verified OK, proceed to the next step. Otherwise, repeat the download procedure.
Validate the patching_upgrade.pl script by starting at Step 3 in the procedure Verify the ISO Image or OVA Package. If the result of the openssl command Verified OK, proceed to the next step. Otherwise, repeat the download procedure.
Step 7![]() Run the Patching Upgrade script:
Run the Patching Upgrade script:
Step 8![]() Log out as the Linux CLI root user.
Log out as the Linux CLI root user.
Step 10![]() Upgrade the Cisco EPN Manager software using the upgrade file that is located in /localdisk/defaultRepo. The script will ask you if you want to save the running ADE-OS configuration, and if you want to proceed with the upgrade. Answer yes to both questions.
Upgrade the Cisco EPN Manager software using the upgrade file that is located in /localdisk/defaultRepo. The script will ask you if you want to save the running ADE-OS configuration, and if you want to proceed with the upgrade. Answer yes to both questions.
application upgrade filename defaultRepo
Where filename is the upgrade file located in /localdisk/defaultRepo. For example:
application upgrade CEPNM-Upgrade-3.0.X_to_3.1.0.0.132.tar.gz defaultRepo
Save the current ADE-OS running configuration? (yes/no) [yes] ? yes
 Please ensure you have a backup of the system before proceeding.
 Proceed with the application install ? (yes/no) [yes] ? yes
Perform the tasks in Post-Upgrade Tasks.
Backup-Restore Upgrade
- Make sure you have completed the tasks in Prerequisites for Upgrades.
- Note the location of the remote backup repository used by the old server. You will need it to configure the same backup location on the new server.
Procedure
Step 1![]() On the new server, install Cisco EPN Manager 2.0 by following the steps in Install Cisco EPN Manager 2.0.
On the new server, install Cisco EPN Manager 2.0 by following the steps in Install Cisco EPN Manager 2.0.
Step 2![]() Configure the new server to use the same remote backup repository as the old server, as explained in the remote backup repository topics in the Cisco Evolved Programmable Network Manager User and Administrator Guide.
Configure the new server to use the same remote backup repository as the old server, as explained in the remote backup repository topics in the Cisco Evolved Programmable Network Manager User and Administrator Guide.
Step 3![]() Restore the backup in the remote repository to the new server, as explained in the restore backup topics in the Cisco Evolved Programmable Network Manager User and Administrator Guide.
Restore the backup in the remote repository to the new server, as explained in the restore backup topics in the Cisco Evolved Programmable Network Manager User and Administrator Guide.
Perform the tasks in Post-Upgrade Tasks.
Post-Upgrade Tasks
- If you are using Cisco Smart Licensing, re-register Cisco EPN Manager with the Cisco Smart Software Manager (CSSM) on Cisco.com. Refer to the topics that describe managing licenses in the Cisco Evolved Programmable Network Manager User and Administrator Guide.
- Instruct user to clear the browser cache on all client machines that accessed an older version of Cisco EPN Manager before they try to connect to the upgraded Cisco EPN Manager server.
- If you were using external AAA before the upgrade, configure external authentication by referring to the user management topics in the Cisco Evolved Programmable Network Manager User and Administrator Guide.
High Availability
- High Availability Deployment Models
- High Availability Installation Considerations
- Prerequisites for High Availability Installations
- Install Cisco EPN Manager in a High Availability Deployment (Fresh Installation)
- Upgrade from an Earlier Version in a High Availability Deployment
High Availability Deployment Models
Cisco EPN Manager HA feature supports the following three HA deployment models.
Consider the following factors when deciding whether to use the Local, Campus, or Remote HA deployment model:
- Exposure to disaster—Remote HA deployments are least likely to be affected by natural disaster, resulting in a less complex and costly business continuity model. While the same is true for Campus HA deployments, this can complicate business continuity planning and increase disaster recovery. Local HA deployments are most vulnerable to disaster because of server co-location, which can result in increased insurance costs.
- Whether you can use a virtual IP address—Only Local HA deployments can use virtual IP addresses. A virtual IP address is a single IP address that will always point to the active server, even after a failover and fallback. It also allows both the primary and secondary servers to share a common management IP address.
- Bandwidth/latency—Bandwidth/latency is best for Local HA deployments because the primary and secondary servers are connected by short network links that have high bandwidth and latency. Campus HA deployments may have lower bandwidth/latency than Local HA deployments. Remote HA deployments have the least bandwidth.
- Administration—HA administration simplest for Local HA deployments, with increasing complexity for Campus and Remote HA deployments. Remote HA deployments will require administrative remedying.
- Configuration of device event forwarding—Configuring event forwarding can be simplest with Local HA deployments because you can use a virtual IP address, and then configure your devices to forward events to that single virtual IP address. Without a virtual IP address, you must configure your devices to forward events to both the primary and secondary servers.
High Availability Installation Considerations
The Cisco EPN Manager HA framework is subject to the following limiting factors (this applies to all HA deployment models):
- The framework requires at least 1 Gb per second of network bandwidth is required to handle HA operations. These operations include (but are not restricted to) HA registration, database and file synchronization, and triggering failback. Because Cisco EPN Manager uses a single physical port for all its networking needs, there can be occurrences of insufficient bandwidth which in turn will affect HA performance.
- The framework requires net latency across network links between the primary and secondary servers. Irrespective of the physical proximity of these two servers, high latency on these links can affect how Cisco EPN Manager maintains sessions between the primary and secondary servers.
HA performance is always sensitive to the net throughput delivered by the network that connects the primary and secondary servers. This restriction applies (to at least some degree) to all of the deployment models. For example, in a geographically dispersed deployment, a Remote HA deployment is more likely to have problems due to low bandwidth and high latency. But if Local and Campus HA deployments are not properly configured, they are highly susceptible to problems with latency that result from bandwidth limitations on high-usage networks.
Consider Whether You Can Use Virtual Addresses
Using virtual IP addresses in a Local HA deployment setup gives your users the ability to connect to the active server using a single IP address or web URL without having to know which server is actually active. Virtual IP addresses also allow both the servers to share a common management IP address. During normal operation, the virtual IP address points to the primary server. If a failover occurs, the virtual IP address automatically points to the secondary server. When failback occurs, the virtual IP address is automatically switches back to the primary server. For more details about HA, see the Cisco Evolved Programmable Network Manager User and Administrator Guide.
The following example illustrates how virtual, primary, and secondary IP addresses should be assigned with respect to each other. If the primary and secondary servers have the following IP address assignments within the given subnet, the virtual IP address for both servers can be assigned as follows:
- Subnet mask: 255.255.255.224 (/32)
- Primary server IP address: 10.10.101.1
- Secondary server IP address: 10.10.101.2
- Virtual IP address: 10.10.101.[3-30] e.g., 10.10.101.3. Note that the virtual IP address can be any of a range of addresses that are valid for the given subnet mask.
If you do not use a virtual IP address, you must configure your devices to forward events to both the primary and secondary servers (for example, by forwarding them to a given subnet or range of IP addresses that includes both the primary and secondary server). To reduce (or eliminate) the chance of losing data, you must configure device event forwarding before a failover occurs. You do not need to make any changes to the secondary server during installation; simply provision the primary and secondary servers with their individual IP addresses.
Prerequisites for High Availability Installations
–![]() Prerequisites for OVA/VM Installations. For OVA/VM deployments, the upgrade is run from the vmWare vSphere client.
Prerequisites for OVA/VM Installations. For OVA/VM deployments, the upgrade is run from the vmWare vSphere client.
–![]() Prerequisites for ISO/Bare Metal Installations. For ISO/bare metal deployments, the upgrade is run from Cisco IMC.
Prerequisites for ISO/Bare Metal Installations. For ISO/bare metal deployments, the upgrade is run from Cisco IMC.
–![]() The secondary server must have hardware and software specifications that meet or exceed the requirements for your primary server. For example, if you installed Cisco EPN Manager on the primary server and specified the Standard system size, your secondary server (1) must also be installed using the Standard system size, and (2) must meet or exceed all requirements for Standard-size servers in System Requirements.
The secondary server must have hardware and software specifications that meet or exceed the requirements for your primary server. For example, if you installed Cisco EPN Manager on the primary server and specified the Standard system size, your secondary server (1) must also be installed using the Standard system size, and (2) must meet or exceed all requirements for Standard-size servers in System Requirements.
–![]() The secondary server must be running the same software level as the primary server (including the patch level).
The secondary server must be running the same software level as the primary server (including the patch level).
–![]() If you plan to use a virtual IP address, the secondary server must be on the same subnet as the primary server (it must be a Local HA deployment).
If you plan to use a virtual IP address, the secondary server must be on the same subnet as the primary server (it must be a Local HA deployment).
–![]() Your network has at least 1 Gb per second of network bandwidth on the link between the two servers, with the lowest latency achievable (otherwise data replication may be impacted).
Your network has at least 1 Gb per second of network bandwidth on the link between the two servers, with the lowest latency achievable (otherwise data replication may be impacted).
–![]() If there is a firewall between the primary and secondary servers, you have permission from the firewall for the ports used by HA. The ports are listed in Ports Used by Cisco EPN Manager.
If there is a firewall between the primary and secondary servers, you have permission from the firewall for the ports used by HA. The ports are listed in Ports Used by Cisco EPN Manager.
–![]() The IP address or host name of the secondary server (if you are not using a virtual IP address). You will need it when configuring HA on the primary server.
The IP address or host name of the secondary server (if you are not using a virtual IP address). You will need it when configuring HA on the primary server.
–![]() The virtual IPv4 and IPv6 (if used) IP addresses you want to use for both servers (if you plan to use a virtual IP address).
The virtual IPv4 and IPv6 (if used) IP addresses you want to use for both servers (if you plan to use a virtual IP address).
–![]() The password you want to use for the HA authentication key. It will be used to authenticate communications between the primary and secondary servers. You will need to enter it when you configure HA—that is, when you register the secondary server on the primary server (also called pairing the servers). Finally, you will need it to log in to the secondary server's Health Monitor page.
The password you want to use for the HA authentication key. It will be used to authenticate communications between the primary and secondary servers. You will need to enter it when you configure HA—that is, when you register the secondary server on the primary server (also called pairing the servers). Finally, you will need it to log in to the secondary server's Health Monitor page.
–![]() A Cisco EPN Manager web GUI user ID with Administration privileges on the primary server. You will also need the user’s password.
A Cisco EPN Manager web GUI user ID with Administration privileges on the primary server. You will also need the user’s password.
–![]() A valid email address to which HA notifications can be sent.
A valid email address to which HA notifications can be sent.
Install Cisco EPN Manager in a High Availability Deployment (Fresh Installation)
Make sure your servers meet the requirements listed in Prerequisites for High Availability Installations.
Procedure
Step 1![]() Install Cisco EPN Manager on the primary server as described in Install Cisco EPN Manager 2.0. You should perform the entire procedure.
Install Cisco EPN Manager on the primary server as described in Install Cisco EPN Manager 2.0. You should perform the entire procedure.
Step 2![]() Install Cisco EPN Manager on the secondary server as described in Install Cisco EPN Manager 2.0.
Install Cisco EPN Manager on the secondary server as described in Install Cisco EPN Manager 2.0.
Step 3![]() When you are prompted to choose whether you want this newly-installed server to act as a secondary fallback server in an HA implementation, enter yes.
When you are prompted to choose whether you want this newly-installed server to act as a secondary fallback server in an HA implementation, enter yes.
Step 4![]() Enter a password which will be used as the HA authentication key for communication between the primary and secondary servers. You will need this key to configure HA in Step 11
Enter a password which will be used as the HA authentication key for communication between the primary and secondary servers. You will need this key to configure HA in Step 11![]() . (During normal operation, you will need to enter the HA authentication key to log in to the secondary server’s Health Monitor page.)
. (During normal operation, you will need to enter the HA authentication key to log in to the secondary server’s Health Monitor page.)
Step 5![]() Enter the password again to confirm.
Enter the password again to confirm.
Step 6![]() Enter Y to confirm that you want to install this server as a secondary. When the installation is complete, the VM (OVA/VM) or Cisco UCS server (ISO/bare metal) will reboot.
Enter Y to confirm that you want to install this server as a secondary. When the installation is complete, the VM (OVA/VM) or Cisco UCS server (ISO/bare metal) will reboot.
Step 7![]() on the you will are presented with a login prompt, log in using the Cisco EPN Manager CLI admin username and password you specified in Step 3 of Install Cisco EPN Manager on the Server.
on the you will are presented with a login prompt, log in using the Cisco EPN Manager CLI admin username and password you specified in Step 3 of Install Cisco EPN Manager on the Server.
Step 8![]() Verify the that all processes are running on the secondary server using the ncs status command.
Verify the that all processes are running on the secondary server using the ncs status command.
Step 9![]() Make sure all devices are configured to forward events (syslogs, traps, and TL1 messages) to both servers (or the virtual IP address, if you are using one).
Make sure all devices are configured to forward events (syslogs, traps, and TL1 messages) to both servers (or the virtual IP address, if you are using one).
Note![]() If you do not perform this step before registering the secondary server on the primary server and a failover occurs, you may lose some data.
If you do not perform this step before registering the secondary server on the primary server and a failover occurs, you may lose some data.
Step 10![]() If you used this procedure to install Cisco EPN Manager on your servers as part of a backup-restore upgrade, go to Step 4 in Perform a Backup-Restore Upgrade (High Availability).
If you used this procedure to install Cisco EPN Manager on your servers as part of a backup-restore upgrade, go to Step 4 in Perform a Backup-Restore Upgrade (High Availability).
Step 11![]() Configure HA by registering the secondary server on the primary server. The registration process must be performed from the primary server. For more information, see the section on registering the secondary server on the primary server, in the Cisco Evolved Programmable Network Manager User and Administrator Guide.
Configure HA by registering the secondary server on the primary server. The registration process must be performed from the primary server. For more information, see the section on registering the secondary server on the primary server, in the Cisco Evolved Programmable Network Manager User and Administrator Guide.
Prerequisites for Upgrade in a High Availability Deployment
Before you begin, ensure that:
- Your current version Cisco EPN Manager is supported for upgrade. See Upgrade Options.
- You have the password (authentication key) that was created when HA was enabled. You will need it to perform the Cisco EPN Manager 2.0 installation on the secondary server.
- Your data has been backed up. Refer to the backup topics in Cisco Evolved Programmable Network Manager User and Administrator Guide.
- No backups are in progress.
- Your client machine is running SCP. You will need to use one of these to copy files from your client machine to the Cisco EPN Manager server.
Perform an Automatic Upgrade (High Availability)
These are the basic steps of the automatic upgrade procedure:
1.![]() Download the upgrade image and the patching upgrade script (and validation files) from Cisco.com to your client machine.
Download the upgrade image and the patching upgrade script (and validation files) from Cisco.com to your client machine.
2.![]() Copy the files from your client machine to the Cisco EPN Manager server.
Copy the files from your client machine to the Cisco EPN Manager server.
3.![]() Validate the patching_upgrade.pl script, then run the script.
Validate the patching_upgrade.pl script, then run the script.
5.![]() Perform the post-upgrade licensing, authentication, and web GUI tasks described in Post-Upgrade Tasks
Perform the post-upgrade licensing, authentication, and web GUI tasks described in Post-Upgrade Tasks
- Make sure your deployment meets the general HA requirements listed in Prerequisites for High Availability Installations.
- Make sure your deployment meets the upgrade-specific requirements listed in Prerequisites for Upgrade in a High Availability Deployment.
Step 1![]() On the primary server, note the HA configuration, then remove it.
On the primary server, note the HA configuration, then remove it.
a.![]() Log into Cisco EPN Manager as a user with Administrator privileges.
Log into Cisco EPN Manager as a user with Administrator privileges.
b.![]() Choose Administration > Settings > High Availability.
Choose Administration > Settings > High Availability.
c.![]() Make note of the HA configuration. You will need this information to reconfigure HA after the upgrade.
Make note of the HA configuration. You will need this information to reconfigure HA after the upgrade.
d.![]() Choose HA Configuration in the left navigation area, then click Remove.
Choose HA Configuration in the left navigation area, then click Remove.
e.![]() Wait for the remove operation to complete.
Wait for the remove operation to complete.
f.![]() Click HA Configuration in the left navigation area and confirm that the Configuration Mode field displays HA Not Configured.
Click HA Configuration in the left navigation area and confirm that the Configuration Mode field displays HA Not Configured.
Step 2![]() From the Software Download site on Cisco.com, locate and download the following files to your client machine
From the Software Download site on Cisco.com, locate and download the following files to your client machine
- CEPNM upgrade image—Contains the upgrade image. The file will have the prefix CEPNM-upgrade and the suffix .tar.gz. The numbers in the filename may not align to the current Cisco EPN Manager version, so be sure to check the file description.
- Patching Upgrade zip file—Contains the patching_upgrade.pl script, which ensures that optical devices are discovered correctly. You will run this script before performing the upgrade.
- Patching Upgrade signature file—Contains the patching_upgrade.pl.signature file, which you will use to validate the patching_upgrade.pl script.
- Cisco EPNM 2.0 pem file—Contains the CiscoEPNM 2.0.pem file, which you will use to validate the patching_upgrade.pl script.
Step 3![]() Compare the MD5 Checksum size of the CEPNM upgrade image from the Software Download site against the size on your client machine. On the Software Download site, hover your mouse cursor over the upgrade image to view its size in a popup window, then compare it against the size on your client machine.
Compare the MD5 Checksum size of the CEPNM upgrade image from the Software Download site against the size on your client machine. On the Software Download site, hover your mouse cursor over the upgrade image to view its size in a popup window, then compare it against the size on your client machine.
Step 4![]() On the primary server, make sure the /localdisk/defaultRepo directory has enough space to copy the files.
On the primary server, make sure the /localdisk/defaultRepo directory has enough space to copy the files.
a.![]() Start an SSH session with the primary Cisco EPN Manager server and log in as the Cisco EPN Manager CLI admin user.
Start an SSH session with the primary Cisco EPN Manager server and log in as the Cisco EPN Manager CLI admin user.
b.![]() Log in as the as Linux CLI root user as described in How to Log In and Out as the Linux CLI User in Cisco EPN Manager 1.2.x: Complete Workflow. Be sure to use the procedures for Cisco EPN Manager 1.2. x.
Log in as the as Linux CLI root user as described in How to Log In and Out as the Linux CLI User in Cisco EPN Manager 1.2.x: Complete Workflow. Be sure to use the procedures for Cisco EPN Manager 1.2. x.
c.![]() Verify that /localdisk/defaultRepo has enough space using the following command. If it does not, delete all files and directories to free up some space.
Verify that /localdisk/defaultRepo has enough space using the following command. If it does not, delete all files and directories to free up some space.
Step 5![]() Use SCP to retrieve the files from your client machine and copy them to the Cisco EPN Manager primary server’s default local repository (/localdisk/defaultRepo). You should run this command as the Linux CLI root user.
Use SCP to retrieve the files from your client machine and copy them to the Cisco EPN Manager primary server’s default local repository (/localdisk/defaultRepo). You should run this command as the Linux CLI root user.
scp clientUsername @ clientIP :/ fullpath-to-file /localdisk/defaultRepo
- clientUsername is your username on the client machine
- clientIP is the IP address of the client machine to which you downloaded the files in Step 2
- fullpath-to-file is the full pathname of the upgrade file on the client machine
For example (the following command is one line):
scp jsmith@123.456.789.101:/temp/CEPNM-Upgrade-3.0.X_to_3.1.0.0.132.tar.gz /localdisk/defaultRepo
Step 6![]() After the file is transferred to the primary server, compare the MD5 Checksum size of the Cisco EPN Manager upgrade image against the value in Step 3 to ensure it has not been damaged.
After the file is transferred to the primary server, compare the MD5 Checksum size of the Cisco EPN Manager upgrade image against the value in Step 3 to ensure it has not been damaged.
Step 7![]() On the primary server, log out as the Linux CLI root user.
On the primary server, log out as the Linux CLI root user.
Step 8![]() Stop the primary server by running the following command:
Stop the primary server by running the following command:
Step 9![]() Validate the patching_upgrade.pl script on the primary server. (That script ensures that optical devices are discovered correctly.)
Validate the patching_upgrade.pl script on the primary server. (That script ensures that optical devices are discovered correctly.)
a.![]() Log in as the Linux CLI root user as described in How to Log In and Out as the Linux CLI User in Cisco EPN Manager 1.2.x: Complete Workflow. Be sure to use the procedures for Cisco EPN Manager 1.2. x.
Log in as the Linux CLI root user as described in How to Log In and Out as the Linux CLI User in Cisco EPN Manager 1.2.x: Complete Workflow. Be sure to use the procedures for Cisco EPN Manager 1.2. x.
b.![]() In the /localdisk/defaultRepo directory, unzip the Patching Upgrade zip file:
In the /localdisk/defaultRepo directory, unzip the Patching Upgrade zip file:
c.![]() Verify that these three files are in /localdisk/defaultRepo:
Verify that these three files are in /localdisk/defaultRepo:
–![]() patching_upgrade.pl.signature
patching_upgrade.pl.signature
d.![]() Validate the patching_upgrade.pl script by starting at Step 3 in the procedure Verify the ISO Image or OVA Package. If the result of the openssl command Verified OK, proceed to the next step. Otherwise, repeat the download procedure.
Validate the patching_upgrade.pl script by starting at Step 3 in the procedure Verify the ISO Image or OVA Package. If the result of the openssl command Verified OK, proceed to the next step. Otherwise, repeat the download procedure.
Step 10![]() Run the Patching Upgrade script:
Run the Patching Upgrade script:
Step 11![]() On the primary server, log out as the Linux CLI root user.
On the primary server, log out as the Linux CLI root user.
Step 12![]() Stop the primary server.
Stop the primary server.
Step 13![]() Upgrade the primary server using the upgrade file that is located in /localdisk/defaultRepo. The script will ask you if you want to save the running ADE-OS configuration, and if you want to proceed with the upgrade. Answer yes to both questions.
Upgrade the primary server using the upgrade file that is located in /localdisk/defaultRepo. The script will ask you if you want to save the running ADE-OS configuration, and if you want to proceed with the upgrade. Answer yes to both questions.
application upgrade filename defaultRepo
Where filename is the upgrade file located in /localdisk/defaultRepo. For example:
application upgrade CEPNM-Upgrade-3.0.X_to_3.1.0.0.132.tar.gz defaultRepo
Save the current ADE-OS running configuration? (yes/no) [yes] ? yes
 Please ensure you have a backup of the system before proceeding.
 Proceed with the application install ? (yes/no) [yes] ? yes
This step can take 30 minutes or more to complete, depending on the size of the application database. However you can continue with the next step while the upgrade is in progress for the primary server. Once the upgrade is complete, the primary server will be automatically restarted as part of the upgrade.
Step 14![]() Install Cisco EPN Manager 2.0 on the secondary server (you will perform a fresh installation on this server):
Install Cisco EPN Manager 2.0 on the secondary server (you will perform a fresh installation on this server):
–![]() Deploy the OVA from the VMware vSphere Client
Deploy the OVA from the VMware vSphere Client
–![]() Install Cisco EPN Manager on the Server
Install Cisco EPN Manager on the Server
Note![]() (OVA/VM) If you want to retain the same IP address on the secondary server, you must first remove it from the vmWare vSphere client, then use the original address when you deploy the OVA.
(OVA/VM) If you want to retain the same IP address on the secondary server, you must first remove it from the vmWare vSphere client, then use the original address when you deploy the OVA.
–![]() Configure the Cisco IMC Server
Configure the Cisco IMC Server
–![]() Configure the Bare Metal Cisco UCS Server
Configure the Bare Metal Cisco UCS Server
–![]() Install Cisco EPN Manager on the Server
Install Cisco EPN Manager on the Server
Step 15![]() Log into the secondary server as a Cisco EPN Manager CLI admin user and restart the secondary server by running the following command:
Log into the secondary server as a Cisco EPN Manager CLI admin user and restart the secondary server by running the following command:
Step 16![]() On the primary server:
On the primary server:
a.![]() Verify that the server is restarted.
Verify that the server is restarted.
b.![]() Run the ncs status command and make sure that the Health Monitor process and other processes have restarted.
Run the ncs status command and make sure that the Health Monitor process and other processes have restarted.
Step 17![]() If the ncs status output on the primary server lists Compliance engine is stopped, do the following:
If the ncs status output on the primary server lists Compliance engine is stopped, do the following:
b.![]() Log in as the Linux CLI root user (see How to Log In and Out as the Linux CLI User in Cisco EPN Manager 2.x: Complete Workflow. Be sure to use the procedures for Cisco EPN Manager 2. x.
Log in as the Linux CLI root user (see How to Log In and Out as the Linux CLI User in Cisco EPN Manager 2.x: Complete Workflow. Be sure to use the procedures for Cisco EPN Manager 2. x.
c.![]() Update the time zone using a soft link (the following command is one line):
Update the time zone using a soft link (the following command is one line):
ln -sf /usr/share/zoneinfo/$(grep ^clock /storedconfig/active/startup-config | cut -d " " -f 3) /etc/localtime
Step 18![]() On the secondary server:
On the secondary server:
a.![]() Verify that the server is restarted.
Verify that the server is restarted.
b.![]() Run the ncs status command and make sure that the Health Monitor process and other processes have restarted.
Run the ncs status command and make sure that the Health Monitor process and other processes have restarted.
Step 19![]() Perform the following post-upgrade tasks on the primary server:
Perform the following post-upgrade tasks on the primary server:
- If you are using Cisco Smart Licensing, re-register Cisco EPN Manager with the Cisco Smart Software Manager (CSSM) on Cisco.com. Refer to the topics that describe managing licenses in the Cisco Evolved Programmable Network Manager User and Administrator Guide.
- Instruct user to clear the browser cache on all client machines that accessed an older version of Cisco EPN Manager before they try to connect to the upgraded Cisco EPN Manager server.
- If you were using external AAA before the upgrade, configure external authentication by referring to the user management topics in the Cisco Evolved Programmable Network Manager User and Administrator Guide.
Step 20![]() Once the post upgrade tasks are completed, re-configure HA by registering the secondary server on the primary server. Use the information you saved in Step 1. The registration process must be performed from the primary server. For more information, see the section on registering the secondary server on the primary server, in the Cisco Evolved Programmable Network Manager User and Administrator Guide.
Once the post upgrade tasks are completed, re-configure HA by registering the secondary server on the primary server. Use the information you saved in Step 1. The registration process must be performed from the primary server. For more information, see the section on registering the secondary server on the primary server, in the Cisco Evolved Programmable Network Manager User and Administrator Guide.
Perform a Backup-Restore Upgrade (High Availability)
For an HA backup-restore upgrade, you will perform the following steps:
2.![]() Back up your data to a remote repository.
Back up your data to a remote repository.
3.![]() Perform a fresh installation of CEPNM on both the primary and secondary servers.
Perform a fresh installation of CEPNM on both the primary and secondary servers.
4.![]() Restore the backup data on the primary server.
Restore the backup data on the primary server.
- Make sure your deployment meets the general HA requirements listed in Prerequisites for High Availability Installations.
- Make sure your deployment meets the upgrade-specific requirements listed in Prerequisites for Upgrade in a High Availability Deployment.
- Note the location of the remote backup repository used by the old server (if applicable). You will need it to configure the same backup location on the new server.
Step 1![]() On the primary server, remove the High Availability configuration:
On the primary server, remove the High Availability configuration:
a.![]() Log into Cisco EPN Manager as a user with Administrator privileges.
Log into Cisco EPN Manager as a user with Administrator privileges.
b.![]() Choose Administration > Settings > High Availability.
Choose Administration > Settings > High Availability.
c.![]() Make note of the HA configuration. You will need this information to reconfigure HA after the upgrade.
Make note of the HA configuration. You will need this information to reconfigure HA after the upgrade.
d.![]() Choose HA Configuration in the left navigation area, then click Remove.
Choose HA Configuration in the left navigation area, then click Remove.
e.![]() Wait for the remove operation to complete.
Wait for the remove operation to complete.
f.![]() Click HA Configuration in the left navigation area and confirm that the Configuration Mode field displays HA Not Configured.
Click HA Configuration in the left navigation area and confirm that the Configuration Mode field displays HA Not Configured.
Step 2![]() Back up your data to the remote repository. For details, see the topics on backups in the Cisco Evolved Programmable Network Manager User and Administrator Guide.
Back up your data to the remote repository. For details, see the topics on backups in the Cisco Evolved Programmable Network Manager User and Administrator Guide.
Note![]() If you do not have a remote repository, configure one. See the topics on remote backup repositories in the Cisco Evolved Programmable Network Manager User and Administrator Guide.
If you do not have a remote repository, configure one. See the topics on remote backup repositories in the Cisco Evolved Programmable Network Manager User and Administrator Guide.
Step 3![]() Install Cisco EPN Manager 2.0 on the two new servers as described in Install Cisco EPN Manager in a High Availability Deployment (Fresh Installation).
Install Cisco EPN Manager 2.0 on the two new servers as described in Install Cisco EPN Manager in a High Availability Deployment (Fresh Installation).
Step 4![]() Once the installation is completed, configure the new primary server to use the same remote backup repository as the old primary server (which you used in Step 2). See the topics on remote backup repositories in the Cisco Evolved Programmable Network Manager User and Administrator Guide.
Once the installation is completed, configure the new primary server to use the same remote backup repository as the old primary server (which you used in Step 2). See the topics on remote backup repositories in the Cisco Evolved Programmable Network Manager User and Administrator Guide.
Step 5![]() On the primary server (only), restore the backup from the remote repository. See the topics on restoring data in the Cisco Evolved Programmable Network Manager User and Administrator Guide.
On the primary server (only), restore the backup from the remote repository. See the topics on restoring data in the Cisco Evolved Programmable Network Manager User and Administrator Guide.
Note![]() You only need to perform the restore operation on the primary server. The secondary server will be synchronized with the primary server when HA is re-enabled.
You only need to perform the restore operation on the primary server. The secondary server will be synchronized with the primary server when HA is re-enabled.
a.![]() Verify that the server is restarted.
Verify that the server is restarted.
b.![]() Run the ncs status command and make sure that the Health Monitor process and other processes have restarted.
Run the ncs status command and make sure that the Health Monitor process and other processes have restarted.
Step 7![]() If the ncs status output on the primary server lists Compliance engine is stopped, do the following:
If the ncs status output on the primary server lists Compliance engine is stopped, do the following:
b.![]() Log in as the Linux CLI root user (see How to Log In and Out as the Linux CLI User in Cisco EPN Manager 2.x: Complete Workflow. Be sure to use the procedures for Cisco EPN Manager 2. x.
Log in as the Linux CLI root user (see How to Log In and Out as the Linux CLI User in Cisco EPN Manager 2.x: Complete Workflow. Be sure to use the procedures for Cisco EPN Manager 2. x.
c.![]() Update the time zone using a soft link (the following command is one line):
Update the time zone using a soft link (the following command is one line):
ln -sf /usr/share/zoneinfo/$(grep ^clock /storedconfig/active/startup-config | cut -d " " -f 3) /etc/localtime
Step 8![]() Once the restore is completed, perform the following post-upgrade tasks:
Once the restore is completed, perform the following post-upgrade tasks:
- If you are using Cisco Smart Licensing, re-register Cisco EPN Manager with the Cisco Smart Software Manager (CSSM) on Cisco.com. Refer to the topics that describe managing licenses in the Cisco Evolved Programmable Network Manager User and Administrator Guide.
- Instruct user to clear the browser cache on all client machines that accessed an older version of Cisco EPN Manager before they try to connect to the upgraded Cisco EPN Manager server.
- If you were using external AAA before the upgrade, configure external authentication by referring to the user management topics in the Cisco Evolved Programmable Network Manager User and Administrator Guide.
Step 9![]() Re-configure HA by registering the secondary server on the primary server. Use the information you saved in Step 1. The registration process must be performed from the primary server. For more information, see the section on registering the secondary server on the primary server, in the Cisco Evolved Programmable Network Manager User and Administrator Guide.
Re-configure HA by registering the secondary server on the primary server. Use the information you saved in Step 1. The registration process must be performed from the primary server. For more information, see the section on registering the secondary server on the primary server, in the Cisco Evolved Programmable Network Manager User and Administrator Guide.
Get Started with Cisco EPN Manager
Log In to the Cisco EPN Manager Web GUI
Follow these steps to log in to the Cisco EPN Manager web GUI:
Procedure
Step 1![]() On a client machine, launch one of the supported browsers (see Web Client Requirements).
On a client machine, launch one of the supported browsers (see Web Client Requirements).
Step 2![]() In the browser’s address line, enter https:// serverIP, where serverIP is the IP address of the server on which you installed Cisco EPN Manager. The login window is displayed.
In the browser’s address line, enter https:// serverIP, where serverIP is the IP address of the server on which you installed Cisco EPN Manager. The login window is displayed.
When a client accesses the Cisco EPN Manager web GUI for the first time, the browser may display a warning that the site is untrusted. When this happens, follow the prompts to add a security exception and download the self-signed certificate from the Cisco EPN Manager server. After you complete this procedure, the browser will accept the Cisco EPN Manager server as a trusted site in all future login attempts.
Step 3![]() Enter the web GUI root username and password, as specified in Step 5 of Install Cisco EPN Manager on the Server.
Enter the web GUI root username and password, as specified in Step 5 of Install Cisco EPN Manager on the Server.
If any licensing problems occur, a message appears in an alert box. If you have an evaluation license, the number of days until the license expires is shown. You are also alerted about any expired licenses. (You have the option to go directly to the Administration > Licenses and Software Updates > Licenses page to address these problems.) For more information about licenses, refer to the Cisco Evolved Programmable Network Manager User and Administrator Guide.
Step 4![]() Click Login to log in to the Cisco EPN Manager web GUI. The home page appears and you can now use the web GUI. For information about the dashboards and dashlets, refer to the Cisco Evolved Programmable Network Manager User and Administrator Guide.
Click Login to log in to the Cisco EPN Manager web GUI. The home page appears and you can now use the web GUI. For information about the dashboards and dashlets, refer to the Cisco Evolved Programmable Network Manager User and Administrator Guide.
Step 5![]() For increased security, perform these steps:
For increased security, perform these steps:
- Change the password for the web GUI root user by choosing Administration > Users > Roles & AAA > Change Password.
- Create at least one Cisco EPN Manager web GUI user that has Admin or Super User privileges, then disable the web GUI root user. For information on disabling this user, refer to the user management topics in the Cisco Evolved Programmable Network Manager User and Administrator Guide.
- If you have not done so already, disable the Linux CLI users. Refer to the Cisco Evolved Programmable Network Manager User and Administrator Guide.
Perform setup tasks for server, user, fault, and web GUI management. For a detailed list of tasks, see the beginning of the administration section of the Cisco Evolved Programmable Network Manager User and Administrator Guide.
For information on Cisco EPN Manager user interfaces and user types, see the Cisco Evolved Programmable Network Manager User and Administrator Guide.
Navigation to Common Tasks
The following table lists common Cisco EPN Manager tasks, their navigation in the web GUI, and where to get more information.
Uninstall Cisco EPN Manager
Uninstall Cisco EPN Manager (OVA/VM)
Perform a backup. Uninstalling Cisco EPN Manager using the following method will permanently delete all your data on the server, including server settings and local backups. You cannot restore your data unless you have a remote backup. Refer to the backup topics in the Cisco Evolved Programmable Network Manager User and Administrator Guide.
Uninstall Cisco EPN Manager (ISO/Bare Metal)
Make sure you have backed up your current data. See the backup and restore topics in the Cisco Evolved Programmable Network Manager User and Administrator Guide.
To ensure information security, Cisco recommends you use either of the following methods to remove Cisco EPN Manager from the Cisco UCS server:
Related Documentation
Refer to the Cisco Evolved Programmable Network Manager 2.0 Documentation Overview for information about and links to all of the documentation that is provided with Cisco EPN Manager 2.0 and its maintenance packs.
Note![]() We sometimes update the documentation after original publication. Therefore, you should also review the documentation on Cisco.com for any updates.
We sometimes update the documentation after original publication. Therefore, you should also review the documentation on Cisco.com for any updates.
Obtaining Documentation and Submitting a Service Request
For information on obtaining documentation, submitting a service request, and gathering additional information, see the monthly What’s New in Cisco Product Documentation, which also lists all new and revised Cisco technical documentation, at:
http://www.cisco.com/en/US/docs/general/whatsnew/whatsnew.html
Subscribe to What’s New in Cisco Product Documentation, which lists all new and revised Cisco technical documentation, as an RSS feed and deliver content directly to your desktop using a reader application. The RSS feeds are a free service.
This document is to be used in conjunction with the documents listed in the “Related Documentation” section.
Cisco and the Cisco logo are trademarks or registered trademarks of Cisco and/or its affiliates in the U.S. and other countries. To view a list of Cisco trademarks, go to this URL: www.cisco.com/go/trademarks. Third-party trademarks mentioned are the property of their respective owners. The use of the word partner does not imply a partnership relationship between Cisco and any other company. (1110R)
Any Internet Protocol (IP) addresses and phone numbers used in this document are not intended to be actual addresses and phone numbers. Any examples, command display output, network topology diagrams, and other figures included in the document are shown for illustrative purposes only. Any use of actual IP addresses or phone numbers in illustrative content is unintentional and coincidental.
 Feedback
Contact Cisco
- Open a Support Case

- (Requires a Cisco Service Contract)