Cisco Prime Service Catalog 12.1 Reporting Guide
Bias-Free Language
The documentation set for this product strives to use bias-free language. For the purposes of this documentation set, bias-free is defined as language that does not imply discrimination based on age, disability, gender, racial identity, ethnic identity, sexual orientation, socioeconomic status, and intersectionality. Exceptions may be present in the documentation due to language that is hardcoded in the user interfaces of the product software, language used based on RFP documentation, or language that is used by a referenced third-party product. Learn more about how Cisco is using Inclusive Language.
- Updated:
- September 18, 2017
Chapter: Configuring Cisco Prime Service Catalog Reporting Solution
- Defining Roles to Access Reporting Feature Capabilities
- Moving Reports from Development to Testing to Production Environments
- Configuring the DataMart
- Maximum Size of Character Fields
- Scripts for Reporting
- Modifying Form Data Reporting Configuration
- Configuring HTTPS for Cognos
- Configuring Key Performance Indicators (KPIs)
Configuring Cisco
Prime Service Catalog Reporting Solution
This chapter contains the following topics:
- Defining Roles to Access Reporting Feature Capabilities
- Moving Reports from Development to Testing to Production Environments
- Configuring the DataMart
- Maximum Size of Character Fields
- Scripts for Reporting
- Modifying Form Data Reporting Configuration
- Configuring HTTPS for Cognos
- Configuring Key Performance Indicators (KPIs)
Defining Roles to Access Reporting Feature Capabilities
The roles listed in the table below are defined in the Organization Designer module, and should be assigned to users who need to access the Reporting and Advanced Reporting modules.
If you assign a user to the predefined role “Service Operations Report User”, the user should be able to run the prebuilt reports. An administrator must enable reporting capabilities to access reporting features based on individual roles.
To enable RBAC:
Moving Reports from Development to Testing to Production Environments
This section describes how to move reports to the production environment.
- Catalog Deployer and Configuration Management
- Recommended Process for Copying a Database
- Creating an Export File
- Importing the Exported File
Catalog Deployer and Configuration Management
A Service Catalog implementation typically consists of multiple sites, each of which plays a different role:
|
Site |
Usage |
|---|---|
|
Development |
Service definitions are developed and unit tested; customizations are initially applied. |
|
Test |
A controlled environment, not interrupted by development activities, where Quality Assurance or other personnel test a Service Catalog. |
|
Production |
The live environment where the user community can request services from the Service Catalog and IT teams can fulfill service requests. |
Following the guidelines above will allow you to upgrade Service Catalog software without losing the customizations you have applied to that software. However, these guidelines do not address the need to migrate client-provided content—for example, service definitions and Person profiles—from one site to another. That capability is provided by Catalog Deployer.
The Catalog Deployer module provides configuration management for metadata (service definitions) and organizational data (people, organizations, and related entities) which is stored in the repository. Refer to Cisco Prime Service Catalog Designer Guide for Catalog Deployer documentation.
You must be a user with the ability to administer the Reporting module to move reports using the Deployment option discussed below. The predefined roles Site Administrator include this capability.
You must have access to the file system of the Cognos servers for both the source and target environments.
Recommended Process for Copying a Database
At certain times during a deployment, it may be desirable to copy the Service Catalog OLTP database from one site to another. For example:
- When initially installing a test or production site, the complete development site may be copied to the new environments.
- After production has been in operation for a time, all of the user activity should be copied to a test environment, to allow realistic performance or volume studies.
Follow the procedures below to copy a Service Catalog OLTP database from one site to another.
Export Source
To export the source database:
| Step 1 | Inform the users of expected downtime. |
| Step 2 | Stop the Prime Service Catalog and Service Link services in the source environment. |
| Step 3 | Export the source database. Develop a naming convention that allows you to track the source of the data and the date of the export. |
| Step 4 | If a system shutdown is not feasible, use the –consistent flag for the Oracle export. |
| Step 5 | Restart the Prime Service Catalog and Service Link services. |
Import to Target
To import the data into the target database:
| Step 1 | Stop the Prime Service Catalog and Service Link services in the target environment. |
| Step 2 | Ensure you have a current backup copy of the target database. |
| Step 3 | If required, copy the export file from its destination to a file system accessible to the target database server. |
| Step 4 | Import data into the target database. |
| Step 5 | For SQLServer, ensure that logins and users exist in the newly imported database match the credentials required for this instance of Service Catalog. If required, create a new login or associate an existing login with the database owner and ensure this user has appropriate permissions. For Oracle, ensure appropriate users exist in the newly imported database with privileges as specified in the Service Catalog installer. |
| Step 6 | If the two sites are accessing two different Cognos reporting servers, update the entry in the CnfParams table that specifies the name of the “CognosServer” for this site and commit the update. |
| Step 7 | Restart the Prime Service Catalog and Service Link services in the target environment. |
| Step 8 | Set the Administration > Entity Homes > SiteProtection “This Site Is” property to the current site. If Entity Homes are specified differently, or sites have different protection levels, make the changes manually and save your changes. |
| Step 9 | If the two sites are connecting to two different LDAP directories, adjust the Directory Integration Data Source definition appropriately. |
| Step 10 | Check and modify any connection properties for the Service Link agents as appropriate for the target environment. |
| Step 11 | Perform any additional manual operations to adjust the data. For example, you may wish to add permissions to some people, groups, or organizations, or revoke permissions. |
| Step 12 | Inform users that maintenance is complete. |
Creating an Export File
To create an export file:
| Step 1 | On the development machine, create a folder named CustomReports in the Public Folders directory of Cognos. The name of the folder may vary, but it must be a public folder. |
| Step 2 | Copy the new report to the CustomReports folder created above. |
| Step 3 | Log into Service Catalog as a user with the Report Administrator capability. |
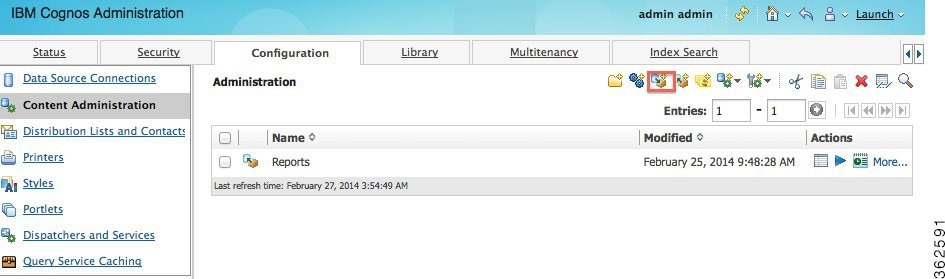
| Step 4 | Go to Launch on the right hand side top corner and click IBM Cognos Administration. |
| Step 5 | Click the Configuration tab. |
| Step 6 | Go to Content
Administration, and in the top-right corner of the screen click the
New
Export icon.
|
| Step 7 | Provide a name (for example, CustomReports) and other details for the export, and then click Next. |
| Step 8 | On the Deployment Method page, choose Select public folders and directory content, and then click Next. |
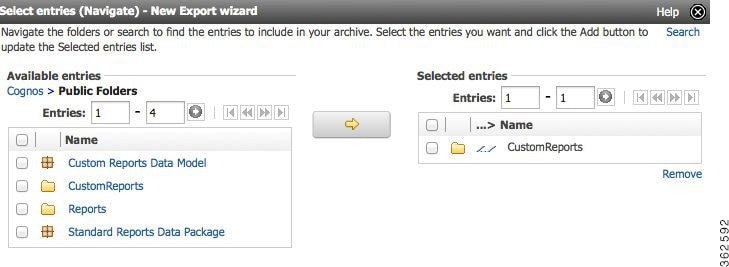
| Step 9 | Click
Add, and choose
the
CustomReports
folder created in Step 1. Choose the Custom reports folders, click
Add, and then
at the bottom, click
OK.
 |
| Step 10 | Deselect Disable after import, and then click Next. |
| Step 11 | Click Next. |
| Step 12 | In the “Select the directory content” section, choose Include Cognos groups and roles and Replace existing entries, and click Next. |
| Step 13 | In the “Specify the general options” section, choose Include access permissions and Apply to new and existing entries. |
| Step 14 | Under External namespaces, choose Include references to external namespaces. |
| Step 15 | In the “Entry ownership” section, choose The user performing the import, and click Next in the “Specify the general options” section. |
| Step 16 | In the “Specify a deployment archive” section, click Next. |
| Step 17 | In the “Review the summary” section, click Next. |
| Step 18 | In the “Select an action” section, click Finish. |
| Step 19 | Choose
Now, and in
“Run with options” section click
Run.
This process creates CustomReports.zip in the <CognosHome>\c10_64\deployment folder of Cognos SOURCE machine. |
Importing the Exported File
To import the file:
| Step 1 | Copy the exported file CustomReports.zip to the <CognosHome>\c10_64\deployment folder on the production machine. |
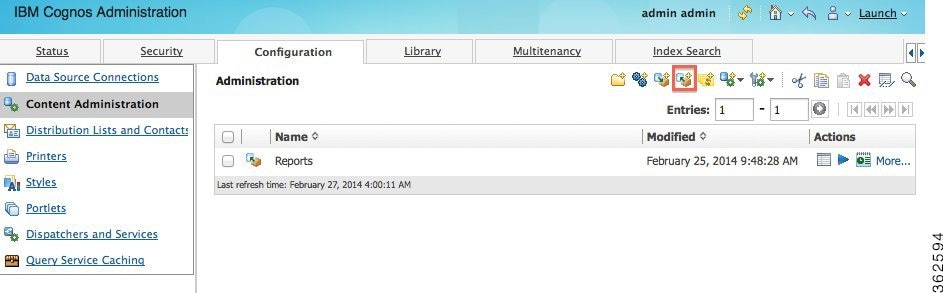
| Step 2 | Go to Launch on the top-right corner of the screen and click IBM Cognos Administration. |
| Step 3 | Click the Configuration tab. |
| Step 4 | Go to
Content Administration and then click the
New
Import icon in the top-right corner of the screen.
|
| Step 5 | Choose CustomReports, and click Next. |
| Step 6 | Choose CustomReports, and in the “Select the public folders content” section, click Next. |
| Step 7 | In the “Select the directory content” section, click Next. |
| Step 8 | In the “Specify the general options” section, click Next. |
| Step 9 | In the “Review the summary” section, click Next. |
| Step 10 | In the “Select an action” section, click Finish. |
| Step 11 | The new report folder CustomReports appears in the in public folders area of the production machine. |
Configuring the DataMart
The Service Catalog data mart can be installed without any customization, usually installed by a Service Designer. However, this “least common denominator” approach is unlikely to meet the reporting requirements of most sites. Therefore, the recommended procedure is to review the best practices presented above, in conjunction with the site's dictionary and service configuration. Using the following section as a worksheet, analysts can determine the desired data mart configuration for their site. These configuration parameters can then be used to configure Advanced Reporting.
These parameters correspond to many of the properties that must be specified when the data mart is installed. For a detailed explanation of the installation and configuration parameters used to configure the data mart and customize its installation, see Cisco Prime Service Catalog Installation and Upgrade Guide.
- Number of Dictionary and Service Tables
- Data Type Conversions
- Number of Columns in the Dictionary and Service Tables
Number of Dictionary and Service Tables
When you create the data mart, you specify the maximum number of dictionary and service dimensions the data mart will contain. Each of these dimensions will correspond to a separate table in the data mart. The number of dictionaries or services can be increased after the data mart has been installed. However, to avoid this step, be sure to create the data mart with enough tables to accommodate current requirements and enhancements that are planned for imminent deployment.
There is no “magic bullet” for determining how many tables of each type need to be created. Some guidelines are given in the previous section. Service designers need to review all dictionaries, determine which ones they want to include in the Data Mart, and designate those as Reportable by choosing Yes in the Reportable drop-down menu in the Service Designer > Dictionaries component.
Service Catalog tracks the number of service and dictionary tables which have been designated as Reportable and created in the data mart, so that the specified number is not exceeded. If you subsequently decide that a dictionary (or service) should not be reportable, you may change the corresponding Reportable field to No. This removes the source dictionary or service from the ETL job which loads the data mart. The query subjects are still available in the reporting framework; the table which holds the dictionary or service data is NOT available for use with another dictionary or service, and still counts as one of the number of tables in use.
|
Parameter |
Default Value |
SiteValue |
|---|---|---|
|
NUMBER_OF_SERVICE_TABLES |
100 |
|
|
NUMBER_OF_DICTIONARY_TABLES |
100 |
|
Data Type Conversions
All data in the data mart is stored as either a character (text) string; a number; or a date (with time component). Data from internal dictionaries is converted to the appropriate type, as shown in the table below.
|
Data Mart Column Data Type |
Internal Dictionary Data Types |
Database-Specific Implementations |
|---|---|---|
|
Number (Numeric) |
Number Money |
Oracle –NUMBER SQL Server - FLOAT |
|
Date |
Date Date and Time |
Oracle – DATE SQL Server - DATETIME |
|
Character (Varchar – variable length character strings) |
Text Person URL Account Phone SSN Boolean |
Oracle – VARCHAR2 SQL Server – VARCHAR |
A Person data type is represented in the data mart as a combination of the person's first name and last name, as shown in the “Select a Person” window on a service form. A Boolean data type is represented by the strings corresponding to “yes” and “no” as shown in the radio button representation of the data type.
Data from external dictionaries is converted into the appropriate type. For example, all numeric fields, regardless of magnitude or precision, are converted into the Number type of the target database shown in the table above. Graphic and large object (LOB) data types in external dictionary tables are not supported and are ignored when the data mart is created or data is loaded via the ETL process.
Number of Columns in the Dictionary and Service Tables
As part of the data mart configuration, designers specify how many of each type of column (character, numeric, or date) should be created in the dictionary and service tables. All dictionary tables must have an identical composition, in terms of the number of each type of column allowed. The same holds true for service tables.
 Note | SQLServer cautions against having tables with a row length greater than 8k (8192) bytes. This would impose a significant constraint on the size of the service dimension tables. Since no such limits are present in Oracle, you can increase the number of columns of each data type and the size of the text column up to a 32k total row size limit. |
An option for increasing the number of columns in the dictionary and service tables is to decrease the size of the character (VARCHAR) columns from its default value of 200 characters (specified via the DATA_STRING_MAX_SIZE property described below.) Since the maximum size of character columns applies to all dictionaries (and services), be cautious if you decide to decrease this value. Any textual data longer than the specified size is truncated.
The number of columns of each type cannot be changed after the tables have been created by the Install process.
|
Parameter |
Default Value |
SiteValue |
|---|---|---|
|
NUMBER_OF_DICTIONARY_VARCHAR_FIELDS |
40 |
|
|
NUMBER_OF_DICTIONARY_NUMERIC_FIELDS |
10 |
|
|
NUMBER_OF_DICTIONARY_DATE_FIELDS |
10 |
|
|
NUMBER_OF_SERVICE_VARCHAR_FIELDS |
80 |
|
|
NUMBER_OF_SERVICE_NUMERIC_FIELDS |
20 |
|
|
NUMBER_OF_SERVICE_DATE_FIELDS |
20 |
|
Maximum Size of Character Fields
The maximum size of character fields in the data mart dictionary and service tables is set, by default, to 200 characters. This is the size of all character (text) fields in all tables—both dictionaries and services. This property can be changed after the initial data mart installation only by running a script available from Cisco Technical Assistance Center (TAC).
Character fields accommodate data represented on service forms as single-line (text) and multi-line (textarea) fields, as well as radio buttons. One or more selections from check boxes and multi-select drop-down lists are all included in the same data mart character field, with options separated by commas. Care should be taken both when setting the maximum size of character fields. If the size is too small, data may be severely truncated; this typically affects description and comments fields. If the size is too large, performance of both the ETL process and generating reports may be adversely affected.
|
Parameter |
Default Value |
SiteValue |
|---|---|---|
|
DATA_STRING_MAX_SIZE |
200 |
|
Do the Math
Follow the procedure below to determine how to configure the data mart to support the site’s reportable dictionaries and services:
- Review the reporting requirements, to determine how many dictionaries and how many services should be reportable.
- Review the selected dictionaries (and services, if any) to determine the maximum number of each type of field (Character, Numeric, Date) required.
Scripts for Reporting
The Reporting modules require scripts that maintain the Service Catalog data mart and produce the standard reports and KPIs available to users.
Reporting Batch Programs
Service Catalog Extract-Transform-Load (ETL) scripts generated from the Cognos DataManager ETL tool control the population of the database which supports running prebuilt reports provided by Service Catalog and all nonform based data in the data mart.
Additional command files complete the generation of the framework used by Cognos QueryStudio and Report Studio (Ad-Hoc Reports and Report Designer) to permit ad-hoc reporting on the Service Catalog data mart.
These scripts share the same invocation and logging framework. They are available as Windows .cmd files that reside and run on the Cognos server. They can be scheduled to run via any enterprise scheduler. These scripts log their activities in the <ReportingInstalledDirectory>\logs directory of the Cognos server.
The following script is required to support standard reports and Key Performance Indicators (KPIs).
|
Program |
Description/Usage |
|---|---|
|
update_datamart_std.cmd |
Populates database tables which support the prebuilt reports according to ETL rules specified in Data Manager. This is a complete rebuild of the database contents, rather than an incremental refresh. Produces a log file in <cognos.root >\c10_64 \datamanager \log. |
The following programs are required to support the data marts.
|
Program |
Description/Usage |
|---|---|
|
update_datamart.cmd |
Populates the data mart tables which will be used in custom reporting package. It also extracts data for Form Data Reporting tables. This is an incremental refresh of all the tables in custom reporting package. It produces log files in cognos.root/c10-64 as well as in cognos_installed_dir/logs/ cognos_datamart_update.log. This script can be executed using the following options: |
|
create_model.cmd |
Creates a Cognos FrameworkManager model that includes dynamically defined reportable objects (dictionaries and services) as well as standard facts and dimensions. The model is rebuilt by merging a statically defined model (the standard facts and dimensions used in the data marts) with dynamically generated metadata describing reportable services and dictionaries. |
|
publish_fdr_pkg.cmd |
Publishes the FrameworkManager model to the Cognos BI Server, via the Cognos ScriptPlayer utility. Must be run as part of the Service Catalog data mart refresh, following the program that creates the model (create_model.cmd). |
Modifying Form Data Reporting Configuration
As your environment grows, you may need to increase the number of form data reporting (Ad-Hoc reporting) dictionary and service tables; for example, if you bring additional services online or decide that you need to report on the contents of additional dictionaries. You can use the FDR Configurator utility to modify the form data reporting configuration after installing Cisco Prime Service Catalog Reporting (see DataMart Reference).
This section describes how to launch and configure the FDR Configurator.
Note | You must log in as a user with administrative privileges to perform the tasks described in this section. |
Launching the FDR Configurator
To execute the program:
| Step 1 | On the Cognos machine, set the JAVA_HOME environment variable to <COGNOS_HOME >\bin64\jre\7.0. Then, add %JAVA_HOME%\bin to the beginning of the PATH environment variable. |
| Step 2 | Stop all programs that access the Data Mart database. |
| Step 3 | Go to the “<Reporting_Install_Dir>\cognos\bin” directory. |
| Step 4 | Double-click
fdrConfigurator.exe to launch the FDR Configurator.
A progress bar appears. When complete, the first page of the FDR Configurator wizard appears (Introduction), as shown below. 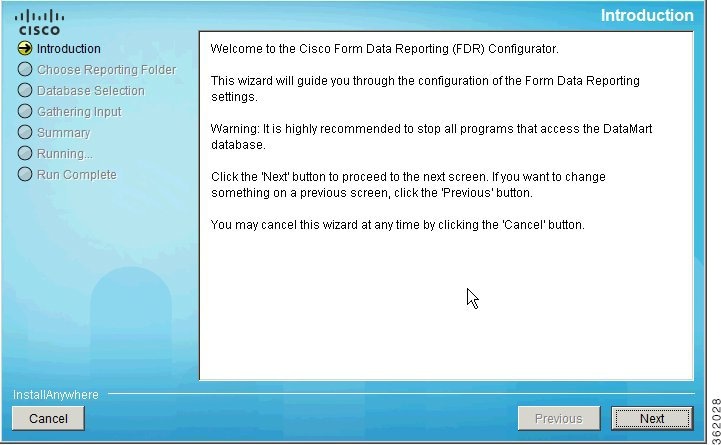
|
Running the FDR Configurator Wizard
The configuration wizard guides you through the configuration by presenting pages of fields to be configured. As each page is completed, click Next to advance to the next page, or Previous to return to a previous page. At the end of the wizard, click Install to begin the configuration. At any time, you may click Cancel to exit the wizard without configuring.
The configuration options are case-sensitive, so ensure that you enter a value, such as a database name, with case sensitivity; otherwise, your configuration may fail.
To execute the FDR Configurator wizard:
| Step 1 | Launch the FDR Configurator (see Launching the FDR Configurator). | ||||||||||
| Step 2 | On the first page of the wizard (Introduction, see Launching the FDR Configurator), click Next to begin. | ||||||||||
| Step 3 | For the next
two pages of the wizard, for the Reporting installation you want to modify,
choose your database type and enter the password for your Data Mart database,
clicking
Next after each page.
After clicking Next on the Data Mart Database page, the Form Data Reporting Tables page of the wizard appears, as shown below. 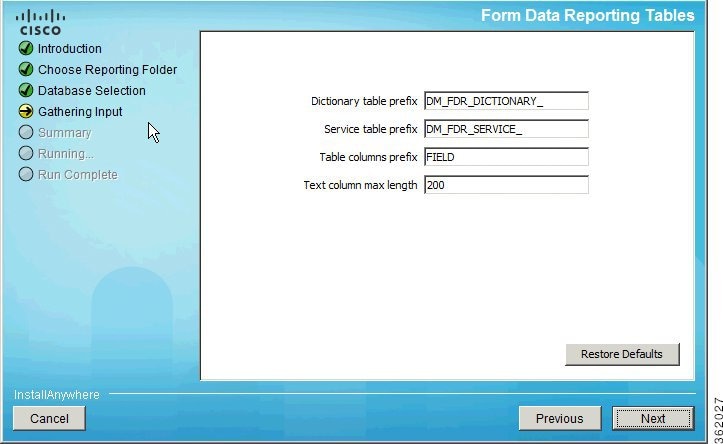
| ||||||||||
| Step 4 | Your Form Data
Reporting Tables settings are retrieved from your existing Data Mart database.
You can modify these settings as described in the table below.
If you click Restore Defaults, your edited values are overwritten by the current configuration values from your existing Data Mart database. | ||||||||||
| Step 5 | Click
Next to proceed to the next page of the wizard.
The Form Data Reporting Dictionary Settings page of the wizard appears, as shown below. 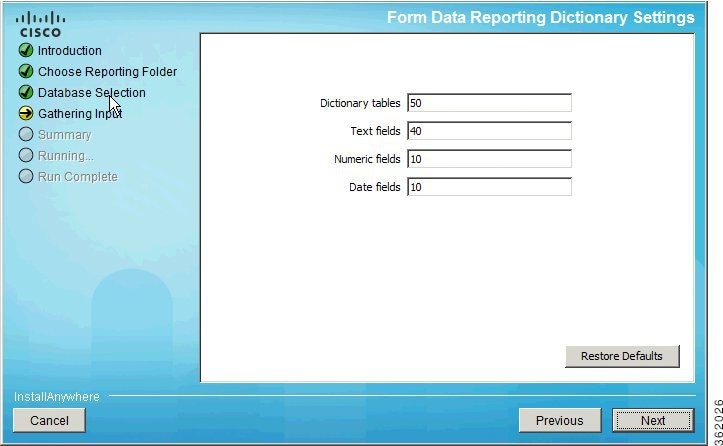
| ||||||||||
| Step 6 | Your Form Data
Reporting Dictionary settings are retrieved from your existing Data Mart
database. You can modify your Form Data Reporting Dictionary Settings as
described in the table below.
If you click Restore Defaults, your edited values are overwritten by the current configuration values from your existing Data Mart database. | ||||||||||
| Step 7 | Click
Next to proceed to the next page of the wizard.
The Form Data Reporting Service Settings page of the wizard appears, as shown below. 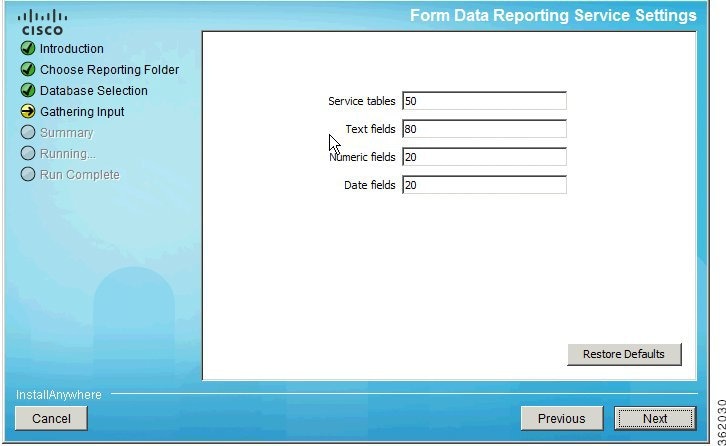
| ||||||||||
| Step 8 | Your Form
Data Reporting Service settings are retrieved from your existing Data Mart
database. You can modify your Form Data Reporting Service Settings as described
in the table below.
If you click Restore Defaults, your edited values are overwritten by the current configuration values from your existing Data Mart database. | ||||||||||
| Step 9 | Click Next to proceed to the Summary page of the wizard. | ||||||||||
| Step 10 | The configuration wizard has enough information to start the configuration process. Review the settings that appear on this page. If you need to make any changes, click Previous to go back to a page and make the necessary changes. If they are correct, click Install to begin the configuration. Do not interrupt the wizard during this process. | ||||||||||
| Step 11 | If the
configuration process completes successfully, click
Done to exit the configuration wizard.
If the configuration process fails, click Done to exit the configuration wizard, and then return to Step 1 to retry the FDR Configurator. Logs of the configuration process are located in the “<Reporting_Install_Dir>\_CSP_FDRConfigurator\Logs” directory. |
Configuring HTTPS for Cognos
This section describes how to configure HTTPS for Cognos.
To enable SSL support on the Cognos Server one has to change the protocol of the Cognos Gateway to HTTPS (assuming that the Web Server like IIS is also setup for HTTPS).

- Prerequisites and Assumptions
- Importing IIS Server Certificate to the Cognos Server
- Configuring Cognos 10.2.1 for SSL
- Changes to newscale.properties for SSL
- Verification
Prerequisites and Assumptions
- Https should be enabled on IIS Server where Cognos Server is installed.
- Remove the TCP port (80) on IIS.
Note
In Windows Server 2008 R2 we can not remove TCP port (80) and hence Firewall should be used to disable the TCP port (80). - For additional security one can use a Firewall to block all the non-SSL ports on the system where Cognos+IIS is installed (for example, port 80 and 9300).
- All Command-line utilities used for SA/Reporting will still Http protocol as those commands are run on the same system where Cognos Server is installed.
- It is also an overhead and performance concern to enable Https/SSL for the command-line utilities, and hence it remains non-SSL.
- “CognosServername” in the CnfParams table should be manually changed to set the SSL port that is configured on IIS.
Importing IIS Server Certificate to the Cognos Server
To import the IIS certificate to the Cognos server:
| Step 1 | The Server
Certificate used for IIS should be copied to a secure location on the Cognos
10.2.1 BI server.
| ||
| Step 2 | Open command prompt and go to the folder “C:\Program Files\cognos\c10_64\bin”. | ||
| Step 3 | Set JAVA_HOME=C:\Program Files\cognos\c10_64\bin64\jre\7.0. | ||
| Step 4 | Import the IIS
Server certificate into Cognos 10.2.1’s JCA Keystore by typing the following
command:
Example: ThirdPartyCertificateTool.bat -T -i -r CA_certificate_file -k crn_location/configuration/signkeypair/jCAKeystore -p password (for example: ThirdPartyCertificateTool.bat -T -i -r “c:\certnew.cer” -k “C:\Program Files\Cognos\c10-64\configuration\signkeypair\jCAKeystore” -p NoPassWordSet) |
Configuring Cognos 10.2.1 for SSL
To configure Cognos 10.2.1 for SSL:
| Step 1 | Choose Program Files > IBM Cognos 10-64 > IBM Cognos Configuration. |
| Step 2 | Choose Environment > Gateway URI. Change http to https, and port default 80 to 443. |
| Step 3 | Choose Cryptography > Use mutual authentication? and change to True. |
| Step 4 | Choose Cryptography > Cognos > Use third party CA? and change to True. |
| Step 5 | Save the configuration. |
| Step 6 | Stop the IBM Cognos Service. |
| Step 7 | Restart. |
Changes to newscale.properties for SSL
To change the newscale.properties:
Verification
To verify the changes:
| Step 1 | Log on to https://CognosServername.domain.com/cognos10, and check whether you can log on to Cognos Connection. |
| Step 2 | Log on to https://RequestCenterServername.domain.com/RequestCenter, and check whether you can navigate to Reporting or Advanced Reporting modules. |
Configuring Key Performance Indicators (KPIs)
Key Performance Indicators (KPIs) provide a quick, handy way to trace trends or statistics that are deemed critical to managing Service Catalog services.
Configuring Dashboards
The Dashboard option is part of the Reporting module. It allows you to configure the portal to display up to four KPIs.
Choose Reporting > Dashboard > Configure Dashboard button to display a list of available KPIs.
Indicate which KPIs to include by checking the check box to the left of the Report Name in Select Key Performance Indicators page. Choose the order (1–4) that the selected KPIs will display in your dashboard quadrant by using the Order drop-down menu. Click Reset to clear your choices and start again, or Cancel to exit the popup window without making any changes. Click Save KPI Selection. Changes are reflected on your Dashboard.
KPIs that measure Service Catalog performance may be specified. If you choose a KPI for a module that you do not have installed, the legend “No data available” appears rather than a graph.
Registering a New KPI
You can quickly and easily register a new KPI.
Modifying an Existing KPI
The KPI Administration option is available on the Advanced Reporting module to users who have the role of “Analytics Administrator”. The KPI Administration option allows the administrator to adjust the appearance or behavior or a KPI. To do so:
| Step 1 | Choose Advanced Reporting > KPI Administration. | ||||||||||||||||||||||||||||||||||||
| Step 2 | Select a KPI on the Select Key Performance Indicators Page. | ||||||||||||||||||||||||||||||||||||
| Step 3 | Once you choose a KPI, its properties appear on the update KPI page. | ||||||||||||||||||||||||||||||||||||
| Step 4 | The only KPI
properties that should be changed are those that define the presentation of the
KPI. These include:
For a service configured with no reportable grid dictionaries, each request for the service (that is, requisition entry) is captured by the ETL process and inserted into the corresponding DM_FDR_SERVICETABLE as one row of data. However, for a service configured with one or more reportable grid dictionaries, the ETL process inserts multiple rows of data into the DM_FDR_SERVICETABLE table. The number of rows inserted corresponds to the greatest number of rows in any of the reportable grid dictionaries. For example, consider a service with a reportable nongrid dictionary (Employee) and two reportable grid dictionaries (Contact, Address). Assume a request for this service has three rows of data in Contact, two rows of data in Address, and some data in the Employee dictionary. The form data captured in the service table for this service would look the following:
|
 Feedback