Cisco Tidal Enterprise Scheduler 6.2 Transporter User Guide
Bias-Free Language
The documentation set for this product strives to use bias-free language. For the purposes of this documentation set, bias-free is defined as language that does not imply discrimination based on age, disability, gender, racial identity, ethnic identity, sexual orientation, socioeconomic status, and intersectionality. Exceptions may be present in the documentation due to language that is hardcoded in the user interfaces of the product software, language used based on RFP documentation, or language that is used by a referenced third-party product. Learn more about how Cisco is using Inclusive Language.
- Updated:
- June 6, 2014
Chapter: Running Transporter in Batch Mode
Overview
Transporter can run from the command line or as a batch job in TES. Transporter in command line mode only applies to jobs. You can either run using an existing selection file or you can specify parameters so that Transporter can transfer a job or job group between source and destination as a batch job in TES.
Using Transporter Command Parameters
The following command parameters are required to use Transporter to batch a selection file, job, or job group in TES. Also, quotes are required for parameters which include white space.
- -i – The name of the selection file that was created by selecting jobs/job groups at an earlier time. If you are using a selection file, you do not need the other parameters as these parameters are specified in the selection file (unless you wish to override the parameter values).
- -a – If you are copying a single job, specify its job alias. You must also use the -s , -d , and -m parameters with the -a parameter. If a job already exists in the destination, it will still be copied unless the -X option is used.
-g – If you are copying a job group specify the full path with the group name in the following format:
You must also use the -s , -d , and -m parameters with the -a or -g parameter. If a job group already exists in the destination, it will still be copied unless the -X option is used.
- -s – The name of the source. (Required if not using a selection file.)
- -d – The name of the destination. (Required if not using a selection file.)
- -m – The name of the map file. (Required if not using a selection file.)
In addition, there are other options that can be included in the parameters.
- -D – Disables the jobs that are copied to the destination. The jobs will have to be manually enabled before they can be run.
- -S – Automatically copies all predecessors of the selected jobs as well.
- -A – Annotates the Notes tab of a job/job group definition that the object or job/group was copied from another source.
- -X – Excludes duplicates. Does not copy a job or job group already present in the destination.
- -SP – If a job selected for copying is a child job then all of the parent job groups it belongs to are also automatically selected for copying.
- -SC – If a job selected for copying is a parent job then all of its child jobs are also automatically selected for copying.
- -C – Compiler option, valid values are OFF (No Compile), NOW (Compile - Repeats Start Now) and SKIP (Compile - Skip Repeats).
- -E – yyyyMMdd where (yyyyMMdd is the date format of the effective date for the compile).
- -I – Ignore conflicts.
Running Batch Jobs with Transporter
Transporter can be scheduled as a batch job in TES to copy a job/job group or a saved selection of jobs between source and destination.
To run batch jobs with Transporter:
Step 1![]() Create a job definition in TES and complete the header text fields.
Create a job definition in TES and complete the header text fields.
Step 2![]() In the
Command
field, enter the path to the command mode transporter executable.
In the
Command
field, enter the path to the command mode transporter executable.
Step 3![]() In the
Command Parameters
field, enter the parameters to use when copying the jobs. For example, to copy a job with alias 7663 from the
fulton
destination to the
drakken
destination:
In the
Command Parameters
field, enter the parameters to use when copying the jobs. For example, to copy a job with alias 7663 from the
fulton
destination to the
drakken
destination:
-s fulton -d drakken -a 7663 -D -S -N OFF -m drak.map
To copy jobs from a selection file named Accont.xpr :
Step 4![]() Complete the rest of the job definition as with any other job.
Complete the rest of the job definition as with any other job.
From a Command Line
When scheduling Transporter batch mode to run with the Tidal Agent, the agent must logon using a user account with access to Transporter. The following is an example of setting up the agent user account for Windows.
The following are examples for scheduling batch-mode transports of jobs:
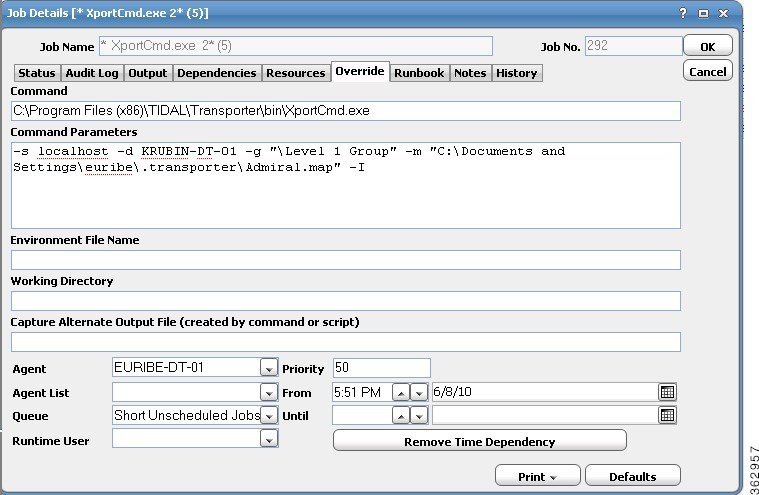
The following dialog shows a group called Level 1 Group copied from source database localhost to destination database UBIN-RT-01 , while ignoring conflicts. Also, since auto selection parameters -S(autoselect deps) , -SP(autoselect parents) , and -SC(autoselect children) have not been specified, transporter will apply the user options set for the current transporter user.
When transporting a single job via the -g (fully qualified group name) or -a (job alias) parameter(s), -m (map file name) , -s (source database) and -d (destination database) are required. The following example also includes -I (allow conflicts) .
Also note that quotes are required for parameters which include white space.
The following dialog shows a group called Level 1 Group copied from source database ruibe-bt-01 to destination database testvm-bt-01 , while ignoring conflicts.
This example uses a selections file to transport job(s), which contains all information required for transport. When using a selections file, no other parameters are required, but may be specified if you would like to override certain values specified in the selections file.
Transporter Job Exit Codes
If a Transporter job does not complete successfully, it will have one of the following exit codes. Find the exit code to diagnose why the job was not successful.
2 = Invalid destination specified.
3 = Processing parameters failed.
4 = Processing selection file failed.
7 = Unable to find and select all items.
8 = Unable to find the job or job group.
9 = Notify master option has an invalid value. Valid values are Y or N.
10 = Compiler option has an invalid value. Valid values are OFF, NOW and SKIP.
11 = Invalid effective date used.
12 = Group or Job not specified.
14 = Source and destination must be different.
15 = Unable to connect to source and destination.
16 = Invalid selection type in selection file.
 Feedback