- Preface
- Installation Prerequisites
- Installing the Master for Windows
- Installing the Master for Unix
- Installing Client Manager
- Installing the Java Client
- Installing Fault Tolerance
- Installing the Agent
- Installing Adapters
- Basic Configuration
- Configuring SSL Messaging
- Defining Users
- Upgrading Components
- Troubleshooting TES
- Appendix A
- Appendix B
Cisco Tidal Enterprise Scheduler 6.2 Installation Guide
Bias-Free Language
The documentation set for this product strives to use bias-free language. For the purposes of this documentation set, bias-free is defined as language that does not imply discrimination based on age, disability, gender, racial identity, ethnic identity, sexual orientation, socioeconomic status, and intersectionality. Exceptions may be present in the documentation due to language that is hardcoded in the user interfaces of the product software, language used based on RFP documentation, or language that is used by a referenced third-party product. Learn more about how Cisco is using Inclusive Language.
- Updated:
- July 1, 2016
Chapter: Installing Client Manager
Installing Client Manager
This chapter outlines the installation procedure for installing Client Manager.
Two main components of the TES architecture are the Master and Client Manager. The Client Manager allows TES to achieve higher performance and scalability needs. Its purpose is to service requests from user-initiated activities, such as through the Tidal Web Client, Tidal Transporter and from other external sources that utilize the Command Line Interface (CLI) or published TES Web services. Client Manager allows the TES master to focus more capacity on core scheduling needs related to job execution and job compilations, while the Client Manager addresses demands from activities such as users viewing/configuring scheduling data and output. A single Client Manager is mandatory and additional Client Managers can be deployed to address additional performance needs.

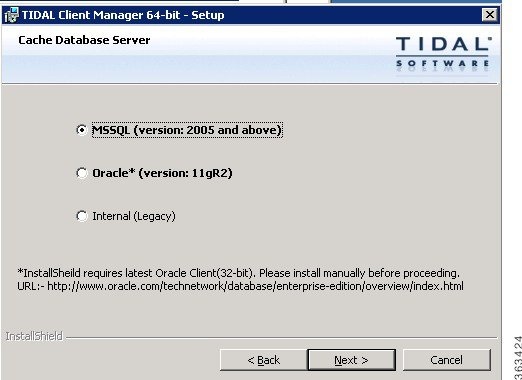
Note![]() With TES version 6.2.0, you can deploy a stand-alone TES cache database ( MSSQL 2005, 2008, 2012 or Oracle 11gR2), as opposed to using the default embedded cache database (Derby). Having a stand-alone cache database allows for faster synchronization time upon Client Manager startup. Additionally, a stand-alone cache database improves the overall UI experience by offering faster filtering and scrolling response times.
With TES version 6.2.0, you can deploy a stand-alone TES cache database ( MSSQL 2005, 2008, 2012 or Oracle 11gR2), as opposed to using the default embedded cache database (Derby). Having a stand-alone cache database allows for faster synchronization time upon Client Manager startup. Additionally, a stand-alone cache database improves the overall UI experience by offering faster filtering and scrolling response times.
Installation Prerequisites
For Unix
For Windows
Compatibility Matrix


Before You Begin
- Obtain machine names, host names, port numbers and IP addresses before beginning the installation.
- Ensure that each computer used for TES can communicate with the other machines on the network. If you cannot ping to and from each component machine, TES cannot function properly. Network conditions affect the operation of TES.
- Ensure that you are logged on with an account that has Administrator privileges.
- Review any supplementary documentation provided with your software.
- Exit all Windows programs before running any installation.
- Contact Support if you have any questions.
Installation Procedures
If the minimum system requirements have been met, Client Manager can be installed on the same machine as the master. Before installing Client Manager:
- install and configure a TES Windows/Unix master
- install JDK version 1.7 on the Client Manager machine
Installing Client Manager for Windows
Step 1![]() Transfer the appropriate installation files to the target machine (binary mode).
Transfer the appropriate installation files to the target machine (binary mode).
Step 2![]() Double-click setup.exe. The Security Warning dialog box displays.
Double-click setup.exe. The Security Warning dialog box displays.
Step 3![]() Click Run. The Internet Explorer-Security Warning dialog box displays.
Click Run. The Internet Explorer-Security Warning dialog box displays.
Step 4![]() Click Run. The InstallShield Wizard Welcome dialog box displays.
Click Run. The InstallShield Wizard Welcome dialog box displays.
Step 5![]() Click Next. The Destination Folder panel displays.
Click Next. The Destination Folder panel displays.
Step 6![]() Select the directory where the TES files will reside.
Select the directory where the TES files will reside.
Step 7![]() Click Next. The TES DSP Name and Master IP panel displays.
Click Next. The TES DSP Name and Master IP panel displays.
Step 8![]() In the TES DSP NAME field, enter the name of your Data Source (TES 6.2) Plug-in.
In the TES DSP NAME field, enter the name of your Data Source (TES 6.2) Plug-in.
This value can be anything you want it to be. The default is tes-6.2.
Note![]() Architecturally, the Client Manager is written to be a generic container of plug-ins and is not TES-specific. The TES-specific parts of the UI are in TES plugin.
Architecturally, the Client Manager is written to be a generic container of plug-ins and is not TES-specific. The TES-specific parts of the UI are in TES plugin.
Step 9![]() In the Primary Server IP field, enter the host name or IP address for your primary master. The default port is 6215.
In the Primary Server IP field, enter the host name or IP address for your primary master. The default port is 6215.
Step 10![]() If using Fault Tolerance, in the Backup Server IP field, enter the IP address for your backup master.
If using Fault Tolerance, in the Backup Server IP field, enter the IP address for your backup master.
Step 11![]() Click Next. The Cache Database Server panel displays.
Click Next. The Cache Database Server panel displays.
By default, Internal Cache DB server is selected. Alternatively, external DB servers may be provisioned to run Cache Database.
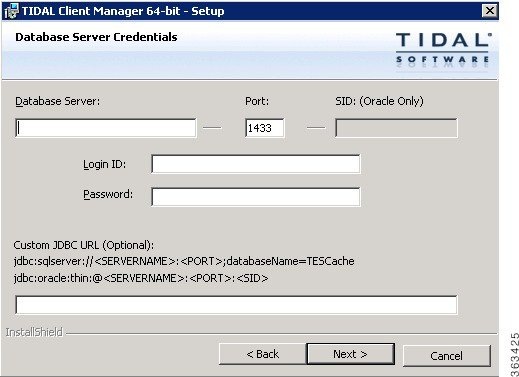
Step 12![]() Click Next. The Database Server Credentials panel displays if you selected an external database server.
Click Next. The Database Server Credentials panel displays if you selected an external database server.
Figure 4-1 Database Server Credentials Panel
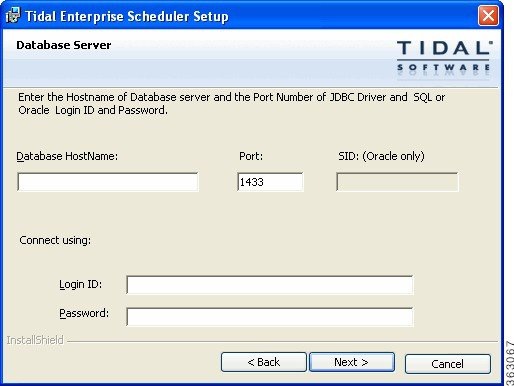
Step 13![]() Enter the credentials for the selected external database, then click Next. The Active Directory/LDAP Authentication panel displays.
Enter the credentials for the selected external database, then click Next. The Active Directory/LDAP Authentication panel displays.
Step 14![]() Select an option, then click Next.
Select an option, then click Next.
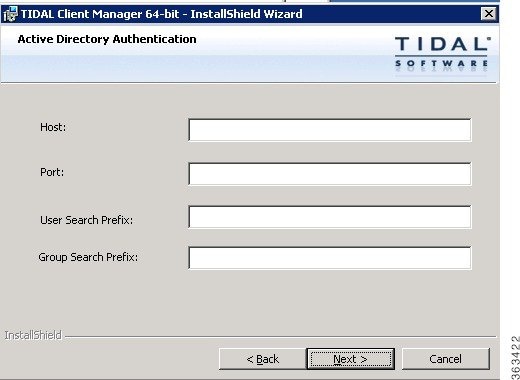
If configuring the Client Manager to use the Active Directory option, the Active Directory Authentication panel displays.
Figure 4-2 Active Directory Authentication Panel
If configuring the Client Manager to use the LDAP option, the LDAP Authentication panel displays.
Figure 4-3 LDAP Authentication Panel

Step 15![]() For Active Directory, enter the following information:
For Active Directory, enter the following information:
For LDAP, enter the following information:
- Hostname – Enter the hostname or IP address for the LDAP server.
- Port – Enter the port number for the LDAP server.
- BindDN – Enter the user account to query the LDAP server.
- UserObjectClass – Specify a valid object class for the BindDB user. Only users who posses one or more of these objectClasses will be permitted to authenticate.
- UserBindDN – Enter the user account to query the LDAP server.
- User-role based access for Oracle/Sun Directory Server – Select this option if your TES 6.2 Web Client user authentication is defined to use Oracle/Sun Directory Server with role-based access.
- GroupBindDN – Enter the group account to query the LDAP server.
Security.Authentication=ActiveDirectory
ActiveDirectory.UserSearchPrefix=DC=tidalsoft,DC=local
ActiveDirectory.GroupSearchPrefix=DC=tidalsoft,DC-local
LDAP.BindDN=ou=people,dc=tidalsoft,dc=local
LDAP.UserObjectClass=inetOrgPerson
LDAP.ContextFactory=com.sun.jndi.ldap.LdapCtxFactory
LDAP.AuthenticationMethod=simple
LDAP.UserBindDN=dc=tidalsoft,dc=local
Note![]() TES 6.2 allows for multiple-domain user authentication for CM. The purpose of this function is to allow users defined in different domains to be authenticated within one CM configuration to avoid installing one CM per domain limitation.
TES 6.2 allows for multiple-domain user authentication for CM. The purpose of this function is to allow users defined in different domains to be authenticated within one CM configuration to avoid installing one CM per domain limitation.
To enable this function:
1. Add the following new property value in clientmgr.props, located under <CM_INSTALL>\config.
Security.Authentication.Ext.File=user-auth.xml
Where user-auth.xml is the file name.
2.Build the user-auth.xml file to include all AD/LDAP servers for TES user authentication.
<ext-user-auth>
<user-auth>
<name>TIDALSOFT</name>
<desc>Configure AD for user user authentication</desc>
<type>ActiveDirectory</type>
<host>hou-ad-1.tidalsoft.local</host>
<port>389</port>
<ad.usersearchprefix>DC=tidalsoft,DC=local</ad.usersearchprefix>
<ad.groupsearchprefix>DC=tidalsoft,DC=local</ad.groupsearchprefix>
</user-auth>
<user-auth>
<name>ITTIDAL</name>
<desc>Configure Open LDAP Server for user authentication</desc>
<type>LDAP</type>
<host>10.88.103.148</host>
<port>5389</port>
<ldap.binddn>ou=People,dc=ittidal,dc=com</ldap.binddn>
<ldap.userobjectclass>account</ldap.userobjectclass>
<ldap.userbinddn>dc=ittidal,dc=com</ldap.userbinddn>
<ldap.groupbinddn>cn=testest,ou=Group,dc=ittidal,dc=com</ldap.groupbinddn>
<ldap.useridentifiertype>uid</ldap.useridentifiertype>
</user-auth>
</ext-user-auth>
In the above example, the authentication process will validate tidalsoft first and then ittidal.
Step 16![]() Click Next. The Ready to Install the Program panel displays.
Click Next. The Ready to Install the Program panel displays.
Step 17![]() Click Install. The Installing Tidal Client Manager panel displays.
Click Install. The Installing Tidal Client Manager panel displays.
Step 18![]() If any information is incorrect, retrace your steps and correct the information by clicking Back until you reach the desired screen.
If any information is incorrect, retrace your steps and correct the information by clicking Back until you reach the desired screen.
If the information is correct, click Install to start the installation of the Client Manager files.
The Installing Tidal Client Manager panel displays. The status of your client installation displays with a progress bar.

Step 19![]() The Setup Completed panel displays.
The Setup Completed panel displays.
Note![]() Before starting the Client Manager, be sure to apply the latest hotfix obtained from cisco.com. To ensure compatibility, apply the latest 6.2 hotfix patches to the Master and other components, each time the hotfix patches are applied to the CM. The first time the Client Manager is started, it initializes its data from the master. Depending upon the amount of data, this could take up to 20 minutes.
Before starting the Client Manager, be sure to apply the latest hotfix obtained from cisco.com. To ensure compatibility, apply the latest 6.2 hotfix patches to the Master and other components, each time the hotfix patches are applied to the CM. The first time the Client Manager is started, it initializes its data from the master. Depending upon the amount of data, this could take up to 20 minutes.
Verifying Successful Installation
You should verify that the installation program installed all of the required files.
Verify that Client Manager files were installed by going to the directory location that you designated during installation.
The seven main file directories (not counting the UninstallerData directory) are listed at the top with the contents of the lib and config directories also displayed.
Note![]() Watch for the primary and secondary sync in cliengmanager\log\clientmgr.out. Completion of the primary sync indicates that the client can be logged into, but all data has not been loaded yet. Please wait until the secondary sync is complete to properly view all jobs and information.
Watch for the primary and secondary sync in cliengmanager\log\clientmgr.out. Completion of the primary sync indicates that the client can be logged into, but all data has not been loaded yet. Please wait until the secondary sync is complete to properly view all jobs and information.
Installing Client Manager for Unix
To install Client Manager for Unix:
Step 1![]() Copy install.bin to the target machine.
Copy install.bin to the target machine.
Step 2![]() Change the permissions on the copied install.bin file to make the file executable by entering:
Change the permissions on the copied install.bin file to make the file executable by entering:
Step 3![]() After copying the file to the directory, begin the installation program by entering:
After copying the file to the directory, begin the installation program by entering:
When the installation program starts, the installation splash screen displays.
The Introduction panel follows.
Step 4![]() After reading the introductory text that explains how to cancel the installation or modify a previous entry on a previous screen, click Next. The Choose Installation Folder panel displays.
After reading the introductory text that explains how to cancel the installation or modify a previous entry on a previous screen, click Next. The Choose Installation Folder panel displays.
Step 5![]() Enter the directory path to the location where you wish to install the master files or click Choose to browse through the directory tree to the desired directory.
Enter the directory path to the location where you wish to install the master files or click Choose to browse through the directory tree to the desired directory.
Step 6![]() Click Next. The TES DSP Name and master IP panel displays.
Click Next. The TES DSP Name and master IP panel displays.
Figure 4-4 TES DSP Name and master IP Panel
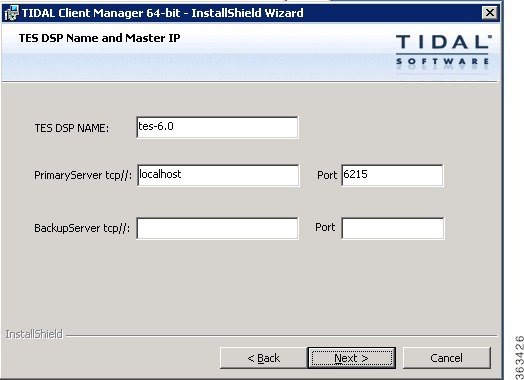
Step 7![]() In TES DSP NAME field, enter the name of your Data Source (TES 6.2) Plug-in.
In TES DSP NAME field, enter the name of your Data Source (TES 6.2) Plug-in.
This value can be anything you want it to be. The default is tes-6.2.
Note![]() Architecturally, the Client Manager is written to be a generic container of plug-ins and is not TES-specific. The TES-specific parts of the UI are in TES plugin.
Architecturally, the Client Manager is written to be a generic container of plug-ins and is not TES-specific. The TES-specific parts of the UI are in TES plugin.
Step 8![]() Enter the following details:
Enter the following details:
- Primary Server IP—Enter the host name or IP address for your primary master. The default port is 6215.
- Backup Server IP— If using Fault Tolerance, enter the IP address for your backup master.
Step 9![]() Click Next. The Cache Database Server panel displays.
Click Next. The Cache Database Server panel displays.
Step 10![]() Click Next. The Database Server Credentials panel displays.
Click Next. The Database Server Credentials panel displays.
Step 11![]() Enter the required authentication information, then click Next. The Active Directory/LDAP Authentication panel displays. See also, TES 6.2 allows for multiple-domain user authentication for CM. The purpose of this function is to allow users defined in different domains to be authenticated within one CM configuration to avoid installing one CM per domain limitation. To enable this function: 1. Add the following new property value in clientmgr.props, located under <CM_INSTALL>\config. Security.Authentication.Ext.File=user-auth.xml Where user-auth.xml is the file name. 2.Build the user-auth.xml file to include all AD/LDAP servers for TES user authentication. <ext-user-auth> <user-auth> <name>TIDALSOFT</name> <desc>Configure AD for user user authentication</desc> <type>ActiveDirectory</type> <host>hou-ad-1.tidalsoft.local</host> <port>389</port> <ad.usersearchprefix>DC=tidalsoft,DC=local</ad.usersearchprefix> <ad.groupsearchprefix>DC=tidalsoft,DC=local</ad.groupsearchprefix> </user-auth> <user-auth> <name>ITTIDAL</name> <desc>Configure Open LDAP Server for user authentication</desc> <type>LDAP</type> <host>10.88.103.148</host> <port>5389</port> <ldap.binddn>ou=People,dc=ittidal,dc=com</ldap.binddn> <ldap.userobjectclass>account</ldap.userobjectclass> <ldap.userbinddn>dc=ittidal,dc=com</ldap.userbinddn> <ldap.groupbinddn>cn=testest,ou=Group,dc=ittidal,dc=com</ldap.groupbinddn> <ldap.useridentifiertype>uid</ldap.useridentifiertype> </user-auth> </ext-user-auth> In the above example, the authentication process will validate tidalsoft first and then ittidal..
Enter the required authentication information, then click Next. The Active Directory/LDAP Authentication panel displays. See also, TES 6.2 allows for multiple-domain user authentication for CM. The purpose of this function is to allow users defined in different domains to be authenticated within one CM configuration to avoid installing one CM per domain limitation. To enable this function: 1. Add the following new property value in clientmgr.props, located under <CM_INSTALL>\config. Security.Authentication.Ext.File=user-auth.xml Where user-auth.xml is the file name. 2.Build the user-auth.xml file to include all AD/LDAP servers for TES user authentication. <ext-user-auth> <user-auth> <name>TIDALSOFT</name> <desc>Configure AD for user user authentication</desc> <type>ActiveDirectory</type> <host>hou-ad-1.tidalsoft.local</host> <port>389</port> <ad.usersearchprefix>DC=tidalsoft,DC=local</ad.usersearchprefix> <ad.groupsearchprefix>DC=tidalsoft,DC=local</ad.groupsearchprefix> </user-auth> <user-auth> <name>ITTIDAL</name> <desc>Configure Open LDAP Server for user authentication</desc> <type>LDAP</type> <host>10.88.103.148</host> <port>5389</port> <ldap.binddn>ou=People,dc=ittidal,dc=com</ldap.binddn> <ldap.userobjectclass>account</ldap.userobjectclass> <ldap.userbinddn>dc=ittidal,dc=com</ldap.userbinddn> <ldap.groupbinddn>cn=testest,ou=Group,dc=ittidal,dc=com</ldap.groupbinddn> <ldap.useridentifiertype>uid</ldap.useridentifiertype> </user-auth> </ext-user-auth> In the above example, the authentication process will validate tidalsoft first and then ittidal..
Step 12![]() Select an option, then click Next.
Select an option, then click Next.
If configuring the Client Manager to use the Active Directory option, the Active Directory Authentication panel displays. If configuring the Client Manager to use the LDAP option, the LDAP Authentication panel displays.
Step 13![]() For Active Directory, enter the following information:
For Active Directory, enter the following information:
For LDAP, enter the following information:
- Hostname – Enter the hostname or IP address for the LDAP server.
- Port – Enter the port number for the LDAP server.
- BindDN – Enter the user account to query the LDAP server.
- UserObjectClass – Specify a valid object class for the BindDB user. Only users who posses one or more of these objectClasses will be permitted to authenticate.
- UserBindDN – Enter the user account to query the LDAP server.
- User-role based access for Oracle/Sun Directory Server – Select this option if your TES Web Client user authentication is defined to use Oracle/Sun Directory Server with role-based access.
- GroupBindDN – Enter the group account to query the LDAP server.
Step 14![]() Click Next. The Pre-Installation Summary panel displays.
Click Next. The Pre-Installation Summary panel displays.
This screen summarizes the information entered during the installation procedure.
Step 15![]() Review the information to ensure it is correct.
Review the information to ensure it is correct.
Step 16![]() If any information is incorrect, retrace your steps and correct the information by clicking Previous until you reach the desired screen.
If any information is incorrect, retrace your steps and correct the information by clicking Previous until you reach the desired screen.
If the information is correct, click Install to start the installation of the Client Manager files.
The Installing Tidal Client Manager panel displays.
The status of your installation is displayed with a progress bar. The Install Complete panel displays.
Step 17![]() Click Done to exit the installer.
Click Done to exit the installer.
Note![]() The first time the Client Manager is started, it initializes its data from the master. Depending upon the amount of data, this could take up to 20 minutes.
The first time the Client Manager is started, it initializes its data from the master. Depending upon the amount of data, this could take up to 20 minutes.
Installing Client Manager from a Command Line
To install Client Master from a command line:
Step 1![]() Copy install.bin to the target machine.
Copy install.bin to the target machine.
Step 2![]() Change the permissions on the copied install.bin file to make the file executable by entering:
Change the permissions on the copied install.bin file to make the file executable by entering:
Step 3![]() After copying the file to the directory, begin the installation program by entering:
After copying the file to the directory, begin the installation program by entering:
The following screen displays as the installation program begins.
When the installation program starts, the Introduction screen displays.
Step 4![]() After reading the introductory text that explains how to cancel the installation or modify an previous entry on a previous screen, press Enter. The Choose Installation Folder screen displays.
After reading the introductory text that explains how to cancel the installation or modify an previous entry on a previous screen, press Enter. The Choose Installation Folder screen displays.
Step 5![]() Enter the directory path to the location where you wish to install the Client Manager files, then press Enter.
Enter the directory path to the location where you wish to install the Client Manager files, then press Enter.
Step 6![]() Verify the path you entered, then press Enter. The Get TES DSP Name and master IP screen displays.
Verify the path you entered, then press Enter. The Get TES DSP Name and master IP screen displays.
Note![]() The master machines, both primary and backup, must have mirror configurations, meaning that both machines must use the same version of operating system and JVM for fault tolerance to operate correctly.
The master machines, both primary and backup, must have mirror configurations, meaning that both machines must use the same version of operating system and JVM for fault tolerance to operate correctly.
Step 7![]() Enter the name of your Data Source (TES 6.2) Plug-in, then press Enter.
Enter the name of your Data Source (TES 6.2) Plug-in, then press Enter.
Step 8![]() Enter the host name or IP address for your primary master, then press Enter.
Enter the host name or IP address for your primary master, then press Enter.
Step 9![]() Enter the port number for the primary master, then press Enter.
Enter the port number for the primary master, then press Enter.
Step 10![]() Enter the host name or IP address for your backup master, then press Enter.
Enter the host name or IP address for your backup master, then press Enter.
Step 11![]() Enter the port number for the backup master, then press Enter.
Enter the port number for the backup master, then press Enter.
Step 12![]() If using Fault Tolerance, enter the IP address for your backup master, then press Enter. The Get Authentication Method screen displays.
If using Fault Tolerance, enter the IP address for your backup master, then press Enter. The Get Authentication Method screen displays.
Step 13![]() Enter 1 for the Active Directory option or 2 for the LDAP option, then press Enter.
Enter 1 for the Active Directory option or 2 for the LDAP option, then press Enter.
Step 14![]() For Active Directory, enter the following information:
For Active Directory, enter the following information:
- Host – Enter the hostname or IP address for the Active Directory server.
- User Search Prefix – Enter the location you want Active Directory to search for users.
- Group Search Prefix – Enter the location you want Active Directory to search for groups.
- Port – Enter the port number for the AD server.
Note![]() Contact your IT Administrator for Active Directory/LDAP authentication values.
Contact your IT Administrator for Active Directory/LDAP authentication values.
For LDAP, enter the following information:
- Hostname – Enter the hostname or IP address for the LDAP server.
- Port – Enter the port number for the LDAP server.
- BindDN – Enter the user account to query the LDAP server.
- UserObjectClass – Specify a valid object class for the BindDB user. Only users who posses one or more of these objectClasses will be permitted to authenticate.
- UserBindDN – Enter the user account to query the LDAP server.
- User-role based access for Oracle/Sun Directory Server – Enter 1 for Yes if your TES Web Client user authentication is defined to use Oracle/Sun Directory Server with role-based access.
Step 15![]() Press Enter. The Pre-Installation Summary screen displays.
Press Enter. The Pre-Installation Summary screen displays.
Step 16![]() Press Enter. The Installing screen displays.
Press Enter. The Installing screen displays.
Once installation is complete, the Installation Complete screen displays.
Step 17![]() Press Enter to exit the installer.
Press Enter to exit the installer.
Verifying Successful Installation
You should verify that the installation program installed all of the required files.
Verify that Client Manager files were installed by going to the directory location that you designated during installation and listing the directory contents with the following command:
The seven main file directories (not counting the UninstallerData directory) are listed at the top with the contents of the bin, lib and config directories also displayed.
Starting and Stopping Client Manager
Starting and Stopping the Windows Client Manager
Step 1![]() From the Windows Start menu on the master machine, choose Programs > TIDAL Software > Scheduler > Master > Service Control Manager to display the Tidal Service Manager.
From the Windows Start menu on the master machine, choose Programs > TIDAL Software > Scheduler > Master > Service Control Manager to display the Tidal Service Manager.
Step 2![]() From the Service list, choose Client Manager. The Client Manager status displays at the bottom of the dialog box.
From the Service list, choose Client Manager. The Client Manager status displays at the bottom of the dialog box.
Step 3![]() Click Start to start the Client Manager.
Click Start to start the Client Manager.
Step 1![]() From the Windows Start menu on the master machine, choose Programs > TIDAL Software > Scheduler > Master > Service Control Manager to display the Tidal Service Manager.
From the Windows Start menu on the master machine, choose Programs > TIDAL Software > Scheduler > Master > Service Control Manager to display the Tidal Service Manager.
Step 2![]() From the Service list, select Client Manager. The Client Manager status displays at the bottom of the dialog box.
From the Service list, select Client Manager. The Client Manager status displays at the bottom of the dialog box.
Starting and Stopping the Unix Client Manager
Step 1![]() Open a command prompt window.
Open a command prompt window.
Note![]() ./ may not be required on some systems. Consult your system administrator to determine how the commands should be used.
./ may not be required on some systems. Consult your system administrator to determine how the commands should be used.
Step 1![]() Open a command prompt window.
Open a command prompt window.
Uninstalling Client Manager
Uninstalling the Windows Client Manager
The TES master is uninstalled from the Windows Control Panel.
Step 1![]() From the Windows Start menu, choose Control Panel, then double-click Add or Remove Programs.
From the Windows Start menu, choose Control Panel, then double-click Add or Remove Programs.
Step 2![]() Scroll down the list of programs installed on the machine to the Client Manager program.
Scroll down the list of programs installed on the machine to the Client Manager program.
Step 3![]() Click the Client Manager program to highlight it.
Click the Client Manager program to highlight it.
Step 4![]() Click Remove to start the uninstallation process. A confirmation message displays.
Click Remove to start the uninstallation process. A confirmation message displays.
Step 5![]() Click OK to uninstall. The Preparing Setup panel displays showing a progress bar. When the progress bar reaches 100%, a confirmation dialog box displays.
Click OK to uninstall. The Preparing Setup panel displays showing a progress bar. When the progress bar reaches 100%, a confirmation dialog box displays.

Warning![]() Do not cancel the uninstallation process once it begins or the uninstallation program will not be able to find its files the next time you attempt to uninstall. If you do cancel the uninstall, you will need to contact Technical Services.
Do not cancel the uninstallation process once it begins or the uninstallation program will not be able to find its files the next time you attempt to uninstall. If you do cancel the uninstall, you will need to contact Technical Services.
Note![]() During uninstallation, a dialog box may display indicating that some files are locked because they are shared by other applications. Ignore the locked files and continue with the uninstallation.
During uninstallation, a dialog box may display indicating that some files are locked because they are shared by other applications. Ignore the locked files and continue with the uninstallation.
Step 7![]() Repeat to remove other components.
Repeat to remove other components.
Step 8![]() Once you complete uninstalling components, reboot the machine to clear the registry..
Once you complete uninstalling components, reboot the machine to clear the registry..
Warning![]() If you do not reboot after uninstallation(s), any subsequent installation may fail.
If you do not reboot after uninstallation(s), any subsequent installation may fail.
Some files or folders under the Scheduler folder that were created after the installation might not be removed. You may want to manually delete these files and folders. The log file and the database created during installation remain and must be removed in separate procedures.
Uninstalling the Unix Client Manager
To uninstall the Client Manager:
Step 1![]() Open a command prompt window.
Open a command prompt window.
# sh./Uninstall_UnixClientManager
Step 3![]() Press Enter. The Preparing CONSOLE Uninstall panel displays followed by the About to uninstall panel.
Press Enter. The Preparing CONSOLE Uninstall panel displays followed by the About to uninstall panel.
Step 4![]() Click Complete Uninstall to completely remove all features and components of Client Manager that were installed.
Click Complete Uninstall to completely remove all features and components of Client Manager that were installed.
Click Uninstall Specific Features to choose specific features of Client Manager that were installed to be uninstalled.
Step 5![]() Click Next. A status bar is displayed to illustrate the progress of the uninstallation program.
Click Next. A status bar is displayed to illustrate the progress of the uninstallation program.
Once the uninstall is complete, the Uninstall Complete panel displays.
The Client Manager for Unix is now uninstalled. Any files that were created after the Client Manager is installed are not removed. Files that were not removed must be manually removed.
Note![]() The uninstallation program only removes the Client Manager files installed at the time of installation. If you created other files in the master directory after installation, these files are not removed. You must manually delete these additional files.
The uninstallation program only removes the Client Manager files installed at the time of installation. If you created other files in the master directory after installation, these files are not removed. You must manually delete these additional files.
.Uninstalling the Client Manager From the Unix Console
You can also uninstall the Client Manager from the console. The program that uninstalls the Client Manager is one of the files installed during installation of the Client Manager. The program, called Uninstall_ClientManager, is in the Client Manager directory created during installation.
To uninstall the Client Manager using the command line:
Step 1![]() Open a command prompt window.
Open a command prompt window.
# sh./Uninstall_ClientManager -i console
Step 3![]() Press Enter. The Preparing CONSOLE Uninstall screen displays followed by the About to uninstall screen.
Press Enter. The Preparing CONSOLE Uninstall screen displays followed by the About to uninstall screen.
Step 4![]() Press Enter. A status bar is displayed to illustrate the progress of the uninstallation program.
Press Enter. A status bar is displayed to illustrate the progress of the uninstallation program.
The Client Manager is now uninstalled. Any files that were created after the Client Manager is installed are not removed. Files that were not removed must be manually removed.
Step 5![]() Press Enter to exit the installation.
Press Enter to exit the installation.
Note![]() The uninstallation program only removes the master files installed at the time of installation. If you created other files in the master directory after installation, these files are not removed. You must manually delete these additional files.
The uninstallation program only removes the master files installed at the time of installation. If you created other files in the master directory after installation, these files are not removed. You must manually delete these additional files.
Configuring SSL
Configuring SSL for Web Client Connections
This section describes the procedure to enable SSL on for Web Client connections. Client Manager uses an embedded Jetty Web Server to implement web access, configuring SSL on Client Manager is essentially the same as that on Jetty. A simple demo is discussed in the next section to provide a jumpstart.
Note that this guide assumes you already have the following Cisco Tidal products installed and connected to one another:
Demo
The Client Manager comes with a demo certificate to allow you to quickly test its SSL functionality.
Step 1![]() Shut down the Client Manager.
Shut down the Client Manager.
Step 2![]() Using a text editor, open Web server configuration file config/webserver.xml located in Client Manager installation directory.
Using a text editor, open Web server configuration file config/webserver.xml located in Client Manager installation directory.
Note![]() Back up this file before you start editing it to ensure there is a good copy to fall back to.
Back up this file before you start editing it to ensure there is a good copy to fall back to.
Step 3![]() Find the segment of SSL connector that looks like the following. Uncomment the segment by removing "<!--" at the beginning and "-->" at the end.
Find the segment of SSL connector that looks like the following. Uncomment the segment by removing "<!--" at the beginning and "-->" at the end.
<New class="org.mortbay.jetty.security.SslSelectChannelConnector">
<Set name="truststore">config/demo-keystore</Set>
<Set name="keystore">config/demo-keystore</Set>
<Set name="trustPassword">OBF:1vny1ym91x1b1z...</Set>
<Set name="password">OBF:1vny1ym91x1b1z7e1vu...</Set>
<Set name="keyPassword">OBF:1u2u1vn61z0p1yt4...</Set>
<Set name="maxIdleTime">30000</Set>
<Set name="statsOn">true</Set>
<Set name="lowResourceMaxIdleTime">5000</Set>
<Set name="lowResourcesConnections">5000</Set>
Step 4![]() Save the file and start the Client Manager.
Save the file and start the Client Manager.
Step 5![]() Open a web browser on the Client Manager host system and enter the URL of TES Web UI with HTTPS protocol, as seen below:
Open a web browser on the Client Manager host system and enter the URL of TES Web UI with HTTPS protocol, as seen below:
Note![]() You may be prompted with a message about the site does not have a trusted certificate. This is because the demo certificate is not signed by a certificate authority. It is only for demo purpose and not meant to be used in production server. You may instruct the browser to proceed.
You may be prompted with a message about the site does not have a trusted certificate. This is because the demo certificate is not signed by a certificate authority. It is only for demo purpose and not meant to be used in production server. You may instruct the browser to proceed.
Your browser is now communicating with the Client Manager via HTTPS protocol.
Configuring SSL Using Your Own Certificate
Step 1![]() Obtaining server key and certificate
Obtaining server key and certificate
You may generate key and certificate by yourself or obtain them from a trusted certificate authority (CA):
a.![]() Generating key and certificate
Generating key and certificate
There are various tools that allow you to generate keys and certificates, among them the Java Keytool that comes with JRE installation.
Java Keytool Example: generating key and certificate in a keystore
keytool -keystore my_keystore -alias tescm -genkey -keyalg RSA
Once you have the keystore, you can follow the instructions in Step 2 to configure SSL connector for the Client Manager. However, your certificate will not be trusted by web browser and user will be prompted to this effect. To set up a production grade server, you must request a well known certificate authority (CA) to sign your key/certificate.
b.![]() Obtaining key and certificate from a trusted CA
Obtaining key and certificate from a trusted CA
There are many trusted CA's, such as AddTrust, Entrust, GeoTrust, RSA Data Security, Thawte, VISA, ValiCert, Verisign, beTRUSTed. Each CA has its own instructions which should be followed (look for JSSE section), but all will involve a step to generate a certificate signing request (CSR).
Java Keytool Example: generating CSR
keytool -certreq -alias tescm -keystore my_keystore -file mycsr.csr
Step 2![]() Configuring SSL connector with the server key and certificate.
Configuring SSL connector with the server key and certificate.
In this section, you will edit the web server configuration file with the key and certificate you obtained from previous section.
a.![]() Shut down the Client Manager.
Shut down the Client Manager.
b.![]() Copy your server key store to the config directory in Client Manager's installation directory.
Copy your server key store to the config directory in Client Manager's installation directory.
c.![]() Using a text editor to open the Jetty Web Server configuration file config/webserver.xml located in Client Manager installation directory.
Using a text editor to open the Jetty Web Server configuration file config/webserver.xml located in Client Manager installation directory.
Note![]() Back up this file before editing it to ensure there is a good copy to fall back to.
Back up this file before editing it to ensure there is a good copy to fall back to.
d.![]() Uncomment the segment of SSL connector as described in Step 2 of Demo.
Uncomment the segment of SSL connector as described in Step 2 of Demo.
e.![]() Replace the values of the following elements by the values applicable to your certificate.
Replace the values of the following elements by the values applicable to your certificate.
"keystore": Path to the key store mentioned in step b
"password": Password needed to open the key store
"keyPassword": Password needed to read the key, if it's different from the password of the key store
Note![]() Back up this file before editing it to ensure there is a good copy to fall back to.
Back up this file before editing it to ensure there is a good copy to fall back to.
Note that you can obfuscate the passwords before storing them in the file so their secrecy is secured:
–![]() First, open a command shell window and change directory to the lib directory under Client Manager's installation directory.
First, open a command shell window and change directory to the lib directory under Client Manager's installation directory.
–![]() Issue one of the following commands:
Issue one of the following commands:
java -cp./jetty-6.2.10.jar;./jetty-util-6.2.10.jar org.mortbay.jetty.security.Password blah <your_password>
java -cp./jetty-6.2.10.jar:./jetty-util-6.2.10.jar org.mortbay.jetty.security.Password blah <your_password>
where <your_password> is the password to be obfuscated.
–![]() From the output of the command, copy the entire line that starts with "OBF:" (including OBF:) and paste it into the value field of that password in the file.
From the output of the command, copy the entire line that starts with "OBF:" (including OBF:) and paste it into the value field of that password in the file.
–![]() Repeat step 1 to 3 for each of the other passwords.
Repeat step 1 to 3 for each of the other passwords.
f.![]() Optionally, you can change the port number to be used with HTTPS protocol by modifying the value of the "Port" element. Default is 8443 as seen in the file.
Optionally, you can change the port number to be used with HTTPS protocol by modifying the value of the "Port" element. Default is 8443 as seen in the file.
g.![]() Save the file and start the Client Manager.
Save the file and start the Client Manager.
Step 3![]() Testing HTTPS connection to Client Manager from Web browser.
Testing HTTPS connection to Client Manager from Web browser.
Open a Web browser and enter the URL of TES Web UI with HTTPS protocol, for example:
https://<hostname>:<portnumber>/client
Replace <hostname> by the actual DNS name or IP address of the Client Manager system.
Replace <portnumber> by the actual port number of the SSL connector.
Your browser is now communicating with the Client Manager via HTTPS protocol.
Configuring SSL access for use with Active Directory server
Follow these steps to connect to a Active Directory, SSL-enabled environment.
Step 1![]() Shut down the Client Manager.
Shut down the Client Manager.
Step 2![]() Download the CA certificate for the Active Directory server from CA Certificate server, or export the installed Certificate from browser. Then save the certificate into a file.
Download the CA certificate for the Active Directory server from CA Certificate server, or export the installed Certificate from browser. Then save the certificate into a file.
a.![]() N avigate to http://<CA_SERVER>/certsrv , and th en click Download a CA certificate, certificate chain, or CRL.
N avigate to http://<CA_SERVER>/certsrv , and th en click Download a CA certificate, certificate chain, or CRL.
b.![]() From the CA Certificate list, choose the certificate.
From the CA Certificate list, choose the certificate.
c.![]() From the Encoding method section, click the DER radio button.
From the Encoding method section, click the DER radio button.
d.![]() Click Download CA Certificate.
Click Download CA Certificate.
e.![]() Save the certificate, such as certnew.cer.
Save the certificate, such as certnew.cer.
Step 3![]() Build a trusted keystore for the CA certificate.
Build a trusted keystore for the CA certificate.
C:\>keytool -import -trustcacerts -keystore store.jks -alias <unique-name> -file certnew.cer -storepass password
Step 4![]() Using a text editor, modify <CM_INSTALL>/config/clientmgr.props to include the following three lines, then save clientmgr.props :
Using a text editor, modify <CM_INSTALL>/config/clientmgr.props to include the following three lines, then save clientmgr.props :
Security.SSL.trustStore=c:\\<path>\\store.jks
Security.SSL.trustStorePassword=password
Step 5![]() Restart the Client Manager.
Restart the Client Manager.
Connecting to an Active Directory or Open LDAP, SSL-enabled environment
To connect to a Active Directory or Open LDAP, SSL-enabled environment:
Step 1![]() Stop the Client Manager.
Stop the Client Manager.
Step 2![]() Request a copy of the CA Certificate for Client access.
Request a copy of the CA Certificate for Client access.
For Active Directory server, download the CA certificate from CA Certificate server, or export the installed Certificate from your browser.
For example:
a.![]() Navigate to http://<CA_SERVER>/certsrv, and then click Download a CA certificate, certificate chain, or CRL.
Navigate to http://<CA_SERVER>/certsrv, and then click Download a CA certificate, certificate chain, or CRL.
b.![]() From the CA Certificate list, select the certificate.
From the CA Certificate list, select the certificate.
c.![]() From the Encoding method section, click the DER radio button.
From the Encoding method section, click the DER radio button.
d.![]() Click Download CA Certificate.
Click Download CA Certificate.
e.![]() Save the certificate, such as certnew.cer.
Save the certificate, such as certnew.cer.
For Open LDAP server, copy a DER encoded CA Certificate from the Open LDAP Client to the Client Manager machine. For example, certnew.cer.
Step 3![]() Build a trusted keystore for the CA certificate.
Build a trusted keystore for the CA certificate.
C:\>keytool -import -trustcacerts -keystore store.jks -alias <unique-name> -file certnew.cer -storepass password
Step 4![]() Using a text editor, modify <CM_INSTALL>/config/clientmgr.props to include the following three lines, then save clientmgr.props.
Using a text editor, modify <CM_INSTALL>/config/clientmgr.props to include the following three lines, then save clientmgr.props.
Security.SSL.trustStore=c:\\<path>\\store.jks
Security.SSL.trustStorePassword=password
Step 5![]() Restart the Client Manager.
Restart the Client Manager.
References
- How to configure SSL http://docs.codehaus.org/display/JETTY/How+to+configure+SSL
- Securing Passwords http://docs.codehaus.org/display/JETTY/Securing+Passwords
- SslSelectChannelConnector http://jetty.codehaus.org/jetty/jetty-6/apidocs/org/mortbay/jetty/security/SslSelectChannelConnector.html
 Feedback