- Preface
- Supplemental License Agreement
- Installing the Product Software
- Running the Setup Program
- Configuring Cisco IOS CNS Agents
- Setting Up a Multizone System
- Setting Up a Multihomed System
- Scalability Among Event Gateway Ports
- Cisco CNS Configuration Engine SSL Security
- Installing the VMware
- Index
Cisco Configuration Engine Installation and Configuration Guide 3.5.4
Bias-Free Language
The documentation set for this product strives to use bias-free language. For the purposes of this documentation set, bias-free is defined as language that does not imply discrimination based on age, disability, gender, racial identity, ethnic identity, sexual orientation, socioeconomic status, and intersectionality. Exceptions may be present in the documentation due to language that is hardcoded in the user interfaces of the product software, language used based on RFP documentation, or language that is used by a referenced third-party product. Learn more about how Cisco is using Inclusive Language.
- Updated:
- April 10, 2014
Chapter: Setting Up a Multihomed System
Setting Up a Multihomed System
By default, the installation of the Cisco Configuration Engine software offers a single-homed system setup. If you require a multihomed system setup, you must manually customize the network parameters of the Cisco Configuration Engine server. This chapter provides instructions for manually customizing these network parameters. It contains the following sections:
Setup Restrictions
Two network interfaces are installed in the Cisco Configuration Engine server: eth0 (Ethernet 0) and eth1 (Ethernet 1). Both interfaces can be configured and connected to networks. Cisco Configuration Engine setup has the following restrictions:
1.![]() The hostname and domain name that are input at setup make up the identity for eth0.
The hostname and domain name that are input at setup make up the identity for eth0.
2.![]() There are no hostname and domain name assignments for eth1.
There are no hostname and domain name assignments for eth1.
3.![]() For both eth0 and eth1 interfaces, the default gateway must be configured on the same network as eth0.
For both eth0 and eth1 interfaces, the default gateway must be configured on the same network as eth0.
4.![]() Ethernet0 is used to connect to the management network. The customer premises equipment (CPE) resides in the management network.
Ethernet0 is used to connect to the management network. The customer premises equipment (CPE) resides in the management network.
5.![]() There are no setup prompts that allow you to add additional routes into the routing table.
There are no setup prompts that allow you to add additional routes into the routing table.
6.![]() The Cisco Configuration Engine user interface does not allow you to manipulate the routing table.
The Cisco Configuration Engine user interface does not allow you to manipulate the routing table.
7.![]() The routing table changes are not automatically backed up and saved.
The routing table changes are not automatically backed up and saved.
Typical Deployment of the Multihomed System
Figure 5-1 shows a typical deployment of Cisco Configuration Engine server with the Cisco Configuration Engine software in a two-network environment: private network and public network.
- Private Network—The private network contains the Network Operation Center (NOC), where the provisioning applications connect to the Cisco Configuration Engine through the CNS Event Bus.
- Public Network—The public network is the entry to the management network where CPE connects to the Cisco Configuration Engine through TCP connections.
This deployment provides security to network management because it physically isolates provisioning applications from external traffic.
Figure 5-1 Typical Deployment of a Multihomed System
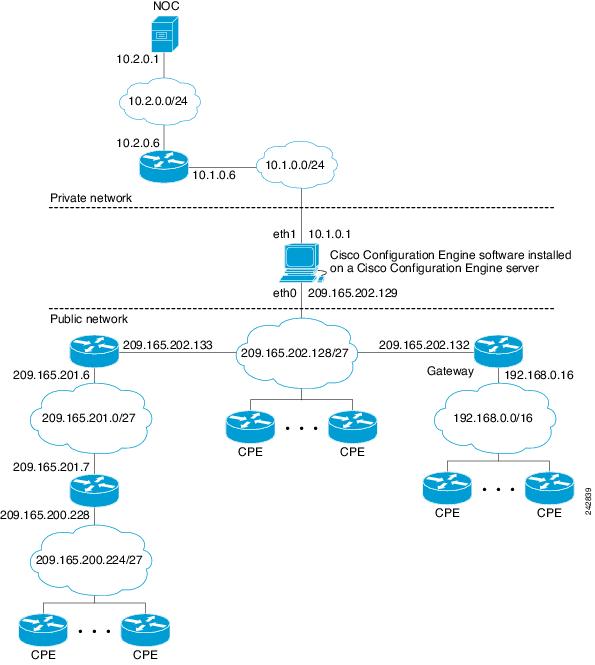
See Figure 5-1 and Setup Restrictions, and note the following:
- Ethernet0 is used for connecting to the CPE in the public (management) network (restriction 4) and eth1 is used for connecting to the provisioning applications in the private network.
- Gateway 209.165.202.132 is the default gateway because setup restricts the location of the default gateway (restriction 3). In effect, this restriction requires all routes going to the private network to be explicitly declared (or controlled) in the Cisco Configuration Engine server’s routing table.
- The CNS Event Bus Network Parameter prompt in the Cisco Configuration Engine setup controls the location of the CNS Event Bus. By default, the CNS Event Bus is set to eth0, which means that the event bus is started on the public network. If you choose to start the event bus on the private network, you must set the CNS Event Bus Network Parameter to the eth1 IP address.
- By default, Cisco Configuration Engine setup automatically creates direct and default routes in the routing table. The network administrator must manually add the indirect routes to the routing table (restriction 5). For details, see Adding Indirect Routes to the Routing Table, page 5-50 .

Note In the public network, the routes leading to networks 209.165.201.0/27, 192.168.0.0/16, and 209.165.200.224/27 could be defined either in the default gateway or in the Cisco Configuration Engine server. Defining the routes in the default gateway is preferable because it reduces management burden on the Cisco Configuration Engine server. In this chapter, however, we defined the routes in the Cisco Configuration Engine server to illustrate the routing table management tasks that you can perform on the server.
Understanding the Routing Table
The routing table in the Cisco Configuration Engine server plays a major role in maintaining the two network topologies. The Cisco Configuration Engine server is not a gateway for passing traffic between the public and private network, and it should be controlled and restrained from network access. Thus, the number of routes to be maintained in the routing table must be small. The current approach for maintaining the routing table is static routing.
Each route in the routing table describes a path from the network interface to the reachable network for directing outbound traffic. There are three types of routes required in the routing table: direct, indirect, and default.
Direct routes specify the networks that are directly connected to the network interfaces. For example, the two directly connected networks in Figure 5-1 are networks 10.1.0.0/24 and 209.165.202.128/27. The two direct routes are:
Indirect routes describe the paths from the directly connected gateways to the indirectly connected networks. See Figure 5-1, and note the following information.
The indirectly connected networks in the public network are:
The indirect routes in the public network are:
- 209.165.202.133 > 209.165.201.0/27
- 209.165.202.132 > 192.168.0.0/16
- 209.165.202.133 > 209.165.200.224/27
Note A packet destined for network 209.165.200.224/27 is first forwarded to gateway 209.165.202.133, which sends it to gateway 209.165.201.7; therefore, the route 209.165.202.133 > 209.165.200.224/27 is required in the Cisco Configuration Engine server’s routing table.
The indirect route in the private network is:
The default route specifies the default gateway for sending outgoing packets that have no matching routes. The default route in Figure 5-1 is 209.165.202.132 > 0.0.0.0/0.
Note Network 0.0.0.0/0 is a wildcard notation that matches any network address.
Manually Updating the Routing Table
By default, Cisco Configuration Engine setup automatically creates the direct and default routes in the routing table. The network administrator must manually add the indirect routes to the routing table. The following sections provide the steps for manually adding indirect routes and changing the default route:
Note When modifying the routing table, we recommend that you log in through the serial port console connection.
Indirect Routes
Use variations of the route command to display, add, or delete routes from the routing table. The following sections provide more information:
Displaying the Routing Table
Use the route –n command to display the routing table:
Note The –n part of the command allows numerical addresses to be displayed instead of symbolic hostnames, thus avoiding DNS for hostname lookup. This prevents the command from hanging if the DNS is not ready or reachable.
Note The first two lines are direct routes (eth0 > 209.165.202.128 and eth1 > 10.1.0.0).
The last line is the default route (209.165.202.132 > 0.0.0.0). This default route was configured during Cisco Configuration Engine setup.
The third line is the route for using the loopback interface (lo > 172.16.0.0). This is the interface with a special IP address:172.16.0.1. This loopback interface is configured by default during setup.
Adding Indirect Routes to the Routing Table
Use the route add command to add indirect routes to the routing table. You must specify the network address, network mask, gateway address, and network interface identifier in the command:
Note In the example, the first line adds the indirect route for the private network: 10.1.0.6 > 10.2.0.0/24.
The next three lines add the indirect routes for the public network:
209.165.202.133 > 209.165.201.0/27
209.165.202.132 > 192.168.0.0/16
209.165.202.133 > 209.165.200.224/27
After you add the indirect routes, use the route –n command to display the updated routing table:
Deleting a Route from the Routing Table
Use the route del command to delete a route from the routing table. For example, to delete the route to network 209.165.200.224, enter the following command:
Persistent Update—Indirect Routes
Modifying the routing table with the route command provides only a temporary solution that is in effect until the machine reboots. For a persistent update, add the indirect routes into the file /etc/sysconfig/static-routes, in the following format:
any <type destination-address> netmask <netmask-address> gw <gateway-address> dev <interface number>
When the server reboots, the network startup script, /etc/rc.d/init.d/network, executes the following route add command for each line in the static routes table, beginning with the keyword any (as shown in the example above):
route add <type destination-address> netmask <netmask-address> gw <gateway-address> dev <interface number>
Note If the routes are no longer required, you must physically remove them from the /etc/sysconfig/static-routes file.
Default Route
Use the route command to change the default route on the routing table. The following sections provide more information:
Changing the Default Route
To change the default route, you must first delete the existing default route and then add the new default route to the routing table. For example, to change the default route in Figure 5-1 so that it points to the default gateway 10.1.0.6 that is connected to eth0 on the public network, follow these steps:
Step 1![]() Delete the default route. To delete the default route 209.165.202.132, enter the following command:
Delete the default route. To delete the default route 209.165.202.132, enter the following command:
route del default gw 209.165.202.132
Step 2![]() Add the default route. To add the default route 10.1.0.6, enter the following command:
Add the default route. To add the default route 10.1.0.6, enter the following command:
Example of the Routing Table with the Default Gateway 10.1.0.6
Note The last line displays the new default route.
Persistent Update—Default Routes
The /etc/sysconfig/network file stores the following network parameters:
For a persistent default route update, you must substitute the GATEWAY parameter and the GATEWAYDEV parameter with the new desired values; for example, 10.1.0.6 and eth1.
Note The Setup program updates the file with the gateway parameters, but your manual changes are lost when you rerun the Setup program.
Reloading the Routing Table
You can reload the routing table in one of the following ways:
- Use the route command to update temporary changes, modify the associated file, and then reboot the machine for persistent changes.
- Enter the following command directly at the command line: /etc/rc.d/init.d/network restart . This updates the routing table with all persistent changes without rebooting your machine.
Information About the /etc/hosts File
The hostname and domain name that you added during the Cisco Configuration Engine Setup program defined the identity of the system and of eth0. This information is stored in the /etc/hosts file. If a name is required for eth1, you can add it to the /etc/hosts file. However, the setup script removes eth0 and eth1 entries from the /etc/hosts file at setup and regenerates the eth0 entry only. Therefore, you must re-add the eth1 entry after each setup. Other entries are not affected.
 Feedback