- Preface
- New and Changed Information
- Getting Started
- Securing the Cisco APIC-EM
- Managing Users
- Enabling Applications on the Cisco APIC-EM
- Configuring IWAN-Specific Settings
- Configuring Telemetry
- Backing Up and Restoring the Cisco APIC-EM
- Managing the Cisco APIC-EM
- Monitoring the Cisco APIC-EM Services
Cisco Application Policy Infrastructure Controller Enterprise Module Administrator Guide, Release 1.6.x
Bias-Free Language
The documentation set for this product strives to use bias-free language. For the purposes of this documentation set, bias-free is defined as language that does not imply discrimination based on age, disability, gender, racial identity, ethnic identity, sexual orientation, socioeconomic status, and intersectionality. Exceptions may be present in the documentation due to language that is hardcoded in the user interfaces of the product software, language used based on RFP documentation, or language that is used by a referenced third-party product. Learn more about how Cisco is using Inclusive Language.
- Updated:
- October 23, 2017
Chapter: Securing the Cisco APIC-EM
Securing the Cisco APIC-EM
About Cisco APIC-EM Security
The Cisco APIC-EM requires a multi-layered architecture to support its basic functionality. This multi-layered architecture consists of the following components:
-
External network or networks—The external network exists between administrators and applications on one side of the network, and the Grapevine root and clients within an internal network or cloud on the other side. Both administrators and applications access the Grapevine root and clients using this external network.
-
Internal network—The internal network consists of both the Grapevine root and clients.
-
Device management network—This network consists of the devices that are managed and monitored by the controller. Note that the device management network is essentially the same as the external network described above. This may be physically or logically segmented from the admins or northbound applications.
Any inter-communications between the layers and intra-communications within the layers are protected through encryption, authentication, and segmentation.
 Note | For information about the different services running on the clients within the internal network, see Chapter 4, Cisco APIC-EM Services. |
PKI and the Cisco APIC-EM
The Cisco APIC-EM relies on Public Key Infrastructure (PKI) to provide secure communications. PKI consists of certificate authorities, digital certificates, and public and private keys.
Certificate authorities (CAs) manage certificate requests and issue digital certificates to participating entities such as hosts, network devices, or users. The CAs provide centralized key management for the participating entities.
Digital signatures, based on public key cryptography, digitally authenticate the hosts, devices and/or individual users. In public key cryptography, such as the RSA encryption system, each entity has a key pair that contains both a private key and a public key. The private key is kept secret and is known only to the owning host, device or user. However, the public key is known to everyone. Anything encrypted with one of the keys can be decrypted with the other. A signature is formed when data is encrypted with a sender's private key. The receiver verifies the signature by decrypting the message with the sender's public key. This process relies on the receiver having a copy of the sender's public key and knowing with a high degree of certainty that it really does belong to the sender and not to someone pretending to be the sender.
Digital certificates link the digital signature to the sender. A digital certificate contains information to identify a user or device, such as the name, serial number, company, department, or IP address. It also contains a copy of the entity's public key. The CA that signs the certificate is a third party that the receiver explicitly trusts to validate identities and to create digital certificates.
To validate the signature of the CA, the receiver must first know the CA's public key. Typically this process is handled out of band or through an operation done at installation. For instance, most web browsers are configured with the public keys of several CAs by default.
Cisco APIC-EM PKI Planes
The Cisco APIC-EM provides PKI-based connections in the following distinct PKI planes:
-
Controller PKI Plane—HTTPS connections in which the controller is the server in the client-server model, and the controller's server certificate secures the connection. The controller's server certificate can be self-signed (default) or issued by an external CA (recommended.)
-
Device PKI Plane—DMVPN connections between devices in the control plane of the network, bilaterally authenticated and secured by the device ID certificates of both devices that participate in the connection. A private CA provided by the Cisco APIC-EM controller (the Device PKI CA) manages these certificates and keys.
-
Grapevine Service PKI Plane—The Grapevine root manages this internal PKI plane that secures communications between Grapevine services in a multi-host cluster; the Grapevine Service PKI Plane is not externally accessible, so it is not discussed further here.
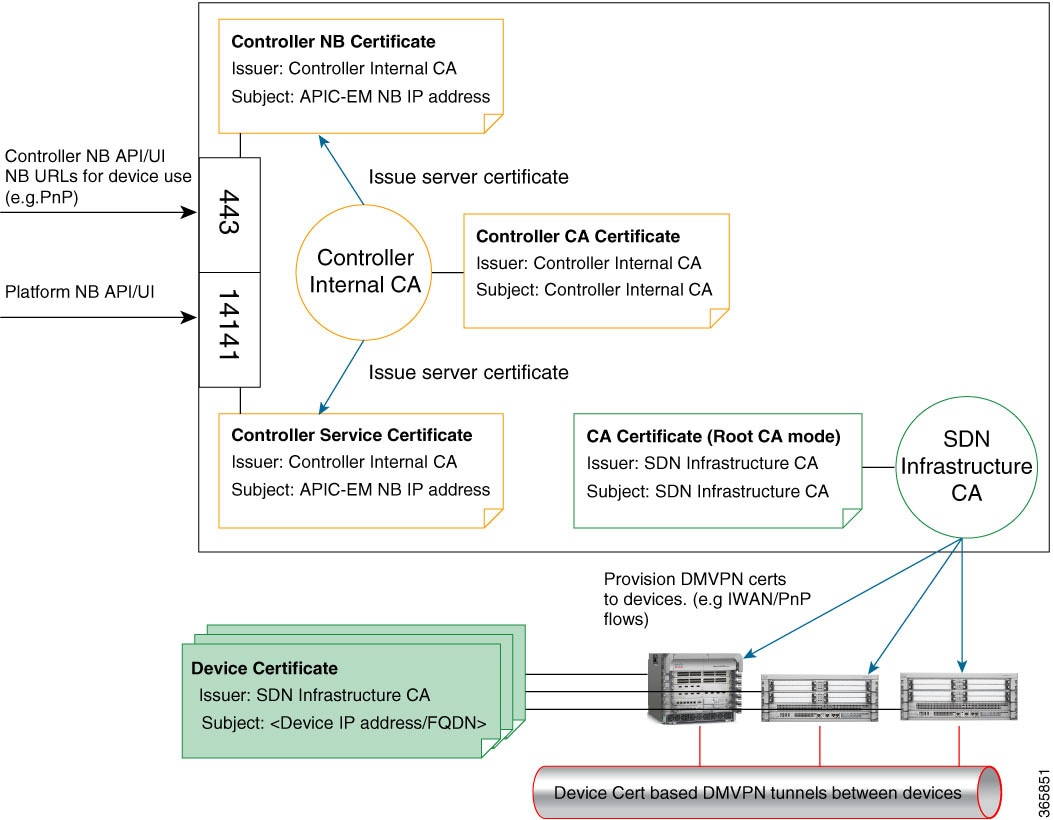
The following is a schematic of the Cisco APIC-EM PKI planes, certificate authorities, and certificates. The Controller PKI Plane employs a Controller Internal CA that in response to external requests provides a Controller NB certificate and Controller CA certificate. The Grapevine PKI Plane employs the same Controller Internal CA that in response to internal requests (from controller services) provides a Controller Service Certificate. The Device PKI Plane employs a SDN Infrastructure CA that provides a CA Certificate (Root CA mode in this schematic) for IWAN and PnP devices.
The Cisco APIC-EM PKI planes support different trust relationships or domains as displayed with the use cases in the following table:
|
|
Authentication |
Encryption |
Use Case |
|---|---|---|---|
|
Controller PKI Plane: external caller initiates connection to controller |
|||
|
HTTPS |
Caller presents username and password or service ticket; Controller presents server certificate. |
Yes |
REST client, including Cisco Network Plug N Play (PnP) mobile app or Cisco Prime Infrastructure |
|
HTTPS |
One-way: controller presents its server certificate. |
Yes |
Cisco Network Plug N Play (PnP) provisioning workflow |
|
|
|
|
|
|
Device PKI Plane: device-to-device connections |
|||
|
DMVPN |
Bilateral authentication via Internet Key Exchange Version 2 (IKEv2) using certificates/keys issued by a private CA within the Cisco APIC-EM controller. |
Yes |
DMVPN connections between devices |
Note | The security content and discussion in this deployment guide concerns itself primarily with the Controller PKI Plane. For information about the Device PKI Plane, see the PKI Planes in Cisco APIC-EM Technote. |
Controller PKI Plane
When an external caller initiates an HTTPS connection to the controller, the controller presents its server certificate. Such connections include the following:
-
Logins to the Cisco APIC-EM GUI via HTTPS
-
Logins to the Grapevine APIs (port 14141) via HTTPS
-
Invocations of the NB REST API via HTTPS
When a NB REST API caller initiates an HTTPS connection to the controller to invoke a NB REST API or to download a file (such as a device image, a configuration, and so on) the controller (server) presents its server certificate to the caller (client) that requested the connection.
Only two NB REST APIs use HTTP instead of HTTPS: the API that downloads the trustpool bundle (GET /ca/trustpool), and the API that downloads the controller's certificate (GET /ca/pem). All other NB REST APIs utilize HTTPS.
Note that controller-initiated connections to devices do NOT take place within the Controller PKI Plane. Even if the connections use SSH or SNMPv3, no CA manages the keys involved, so the connection is not considered to be PKI-based. The controller may initiate connections to devices for purposes that include discovery, managing tags, pushing policy to devices, or interacting with devices on behalf of a REST caller. For compatibility with older devices, discovery can optionally use the TELNET protocol, which is insecure and therefore outside the scope of this PKI discussion.
Device PKI Plane
IWAN-managed control-plane devices form Dynamic Multipoint VPN (DMVPN) connections among themselves. A private Certificate Authority (CA) provided by the Cisco APIC-EM (the Device PKI CA) provisions the certificates and keys that secure these DMVPN connections. The PKI broker service manages these certificates and keys as directed by an admin in the IWAN GUI or as directed by a REST caller that uses the /certificate-authority and /trust-point NB REST APIs.
Note | In the default mode, the Device PKI CA in the Cisco APIC-EM cannot be a subordinate/intermediate CA to any external CA. These two PKI planes (one for the controller connections and the other for the device-to-device DMVPN connections) remain completely independent of each another. In the current release, the IWAN devices’ mutual interaction certificates are managed only by the Device PKI CA. External CAs cannot manage the IWAN-specific certificates that devices present to each other for DMVPN tunnel-creation and related operations. |
Device PKI Plane Modes
The Device PKI Plane supports two modes:
-
Root mode-—The private CA provided by the Cisco APIC-EM controller does not interact with any other CA. This is the default mode for the controller.
-
Sub CA mode —In Sub CA mode, the private CA provided by the Cisco APIC-EM controller can be an intermediary CA to an external CA. This means that the private controller CA still manages the certificates and keys that secure device-to-device communications, but it is in a subordinate position to that external CA. This mode must be enabled by an administrator (ROLE_ADMIN).
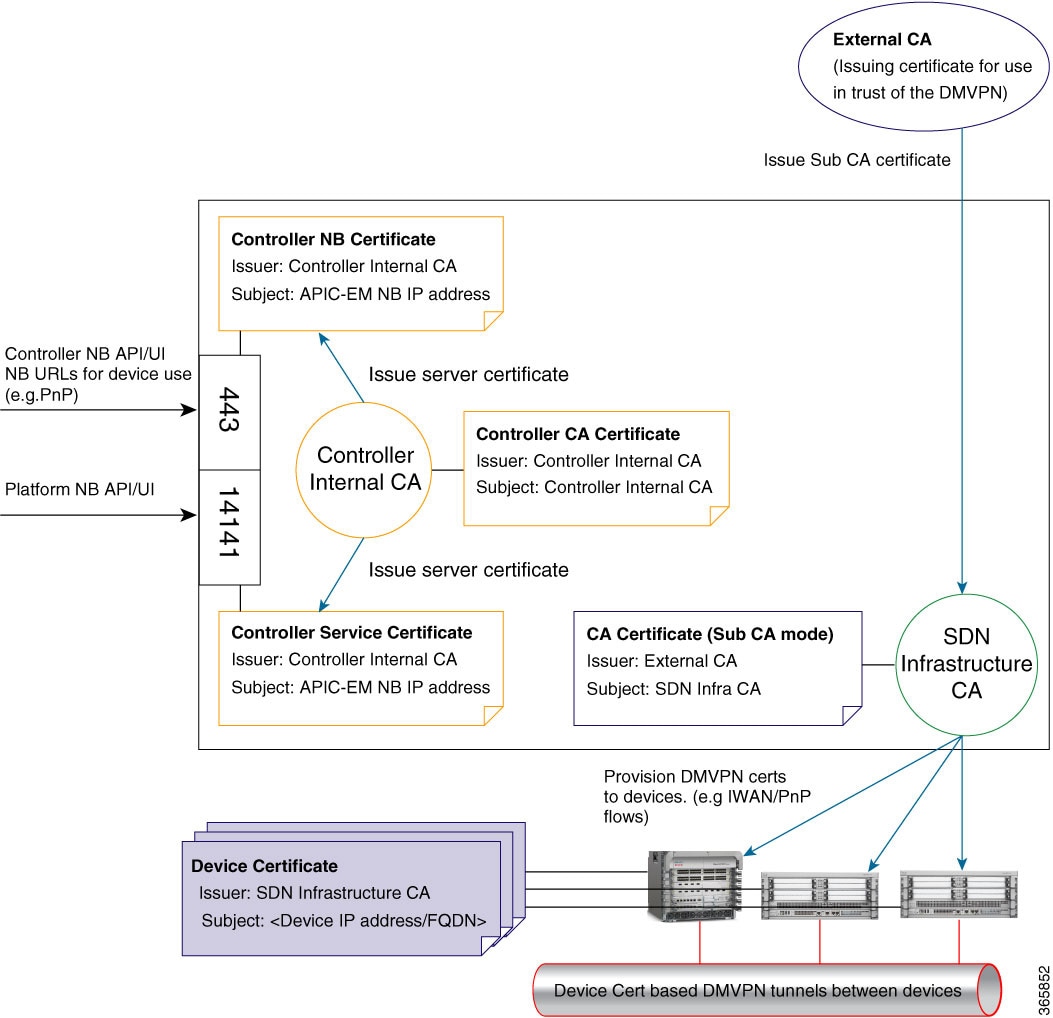
Changing the PKI mode from root to Sub CA (subordinate CA), changes the hierarchy and subordinates the private controller CA to an external CA. The following is a schematic of the distinct PKI planes, with the Device PKI plane being in Sub CA mode.
The following schematic displays the Sub CA mode for the Device PKI plane. In this schematic the Root CA is external to the controller. See Cisco APIC-EM PKI Planes for a schematic of Root CA mode for the Device PKI plane.
Device PKI Notifications
The Cisco APIC-EM provides device PKI notifications to assist the user with both troubleshooting and serviceability.
The device PKI notifications described in this section are only activated from device-to-device DMVPN connections and not the controller connections.
The following device PKI notifications are available:
-
System Notifications—Notifications indicating that user action is required. These notifications are visible from the Systems Notifications view that is accessible from the Global toolbar in the GUI.
-
Audit Log Notifications—Notifications in system logs that are visible using the controller's Audit Log GUI. For information about viewing the audit logs in the controller's GUI, see the Cisco Application Policy Infrastructure Controller Enterprise Module Troubleshooting Guide.
The following PKI System notification types are supported:
The following audit log notifications are available in the system logs:
PKI Certificate Management
The Cisco APIC-EM provides PKI-based connections in the following distinct PKI planes:
-
Controller PKI Plane—With this plane, there exists HTTPS connections in which the controller is the server in the client-server model, and the controller's server certificate secures the connection.
-
Device PKI Plane—With this plane, there exists DMVPN connections between devices in the control plane of the network, bilaterally authenticated and secured by the device ID certificates of both devices that participate in the connection. These certificates/keys are issued by a private CA that the Cisco APIC-EM controller provides (Device PKI CA).
The following PKI certificate management procedures that are described in this chapter involve only the Device PKI plane:
-
Changing the Role of the PKI Certificate from Root to Subordinate—This procedure requires that you replace the CA certificate of the private CA with one signed by the external CA.
-
Configuring the Device Certificate Lifetime—This procedure helps you secure the device-to-device connections between IWAN-managed devices.
Cisco APIC-EM Controller Certificate and Private Key Support
The Cisco APIC-EM supports a PKI certificate management feature (Controller PKI Plane) that is used to authenticate sessions (HTTPS). These sessions use commonly recognized trusted agents called certificate authorities (CAs). The Cisco APIC-EM uses the PKI certificate management feature to import, store, and manage an X.509 certificate from well-known CAs. The imported certificate becomes an identity certificate for the controller itself, and the controller presents this certificate to its clients for authentication. The clients are the NB API applications and network devices.
The Cisco APIC-EM can import the following files (in either PEM or PKCS file format) using the controller's GUI:
Note | For the private key, Cisco APIC-EM supports the importation of RSA keys. You should not import DSA, DH, ECDH, and ECDSA key types; they are not supported. You should also keep the private key secure in your own key management system. |
Prior to import, you must obtain a valid X.509 certificate and private key from a well-known, certificate authority (CA) or create your own self-signed certificate. After import, the security functionality based upon the X.509 certificate and private key is automatically activated. The Cisco APIC-EM presents the certificate to any device or application that requests them. Both the northbound API applications and network devices can use these credentials to establish a trust relationship with the controller.
In an IWAN configuration and for the Network PnP functionality, an additional procedure involving a PKI trustpool is used to ensure trust between devices within the network. See the following Cisco APIC-EM Trustpool Support section for information about this procedure.
Note | We recommend against using and importing a self-signed certificate into the controller. Importing a valid X.509 certificate from a well-known, certificate authority (CA) is recommended. Additionally, you must replace the self-signed certificate (installed in the Cisco APIC-EM by default) with a certificate that is signed by a well-known certificate authority for the Network PnP functionality to work properly. |
The Cisco APIC-EM supports only one imported X.509 certificate and private key at a time. When you import a second certificate and private key, it overwrites the first (existing) imported certificate and private key values.
Note | If the external IP address changes for your controller for any reason, then you need to re-import a new certificate with the changed or new IP address. |
- Cisco APIC-EM Controller Certificate Chain Support
- Obtaining a CA-Signed Certificate for the Cisco APIC-EM Controller
Cisco APIC-EM Controller Certificate Chain Support
The Cisco APIC-EM is able to import certificates and private keys into the controller through its GUI.
If there are subordinate certificates involved in the certificate chain leading to the certificate that is imported into the controller (controller certificate), then both the subordinate certificates as well as the root certificate of these subordinate CAs must be appended together into a single file to be imported. When appending these certificates, you must append them in the same order as the actual chain of certification.
For example, assume that a well-known and trusted CA with a root certificate (CA root) signed an intermediate CA certificate (CA1). Next, assume that this certificate, CA1 signs another intermediate CA certificate (CA2). Finally, assume that the CA certificate (CA2) was the CA that signed the controller certificate (Controller_Certificate). In this example, the PEM file that needs to be created and imported into the controller should have the following order from the top (beginning) of the file to the bottom of the file (end):
The requirement to append the root and subordinate certificates to the controller certificate to create a single file only applies to a PEM file. The requirement for appending a root and intermediate certificates to a root certificate for import is not required for a PKCS file.
Obtaining a CA-Signed Certificate for the Cisco APIC-EM Controller
You can perform the following steps to obtain a CA signed certificate to import into and use for the Cisco APIC-EM.
-
Determine the IP address or DNS-resolvable FQDN of your Cisco APIC-EM cluster.
-
Use that IP address or the DNS-resolvable FQDN of your Cisco APIC-EM cluster as the common name in your certificate signing request (CSR).
Note
It is preferable for the Subject Alternate Name (SAN) field to also be used, so that both the IP address and the DNS-resolvable FQDN are included in the certificate.
-
Follow the procedure described below to create the CSR.
-
Send the completed CSR to the certificate authority (CA) that you have selected.
-
Receive the signed certificate back from the CA.
-
Install the certificate into the controller using the controller's GUI.
Note | This example procedure is performed on the host where the Cisco APIC-EM is installed. You can also perform this procedure to generate a CSR and private key on a Linux OS or Apple Macintosh computer. You do not have to perform this procedure on the host where the Cisco APIC-EM is installed. |
Before you attempt this procedure, you should have knowledge of these topics:
| Step 1 |
Using a Secure Shell (SSH) client, log into the host (physical or
virtual) with the IP address that you specified using the configuration wizard.
The IP address to enter for the SSH client is the IP address that you configured for the network adapter. This IP address connects the host to the external network. | ||
| Step 2 | When prompted, enter your Linux username ('grapevine') and password for SSH access. | ||
| Step 3 | Enter the
following command to create a private key and a CSR.
$ openssl req -out CSR.csr -new -newkey rsa:2048 -nodes -keyout privateKey.key Generating a 2048 bit RSA private key .......................................................+++ ........+++ writing new private key to 'privateKey.key' ----- You are about to be asked to enter information that will be incorporated into your certificate request. What you are about to enter is what is called a Distinguished Name or a DN. There are quite a few fields but you can leave some blank For some fields there will be a default value, If you enter '.', the field will be left blank. ----- | ||
| Step 4 | Respond to the
certificate prompts with customer specific information as needed.
For the common name IP address, if this request is for multi-host Cisco APIC-EM deployment, then enter the Virtual IP address planned for the multi-host. If this request is for a single Cisco APIC-EM appliance or VM, then enter the eth0 IP address. For example: Country Name (2 letter code) [AU]:US State or Province Name (full name) [Some-State]:CA Locality Name (eg, city) []:San Jose Organization Name (eg, company) [Internet Widgits Pty Ltd]:Cisco Organizational Unit Name (eg, section) []:Cloud Unit Common Name (e.g. server FQDN or YOUR name) []:209.165.201.22 Email Address []:myemail@email.com | ||
| Step 5 | Do not enter
values for the extra attributes fields, just press
Enter.
Please enter the following 'extra' attributes
to be sent with your certificate request
A challenge password []:

An optional company name []:
After pressing Enter, two files (CSR and private key) will be generated. | ||
| Step 6 | Locate the two
files (CSR and private key) that were generated on the host.
The two files are: privateKey.key and CSR.csr. For example, information about the files is displayed using the following command: $ ls -ltr total 8 -rw-rw-r-- 1 grapevine grapevine 1708 Apr 18 15:39 privateKey.key -rw-rw-r-- 1 grapevine grapevine 1054 Apr 18 15:39 CSR.csr | ||
| Step 7 | Secure the
privateKey.key file.
| ||
| Step 8 | Copy and paste
the CSR content from the CSR.csr file and send it to the CA for signing.
In this example, the content in bold below will be the CSR that is copied and sent to the CA for signing and to get the certificate sent back. $ cat CSR.csr -----BEGIN CERTIFICATE REQUEST----- MIIC0jCCAboCAQAwgYwxCzAJBgNVBAYTAlVTMQswCQYDVQQIDAJDQTERMA8GA1UE MRYwFAYDVQQDDA0xNzIuMjQuMTAwLjU1MSAwHgYJKoZIhvcNAQkBFhFteWVtYWls QGVtYWlsLmNvbTCCASIwDQYJKoZIhvcNAQEBBQADggEPADCCAQoCggEBAONJ7M96 rXjg/kwWcfJUlJJG2agLv7EAIxaB7He84fSdNMVXsJmuYBwZBWuZ9t/h3AKs/n/t MRYwFAYDVQQDDA0xNzIuMjQuMTAwLjU1MSAwHgYJKoZIhvcNAQkBFhFteWVtYWls QGVtYWlsLmNvbTCCASIwDQYJKoZIhvcNAQEBBQADggEPADCCAQoCggEBAONJ7M96 rXjg/kwWcfJUlJJG2agLv7EAIxaB7He84fSdNMVXsJmuYBwZBWuZ9t/h3AKs/n/t 87nugrgW7SmI4F1wLsVg8KU2X0bmHoke6yCkhCPykQXJR2blMWp/OBc0ASMTIdhH XRju1y/5 -----END CERTIFICATE REQUEST----- (grapevine) It is likely that instead of a single root CA certificate being sent back to you, that a chain of CA certificates, (including the CA's own public root certificate) will be sent back to you. In this case, follow the rules of appending the CA certificates as described in Cisco APIC-EM Controller Certificate Chain Support, before importing them into the controller using its GUI. | ||
| Step 9 | Once the CA
administrator in your organization provides you with the signed certificate
(for example, MyCert.pem), drag and drop the
MyCert.pem
and
privateKey.key into the
Cisco APIC-EM
GUI certificate page. For information about this procedure, see
Importing the Controller's Server Certificate
|
Cisco APIC-EM Trustpool Support
The Cisco APIC-EM and Cisco IOS devices support a special PKI certificate store known as the trustpool. The trustpool holds X.509 certificates that identify trusted certificate authorities (CAs). The Cisco APIC-EM and the devices in the network use the trustpool bundle to manage trust relationships with each other and with these CAs. The controller manages this PKI certificate store and an administrator (ROLE_ADMIN) has the ability to update it through the controller's GUI when certificates in the pool are due to expire, are reissued, or must be changed for other reasons.
Note | The Cisco APIC-EM also uses the trustpool functionality to determine whether any certificate file that is uploaded via its GUI is a valid trustpool CA-signed certificate or not. |
The Cisco APIC-EM contains a pre-installed, default, Cisco-signed trustpool bundle named ios.p7b. This trustpool bundle is trusted by supported Cisco network devices natively, since it is signed with a Cisco digital signing certificate. This trustpool bundle is critical for the Cisco network devices to establish trust with services and applications that are genuine. This Cisco PKI trustpool bundle file is available on the Cisco website (Cisco InfoSec).
The link is located at:http://www.cisco.com/security/pki/
For the controller's Network PnP functionality, the supported Cisco devices that are being managed and monitored by the controller need to import this file. When the supported Cisco devices first boot-up, they contact the controller to import this file.
The Cisco APIC-EM trustpool management feature operates in the following way:
-
You boot-up the Cisco devices within your network that supports the Network PnP functionality.
Note that not all Cisco devices support the Network PnP functionality. See the Release Notes for Cisco Network Plug and Play for a list of the supported Cisco devices.
-
As part of initial PnP flow, these supported Cisco devices download a trustpool bundle directly from the Cisco APIC-EM using HTTP.
-
The Cisco devices are now ready to interact with the Cisco APIC-EM to obtain further device configuration and provisioning per the Network PnP traffic flows.
Important: If an HTTP proxy gateway exists between the controller and these Cisco devices, then perform an additional procedure to import the proxy gateway certificate into the controller. See Importing a Proxy Gateway Certificate.
Note | At times, you may need to update this trustpool bundle to a newer version due to certificates in the trustpool expiring, being reissued, or for other reasons. Whenever the trustpool bundle that exists on the controller needs to be updated, you can update it by using the controller's GUI. The controller can access the Cisco cloud (where the Cisco approved trustpool bundles are located) and download the latest trustpool bundle. After download, the controller then overwrites the current, older trustpool bundle file. As a practice, you may want to update the trustpool bundle before a new certificate from a CA is to be imported using the Certificate window or the Proxy Gateway Certificate window, or whenever the Update button is active and not grayed out. |
Security and Cisco Network Plug and Play
With the Cisco Network Plug and Play (PnP) application, the Cisco APIC-EM responds to HTTPS requests from supported Cisco network devices and permits these devices to download and install an image and desired configuration. Before a device can download these files from the controller, the initial interaction between the controller and device involves the establishment of a trust relationship.
In certain Cisco Network Plug and Play scenarios, your network configuration may also have a proxy gateway present between the controller and PnP-enabled devices. For example, in an IWAN deployment a branch router may communicate with the Cisco APIC-EM through a proxy gateway at the DMZ at initial provisioning. Depending upon whether there is a proxy gateway present or not, the trust information provided by the controller at the initial transaction with the devices may correspond to either the proxy gateway's or to the controller’s certificate issuer (if the corresponding server certificates are not valid CA signed). On the other hand, in either proxy or non-proxy cases, if the certificate is a simple self-signed certificate, then that certificate will be downloaded by the device into its trust store.
Note | Using a self-signed certificate for either the Cisco APIC-EM or the proxy gateway is strongly discouraged. We strongly recommend using a publicly verifiable CA issued certificate to be installed on the controller, as well as the proxy gateway if one is present. |
With a valid CA issued certificate for the controller or the proxy gateway (if present), the PnP-enabled devices can download the trustpool bundle (ios.p7b) containing all the well known CA root certificates. This permits the devices to establish secure connections to the controller or to the proxy gateway for further provisioning and operation of those devices. If such a certificate is not a valid CA issued or self-signed, then the devices will have to download the issuing CA’s or self-signed certificate to proceed further with a secure connection to the controller or a proxy gateway in front of the controller. The Cisco APIC-EM facilitates automatic downloads of the relevant trusted certificates on the devices, depending on the nature of the certificate installed on it. However; when a proxy gateway is present, the controller provides a provisioning GUI to facilitate similar pre-provisioning.
Configuring the TLS Version Using the CLI
Northbound REST API requests from the external network to the Cisco APIC-EM (from northbound REST API based apps, browsers, and network devices connecting to the controller using HTTPS) are made secure using the Transport Layer Security protocol (TLS). The Cisco APIC-EM supports TLS versions 1.0, 1.1, and 1.2.
By default, the minimum TLS version that a client can use to communicate with the controller is version 1.0. If your network device IOS/XE versions can support a higher version than version 1.0, then it is strongly recommended to configure the minimum TLS version of the controller to that higher version, but first ensure that all of your network devices under Cisco APIC-EM control can support the higher version.
With the controller TLS version set to 1.2, a client initiating a lower TLS connection version (for example, versions 1.0 or 1.1) will be rejected and any communications from this client will fail. With the controller TLS version set to 1.0, a client initiating a higher TLS connection version (for example, versions 1.1 or 1.2) will be permitted. Any versions lower than TLS 1.0 (such as SSLv3 and SSLv2) are not supported by the Cisco APIC-EM.
You configure the TLS version for the controller by logging into the host (physical or virtual) and using the CLI.
You must have successfully deployed the Cisco APIC-EM and it must be operational.
You must have grapevine SSH access privileges to perform this procedure.
Configuring IPSec Tunneling for Multi-Host Communications
The default tunneling protocol used for inter-host communications in a multi-host cluster is Internet Protocol Security (IPsec). The previous default tunneling protocol (in earlier controller release versions) was Generic Routing Encapsulation (GRE). Communications between the hosts in a multi-host cluster can be made more secure using IPSec. If you current tunneling configuration between hosts is GRE, then you can enable secure tunneling with IPSec with the configuration wizard.
Perform the steps described in the following procedure to enhance security for communications between the hosts. The steps are organized as follow:
-
Break up or disassemble your existing multi-host cluster (steps 1-6).
-
Enable IPSec tunneling on the last host that was in your cluster (steps 7-11).
-
Reassemble your multi-host cluster around that host where you enabled IPSec tunneling. (steps 11-21).
Note | Do not enable or disable the secure tunnel mode (IPSec tunneling) while the Cisco APIC-EM is in a multi-host cluster. The configuration wizard does not support such a change while in a multi-host cluster. |
You must have successfully deployed the Cisco APIC-EM and it must be operational.
The current tunneling protocol is GRE, and not IPSec.
You must have grapevine SSH access privileges to perform this procedure.
| Step 1 | Using a Secure
Shell (SSH) client, log into one of the hosts in your cluster.
When prompted, enter your Linux username ('grapevine') and password for SSH access. | ||
| Step 2 | Enter the grape config display command to view and confirm your current GRE tunneling configuration.
$ grape config display The enable_secure_tunnel value will be set to false for a GRE configuration. | ||
| Step 3 | Enter the
following command to access the configuration wizard.
$ config_wizard | ||
| Step 4 | Review the Welcome to the APIC-EM Configuration Wizard! screen and choose the option to remove the host from the cluster: | ||
| Step 5 | A message
appears with an option to
[proceed] and remove this host from the cluster.
Choose
proceed>> to begin. After choosing
proceed>>, the configuration wizard begins to
remove this host from the cluster.
At the end of this process, this host is removed from the cluster. | ||
| Step 6 | Repeat the above
steps (steps 1-4) on the second host in your cluster. This will break up your
multi-host cluster.
Make a note of the final host in the cluster that you have just broken up or disassembled. You must perform the next steps (enabling IPSec tunneling) on that final host. For example, with 3 hosts in a cluster (A, B, and C) and you first remove host A, then remove host B, then you must enable IPSec on host C. | ||
| Step 7 | Using a Secure
Shell (SSH) client, log into the last host in your cluster and run the
config_wizard command.
$ config_wizard | ||
| Step 8 | Review the current configuration values in the configuration wizard and click next>>, until you access the INTER-HOST COMMUNICATION screen. | ||
| Step 9 | Configure IPSec
tunneling for communications between the hosts in a multi-host cluster by
selecting
yes.
By entering 'yes', you are configuring IPSec tunneling with this step. | ||
| Step 10 | Click next>> until the last step of the configuration wizard process is reached. | ||
| Step 11 | Click
proceed>> to have the configuration wizard
save and apply your configuration changes to your
Cisco APIC-EM
deployment.
At the end of the configuration process, a CONFIGURATION SUCCEEDED! message appears. Next, proceed to log into the other hosts previously in your multi-host cluster and use the configuration wizard to reassemble the cluster (with IPSec tunneling configured between the hosts). | ||
| Step 12 | Using a Secure
Shell (SSH) client, log into one of the other hosts in your cluster.
When prompted, enter your Linux username ('grapevine') and password for SSH access. | ||
| Step 13 | Enter the
following command to access the configuration wizard.
$ config_wizard | ||
| Step 14 | Review the
Welcome
to the APIC-EM Configuration Wizard! screen and choose the
Create a
new APIC-EM cluster option.
| ||
| Step 15 | Proceed to
recreate the cluster using the configuration wizard.
For additional information about this step and process, see . | ||
| Step 16 | At the end of
the configuration process, click
proceed>> to have the configuration wizard
save and apply your configuration changes.
A CONFIGURATION SUCCEEDED! message appears. | ||
| Step 17 | Using a Secure
Shell (SSH) client, log into the third host and use the configuration wizard to
join the new multi-host cluster.
When prompted, enter your Linux username ('grapevine') and password for SSH access. | ||
| Step 18 | Enter the
following command to access the configuration wizard.
$ config_wizard | ||
| Step 19 | Review the
Welcome to the APIC-EM Configuration Wizard! screen
and choose the
Add
this host to an existing APIC-EM cluster option.
| ||
| Step 20 | Proceed to add
this host to the cluster using the configuration wizard.
For additional information about this step and process, see the Cisco Application Policy Infrastructure Controller Enterprise Module Installation Guide. | ||
| Step 21 | At the end of
the configuration process, click
proceed>> to have the configuration wizard
save and apply your configuration changes.
A CONFIGURATION SUCCEEDED! message appears. At the end of this step, you have updated your cluster and configured IPSec tunneling. |
Password Requirements
The Cisco APIC-EM password policy governs password values in logins to the controller GUI, SSH logins to the Grapevine root, northbound API requests, and logins to the Grapevine console for troubleshooting. The Cisco APIC-EM rejects a password that does not conform to the password policy. If a password is rejected, the controller provides an error message that describes the reason for the rejection.
A new or changed password must meet the following criteria:
-
Length of password must be from 8 (minimum) to 127 (maximum) characters.
-
Does NOT contain a tab or a line break.
-
Does contain characters from at least three of the following categories:
For example, Splunge! is a valid password because it meets the eight-character minimum length, contains at least one uppercase alphabetic character, contains at least one lowercase alphabetic character, and contains at least one special character (!).
Cisco APIC-EM Ports Reference
The following tables list the Cisco APIC-EM ports that permit incoming traffic, as well as the Cisco APIC-EM ports that are used for outgoing traffic. You should ensure that these ports on the controller are open for both incoming and outgoing traffic flows.
Note | Ensure that proper protections exist in your network for accessing ports 22 and 14141. For example, you can configure a proxy gateway or secure subnets to access these ports. |
|
Port Number |
Permitted Traffic |
Protocol (TCP or UDP) |
|---|---|---|
|
22 |
SSH |
TCP |
|
67 |
bootps |
UDP |
|
80 |
HTTP |
TCP |
|
123 |
NTP |
UDP |
|
162 |
SNMP |
UDP |
|
443 1 |
HTTPS |
TCP |
|
500 |
ISAKMP In order for deploying multiple hosts across firewalls in certain deployments, the IPSec ISAKMP (Internet Security Association and Key Management Protocol) UDP port 500 has to be allowed to be traversed. |
UDP |
|
14141 |
Grapevine APIs |
TCP |
|
16026 |
SCEP |
TCP |
|
Port Number |
Permitted Traffic |
Protocol (TCP or UDP) |
||
|---|---|---|---|---|
|
22 |
SSH (to the network devices) |
TCP |
||
|
23 |
Telnet (to the network devices) |
TCP |
||
|
53 |
DNS |
UDP |
||
|
80 |
Port 80 may be used for an outgoing proxy configuration. Additionally, other common ports such as 8080 may also be used when a proxy is being configured by the Cisco APIC-EM configuration wizard (if a proxy is already in use for your network).
|
TCP |
||
|
123 |
NTP |
UDP |
||
|
161 |
SNMP agent |
UDP |
||
|
443 2 |
HTTPS |
TCP |
||
|
500 |
ISAKMP In order for deploying multiple hosts across firewalls in certain deployments, the IPSec ISAKMP ( (Internet Security Association and Key Management Protocol) UDP port 500 has to be allowed to be traversed. |
UDP |
Cisco APIC-EM Accessed Cloud Server Reference
Note | Ensure you enable DNS resolution on your APIC-EM cluster. |
Following is a list of sites which need to be opened to enable access to the cloud servers.
-
https://api.cisco.com/
-
https://cloudsso.cisco.com/
-
https://ciscoactiveadvisor.com/
-
https://apx.cisco.com/
-
https://op2-prd1-dprox.cisco.com/ and its IP address 173.37.149.210
-
https://apic-em-repo-01.cisco.com/
-
https://op2-dev2-dprox1.cisco.com/
Configuring Security Settings
Importing the Controller's Server Certificate
The Cisco APIC-EM supports the import and storing of an X.509 certificate and private key into the controller. After import, the certificate and private key can be used to create a secure and trusted environment between the Cisco APIC-EM, NB API applications, and network devices.
Note | If you have a multi-host deployment and you plan to acquire a valid CA-issued certificate for your controller HTTPS server, then use the virtual IP address that you assigned to the multi-hosts as the Common Name for the certificate when you order. If you are using a host name instead, make sure the host name is DNS-resolvable to the virtual IP address of the multi-host deployment. If you already have a single-host Cisco APIC-EM with a previously purchased CA-issued certificate for its external IP address, then it is ideal to use that original physical IP address of the single host as the virtual IP address of the multi-host deployment. This way you can save your investment in the CA-issued certificate and external client applications can continue using the same IP address to access your Cisco APIC-EM services. |
You import a certificate and private key using the Certificate window in the Cisco APIC-EM GUI.

The Cisco APIC-EM itself does NOT interact with any external CA directly; therefore, it does not check any Certificate Revocation Lists and it has no way to learn of revocation of its server certificate by an external CA. Note, also, that the controller does not automatically update its server certificate. Replacement of an expired or revoked server certificate requires explicit action on the part of a ROLE_ADMIN user. Although the controller has no direct means of discovering the revocation of its server certificate by an external CA, it does notify the admin of expiration of its server certificate as well as self-signed key being operational.
You must have successfully deployed the Cisco APIC-EM and it must be operational.
You must have acquired an X.509 certificate and private key from a well-known certificate authority (CA) for the import.
You must have administrator (ROLE_ADMIN) permissions and either access to all resources (RBAC scope set to ALL) or an RBAC scope that contains all of the resources that you want to group. For example, to create a group containing a specific set of resources, you must have access to those resources (custom RBAC scope set to all of the resources that you want to group).
For information about user permissions and RBAC scopes required to perform tasks using the Cisco APIC-EM, see the chapter, "Managing Users".
| Step 1 | In the Home window, click either admin or the Settings icon (gear) at the top right corner of the screen. | ||||
| Step 2 | Click the Settings link from the drop-down menu. | ||||
| Step 3 | In the Settings navigation pane, click Certificate to view the Certificate window. | ||||
| Step 4 | In the
Certificate window, view the current certificate
data.
When first viewing this window, the current certificate data that is displayed is the controller's self-signed certificate. The self-signed certificate's expiration is set for several years in the future.
Additional displayed fields in the Certificate window include: | ||||
| Step 5 | To replace the
current certificate, click the
Replace
Certificate button.
The following new fields appear: | ||||
| Step 6 | In the
Certificate fields, choose the file format type of
the certificate:
Choose one of the above file types for the certificate that you are importing into the Cisco APIC-EM. | ||||
| Step 7 | If you choose
PEM, then perform the following tasks:
| ||||
| Step 8 | If you choose
PKCS, then perform the following tasks:
| ||||
| Step 9 | Click the Upload/Activate button. | ||||
| Step 10 | Return to the Certificate window to view the updated certificate data. The information displayed in the Certificate window should have changed to reflect the new certificate name, issuer, and certificate authority. |
Importing a Trustpool Bundle
The Cisco APIC-EM contains a pre-installed Cisco trustpool bundle (Cisco Trusted External Root Bundle). The Cisco APIC-EM also supports the import and storage of an updated trustpool bundle from Cisco. The trustpool bundle is used by supported Cisco networking devices to establish a trust relationship with the controller and its applications, such as Network PnP.
Note | The Cisco trustpool bundle is an ios.p7b file that only supported Cisco devices can unbundle and use. This ios.p7b file contains root certificates of valid certificate authorities including Cisco itself. This Cisco trustpool bundle is available on the Cisco cloud (Cisco InfoSec). The link is located at: http://www.cisco.com/security/pki/. |
The trustpool bundle provides you with a safe and convenient way to use the same CA to manage all your network device certificates, as well as your controller certificate. The trustpool bundle is used by the controller to validate its own certificate as well as a proxy gateway certificate (if any), to determine whether it is valid CA signed certificate or not. Additionally, the trustpool bundle is available to be uploaded to the Network PnP enabled devices at the beginning of their PnP workflow so that they can trust the controller for subsequent HTTPS-based connections.
You import the Cisco trust bundle using the Trustpool window in the Cisco APIC-EM GUI.

You must have successfully deployed the Cisco APIC-EM and it must be operational.
You must have administrator (ROLE_ADMIN) permissions and either access to all resources (RBAC scope set to ALL) or an RBAC scope that contains all of the resources that you want to group. For example, to create a group containing a specific set of resources, you must have access to those resources (custom RBAC scope set to all of the resources that you want to group).
For information about user permissions and RBAC scopes required to perform tasks using the Cisco APIC-EM, see the chapter, "Managing Users".
| Step 1 | In the Home window, click either admin or the Settings icon (gear) at the top right corner of the screen. | ||
| Step 2 | Click the Settings link from the drop-down menu. | ||
| Step 3 | In the Settings navigation pane, click Trustpool to view the Trustpool window. | ||
| Step 4 | In the
Trustpool window, view the
Update button.
The Update button in the controller's Trustpool window becomes active when an updated version of ios.p7b file is available and Internet access is available. The Update button remains inactive if there is no Internet access or if there is no updated version of the ios.p7b file. | ||
| Step 5 | Click the
Update button to initiate a new download and install
of the trustpool bundle.
|
Importing a Proxy Gateway Certificate
In some network configurations, proxy gateways may exist between the Cisco APIC-EM and the remote network it manages (containing IWAN and PnP network devices). Common ports such as 80 and 443 pass through the gateway proxy in the DMZ, and for this reason SSL sessions from the network devices meant for the controller terminate at the proxy gateway. Therefore, the network devices located within these remote networks can only communicate with the controller via the proxy gateway. In order for the network devices to establish secure and trusted connections with the controller, or if present, a proxy gateway, then the network devices should have their PKI trust stores appropriately provisioned with the relevant CA root certificates or the server’s own certificate under certain circumstances.
In network topologies where there is a proxy gateway present between controller and the remote network it manages, follow the procedure below to import a proxy gateway certificate into the controller.

You have successfully deployed the Cisco APIC-EM and it is operational.
In your network, an HTTP proxy gateway exists between the controller and the remote network it manages (containing IWAN and PnP network devices) . These network devices will use the proxy gateway's IP address to reach the Cisco APIC-EM controller and its services.
You have the certificate file currently being used by the proxy gateway. The certificate file contents can consist any of the following:
-
The proxy gateways’s certificate in PEM or DER format, with the certificate being self-signed.
-
The proxy gateway’s certificate in PEM or DER format, with the certificate being issued by a valid, well-known CA.
-
The proxy gateway's certificate and its chain in PEM or DER format.
The certificate used by the devices and proxy gateway must be imported into the controller by following this procedure.
| Step 1 | In the Home window, click either admin or the Settings icon (gear) at the top right corner of the screen. | ||
| Step 2 | Click the Settings link from the drop-down menu. | ||
| Step 3 | In the Settings navigation pane, click Proxy Gateway Certificate to view the Proxy Certificate window. | ||
| Step 4 | In the
Proxy
Gateway Certificate window, view the current proxy gateway
certificate data (if this exists).
| ||
| Step 5 | To add a proxy
gateway certificate, drag and drop the self-signed or CA certificate to the
Drag n'
Drop a File Here field.
| ||
| Step 6 | Click the Save button. | ||
| Step 7 | Refresh the Proxy Gateway Certificate window to view the updated proxy gateway certificate data. The information displayed in the Proxy Gateway Certificate window should have changed to reflect the new certificate name, issuer, and certificate authority. |
Managing PKI Certificates
Configuring the Device Certificate Lifetime
The Cisco APIC-EM enables the user to change the certificate lifetime of network devices managed and monitored by the private (internal) controller's CA. The controller's default value for the certificate lifetime is 365 days. After the certificate lifetime value is changed using the controller's GUI, then any network devices subsequently requesting a certificate from the controller are assigned this lifetime value.
Note | The device certificate lifetime value cannot exceed the CA certificate lifetime value. Additionally, if the remaining time of CA certificate lifetime is less than configured device's certificate lifetime, then the device will get a certificate lifetime value equal to the remaining CA certificate lifetime. |
You change the device certificate lifetime using the PKI Certificate Managment window in the Cisco APIC-EM GUI.

You must have successfully deployed the Cisco APIC-EM and it must be operational.
You must have administrator (ROLE_ADMIN) permissions and either access to all resources (RBAC scope set to ALL) or an RBAC scope that contains all of the resources that you want to group. For example, to create a group containing a specific set of resources, you must have access to those resources (custom RBAC scope set to all of the resources that you want to group).
For information about user permissions and RBAC scopes required to perform tasks using the Cisco APIC-EM, see the chapter, "Managing Users".
| Step 1 | In the Home window, click either admin or the Settings icon (gear) at the top right corner of the screen. |
| Step 2 | Click the Settings link from the drop-down menu. |
| Step 3 | In the Settings navigation pane, click PKI Certificate Management to view the PKI Certificate Management window. |
| Step 4 | Click the Device Certificate tab. |
| Step 5 | Review the device certificate and current device certificate lifetime. |
| Step 6 | In the Device Certificate Lifetime field, enter a new value in days. |
| Step 7 | Click the Apply button. |
What to Do Next
Refresh the PKI Certificate Management window to confirm the new device certificate lifetime value.
Changing the Role of the PKI Certificate from Root to Subordinate
The Cisco APIC-EM permits the user to change the role of the Device PKI CA from a root CA to a subordinate CA.
When changing the private controller's CA from a root CA to a subordinate CA note the following:
-
If you intend to have the controller act as a subordinate CA, then it is assumed that you already have a root CA (for example Microsoft CA) and you are willing to accept the controller as a subordinate CA.
-
As long as the subordinate CA is not fully configured, then the controller will continue to operate as an internal root CA.
-
You will need to generate a Certificate Signing Request (CSR) file for the controller (as described in this procedure) and manually have it signed by your external root CA.
Note
The controller will continue to run as an internal root CA during this time.
-
Once the CSR is signed by the external root CA, then this signed file must be imported back into the controller using the GUI (as described below in this procedure).
After the import, the controller will initialize itself as the subordinate CA and provide all the existing functionality of a subordinate CA.
-
The switch over from internal root CA to subordinate CA is not automatically supported; therefore, it is assumed that no devices have yet been configured with the internal root CA. In case any devices are configured, then it is the responsibility of the network administrator to manually revoke the existing device ID certificates before switching to the subordinate CA.
-
Note that there is no rollover provisioning for the subordinate CA, so for this reason we recommend that you choose the longest possible certificate lifetime for subordinate certificate, and not less than 2 years.
-
There is no controller warning for expiration of the subordinate CA certificate.
-
The subordinate CA certificate lifetime as displayed in the GUI is just read from the certificate itself; it is not computed against the system time. So if you install a certificate with a lifespan of one year today and then look at it in the GUI next July, then the GUI will still show that the certificate has a one year lifetime.
-
The subordinate CA certificate must be in PEM or DER format only.
-
Due to a Cisco IOS XE crypto PKI import limitation, devices cannot import a PKCS bundle (made up of a device certificate, device key and the subordinate CA certificate) exceeding 4KB size. This problem occurs when the Cisco APIC-EM device PKI CA is changed to SubCA mode with a subordinate CA certificate that has several and/or lengthy X509 attributes defined, thereby increasing the size of the device PKCS bundle beyond 4KB. To circumvent this issue, get the subordinate CA certificate issued with very minimal attributes. For example, do not include CDP distribution and OCSP settings.
The following command output is provided as an example of content from a subordinate CA certificate that can impact the file size, as well as the fields within the certificate where content should be minimized:
Certificate: Data: Version: 3 (0x2) Serial Number: 2e:00:00:00:0e:28:d7:1f:24:a1:1e:ef:70:00:00:00:00:00:0e Signature Algorithm: sha256WithRSAEncryption Issuer: DC=com, DC=apic-em, CN=apic-em-CA Validity Not Before: Oct 18 19:56:54 2016 GMT Not After : Oct 19 19:56:54 2016 GMT Subject: CN=sdn-network-infra-subca Subject Public Key Info: Public Key Algorithm: rsaEncryption Public-Key: (2048 bit) Modulus: 00:cd:a7:65:a4:c4:64:e6:e0:6b:f2:39:c0:a2:3b: <snip> 85:a3:44:d1:a2:b3:b1:f5:ff:28:e4:12:41:d3:5f: bf:e9 Exponent: 65537 (0x10001) X509v3 extensions: X509v3 Subject Key Identifier: D2:DD:FA:E4:A5:6A:3C:81:29:51:B2:17:ED:82:CE:AA:AD:91:C5:1D X509v3 Authority Key Identifier: keyid:62:6F:C7:83:42:82:5F:54:51:2B:76:B2:B7:F5:06:2C:76:59:7F:F8 X509v3 Basic Constraints: critical CA:TRUE X509v3 Key Usage: critical Digital Signature, Certificate Sign, CRL Sign 1.3.6.1.4.1.311.21.7: 0-.%+.....7.....#...I......^...Q...._...S..d... Signature Algorithm: sha256WithRSAEncryption 18:ce:5b:90:6b:1d:5b:b4:df:fa:d3:8e:80:51:6f:46:0d:19: -
The subordinate CA does not interact with the higher CAs, so it will not be aware of any revocation of the certificates at a higher level. Due to this fact, any information about certificate revocation will also not be communicated from the subordinate CA to the network devices. Since the subordinate CA does not have this information, all the network devices will only use the subordinate CA as the CDP source.
You change the role of the private (internal) controller's CA from a root CA to a subordinate CA using the PKI Certificate Managment window in the Cisco APIC-EM GUI.
You must have successfully deployed the Cisco APIC-EM and it must be operational.
You must have administrator (ROLE_ADMIN) permissions and either access to all resources (RBAC scope set to ALL) or an RBAC scope that contains all of the resources that you want to group. For example, to create a group containing a specific set of resources, you must have access to those resources (custom RBAC scope set to all of the resources that you want to group).
For information about user permissions and RBAC scopes required to perform tasks using the Cisco APIC-EM, see the chapter, "Managing Users".
You must have a copy of the root CA certificate to which you will subordinate the private (internal) controller's PKI certificate.
| Step 1 | In the Home window, click either admin or the Settings icon (gear) at the top right corner of the screen. | ||||||||
| Step 2 | Click the Settings link from the drop-down menu. | ||||||||
| Step 3 | In the Settings navigation pane, click PKI Certificate Management to view the PKI Certificate Management window. | ||||||||
| Step 4 | Click the CA Management tab. | ||||||||
| Step 5 | Review the
existing root or subordinate CA certificate configuration information from the
GUI.
| ||||||||
| Step 6 | In the CA Management tab, for Change to Sub CA mode click Yes. | ||||||||
| Step 7 | In the CA Management tab, click Next. | ||||||||
| Step 8 | Review the
Root
CA to Sub CA warnings that appears:
| ||||||||
| Step 9 | Click
OK to proceed.
The PKI Certificate Management window changes and displays an Import External Root CA Certificate field. | ||||||||
| Step 10 | Drag and drop
your root CA certificate into the
Import
External Root CA Certificate field and click
Upload.
The root CA certificate will then be uploaded into the controller and used to generate a Certificate Signing Request (CSR). When the upload process is finished a Certificate Uploaded Successfully message appears. | ||||||||
| Step 11 | After the
upload process is finished and the success message appears, click
Next to proceed.
The controller will then generate and display the CSR. | ||||||||
| Step 12 | View the
controller generated Certificate Signing Request (CSR) in the GUI and perform
one of the following actions:
| ||||||||
| Step 13 | Send the CSR
file to your root CA.
You must send the CSR file to your root CA. Your root CA will then return to you a subordinate CA file that you must import back into the controller. | ||||||||
| Step 14 | After receiving the subordinate CA file from your root CA, access the controller's GUI again and return to the PKI Certificate Management window. | ||||||||
| Step 15 | Click the CA Management tab. | ||||||||
| Step 16 | Click
Yes for the
Change
CA mode button in the
CA
Management tab.
After clicking Yes, the GUI view with the CSR is displayed. | ||||||||
| Step 17 | Click
Next in the GUI view with the CSR being displayed.
The PKI Certificate Management window changes and displays an Import Sub CA Certificate field. | ||||||||
| Step 18 | Drag and drop
your subordinate CA certificate into the
Import
Sub CA Certificate field and click
Apply.
The subordinate CA certificate will then be uploaded into the controller. After the upload finishes, the GUI window changes to display the subordinate CA mode in the CA Management tab. | ||||||||
| Step 19 | Review the
fields in the
CA
Management tab.
|
Configuring the Authentication Timeout
You can configure authentication timeouts that require the user to log back into the controller with their credentials (username and password) using the Authentication Timeout window in the Cisco APIC-EM GUI.

The following authentication timeout values can be configured:
-
Idle timeout—Time interval that you can configure before the controller requires re-authentication (logging back in with appropriate credentials) due to Cisco APIC-EM inactivity. Idle timeouts are API-based, meaning that idle timeout is the time the controller is idle between API usages and not GUI mouse clicks or drags.
-
Session timeout—Time interval that you can configure before the controller requires re-authentication (logging back in with appropriate credentials). This is a forced re-authentication.
Note | Approximately 2-3 minutes before your session is about to idle timeout, a pop-up warning appears in the GUI stating that your session is about to idle timeout and asking if you wish to continue with the current session. Click Cancel to ignore the warning and idle timeout of the session within approximately 2-3 minutes. Click OK to continue the session for another 30 minutes. |
You must have successfully deployed the Cisco APIC-EM and it must be operational.
You must have administrator (ROLE_ADMIN) permissions and either access to all resources (RBAC scope set to ALL) or an RBAC scope that contains all of the resources that you want to group. For example, to create a group containing a specific set of resources, you must have access to those resources (custom RBAC scope set to all of the resources that you want to group).
For information about user permissions and RBAC scopes required to perform tasks using the Cisco APIC-EM, see the chapter, "Managing Users".
| Step 1 | In the Home window, click either admin or the Settings icon (gear) at the top right corner of the screen. |
| Step 2 | Click the Settings link from the drop-down menu. |
| Step 3 | In the Settings navigation pane, click Authentication Timeout to view the Authentication Timeout window. |
| Step 4 | (Optional)
Configure the idle timeout value using the
Idle
Timeout drop-down menu.
You can configure the idle timeout value in increments of 5 minutes, up to an hour. The default value is 30 minutes. |
| Step 5 | (Optional)
Configure the session timeout value using the
Session
Timeout drop-down menu.
You can configure the session timeout value in increments of 30 minutes, up to 24 hours. The default value is six hours. |
| Step 6 | Click the
Apply button to apply your configuration to the
controller.
To restore the authentication timeout defaults to the controller, click the Revert to Defaults button. |
Configuring Password Policies
As an administrator, you can control the number of consecutive, invalid user login attempts to the Cisco APIC-EM. Once a user crosses the threshold set by you as administrator, the user's account is locked and access is refused. Additionally, as an administrator, you can also configure the length of time that the user account is locked. The user account will remain locked until the configured time period expires.
You configure these controller access parameters for the Cisco APIC-EM using the Password Policy window.

The following password policy functionality is supported:
-
As an administrator, you can set the number of consecutive, invalid user login attempts to the controller. These consecutive, invalid user login attempts can be set from 0 to 10 attempts, with 8 attempts being the default value. Setting invalid attempts to 0 will disable the feature of locking a user with invalid password attempts.
-
As an administrator, you can set the length of time a user account is locked. Permitted lock time intervals for a user account range from 1-3600 seconds, with 900 seconds being the default value.
-
When a user account is locked due to the number of consecutive, invalid login attempts, entering correct credentials will still result in a login failure until the expiration of the configured lock out time period.
-
An administrator can unlock the user account at any time.
We recommend that you create at least two administrator accounts for your deployment. With two administrator accounts, if one account is locked for whatever reason then the other account can be used to unlock that locked account.
Note
For information about how to unlock a user account, see the Chapter 4, Managing Users and Roles in the Cisco Application Policy Infrastructure Controller Enterprise Module Configuration Guide.
-
A locked user account is unlocked when the configured lock out time period expires.
-
A user account can never be permanently locked, but to deny access permanently, an administrator can delete the account.
You must have successfully deployed the Cisco APIC-EM and it must be operational.
You must have administrator (ROLE_ADMIN) permissions and either access to all resources (RBAC scope set to ALL) or an RBAC scope that contains all of the resources that you want to group. For example, to create a group containing a specific set of resources, you must have access to those resources (custom RBAC scope set to all of the resources that you want to group).
For information about user permissions and RBAC scopes required to perform tasks using the Cisco APIC-EM, see the chapter, "Managing Users".
| Step 1 | In the Home window, click either admin or the Settings icon (gear) at the top right corner of the screen. |
| Step 2 | Click the Settings link from the drop-down menu. |
| Step 3 | In the Settings navigation pane, click Password Policy to view the Password Policy window. |
| Step 4 | (Optional) Configure the number of permitted consecutive, invalid password attempts by choosing from the Number of Invalid Attempts drop-down menu. |
| Step 5 | (Optional) Configure the time interval for locking a user account by choosing from the Temporary Account Lock drop-down menu. |
| Step 6 | Click the Apply button to apply your configuration to the controller. |
 Feedback