Cisco Network Visibility Application on APIC-EM User Guide, Release 1.4.0.x
Bias-Free Language
The documentation set for this product strives to use bias-free language. For the purposes of this documentation set, bias-free is defined as language that does not imply discrimination based on age, disability, gender, racial identity, ethnic identity, sexual orientation, socioeconomic status, and intersectionality. Exceptions may be present in the documentation due to language that is hardcoded in the user interfaces of the product software, language used based on RFP documentation, or language that is used by a referenced third-party product. Learn more about how Cisco is using Inclusive Language.
- Updated:
- February 21, 2017
Chapter: Managing Devices and Hosts
- Managing Your Device Inventory
- Device Inventory Information
- Device Inventory Tasks
- Adding a Device Manually
- Deleting a Device
- Filtering Devices in the Device Inventory Window
- Changing the Devices Layout View
- Changing the Device Role
- Adding or Removing a Device Tag in Device Inventory
- Adding or Removing a Policy Tag in Device Inventory
- Adding or Removing Location Tags
- Adding or Changing a Location Marker
- Deleting a Tag
- Updating Device Credentials
- Resynchronizing Device Information
- Running Commands on Devices
- Updating a Device's Polling Interval
- Managing Your Host Inventory
Managing Devices and
Hosts
Managing Your Device Inventory
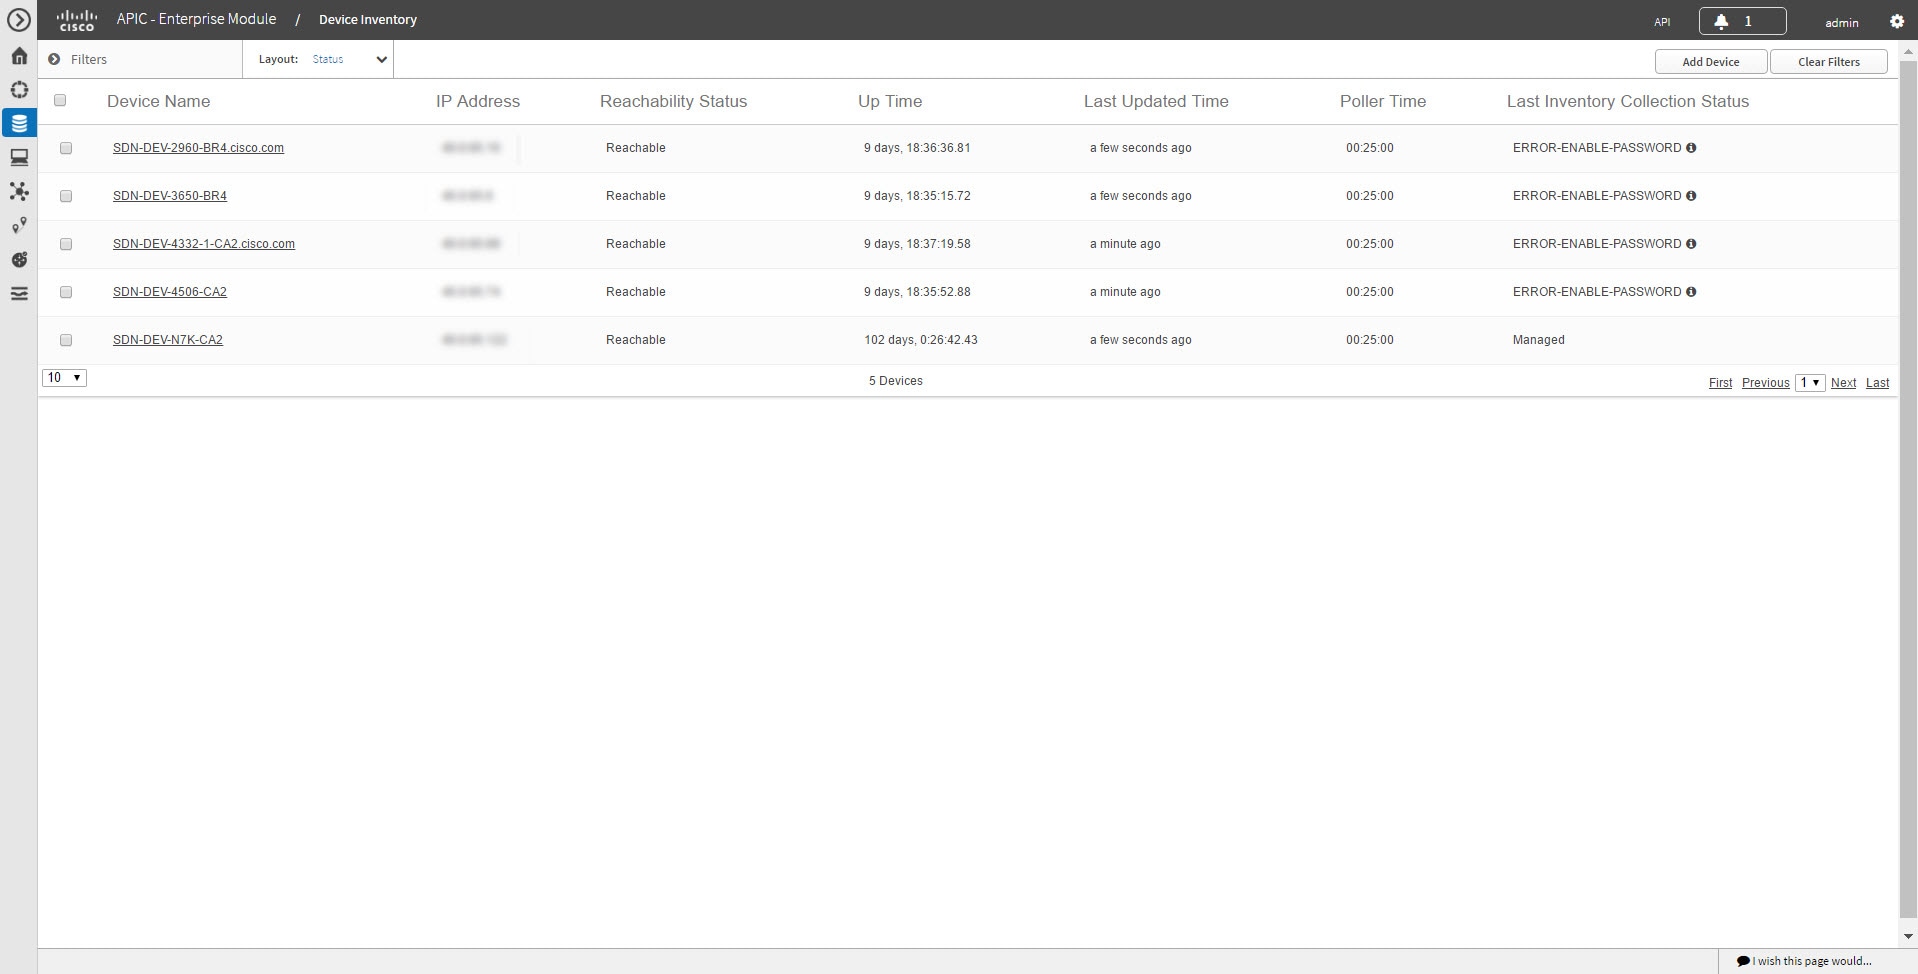
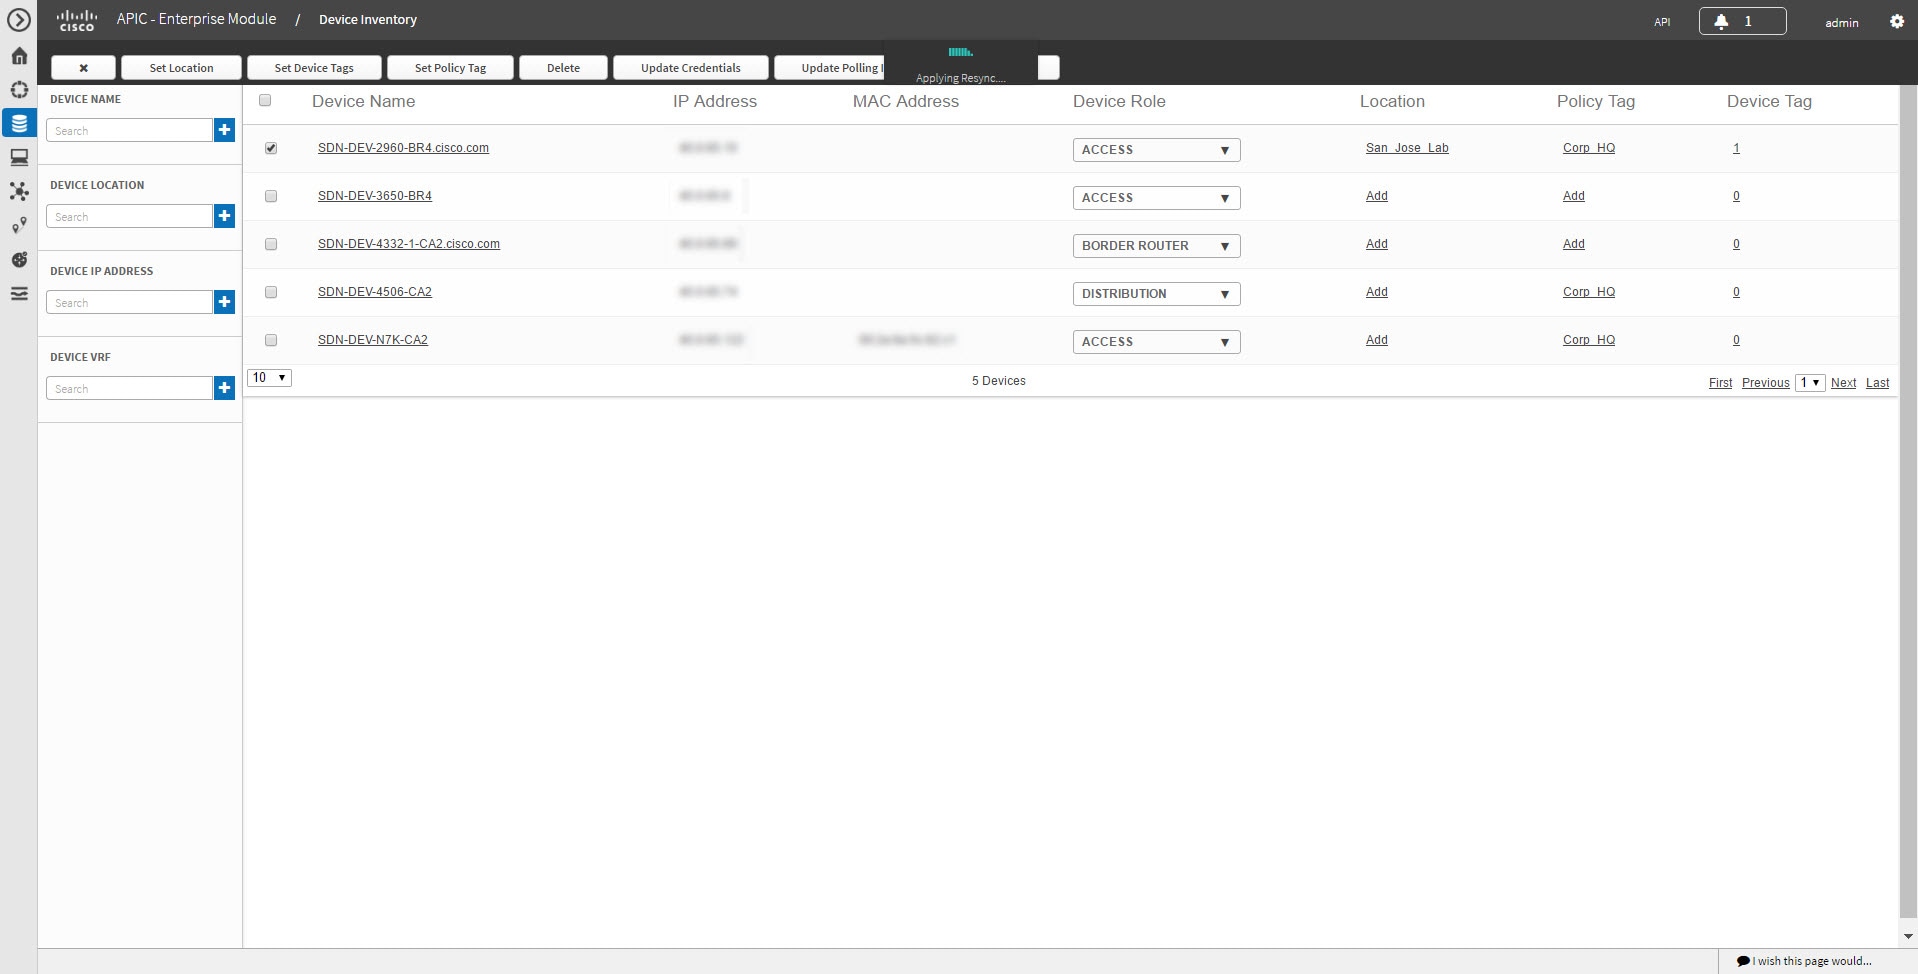
The Device Inventory window displays the results of the discovery scan. To access the Discovery window, from the Navigation pane, click Device Inventory.
 Note | The information that is displayed depends on the Layout that you selected. |
After the initial discovery, network devices are polled every 30 minutes. Polling occurs for each device, link, host, and interface. Only devices that have been active for less than a day are displayed. This prevents any stale device data from being displayed. On average, polling 500 devices takes approximately 20 minutes.
For information about the actions that you can perform from the Device Inventory window, see Device Inventory Tasks.
The following table describes the main elements in the Device Inventory table.
|
Window Element |
Description |
|---|---|
|
Device Selection check boxes |
Allows you to select devices to perform tasks. When you select a device, the action buttons appear above the Device Inventory table. For information about these buttons and the actions that you can perform with them, see Device Inventory Tasks. |
|
Filters |
Allows you to refine the list of devices that are displayed in the table by name, location tag, and IP address. To remove filters, click Clear Filters. |
|
Layout |
Allows you to choose from three predefined layouts or a customized layout:
For descriptions of the columns of information that you can display, see the Device Inventory Information table below. |
Below the Device Inventory table, you can adjust the number of devices displayed in the table (10, 25, 50, 100), and you can click First, Previous, Next, Last, or the page number to navigate through the table.
- Device Inventory Information
- Device Inventory Tasks
- Adding a Device Manually
- Deleting a Device
- Filtering Devices in the Device Inventory Window
- Changing the Devices Layout View
- Changing the Device Role
- Adding or Removing a Device Tag in Device Inventory
- Adding or Removing a Policy Tag in Device Inventory
- Adding or Removing Location Tags
- Adding or Changing a Location Marker
- Deleting a Tag
- Updating Device Credentials
- Resynchronizing Device Information
- Running Commands on Devices
- Updating a Device's Polling Interval
Device Inventory Information
The Device Inventory table displays the following information for each discovered device. All of the columns, except the Config column, support sorting. Clicking on the column header sorts the rows in an ascending order. Clicking on the column header again sorts the rows in descending order.
For more information, see the Cisco Application Policy Infrastructure Controller Enterprise Module Configuration Guide.
|
Column Name |
Description |
||
|---|---|---|---|
|
Device Status |
State of the device.
|
||
|
Device Name |
Name of the device. Click the device name to display the Device Overview dialog box with the following information:
The Device Overview dialog box also includes an Interfaces tab with the following interface data: |
||
|
MAC Address |
MAC address of the device. |
||
|
IP Address |
IP address of the device. |
||
|
IOS/Firmware |
Cisco IOS software currently running on the device. |
||
|
Platform |
Cisco product part number. |
||
|
Serial Number |
Cisco device serial number. |
||
|
Up Time |
Period of time that the device has been up and running. |
||
|
Config |
Click View to display detailed configuration information similar to the CLI show running-config command output.
|
||
|
Device Role |
Role assigned to each discovered device during the scan process. The device role is used to identify and group devices according to their responsibilities and placement within the network. If the controller is unable to determine a device role, it sets the device role as unknown.
If desired, you can use the drop-down list in this column to change the assigned device role. The following device roles are available: |
||
|
Location |
Tag that you can apply to a device to denote its geographic location. By applying the same tag to several devices, you can group them based on a common attribute. The Device Inventory window and Topology window support location tags. Use the following guidelines when creating location tags:
For information about adding location tags, see Adding or Removing Location Tags. Along with the location tag, you can add a geographical marker on a world map to a device. For information, see Adding or Changing a Location Marker. |
||
|
Device Tag |
Tag assigned to devices to identify them by a common attribute. For example, you can create a tag and use it to group devices based on a platform ID or Cisco IOS release. A number in the Tag column indicates how many tags have been applied to that device.
For information about adding or removing device tags, see Adding or Removing a Device Tag in Device Inventory. For information about deleting a tag from the controller database, see Deleting a Tag. |
||
|
Policy Tag |
Tag applied to a group of devices that will share the same policy. After applying a policy tag, you need to configure the policies that will be applied to the devices with the same policy tag. For information about configuring QoS policies, see the Cisco EasyQoS Application for APIC-EM User Guide. |
||
|
Last Updated Time |
Date and time that the device was last scanned and the controller database was updated. |
||
|
Device Family |
Group of related devices, as follows: |
||
|
Device Series |
Series number of the device, for example, Cisco Catalyst 4500 Series Switches. |
||
|
Last Inventory Collection Status |
Status of the last discovery scan for the device:
|
Device Inventory Tasks
The actions that you can perform from the Device Inventory window depend on the layout that you choose. When you select one or more devices, you can click any of the following buttons to perform the corresponding action.
|
Button |
Action |
|---|---|
|
Add Device |
Allows you to discover a specific device and add it to your inventory. If authentication of the device fails due to invalid credentials, the device enters the collection failure state. For information, see Adding a Device Manually. |
|
Set Location |
Sets the location of the devices associated with a location tag on a geographical map. For information, see Adding or Changing a Location Marker. |
|
Set Device Tags |
Groups devices according to common attributes. For information, see Adding or Removing a Device Tag in Device Inventory. |
|
Set Policy Tag |
Groups devices so that you can deploy the same QoS policy to those devices at the same time. For information, see Adding or Removing a Policy Tag in Device Inventory. |
|
Delete |
Deletes the selected devices from inventory. For information, see Deleting a Device. |
|
Update Credentials |
Changes the credentials of the selected devices. In future discoveries, these credentials are used for the selected devices instead of the global or discovery job-specific credentials. For information, see Updating Device Credentials |
|
Update Polling Interval |
You can update the polling interval of selected devices. These device-specific settings override the global and job-specific settings for the selected devices. For information, see Updating a Device's Polling Interval. |
|
Resync (Resynchronize Devices) |
Immediately polls the selected device for updated device information and status. For information, see Resynchronizing Device Information. |
|
Command Runner |
Sends CLI commands to the selected devices using API commands. Currently, show and other read-only commands are permitted. For information, see Running Commands on Devices. |
Adding a Device Manually
You can manually add a device to your inventory.
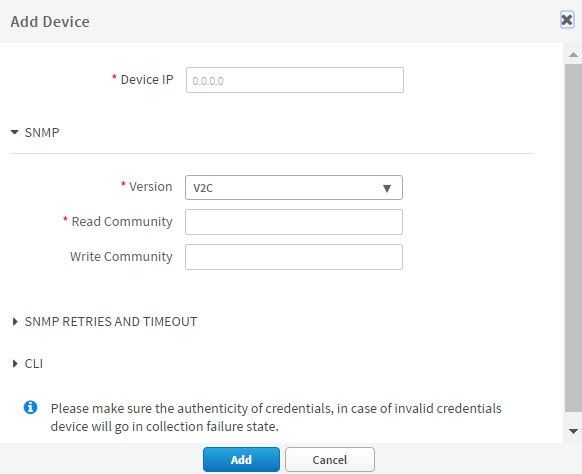
You must have administrator (ROLE_ADMIN) permissions and access to all devices (RBAC Scope set to ALL) to perform this procedure.
Make sure that you have devices in your inventory. If not, discover devices using the Discovery function.
Deleting a Device
You can delete devices from the Cisco APIC-EM database.
You must have administrator (ROLE_ADMIN) permissions and access to all devices (RBAC Scope set to ALL) to perform this procedure.
Make sure that you have devices in your inventory. If not, discover devices using the Discovery function.
| Step 1 | From the Navigation pane, click Device Inventory. | ||
| Step 2 | Click the check box next to the device that you want to delete.
A toolbar opens.
| ||
| Step 3 | From the open toolbar, click Delete. |
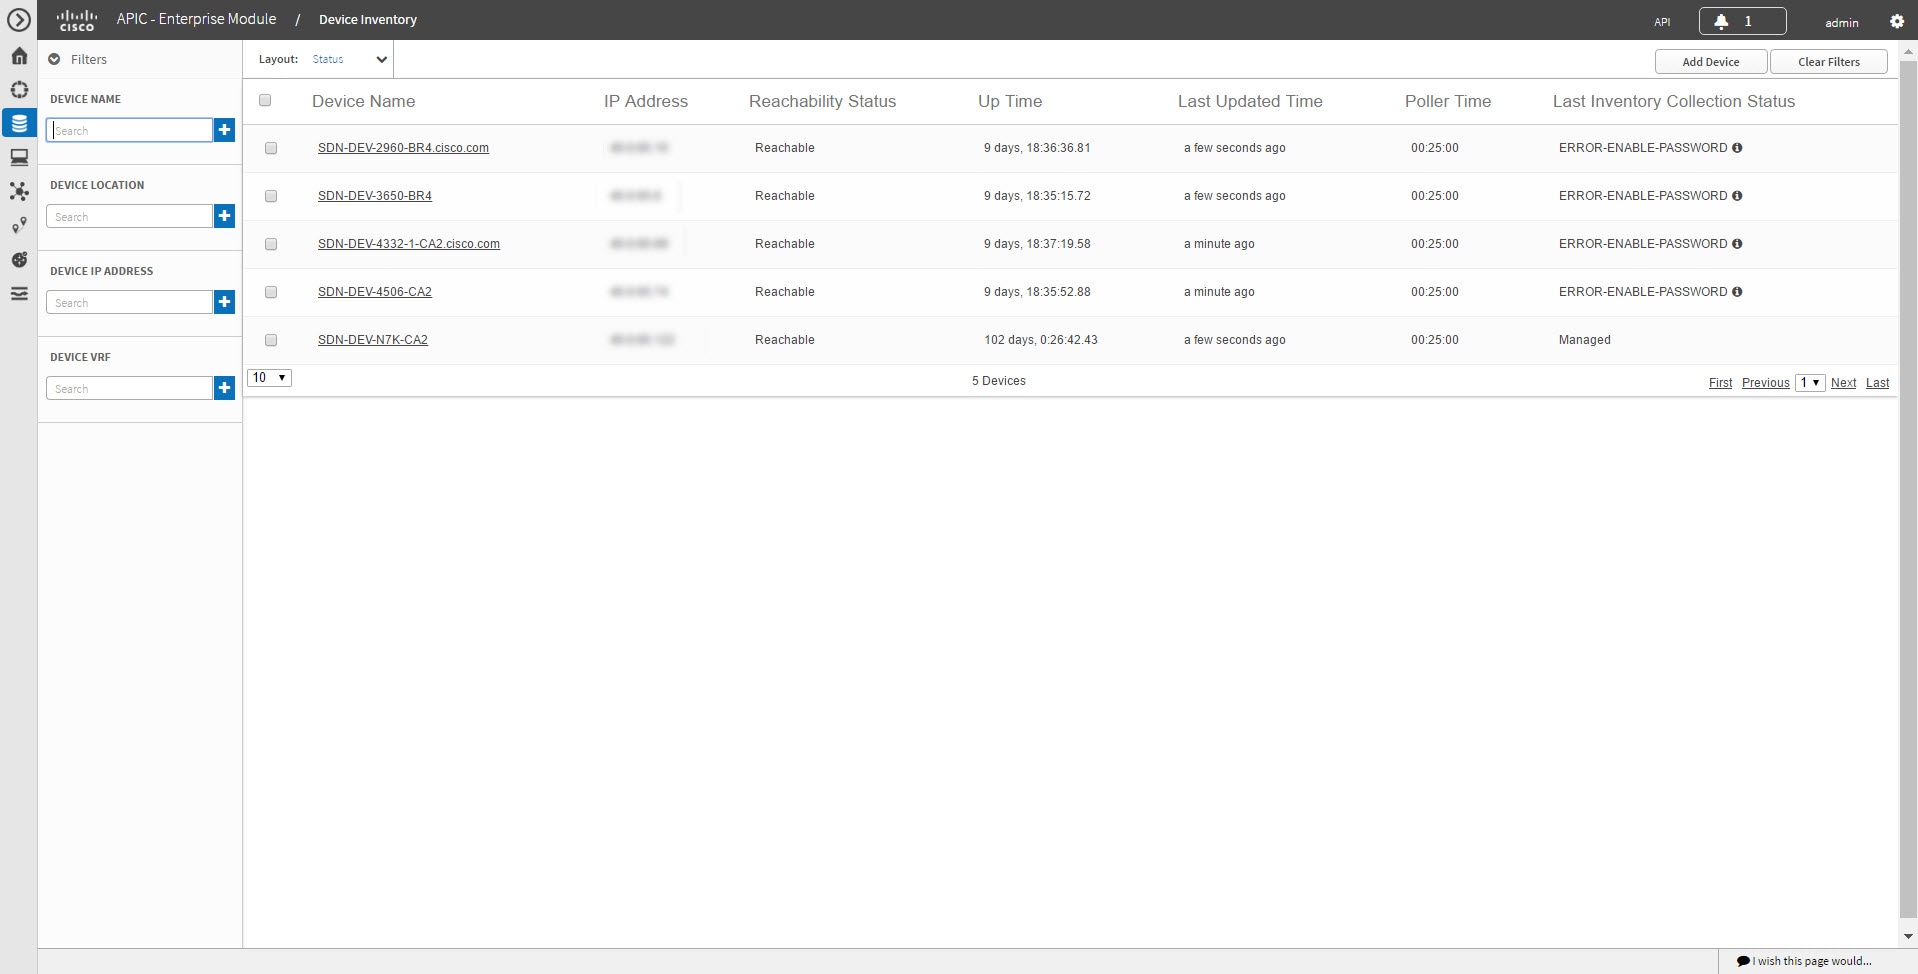
Filtering Devices in the Device Inventory Window
You can filter the devices displayed in the Devices Inventory window by device name, location, IP address and VRF instance.
Note | To remove the filters, click Clear Filters. |
Make sure that you have devices in your inventory. If not, discover devices using the Discovery function.
| Step 1 | From the
Device
Inventory toolbar, click
Filters.
The following filters display: | ||
| Step 2 | Enter the appropriate value in the selected
filter field.
For example, for the Device Name filter, enter the name of a device. The controller presents you with auto-complete values as you enter values in the other fields. Choose one of the suggested values or finish entering the desired value.
| ||
| Step 3 | Click the plus
(+) icon to perform the filter.
The data displayed in the Devices table automatically updates according to your filter selection. | ||
| Step 4 | (Optional) If needed, add more filters
following the above steps.
| ||
| Step 5 | To remove the filter, click the x icon next to the filter value. |
What to Do Next
Review the updated information displayed in the Device Inventory window. If required for your network configuration, make changes to the displayed columns within the Devices table view.
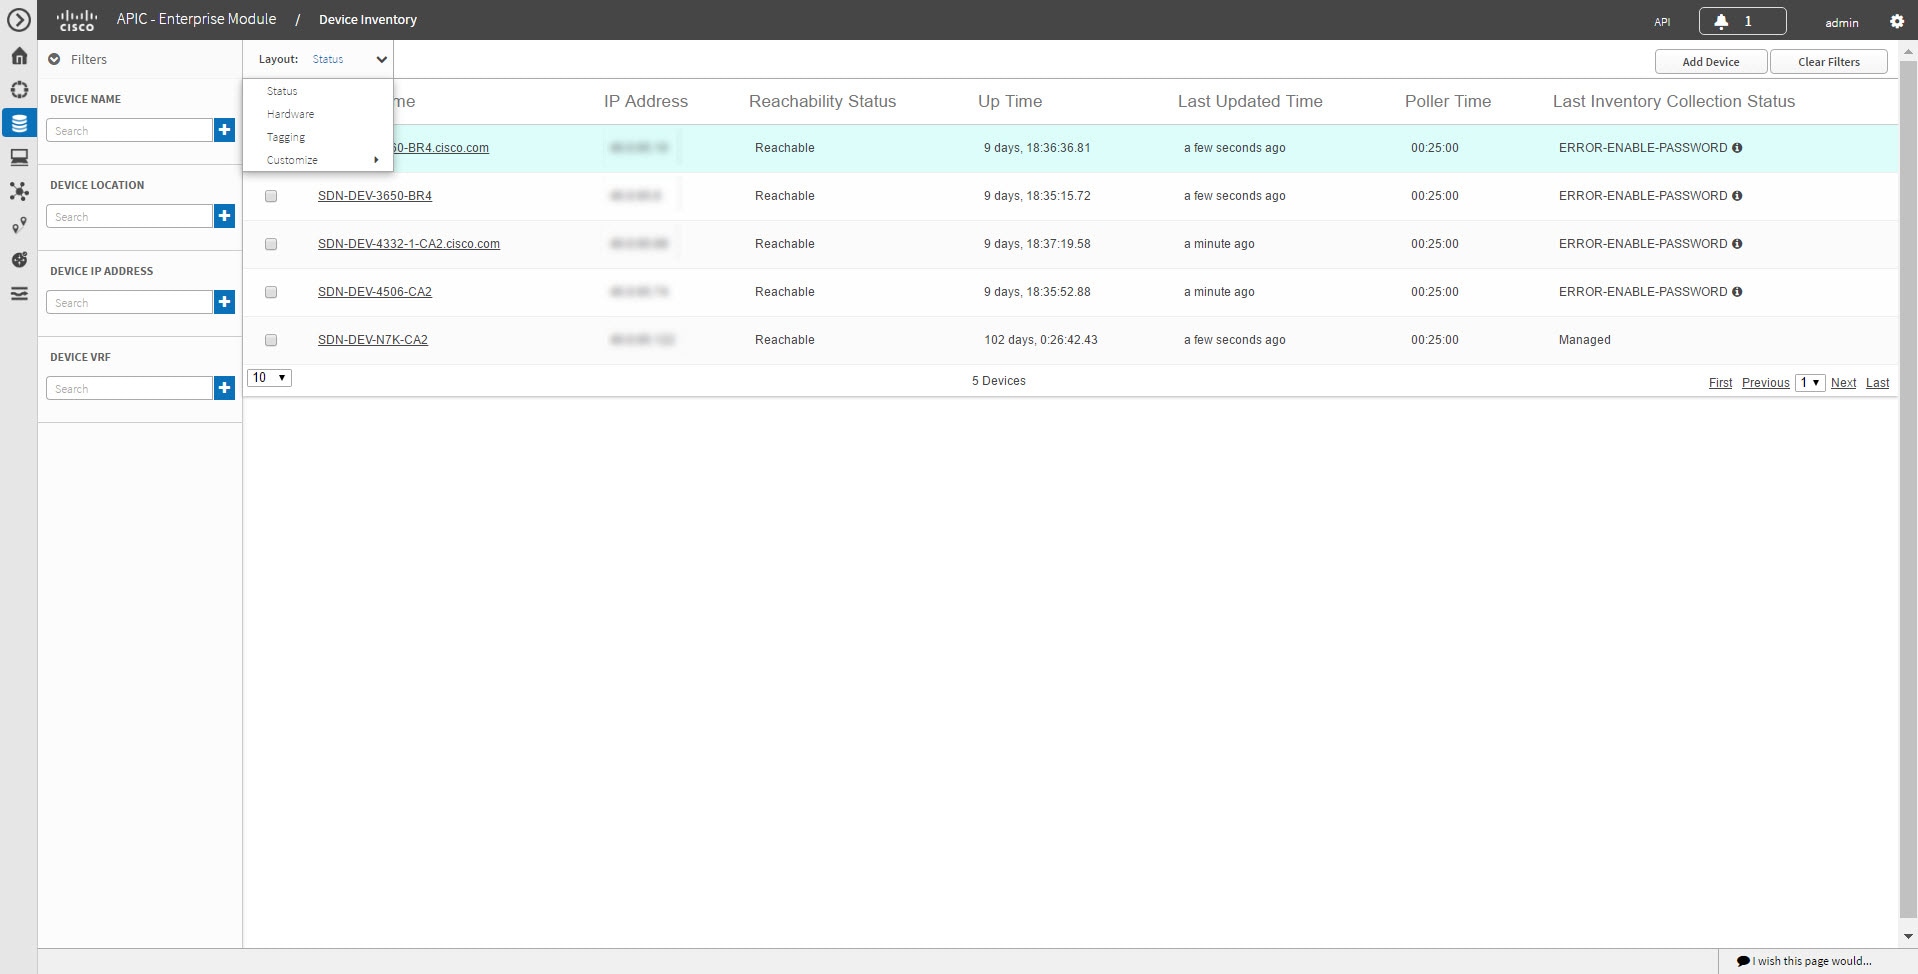
Changing the Devices Layout View
You can change the information that is displayed in the Devices table by selecting different layout views or by customizing a layout view for the devices in your network.
Make sure that you have devices in your inventory. If not, discover devices using the Discovery function.
| Step 1 | From the Device Inventory toolbar, click the Layout field and choose one of the following layout options from the drop-down list:
APIC-EM displays the information for the chosen layout. |
| Step 2 | To customize a specific layout, choose Customize and select the desired display options. Display options toggle on and off. Blue options with checkmarks indicate that the option is on and is displayed in the table. |
What to Do Next
Review the updated information displayed in the Device Inventory window. If required for your network configuration, make any adjustments.
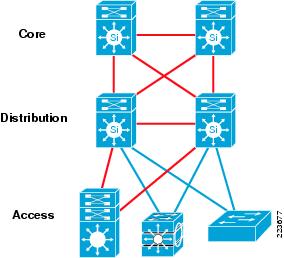
Changing the Device Role
During the scan process, the controller assigns a role to each discovered device. The device role is used to identify and group devices according to their responsibilities and placement in the network.
A device can have one of the following roles:
-
Unknown—Device role is unknown.
-
Access—Device is located in and performs tasks required of the access layer or first tier/edge of the network.
-
Border Router—Device performs tasks required of a border router.
-
Distribution—Device is located in and performs tasks required of the distribution layer of the network.
-
Core—Device is located in and performs tasks required of the core of the network.
You can change the device role in the Device Inventory window.
Note | You can also change the device role from the Topology window. See Changing a Device's Role From the Topology Window. |
Make sure that you have devices in your inventory. If not, discover devices using the Discovery function.
You must have either administrator (ROLE_ADMIN) or policy administrator (ROLE_POLICY_ADMIN) permissions and the appropriate RBAC scope to perform this procedure.
| Step 1 | From the
Navigation pane, click Device
Inventory.
The Devices Inventory window appears. |
| Step 2 | From the
Device
Inventory toolbar, choose one of the options from the
Layout drop-down list.
Valid options are Hardware, Tagging, or Customize > Device Role. The table refreshes and includes a column for the Device Role. |
| Step 3 | Locate the
device you want to change and choose a new role from the drop-down list in the
Device
Role column.
Valid choices are Unknown, Access, Core, Distribution, or Border Router. |
What to Do Next
If required, change the role of other devices in the Device Inventory window.
Adding or Removing a Device Tag in Device Inventory
You can group devices according to common attributes by applying device tags. For example, you may want to apply device tags to group devices by their platform ID or Cisco IOS release. A single device can have multiple device tags; similarly, a single device tag can be applied to multiple devices.
Note | For information about Policy tags and Location tags, see Adding or Removing a Policy Tag in Device Inventory and Adding or Removing Location Tags. |
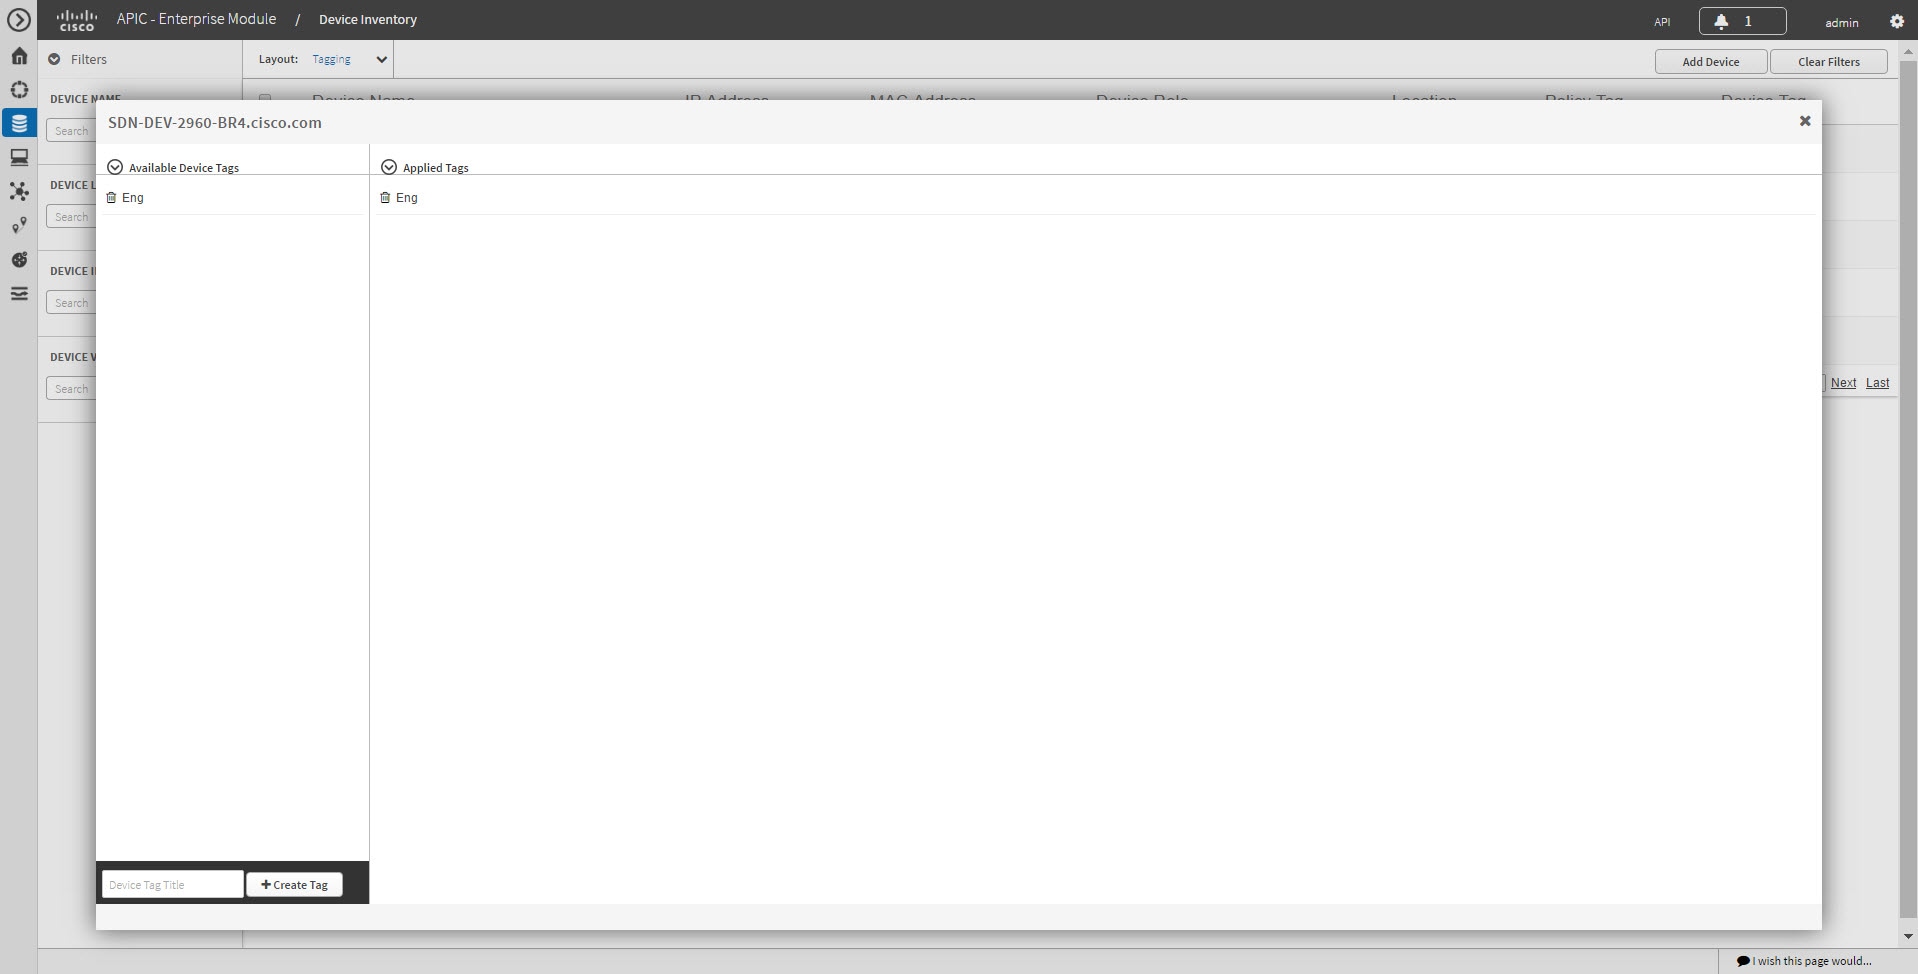
You must have administrator (ROLE_ADMIN) permissions and access to all devices (RBAC Scope set to ALL) to perform this procedure.
Make sure that you have devices in your inventory. If not, discover devices using the Discovery function.
| Step 1 | From the Navigation pane, click Device Inventory. | ||||
| Step 2 | From the
Device
Inventory toolbar, choose
Layout
> Tagging from the drop-down list.
The table refreshes and displays a Device Tag column in addition to other columns. | ||||
| Step 3 | Select the check box to the left of the
desired devices and click Set Device Tags.
| ||||
| Step 4 | Do one of the
following:
| ||||
| Step 5 | Click x to close the dialog box. |
What to Do Next
If required for your network configuration, add location or policy tags to your devices.
Adding or Removing a Policy Tag in Device Inventory
You can apply a policy tag applied to a group of devices so that you can deploy the same QoS policy to those devices at the same time.

Make sure that you have devices in your inventory. If not, discover devices using the Discovery function.
1. From the Navigation pane, click Device Inventory.
2. From the Device Inventory toolbar, choose Layout > Tagging from the drop-down list.
3. Select the check box to the left of the desired devices and click Set Policy Tag.
4. Do one of the following:
5. Click x to close the dialog box.
DETAILED STEPS
| Step 1 | From the Navigation pane, click Device Inventory. | ||||
| Step 2 | From the Device Inventory toolbar, choose
Layout > Tagging from the drop-down list.
The table refreshes and displays a Policy Tag column in addition to other columns. | ||||
| Step 3 | Select the check box to the left of the
desired devices and click Set Policy Tag.
| ||||
| Step 4 | Do one of the following:
| ||||
| Step 5 | Click x to close the dialog box. |
What to Do Next
If you added a policy tag to devices and now want to configure QoS policies, see the Cisco EasyQoS Application for APIC-EM User Guide.
Adding or Removing Location Tags
You can apply a location tag to a device to name a device's geographic location. By applying the same tag to several devices, you can group them based on their common location. You can create a location tag and, optionally, place a corresponding location marker on a geographical map. For information, see Adding or Changing a Location Marker.
Use the following guidelines when adding location tags:
-
Location tag information is maintained on the controller only and not deployed to or dirived from the device itself.
-
When location tags and markers are used, the Topology window displays them on a geographical map.
-
A location defined on the controller is not the "civic-location" property that some devices support.
-
Location tags cannot be attached to hosts.
-
You can apply only one location tag to a device. However, you can use both a location tag and a device tag together.
You must have administrator (ROLE_ADMIN) permissions and access to all devices (RBAC Scope set to ALL) to perform this procedure.
| Step 1 | From the Navigation pane, click Device Inventory. | ||
| Step 2 | From the Device Inventory toolbar, choose
Layout > Tagging from the drop-down list.
The table refreshes and displays a Location column in addition to other columns. | ||
| Step 3 | Select the check box to the left of the desired devices (or select the check box at the top of the list to select all devices) and click Set Location.
| ||
| Step 4 | Do one of the following:
| ||
| Step 5 | When you are done, click x to close the dialog box. |
What to Do Next
If required for your network configuration, add or remove other location tags to other devices or add location markers.
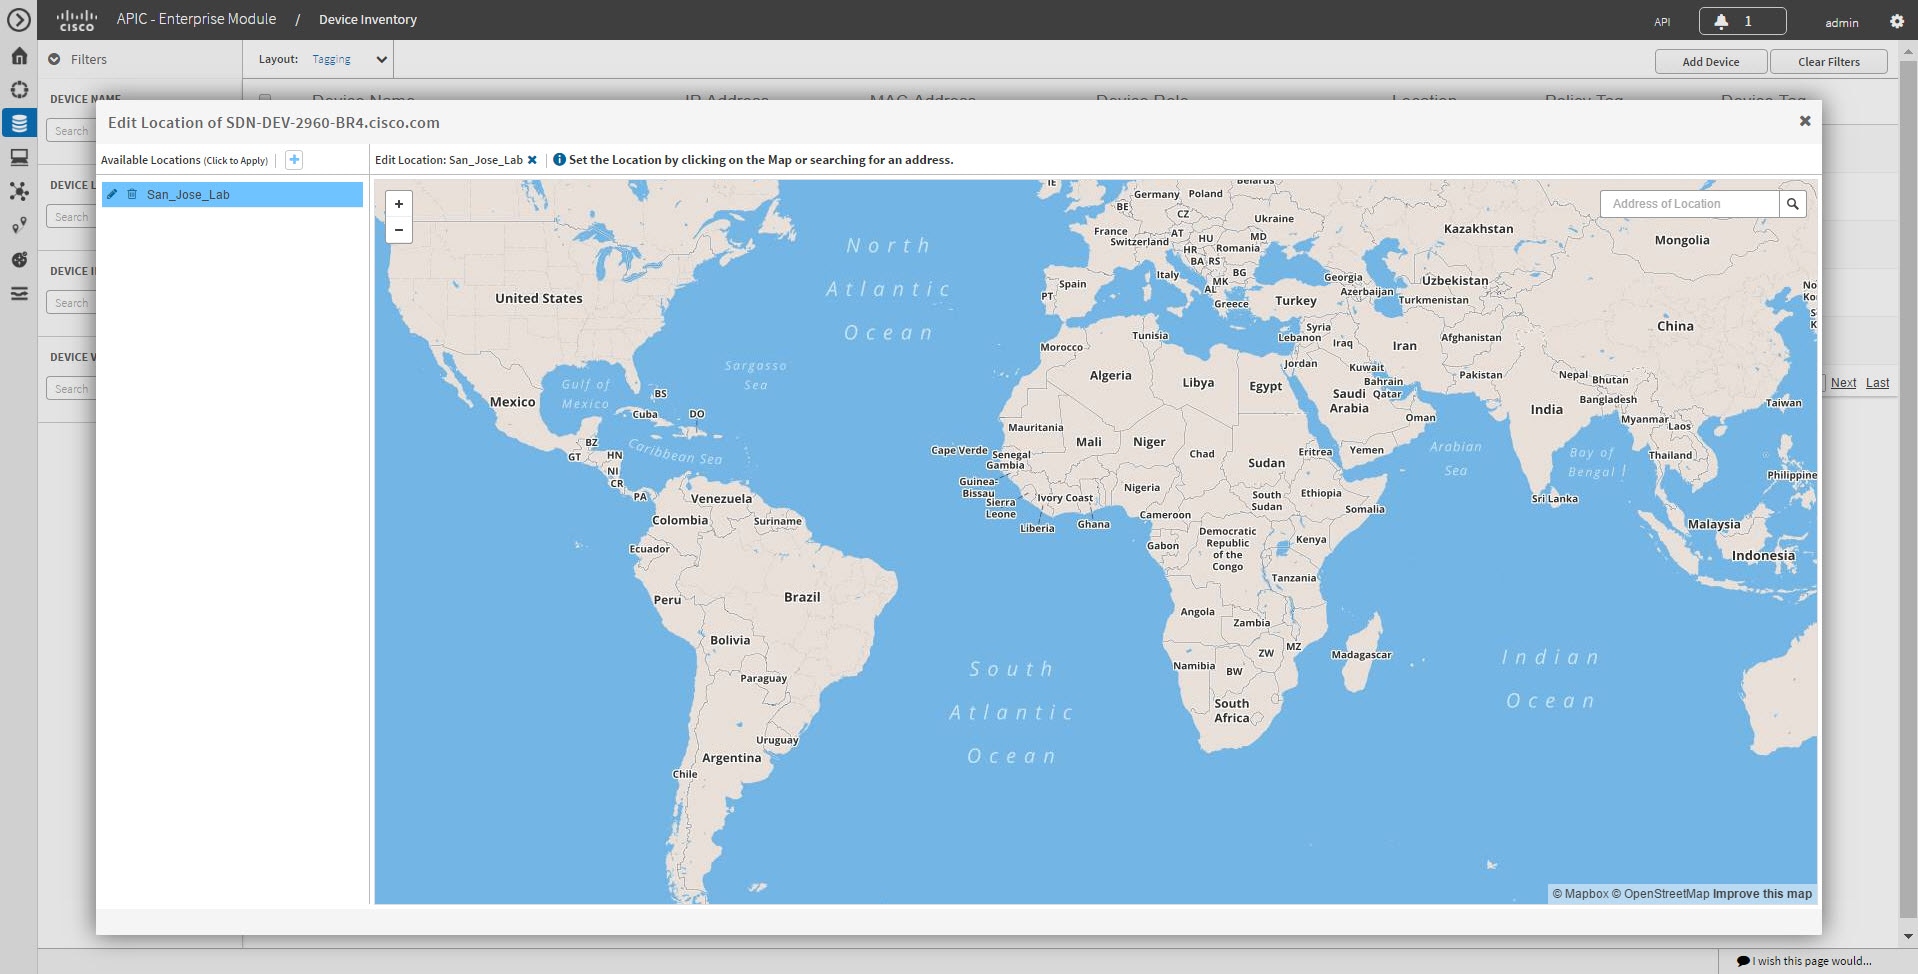
Adding or Changing a Location Marker
A location marker is an icon used to indicate the location of the devices associated with a location tag on a geographical map. You can add a location marker to devices in the Device Inventory window.
You must have administrator (ROLE_ADMIN) permissions and access to all devices (RBAC Scope set to ALL) to perform this procedure.
Make sure that you have devices in your inventory. If not, discover devices using the Discovery function.
You have already added location tags to your devices.
| Step 1 | From the Navigation pane, click Device Inventory. | ||
| Step 2 | From the
Device
Inventory toolbar, choose
Layout
> Tagging from the drop-down list.
The table refreshes and displays a Location column in addition to other columns. | ||
| Step 3 | (Optional) To display devices with a specific location tag, from the Device Inventory toolbar, click Filters, enter a location tag in the Device Location field, and click the + icon. | ||
| Step 4 | Select the desired location tag from the Locations column.
| ||
| Step 5 | To add or change a location marker, select the location tag from the Available Locations pane and do one of the following:
 | ||
| Step 6 | (Optional)To add additional location markers, click another location tag and repeat Step 5. | ||
| Step 7 | When you are done, click x to close the dialog box. |
Deleting a Tag
When a device tag, policy tag, or location tag is no longer needed, you can delete it, and it is removed permanently from the controller. You can delete device tags using the Device Inventory window or the Topology window. Policy tags and location tags can be deleted only from the Device Inventory window. This procedure shows you how to delete tags from the Device Inventory window.
You must have administrator (ROLE_ADMIN) permissions and access to all devices (RBAC Scope set to ALL) to perform this procedure.
Make sure that you have devices in your inventory. If not, discover devices using the Discovery function.
Before you can delete a tag, you need to remove it from all devices that have been assigned the tag.
| Step 1 | From the Navigation pane, click Device Inventory. |
| Step 2 | From the Device Inventory toolbar, choose Layout > Tagging from the drop-down list. |
| Step 3 | Do one of the following:
|
| Step 4 | Click OK to confirm
the deletion.
The tag is removed permanently from the controller. If the deletion fails, the tag might still be assigned to devices. Remove the tag from these devices and try to delete the tag again. |
| Step 5 | Click x to close the dialog box. |
Updating Device Credentials
You can update the discovery credentials of selected devices. The updated settings override the global and job-specific settings for the selected devices.
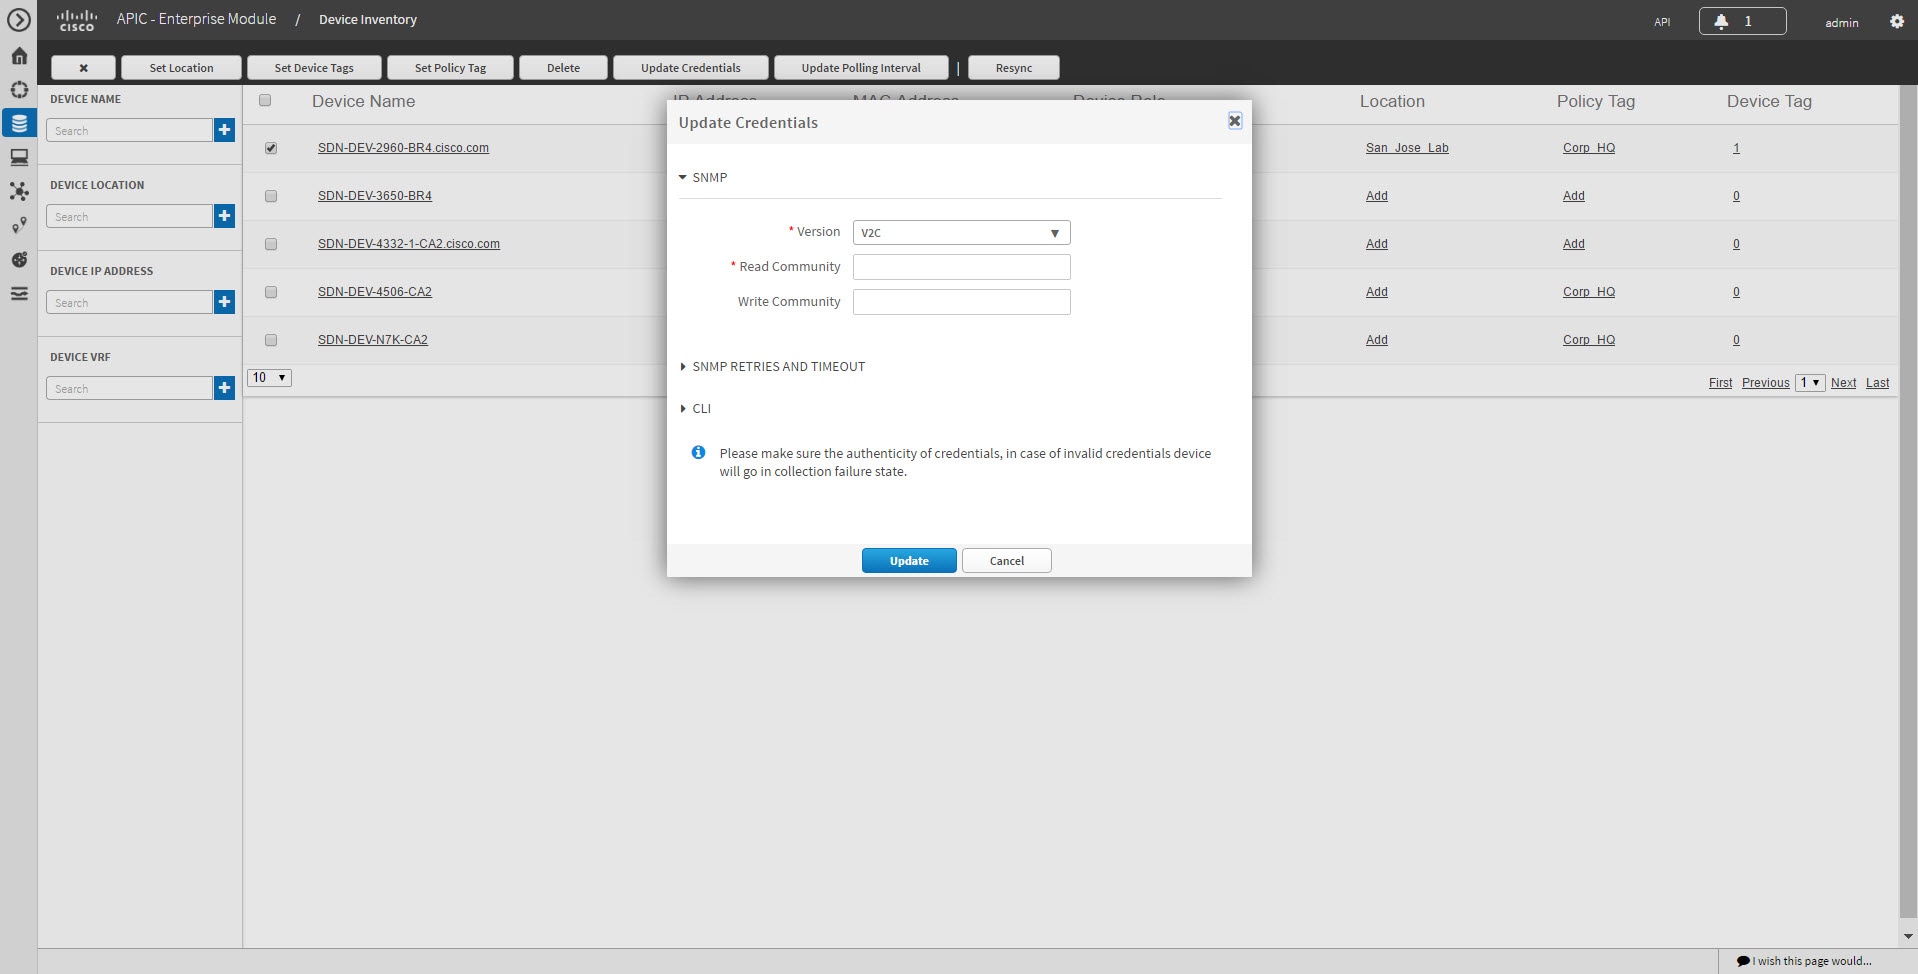
Make sure that you have devices in your inventory. If not, discover devices using the Discovery function.
You must have either administrator (ROLE_ADMIN) or policy administrator (ROLE_POLICY_ADMIN) permissions and the appropriate RBAC scope to perform this procedure.
| Step 1 | From the Navigation pane, click Device Inventory. | ||||||||||||||||||||||
| Step 2 | Select the devices that you want to update. | ||||||||||||||||||||||
| Step 3 | Click Update Credentials. | ||||||||||||||||||||||
| Step 4 | Click OK to confirm this action. | ||||||||||||||||||||||
| Step 5 | From the Update Credentials dialog box, expand the SNMP area, if it is not already expanded. | ||||||||||||||||||||||
| Step 6 | In the Version field, choose the SNMP version from the drop-down list: V2C or V3 and complete the corresponding fields:
| ||||||||||||||||||||||
| Step 7 | Expand the SNMP RETRIES AND TIMEOUT area, if it is not already expanded, and complete the following fields:
| ||||||||||||||||||||||
| Step 8 | Expand the CLI area, if it is not already expanded, and complete the following fields:
| ||||||||||||||||||||||
| Step 9 | Click Update. |
Resynchronizing Device Information
You can select devices to be polled immediately for updated device and status information, regardless of the polling interval that is set. A maximum of 40 devices can be resynchronized at the same time.
| Step 1 | From the Navigation pane, click Device Inventory. |
| Step 2 | Select the device or devices on which you want to gather information about. |
| Step 3 | Click Resync. |
| Step 4 | Confirm the resynchronization by clicking OK. |
Running Commands on Devices
You can run show commands and other read-only commands on selected devices and display the output in Cisco APIC-EM. To determine the allowed command keywords, from the global toolbar, click API > Network Poller > network-device-poller > /network-device-poller/cli/legit-reads > Try it out!
From the GUI, you can run a maximum of 5 commands per device, with a maximum of 20 devices per request. When a device is part of another request that has not completed yet, no other commands are executed on it.
Access points are not supported. If you choose access points, they are omitted from executing commands. Commands are only run on the other selected devices.
The command runner application is not installed on Cisco APIC-EM by default. To use the command running application, you need to download the image from Cisco.com, install it, and enable the Command Runner application. For information, see the Cisco Application Policy Infrastructure Controller Enterprise Module Administrator Guide.
You must have either administrator (ROLE_ADMIN) or policy administrator (ROLE_POLICY_ADMIN) permissions and the appropriate RBAC scope to perform this procedure.
Make sure that you have devices in your inventory. If not, discover devices using the Discovery function.
| Step 1 | From the Navigation pane, click Device Inventory. | ||
| Step 2 | Select the device on which you want to run commands. | ||
| Step 3 | Click Command Runner. | ||
| Step 4 | In the Command field, enter the command that you want to run and click the plus sign (+) icon to add the command to the list of commands to be run.
You can add only one command at a time and up to 5 commands total. | ||
| Step 5 | When you have defined all of the commands that you want to run, click Run. Cisco APIC-EM runs the commands on the selected devices and displays the command output.
|
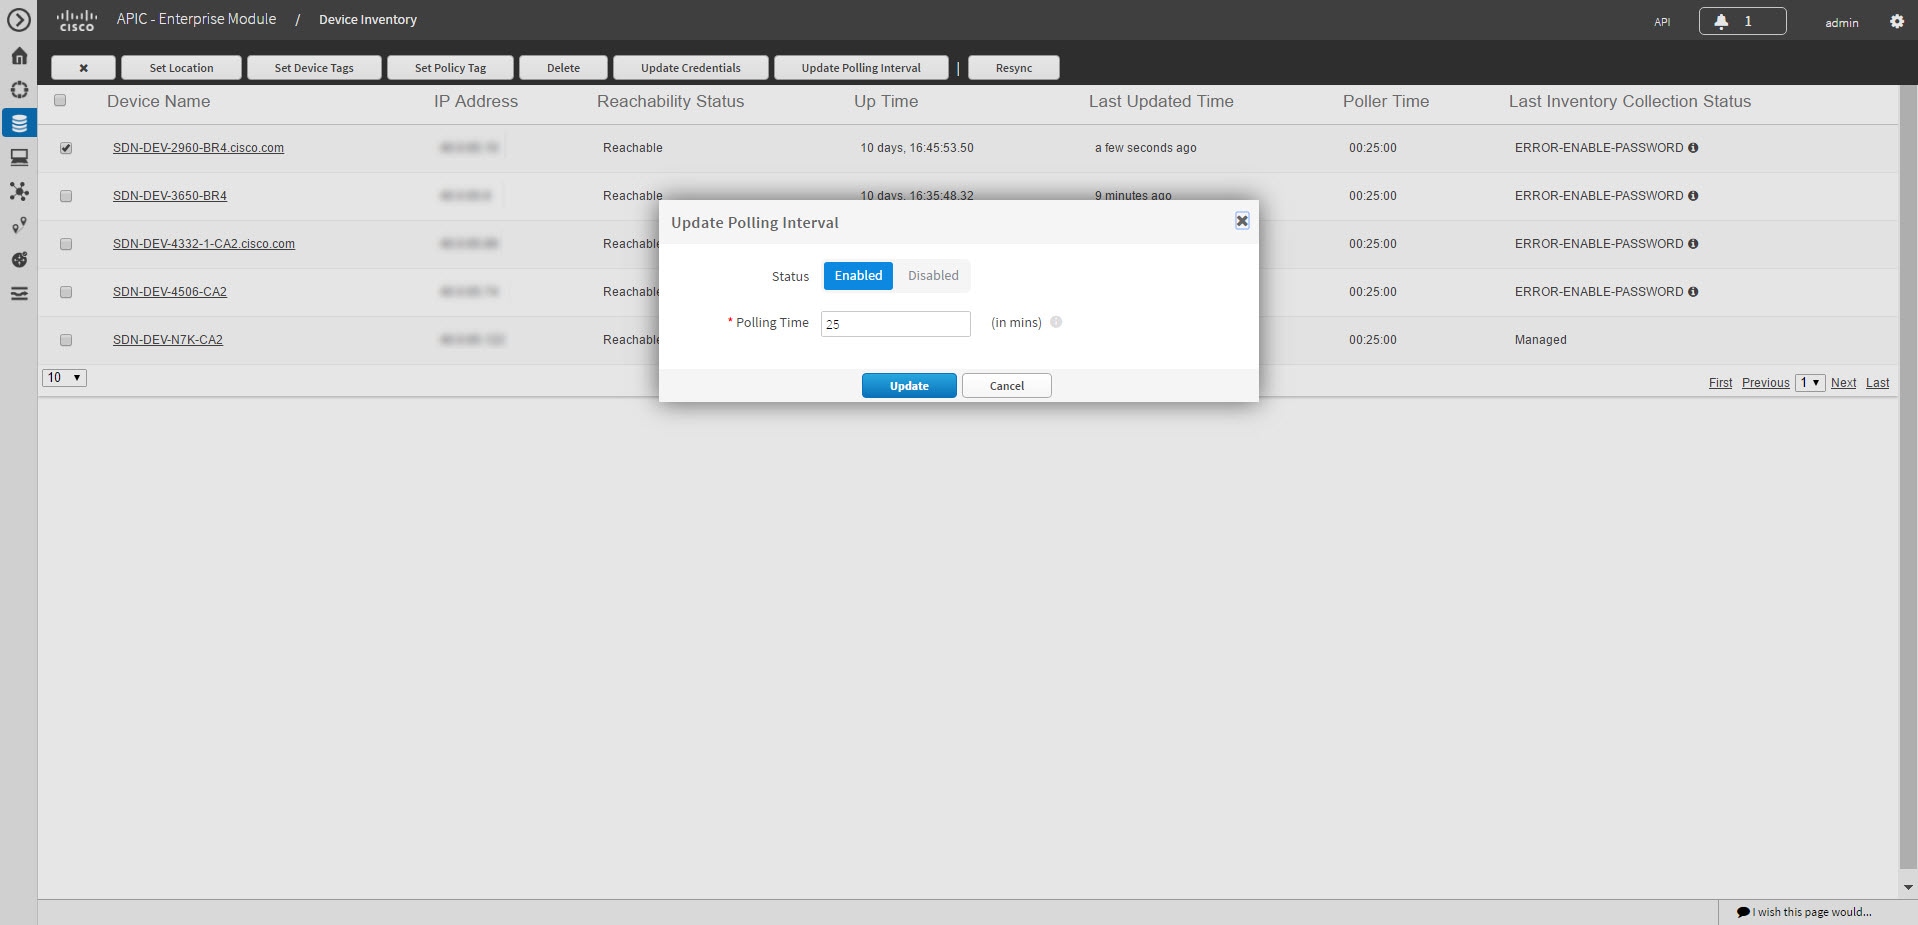
Updating a Device's Polling Interval
You can update the polling interval at the global level for all devices on the Settings > Polling Interval page or at the device level for a specific device in the Device Inventory window. When you set the polling interval at the device level, that value takes precedence over the global polling interval value.
For information about setting the polling interval at the global level, see the Cisco Application Policy Infrastructure Controller Enterprise Module Administrator Guide.
Make sure that you have devices in your inventory. If not, discover devices using the Discovery function.
You must have either administrator (ROLE_ADMIN) or policy administrator (ROLE_POLICY_ADMIN) permissions and the appropriate RBAC scope to perform this procedure.
| Step 1 | From the Navigation pane, click Device Inventory. | ||
| Step 2 | Select the devices that you want to update. | ||
| Step 3 | Click Update Polling Interval. | ||
| Step 4 | Click OK to confirm this action. | ||
| Step 5 | From the Update Polling Interval dialog box, in the Status field, click Enabled to turn on polling or click Disabled to turn off polling. | ||
| Step 6 | In the Polling Time field, enter the time interval (in minutes) between successive polling cycles. Valid values are from 25 to 1440 minutes (24-hours).
| ||
| Step 7 | Click Update. |
Managing Your Host Inventory
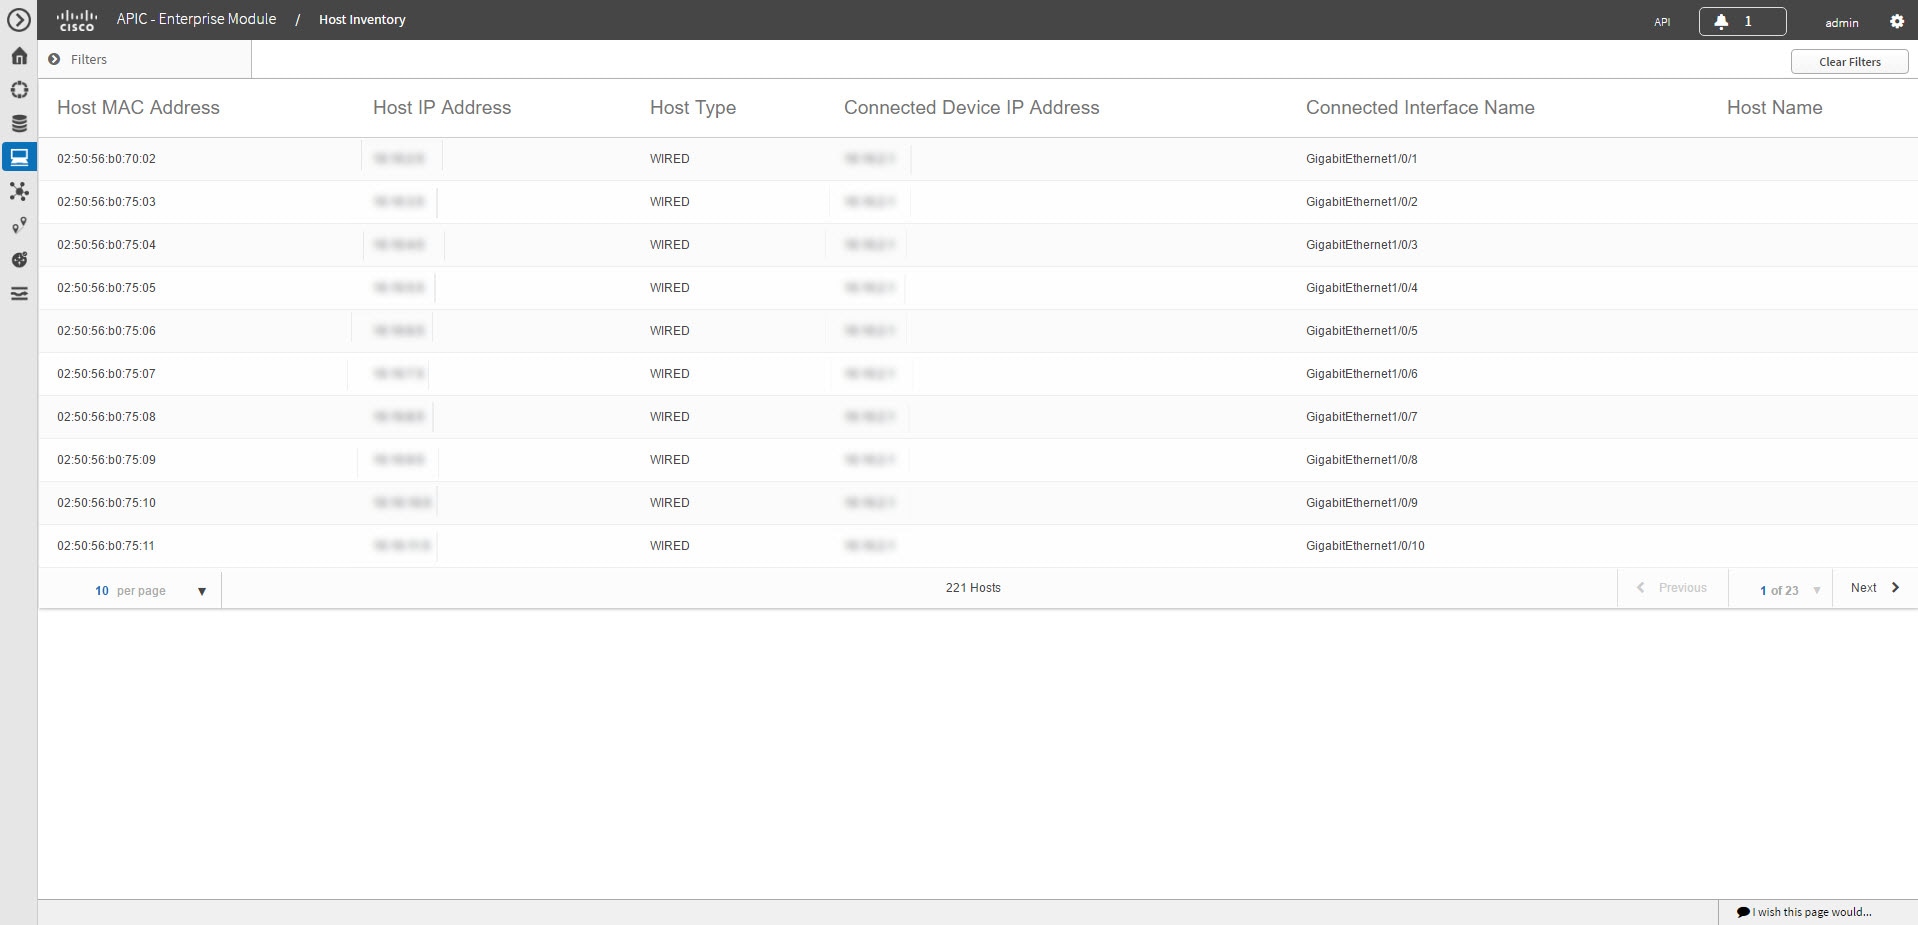
Cisco APIC-EM displays information about the discovered hosts in the Host Inventory window.
The following table describes the information that is displayed about the hosts in your inventory.
Note | Use the filters located below the Host Inventory table to limit the number of hosts displayed in the table (10, 25, 50, 100) or to view groups of hosts at a time (First, Previous, Next, Last, or 1-3). |
The following table describes the information that is displayed about the hosts in your inventory.
|
Host Inventory |
Description |
||
|---|---|---|---|
|
Host Name |
Name of the host. |
||
|
Host MAC address |
MAC address of the host. |
||
|
Host IP address |
IP address of the host. |
||
|
Host type |
Type of host (wired or wireless). |
||
|
Connected Network Device IP Address |
IP address of the device that is connected to the host.
|
||
|
Connected Interface Name |
Name of the interface that the device is connected to. For example, GigabitEthernet1/0/24. |
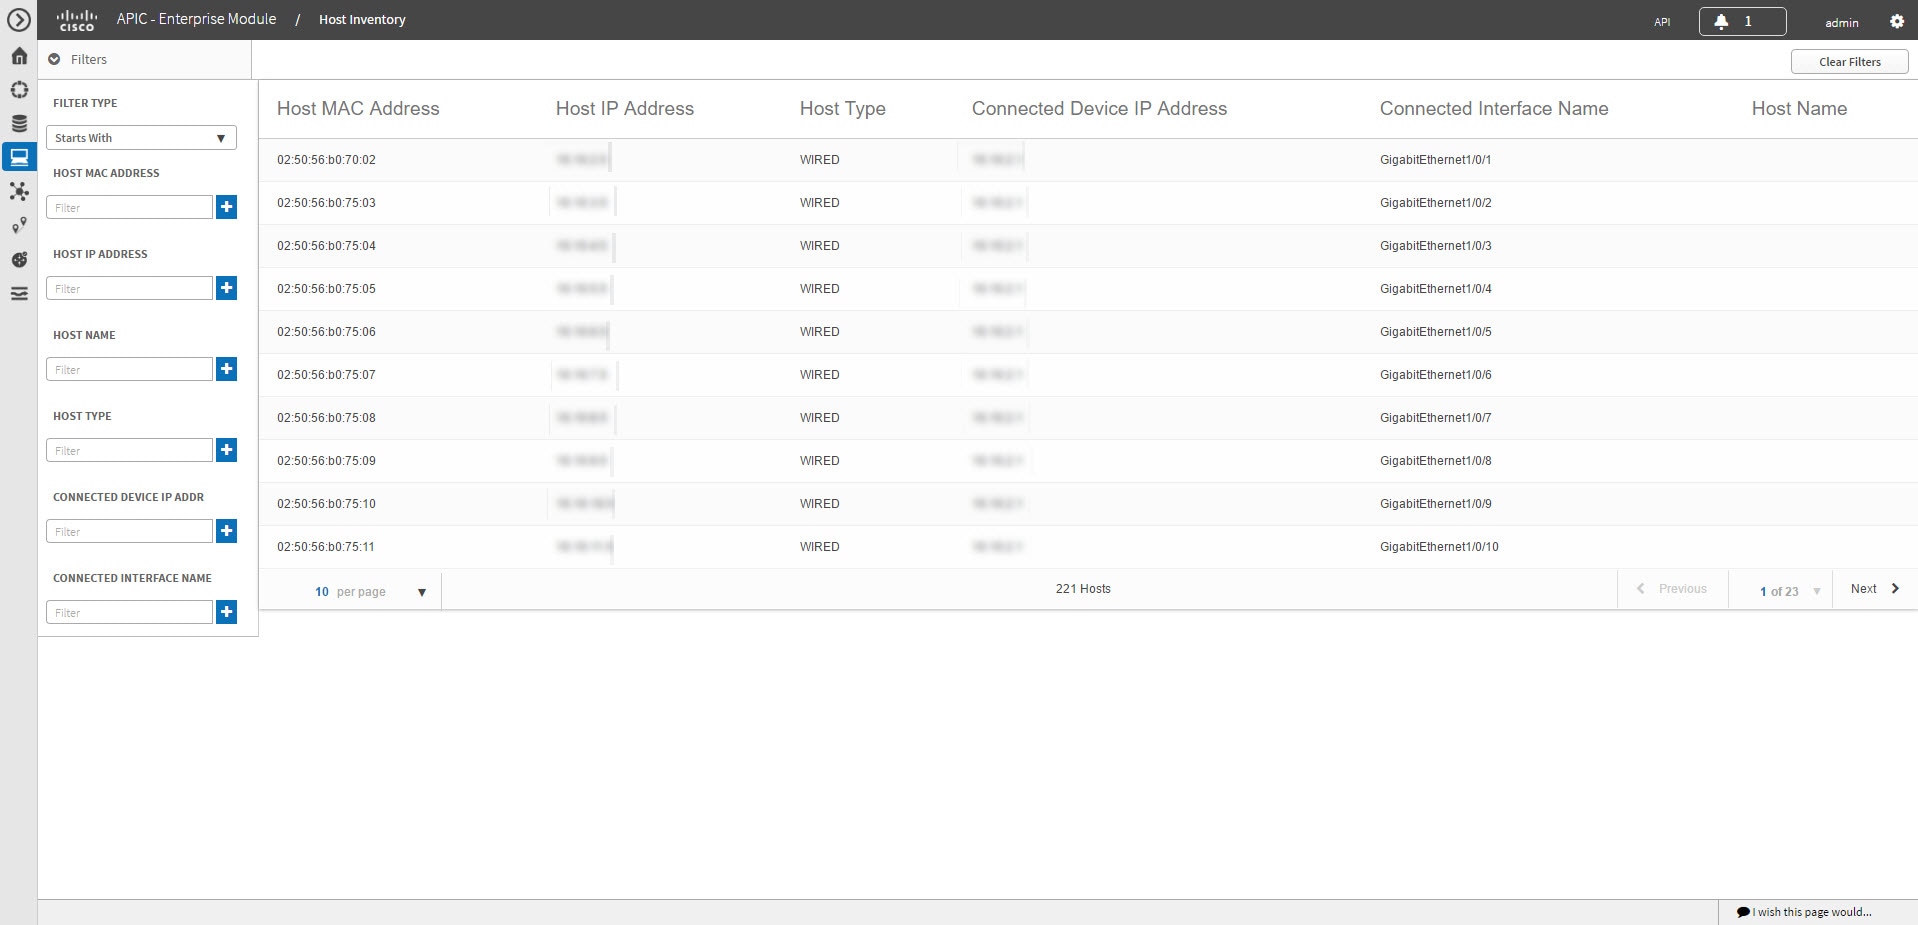
Filtering Hosts in the Host Inventory Window
You can filter the hosts displayed in the Host Inventory window by host MAC address, host IP address, host name, host type, connected network device IP address, or connected interface name.
Make sure that you have hosts in your inventory. If not, discover them using the Discovery function.
| Step 1 | From the Host Inventory toolbar, click Filters.
You can choose from the following filter options: | ||
| Step 2 | Enter the appropriate value in the selected filter field.
For example, for the Host Name filter, enter the name of the host. The controller presents you with auto-complete values as you enter values in the other fields. Choose one of the suggested values or finish entering the value.
| ||
| Step 3 | Click the plus (+) icon to perform the filter.
The data displayed in the Devices table automatically updates according to your filter selection. | ||
| Step 4 | (Optional) If needed, add more filters following the above steps.
| ||
| Step 5 | To remove the filter, click the x icon next to the filter value. |
 Feedback