Cisco Application Policy Infrastructure Controller Enterprise Module Configuration Guide, Release 1.1.x
Bias-Free Language
The documentation set for this product strives to use bias-free language. For the purposes of this documentation set, bias-free is defined as language that does not imply discrimination based on age, disability, gender, racial identity, ethnic identity, sexual orientation, socioeconomic status, and intersectionality. Exceptions may be present in the documentation due to language that is hardcoded in the user interfaces of the product software, language used based on RFP documentation, or language that is used by a referenced third-party product. Learn more about how Cisco is using Inclusive Language.
- Updated:
- February 29, 2016
Chapter: Configuring Quality of Service
- About EasyQoS
- Configuring QoS Policies
- Enabling the EasyQoS Beta Feature
- Creating a Policy for Wired Devices
- Creating a Policy for a Wireless Segment
- Editing a Policy
- Changing the Business Relevance of an Application
- Configuring Favorite Applications
- Creating a Custom Application
- Editing a Custom Application
- Enabling Dynamic QoS Policies
- Viewing Dynamic Policies
Configuring Quality of Service
About EasyQoS
Quality of service (QoS) refers to the ability of a network to provide preferential or deferential service to selected network traffic. The Cisco APIC-EM enables you to configure quality of service on the devices in your network using the EasyQoS feature.
To configure QoS on the devices in your network, you must be assigned either administrative permissions (ADMIN_ROLE) or policy administrator permissions (POLICY_ADMIN_ROLE) to use EasyQoS. For information, see Managing Users and Roles.
You define the scope of the devices that you want to apply QoS policies on. Then you define the QoS policy for the scope. The Cisco APIC-EM takes your selections, translates them into the proper device configurations, and deploys them onto the devices defined in the scope.
EasyQoS configures quality of service policies on devices based on the QoS feature set available on the device. For more information about a specific device’s QoS implementation, see the device product documentation.
 Note | EasyQoS is not enabled by default. To enable EasyQoS, you need to enable EasyQoS in the Settings window. For information, see Enabling the EasyQoS Beta Feature. |
- Policies
- Custom Applications
- Favorite Applications
- Static and Dynamic QoS Policies
- Device Configuration Prerequisites for WAN Policies
- Processing Order for Devices with Limited Resources
- EasyQoS Guidelines and Limitations
Policies
A QoS policy defines how network traffic should be handled so that you can make the most efficient use of network resources while still adhering to the objectives of the business (such as guaranteeing voice quality meets enterprise standards or ensuring a high Quality of Experience (QoE) for video). To achieve these goals, a policy comprises the following elements:
-
Policy Scope—Group of devices that will be configured with the policy.
-
Applications—Software programs or network signaling protocols that are being used in your network. EasyQoS includes the Cisco Network Based Application Recognition, second generation (NBAR2) application library of approximately 1400 distinct applications. For more information about NBAR2, see the following URL: http://www.cisco.com/c/en/us/products/ios-nx-os-software/network-based-application-recognition-nbar/index.html.
-
Traffic Classes—Groups of applications that make configuring policies easier, because the groups contain applications that have similar traffic needs.
-
Business-relevance—Attribute that classifies a given application according to how relevant it is to your business and operations. The attributes are business relevant, default, and business irrelevant. For detailed information about these attributes, see Business-Relevance Groups.
EasyQoS comes with the Cisco NBAR2 applications preconfigured into application categories and sorted into business-relevancy groups. You can apply this preconfigured policy to your network devices, or you can modify it to meet the needs of your business objectives and your network configuration.
For example, YouTube is set as business-irrelevant (by default), because most customers typically classify this application this way. However, this classification may not be the true for all companies; for example, some businesses may be using YouTube for training purposes. In such cases, an administrator can change this business-relevancy setting to business-relevant to align with their business objectives.
The QoS trust and QoS queuing functionality is preconfigured for the current release and cannot be changed. QoS trust and QoS queuing is set per device according to the Cisco Validated Design (CVD) for Enterprise Medianet Quality of Service Design.
The latest validated designs are published in the Cisco Press book, End-to-End QoS Network Design: Quality of Service for Rich-Media & Cloud Networks, 2nd Edition, available at: http://www.ciscopress.com/store/end-to-end-qos-network-design-quality-of-service-for-9781587143694. For additional information about Cisco Validated Design (CVD) for Enterprise Medianet Quality of Service, see the following Cisco documentation:
Policy Scope
You define the scope of a policy by applying policy tags to devices that have similar QoS level needs. A policy tag groups the devices so that you can deploy the same QoS policy to more than one device at the same time. You can apply policy tags from the Device Inventory window. Then in the EasyQoS window, you configure the QoS policies for the scopes and save them to the devices. Applying the QoS policies deploys the QoS configurations onto the devices.
For example, you have three devices that need the same quality of service level. From the Device Inventory window, you create a policy tag and apply it to the three devices. From the EasyQoS window, you choose the scope of your policy by selecting the policy tag that contains the three devices. Then, you configure the QoS policies by assigning the applications to a business-relevancy group. When you apply the QoS policies that you have defined for the policy tag, the three devices are updated with the corresponding QoS configurations.
Note | Because QoS (by nature) needs to be deployed end-to-end, it is important to add all devices in a path to the scope in order for the QoS policy as a whole to have effect. |
Applications
EasyQoS pre-allocates all of the applications in the Cisco Next Generation Network-Based Application Recognition (NBAR2) library into industry standard-based traffic classes (as defined in RFC 4594). These traffic classes define the network QoS treatments of the applications assigned to them; these treatments include DSCP marking, queuing and dropping treatments.
Note | Changing an application's traffic class is not supported; only changing the business-relevance of an application is supported. |
If you have additional applications that are not included in EasyQoS, you can add them as custom applications. For information, see Custom Applications.
Traffic Classes
The Cisco APIC-EM provides the following traffic classes, which have preconfigured QoS settings to support the specific types of application traffic.
|
Traffic Class |
Supported Types of Application Traffic |
|---|---|
|
Voice |
VoIP telephony (bearer-only) traffic. (VoIP signaling traffic is assigned to the Call Signaling class.) Traffic in this class is marked EF (DSCP 46). Voice is treated with a strict priority service. |
|
Broadcast Video |
Broadcast TV, live events, video surveillance flows, and similar inelastic streaming media flows. (Inelastic flows refer to flows that are highly drop sensitive and have no retransmission and/or flow-control capabilities.) Traffic in this class is marked as Class Selector 5 (CS5/DSCP 40) and may be treated with a strict-priority service. |
|
Realtime Interactive |
Inelastic high-definition interactive video applications and audio and video components of these applications. Traffic in this class is marked CS4 (DSCP 32) and may be treated with a strict-priority service. |
|
Multimedia Conferencing |
Desktop software multimedia collaboration applications and audio and video components of these applications. Traffic in this class is marked as Assured Forwarding Class 4 (AF41/DSCP 34) and is provisioned with a guaranteed bandwidth queue with DSCP-based Weighted-Random Early Detect (DSCP-WRED) enabled. |
|
Multimedia Streaming |
Video-on-Demand (VoD) streaming video flows and desktop virtualization applications. Traffic in this class is marked as AF Class 3 (AF31) and is provisioned with a guaranteed bandwidth queue with DSCP-based WRED enabled. |
|
Network Control |
Network control plane traffic, which is required for reliableoperation of the enterprise network. Traffic in this class is marked as CS6 and provisioned with a (moderate, but dedicated) guaranteed bandwidth queue.WRED should not be enabled on this class, as network control traffic should not be dropped. Example traffic includes EIGRP, OSPF, BGP, HSRP, IKE, and so on. |
|
Signaling |
Control-plane traffic for the IP voice and video telephony infrastructure. Traffic in this class is marked as CS3 (DSCP 24) and provisioned with a moderate, but dedicated, guaranteed bandwidth queue. |
|
Network Management |
Network operations, administration, and management traffic, such as SSH, SNMP, syslog, and so on. This class is important to the ongoing maintenance and support of the network. Traffic in this class is marked as CS2 (DSCP 16) and provisioned with a (moderate, but dedicated) guaranteed bandwidth queue. WRED is not enabled on this class, as OAM traffic cannot be dropped. |
|
Transactional Data (Low-Latency Data) |
Interactive (foreground) data applications. Traffic in this class is marked as Assured Forwarding Class 2 (AF21/DSCP 18) and is provisioned with a dedicated bandwidth queue with DSCP-WRED enabled. |
|
Bulk Data (High-Throughput Data) |
Noninteractive (background) data applications. Traffic in this class is marked as Assured Forwarding Class 1 (AF11/DSCP 10) and is provisioned with a moderate, but dedicated, bandwidth queue with DSCP-WRED enabled. |
|
Default Forwarding (Best Effort) |
Default applications and applications assigned to the default business-relevant group. Because only a small minority of applications are assigned to priority, guaranteed-bandwidth, or even to deferential service classes, the vast majority of applications continue to default to this best-effort service. Traffic in this class is marked as Default Forwarding (DF or DSCP 0) and is provisioned with a dedicated queue. |
|
Scavenger |
Nonbusiness related traffic flows and applications assigned to the business-irrelevant group, such as data or media applications that are entertainment-oriented. Traffic in this class is marked CS1 (DSCP 8) and is provisioned with a minimal bandwidth queue that is the first to starve if network congestion occurs. |
Business-Relevance Groups
The EasyQoS feature provides three levels of business-relevance groupings. These groupings provide different levels of service to the applications that have been assigned to them. These groups include:
-
Business Relevant—The applications in this group directly contribute to organizational objectives and, as such, may include a variety of applications, including voice, video, streaming and collaborative multimedia applications, database applications, enterprise resource applications, email, file-transfers, content distribution, and so on. Applications designated as business-relevant are treated according to industry best-practice recommendations, as prescribed in IETF RFC 4594.
-
Default—This group is intended for applications that may or may not be business-relevant. For example, generic HTTP/HTTPS traffic may contribute to organizational objectives at times, while at other times such traffic may not. You may not have insight into the purpose of some applications (for instance, legacy applications or even newly deployed applications), so the traffic flows for these applications should be treated with the Default Forwarding service, as described in RFC 2747 and 4594.
-
Business Irrelevant—This group is intended for applications that have been identified to have no contribution towards achieving organizational objectives. They are primarily consumer- and/or entertainment-oriented in nature. We recommend that this type of traffic be treated as a "Scavenger" service, as described in RFC 3662 and 4594.
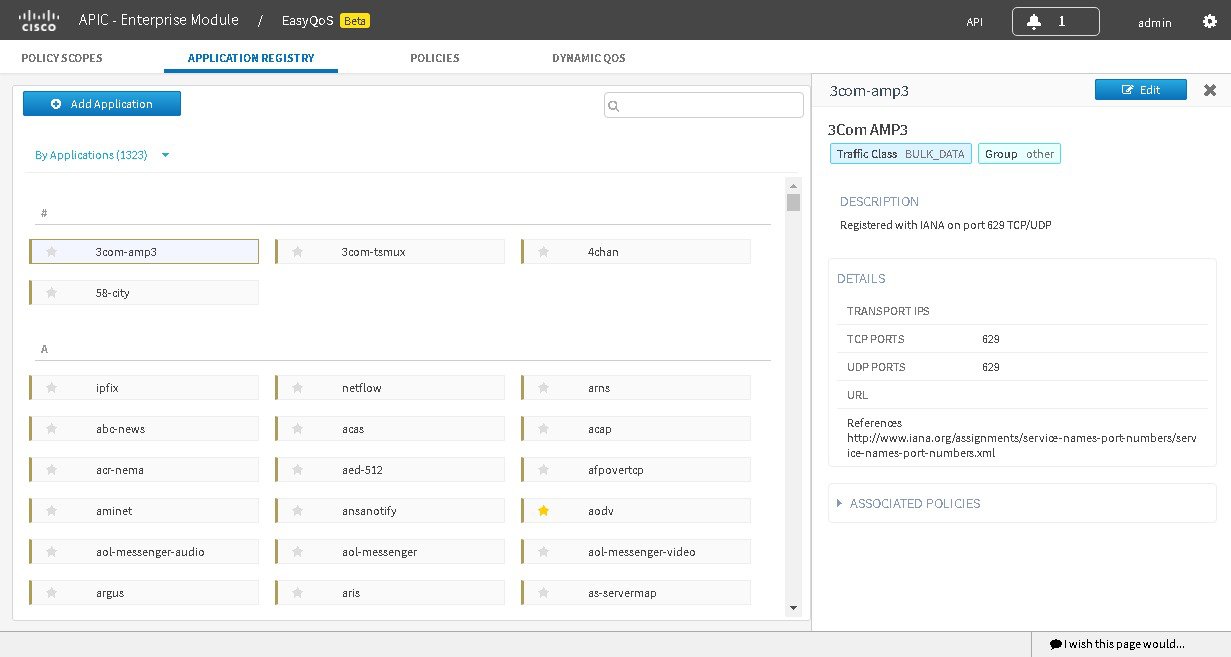
Custom Applications
Custom applications are applications that you add to the EasyQoS application library. You can define the protocol, port numbers for specific host IP addresses, and the traffic class for the application. You can also add URL-based applications. Alternatively, you can choose an existing application that closely matches the traffic requirements of the application you are adding. In this case, EasyQoS copies the other application's traffic class, category, and subcategory settings to the application that you are defining.
EasyQoS does not configure ACEs for port numbers 80, 443, and 8080, even if they are defined as part of a custom application. If the custom application has a transport IP defined, EasyQoS configures the application on the devices.
Note | When you define a custom application in Cisco APIC-EM, the application is available to be assigned in IWAN; however, in IWAN, unless custom applications are assigned to a policy, they are not available in Cisco APIC-EM. |
Favorite Applications
Cisco APIC-EM allows you to flag applications that you want EasyQoS to configure on devices before all other applications, except custom applications. The benefit of this feature is that network devices have a limited memory (called Ternary Content Addressable Memory or TCAM) for storing network access control lists (ACLs) and access control entries (ACEs), and flagging an application as a favorite helps to ensure that the QoS policies for your favorite applications get configured on devices.
Although there is no limit to the number of favorite applications that you can create, selecting only a small number of favorite applications (for example, less than 25) will help to ensure that these applications are treated correctly from a business-relevance perspective in deployments with network devices that have limited TCAM.
Favorite applications can belong to any business relevancy group or traffic class and are configured system-wide, not on a per scope basis. For example, if you flag the Dynamic Host Configuration Protocol (DHCP) as a favorite, the DHCP protocol is flagged as a favorite in all other policies.
Keep in mind that not only business-relevant applications may be flagged as favorites, but even business-irrelevant applications may be flagged as such. For example, if an administrator notices a lot of unwanted Netflix traffic on his network, he may chose to flag Netflix as a favorite application (despite its being assigned as business-irrelevant). In this case, Netflix would be programmed into the device policies before other business-irrelevant applications, ensuring that the business-intent of controlling this application is realized.
Static and Dynamic QoS Policies
There are two types of QoS policies, named for the way in which the policies are implemented:
-
Static policies—The Cisco APIC-EM deploys the QoS policies to the devices and the policies are in effect until you change or remove them. Static policies comprise the majority of the deployments.
-
Dynamic policies—(Used on LAN interfaces only.) You configure another software application to signal the Cisco APIC-EM (through REST APIs) when a specified event occurs so that a corresponding QoS policy is applied to the relevant network devices for the duration of the event. When you enable the dynamic policy capability, it is enabled globally on all policies, not on a per scope basis.
Dynamic policies are used primarily in business applications, such as voice and video applications. For example, you configure Cisco Unified Call Manager (CUCM) to signal the Cisco APIC-EM of a proceeding call. Cisco APIC-EM responds by setting up QoS policies for the video or voice traffic flow on all of the relevant network devices. When the call is over, CUCM signals the APIC-EM to remove the QoS policies. Note that the call does not wait for the QoS policies to be in effect before proceeding. The call proceeds while the Cisco APIC-EM applies the QoS policies to the relevant LAN access interfaces on which hosts (such as, IP phones or telepresence end-points) are connected..
Device Configuration Prerequisites for WAN Policies
In order for the Cisco APIC-EM to identify the WAN interfaces that need dynamic policies, you must specify the interface type (WAN) and (optionally) its subline rate and service-provider Class-of-Service model.
When the Cisco APIC-EM discovers the device and places it in its inventory, the Cisco APIC-EM identifies these specifically marked interfaces as WAN interfaces. The subline rate information is used to trigger a congestion event on the device when this contracted rate is reached (even if the physical WAN interface itself is not congested). As a result of the congestion event, the Cisco APIC-EM updates the device configuration with the queuing policy that reflects the configured business-intent.
Before you can implement a policy of this type, you need to configure the following strings on the device using the command line interface (CLI):
WAN interface—To indicate to the Cisco APIC-EM that the interface needs special handling, you need to include #WAN# in the interface description.
-
Subline rate (MB)—You need to indicate the interface subline rate by including #rateM# in the interface description. The rate must be a value below the actual line rate of the interface.
-
Service provider profile—You need to specify one of the following four Service Provider profiles by including #SPPProfileNumber# in the interface description.
|
Class Name |
DSCP |
Priority Class |
SLA |
|
|---|---|---|---|---|
| Bandwidth (%) |
Remaining Bandwidth (%) |
|||
|
Default |
0 |
— |
— |
31 |
|
Voice |
EF |
Yes |
10 |
— |
|
Class 1 Data |
AF31 |
— |
— |
44 |
|
Class 2 Data |
AF21 |
— |
— |
25 |
|
Class Name |
DSCP |
Priority Class |
SLA |
|
|---|---|---|---|---|
| Bandwidth (%) |
Remaining Bandwidth (%) |
|||
|
Class 3 Data |
AF11 |
— |
— |
1 |
|
Voice |
EF |
Yes |
10 |
— |
|
Class 1 Data |
AF31 |
— |
— |
44 |
|
Class 2 Data |
AF21 |
— |
— |
25 |
|
Class Name |
DSCP |
Priority Class |
SLA |
|
|---|---|---|---|---|
| Bandwidth (%) |
Remaining Bandwidth (%) |
|||
|
Class 1 Data |
AF31 |
— |
— |
10 |
|
Class 3 Data |
AF11 |
— |
— |
1 |
|
Video |
AF41 |
— |
— |
34 |
|
Voice |
EF |
Yes |
10 |
— |
|
Default |
0 |
— |
— |
30 |
|
Class 2 Data |
AF21 |
— |
— |
25 |
|
Class Name |
DSCP |
Priority Class |
SLA |
|
|---|---|---|---|---|
| Bandwidth (%) |
Remaining Bandwidth (%) |
|||
|
Network-Control Management |
CS6 |
— |
— |
5 |
|
Streaming Video |
AF31 |
— |
— |
10 |
|
Call Signalling |
CS3 |
— |
— |
4 |
|
Scavenger |
CS1 |
— |
— |
1 |
|
Interactive Video |
AF41 |
— |
— |
30 |
|
Voice |
EF |
Yes |
10 |
— |
|
Default |
0 |
— |
— |
25 |
|
Critical Data |
AF21 |
— |
— |
25 |
Example
interface GigabitEthernet0/2
     description AT&T Circuit from SJ-13-12 to RTP-Ridge-7 #WAN#50M#SPP4#
Note | You may want to create a script to automate these device configuration changes. |
Processing Order for Devices with Limited Resources
Some network devices have a limited memory (called Ternary Content Addressable Memory or TCAM) for storing network access control lists (ACLs) and access control entries (ACEs). So, as ACLs and ACEs for applicatioins are configured on these devices, the available TCAM space is used. When the TCAM space is depleted, QoS settings for no additional applications can be configured on that device.
To ensure that QoS policies for the most important applications get configured on these devices, EasyQoS allocates TCAM space based on the following order:
Applications are given priority according to the following criteria and order:
-
Rank—Number assigned to custom and favorite applications, but not to existing, default NBAR applications. The lower the rank number, the higher the priority. So, an application with rank 1 has a higher priority than an application with rank 2, and so on. Having no rank is the lowest priority.
-
Custom applications are assigned rank 1 by default.
-
Existing, default NBAR applications are not assigned a rank until you mark them as favorites, at which point they are assigned rank 10,000.
-
-
Popularity—Number (1–10) that is based on Cisco Validated Design (CVD) criteria. The popularity number cannot be changed. An application with a popularity of 10 has a higher priority than an application with a popularity of 9, and so on.
-
Custom applications are assigned popularity 10 by default.
-
Existing, default NBAR applications are assigned a popularity number (1–10) that is based on Cisco Validated Design (CVD) criteria. When you mark an application as a favorite, this does not change the popularity number (only rank is changed).
-
-
Alphabetization—If two or more applications have the same rank and/or popularity number, they are sorted alphabetically by the application’s name, and assigned a priority accordingly.
For example, you define a policy that has the following applications:
-
Custom application, custom_realtime, which has been assigned rank 1 and popularity 10 by default.
-
Custom application, custom_salesforce, which has been assigned rank 1 and popularity 10 by default.
-
Application named corba-iiop, which you have designated as a favorite, giving that application a ranking of 10,000 and popularity of 9 (based on CVD).
-
Application named gss-http, which you have designated as a favorite, giving that application a ranking of 10,000 and popularity of 10 (based on CVD).
-
All other, default NBAR applications, which have no rank, but will have the default popularity (based on CVD).
According to the prioritization rules, the applications are configured on the device in this order:
|
Application Configuration Order |
Reason |
|---|---|
|
1. Custom application, custom_realtime |
Custom applications are given highest priority. Given that the custom_salesforce and custom_realtime applications have the same rank and popularity, they are sorted alphabetically, custom_realtime before custom_salesforce. |
|
2. Custom application, custom_salesforce |
|
|
3. Favorite application, gss-http |
Next, favorite applications have priority because their rank is 10,000. However, because the gss-http application has a higher popularity (10), it is given a higher priority than the corba-iiop application (popularity 9). |
|
4. Favorite application, corba-iiop |
|
|
5. All other, default NBAR applications |
All other applications are next and are prioritized according to popularity, with any applications having the same popularity being alphabetized according to the application’s name. |
In the QoS Policy Manager window, you can view the results of the policy configuration that was applied on the devices. With a policy selected, EasyQoS displays the list of the devices in the policy scope and the status of the configuration on each device.
EasyQoS Guidelines and Limitations
When configuring policies, be sure to follow these guidelines and limitations:
-
When you apply a Cisco APIC-EM policy tag to a device, you cannot provision the same device. If you want to provision a device using IWAN, you must first remove the APIC-EM policy tag.
-
When you provision a device using IWAN, you cannot apply a Cisco APIC-EM policy tag to the same device. To apply a Cisco APIC-EM policy tag, you must delete the device from the IWAN device inventory and then rediscover it in the Cisco APIC-EM.
-
Changing a policy tag does not automatically rollback or change the policy on the device. You must reapply the policy in order for the updated configuration to be deployed to the device.
-
Policies are not removed from a device when the policy tag is removed from the device.
-
Policies are not reapplied automatically when you change the policy tag on a device to a different policy tag that has already been applied to devices.
-
EasyQos supports Out Of Band (OOB) changes. However, after you make the OOB change, you must wait at least 30 minutes until the inventory synchronization occurs and then click Reapply Policy.
-
EasyQoS supports applications that have names consisting of up to 24 alphanumeric characters, including underscores and hyphens. The underscore and hyphen characters are the only special character allowed in the application name.
-
Some network devices have a limited memory (called Ternary Content Addressable Memory or TCAM) for storing network access control lists (ACLs) and access control entries (ACEs). For more information about this limitation and how it is handled, see Processing Order for Devices with Limited Resources.
-
You cannot create custom applications for wireless devices.
-
You cannot delete custom applications using the GUI.
-
EasyQoS does not configure ACEs for a custom application that does not define an IP address but does define port number 80, 443, or 8080. However, EasyQoS does configure ACEs for a custom application that does define an IP address and port number 80, 443, or 8080.
Configuring QoS Policies
You configure QoS policies using the QoS Policy Manager window. To access the QoS Policy Manager window, from the Navigation pane, click EasyQoS.
|
Name |
Description |
|---|---|
|
Policy Scopes pane |
Lists the QoS policy tags that have been created in the Device Inventory window. Click a policy tag from the Policy Scopes pane to display the devices defined for the tag. The Wired Devices and Wireless Devices panes appear. From this window, you can create a new policy or view an existing policy. Click the Plus icon (+) to list any policies that have been created for the policy tag. |
|
Wired Devices pane |
Lists the wired devices defined for the selected policy tag. To display device details, place the cursor over the device name. Create Policy—Allows you to create a policy for wired devices. Click Create Policy, enter a name in the Policy Name field, and click Create. The Policy Details pane appears. For more information, see the Policy Details pane entry in the QoS Policy Manager Window— Policy Details table. |
|
Wireless Devices |
Lists the wireless devices defined for the selected policy tag. To display device details, place the cursor over the device name. Create Policy—Allows you to create a policy for wireless devices. After you name the policy and click Create, the QoS Policy Manager pane (Create Policy) appears. View Policy—Allows you to display details about a policy that has already been created. For more information, see the Policy Details pane entry in the QoS Policy Manager Window— Policy Details table. |
|
Dynamic QoS Area |
Allows you to enable or disable dynamic QOS and lists the active dynamic policies. |
|
Name |
Description |
|---|---|
|
Add Application |
Allows you to add applications that are not in the list. (For more information, see the next row.) |
|
Star icon |
Allows you to flag applications that you want EasyQoS to configure on devices before all other applications, except custom applications. Favorite applications are configured system-wide, not on a per scope basis. For more information, see Processing Order for Devices with Limited Resources. |
|
Additional Options |
Provides more actions that you can perform:
|
- Enabling the EasyQoS Beta Feature
- Creating a Policy for Wired Devices
- Creating a Policy for a Wireless Segment
- Editing a Policy
- Changing the Business Relevance of an Application
- Configuring Favorite Applications
- Creating a Custom Application
- Editing a Custom Application
- Enabling Dynamic QoS Policies
- Viewing Dynamic Policies
Enabling the EasyQoS Beta Feature
To use EasyQoS, you need to enable the EasyQoS Beta feature.
You must have either administrator (ROLE_ADMIN) or policy administrator (ROLE_POLICY_ADMIN) permissions to perform this procedure.
| Step 1 | From the Global toolbar, click the Administrative Functions (Gear) icon > Settings. |
| Step 2 | From the navigation pane in the Settings window, click EasyQoS Beta. |
| Step 3 | Click EasyQoS Enabled. |
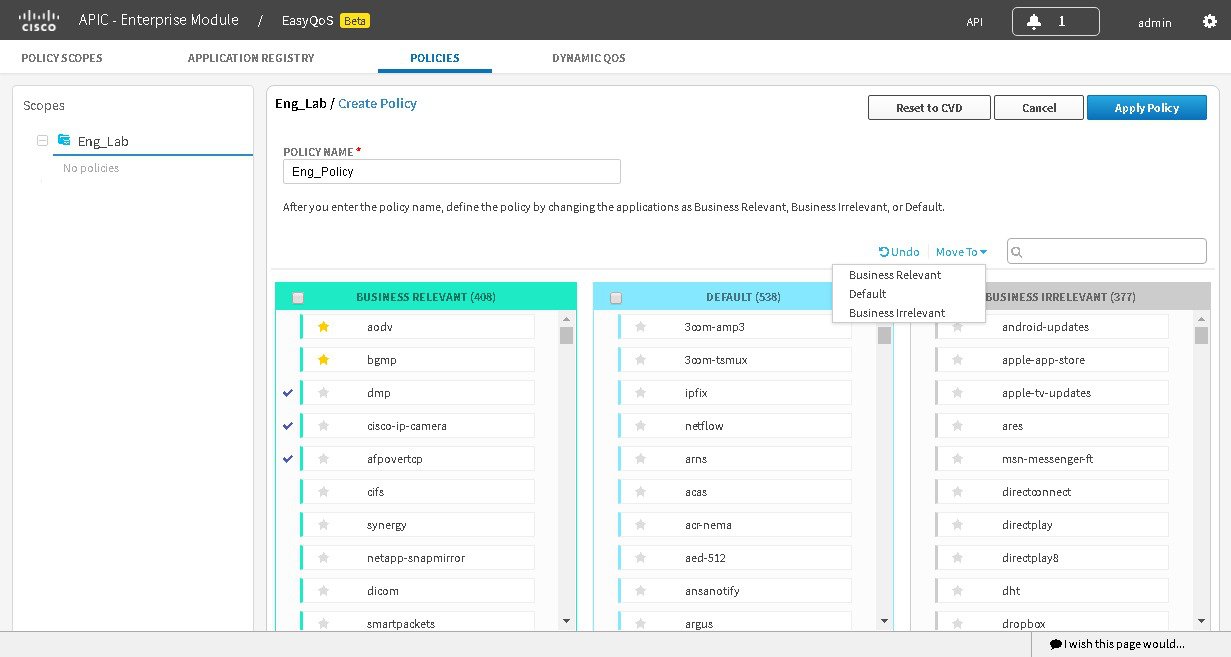
Creating a Policy for Wired Devices
You can create a QoS policy for a group of devices that have the same policy tag. When you apply the policy, it is deployed to the devices.
Note | Each policy tag can have only one QoS policy assigned to it. You cannot assign more than one QoS policy to a policy tag |
You must have either administrator (ROLE_ADMIN) or policy administrator (ROLE_POLICY_ADMIN) permissions to perform this procedure.
Make sure that you have discovered your complete network topology.
From the Device Inventory window, verify that the device roles (assigned during discovery) are appropriate for your network design. If necessary, change any of the device roles that are not appropriate.
You must have created at least one policy tag. Policy tags define the devices that you are going to configure policies on.
| Step 1 | From the Navigation pane, click EasyQoS. |
| Step 2 | From the Policy Scopes pane, select the desired policy tag. |
| Step 3 | Click Create Policy. |
| Step 4 | Enter a name for the policy in the Policy Name field and click Create. |
| Step 5 | If you want to change the policy settings, proceed to the next step. Otherwise, click Apply Policy to deploy the default policy settings to the devices. |
| Step 6 | To change the policy settings, from the
Policy
Manager pane, click Edit
Policy.
The Business Relevancy pane lists the business relevant groups and the applications that are assigned to each group. |
| Step 7 | To change the business-relevancy group of an
application (including custom applicaitons), select the business-relevancy group
from the drop-down list next to the desired application.
Valid options are Business Relevant, Default, and Business Irrelevant. For information about these options, see Business-Relevance Groups. |
| Step 8 | (Optional)If desired, designate applications as favorites by clicking the star icon next
to the application.
For information about how favorite applications work, see Favorite Applications. |
| Step 9 | (Optional)If desired, create a custom applicaiton. For information, see Creating a Custom Application. |
| Step 10 | Click Apply
Policy.
The policy configuration is deployed to the devices. |
Creating a Policy for a Wireless Segment
You can create a QoS policy for wireless devices that have the same policy tag. When you apply the policy, it is deployed to the devices.
Note | Each policy tag can have only one QoS policy assigned to it. You cannot assign more than one QoS policy to a policy tag |
You must have either administrator (ROLE_ADMIN) or policy administrator (ROLE_POLICY_ADMIN) permissions to perform this procedure.
Make sure that you have discovered your complete network topology.
From the Device Inventory window, verify that the device roles (assigned during discovery) are appropriate for your network design. If necessary, change any of the device roles that are not appropriate.
You must have created at least one policy tag. Policy tags define the devices that you are going to configure policies on.
| Step 1 | From the Navigation pane, click EasyQoS. |
| Step 2 | From the Policy Scopes pane, select the desired policy tag. |
| Step 3 | In the Wireless Segments pane, click Create Policy next to the wireless segment that you want to create a policy for. |
| Step 4 | Enter a name for the policy in the Policy Name field and click Create. |
| Step 5 | From the Policy Manager pane, click Edit Policy. |
| Step 6 | If you want to change the policy settings, proceed to the next step. Otherwise, click Apply to deploy the default policy settings to the devices. |
| Step 7 | To change the business-relevancy group of an application (including custom
applicaitons), select the business-relevancy group from the drop-down list next
to the desired application.
Valid options are Business Relevant, Default, and Business Irrelevant. For information about these options, see Business-Relevance Groups. |
| Step 8 | (Optional)If desired, designate applications as favorites by clicking the star icon next
to the application.
For information about how favorite applications work, see Favorite Applications. |
| Step 9 | (Optional)If desired, create a custom applicaiton. For information, see Creating a Custom Application. |
| Step 10 | Click Apply Policy.
The policy configuration is deployed to the devices. |
Editing a Policy
You can edit an existing QoS policy. After editing, when you apply the policy, it is deployed to the devices.
Note | Each policy tag can have only one QoS policy assigned to it. You cannot assign more than one QoS policy to a policy tag |
You must have either administrator (ROLE_ADMIN) or policy administrator (ROLE_POLICY_ADMIN) permissions to perform this procedure.
| Step 1 | From the Navigation pane, click EasyQoS. |
| Step 2 | From the Policy Scopes pane, select the desired policy tag. |
| Step 3 | To change the policy settings, from the Policy Manager
pane, click Edit Policy.
The Business Relevancy pane lists the business relevant groups and the applications that are assigned to each group. |
| Step 4 | To change the business-relevancy group of an application (including custom
applicaitons), select the business-relevancy group from the drop-down list next
to the desired application.
Valid options are Business Relevant, Default, and Business Irrelevant. For information about these options, see Business-Relevance Groups. |
| Step 5 | (Optional)If desired, designate
applications as favorites by clicking the star icon next to the
application.
For information about how favorite applications work, see Favorite Applications. |
| Step 6 | (Optional)If desired, create a custom applicaiton. For information, see Creating a Custom Application. |
| Step 7 | Click Apply Policy.
The updated policy configuration is deployed to the devices. |
Changing the Business Relevance of an Application
You can change an application's business-relevancy group. For information, see Business-Relevance Groups.
Make sure that you have devices in your inventory. If not, discover devices using the Discovery function.
You must have policy administrator (ROLE_POLICY_ADMIN) permissions to perform this procedure.
You must have created at least one policy tag. Policy tags define the devices that you are going to configure policies on.
Configuring Favorite Applications
You can designate applications as favorites for an existing policy.
For information about how favorite applications work, see Favorite Applications.
Make sure that you have devices in your inventory. If not, discover devices using the Discovery function.
You must have policy administrator (ROLE_POLICY_ADMIN) permissions to perform this procedure.
You must have created at least one policy tag. Policy tags define the devices that you are going to configure policies on.
| Step 1 | From the Navigation pane, click EasyQoS. |
| Step 2 | From the Policy Scopes pane, select the desired policy tag. |
| Step 3 | To change the policy settings for these devices, click Edit Policy. |
| Step 4 | Click the star icon next to
the applications that you want to designate as favorites.
For information about how favorite applications work, see Favorite Applications. |
| Step 5 | Click Repply Policy.
The updated policy configuration is deployed to the devices. |
Creating a Custom Application
To help you quickly configure QoS policies, EasyQoS provides a number of applications that support the NBAR2 protocol library. However, if you have applications that are not in the the library, you can add them.
You must have either administrator (ROLE_ADMIN) or policy administrator (ROLE_POLICY_ADMIN) permissions to perform this procedure.
Make sure that you have devices in your inventory. If not, discover devices using the Discovery function.
You must have created at least one policy tag. Policy tags define the devices that you are going to configure policies on.
Editing a Custom Application
You can any of the applications that you have added.
You must have either administrator (ROLE_ADMIN) or policy administrator (ROLE_POLICY_ADMIN) permissions to perform this procedure.
| Step 1 | In the Navigation pane, click EasyQoS. |
| Step 2 | From the Policy Scopes pane, expand the scope where the policy that you want to edit resides. |
| Step 3 | Select the policy that you want to edit. |
| Step 4 | From the Policy Details pane, click Edit Policy. |
| Step 5 | From the Edit Applications pane, click the More Options icon (icon) next to the application that you want to edit and select Edit. |
| Step 6 | Change the desired settings for the custom application: |
| Step 7 | Click Save Application. |
| Step 8 | To change the business-relevancy group of the custom application, click the
business-relevancy group drop-down list next to the custom application and
choose the group that you want to assign to the application.
Valid options are Business Relevant, Default, and Business Irrelevant. For more information about these options, see Business-Relevance Groups. |
| Step 9 | (Optional)If desired, continue configuring the policy or deploy these changes to the devices by clicking Reapply Policy. |
Enabling Dynamic QoS Policies
You can enable a policy to be dynamically applied to devices. For more information, see Static and Dynamic QoS Policies.
Note | Each policy tag can have only one QoS policy assigned to it. You cannot assign more than one QoS policy to a policy tag |
You must have either administrator (ROLE_ADMIN) or policy administrator (ROLE_POLICY_ADMIN) permissions to perform this procedure.
You must have created a QoS policy with the appropriate configuration. For information, see Creating a Policy for Wired Devices.
Viewing Dynamic Policies
You can view the dynamic policies that you have created.
You must have either administrator (ROLE_ADMIN) or policy administrator (ROLE_POLICY_ADMIN) permissions to perform this procedure.
 Feedback