- Preface
- Introducing the Cisco Wide Area Virtualization Engine 594/694
- Preparing to Install the WAVE-594/694
- Installing the WAVE-594/694
- Installing Hardware Options for the WAVE-594/694
- WAVE Interface Modules
- Troubleshooting the System Hardware
- WAVE-594/694 Hardware Specifications
- Maintaining the WAVE-594/694
- Index
Cisco Wide Area Virtualization Engine 594 and 694 Hardware Installation Guide
Bias-Free Language
The documentation set for this product strives to use bias-free language. For the purposes of this documentation set, bias-free is defined as language that does not imply discrimination based on age, disability, gender, racial identity, ethnic identity, sexual orientation, socioeconomic status, and intersectionality. Exceptions may be present in the documentation due to language that is hardcoded in the user interfaces of the product software, language used based on RFP documentation, or language that is used by a referenced third-party product. Learn more about how Cisco is using Inclusive Language.
- Updated:
- August 9, 2011
Chapter: Installing Hardware Options for the WAVE-594/694
Installing Hardware Options for the WAVE-594 and WAVE-694
This chapter provides basic instructions for installing hardware options in your WAVE-594 and WAVE-694. These instructions are intended for technicians who are experienced with setting up Cisco WAVE-594 and WAVE-694 hardware.
Installing a Cisco WAVE Interface Module
In addition to the two onboard Gigabit Ethernet ports, the WAVE-594 and WAVE-694 can accommodate one optional Interface Module network module:
- 4-port Gigabit Ethernet Copper Bypass Interface Module
- 8-port Gigabit Ethernet Copper Bypass Interface Module
- 4-port Gigabit Ethernet Fiber Optic Bypass Interface Module
- 2-port 10 Gigabit Ethernet Fiber Optic SPF+ Interface Module
For information on the features of the Cisco WAVE Interface Modules and cabling requirements, see Chapter5, “WAVE Interface Modules”

Note![]() Interface Modules are not hot-swappable therefore it is necessary to power the system down before installing or replacing.
Interface Modules are not hot-swappable therefore it is necessary to power the system down before installing or replacing.

To install a Cisco Interface Module in the Interface Module slot, follow these steps:
Step 1![]() Review the information in the Safety Warnings and Cautions and Safety Guidelines sections in Chapter 2, “Preparing to Install the WAVE-594 and WAVE-694.”
Review the information in the Safety Warnings and Cautions and Safety Guidelines sections in Chapter 2, “Preparing to Install the WAVE-594 and WAVE-694.”
Step 2![]() Power down the appliance.
Power down the appliance.
Note![]() You must power down the appliance before installing or removing an Interface Module. Interface Modules are not hot-swappable.
You must power down the appliance before installing or removing an Interface Module. Interface Modules are not hot-swappable.
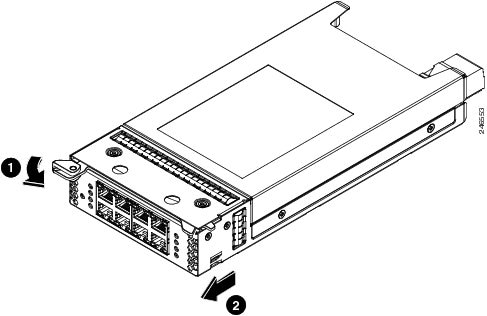
Step 3![]() Locate the Interface Module slot in the appliance chassis and slide the Cisco Interface Module into the slot until the ejector lever is seated.
Locate the Interface Module slot in the appliance chassis and slide the Cisco Interface Module into the slot until the ejector lever is seated.
To remove an Interface Module, first use the ejector lever to unlatch and then pull out the Interface Module. (See Figure 4-1.)
Figure 4-1 Interface Module—Removal
Step 4![]() Power on the appliance.
Power on the appliance.
Step 5![]() For information about connecting cables to the Cisco WAVE Interface Module ports, see Chapter5, “WAVE Interface Modules”
For information about connecting cables to the Cisco WAVE Interface Module ports, see Chapter5, “WAVE Interface Modules”
Replacing a Hard Disk Drive/Solid State Drive
The WAVE appliance supports as many as two 2.5-inch (Small Form Factor) hard drives. The WAVE-594 and WAVE-694 support both Hard Disk Drives and Solid State Drives.
Note![]() The WAVE-594 and WAVE-694 support both Hard Disk Drives and Solid State Drives, but you cannot mix HDD and SSD in the same chassis. For details about the WAVE-594 and WAVE-694 appliance specifications, see Appendix A, “Appliance Specifications”.
The WAVE-594 and WAVE-694 support both Hard Disk Drives and Solid State Drives, but you cannot mix HDD and SSD in the same chassis. For details about the WAVE-594 and WAVE-694 appliance specifications, see Appendix A, “Appliance Specifications”.
Replacing a Hard Disk Drive
Hard drives are hot-swappable therefore it is not necessary to power the system down before installing or replacing.
When removing hard drives from the WAVE appliance, observe the following general guidelines:
- The system automatically sets all drive numbers.
- Drives must be the same capacity to provide the greatest storage space efficiency when drives are grouped together into the same drive array.
Note![]() All hard disk drives being used in the appliance must be identical.
All hard disk drives being used in the appliance must be identical.
Note![]() The HDD should not be replaced with SSD when WAVE is in CM device mode, as it is not supported.
The HDD should not be replaced with SSD when WAVE is in CM device mode, as it is not supported.
To replace a hard disk drive in a bay, follow these steps:
Step 1![]() Review the information in the Safety Warnings and Cautions and Safety Guidelines sections in Chapter 2, “Preparing to Install the WAVE-594 and WAVE-694.
Review the information in the Safety Warnings and Cautions and Safety Guidelines sections in Chapter 2, “Preparing to Install the WAVE-594 and WAVE-694.
Step 2![]() Press the button and swing the handle out. (See Figure 4-2).
Press the button and swing the handle out. (See Figure 4-2).
Note![]() Wait 5 seconds before removing to let the disk spin down.
Wait 5 seconds before removing to let the disk spin down.
Figure 4-2 Removing a Hard Disk Drive
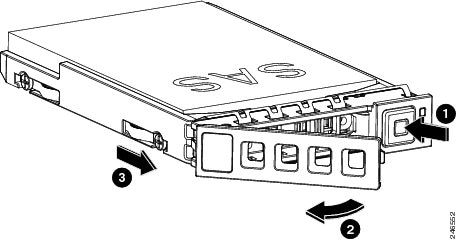
Step 3![]() After waiting 5 seconds, pull the handle to remove the drive assembly from the bay.
After waiting 5 seconds, pull the handle to remove the drive assembly from the bay.
Step 4![]() Within one minute, insert the new drive into the same slot by aligning the replacement drive assembly with guide rails in the bay and sliding the drive assembly into the bay until it stops. Make sure that the drive is properly seated in the bay.
Within one minute, insert the new drive into the same slot by aligning the replacement drive assembly with guide rails in the bay and sliding the drive assembly into the bay until it stops. Make sure that the drive is properly seated in the bay.
Step 5![]() Close the drive handle.
Close the drive handle.
Step 6![]() Check the hard disk drive status LED after the system has booted to verify that the hard disk drive is operating correctly. If the amber hard disk drive status LED for a drive is lit continuously, that drive is faulty and must be replaced. If the green hard disk drive activity LED is flashing, the drive is being accessed.
Check the hard disk drive status LED after the system has booted to verify that the hard disk drive is operating correctly. If the amber hard disk drive status LED for a drive is lit continuously, that drive is faulty and must be replaced. If the green hard disk drive activity LED is flashing, the drive is being accessed.
Step 7![]() Wait 1 minute and then verify that the replaced disk drive is in the Rebuilding state by using the show disks details command in EXEC mode.
Wait 1 minute and then verify that the replaced disk drive is in the Rebuilding state by using the show disks details command in EXEC mode.
Note![]() The system automatically starts the rebuild operation when it detects the removal and reinsertion of a drive that is part of the logical RAID drive.
The system automatically starts the rebuild operation when it detects the removal and reinsertion of a drive that is part of the logical RAID drive.
Step 8![]() Wait until the rebuild operation is complete. A disk rebuild operation may take several hours. You can check if the rebuild operation is complete by using the show disk details command in EXEC mode. The physical drive state will be Online and the RAID logical drive state will be Okay after the rebuild operation is completed.
Wait until the rebuild operation is complete. A disk rebuild operation may take several hours. You can check if the rebuild operation is complete by using the show disk details command in EXEC mode. The physical drive state will be Online and the RAID logical drive state will be Okay after the rebuild operation is completed.
Step 9![]() Use the show disk tech command in EXEC mode to verify that the firmware and BIOS information is correct for both hard drives.
Use the show disk tech command in EXEC mode to verify that the firmware and BIOS information is correct for both hard drives.
If you have multiple disk failures and your RAID-1 logical status is Offline, you must recreate the RAID-1 array. For more information on disk removal and replacement procedures, see the Cisco Wide Area Application Services Configuration Guide chapter named “Maintaining Your WAAS System.”
Replacing a Fan
The WAVE appliance supports six fan assemblies that are hot-swappable.
Fan assemblies can only be inserted in one orientation.
Note![]() Fan assemblies must be inserted and can only function with the surface marked “TOP” facing up.
Fan assemblies must be inserted and can only function with the surface marked “TOP” facing up.
To replace a fan assembly, follow these steps:
Step 1![]() Review the information in the Safety Warnings and Cautions and Safety Guidelines sections in Chapter 2, “Preparing to Install the WAVE-594 and WAVE-694.”
Review the information in the Safety Warnings and Cautions and Safety Guidelines sections in Chapter 2, “Preparing to Install the WAVE-594 and WAVE-694.”
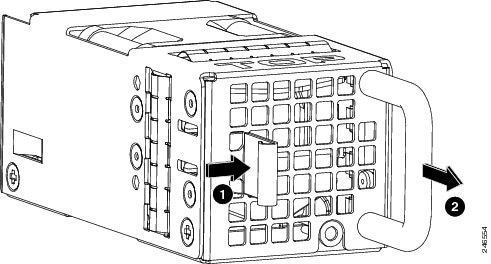
Step 2![]() Disengage the fan latch and pull the fan out by the handle (see Figure 4-3).
Disengage the fan latch and pull the fan out by the handle (see Figure 4-3).
Step 3![]() Within one minute, insert the new fan with the surface marked “TOP” facing up and verify that the latch is engaged.
Within one minute, insert the new fan with the surface marked “TOP” facing up and verify that the latch is engaged.
Step 4![]() Check the power LED to verify that the new fan is receiving power.
Check the power LED to verify that the new fan is receiving power.
Note![]() If a fan alarm occurs and you power down the WAVE appliance to replace the fan, you must use the clear bmc event-log global configuration command and then reboot to clear the alarm.
If a fan alarm occurs and you power down the WAVE appliance to replace the fan, you must use the clear bmc event-log global configuration command and then reboot to clear the alarm.
Replacing a Power Supply
The WAVE appliance supports two power supply assemblies that are hot-swap capable.
Power supply assemblies can only be inserted in one orientation.
Note![]() Power supply assemblies must be inserted and can only function with the surface marked “TOP” facing up.
Power supply assemblies must be inserted and can only function with the surface marked “TOP” facing up.
To replace a power supply assembly, follow these steps:
Step 1![]() Review the information in the Safety Warnings and Cautions and Safety Guidelines sections in Chapter 2, “Preparing to Install the WAVE-594 and WAVE-694.”
Review the information in the Safety Warnings and Cautions and Safety Guidelines sections in Chapter 2, “Preparing to Install the WAVE-594 and WAVE-694.”
Step 2![]() Remove the power cord from the power supply.
Remove the power cord from the power supply.
Note![]() When more than one power supply assembly is present, load-sharing is supported. If one loses power, the second power supply takes over.
When more than one power supply assembly is present, load-sharing is supported. If one loses power, the second power supply takes over.
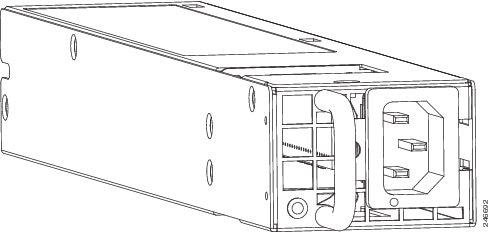
Step 3![]() Disengage the latch and pull the power supply out by the handle. (See Figure 4-4.)
Disengage the latch and pull the power supply out by the handle. (See Figure 4-4.)
Figure 4-4 Power Supply Assembly
Step 4![]() Within one minute, insert the new power supply with the surface marked “TOP” facing up and verify that the latch is engaged.
Within one minute, insert the new power supply with the surface marked “TOP” facing up and verify that the latch is engaged.
Step 5![]() Insert the power cord into the replacement power supply.
Insert the power cord into the replacement power supply.
Step 6![]() Check the power LED to verify that the new power supply is receiving power.
Check the power LED to verify that the new power supply is receiving power.
Note![]() If a power supply alarm occurs and you power down the WAVE appliance to replace the power supply, you must use the clear bmc event-log global configuration command and then reboot to clear the alarm.
If a power supply alarm occurs and you power down the WAVE appliance to replace the power supply, you must use the clear bmc event-log global configuration command and then reboot to clear the alarm.
Installing Memory
This section provides basic instructions for installing memory in your WAVE-594 and WAVE-694.
This section contains the following topics:
Removing the Cover

Warning![]() Before working on a system that has an on/off switch, turn OFF the power and unplug the power cord. Statement 1
Before working on a system that has an on/off switch, turn OFF the power and unplug the power cord. Statement 1
To remove the appliance cover, follow these steps:
Step 1![]() Review the information in the Safety Warnings and Cautions and Safety Guidelines sections in Chapter 2, “Preparing to Install the WAVE-594 and WAVE-694.”
Review the information in the Safety Warnings and Cautions and Safety Guidelines sections in Chapter 2, “Preparing to Install the WAVE-594 and WAVE-694.”
Step 2![]() Power off the appliance and all attached devices and disconnect all external cables and power cords.
Power off the appliance and all attached devices and disconnect all external cables and power cords.
Step 3![]() Remove the WAVE appliance from the rack.
Remove the WAVE appliance from the rack.
Step 4![]() Loosen the screw on the top that secures the access panel to the WAVE appliance.
Loosen the screw on the top that secures the access panel to the WAVE appliance.
Step 5![]() Slide the access panel toward the front of the WAVE appliance, then lift it from the WAVE appliance.
Slide the access panel toward the front of the WAVE appliance, then lift it from the WAVE appliance.
Installing Memory Modules
The WAVE-594 appliance supports either 8 GB or 12 GB of memory using 2-GB RDIMM memory modules. The WAVE-694 appliance supports either 16 GB or 24 GB of memory using 4-GB RDIMM memory modules.
Observe the following guidelines when installing additional memory:
- Use only Cisco memory upgrades in your appliance.
- BIOS detects the DIMM population and sets the system to dual-bank interleaved mode (DIMMs installed in both banks with equal bank capacities).
Figure 4-5 shows the memory slot mapping on the system board.
Figure 4-5 Memory Slot Mapping
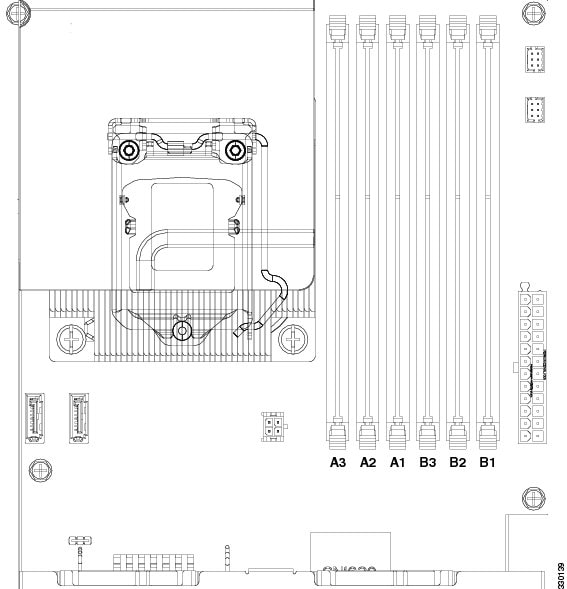
Table 4-1 and Table 4-2 list the RDIMM configurations available for the WAVE-594 and WAVE-694 appliance.
|
|
|
|
|
|
|
|
|---|---|---|---|---|---|---|
|
|
||||||
|
|
|
|
|
|
|
|
|
|
|---|---|---|---|---|---|---|
|
|
||||||
|
|
To install a Cisco memory upgrade on the WAVE-594 from 8 GB to 12 GB or on the WAVE-694 from 16 GB to 24 GB, follow these steps:
Step 1![]() Power down the WAVE appliance.
Power down the WAVE appliance.
Step 2![]() Remove the WAVE appliance from the rack.
Remove the WAVE appliance from the rack.
Step 3![]() Remove the primary access panel (See Removing the Cover).
Remove the primary access panel (See Removing the Cover).
Step 4![]() Open the DIMM slot latches for slots A1, A2, B1, and B2 and remove the existing memory modules.
Open the DIMM slot latches for slots A1, A2, B1, and B2 and remove the existing memory modules.
Note![]() All existing memory must be removed and replaced by the RDIMMS contained in the Cisco upgrade kit.
All existing memory must be removed and replaced by the RDIMMS contained in the Cisco upgrade kit.
Step 5![]() Open the DIMM slot latches for slots A3 and B3.
Open the DIMM slot latches for slots A3 and B3.
Step 6![]() To upgrade from 8 GB to 12 GB on a WAVE-594, install a 2-GB RDIMM memory module into all six slots. (See Figure 4-6.)
To upgrade from 8 GB to 12 GB on a WAVE-594, install a 2-GB RDIMM memory module into all six slots. (See Figure 4-6.)
To upgrade from 16 GB to 24 GB on a WAVE-694, install a 4-GB RDIMM memory module into all six slots. (See Figure 4-6.)
Figure 4-6 Installing an RDIMM
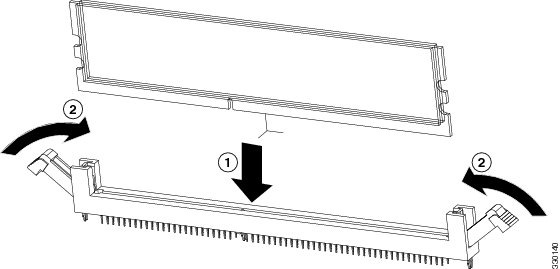
Step 7![]() Check to make sure that the DIMM latches are fully engaged in the notches.
Check to make sure that the DIMM latches are fully engaged in the notches.
Step 8![]() Install the access panel.
Install the access panel.
a.![]() Lower the access panel onto the WAVE appliance and then slide the access panel toward the back of the WAVE appliance.
Lower the access panel onto the WAVE appliance and then slide the access panel toward the back of the WAVE appliance.
b.![]() Tighten the screw on the top that secures the access panel to the WAVE appliance.
Tighten the screw on the top that secures the access panel to the WAVE appliance.
Step 9![]() Install the WAVE appliance into the rack.
Install the WAVE appliance into the rack.
For complete rack installation and removal instructions, see Chapter3, “Installing the WAVE-594 and WAVE-694”
Step 10![]() Connect the cables and power cords. For information on connecting cables and power cords, see Rack Mounting and Cabling the WAVE-594 and WAVE-694 in Chapter 3, “Installing the Wave-594 and WAVE-694.
Connect the cables and power cords. For information on connecting cables and power cords, see Rack Mounting and Cabling the WAVE-594 and WAVE-694 in Chapter 3, “Installing the Wave-594 and WAVE-694.
Step 11![]() Reboot the WAVE appliance.
Reboot the WAVE appliance.
Step 12![]() Use the show memory EXEC mode command to verify that the memory you installed is recognized by the WAVE appliance.
Use the show memory EXEC mode command to verify that the memory you installed is recognized by the WAVE appliance.
Step 13![]() Repartition the disks, using the disk delete-data-partitions command, and reload.
Repartition the disks, using the disk delete-data-partitions command, and reload.
Note![]() Repartitioning the disks deletes all data, including all virtual blades on the hardware.
Repartitioning the disks deletes all data, including all virtual blades on the hardware.
Note![]() Repartitioning the disks is required after adding memory to reset the DRE space allocation.
Repartitioning the disks is required after adding memory to reset the DRE space allocation.
 Feedback