- About This Guide
- Getting Started Installing or Upgrading Cisco Vision Dynamic Signage Director
- Installing Cisco Vision Dynamic Signage Director for the First Time
- Using the Software Manager to Upgrade Cisco Vision Dynamic Signage Director Software, Language Packs, and Fonts
- Verifying the Upgrade
- Upgrading the DMP Firmware
- Appendix A: Post-Upgrade Checklist
- Appendix B: Port Reference
- Appendix C: CIMC Configuration and Firmware Upgrade Guidelines on the Cisco UCS C220 Server
Cisco Vision Software Installation and Upgrade Guide: Dynamic Signage Director Release 6.2
Bias-Free Language
The documentation set for this product strives to use bias-free language. For the purposes of this documentation set, bias-free is defined as language that does not imply discrimination based on age, disability, gender, racial identity, ethnic identity, sexual orientation, socioeconomic status, and intersectionality. Exceptions may be present in the documentation due to language that is hardcoded in the user interfaces of the product software, language used based on RFP documentation, or language that is used by a referenced third-party product. Learn more about how Cisco is using Inclusive Language.
- Updated:
- July 29, 2019
Chapter: Installing Cisco Vision Dynamic Signage Director for the First Time
- Prerequisites
- Mandatory: Migrate Data from Release 6.1 to Release 6.2
- Overview
- Perform a Full Install of Dynamic Signage Director Release 6.2
- Enable Remote Access on Dynamic Signage Director Release 6.2
- Set Dynamic Signage Director Release 6.2 as Secondary Server
- Configure the Backup Server on Dynamic Signage Director Release 6.1
- Generate a Backup on DSD Release 6.1
- Restore and Migrate the DSD Release 6.1 Backup Server on DSD Release 6.2 Server
- Shut Down DSD Release 6.1 Server
- Prepare to Setup DSD Release 6.2 as the Primary Server
- Setup the DSD Release 6.2 Secondary Server
- Access DSD Release 6.2 Server from Browser
- Overview
Installing Cisco Vision Dynamic Signage Director for the First Time
This module describes the requirements for installing Cisco Vision Dynamic Signage Director on a VM (virtual machine).
Caution: You must install the Cisco Vision Dynamic Signage Director Release software from a full ISO image (not an upgrade) that you down loaded from Cisco.com to be sure that you are running the released production version of Cisco Vision Dynamic Signage Director.
This module includes the following topics:
■![]() Mandatory: Migrate Data from Release 6.1 to Release 6.2
Mandatory: Migrate Data from Release 6.1 to Release 6.2
Prerequisites
Refer to the Release Notes for Cisco Vision Dynamic Signage Director 6.2 for the latest information about hardware and software requirements, changes, important notes, and caveats for your software release.
Be sure that the following requirements are met before you upgrade your server:
■![]() You have the network information required to configure the Ethernet connection on the Cisco Vision Dynamic Signage Director server, such as:
You have the network information required to configure the Ethernet connection on the Cisco Vision Dynamic Signage Director server, such as:
–![]() IP address (IPv4 only) and network mask
IP address (IPv4 only) and network mask
Note: The Cisco Vision Dynamic Signage Director server should be configured with a static IP address or a non-expiring DHCP lease.
■![]() The Cisco Vision Dynamic Signage Director server is connected to the network and has power.
The Cisco Vision Dynamic Signage Director server is connected to the network and has power.
■![]() Power on the server and verify the boot order in the BIOS (by pressing F2 while booting) prior to installation.
Power on the server and verify the boot order in the BIOS (by pressing F2 while booting) prior to installation.
■![]() To access the Cisco Integrated Management Controller (CIMC) for the software installation, the following requirements are met:
To access the Cisco Integrated Management Controller (CIMC) for the software installation, the following requirements are met:
–![]() Your computer meets the minimum browser and Flash player requirements for Cisco Vision Dynamic Signage Director, and also has Java 1.6 or later installed.
Your computer meets the minimum browser and Flash player requirements for Cisco Vision Dynamic Signage Director, and also has Java 1.6 or later installed.
–![]() You have a laptop connection with access to the Cisco Vision Dynamic Signage Director network.
You have a laptop connection with access to the Cisco Vision Dynamic Signage Director network.
–![]() You have the IP address of the CIMC interface on the Cisco Vision Dynamic Signage Director server.
You have the IP address of the CIMC interface on the Cisco Vision Dynamic Signage Director server.
–![]() You have the CIMC interface login credential. The default credential is admin and password.
You have the CIMC interface login credential. The default credential is admin and password.
Virtualized Server Environment
Installing Cisco Vision Dynamic Signage Director in a virtualized server environment includes setting up your server environment, running the full ISO for Cisco Vision Dynamic Signage Director, and configuring the network. For more information see Hardware Prerequisites and Installing on a Virtual Server for the First Time in Getting Started Installing or Upgrading Cisco Vision Dynamic Signage Director.
Mandatory: Migrate Data from Release 6.1 to Release 6.2
Note: The installation (full ISO) image of 6.2 is not posted on cisco.com. To obtain the Release 6.2 installation image, please send an email to cvupgrades@cisco.com and include your cisco.com userID and the site being upgraded.
For existing customers with data, this installation is a migration of data from older DSD versions to the newest release. Unless you follow these steps, your previous data will be lost when installing Release 6.2. This is a different procedure from an automated incremental upgrade. Release 6.2 contains a new operating system which forces a completely new installation and data migration.
IMPORTANT: Release 6.2 will support a full ISO installation ONLY. There is no upgrade to this release.
Cisco Vision Director is installed within a virtual machine (VM) environment. With our 6.2 release, the VM environment will be used to migrate your data from Release 6.1. Release 6.2 includes a new operating system which requires complete installation. This means you create and configure a second instance of Cisco Vision Dynamic Signage Director to be a secondary, with a complete backup of the primary Cisco Vision Director software.
Overview
■![]() The recommended procedure involves using a primary and secondary server redundancy configuration.
The recommended procedure involves using a primary and secondary server redundancy configuration.
■![]() Release 6.1 will backup the configuration to the Release 6.2 system using the regular primary/secondary backup copy mechanism.
Release 6.1 will backup the configuration to the Release 6.2 system using the regular primary/secondary backup copy mechanism.
■![]() Setup the new Release 6.2 system as the secondary server, if not already present.
Setup the new Release 6.2 system as the secondary server, if not already present.
■![]() Ensure the new primary Cisco Vision Director is performing as expected.
Ensure the new primary Cisco Vision Director is performing as expected.
■![]() Migrate the secondary Cisco Vision Director to Release 6.2.
Migrate the secondary Cisco Vision Director to Release 6.2.
To preserve your data from a single or primary server running Release 6.1 SPn to a new or secondary server containing a fresh ISO installation of Release 6.2. The following prerequisite conditions apply:
■![]() Two virtual machines matching Cisco Vision Director requirements, the second VM will have Release 6.2
Two virtual machines matching Cisco Vision Director requirements, the second VM will have Release 6.2
■![]() Both machines have the ability to reach each other over the network
Both machines have the ability to reach each other over the network
■![]() One of the machines is an established Cisco Vision Director server running Release 6.1 SPn
One of the machines is an established Cisco Vision Director server running Release 6.1 SPn
■![]() You have a 6.2 FULL ISO file (see the first note on how to obtain)
You have a 6.2 FULL ISO file (see the first note on how to obtain)
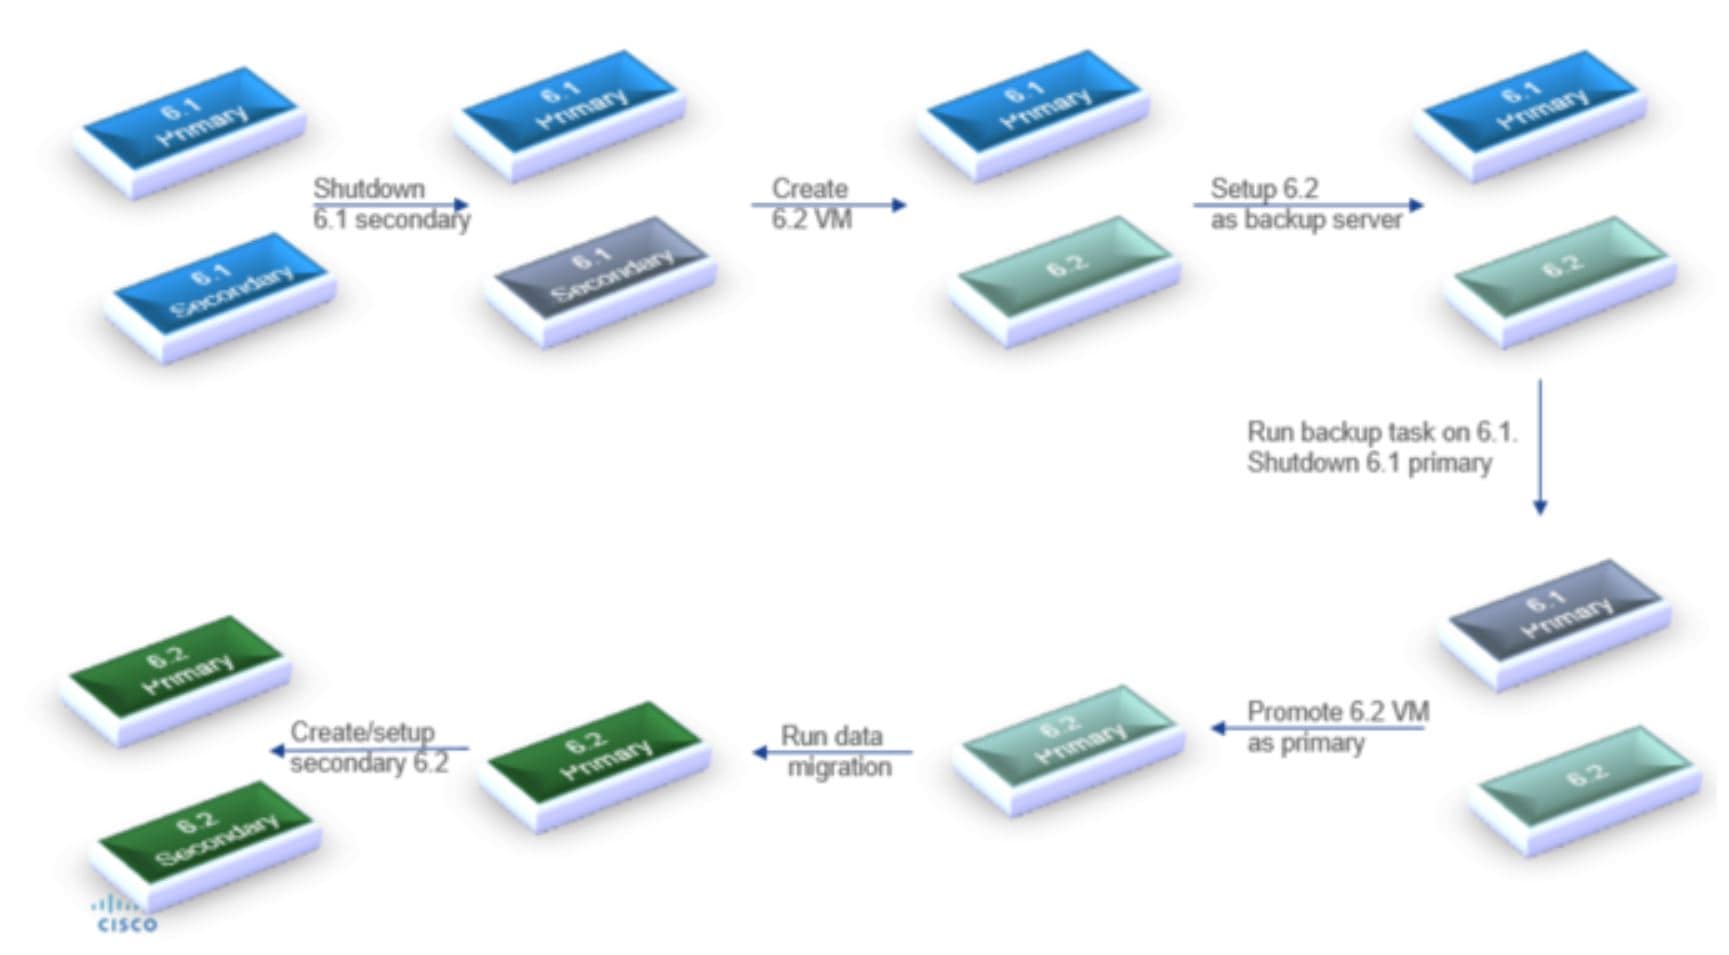
Figure 1 shows the installation flow. This procedure assumes the following:
■![]() Release 6.1 Primary, Secondary (P1, S1) VM Server
Release 6.1 Primary, Secondary (P1, S1) VM Server
■![]() Release 6.2 Primary, Secondary (P2, S2) VM Server
Release 6.2 Primary, Secondary (P2, S2) VM Server
Figure 1 Release 6.2 installation Using Two Virtual Machines
IMPORTANT : Before you begin, generate and download any proof of play reports.
Note: Configure NTP and Timezone after the full installation completes. See Release 6.2: Cisco Vision Dynamic Signage Director Administration Guide. Reboot Dynamic Signage Director.
To generate Proof of Play reports :
Perform a Full Install of Dynamic Signage Director Release 6.2
3.![]() Configure it with the same memory profile as Release 6.1 (standard or small configuration).
Configure it with the same memory profile as Release 6.1 (standard or small configuration).
Enable Remote Access on Dynamic Signage Director Release 6.2
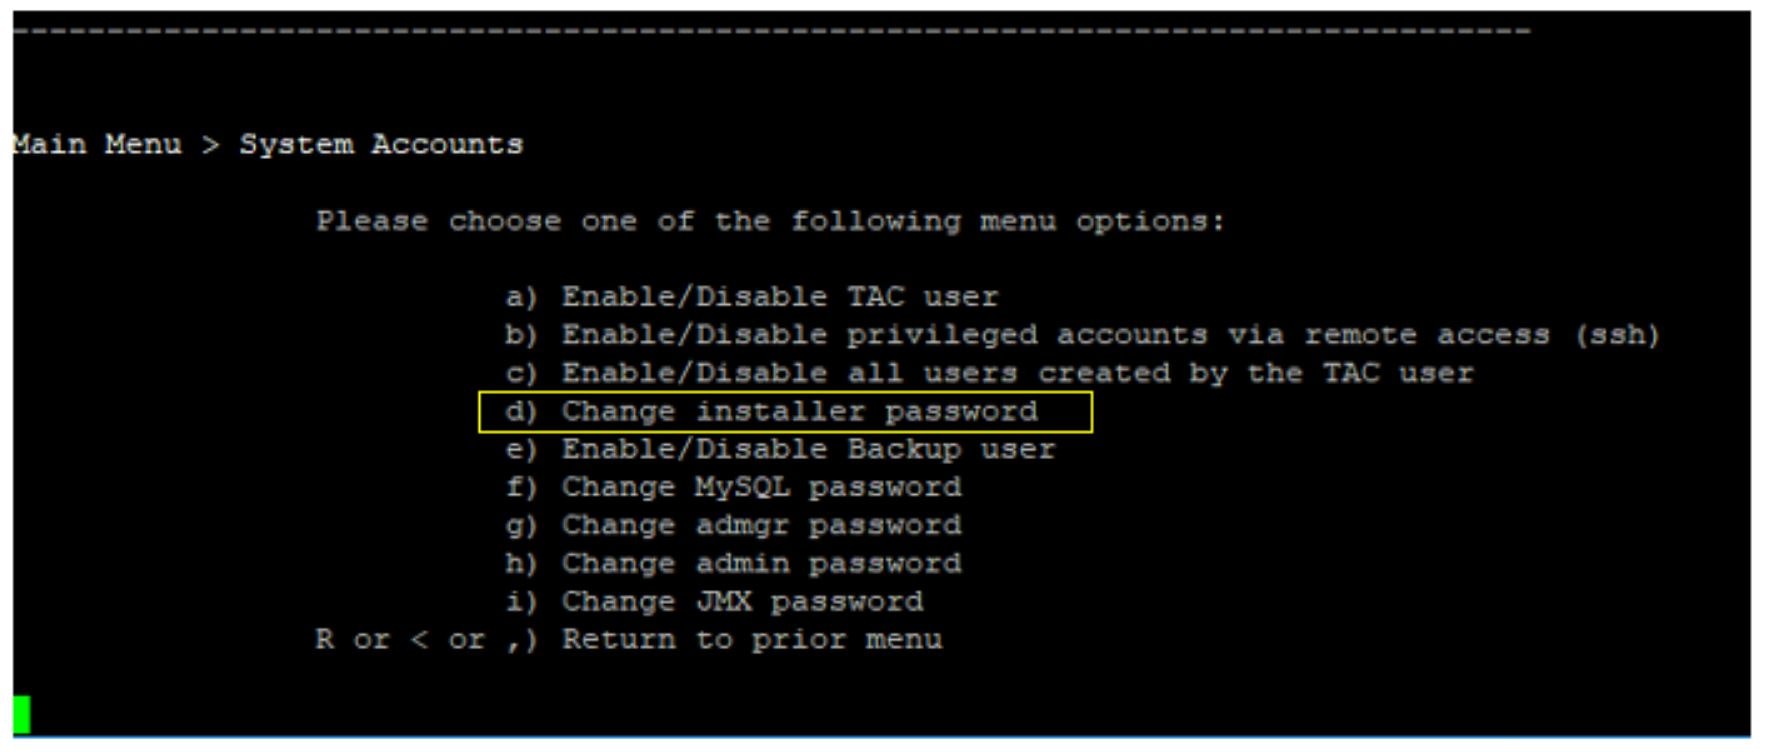
4.![]() Login to the DSD TUI. Go to: Main Menu > System Accounts > Change installer password (Figure 2).
Login to the DSD TUI. Go to: Main Menu > System Accounts > Change installer password (Figure 2).
Figure 2 Change Installer Password in TUI
5.![]() Choose a password and save it. Note this password safely, as Cisco TAC personnel cannot retrieve it.
Choose a password and save it. Note this password safely, as Cisco TAC personnel cannot retrieve it.
6.![]() From System Accounts menu, choose e) Enable/Disable Backup user. Follow screen prompts and set up the backup user key from the primary system to use it.
From System Accounts menu, choose e) Enable/Disable Backup user. Follow screen prompts and set up the backup user key from the primary system to use it.
7.![]() From System Accounts menu, choose b) Enable/Disable privileged accounts via remote access (ssh) (Figure 3).
From System Accounts menu, choose b) Enable/Disable privileged accounts via remote access (ssh) (Figure 3).
Figure 3 Enable/Disable Privileged Accounts Over Remote (SSH)
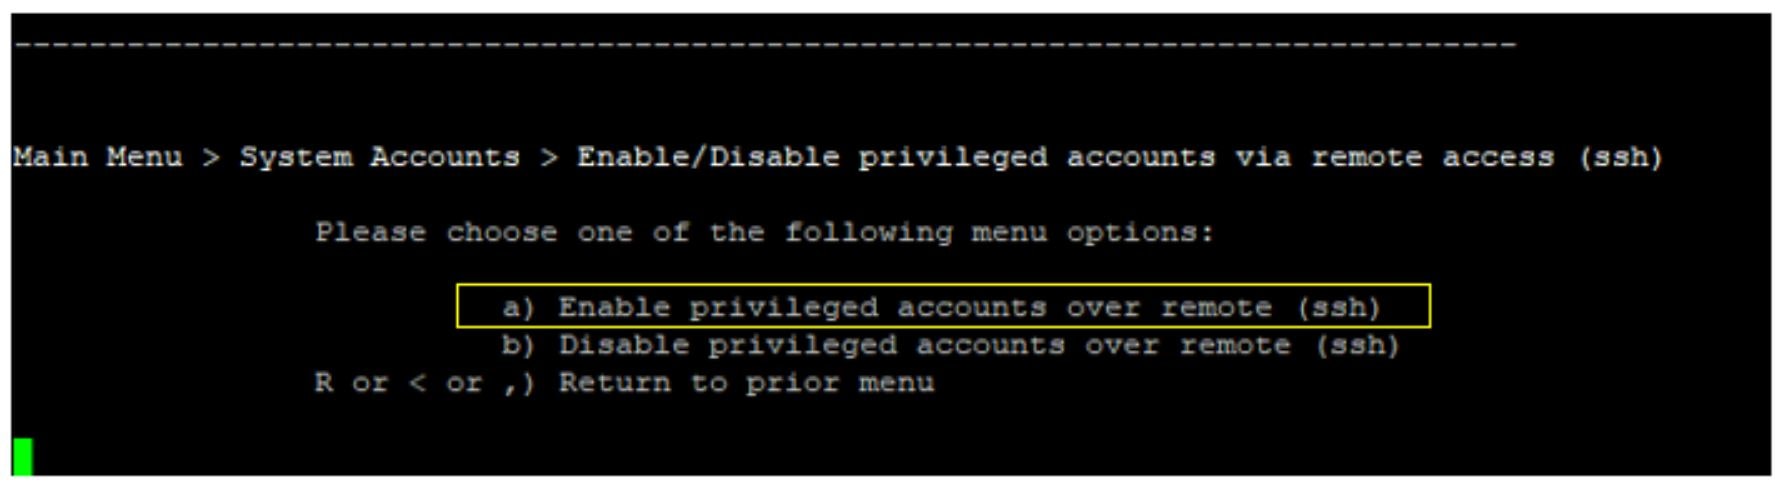
Note: After completing the data migration, return here and disable remote access for added security.
Set Dynamic Signage Director Release 6.2 as Secondary Server
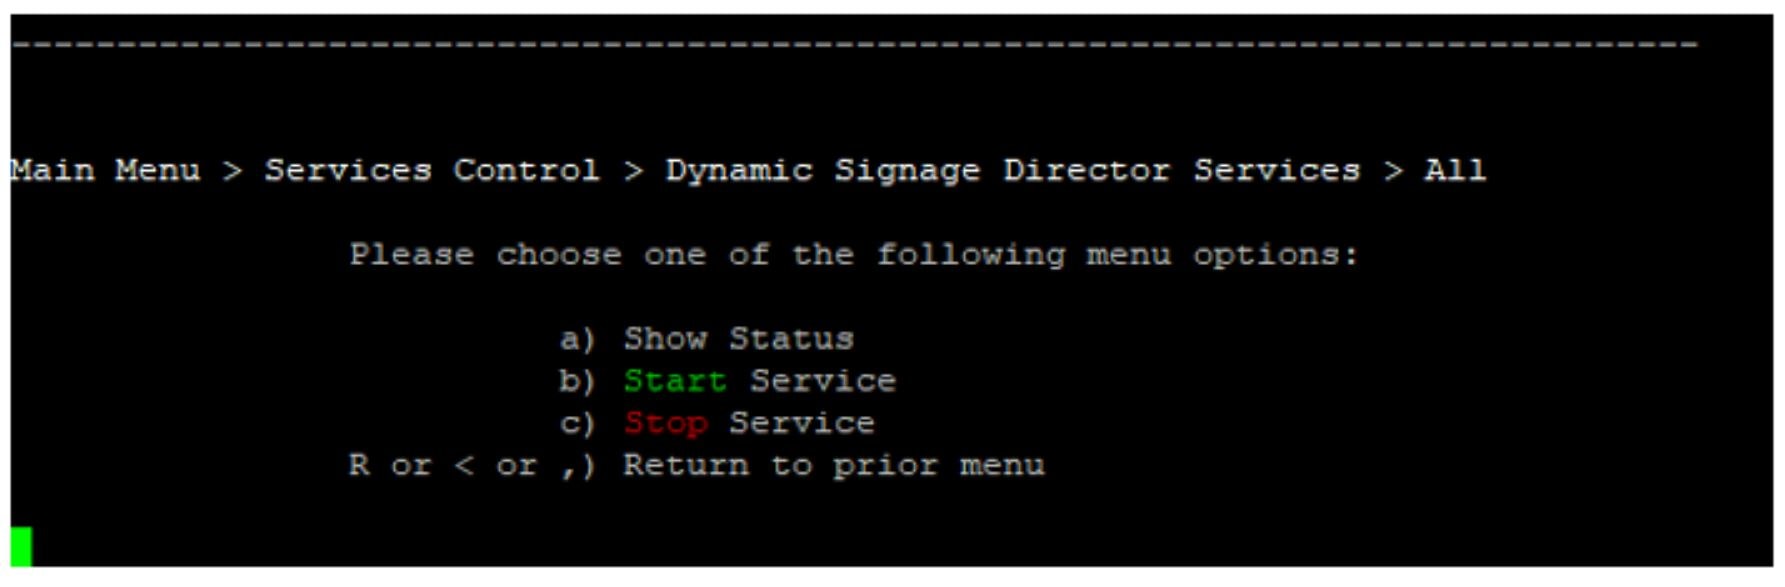
For simplicity, stop the services in Dynamic Signage Director Release 6.2.
8.![]() Go to the TUI Main Menu. Choose c) Services Control > i) Dynamic Signage Director Services > a) All ().
Go to the TUI Main Menu. Choose c) Services Control > i) Dynamic Signage Director Services > a) All ().
Figure 4 Stop Service on Dynamic Signage Director
Configure the Backup Server on Dynamic Signage Director Release 6.1
10.![]() Use the Cisco Vision Director TUI to log in to DSD Release 6.1 as installer.
Use the Cisco Vision Director TUI to log in to DSD Release 6.1 as installer.
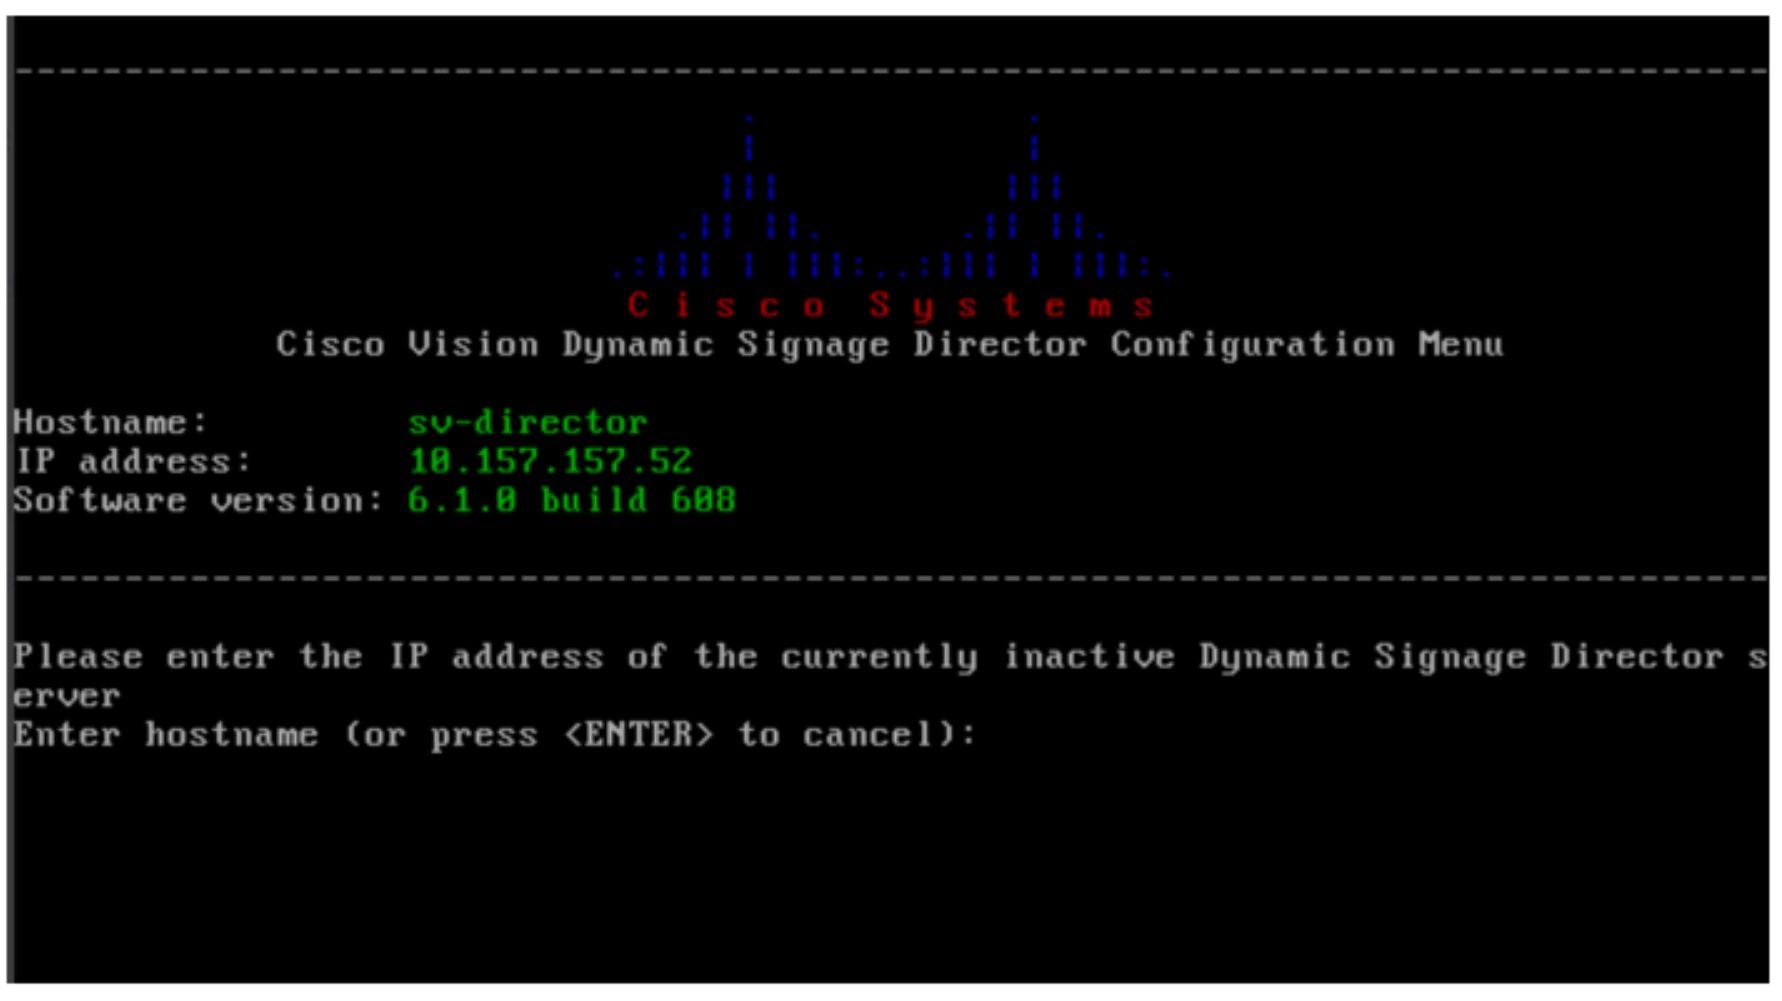
11.![]() Go to Main Menu > Cisco Vision Server Administration > Setup automatic backup and restore.
Go to Main Menu > Cisco Vision Server Administration > Setup automatic backup and restore.
12.![]() Enter the inactive DSD server, enter the IP address of DSD Release 6.2 server (Figure 5).
Enter the inactive DSD server, enter the IP address of DSD Release 6.2 server (Figure 5).
Figure 5 Enter IP Address of DSD Release 6.2
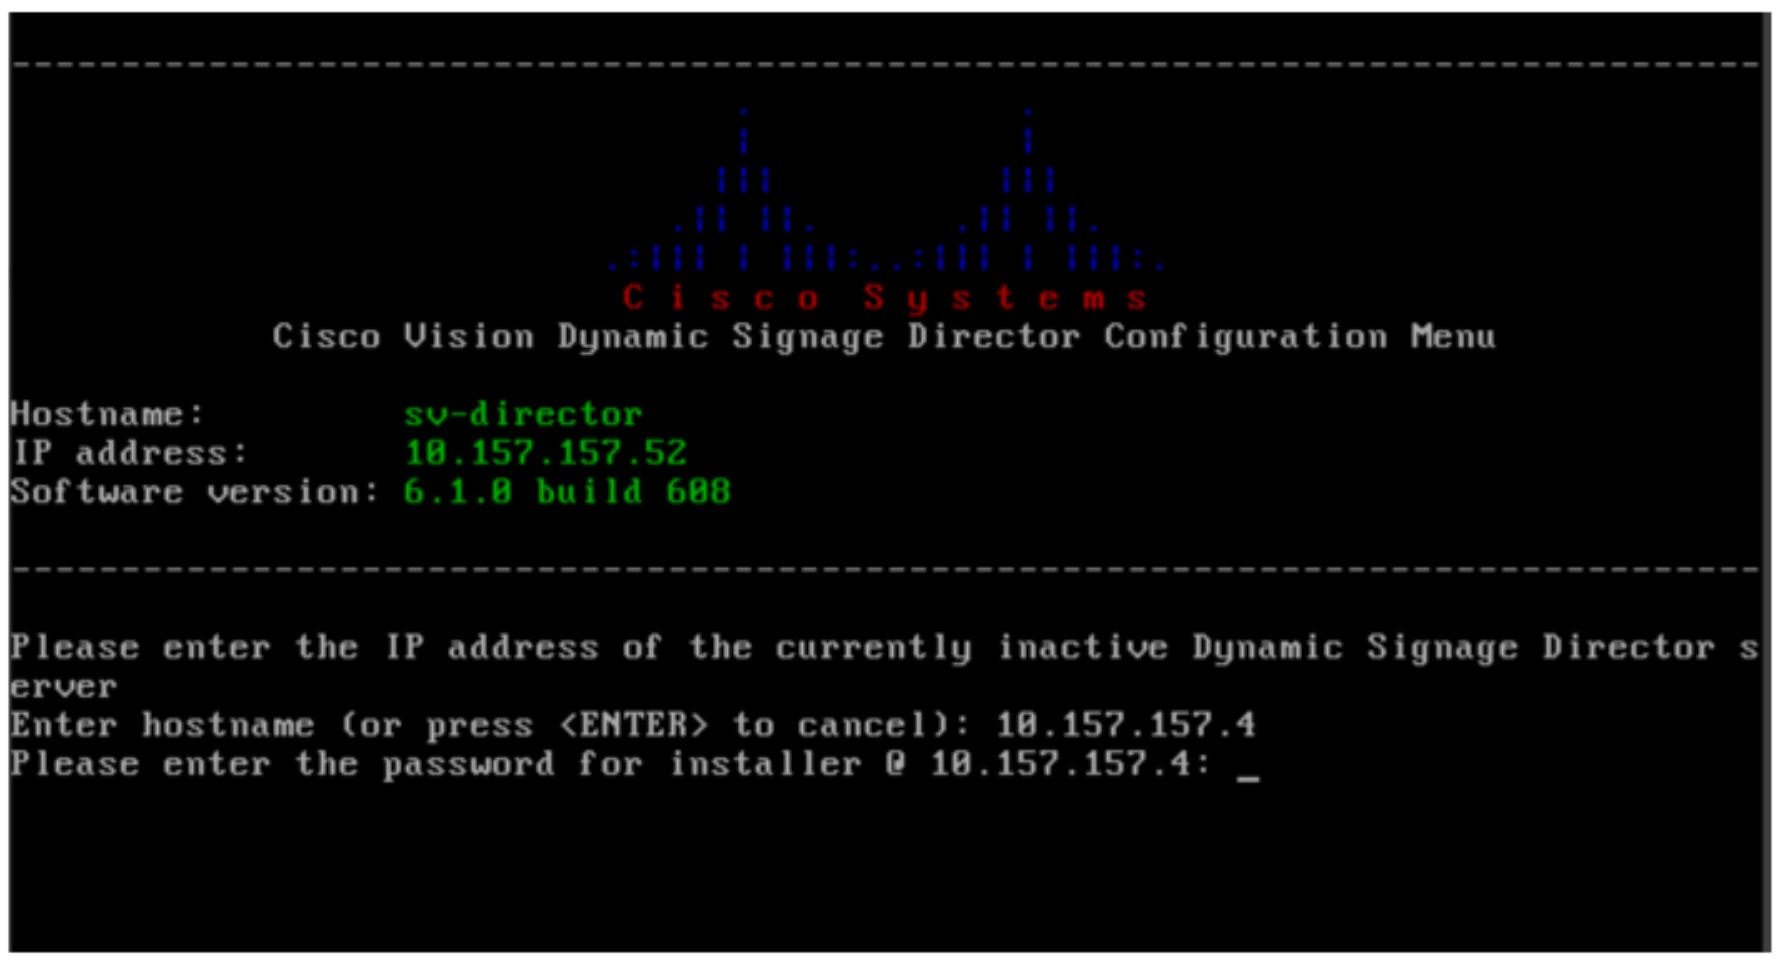
You will be prompted for the installer password of the backup server.
13.![]() Enter the installer password for DSD Release 6.2 that you set up in step 5 ().
Enter the installer password for DSD Release 6.2 that you set up in step 5 ().
Figure 6 Enter Installer Password for Backup Server
This takes a few minutes. Wait for the setup process to complete.
Generate a Backup on DSD Release 6.1
14.![]() Log in to DSD Release 6.1 as an administrator user.
Log in to DSD Release 6.1 as an administrator user.
15.![]() Go to Tools > Management Dashboard > Tool drawer > Advanced tab > Run a Task.
Go to Tools > Management Dashboard > Tool drawer > Advanced tab > Run a Task.
16.![]() In the right panel Parameters field, click Backup Task (Figure 7).
In the right panel Parameters field, click Backup Task (Figure 7).
17.![]() Click Apply. The backup may take some time to complete. Click Apply only once.
Click Apply. The backup may take some time to complete. Click Apply only once.
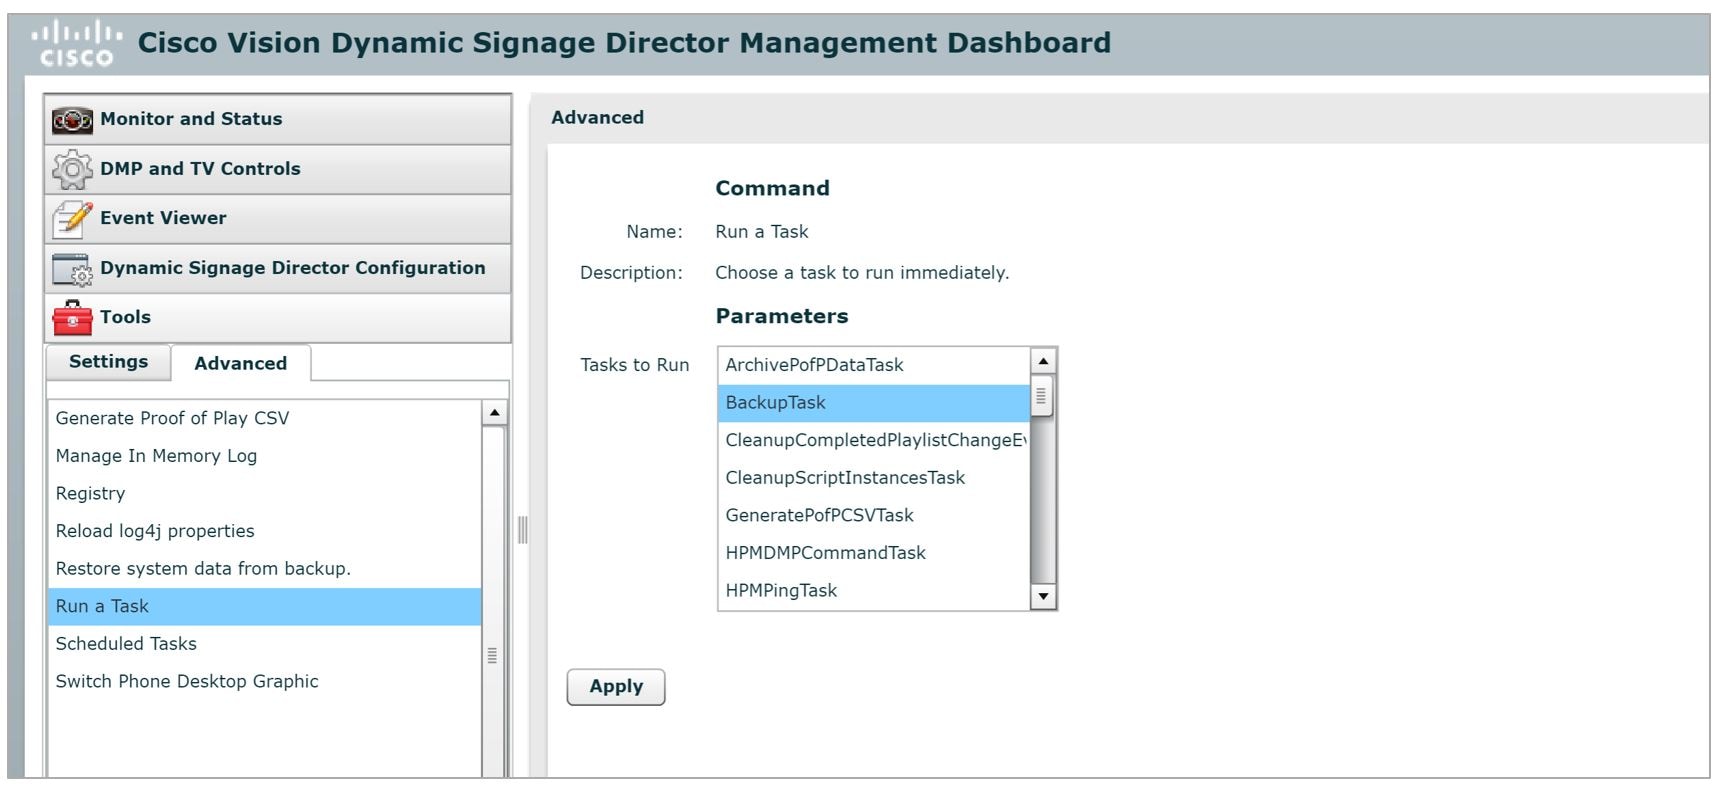
Note : Backup task may take a while to finish, particularly if there is a lot of content.
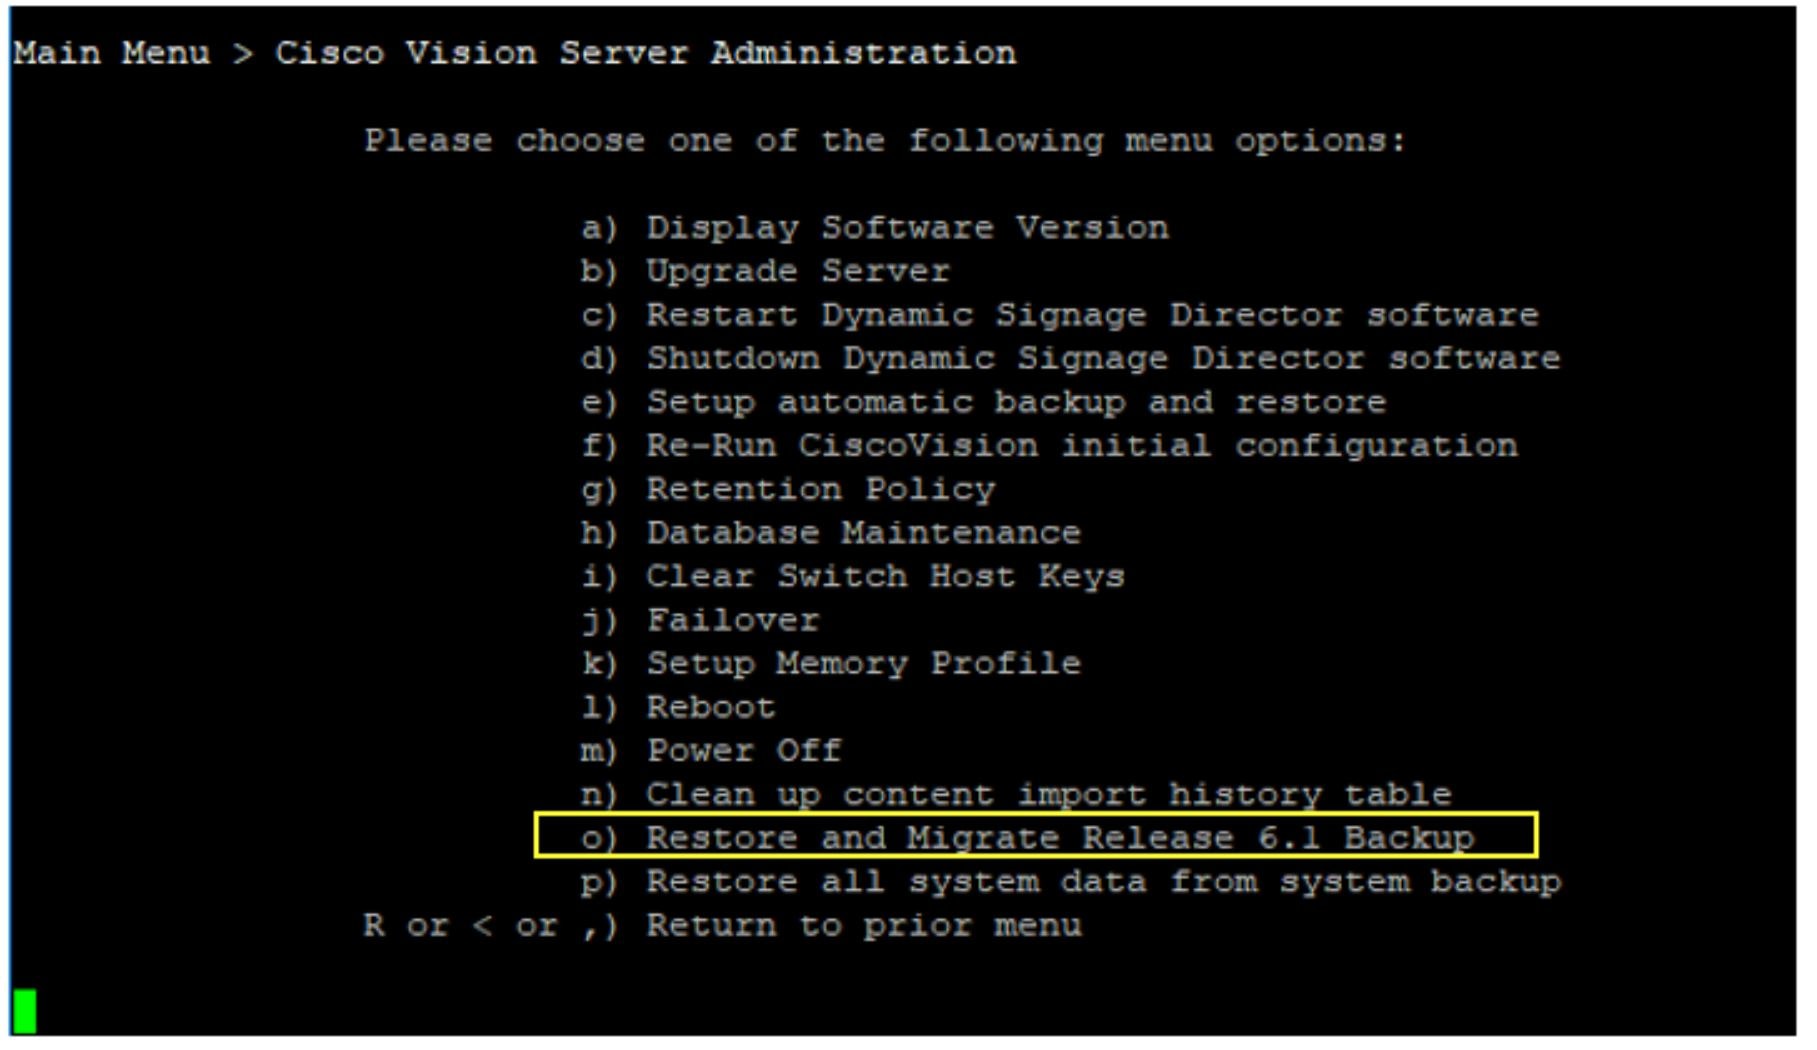
Restore and Migrate the DSD Release 6.1 Backup Server on DSD Release 6.2 Server
18.![]() Login to Cisco Vision Director TUI.
Login to Cisco Vision Director TUI.
19.![]() Type d for Cisco Vision Server Administration.
Type d for Cisco Vision Server Administration.
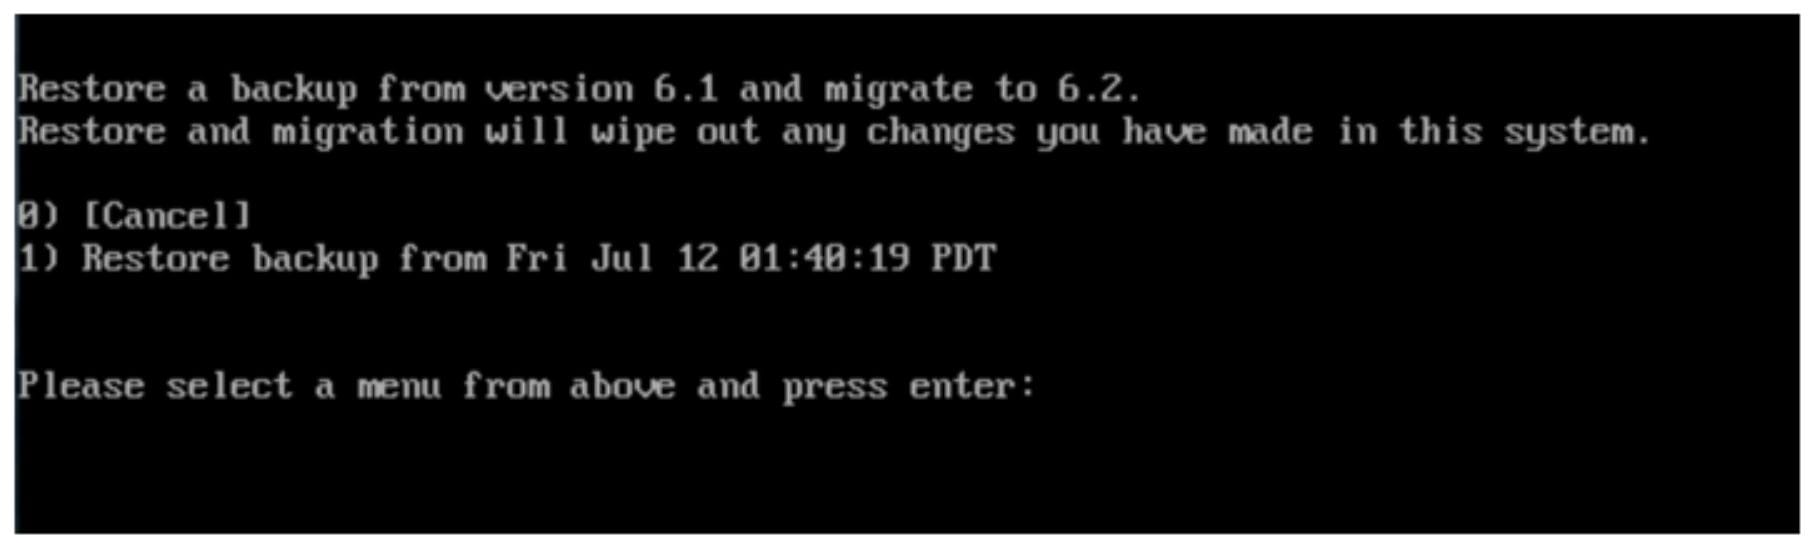
20.![]() Type o for Restore and Migrate Release 6.1 Backup (Figure 8).
Type o for Restore and Migrate Release 6.1 Backup (Figure 8).
Figure 8 Restore and Migrate Release 6.1 Backup
Note: Once migration starts, DO NOT press any keys on your keyboard until migration is done.
Note: The restore operation can only be performed once.
IMPORTANT : If the only option you see is 0, the backup may not be complete.
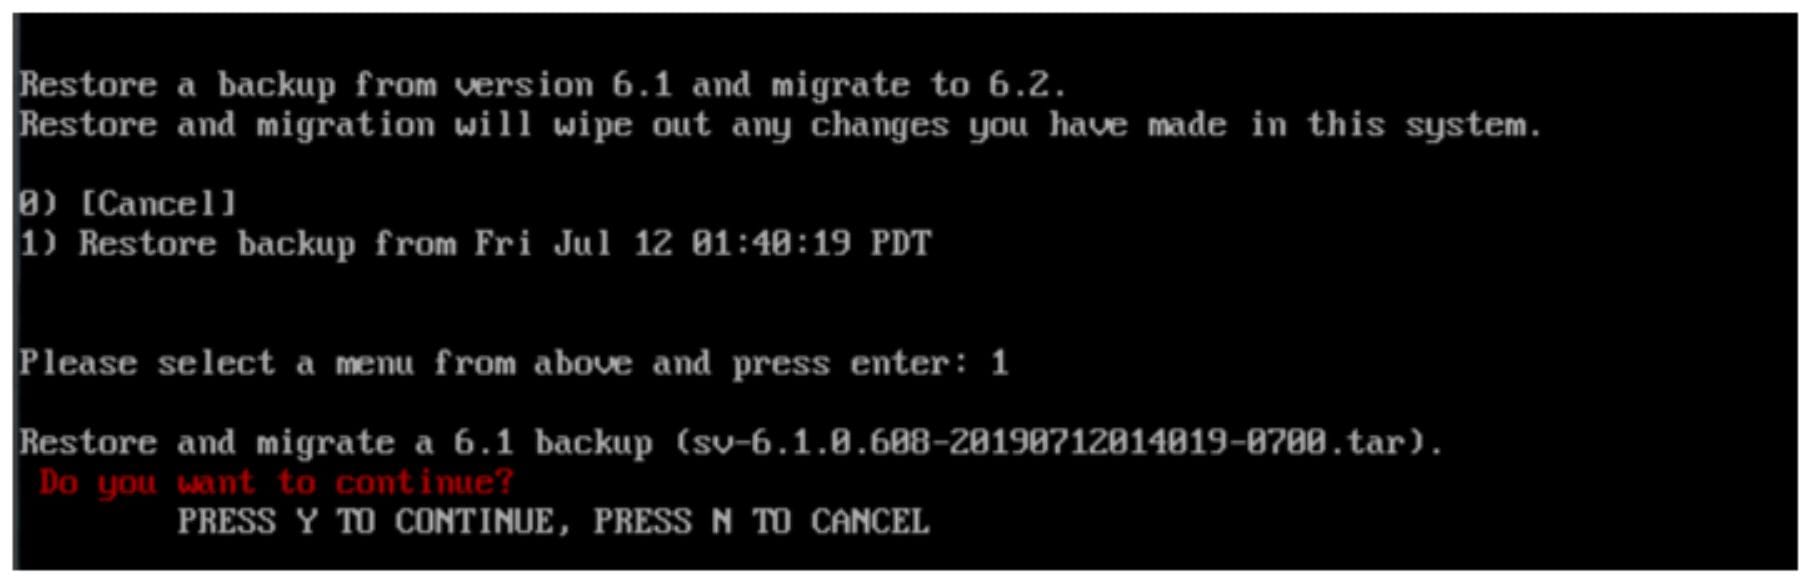
21.![]() If the backup and transfer to DSD Release 6.2 completes, you will see an option 1. Select 1) option (Figure 9).
If the backup and transfer to DSD Release 6.2 completes, you will see an option 1. Select 1) option (Figure 9).
Figure 9 Option 1: Restore Backup
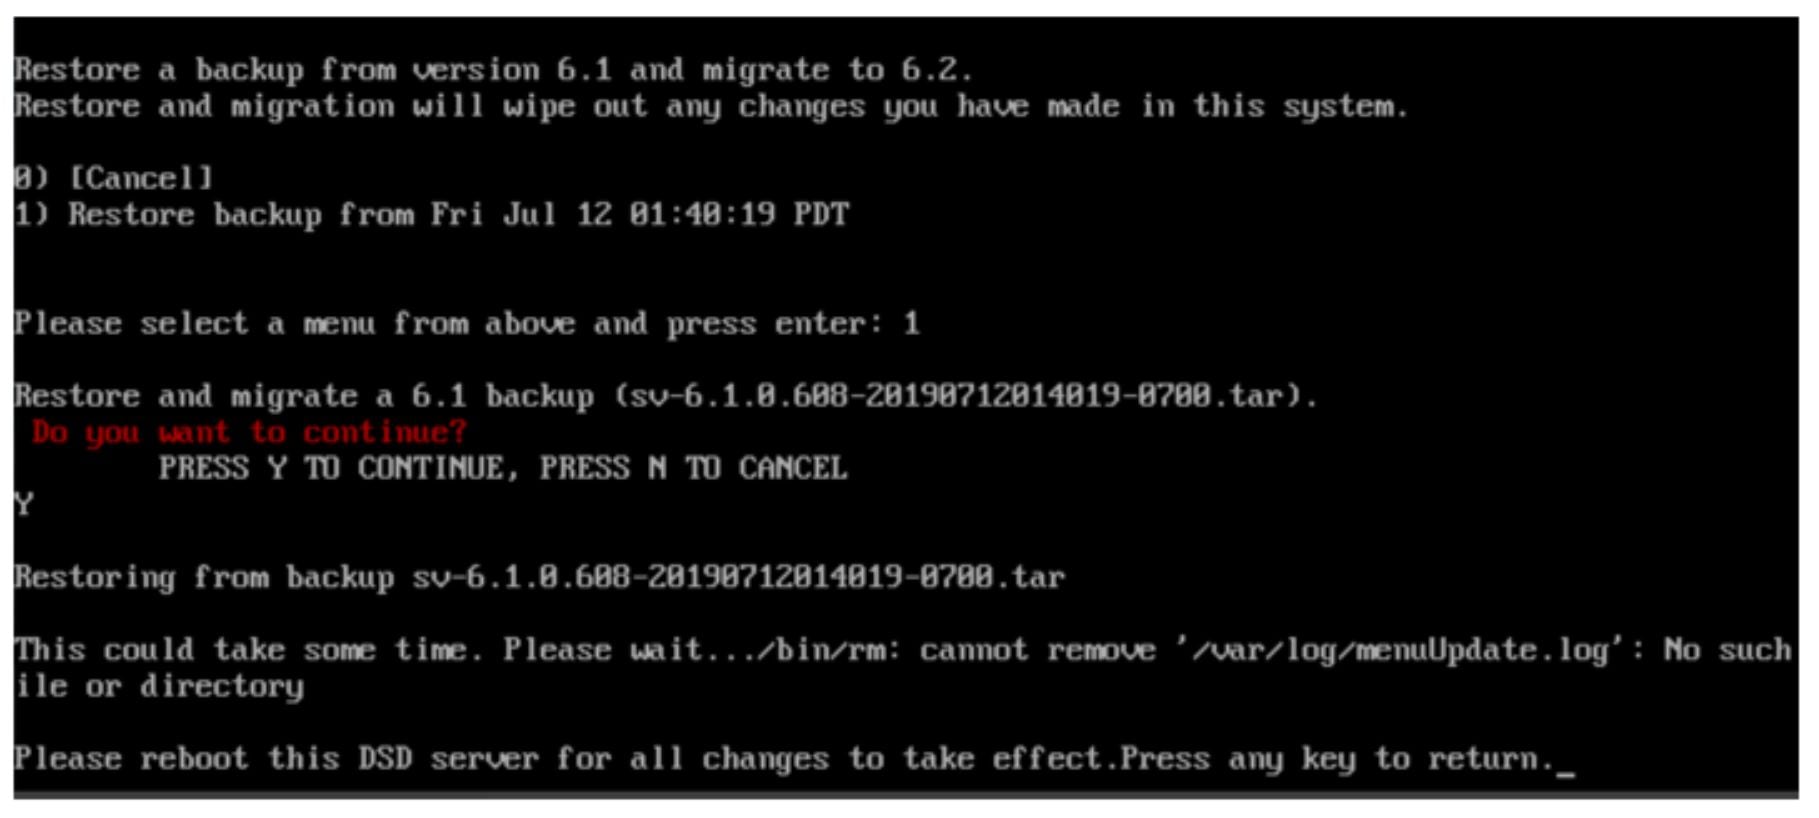
22.![]() Press Y to start the data restore and migration (Figure 10).
Press Y to start the data restore and migration (Figure 10).
Figure 10 Start Restore and Backup Data from Release 6.1 and Migrate to Release 6.1 Process
23.![]() Wait until process completes. You will see a screen similar to Figure 11.
Wait until process completes. You will see a screen similar to Figure 11.
Figure 11 Restore and Backup Complete
Shut Down DSD Release 6.1 Server
25.![]() Go to DSD Release 6.1 TUI Main Menu > d) Cisco Vision Server Administration.
Go to DSD Release 6.1 TUI Main Menu > d) Cisco Vision Server Administration.
Prepare to Setup DSD Release 6.2 as the Primary Server
27.![]() Go to Cisco Vision Director TUI Main Menu > a) System Settings > a) Network Settings.
Go to Cisco Vision Director TUI Main Menu > a) System Settings > a) Network Settings.
28.![]() Select a) Setup Network Information.
Select a) Setup Network Information.
29.![]() Change the IP address of DSD Release 6.2 to the IP address of DSD Release 6.1.
Change the IP address of DSD Release 6.2 to the IP address of DSD Release 6.1.
30.![]() Select d) Generate certificate file.
Select d) Generate certificate file.
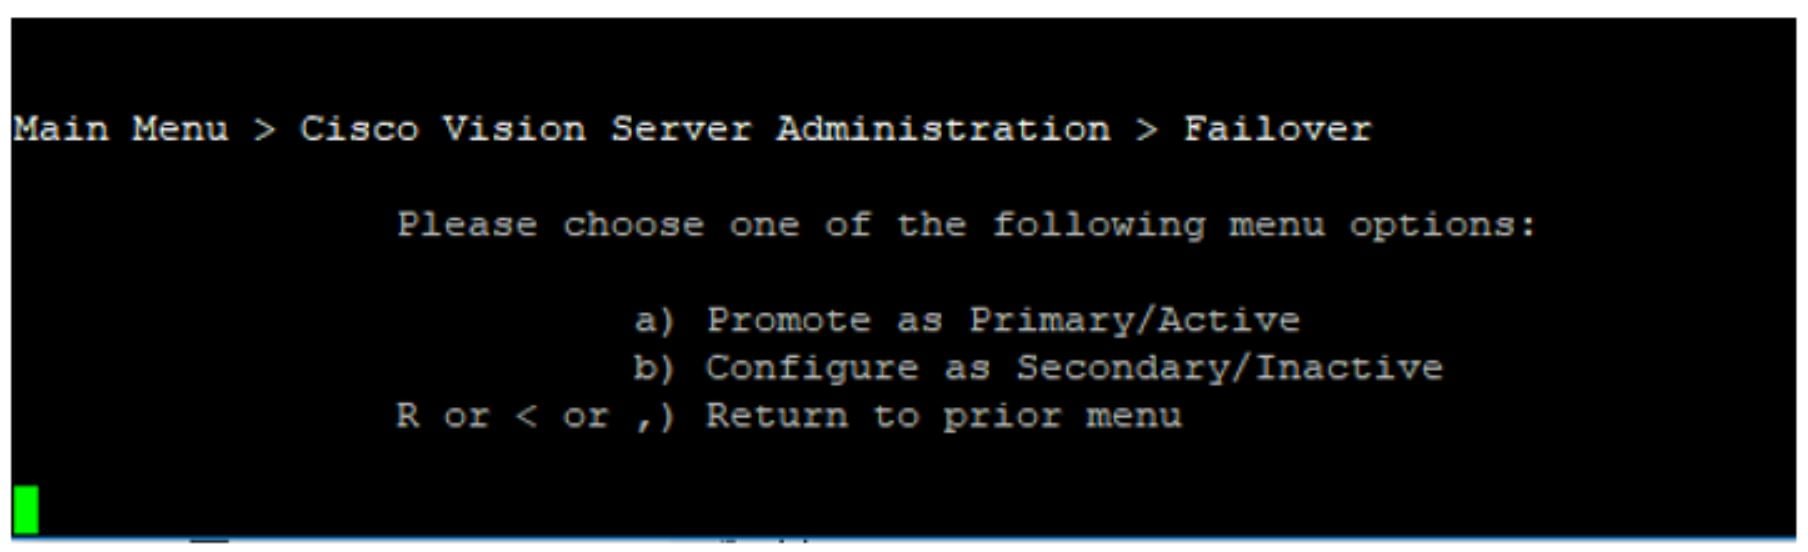
Note: Since you previously set DSD Release 6.2 as secondary/inactive in Set Dynamic Signage Director Release 6.2 as Secondary Server, promote DSD Release 6.2 to the primary/active server.
31.![]() Go to Main Menu > d) Cisco Vision Server Administration > j) Failover > a) Promote as Primary/Active ( Figure 12).
Go to Main Menu > d) Cisco Vision Server Administration > j) Failover > a) Promote as Primary/Active ( Figure 12).
Figure 12 Promote DSD Release 6.2 Server to Primary
32.![]() Navigate up to Main Menu > d) Cisco Vision Server Administration > l) Reboot.
Navigate up to Main Menu > d) Cisco Vision Server Administration > l) Reboot.
Setup the DSD Release 6.2 Secondary Server
Note : Skip this step if your deployment does not have a secondary server.
34.![]() Perform a full installation of DSD Release 6.2 on a new VM. Use the same IP address as the DSD Release 6.1 secondary server. See “Changing the IP Address on the Secondary Server” in Cisco Vision Administration Guide, Release 6.2.
Perform a full installation of DSD Release 6.2 on a new VM. Use the same IP address as the DSD Release 6.1 secondary server. See “Changing the IP Address on the Secondary Server” in Cisco Vision Administration Guide, Release 6.2.
35.![]() Use the TUI to configure the DSD Release 6.2 server as the secondary server. See “Starting and Configuring the Services on the Secondary Server” in Cisco Vision Administration Guide, Release 6.2.
Use the TUI to configure the DSD Release 6.2 server as the secondary server. See “Starting and Configuring the Services on the Secondary Server” in Cisco Vision Administration Guide, Release 6.2.
36.![]() Use the TUI on the Release 6.2 primary server to configure automatic backup and restore to point to DSD Release 6.2 secondary server. See “Setting up the Primary Server for Automatic Backup and Restore” in Cisco Vision Administration Guide, Release 6.2.
Use the TUI on the Release 6.2 primary server to configure automatic backup and restore to point to DSD Release 6.2 secondary server. See “Setting up the Primary Server for Automatic Backup and Restore” in Cisco Vision Administration Guide, Release 6.2.
Access DSD Release 6.2 Server from Browser
38.![]() Enter the IP address of DSD Release 6.2 on your browser address bar.
Enter the IP address of DSD Release 6.2 on your browser address bar.
Installation Tasks
Note: This section includes the tasks to install Cisco Vision Dynamic Signage Director for the first time on a server.
To install Cisco Vision Dynamic Signage Director for the first time on a server, complete the following tasks:
■![]() Downloading the ISO Files from Cisco.com (required)
Downloading the ISO Files from Cisco.com (required)
■![]() What To Do Next (required)
What To Do Next (required)
Downloading the ISO Files from Cisco.com
You are eligible to access the Cisco Vision Dynamic Signage Director full ISO file after you purchased the proper licensing. Contact Cisco Technical Support for information about how to download the ISO file (Table 1).
Note: Choose the ISO for SV-DIRECTOR.
Table 1 shows the filename conventions used for full ISO images for the Cisco Vision Dynamic Signage Director server.
|
|
|---|
■ |
1.“579” represents the build number of the image in the file. |
Be sure to download the ISO files to a location where you can access them once logged into the CIMC interface.
To verify the integrity of your upgrade file from the download, you can use a command-line or GUI utility on your laptop to calculate the checksum on the.iso file. Open the.sha512sum file to compare the value that you calculated with the expected value provided in the.sha512sum file. The values should match. If they do not, retry the download.
Logging Into the CIMC Interface
Note : To log into the CIMC interface, check the previous version of this document on Cisco.com. All the requirements and steps are available to read.
What To Do Next
After you have installed the Cisco Vision Dynamic Signage Director software, do the following:
Note: For initial deployments of the DMPs, follow the instructions in the Cisco Vision Deployment Guide for Digital Media Players: Dynamic Signage Director, Release 6.2.
■![]() Upgrade the DMP firmware (required).
Upgrade the DMP firmware (required).
See Upgrading the DMP Firmware.
■![]() Go to the “Configuring Cisco Vision Director Server System Settings” module of the Release 6.2: Cisco Vision Administration Guide: Dynamic Signage Director to complete initial setup of the server and do the following:
Go to the “Configuring Cisco Vision Director Server System Settings” module of the Release 6.2: Cisco Vision Administration Guide: Dynamic Signage Director to complete initial setup of the server and do the following:
–![]() Generate the SSL certificate ( required for Release 6.2).
Generate the SSL certificate ( required for Release 6.2).
–![]() Configure NTP on Cisco Vision Dynamic Signage Director Servers and DMPs.
Configure NTP on Cisco Vision Dynamic Signage Director Servers and DMPs.
–![]() Configure NTP and PTP for the DMPs.
Configure NTP and PTP for the DMPs.
Note: By default, all media players use the Cisco Vision Dynamic Signage Director server as the NTP source. When using PTP on the DMPs, only the PTP master device references an NTP source. To change the NTP source used by the DMPs, change the DMP global settings.
–![]() Configure multicast ports for Cisco Vision Dynamic Signage Director.
Configure multicast ports for Cisco Vision Dynamic Signage Director.
 Feedback