- About This Guide
- Overview of Content Support in Cisco Vision Dynamic Signage Director
- Overview of Content Deployment in Cisco Vision Dynamic Signage Director
- Video Wall Planning in Cisco Vision Dynamic Signage Director
- Screen Template Specifications for Cisco Vision Dynamic Signage Director
- Content Guidelines and Specifications for Cisco Vision Dynamic Signage Director
- HTML Content Creation Guidelines for Cisco Vision Dynamic Signage Director
Release 6.3: Cisco Vision Content Planning and Specifications Guide: Dynamic Signage Director
Bias-Free Language
The documentation set for this product strives to use bias-free language. For the purposes of this documentation set, bias-free is defined as language that does not imply discrimination based on age, disability, gender, racial identity, ethnic identity, sexual orientation, socioeconomic status, and intersectionality. Exceptions may be present in the documentation due to language that is hardcoded in the user interfaces of the product software, language used based on RFP documentation, or language that is used by a referenced third-party product. Learn more about how Cisco is using Inclusive Language.
- Updated:
- November 13, 2020
Chapter: Content Guidelines and Specifications for Cisco Vision Dynamic Signage Director
Content Guidelines and Specifications for Cisco Vision Dynamic Signage Director
Before you import content, verify:
■![]() Content is in the correct format
Content is in the correct format
■![]() Content is the appropriate size
Content is the appropriate size
■![]() Content has the correct dimensions for where it will be displayed.
Content has the correct dimensions for where it will be displayed.
If the content is not the correct size for the Cisco Vision Director region into which it is placed, the image will be cropped or there will be blank space in the region.
Content Dimensions
Content dimensions for images depend on whether the image will play in full screen mode or in one region of a multi-region screen template.
■![]() If the content is shown in full screen mode, then the image should match the resolution of the graphics screen:
If the content is shown in full screen mode, then the image should match the resolution of the graphics screen:
Full Screen HD/SD Mode: 1920x1080 (maximum supported by all DMPs)
■![]() If the content is shown in a region of a multi-region screen template, then the image should match the dimensions of that specific region.
If the content is shown in a region of a multi-region screen template, then the image should match the dimensions of that specific region.
Note: For the CV-UHD2, CV-UHD and SV-4K, UHD video can be displayed in full ultra HD resolution (3840x2160) when using any of the Dynamic Signage Director templates using the primary video region. For additional information, refer to Restrictions for UHD Video Content.
Content Orientation
The default orientation for all content in Cisco Vision Dynamic Signage Director is landscape mode.
Portrait Mode Auto-Rotation
Note: The term “auto-rotation” does not mean that the content will rotate automatically with physical rotation of the TV display (such as happens with mobile device screens). It means that the DMP rotates the content for display in 1080x1920 orientation. From a TV’s usual horizontal mounting position, the TV should be rotated 90 degrees (clockwise) for proper display of portrait mode content.
Portrait mode auto-rotation allows DMPs to automatically rotate all content for proper orientation on vertically-positioned displays, according to the following guidelines:
■![]() Supports all content sources for a single TV display.
Supports all content sources for a single TV display.
■![]() For multicast streaming video only, supports scaling of content across multiple display screens.
For multicast streaming video only, supports scaling of content across multiple display screens.
■![]() Is enabled using the “dmp.portrait” display parameter when configuring TV display specifications in the Configuration interface.
Is enabled using the “dmp.portrait” display parameter when configuring TV display specifications in the Configuration interface.
Note : When using video in portrait mode, do not scale the video beyond the full HD resolution. Ideally, the aspect ratio of the video relative to the screen region should match, for non-UHD video.
Flexible DMP Content Rotation
Release 6.0 introduced portrait-view content display. We enhanced that feature by allowing you to rotate the content 90 degrees and -90 degrees (or +270 degrees). This works for all content like videos, static images, widgets, local and multicast video, and external URLs. For situations where the display monitor has already been installed in a portrait position and to show your content the way you want, rotate the content.
1.![]() Go to: Configuration > Devices > Display Specifications.
Go to: Configuration > Devices > Display Specifications.
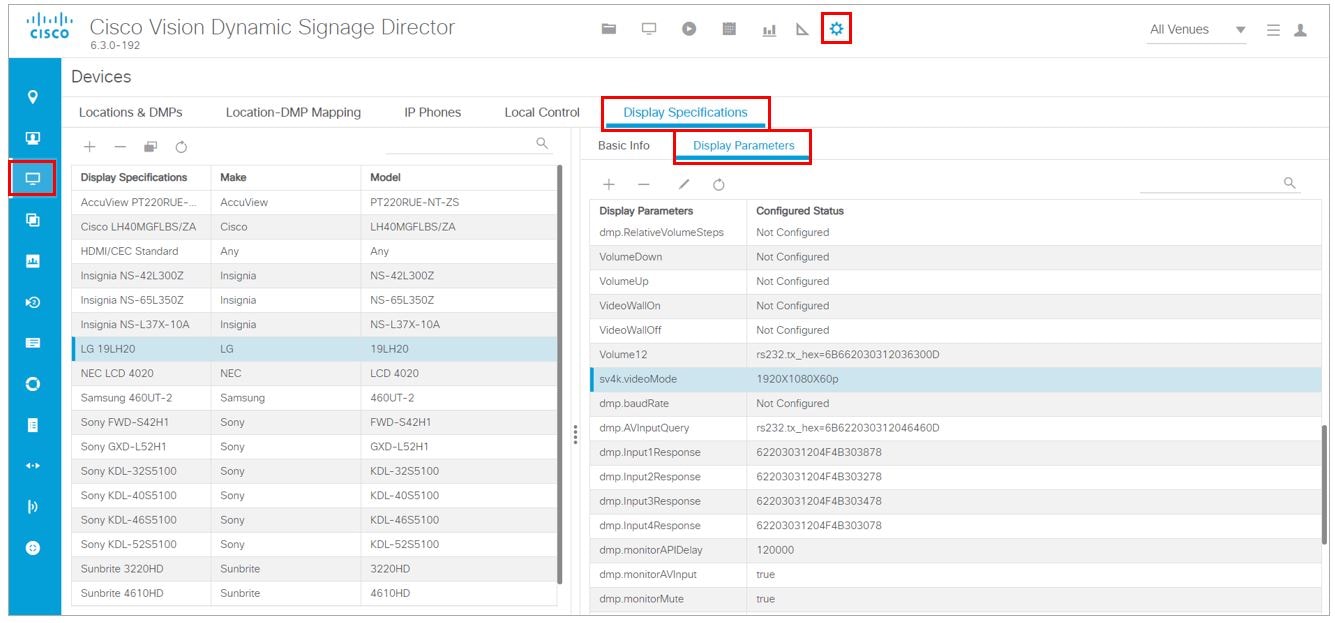
2.![]() Choose the specific display from the list on the left panel and click the Display Parameters tab in the right panel (Figure 1).
Choose the specific display from the list on the left panel and click the Display Parameters tab in the right panel (Figure 1).
Figure 1 Enabling dmp.portrait Display Parameter

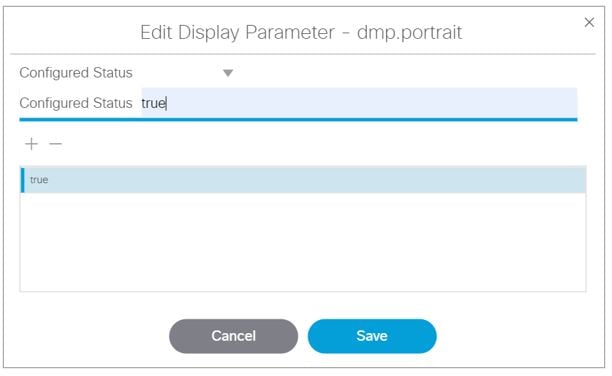
3.![]() Add or Edit a Display Parameter called dmp.portrait or dmp.portrait.clockwise and set it to “ true ” to achieve the proper rotation value you need (see Figure 2).
Add or Edit a Display Parameter called dmp.portrait or dmp.portrait.clockwise and set it to “ true ” to achieve the proper rotation value you need (see Figure 2).
Note : By default, if you use dmp.portrait and set “true” to your content, it rotates the content 90 degree. If you set dmp.portrait.clockwise to “true”, it will rotate the content 270 degrees (or -90 degrees).
Figure 2 Adding dmp.portrait Display Parameter
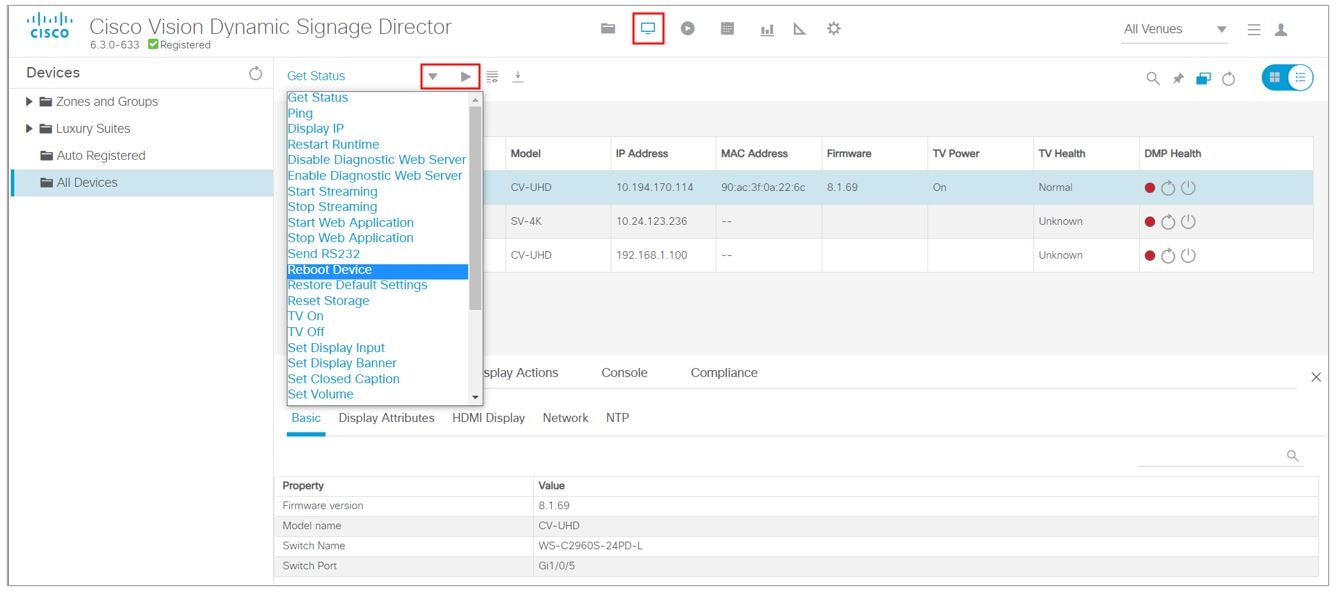
5.![]() Reboot the DMPs after setting this parameter. Click Device Management (Figure 3).
Reboot the DMPs after setting this parameter. Click Device Management (Figure 3).
6.![]() Use the check boxes to select the DMP(s) that you set the dmp.portrait parameter.
Use the check boxes to select the DMP(s) that you set the dmp.portrait parameter.
7.![]() Use the drop-down arrow to select Reboot DMP.
Use the drop-down arrow to select Reboot DMP.
8.![]() Click the Play icon (Send Command) to execute the reboot command.
Click the Play icon (Send Command) to execute the reboot command.
Note : When using video in portrait mode, do not scale the video beyond the full HD resolution. Ideally, the aspect ratio of the video relative to the screen region should match, for non-UHD video.
Figure 4 is a figure displaying rotated content +90 and +270 degrees. Use portrait and portrait clockwise. You can only use +90 and +270 (-90).
Figure 4 90 Degrees and 270 Degrees, Content Rotation
Portrait,, +90 Portrait clockwise, +270

Automated Content Import to Library Inbox
New to Release 6.2 is running an automated import of content from a defined source. The source may be a defined SFTP location. There can be multiple SFTP locations defined in the system. This feature can be registered as a task and the task configured to run every day.
Note : A file that is already imported to Cisco Vision Director using the SFTP feature cannot be reimported with the same content name.
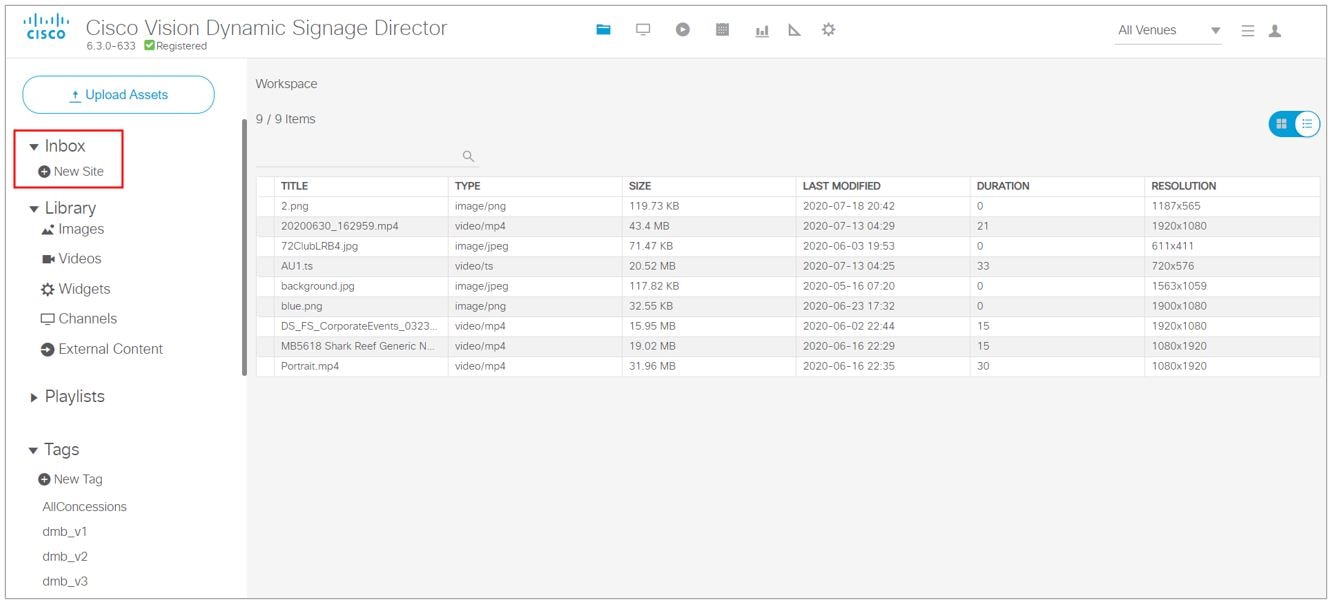
Figure 5 shows how to access it in Library. Add the designated sites here.
Figure 5 Automated Content Import
To create a designated site to fetch files:
1.![]() Click New Site. The Create Site box appears in the right panel (Figure 6).
Click New Site. The Create Site box appears in the right panel (Figure 6).
Figure 6 Create New Site to Get Content From
2.![]() Fill in the required fields.
Fill in the required fields.
3.![]() Choose a Host Folder and a designation folder (To Folder) where the content will reside in Cisco Vision Director. If you don’t choose a destination folder, the content goes to the Inbox list of sites.
Choose a Host Folder and a designation folder (To Folder) where the content will reside in Cisco Vision Director. If you don’t choose a destination folder, the content goes to the Inbox list of sites.
4.![]() Schedule a Start and End time to fetch files. The time defined should be greater than 30 minutes.
Schedule a Start and End time to fetch files. The time defined should be greater than 30 minutes.
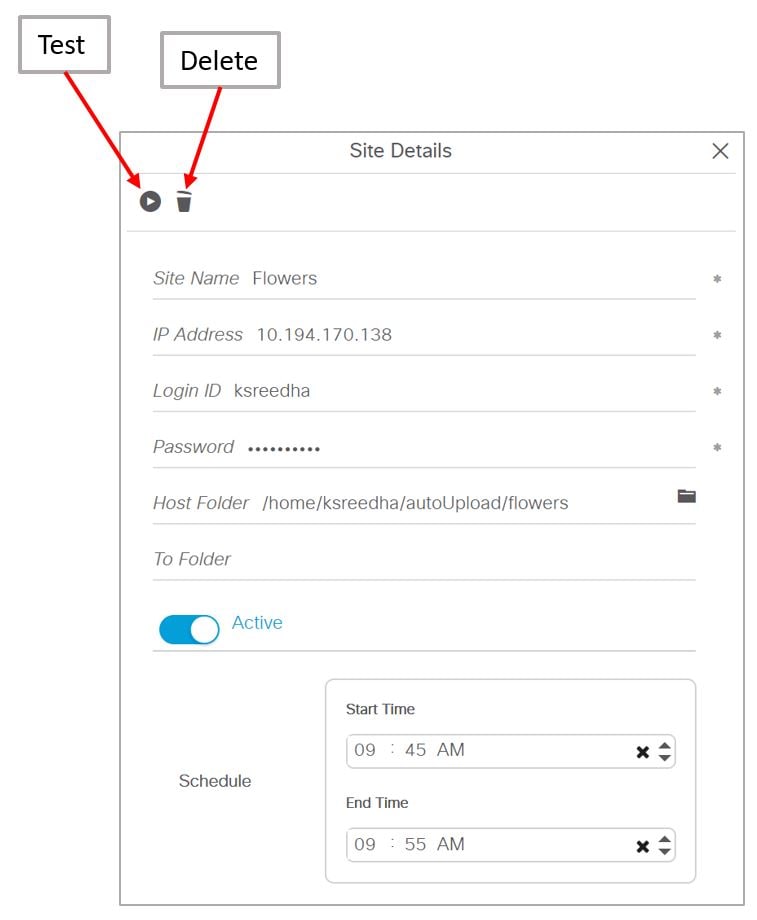
After you create a new site, you can Test or Delete the source sites (Figure 7).
Figure 7 Test or Delete a Content Source
To download, copy, or delete the content:
1.![]() Select the content and right click it. An Action box appears (Figure 8).
Select the content and right click it. An Action box appears (Figure 8).
Figure 8 Action Box Operations for Auto-Content Import

If you choose Download Now, you see “Content Import successfully triggered now.” This action executes the content import On Demand. The content appears in the site folder. If you didn’t choose a destination folder (in red box above), all the imported files are visible under the sites in the Inbox list.
■![]() A file that is already imported to Cisco Vision Director using the SFTP feature cannot be reimported with the same content name.
A file that is already imported to Cisco Vision Director using the SFTP feature cannot be reimported with the same content name.
■![]() If you did not specify a Folder in the import action, you must move all the files to the correct Workspace folder or subfolders you’ve created. Otherwise the content is not available to use in a playlist.
If you did not specify a Folder in the import action, you must move all the files to the correct Workspace folder or subfolders you’ve created. Otherwise the content is not available to use in a playlist.
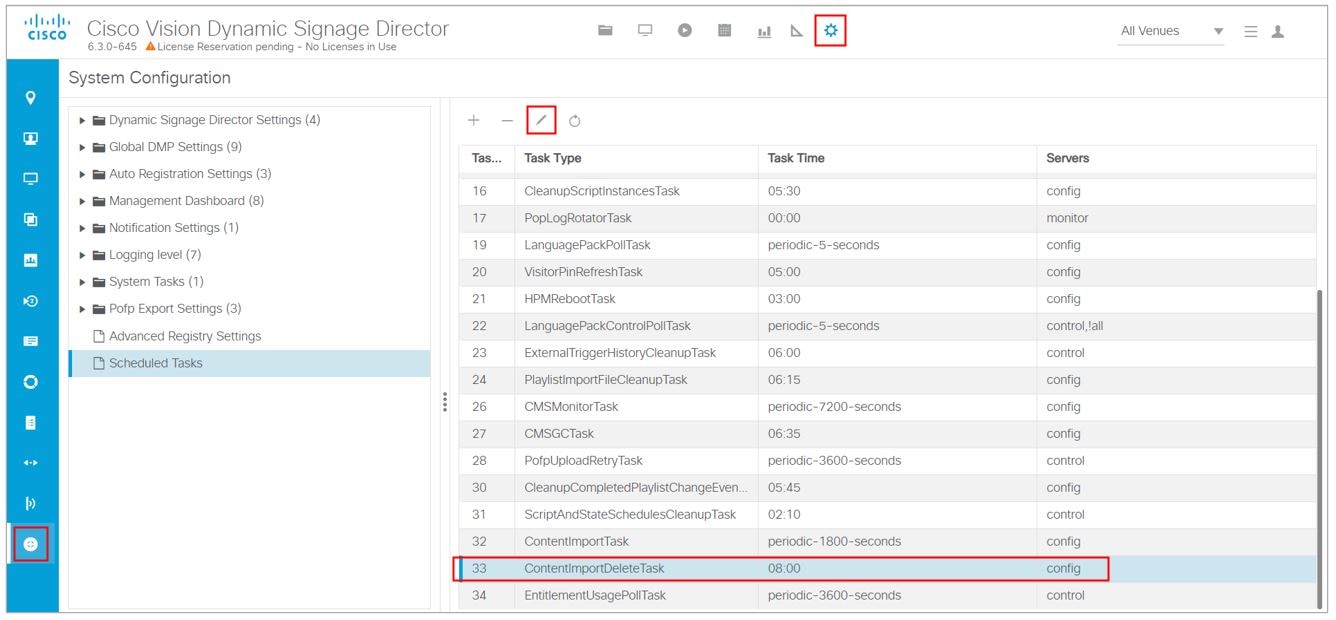
■![]() If you delete a site, the site is not visible in the list. However, the site details are not removed until the scheduled task runs. The default is 8:00 am. If you need to create a site with the same name before the scheduled task runs, click Configuration > System Configuration > Scheduled Tasks. Scroll down to ContentImportDeleteTask (Figure 9 on page 64). Configure this task; use the Edit icon. The Schedule Task — Edit dialog box appears. This allows you to add the same site details the same day.
If you delete a site, the site is not visible in the list. However, the site details are not removed until the scheduled task runs. The default is 8:00 am. If you need to create a site with the same name before the scheduled task runs, click Configuration > System Configuration > Scheduled Tasks. Scroll down to ContentImportDeleteTask (Figure 9 on page 64). Configure this task; use the Edit icon. The Schedule Task — Edit dialog box appears. This allows you to add the same site details the same day.
Figure 9 Schedule ContentImportDeleteTask
To manage your content source assets once they are placed in a folder:
1.![]() Select one from the Library Inbox and right click. The action box appears (Figure 10).
Select one from the Library Inbox and right click. The action box appears (Figure 10).
Figure 10 Inbox Content Source Assets
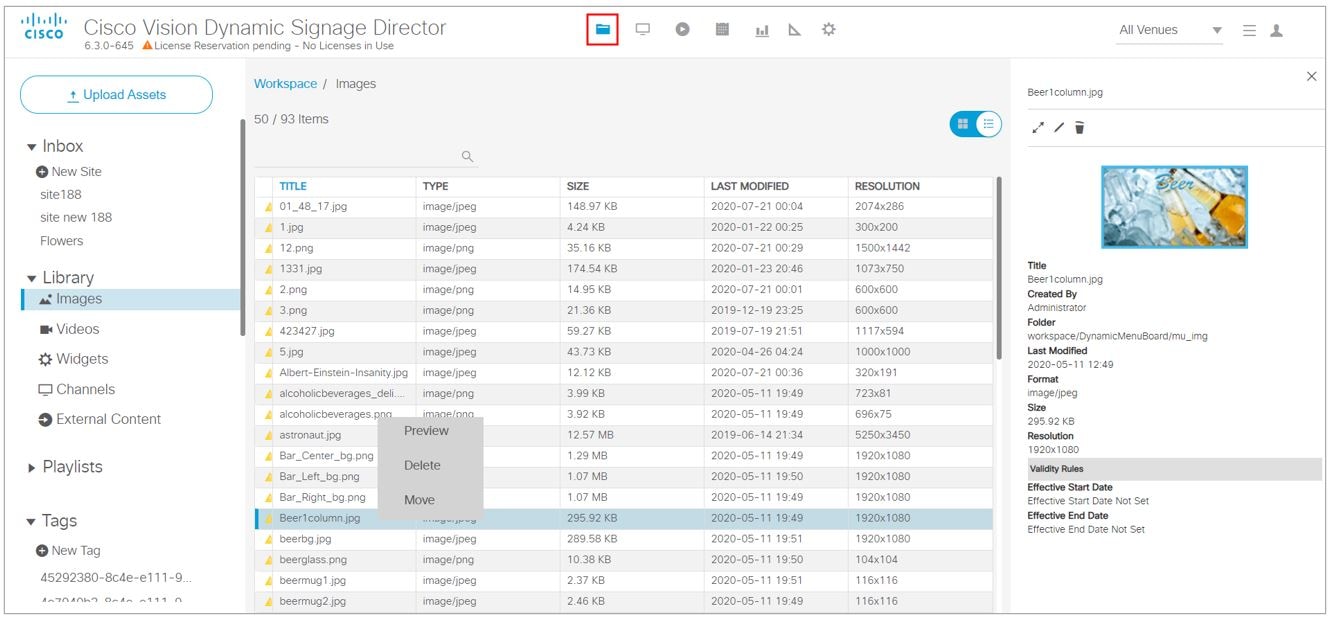
Content source files can be batch uploaded to Library, as long as all the content files go into the same folder you create.
To set the configuration properties for the content site:
1.![]() Click Configuration > System Configuration > Dynamic Signage Director Settings > Content Source Settings (Figure 11).
Click Configuration > System Configuration > Dynamic Signage Director Settings > Content Source Settings (Figure 11).
2.![]() Select the property you want to change.
Select the property you want to change.
3.![]() Click Edit (pencil icon). The Edit Configuration Setting dialog box appears.
Click Edit (pencil icon). The Edit Configuration Setting dialog box appears.
4.![]() Type in the specific value you want.
Type in the specific value you want.
Figure 11 Set Values for Content Source Settings
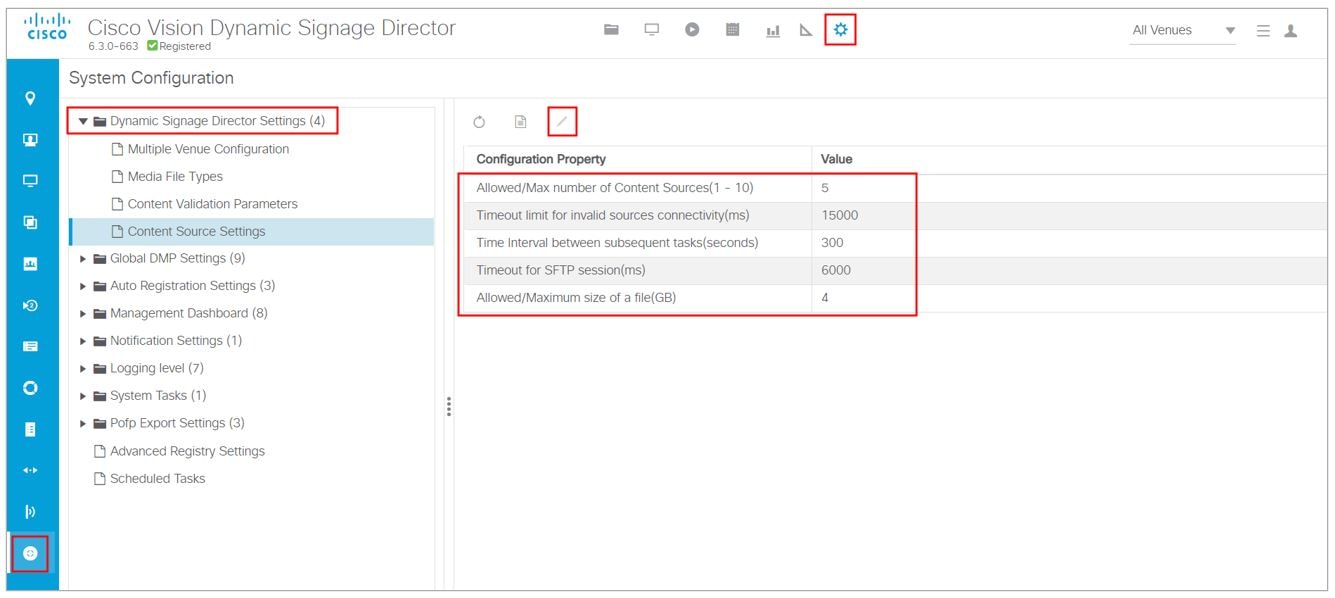
Use System Configuration to configure global settings for automated content import for the configuration properties shown above. Use the Asset Library (Figure 10) window to configure and setup the content sources.
To set the registry value for automated content:
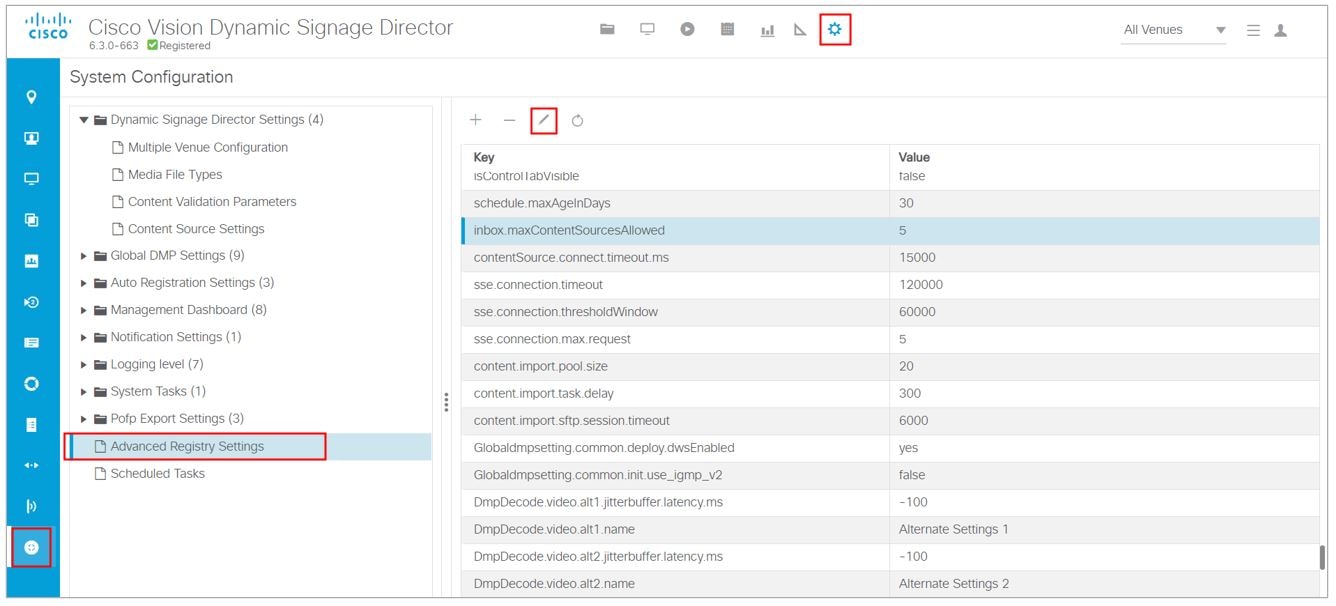
1.![]() Click Configuration > System Configuration > Advanced Registry Settings.
Click Configuration > System Configuration > Advanced Registry Settings.
2.![]() Scroll to inbox.maxContentSourcesAllowed and select it. The default value is 5 (Figure 12).
Scroll to inbox.maxContentSourcesAllowed and select it. The default value is 5 (Figure 12).
Figure 12 Automated Content Registry Value
3.![]() Click Edit to change the value. The Edit Configuration Setting dialog box appears.
Click Edit to change the value. The Edit Configuration Setting dialog box appears.
Content Scaling
Scaling refers to support of two things:
■![]() Showing only a portion of the content per display in a multi-screen video wall.
Showing only a portion of the content per display in a multi-screen video wall.
Note : Content scaling works with multicast video and local video, as well as for static graphics, widgets, and external URLs.
Note : Scale down large content and keep the correct aspect ratio. If your image or widget resolution is smaller than the region, the content resolution will not scale up.
No need to configure. This is just an added feature/ability of Cisco Vision Director. For video walls, videos always scale to the region. However, if your region is out of spec, it may not display. For non-video, content will be scaled down (scale-to-fit for images and widgets, maintaining aspect ratio; scale-to-fill for external URL). This feature will scale non-video content down so it will not spill over beyond the region size.
Limitation : If you have content that is too small for your region, you can scale up—for video only.
Best practice : Match content resolutions with region resolutions.
Guidelines for Video Content
To deploy video content in Cisco Vision Dynamic Signage Director, use the following guidelines:
■![]() Video files range in size. 4 GB is the maximum file size.
Video files range in size. 4 GB is the maximum file size.
■![]() Be sure that your video content meets the requirements described in Supported Video and Audio Formats.
Be sure that your video content meets the requirements described in Supported Video and Audio Formats.
■![]() Test the devices that you plan to connect to the SV-4K, CV-UHD, or CV-UHD2 HDMI-In port to stream content for support of HDCP. Most Mac OS and Windows laptops should work for HDMI-In video encoding for non-copy-protected content. The device manufacturer and OS determine whether or not this is supported.
Test the devices that you plan to connect to the SV-4K, CV-UHD, or CV-UHD2 HDMI-In port to stream content for support of HDCP. Most Mac OS and Windows laptops should work for HDMI-In video encoding for non-copy-protected content. The device manufacturer and OS determine whether or not this is supported.
■![]() Using multicast or locally-stored videos for both video regions is supported, we recommend using a combination of multicast and locally-stored videos for the video regions (or local video for both video regions).
Using multicast or locally-stored videos for both video regions is supported, we recommend using a combination of multicast and locally-stored videos for the video regions (or local video for both video regions).
■![]() For best performance of local video playback on the media players, use Constant Bit Rate (CBR). Variable Bit Rate (VBR) will also work but synchronized video playback could be compromised.
For best performance of local video playback on the media players, use Constant Bit Rate (CBR). Variable Bit Rate (VBR) will also work but synchronized video playback could be compromised.
■![]() Create video content that is the same size as the video region in which it will be rendered. This avoids any unnecessary video scaling.
Create video content that is the same size as the video region in which it will be rendered. This avoids any unnecessary video scaling.
■![]() The audio track for any local video content should be sampled at 48 kHz.
The audio track for any local video content should be sampled at 48 kHz.
■![]() All local video content must include an audio PID (even if silent, without an audio source present).
All local video content must include an audio PID (even if silent, without an audio source present).
■![]() Use progressive video modes instead of interlaced to achieve optimal video display.
Use progressive video modes instead of interlaced to achieve optimal video display.
■![]() For frameless external HTML browser content, the videos will likely render at the lowest layer. We do not recommend rendering video content on the external HTML.
For frameless external HTML browser content, the videos will likely render at the lowest layer. We do not recommend rendering video content on the external HTML.
Additional Guidelines for UHD Video Content
Best Practices for UHD Video Content
Before preparing video content with UHD resolution for the SV-4K, CV-UHD, or CV-UHD2 digital media player, consider the following best practice:
■![]() When using any templates with native UHD video, it is best to design all content/regions for HD 1920 x 1080. The image content that is displayed with the UHD video will resize proportionally to a 3840 x 2160 canvas size automatically.
When using any templates with native UHD video, it is best to design all content/regions for HD 1920 x 1080. The image content that is displayed with the UHD video will resize proportionally to a 3840 x 2160 canvas size automatically.
UHD video is displayed in full ultra HD resolution (3840 x 2160) when using any of the Cisco Vision Dynamic Signage Director templates using the primary video region.
Restrictions for UHD Video Content
Before preparing video content with UHD resolution, consider the following restrictions:
■![]() Video content with UHD resolution is only supported by the SV-4K, CV-UHD, and CV-UHD2 DMPs.
Video content with UHD resolution is only supported by the SV-4K, CV-UHD, and CV-UHD2 DMPs.
■![]() Video content with UHD resolution is not supported in portrait mode.
Video content with UHD resolution is not supported in portrait mode.
■![]() H.264 video encoding is not supported. Be sure that your content tools support H.265 encoding.
H.264 video encoding is not supported. Be sure that your content tools support H.265 encoding.
■![]() H.264 video is not supported for streaming content.
H.264 video is not supported for streaming content.
■![]() Videos with UHD resolution are not supported for HDMI-In streaming.
Videos with UHD resolution are not supported for HDMI-In streaming.
■![]() Display of dual UHD video regions is not supported.
Display of dual UHD video regions is not supported.
■![]() The UHD video region should be played in the primary video region only. A secondary video region can support up to HD (1920 x 1080) video resolution.
The UHD video region should be played in the primary video region only. A secondary video region can support up to HD (1920 x 1080) video resolution.
■![]() No luma key can be applied to UHD video content. Luma keying is only supported with UHD for dual video when an HD video in the secondary region uses a luma key over a UHD video in the primary region.
No luma key can be applied to UHD video content. Luma keying is only supported with UHD for dual video when an HD video in the secondary region uses a luma key over a UHD video in the primary region.
■![]() The Screen Template editor in Cisco Vision Dynamic Signage Director presents all region sizes based on an HD 1920x1080 canvas size. Do not configure templates based on the ultra HD size of 3840x2160 when using a UHD display.
The Screen Template editor in Cisco Vision Dynamic Signage Director presents all region sizes based on an HD 1920x1080 canvas size. Do not configure templates based on the ultra HD size of 3840x2160 when using a UHD display.
■![]() If you are using a UHD display, configure a fixed resolution value of 3840 x 2160 x 60p in the sv4k.videoMode serial command (Figure 13) in the TV Display Specification.
If you are using a UHD display, configure a fixed resolution value of 3840 x 2160 x 60p in the sv4k.videoMode serial command (Figure 13) in the TV Display Specification.
Figure 13 sv4k.videoMode Display Parameter
Enabling Dolby Vision
The Series 4 DMPS (CV-UHD2 and CV-HD2) are high dynamic range 10 (HDR10) and Dolby Vision capable. These DMPs will automatically detect HDR content. For HDR10 content, if the DMP transitions from non-HDR to HDR content, an “HDR” logo may flash on the top right corner of the display.
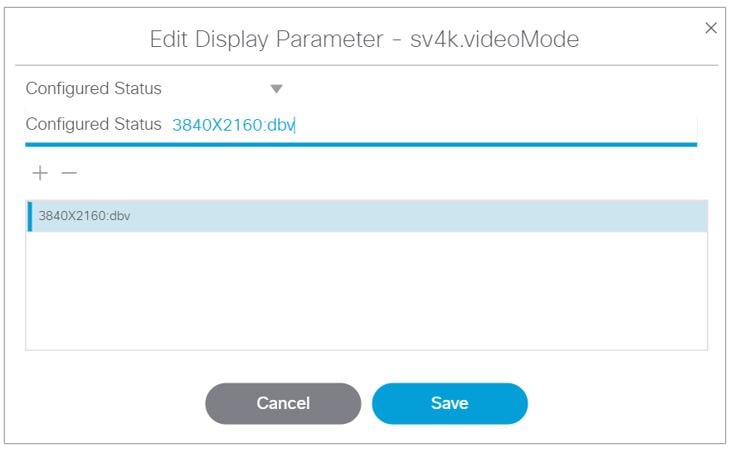
For Dolby Vision playback, you must append the sv4k.videoMode with :dbv.
1.![]() Click Configuration > Devices > Display Specifications > Display Parameters.
Click Configuration > Devices > Display Specifications > Display Parameters.
2.![]() To set the device to use Dolby Vision, append :dbv to the video mode setting (Figure 14).
To set the device to use Dolby Vision, append :dbv to the video mode setting (Figure 14).
Figure 14 Edit Display Parameter for Dolby Vision
When you add :dbv to the videomode, the DMP may flash the Dolby Vision logo in the top right corner of the display.
■![]() If video mode is set to auto detect, DWS will show the video mode for a UHD display as 3840x2160x60 when playing non-HDR content.
If video mode is set to auto detect, DWS will show the video mode for a UHD display as 3840x2160x60 when playing non-HDR content.
■![]() When playing Dolby Vision or HDR10, the video mode in DWS changes to 3840x2160x60p HDR10 (auto)
When playing Dolby Vision or HDR10, the video mode in DWS changes to 3840x2160x60p HDR10 (auto)
■![]() If video mode forces Dolby Vision (:dbv), DWS will show the color depth of the content.
If video mode forces Dolby Vision (:dbv), DWS will show the color depth of the content.
■![]() Dolby Vision is fully supported only on the CV-UHD2 DMP.
Dolby Vision is fully supported only on the CV-UHD2 DMP.
■![]() When using Dolby Vision enabled content, only one video decoder is available.
When using Dolby Vision enabled content, only one video decoder is available.
■![]() There is no warning in Script Validation when using Dolby Vision content.
There is no warning in Script Validation when using Dolby Vision content.
■![]() Playing HDR video on a non-HDR-capable DMP or display will have color distortion.
Playing HDR video on a non-HDR-capable DMP or display will have color distortion.
For more information about how to specify the TV display resolution, see the “Configuring Resolution in Display Specifications” in the Cisco Vision Dynamic Signage Director Operations Guide.
HDR10 Content
■![]() HDR/HDR10 is fully supported only on the CV-UHD2 DMP
HDR/HDR10 is fully supported only on the CV-UHD2 DMP
Table 1 shows the current DMP capabilities with content types.
Note: Portrait mode is not supported with HDR, HLG, or Dolby Vision content.
 Feedback