Cisco StadiumVision Mobile Reporter and Cisco StadiumVision Mobile Streamer Installation and Upgrade Guide
Bias-Free Language
The documentation set for this product strives to use bias-free language. For the purposes of this documentation set, bias-free is defined as language that does not imply discrimination based on age, disability, gender, racial identity, ethnic identity, sexual orientation, socioeconomic status, and intersectionality. Exceptions may be present in the documentation due to language that is hardcoded in the user interfaces of the product software, language used based on RFP documentation, or language that is used by a referenced third-party product. Learn more about how Cisco is using Inclusive Language.
- Updated:
- March 28, 2013
Chapter: Installing Cisco StadiumVision Mobile Streamer and Cisco StadiumVision Mobile Reporter
- Starting CIMC
- What To Do Next
- Set the time zone on the StadiumVision Mobile Streamer
- Start NTP on the StadiumVision Mobile Streamer
- Configure NTP on the StadiumVision Mobile Reporter
- Log into the StadiumVision Mobile Reporter TUI
- Start the Cassandra Service on the StadiumVision Mobile Reporter
- Set the Date and Time on the StadiumVision Mobile Reporter
- Set the User Time Zone on the StadiumVision Mobile Reporter
- Upgrading StadiumVision Mobile Reporter Using the Web Browser UI and TUI
Installing Cisco StadiumVision Mobile Streamer and Cisco StadiumVision Mobile Reporter Software
This module provides instructions for installing StadiumVision Mobile Reporter or StadiumVision Mobile Streamer software on both the Cisco UCS C220 and Cisco UCS C200 servers, nd contains the following sections:
•![]() Preparing for the Installation
Preparing for the Installation
•![]() Installing Cisco StadiumVision Mobile Software
Installing Cisco StadiumVision Mobile Software
–![]() Preparing for the Installation
Preparing for the Installation
–![]() Confirming the CIMC Firmware Version
Confirming the CIMC Firmware Version
–![]() Log into the StadiumVision Mobile Reporter TUI
Log into the StadiumVision Mobile Reporter TUI
–![]() Set the Date and Time on the StadiumVision Mobile Reporter
Set the Date and Time on the StadiumVision Mobile Reporter
–![]() Upgrading StadiumVision Mobile Reporter Using the Web Browser UI and TUI
Upgrading StadiumVision Mobile Reporter Using the Web Browser UI and TUI
Before You Begin
Be sure that you understand and have met the following prerequisites before you begin to install or upgrade the Cisco StadiumVision Mobile hardware.
Browser, Flash Player, and Java Support for StadiumVision Mobile Reporter and StadiumVision Mobile Streamer
You can use an Apple Mac or Microsoft Windows PC or laptop to access the StadiumVision Mobile Streamer configuration and StadiumVision Mobile Reporter marketing and support data. The StadiumVision Reporter configuration Text User Interface (TUI) can be accessed by any SSH client, or by physical console access. describes the method of access.
Java Support
To remotely access the CIMC for the software installation, your computer meets the minimum browser and Flash player requirements for Cisco StadiumVision Mobile, and also has Java 1.6 or later installed.
Browser Support
Table 2 describes the browser software versions that have been tested with Cisco StadiumVision Mobile Release 1.2.

Note ![]() Unless specifically identified as unsupported, other browser versions might work, but their compatibility with Cisco StadiumVision Mobile cannot be assured.
Unless specifically identified as unsupported, other browser versions might work, but their compatibility with Cisco StadiumVision Mobile cannot be assured.
|
|
|
|
|---|---|---|
Apple Mac OS X |
• • |
Adobe Flash Player Version 11.5.502.146 |
Microsoft Windows |
• • • |
Adobe Flash Player Version 11.5.502.146 |
1 No additional browser software is tested other than what is listed in this table (for example, not Apple Safari). However, other browser software might work. |
Hardware Prerequisites
•![]() Connect a monitor and keyboard to the Cisco UCS C220 or Cisco UCS C200. Install the Cisco StadiumVision Mobile software with a hardwired network connection.
Connect a monitor and keyboard to the Cisco UCS C220 or Cisco UCS C200. Install the Cisco StadiumVision Mobile software with a hardwired network connection.
•![]() Bring a US keyboard if traveling to a country where English is not the primary language.
Bring a US keyboard if traveling to a country where English is not the primary language.
•![]() Connect the Cisco UCS C220 or Cisco UCS C200 to the network using the eth0 Ethernet port on the rear panel. Static network addressing should always be used. Have the following information available:
Connect the Cisco UCS C220 or Cisco UCS C200 to the network using the eth0 Ethernet port on the rear panel. Static network addressing should always be used. Have the following information available:
–![]() IPv4 Internet address
IPv4 Internet address
–![]() Netmask
Netmask
–![]() Gateway
Gateway
–![]() Nameservers
Nameservers
–![]() Hostname
Hostname
–![]() Proxy if direct internet access is not available
Proxy if direct internet access is not available
If you are receiving a Cisco StadiumVision Mobile server for the first time
Cisco StadiumVision Mobile software is available in different types of files based on the installation or upgrade environment, as shown in Table 3 and Table 4.
Table 3
Cisco StadiumVision Mobile—Fresh Installation
Table 4 Cisco StadiumVision Mobile—Upgrade
|
|
|
|
|
|
|---|---|---|---|---|
|
|
Cisco UCS C200 |
Upgrade ISO |
scp (secure copy) |
UNIX shell |
Cisco UCS C220 |
||||
|
|
Cisco UCS C200 |
Upgrade ISO |
Browser |
TUI1 |
Cisco UCS C220 |
1 For upgrade instructions using the web browser UI, see the "Upgrading StadiumVision Mobile Reporter Using the Web Browser User Interface" section in the Cisco StadiumVision Mobile Reporter and Cisco StadiumVision Mobile Streamer Installation and Upgrade Guide. |
A fresh installation should be performed only if the pre-installed version number is lower than the following versions:
•![]() StadiumVision Mobile Streamer: 1.2.0-21
StadiumVision Mobile Streamer: 1.2.0-21
•![]() StadiumVision Mobile Reporter: 1.2.0-507
StadiumVision Mobile Reporter: 1.2.0-507
When upgrading the StadiumVision Mobile Streamer, consider the following points:
•![]() Upgrades between StadiumVision Mobile Release 1.0 and 1.1 or 1.2 require a full ISO installation upgrade with full OS re-imaging via CIMC for the Cisco UCS C220.
Upgrades between StadiumVision Mobile Release 1.0 and 1.1 or 1.2 require a full ISO installation upgrade with full OS re-imaging via CIMC for the Cisco UCS C220.
•![]() Streamer builds within Release 1.2 can use RPM upgrades on both the Cisco UCS C220 and Cisco UCS C200.
Streamer builds within Release 1.2 can use RPM upgrades on both the Cisco UCS C220 and Cisco UCS C200.
•![]() Upgrades are performed in the same manner for the StadiumVision Mobile Streamer on the Cisco UCS C220 and Cisco UCS C200 starting with StadiumVision Mobile Release 1.2 build 13.
Upgrades are performed in the same manner for the StadiumVision Mobile Streamer on the Cisco UCS C220 and Cisco UCS C200 starting with StadiumVision Mobile Release 1.2 build 13.
For detailed instructions on installing or upgrade the StadiumVision Mobile Reporter or StadiumVision Mobile Streamer software, see the Cisco StadiumVision Mobile Reporter and Cisco StadiumVision Mobile Streamer Installation and Upgrade Guide.
Installing Cisco StadiumVision Mobile Software
To install StadiumVision Mobile Reporter or StadiumVision Mobile Streamer software on a Cisco UCS C220, use the procedures in the following sections in consecutive order:
•![]() Preparing for the Installation
Preparing for the Installation
•![]() Confirming the CIMC Firmware Version
Confirming the CIMC Firmware Version
•![]() Installing Cisco StadiumVision Mobile Software
Installing Cisco StadiumVision Mobile Software
Supported Servers
Cisco StadiumVision Mobile Reporter and Cisco StadiumVision Mobile Streamer are supported on the following platforms:
•![]() Cisco UCS C220—uses Cisco Integrated Management Controller (CIMC) to perform the installation
Cisco UCS C220—uses Cisco Integrated Management Controller (CIMC) to perform the installation
•![]() Cisco UCS C200—uses a DVD to perform the installation
Cisco UCS C200—uses a DVD to perform the installation
Preparing for the Installation
This section provides instructions for configuring CIMC network connectivity for the Cisco UCS C220 server. Download the StadiumVision Mobile ISO file to prepare for the installation after CIMC setup.
Prior to installation:
•![]() Set up the server hardware
Set up the server hardware
•![]() Connect a monitor and keyboard to the StadiumVision Mobile server
Connect a monitor and keyboard to the StadiumVision Mobile server
•![]() Bring a US keyboard if traveling to a country where English is not the primary language
Bring a US keyboard if traveling to a country where English is not the primary language
Cisco UCS C220
•![]() Download the latest ISO image
Download the latest ISO image
•![]() Be sure the CIMC firmware is up to date (see Confirming the CIMC Firmware Version)
Be sure the CIMC firmware is up to date (see Confirming the CIMC Firmware Version)
•![]() Configure CIMC (see Configuring CIMC)
Configure CIMC (see Configuring CIMC)
Cisco UCS C200
•![]() Have the installation DVD available
Have the installation DVD available
•![]() Follow the procedures in the "To install on a Cisco UCS C200, begin installation with the following steps:" section
Follow the procedures in the "To install on a Cisco UCS C200, begin installation with the following steps:" section
Connect the StadiumVision Mobile server to the network using the eth0 Ethernet port on the rear panel. Static network addressing should always be used. Have the following information available:
•![]() IPv4 Internet address
IPv4 Internet address
•![]() Netmask
Netmask
•![]() Gateway
Gateway
•![]() Nameservers
Nameservers
•![]() Hostname
Hostname
•![]() Proxy if direct internet access is not available
Proxy if direct internet access is not available
Confirming the CIMC Firmware Version
Step 1 ![]() Access CIMC from a web browser using the following credentials:
Access CIMC from a web browser using the following credentials:
user: admin
password: password
e.g., https://10.194.168.139/login.html
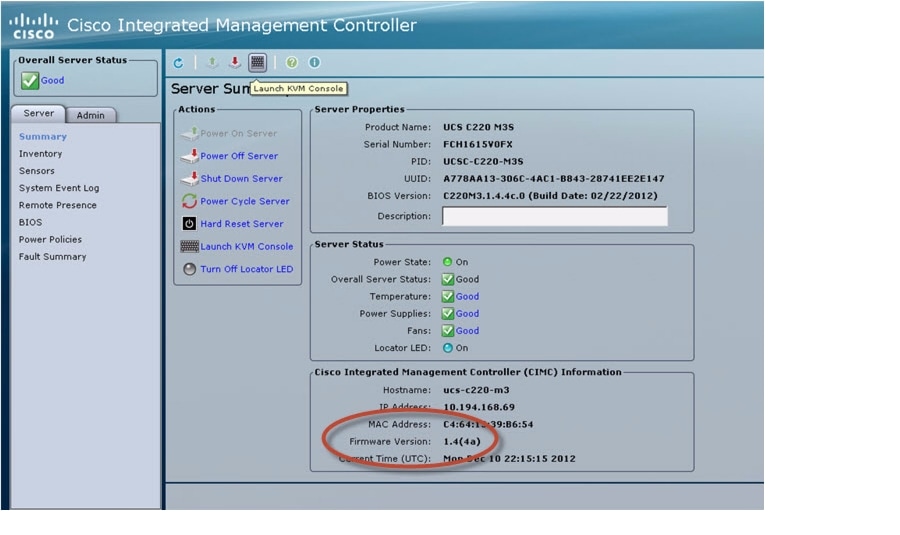
Step 2 ![]() Locate the firmware version in the Server Summary screen as shown in Figure 1.
Locate the firmware version in the Server Summary screen as shown in Figure 1.
Note ![]() 1.4(6d) is the minimum tested CIMC firmware version for Cisco StadiumVision Mobile release 1.2.
1.4(6d) is the minimum tested CIMC firmware version for Cisco StadiumVision Mobile release 1.2.
For instructions on upgrading the CIMC firmware, refer to the Installing the Server chapter in the "Updating the BIOS and CIMC Firmware" section in the Cisco UCS C220 Server Installation and Service Guide.
Figure 1 CIMC Firmware Version Location

Configuring CIMC
To perform the initial CIMC configuration on a Cisco UCS C220, use the procedure described in"Appendix A: CIMC Configuration and Firmware Upgrade Guidelines on the Cisco UCS C220 Server".
Note ![]() If you see a "Media Fail" error message during StadiumVision Mobile Streamer bootup, there is likely a misconfigured RAID controller. Install the Streamer ISO virtual DVD to correct this error.
If you see a "Media Fail" error message during StadiumVision Mobile Streamer bootup, there is likely a misconfigured RAID controller. Install the Streamer ISO virtual DVD to correct this error.
If the RAID controller is configured properly, no error message is expected.
Refer to the Cisco StadiumVision Mobile Release Notes for the latest installation information.
To continue the StadiumVision Mobile installation process, refer to the"Installing Cisco StadiumVision Mobile Software" section.
Installing Cisco StadiumVision Mobile Software
This section provides instructions for installing StadiumVision Mobile Streamer or StadiumVision Mobile Reporter software on both a Cisco UCS C220 and Cisco UCS C200.
The install program will:
•![]() Automatically set up and initialize the hardware RAID controller 1
Automatically set up and initialize the hardware RAID controller 1
•![]() Wipe any existing partitions and zero out the Master Boot Record (MBR)
Wipe any existing partitions and zero out the Master Boot Record (MBR)
To start installation on a Cisco UCS C220, follow the procedures in the "Starting CIMC" section.
To start installation on a Cisco UCS C200, follow the procedures in the "To install on a Cisco UCS C200, begin installation with the following steps:" section.
Starting CIMC
Step 1 ![]() Access CIMC from a web browser:
Access CIMC from a web browser:
e.g., https://IP address/login.html
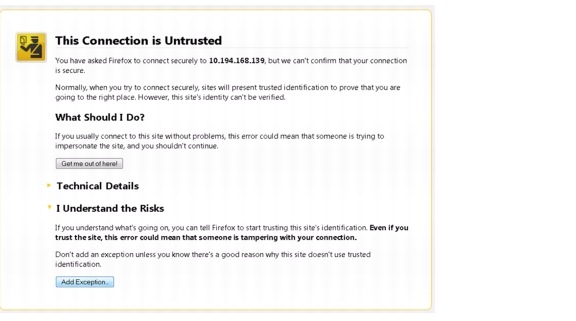
Step 2 ![]() Click the Add Exception button.
Click the Add Exception button.

Step 3 ![]() Click the Confirm Security Exception button to get to the CIMC login page. The default login credentials are:
Click the Confirm Security Exception button to get to the CIMC login page. The default login credentials are:
user: admin
password: password
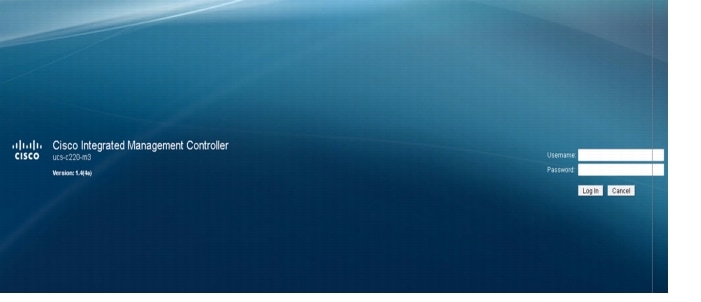
Step 4 ![]() Observe the CIMC interface.
Observe the CIMC interface.
Step 5 ![]() Verify that the CIMC firmware is the latest version. To verify the firmware version, see Confirming the CIMC Firmware Version.
Verify that the CIMC firmware is the latest version. To verify the firmware version, see Confirming the CIMC Firmware Version.
Note ![]() At this release, 1.4(6d) firmware version is the minimum tested version. For instructions on upgrading the CIMC firmware, refer to the Installing the Server chapter in the "Updating the BIOS and CIMC Firmware" section Cisco UCS C220 Server Installation and Service Guide.
At this release, 1.4(6d) firmware version is the minimum tested version. For instructions on upgrading the CIMC firmware, refer to the Installing the Server chapter in the "Updating the BIOS and CIMC Firmware" section Cisco UCS C220 Server Installation and Service Guide.
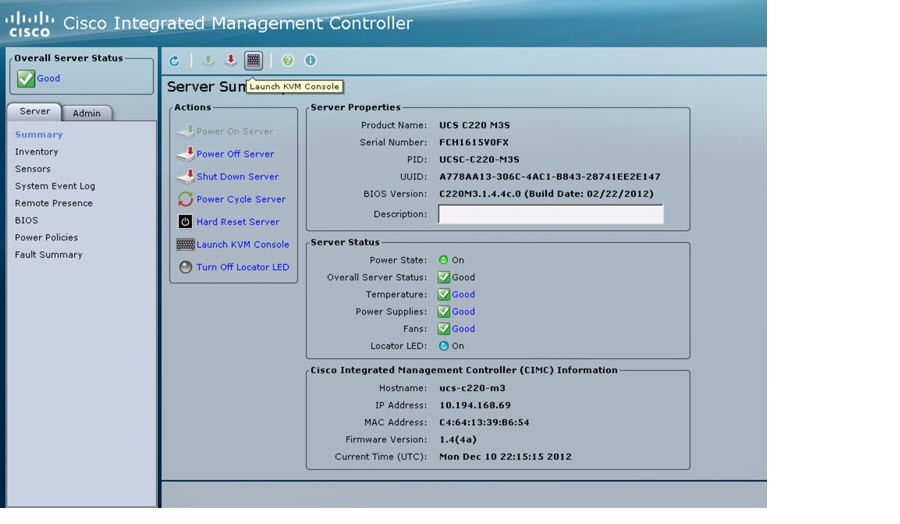
Step 6 ![]() Click on the Launch KVM Console button at the top of the CIMC interface to launch the KVM console.
Click on the Launch KVM Console button at the top of the CIMC interface to launch the KVM console.

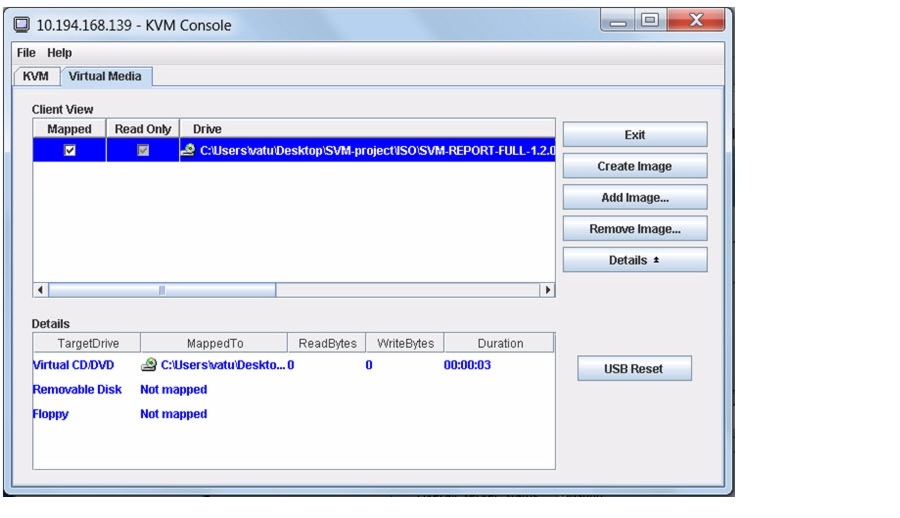
The KVM tab provides a view of the system diagnostics or command prompt execution. The Virtual Media tab provides the virtual CD/DVD setup for ISO installation.
Step 7 ![]() Prepare for the StadiumVision Mobile Streamer or StadiumVision Mobile Reporter ISO installation:
Prepare for the StadiumVision Mobile Streamer or StadiumVision Mobile Reporter ISO installation:
a. ![]() Click on Add Image tab under the KVM Console Virtual Media tab.
Click on Add Image tab under the KVM Console Virtual Media tab.
b. ![]() Navigate to the Streamer ISO file.
Navigate to the Streamer ISO file.
Note ![]() CIMC can experience slow performance. If slow performance occurs, clear the browser cache.
CIMC can experience slow performance. If slow performance occurs, clear the browser cache.
c. ![]() Click the check box for the Mapped option under Client View to select the ISO source.
Click the check box for the Mapped option under Client View to select the ISO source.
d. ![]() Confirm that the Virtual CD/DVD has been added under the Virtual Media tab, Virtual CD/DVD.
Confirm that the Virtual CD/DVD has been added under the Virtual Media tab, Virtual CD/DVD.
e. ![]() Double click on Virtual CD/DVD, observe read bytes counter increasing (refreshes read bytes).
Double click on Virtual CD/DVD, observe read bytes counter increasing (refreshes read bytes).
f. ![]() Close the KVM tab to start viewing the installation process.
Close the KVM tab to start viewing the installation process.
Step 8 ![]() On the CIMC interface under Server Summary, click on Power Cycle Server to start the installation process.
On the CIMC interface under Server Summary, click on Power Cycle Server to start the installation process.


Step 9 ![]() On the KVM Console/KVM terminal, confirm that the system is restarting and booting up from the Virtual CD/DVD.
On the KVM Console/KVM terminal, confirm that the system is restarting and booting up from the Virtual CD/DVD.
Cisco UCS C200
To install on a Cisco UCS C200, begin installation with the following steps:
Step 1 ![]() Insert the installation disk into the DVD drive, boot from it, and follow the prompts. The server will boot from the installation disk.
Insert the installation disk into the DVD drive, boot from it, and follow the prompts. The server will boot from the installation disk.
Note ![]() Alternatively, the user is first requested to insert the DVD. Once inserted and the drive closed, the install proceeds automatically and does not display the Cisco logo.
Alternatively, the user is first requested to insert the DVD. Once inserted and the drive closed, the install proceeds automatically and does not display the Cisco logo.
The installation process begins, and the Cisco logo appears.
Step 2 ![]() Press F6 to continue booting.
Press F6 to continue booting.
Step 3 ![]() Select Cisco Virtual CD/DVD 1.20 in the dialog box.
Select Cisco Virtual CD/DVD 1.20 in the dialog box.
Under the KVM Console/KVM tab, the Setup Agent menu is displayed.
For both Cisco UCS C220 and Cisco UCS C200, continue the installation with the following steps:
Step 4 ![]() Select Network Configuration from the menu.
Select Network Configuration from the menu.
Note ![]() Pay close attention, as the network configuration window displays for a brief period. If the window disappears, the installation needs to be restarted.
Pay close attention, as the network configuration window displays for a brief period. If the window disappears, the installation needs to be restarted.
If the installation seems to hang on a Cisco UCS C220, you may need to restart the installation by remapping the ISO image, and power cycling the Cisco UCS C220 server.
Step 5 ![]() Select Edit Devices and press the Enter key.
Select Edit Devices and press the Enter key.
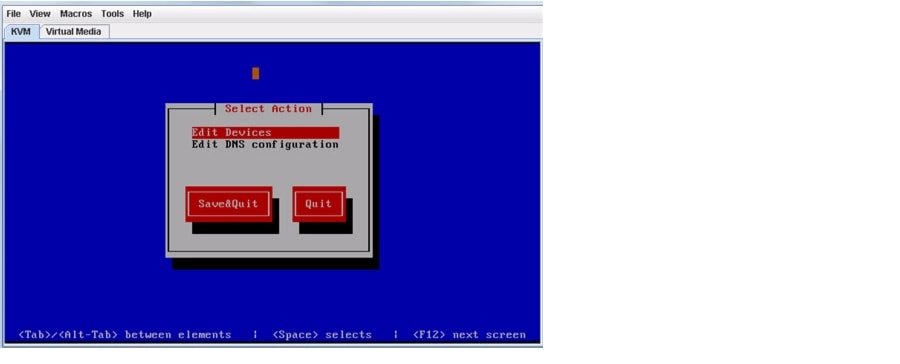
Step 6 ![]() Select eth0 and press the Enter key.
Select eth0 and press the Enter key.

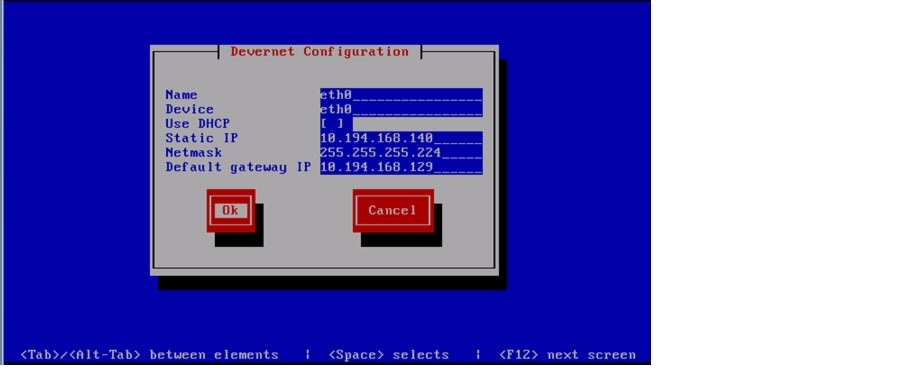
Step 7 ![]() Under Devernet Configuration, enter the network information. When done, select OK tab and press Enter.
Under Devernet Configuration, enter the network information. When done, select OK tab and press Enter.
Note ![]() The StadiumVision Mobile Streamer server IP address is a static IP address.
The StadiumVision Mobile Streamer server IP address is a static IP address.
Step 8 ![]() Select save and press the Enter key.
Select save and press the Enter key.
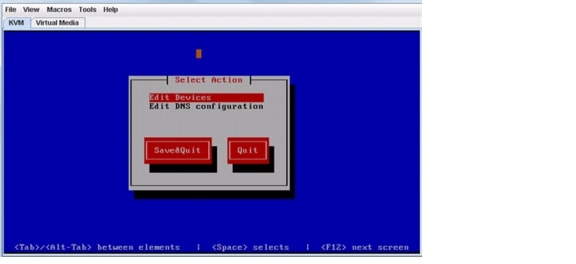
Step 9 ![]() Select Edit DNS configuration and press Enter.
Select Edit DNS configuration and press Enter.
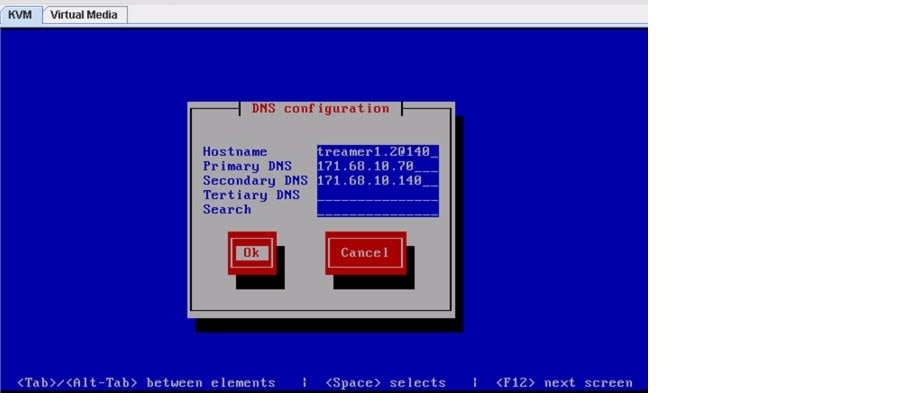
Step 10 ![]() Enter DNS information, when done, select OK tab, press Enter.
Enter DNS information, when done, select OK tab, press Enter.
Step 11 ![]() Select the Save & Quit tab and press the Enter key.
Select the Save & Quit tab and press the Enter key.
Step 12 ![]() Select Exit tab and press the Enter key.
Select Exit tab and press the Enter key.
Cisco UCS C200 Servers
After this step, the Cisco StadiumVision Mobile software installs, the DVD is ejected, and the system reboots. This process takes about 30 minutes.
The installation should be completed. Validate the installation by logging into the StadiumVision Mobile Streamer or StadiumVision Mobile Reporter using the credentials listed in Table 5.
What To Do Next
•![]() Set the time zone on the StadiumVision Mobile Streamer
Set the time zone on the StadiumVision Mobile Streamer
•![]() Start NTP on the StadiumVision Mobile Streamer
Start NTP on the StadiumVision Mobile Streamer
•![]() Configure NTP on the StadiumVision Mobile Reporter
Configure NTP on the StadiumVision Mobile Reporter
•![]() Log into the StadiumVision Mobile Reporter TUI
Log into the StadiumVision Mobile Reporter TUI
•![]() Start the Cassandra Service on the StadiumVision Mobile Reporter
Start the Cassandra Service on the StadiumVision Mobile Reporter
•![]() Set the Date and Time on the StadiumVision Mobile Reporter
Set the Date and Time on the StadiumVision Mobile Reporter
•![]() Set the User Time Zone on the StadiumVision Mobile Reporter
Set the User Time Zone on the StadiumVision Mobile Reporter
Set the time zone on the StadiumVision Mobile Streamer
Step 1 ![]() When the reboot is complete, ssh to the StadiumVision Mobile Streamer with the following credentials to set the time zone:
When the reboot is complete, ssh to the StadiumVision Mobile Streamer with the following credentials to set the time zone:
User: manufac
Password: cisco!123
Step 2 ![]() Change the password for manufac. Use the passwd command, which will then prompt for a new password.
Change the password for manufac. Use the passwd command, which will then prompt for a new password.
Set the Time Zone
Step 3 ![]() First change to the time zone directory, then list the entry/directory options. If the desired time zone is listed within a directory, change to that directory.
First change to the time zone directory, then list the entry/directory options. If the desired time zone is listed within a directory, change to that directory.
cd /usr/share/zoneinfo
Step 4 ![]() Create a symbolic link to the desired time zone from /etc/localtime, eg, If an http proxy is required, modify /etc/profile with nano or other available editor
Create a symbolic link to the desired time zone from /etc/localtime, eg, If an http proxy is required, modify /etc/profile with nano or other available editor
# sudo nano /etc/profile
sudo ln -sf /usr/share/zoneinfo/Europe/Paris /etc/localtime
Step 5 ![]() Enter the SVM Streamer credentials if asked and then set the time zone entry in the file /etc/sysconfig/clock (eg, "Europe/Paris"). Confirm that the date is set correctly or modify if needed. View the date by entering:
Enter the SVM Streamer credentials if asked and then set the time zone entry in the file /etc/sysconfig/clock (eg, "Europe/Paris"). Confirm that the date is set correctly or modify if needed. View the date by entering:
# date
Set the server date and time
Step 6 ![]() If the date or time needs to be modified, enter the following command, using the appropriate date and time.
If the date or time needs to be modified, enter the following command, using the appropriate date and time.
# sudo date -s "2 MAR 2012 18:00:00"
Step 7 ![]() If an http proxy is required, modify /etc/profile with nano or other available editor,
If an http proxy is required, modify /etc/profile with nano or other available editor,
# sudo nano /etc/profile
Step 8 ![]() Enter SVM Streamer credentials if asked and insert the following entries:
Enter SVM Streamer credentials if asked and insert the following entries:
Replace proxy-someproxy.com with the actual proxy to be used.
export http_proxy=proxy-someproxy.com:8080
Step 9 ![]() Enter the following command to restart the Streamer:
Enter the following command to restart the Streamer:
sudo /sbin/service svm-stream restart
Start NTP on the StadiumVision Mobile Streamer
In order to have accurate reports generated on the StadiumVision Mobile Reporter, the Network Time Protocol (NTP) service must be started on the StadiumVision Mobile Streamer immediately after installation. To start the NTP service, use the following procedure:
Step 1 ![]() Open ntp.conf in an editor: sudo vi /etc/ntp.conf
Open ntp.conf in an editor: sudo vi /etc/ntp.conf
Step 2 ![]() Add 'server ip address' just before the line 'server 0.rhel.pool.ntp.org'
Add 'server ip address' just before the line 'server 0.rhel.pool.ntp.org'
Step 3 ![]() Enable the NTP daemon: sudo /sbin/chkconfig --add ntpd
Enable the NTP daemon: sudo /sbin/chkconfig --add ntpd
Step 4 ![]() Set the privileges for the NTP process with the following command: sudo /sbin/chkconfig --level 2345 ntpd on
Set the privileges for the NTP process with the following command: sudo /sbin/chkconfig --level 2345 ntpd on
Configure NTP on the StadiumVision Mobile Reporter
Step 1 ![]() When the reboot is complete, a login window appears. Login with the following credentials:
When the reboot is complete, a login window appears. Login with the following credentials:
User: installer
Password: cisco!123
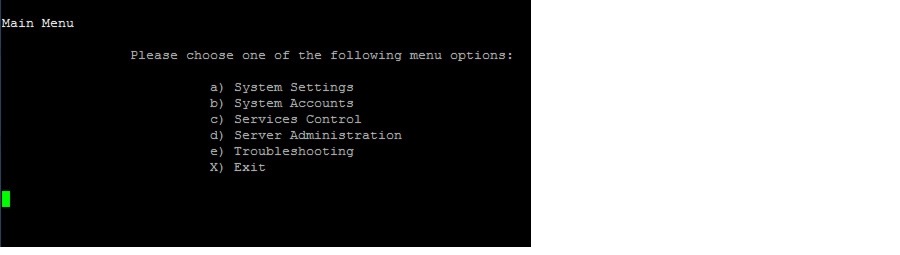
Step 2 ![]() The TUI (Text User Interface) will appear on the screen.
The TUI (Text User Interface) will appear on the screen.
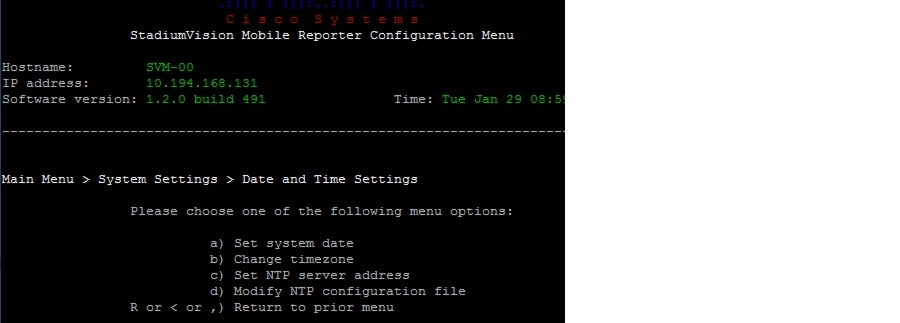
Step 3 ![]() Configure NTP from the System Settings/Date and Time Settings menu:
Configure NTP from the System Settings/Date and Time Settings menu:
a. ![]() Set the system time.
Set the system time.
b. ![]() Change the time zone, if applicable.
Change the time zone, if applicable.
Note ![]() The default time zone is Eastern Standard Time (EST).
The default time zone is Eastern Standard Time (EST).
Note ![]() After setting the server time zone in the TUI. always restart the svmreporter service by using the Stop and Start options in the the StadiumVision Mobile Reporter Services menu.
After setting the server time zone in the TUI. always restart the svmreporter service by using the Stop and Start options in the the StadiumVision Mobile Reporter Services menu.
c. ![]() Set the NTP server address.
Set the NTP server address.
Note ![]() It is critical that NTP be properly configured in order to provide accurate reports.
It is critical that NTP be properly configured in order to provide accurate reports.
Log into the StadiumVision Mobile Reporter TUI
To access the StadiumVision Mobile Reporter TUI, you need either physical console access or an SSH client such as PUTTY. Log in from the console or over SSH with the following credentials, using the IP address of the StadiumVision Mobile Reporter:
username = installer
password = cisco!123
You will be prompted to change the password on your first successful login. You also have the option of changing the password via the TUI.
Start the Cassandra Service on the StadiumVision Mobile Reporter
There are two situations that require restarting of the cassandra service.
One case is during the network configuration part of the install process, when the hostname is configured. If the default "reporter" hostname is changed to something else other than the default, use the following procedure to update the hostname in the DNS config file, and restart the cassandra service.
Step 1 ![]() In the TUI, go to the System Settings/Network Settings/Edit DNS config. Change the hostname to `reporter'.
In the TUI, go to the System Settings/Network Settings/Edit DNS config. Change the hostname to `reporter'.
Step 2 ![]() In the TUI, go to Services Control/Chart and Config Database. Choose the Stop Service option, then the Start Service option.
In the TUI, go to Services Control/Chart and Config Database. Choose the Stop Service option, then the Start Service option.
The second case is that the hostname is changed via the StadiumVision Mobile Reporter TUI to something other than the default `reporter' after installation. If this occurs, use the following procedure to update the hostname in both the hosts and the DNS config files, and restart the cassandra service.
Step 1 ![]() In the TUI, go to System Settings/Network Settings/Edit DNS config. Change the hostname to `reporter'
In the TUI, go to System Settings/Network Settings/Edit DNS config. Change the hostname to `reporter'
Step 2 ![]() In the TUI, go to System Settings/Network Settings/Edit hosts file. Change the hostname to `reporter'
In the TUI, go to System Settings/Network Settings/Edit hosts file. Change the hostname to `reporter'
Step 3 ![]() In the TUI, go to Services Control/Chart and Config Database. Choose the Stop Service option, then the Start Service option.
In the TUI, go to Services Control/Chart and Config Database. Choose the Stop Service option, then the Start Service option.
Set the Date and Time on the StadiumVision Mobile Reporter
To set the date on the StadiumVision Mobile Reporter, use the following procedure:
Step 1 ![]() Log into the TUI using the procedure in the "Log into the StadiumVision Mobile Reporter TUI" section.
Log into the TUI using the procedure in the "Log into the StadiumVision Mobile Reporter TUI" section.
Step 2 ![]() In the TUI, go to System Settings, Date and Time Settings, and Set System date.
In the TUI, go to System Settings, Date and Time Settings, and Set System date.
Step 3 ![]() Enter the date using the following format:
Enter the date using the following format:
MMDDHHMIYYYY for Month Day Hour Minute Year
Note ![]() After setting the server timezone, always restart the svmreporter service by using the Stop and Start options in the the StadiumVision Mobile Reporter Services menu.
After setting the server timezone, always restart the svmreporter service by using the Stop and Start options in the the StadiumVision Mobile Reporter Services menu.
Set the User Time Zone on the StadiumVision Mobile Reporter
The StadiumVision Mobile Reporter has the default users marketing and admin, and a default time zone setting of Pacific Standard Time (PST). If the user browser or device is set to Pacific Standard Time (PST) and if the events are occurring in the EST time zone, the user can change the reports timestamp to the Eastern Standard Time (EST) time zone.
Each user time zone can be changed by using the following procedure:
Note ![]() Access to the StadiumVision Reporter CLI requires administrator access.
Access to the StadiumVision Reporter CLI requires administrator access.
Step 1 ![]() SSH to the StadiumVision Mobile Reporter.
SSH to the StadiumVision Mobile Reporter.
Step 2 ![]() Execute the./cassandra-cli shell command.
Execute the./cassandra-cli shell command.
Step 3 ![]() Within the CLI console, execute the following commands:
Within the CLI console, execute the following commands:
a. ![]() use BDASchema;
use BDASchema;
b. ![]() set Users['marketing']['gmtoffset']='-8';
set Users['marketing']['gmtoffset']='-8';
c. ![]() set Users['admin']['gmtoffset']='-8';
set Users['admin']['gmtoffset']='-8';
`-8' can be changed according to the desired time zone offset listed in Table 6.
Table 6
Time Zones and Offsets
Upgrading StadiumVision Mobile Reporter Using the Web Browser UI and TUI
The StadiumVision Mobile Reporter software can be upgraded using a combination of the web browser user interface, and the StadiumVision Mobile Reporter TUI. To upgrade the StadiumVision Mobile Reporter, use the following procedure:
Step 1 ![]() Navigate to the StadiumVision Mobile Reporter in a web browser, using the following address:
Navigate to the StadiumVision Mobile Reporter in a web browser, using the following address:
reporter ip address/cgi-bin/isoupload.cgi

Step 2 ![]() Click on the Choose File button, navigate to the ISO file, and click the Upload ISO button.
Click on the Choose File button, navigate to the ISO file, and click the Upload ISO button.
The ISO image is copied to the StadiumVision Mobile Reporter hard drive.
Step 3 ![]() Access the StadiumVision Mobile Reporter TUI, using the procedure in "Log into the StadiumVision Mobile Reporter TUI" section.
Access the StadiumVision Mobile Reporter TUI, using the procedure in "Log into the StadiumVision Mobile Reporter TUI" section.
Step 4 ![]() Navigate to the server upgrade option.
Navigate to the server upgrade option.

Step 5 ![]() Choose the desired software upgrade from the list and press enter.
Choose the desired software upgrade from the list and press enter.
The server begins the upgrade process.
 Feedback