- Cisco StadiumVision Director Software Installation and Upgrade Guide
- Preface
- Getting Started Installing or Upgrading Cisco StadiumVision Director
- Upgrading a Cisco StadiumVision Director Server From Release 2.3 to Release 2.4
- Installing Cisco StadiumVision Director Software From a DVD
- Using the TUI Upgrade Utility to Update an Existing Release 2.4 Server
- Upgrading the CIMC and BIOS Firmware on a Cisco StadiumVision Director Platform 2 Server
- Migrating the Cisco StadiumVision Director Server Environment to Platform 2 from the Cisco ADE 2140 Series Appliance
- Appendix A: Post-Upgrade Checklist
- Appendix B: Port Reference
Cisco StadiumVision Director Software Installation and Upgrade Guide, Release 2.4
Bias-Free Language
The documentation set for this product strives to use bias-free language. For the purposes of this documentation set, bias-free is defined as language that does not imply discrimination based on age, disability, gender, racial identity, ethnic identity, sexual orientation, socioeconomic status, and intersectionality. Exceptions may be present in the documentation due to language that is hardcoded in the user interfaces of the product software, language used based on RFP documentation, or language that is used by a referenced third-party product. Learn more about how Cisco is using Inclusive Language.
- Updated:
- January 20, 2012
Chapter: Installing Cisco StadiumVision Director Software From a DVD
Installing Cisco StadiumVision Director Software From a DVD
This module describes how to install the Cisco StadiumVision Director Release 2.4 software from an installation DVD that ships with your newly-purchased server hardware. The process applies to a brand new server that has never been installed with any version of Cisco StadiumVision Director software.
This module includes the following topics:
•![]() Information About Installing Cisco StadiumVision Director Software From a DVD
Information About Installing Cisco StadiumVision Director Software From a DVD
Prerequisites
Be sure that the following requirements are met before you upgrade your server:
•![]() Your new server is installed in its production location and does not currently have any version of the Cisco StadiumVision Director software installed. For more information about installing your hardware, go to: http://www.cisco.com/en/US/products/ps11274/prod_installation_guides_list.html
Your new server is installed in its production location and does not currently have any version of the Cisco StadiumVision Director software installed. For more information about installing your hardware, go to: http://www.cisco.com/en/US/products/ps11274/prod_installation_guides_list.html
•![]() Verify that a monitor and keyboard are connected to the Cisco StadiumVision Director server.
Verify that a monitor and keyboard are connected to the Cisco StadiumVision Director server.
•![]() Be sure to have the network information required to configure the Ethernet connection on the Cisco StadiumVision Director server, such as:
Be sure to have the network information required to configure the Ethernet connection on the Cisco StadiumVision Director server, such as:
–![]() IP address (IPv4 only) and mask
IP address (IPv4 only) and mask
–![]() Default gateway address
Default gateway address
–![]() DNS server address
DNS server address
–![]() Hostname
Hostname
•![]() You have a supported browser version for Cisco StadiumVision Director. For more information about the latest supported browsers, see the Cisco StadiumVision Release Notes for Release 2.4.
You have a supported browser version for Cisco StadiumVision Director. For more information about the latest supported browsers, see the Cisco StadiumVision Release Notes for Release 2.4.
•![]() The Cisco StadiumVision Director server is connected to the network and has power.
The Cisco StadiumVision Director server is connected to the network and has power.
•![]() To access the Text Utility Interface (TUI) to verify the installation, you can use a directly connected console or be sure that you have a laptop computer connected to the same network as the Cisco StadiumVision Director server with an SSH client (such as PuTTY).
To access the Text Utility Interface (TUI) to verify the installation, you can use a directly connected console or be sure that you have a laptop computer connected to the same network as the Cisco StadiumVision Director server with an SSH client (such as PuTTY).
Information About Installing Cisco StadiumVision Director Software From a DVD
The installation program automatically begins when you install the DVD into the server drive and boot the server by either powering the server off or using the reset switch.
The installation DVD program will present you with screens asking you to confirm or provide information before moving to the next installation screen.
Navigating the Installation Screens

Note ![]() The installation program only supports keyboard controls and not any mouse selection. Each screen also provides information about how to navigate through the options and screens.
The installation program only supports keyboard controls and not any mouse selection. Each screen also provides information about how to navigate through the options and screens.
To provide input to the prompts on the installation screens, use the following keys:
•![]() To move between selection options on the screen—Press Tab or Alt-Tab.
To move between selection options on the screen—Press Tab or Alt-Tab.
•![]() To confirm selection of an option on the screen—Press the spacebar.
To confirm selection of an option on the screen—Press the spacebar.
•![]() To accept your selection and move to the next installation screen—Press F12.
To accept your selection and move to the next installation screen—Press F12.
Installing the Software
To install Cisco StadiumVision Director Release 2.4 software for the first time on a new server, complete the following steps:
Step 1 ![]() Insert the installation disk into the DVD drive, power on or reset the server, and follow the prompts. The server will boot from the installation disk.
Insert the installation disk into the DVD drive, power on or reset the server, and follow the prompts. The server will boot from the installation disk.

Step 2 ![]() At the Configure Network Interface screen, press the spacebar to select Yes:
At the Configure Network Interface screen, press the spacebar to select Yes:

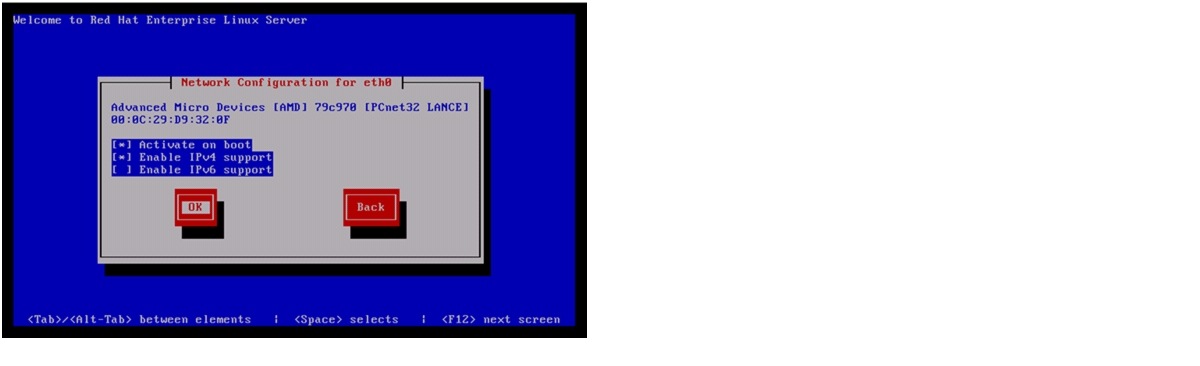
Step 3 ![]() In the Network Configuration for eth0 screen, select Activate on boot and Enable IPv4 support and select OK:
In the Network Configuration for eth0 screen, select Activate on boot and Enable IPv4 support and select OK:
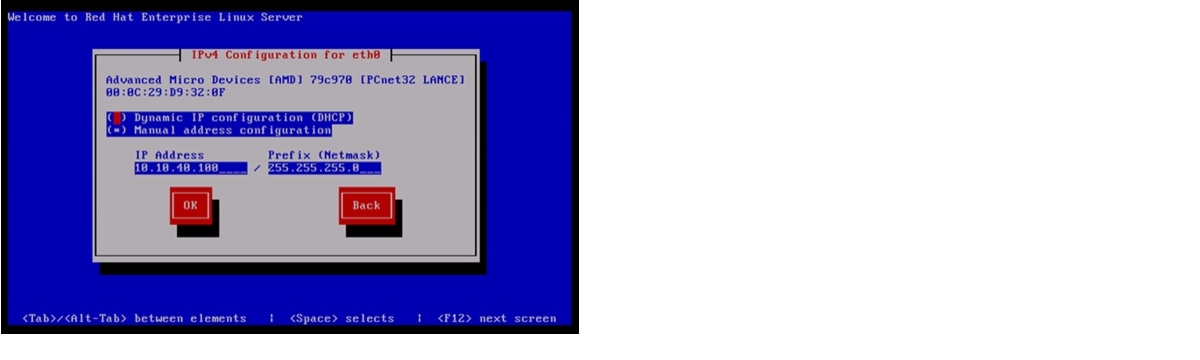
Step 4 ![]() In the IPv4 Configuration for eth0 screen, do the following:
In the IPv4 Configuration for eth0 screen, do the following:
a. ![]() Select Manual address configuration.
Select Manual address configuration.
b. ![]() Type the IPv4 address for the server.
Type the IPv4 address for the server.
c. ![]() Type the Prefix (network mask) for the IP address.
Type the Prefix (network mask) for the IP address.
d. ![]() Select OK.
Select OK.
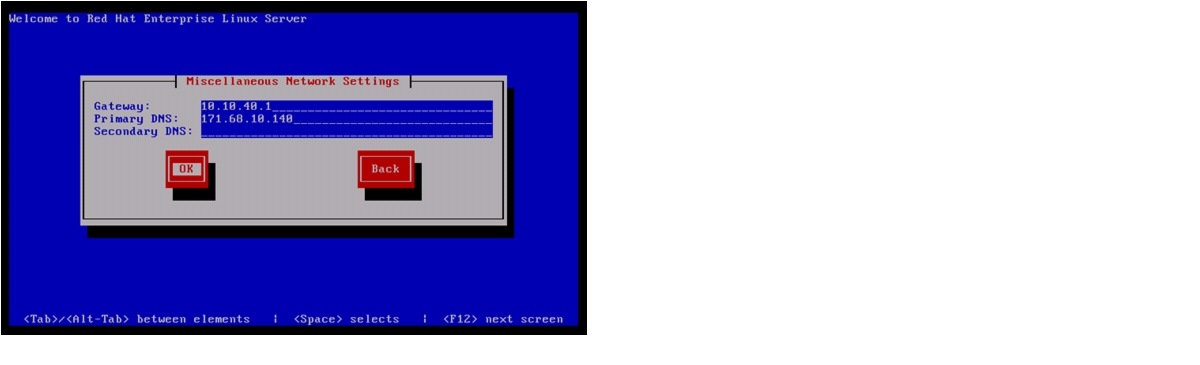
Step 5 ![]() In the Miscellaneous Network Settings screen, do the following:
In the Miscellaneous Network Settings screen, do the following:
a. ![]() Type the IPv4 address of the default gateway.
Type the IPv4 address of the default gateway.
b. ![]() Type the IPv4 address(es) of the primary and secondary (if used) Doman Name Server (DNS).
Type the IPv4 address(es) of the primary and secondary (if used) Doman Name Server (DNS).
c. ![]() Select OK.
Select OK.
Step 6 ![]() In the Hostname Configuration screen, select manually and type a host name for your system. Select OK.
In the Hostname Configuration screen, select manually and type a host name for your system. Select OK.

Tip ![]() When specifying a hostname for the server, use a descriptive name that identifies the location or customer and the server number. For example: svd-mylocation-1.
When specifying a hostname for the server, use a descriptive name that identifies the location or customer and the server number. For example: svd-mylocation-1.

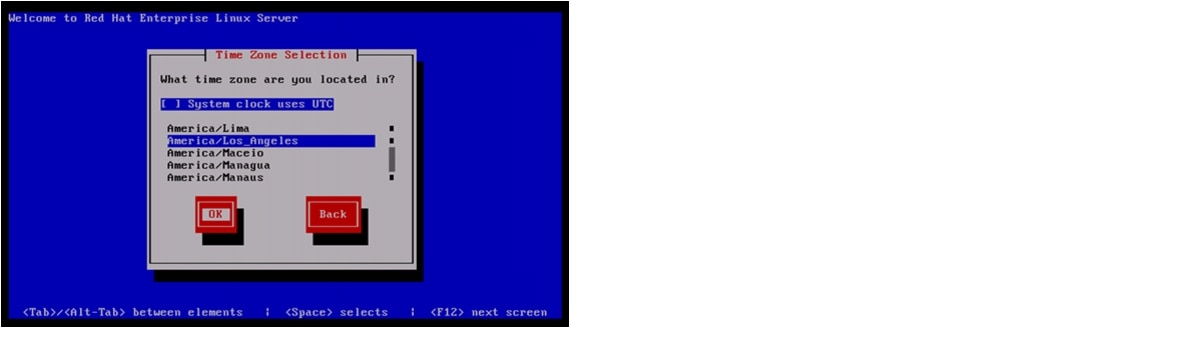
Step 7 ![]() In the Time Zone Selection screen, select the time zone and select OK.
In the Time Zone Selection screen, select the time zone and select OK.
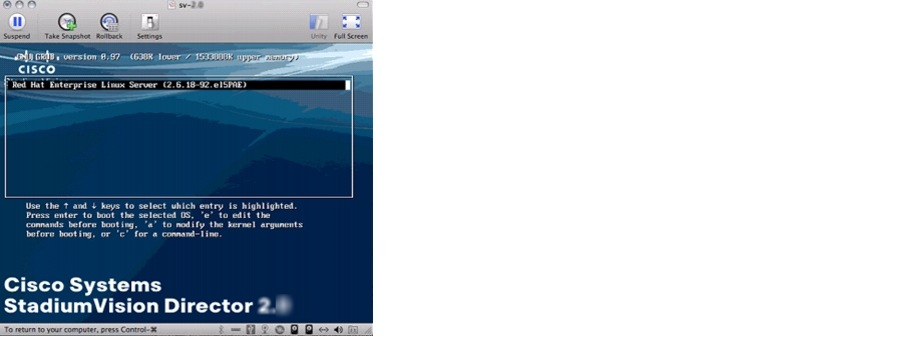
The Cisco StadiumVision Director software installs, the DVD is ejected, and the system reboots. This process takes about 30 minutes.
When the reboot is complete, the following screen is displayed:
Verifying a New Installation
To verify a new installation of Cisco StadiumVision Director Release 2.4, complete the following steps:
Step 1 ![]() Use a directly connected console, or use an SSH client from a laptop computer that is connected to the Cisco StadiumVision Server network to run a secure login to the Cisco StadiumVision Director server using the IP address for your server.
Use a directly connected console, or use an SSH client from a laptop computer that is connected to the Cisco StadiumVision Server network to run a secure login to the Cisco StadiumVision Director server using the IP address for your server.
Step 2 ![]() When the login prompt appears, enter the installer userid followed by the installer password cisco!123 at the password prompt.
When the login prompt appears, enter the installer userid followed by the installer password cisco!123 at the password prompt.
Step 3 ![]() When the StadiumVision Director Configuration menu appears, type p and press Enter:
When the StadiumVision Director Configuration menu appears, type p and press Enter:

Step 4 ![]() When the system details are displayed, verify the server IP address and other system information has been properly configured.
When the system details are displayed, verify the server IP address and other system information has been properly configured.
Step 5 ![]() Type r and press Enter to return to the TUI main menu.
Type r and press Enter to return to the TUI main menu.
Step 6 ![]() If there are any system configuration settings that you want to change, access the appropriate TUI menu option to modify your configuration.
If there are any system configuration settings that you want to change, access the appropriate TUI menu option to modify your configuration.
Step 7 ![]() To verify connectivity to another host connected on the network, type g to ping a host and press Enter. Type the IP address of the host that you want to test and press Enter.
To verify connectivity to another host connected on the network, type g to ping a host and press Enter. Type the IP address of the host that you want to test and press Enter.
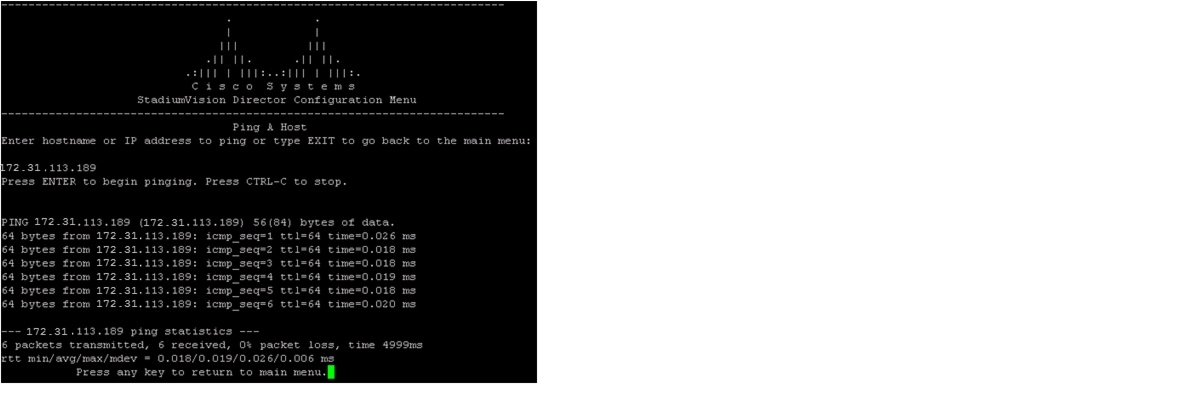
Step 8 ![]() To stop the ping, press Ctl-C and then press any key to return to the TUI main menu.
To stop the ping, press Ctl-C and then press any key to return to the TUI main menu.
Step 9 ![]() Type x and press Enter to exit the TUI.
Type x and press Enter to exit the TUI.
Step 10 ![]() From your browser, open the Cisco StadiumVision Director software using the following secure HTTPS URL, where x.x.x.x is the IP address of your server:
From your browser, open the Cisco StadiumVision Director software using the following secure HTTPS URL, where x.x.x.x is the IP address of your server:
https://x.x.x.x
Step 11 ![]() At the Cisco StadiumVision Director login screen, verify that the window displays the appropriate version. Then type the default username admin with password admin, and click Login.
At the Cisco StadiumVision Director login screen, verify that the window displays the appropriate version. Then type the default username admin with password admin, and click Login.

Step 12 ![]() After you log in with the default admin credential for the first time, enter a new password when prompted to change it at the next screen.
After you log in with the default admin credential for the first time, enter a new password when prompted to change it at the next screen.
What to Do Next
This section describes some of the initial things you can do to begin configuring your Cisco StadiumVision Director server:
•![]() Open the Management Dashboard to begin the process of provisioning DMPs for auto-registration.
Open the Management Dashboard to begin the process of provisioning DMPs for auto-registration.
Note ![]() Beginning in Cisco StadiumVision Director Release 2.4, the default global DHCP setting for auto-registration is set to enabled.
Beginning in Cisco StadiumVision Director Release 2.4, the default global DHCP setting for auto-registration is set to enabled.
For more information about DMP configuration, see the Cisco StadiumVision Video Endpoint (DMP) Design and Implementation Guide.
•![]() If your site does not use the Ad Insertion Manager, it can be removed from the Cisco StadiumVision Director main menu by somebody with sudo root access to the server. For more information, see the "Disabling the AIM Software" section of the "Upgrading a Cisco StadiumVision Director Server From Release 2.3 to Release 2.4" module.
If your site does not use the Ad Insertion Manager, it can be removed from the Cisco StadiumVision Director main menu by somebody with sudo root access to the server. For more information, see the "Disabling the AIM Software" section of the "Upgrading a Cisco StadiumVision Director Server From Release 2.3 to Release 2.4" module.
•![]() Change the default password for the admin user account.
Change the default password for the admin user account.
•![]() Add additional user accounts.
Add additional user accounts.
•![]() Refer to the other design, configuration, and operation guides on Cisco.com to continue setting up your Cisco StadiumVision Director server at:
Refer to the other design, configuration, and operation guides on Cisco.com to continue setting up your Cisco StadiumVision Director server at:
http://www.cisco.com/en/US/products/ps11274/tsd_products_support_series_home.html
 Feedback