Cisco Secure Services Client with PEAP/GTC WPA Configuration Example
Available Languages
Contents
Introduction
This document describes how to configure Protected Extensible Authentication Protocol (PEAP)/Generic Token Card (GTC) Wi-Fi Protected Access (WPA) on the Cisco Secure Services Client.
Prerequisites
Components Used
The information in this document is based on these software and hardware versions:
-
Cisco Secure Services Client version 4.0
The Cisco Secure Services Client is available for download from Cisco.com Software Center (registered customers only) .
-
Windows XP SP2 or 2000 SP 4 minimum
Conventions
For more information about document conventions, refer to the Cisco Technical Tips Conventions.
Configure Cisco Secure Services Client with PEAP/GTC WPA
To configure Cisco Secure Services Client with PEAP/GTC WPA, complete these steps:
-
Right-click the Cisco Secure Services Client system tray icon, and choose Open.
Note: If you are not connected to a network, your system tray icon is dim.
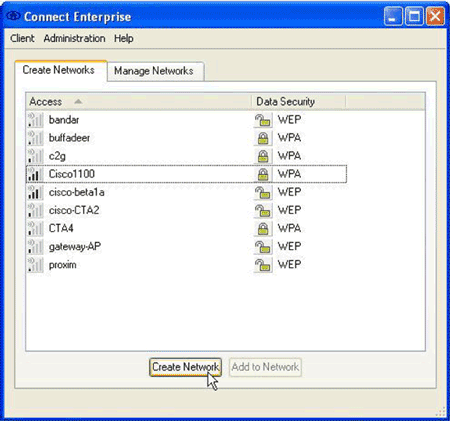
The Connect Enterprise dialog box appears.
-
Click the Create Networks tab.
The Create Networks area displays the networks that broadcast their service set identifier (SSID).
-
Click the Create Network button.
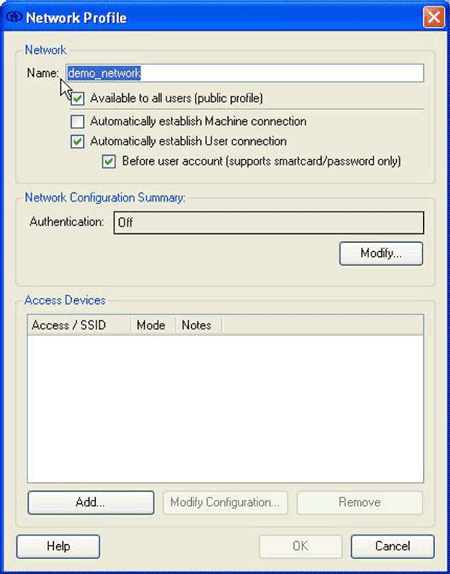
The Network Profile dialog box appears.
-
In the Network area, configure these options:
-
In the Name field, enter a name for your network.
This name appears as the SSID for this network. For this example, the name is demo_network.
-
Check the Available to all users (public profile) check box.
-
Check the Automatically establish User connection check box, and verify the Automatically establish Machine connection check box is not checked.
-
Check the Before user account (supports smartcard/password only) check box.
Note: When the Before user account (supports smartcard/password only) check box is checked, authentication proceeds immediately after credentials are entered, but before the domain logon occurs. If you use user certificates, do not check the Before user account (supports smartcard/password only) check box. Because they are not available prior to Windows logon, you cannot use user certificates with domain logons.
-
-
In the Network Configuration Summary area, click the Modify button.
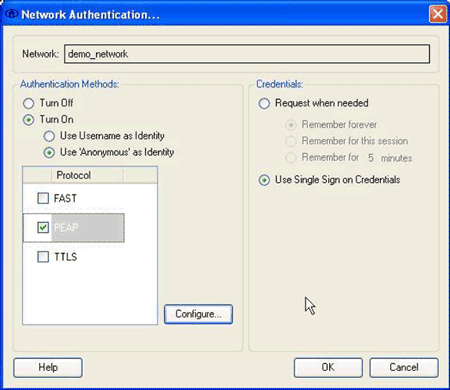
The Network Authentication dialog box appears.
-
In the Network Authentication dialog box, configure these options:
-
In the Credentials area, click the Use Single Sign on Credentials radio button.
-
In the Authentication Methods area, click the Turn On radio button, and then click Use 'Anonymous' as Identity.
The Turn On radio button populates the protocol list displayed in the Authentication Methods area. The Use 'Anonymous' as Identity radio button limits the list to only tunneled authentication protocols.
-
Check the PEAP check box, and then click Configure.
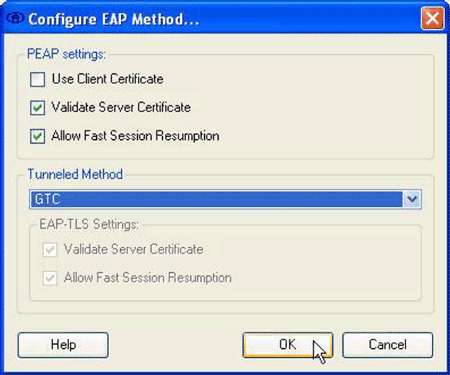
The Configure EAP Method dialog box appears.
-
Uncheck the Use Client Certificate check box.
-
Check the Validate Server Certificate and Allow Fast Session Resumption check boxes.
-
From the Tunneled Method drop-down menu, choose GTC.
-
Click OK to return to the Network Authentication dialog box, and then click OK to return to the Network Profile dialog box.
-
-
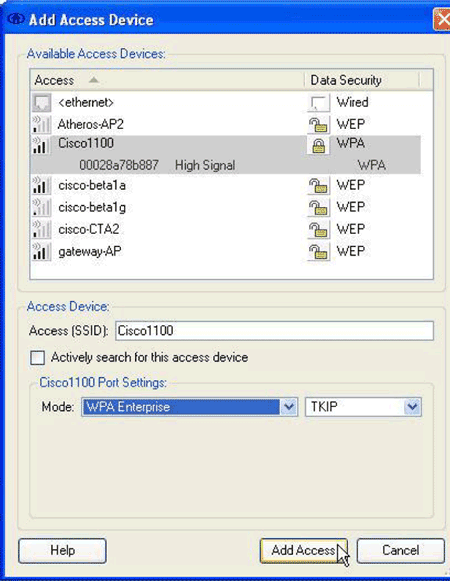
In the Access Devices area of the Network Profile dialog box, click Add.
The Add Access Device dialog box appears.
-
In the Add Access Devices dialog box, choose the device you want to configure, and then click Add Access.
Note: If the device you want to configure is within range, the SSID for that device should appear in the Available Access Devices list. If the device does not appear, enter the SSID for the device in the Access (SSID) field, enter the port settings in the Cisco 1100 Port Settings area, and then click Add Access.
-
In the Network Profile dialog box, click OK to return to the Connect Enterprise dialog box.
-
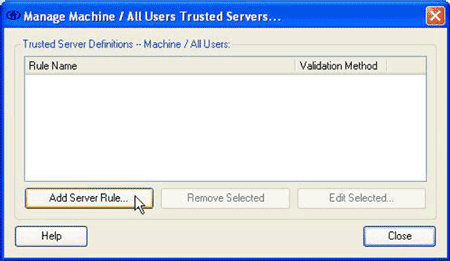
In the Connect Enterprise dialog box, choose Trusted Servers > Manage Machine / All Users trusted servers from the Client menu.
The Manage Machine / All Users Trusted Servers dialog box appears.
-
Click Add Server Rule.
The Trusted Server dialog box appears.
-
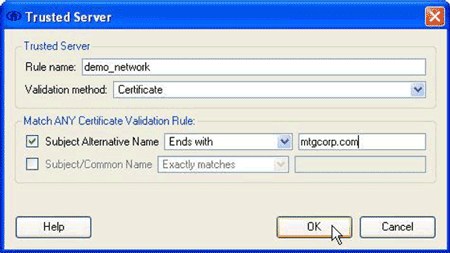
In the Trusted Server dialog box, configure these options:
-
In the Rule name field, enter a name for the rule.
-
From the Validation method drop-down menu, choose Certificate.
-
In the Match ANY Certificate Validation Rule area, configure options for the rule.
To construct a rule, you must know the content of the server certificate and enter those values in the Match ANY Certificate Validation Rule area. For example, if the subject alternative name contains the domain name of a server, mtgcorpserver.mtgcorp.com, choose Ends with from the Subject Alternative Name drop-down menu, and then enter mtgcorp.com in the text field.
-
Click OK to return to the Manage Machine / All Users Trusted Servers dialog box.
-
-
In the Manage Machine / All Users Trusted Servers dialog box, click Close to return to the Connect Enterprise dialog box.


Configuration is complete, and you can connect to the network.
Connect to the Network
To connect to your new network, complete these steps:
-
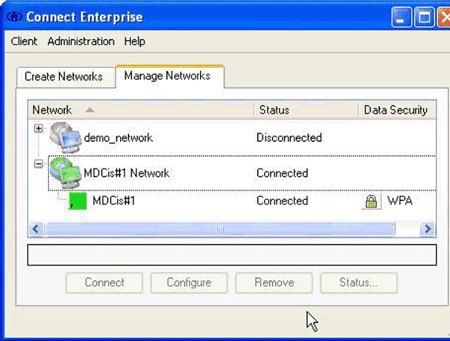
In the Connect Enterprise dialog box, click the Manage Networks tab.
-
Disconnect from any network that is connected to the adapter used by your new network.
-
From the Network list, select the new network profile, and click Connect.

Upon successful configuration and connection, the Cisco Secure Services Client system tray icon displays green.
Note: If virus protection software is installed on your computer and it is configured to parse the Cisco Secure Services Client log directory, you may experience high CPU cycles with Cisco Secure Services Client authentication. To improve performance, configure your virus protection software to exclude the Cisco Secure Services Client log directory.
Related Information
Revision History
| Revision | Publish Date | Comments |
|---|---|---|
1.0 |
14-Sep-2006 |
Initial Release |
 Feedback