Configure External Web Authentication with WLCs
Available Languages
Contents
Introduction
This document explains how to use an external web server in order to set up a wireless LAN controller (WLC) for web authentication.
Prerequisites
Requirements
Ensure that you meet these requirements before you attempt this configuration:
-
Basic knowledge of the configuration of Lightweight Access Points (LAPs) and Cisco WLCs
-
Basic knowledge of Lightweight Access Point Protocol (LWAPP) and Control and Provisioning of Wireless Access Points (CAPWAP)
-
Knowledge on how to set up and configure an external web server
-
Knowledge on how to set up and configure DHCP and DNS servers
Components Used
The information in this document is based on these software and hardware versions:
-
Cisco 4400 WLC that runs firmware release 7.0.116.0
-
Cisco 1131AG Series LAP
-
Cisco 802.11a/b/g Wireless Client Adapter that runs firmware release 3.6
-
External web server that hosts the web authentication login page
-
DNS and DHCP Servers for address resolution and IP address allocation to wireless clients
The information in this document was created from the devices in a specific lab environment. All of the devices used in this document started with a cleared (default) configuration. If your network is live, make sure that you understand the potential impact of any command.
Conventions
Refer to Cisco Technical Tips Conventions for more information on document conventions.
Background Information
Web authentication is a Layer 3 security feature that causes the controller to not allow IP traffic (except DHCP and DNS -related packets) from a particular client until that client has correctly supplied a valid username and password. Web Authentication is a simple authentication method without the need for a supplicant or client utility.
Web authentication can be performed using:
-
Default login window on the WLC
-
Modified version of the default login window on the WLC
-
A customized login window that you configure on an external web server (External web authentication)
-
A customized login window that you download to the controller
This document provides a configuration example to explain how to configure the WLC to use a login script from an external web server.
External Web Authentication Process
With external web authentication, the login page used for web authentication is stored on an external web server. This is the sequence of events when a wireless client tries to access a WLAN network which has external web authentication enabled:
-
The client (end user) connects to the WLAN and opens a web browser and enters a URL, such as www.cisco.com.
-
The client sends a DNS request to a DNS server in order to resolve www.cisco.com to IP address.
-
The WLC forwards the request to the DNS server which, in turn, resolves www.cisco.com to IP address and sends a DNS reply. The controller forwards the reply to the client.
-
Client tries to initiate a TCP connection with the www.cisco.com IP address by sending the TCP SYN packet to the www.cisco.com IP address.
-
The WLC has rules configured for the client and hence can act as a proxy for www.cisco.com. It sends back a TCP SYN-ACK packet to the client with source as the IP address of www.cisco.com. The client sends back a TCP ACK packet in order to complete the three way TCP handshake and the TCP connection is fully established.
-
The client sends an HTTP GET packet destined to www.google.com. The WLC intercepts this packet, sends it for redirection handling. The HTTP application gateway prepares a HTML body and sends it back as the reply to the HTTP GET requested by the client. This HTML makes the client go to the default webpage URL of the WLC, for example, http://<Virtual-Server-IP>/login.html.
-
The client then starts the HTTPS connection to the redirect URL which sends it to the 1.1.1.1. This is the virtual IP address of the controller. The client has to validate the server certificate or ignore it in order to bring up the SSL tunnel.
-
Because external web authentication is enabled, the WLC redirects the client to the external web server.
-
The external web auth login URL is appended with parameters such as the AP_Mac_Address, the client_url (www.cisco.com) and the action_URL that the client needs to contact the controller web server.
Note: The action_URL tells the web server that the username and password is stored on the controller. The credentials must be sent back to the controller in order to get authenticated.
-
The external web server URL leads the user to a login page.
-
The login page takes user credentials input, and sends the request back to the action_URL, example http://1.1.1.1/login.html, of the WLC web server.
-
The WLC web server submits the username and password for authentication.
-
The WLC initiates the RADIUS server request or uses the local database on the WLC and authenticates the user.
-
If authentication is successful, the WLC web server either forwards the user to the configured redirect URL or to the URL the client started with, such as www.cisco.com.
-
If authentication fails, then the WLC web server redirects user back to the customer login URL.
Note: In order to configure external webauthentication to use ports other than HTTP and HTTPS, issue this command:
(Cisco Controller) >config network web-auth-port

<port>         Configures an additional port to be redirected for web authentication.
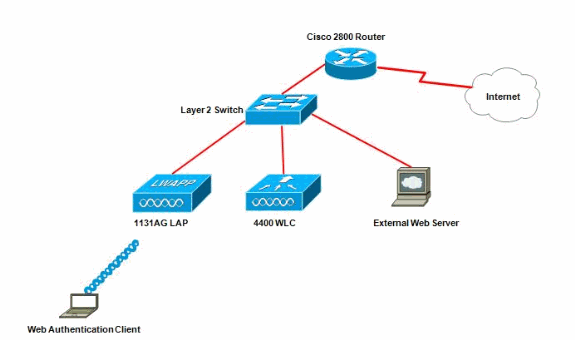
Network Setup
The configuration example uses this setup. A LAP is registered to the WLC. You need to configure a WLAN guest for the guest users and have to enable web authentication for the users. You also need to ensure that the controller redirects the user to the external web server URL (for external web authentication). The external web server hosts the web login page which is used for authentication.
The user credentials must be validated against the local database maintained on the controller. After successful authentication, the users should be allowed access to the WLAN guest. The controller and other devices need to be configured for this setup.
Note: You can use a customized version of the login script, which will be used for web authentication. You can download a sample Web Authentication script from the Cisco Software Downloads page. For example, for the 4400 controllers, navigate to Products > Wireless > Wireless LAN Controller > Standalone Controllers > Cisco 4400 Series Wireless LAN Controllers > Cisco 4404 Wireless LAN Controller > Software on Chassis > Wireless Lan Controller Web Authentication Bundle-1.0.1 and download the webauth_bundle.zip file.
Note: The customized web auth bundle has a limit of up to 30 characters for filenames. Ensure that no filenames within the bundle are greater than 30 characters.
Note: This document assumes that the DHCP, DNS and external web servers are configured. Refer to the appropriate third party documentation for information on how to configure the DHCP, DNS and external web server.
Configure
Before you configure the WLC for external web authentication, you must configure the WLC for basic operation and register the LAPs to the WLC. This document assumes that the WLC is configured for basic operation and that the LAPs are registered to the WLC. Refer to Lightweight AP (LAP) Registration to a Wireless LAN Controller (WLC) if you are a new user trying to set up the WLC for basic operation with LAPs.
Complete these steps in order to configure the LAPs and WLC for this setup:
Create a Dynamic Interface for the Guest Users
Complete these steps in order to create a dynamic interface for the guest users:
-
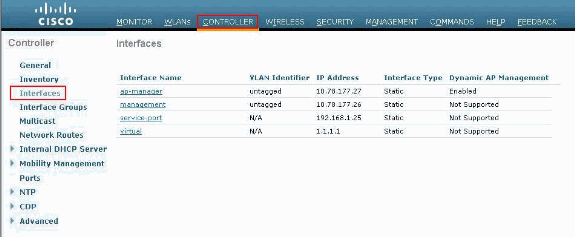
From the WLC GUI, choose Controllers > Interfaces.
The Interfaces window appears. This window lists the interfaces that are configured on the controller. This includes the default interfaces, which are the management interface, ap-manager interface, the virtual interface and the service port interface, and the user defined dynamic interfaces.
-
Click New in order to create a new dynamic interface.
-
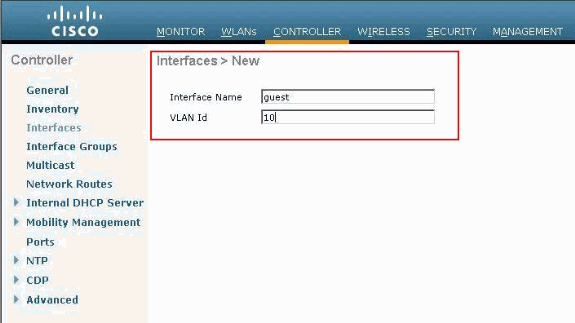
In the Interfaces > New window, enter the Interface Name and the VLAN Id. Then, click Apply.
In this example, the dynamic interface is named guest and the VLAN Id is assigned 10.
-
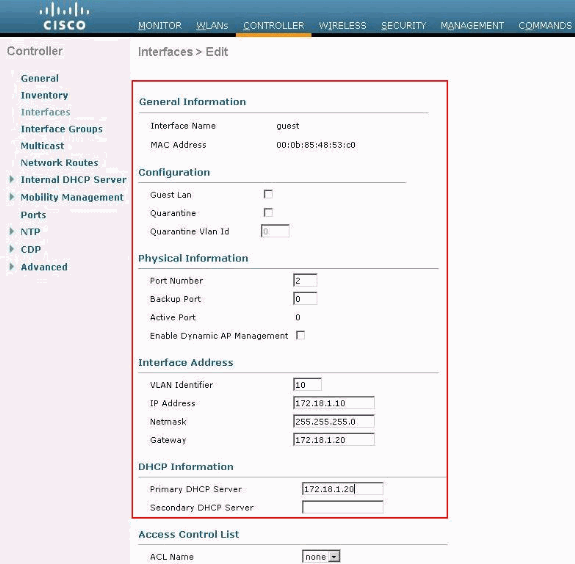
In the Interfaces > Edit window, for the dynamic interface, enter the IP address, the subnet mask, and the default gateway. Assign it to a physical port on the WLC, and enter the IP address of the DHCP server. Then, click Apply.


Create a Preauthentication ACL
When using an external web server for web authentication, some of the WLC platforms need a pre-authentication ACL for the external web server (the Cisco 5500 Series Controller, a Cisco 2100 Series Controller ,Cisco 2000 series and the controller network module). For the other WLC platforms the pre-authentication ACL is not mandatory.
However, it is a good practice to configure a preauthentication ACL for the external web server when using external web authentication.
Complete these steps in order to configure the preauthentication ACL for the WLAN:
-
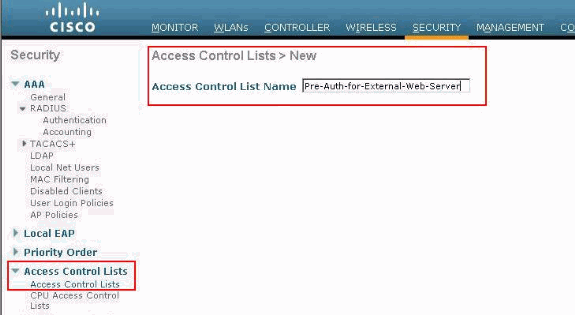
From the WLC GUI, choose Security > Access Control Lists.
This window allows you to view current ACLs that are similar to standard firewall ACLs.
-
Click New in order to create a new ACL.
-
Enter the name of the ACL and click Apply.
In this example, the ACL is named Pre-Auth-for-External-Web-Server.
-
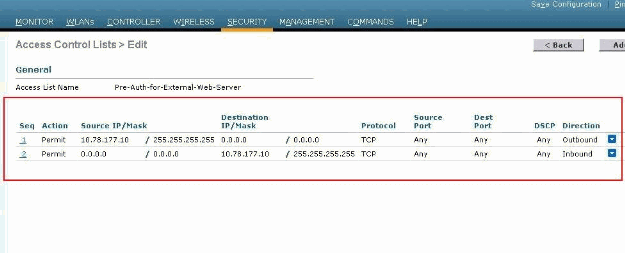
For the new ACL created, click Edit.
The ACL > Edit window appears. This window lets the user define new rules or modify rules of the ACL that exist.
-
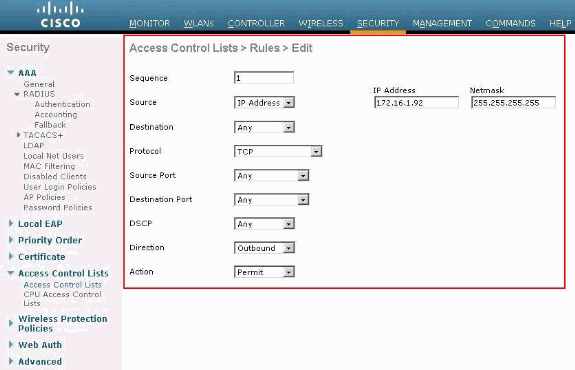
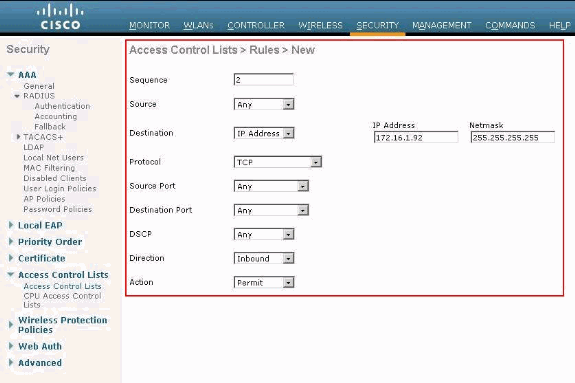
Click Add New Rule.
-
Define an ACL rule which allows access for the clients to the external web server.
In this example, 172.16.1.92 is the external web server IP address.
-
Click Apply in order to commit the changes.


Create a Local Database on the WLC for the Guest Users
The user database for the guest users can either be stored on the Wireless LAN Controller's local database, or might be stored external of the controller.
In this document the local database on the controller is used to authenticate users. You must create a Local Net User and define a password for the web authentication client login. Complete these steps in order to create the user database on the WLC:
-
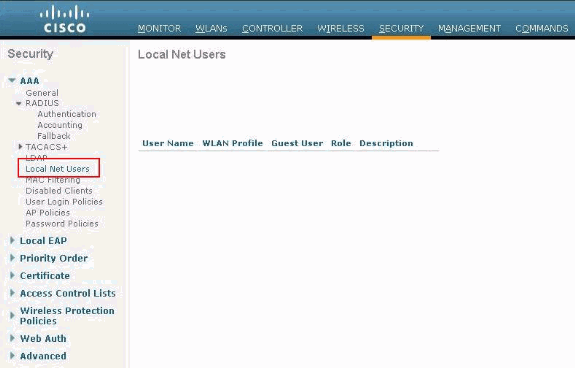
From the WLC GUI, choose Security.
-
Click Local Net Users from the AAA menu on the left.
-
Click New in order to create a new user.
A new window displays that asks for username and password information.
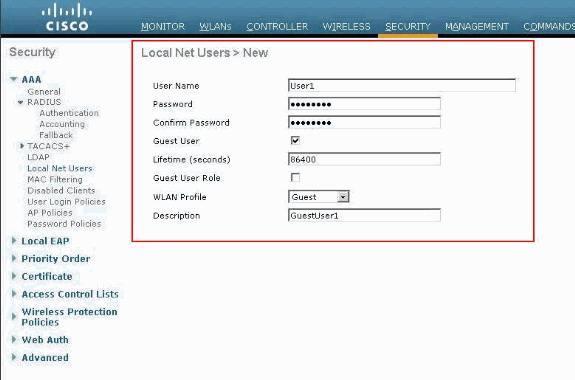
-
Enter a User Name and Password in order to create a new user, then confirm the password that you want to use.
This example creates the user named User1.
-
Add a description, if you choose.
This example uses Guest User1.
-
Click Apply in order to save the new user configuration.
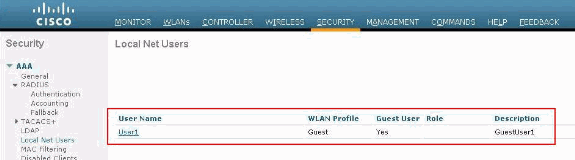
-
Repeat steps 3-6 to add more users to the database.


Configure the WLC for External Web Authentication
The next step is to configure the WLC for the external web authentication. Complete these steps:
-
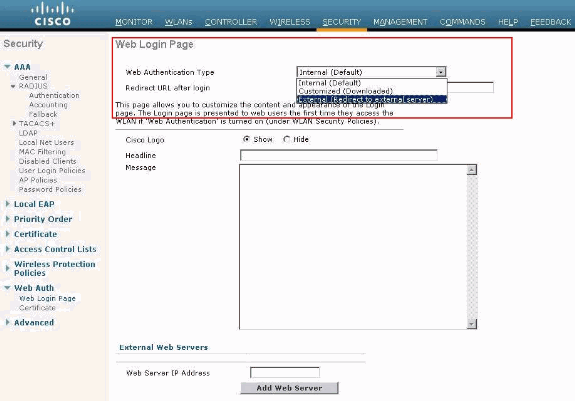
From the controller GUI, choose Security > Web Auth > Web Login Page in order to access the Web Login Page.
-
From the Web Authentication Type drop-down box, choose External (Redirect to external server).
-
In the External Web server section, add the new external web server.
-
In the Redirect URL after login field, enter the URL of the page to which the end user will be redirected to upon successful authentication. In the External Web Auth URL field, enter the URL where the login page is stored on the external web server.

Note: In WLC versions 5.0 and later, the logout page for web-authentication can also be customized. Refer to the Assign Login , Login failure and Logout pages per WLAN section of the Wireless LAN Controller Configuration Guide,5.2 for more information on how to configure it.


Configure the WLAN for Guest Users
The final step is to create WLANs for the guest users. Complete these steps:
-
Click WLANs from the controller GUI in order to create a WLAN.
The WLANs window appears. This window lists the WLANs configured on the controller.
-
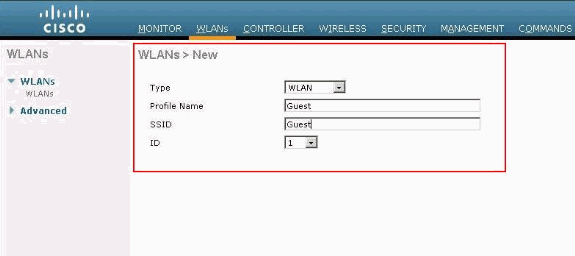
Click New in order to configure a new WLAN.
In this example, the WLAN is named Guest and the WLAN ID is 1.
-
Click Apply.
-
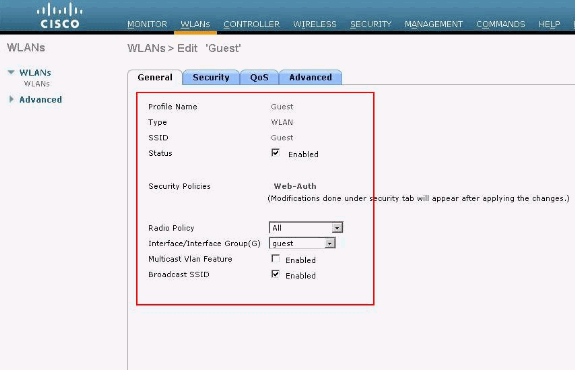
In the WLAN > Edit window, define the parameters specific to the WLAN.
-
For the guest WLAN, in the General tab, choose the appropriate interface from the Interface Name field.
This example maps the dynamic interface guest that was previously created to the WLAN guest.
-
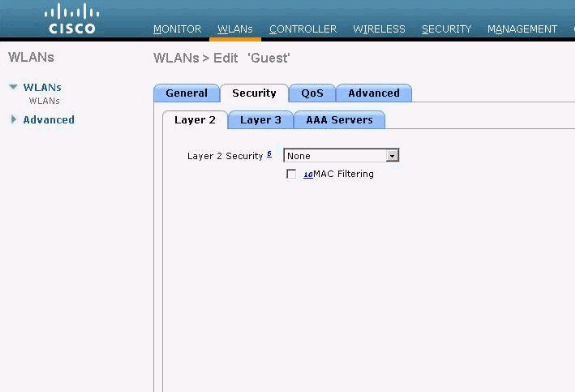
Go to the Security tab. Under Layer 2 Security, None is selected in this example.
Note: Web authentication is not supported with 802.1x authentication. This means you cannot choose 802.1x or a WPA/WPA2 with 802.1x as the Layer 2 security when you use web authentication.Web authentication is supported with all other Layer 2 security parameters.
-
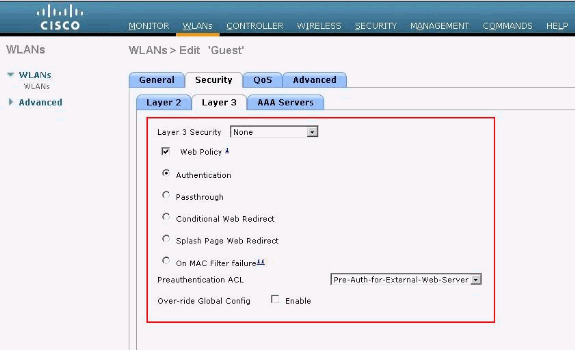
In the Layer 3 Security field, check the Web Policy check box and choose the Authentication option.
This option is chosen because web authentication is used to authenticate the wireless guest clients.
-
Choose the appropriate Preauthentication ACL from the drop-down menu.
In this example, the preauthentication ACL that was created previously is used.
-
Click Apply.
-


Verify
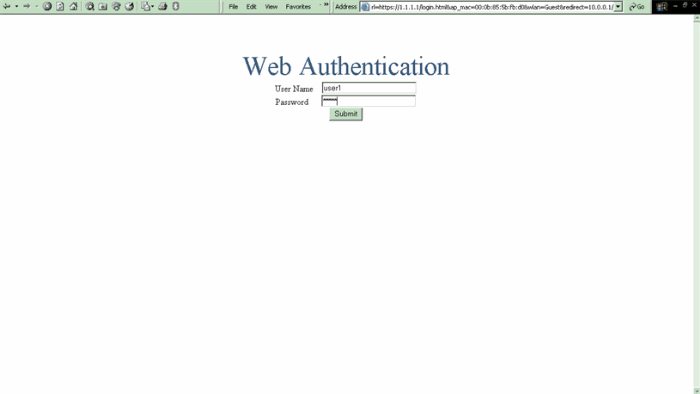
The wireless client comes up and the user enters the URL, such as www.cisco.com, in the web browser. Because the user has not been authenticated, the WLC redirects the user to the external web login URL.
The user is prompted for the user credentials. Once the user submits the username and password, the login page takes user credentials input and on submit sends the request back to the action_URL example, http://1.1.1.1/login.html, of the WLC web server. This is provided as an input parameter to the customer redirect URL, where 1.1.1.1 is the Virtual Interface Address on the switch.
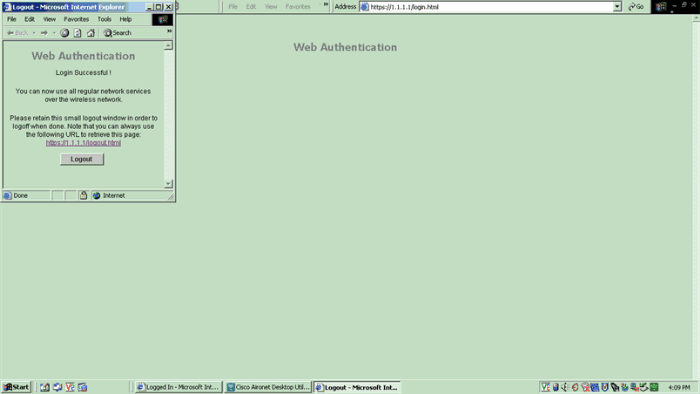
The WLC authenticates the user against the local database configured on the WLC. After successful authentication, the WLC web server either forwards the user to the configured redirect URL or to the URL the client started with, such as www.cisco.com.
Troubleshoot
Use these debug commands in order to troubleshoot your configuration.
-
debug mac addr <client-MAC-address xx:xx:xx:xx:xx:xx>
-
debug aaa all enable
-
debug pem state enable
-
debug pem events enable
-
debug dhcp message enable
-
debug dhcp packet enable
-
debug pm ssh-appgw enable
-
debug pm ssh-tcp enable
Use this section to troubleshoot your configuration.
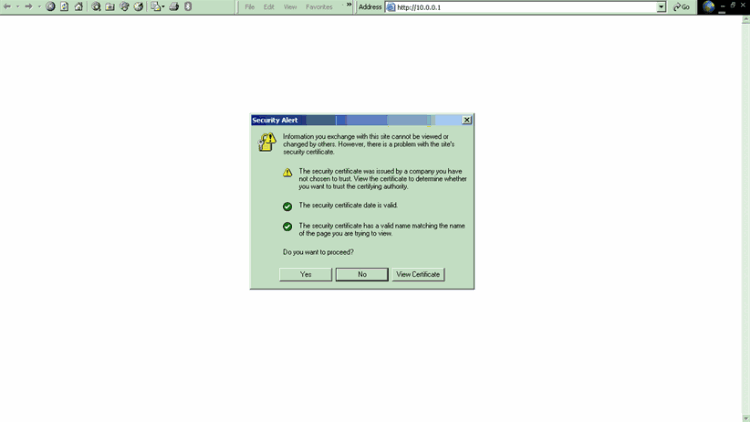
Clients Redirected to External Web Authentication Server Receive a Certificate Warning
Problem: When clients are redirected to Cisco's external web authentication server, they receive a certificate warning. There is a valid certificate on the server, and if you connect to the external web authentication server directly the certificate warning is not received. Is this because the virtual IP address (1.1.1.1) of the WLC is presented to the client instead of the actual IP address of the external web authentication server that is associated with the certificate?
Solution: Yes. Whether or not you perform local or external web authentication, you still hit the internal web server on the controller. When you redirect to an external web server, you still receive the certificate warning from the controller unless you have a valid certificate on the controller itself. If the redirect is sent to https, you receive the certificate warning from the controller and from the external web server, unless both have a valid certificate.
In order to get rid of the certificate warnings all together, you need to have a root level certificate issued and downloaded onto your controller. The certificate is issued for a host name and you put that host name in the DNS host name box under the virtual interface on the controller. You also need to add the host name to your local DNS server and point it to the virtual IP address (1.1.1.1) of the WLC.
Refer to Certificate Signing Request (CSR) Generation for a Third-Party Certificate on a WLAN Controller (WLC) for more information.
Error: "page cannot be displayed"
Problem: After the controller is upgraded to 4.2.61.0, the "page cannot be displayed " error message appears when you use a downloaded web page for web authentication. This worked well prior to the upgrade. The default internal web page loads without any problem .
Solution: From the WLC version 4.2 and later a new feature is introduced wherein you can have multiple cutomized login pages for Web authentication.
In order to have the web page load properly, it is not sufficient to set the web-authentication type as customized globally in the Security > Web Auth > Web login page. It must also be configured on a particular WLAN . In order to do this, complete these steps:
-
Log into the GUI of the WLC.
-
Click on the WLANs tab, and access the profile of the WLAN configured for Web-authentication.
-
On the WLAN > Edit page, click the Security tab. Then, choose Layer 3.
-
On this page, choose None as the Layer 3 Security.
-
Check the Web Policy box, and choose the Authentication option.
-
Check the Over-ride Global Config Enable box, choose Customized (Downloaded) as the Web Auth Type, and select the desired login page from the Login Pagepull down menu. Click Apply.
Related Information
- Wireless LAN Controller Web Authentication Configuration Example
- Video: Web Authentication on Cisco Wireless LAN Controllers (WLCs)

- VLANs on Wireless LAN Controllers Configuration Example
- Wireless LAN Controller and Lightweight Access Point Basic Configuration Example
- Technical Support & Documentation - Cisco Systems
Revision History
| Revision | Publish Date | Comments |
|---|---|---|
1.0 |
19-Jul-2011 |
Initial Release |
 Feedback
Contact Cisco
- Open a Support Case

- (Requires a Cisco Service Contract)