Configuring IPS TCP Reset Using IME
Available Languages
Contents
Introduction
This document discusses the configuration of the Intrusion Prevention System (IPS) TCP Reset using the IPS Manager Express (IME). IME and IPS Sensors are used to manage a Cisco router for TCP Reset. When you review this configuration, remember these items:
-
Install the Sensor and make sure the Sensor works properly.
-
Make the sniffing interface span to the router outside the interface.
Prerequisites
Requirements
There are no specific requirements for this document.
Components Used
The information in this document is based on these software and hardware versions:
-
Cisco IPS Manager Express 7.0
-
Cisco IPS Sensor 7.0(0.88)E3
-
Cisco IOS® router with Cisco IOS Software Release 12.4
The information in this document was created from the devices in a specific lab environment. All of the devices used in this document started with a cleared (default) configuration. If your network is live, make sure that you understand the potential impact of any command.
Conventions
For more information on document conventions, refer to the Cisco Technical Tips Conventions.
Configure
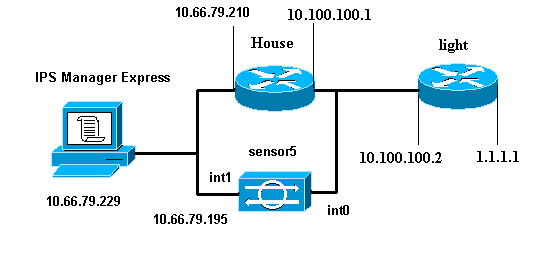
Network Diagram
This document uses the network setup shown in this diagram.
Configurations
This document uses the configurations shown here.
| Router Light |
|---|
Current configuration : 906 bytes ! version 12.4 service timestamps debug uptime service timestamps log uptime no service password-encryption ! hostname light ! enable password cisco ! username cisco password 0 cisco ip subnet-zero ! ! ! ip ssh time-out 120 ip ssh authentication-retries 3 ! call rsvp-sync ! ! ! fax interface-type modem mta receive maximum-recipients 0 ! controller E1 2/0 ! ! ! interface FastEthernet0/0 ip address 10.100.100.2 255.255.255.0 duplex auto speed auto ! interface FastEthernet0/1 ip address 1.1.1.1 255.255.255.0 duplex auto speed auto ! interface BRI4/0 no ip address shutdown ! interface BRI4/1 no ip address shutdown ! interface BRI4/2 no ip address shutdown ! interface BRI4/3 no ip address shutdown ! ip classless ip route 0.0.0.0 0.0.0.0 10.100.100.1 ip http server ip pim bidir-enable ! ! dial-peer cor custom ! ! line con 0 line 97 108 line aux 0 line vty 0 4 login ! end |
| Router House |
|---|
Current configuration : 939 bytes ! version 12.4 service timestamps debug uptime service timestamps log uptime no service password-encryption ! hostname house ! logging queue-limit 100 enable password cisco ! ip subnet-zero ! ! no ip cef no ip domain lookup ! ip audit notify log ip audit po max-events 100 ! ! no voice hpi capture buffer no voice hpi capture destination ! ! ! ! interface FastEthernet0/0 ip address 10.66.79.210 255.255.255.224 duplex auto speed auto ! interface FastEthernet0/1 ip address 10.100.100.1 255.255.255.0 duplex auto speed auto ! interface ATM1/0 no ip address shutdown no atm ilmi-keepalive ! ip classless ip route 0.0.0.0 0.0.0.0 10.66.79.193 ip route 1.1.1.0 255.255.255.0 10.100.100.2 no ip http server no ip http secure-server ! ! ! ! call rsvp-sync ! ! mgcp profile default ! ! line con 0 exec-timeout 0 0 line aux 0 line vty 0 4 exec-timeout 0 0 password cisco login line vty 5 15 login ! ! end |
Start the Sensor Configuration
Complete these steps to start the configuration of the Sensor.
-
If this is your first time to log into the Sensor, you must enter cisco as the user name and cisco as the password.
-
When the system prompts you, change your password.
Note: Cisco123 is a dictionary word and is not allowed in the system.
-
Type setup and complete the system prompt in order to set up the basic parameters for the Sensors.
-
Enter this information:
sensor5#setup --- System Configuration Dialog --- !--- At any point you may enter a question mark '?' for help. !--- Use ctrl-c to abort the configuration dialog at any prompt. !--- Default settings are in square brackets '[]'. Current Configuration: networkParams ipAddress 10.66.79.195 netmask 255.255.255.224 defaultGateway 10.66.79.193 hostname Corp-IPS telnetOption enabled !--- Permit the IP address of workstation or network with IME accessList ipAddress 10.66.79.0 netmask 255.255.255.0 exit timeParams summerTimeParams active-selection none exit exit service webServer general ports 443 exit exit -
Save the configuration.
It can take a few minutes in order for the Sensor to save the configuration.
[0] Go to the command prompt without saving this config.
[1] Return back to the setup without saving this config.
[2] Save this configuration and exit setup.

Enter your selection[2]: 2
Add the Sensor into the IME
Complete these steps in order to add the Sensor into the IME:
-
Go to the Windows PC, which installed the IPS Manager Express, and open the IPS Manager Express.
-
Choose Home > Add .
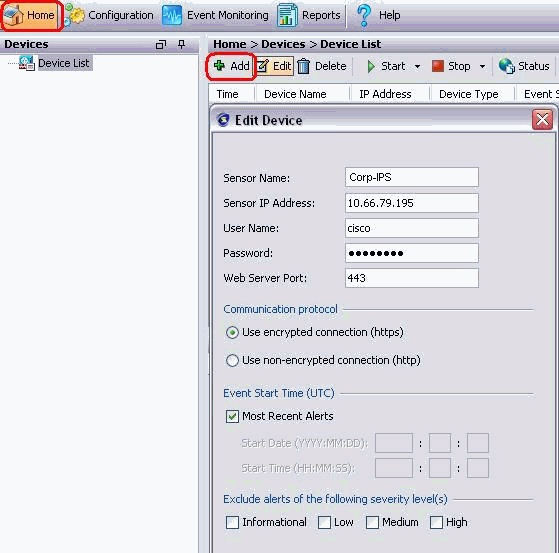
-
Type in this information and click OK in order to finish the configuration.
-
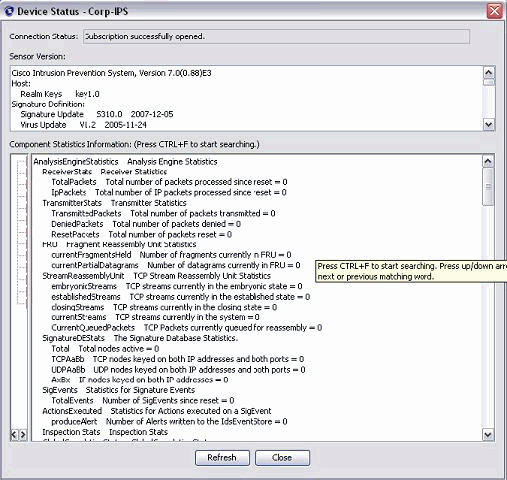
Choose Devices > Corp-IPS in order to verify the Sensor status and then right-click in order to choose Device Status.
Make sure that you can see Subscription successfully opened.


Configure the TCP Reset for the Cisco IOS Router
Complete these steps in order to configure the TCP Reset for the Cisco IOS router:
-
From the IME PC, open your web browser and go to https://10.66.79.195.
-
Click OK in order to accept the HTTPS certificate downloaded from the Sensor.
-
In the login window, enter cisco for the user name and 123cisco123 for the password.
This IME management interface appears:

-
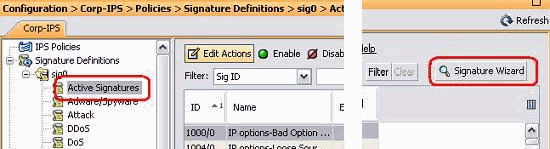
From the Configuration tab, click Active Signatures.
-
Then click Signature Wizard.
-
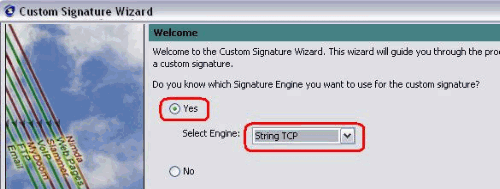
In the wizard, choose Yes and choose String TCP as the Signature engine. Click Next.
-
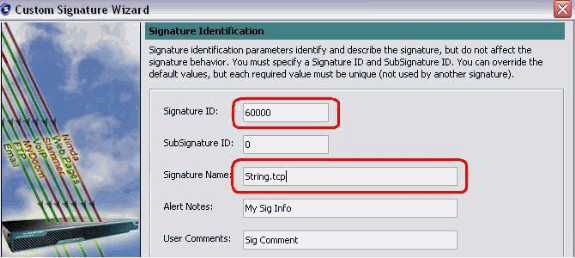
You can leave this information as efdault or enter your own Signature ID, Signature Name and User Notes. Click Next.
-
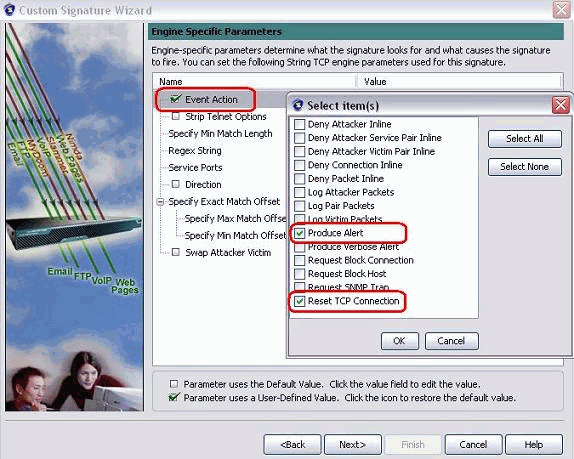
Choose Event Action, and choose Produce Alert and Reset TCP Connection. Click OK and then Next in order to continue.
-
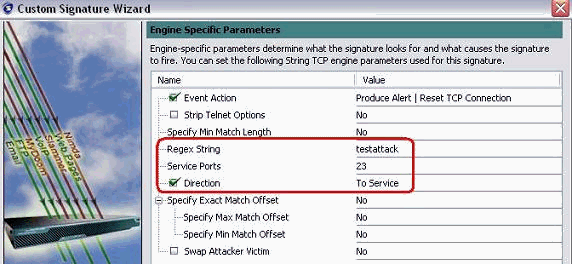
Enter a Regular Expression, and testattack is used in this example. Enter 23 for Service Ports, choose To Service for the Direction, and click Next in order to continue.
-
You can leave this information as Default. Click Next.
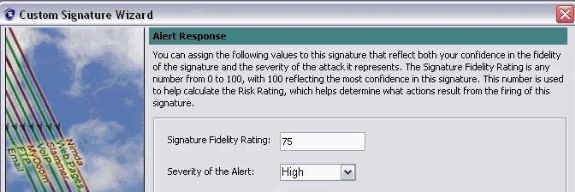
-
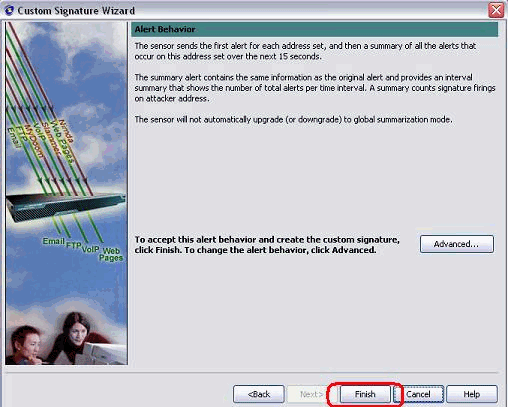
Click Finish in order to finish the Wizard.
-
Choose Configuration > sig0 > Active Signatures in order to locate the newly created signature by Sig ID or Sig Name. Click Edit in order to view the Signature.
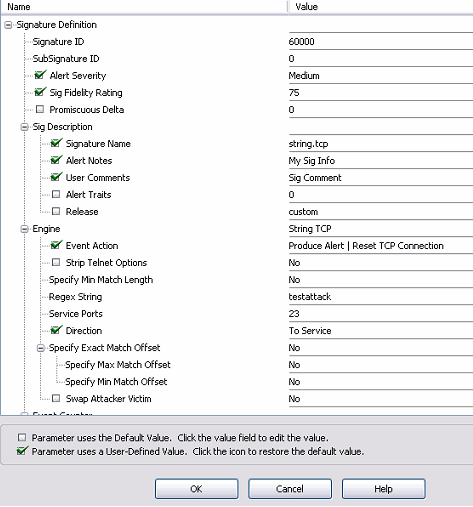
-
Click OK after you confirm and click the Apply button in order to apply the signature to the Sensor.


Verify
Launch the Attack and the TCP Reset
Complete these steps in order to launch the attack and the TCP Reset:
-
Before you launch the attack, go to the IME, choose Event Monitoring > Dropped Attacks View and choose the sensor on the right.
-
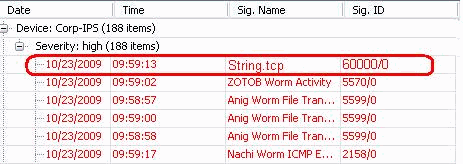
From the Router Light, Telnet to Router House and enter testattack.
Hit either <space> or <enter> in order to reset your Telnet session.
light#telnet 10.100.100.1 Trying 10.100.100.1 ... Open User Access Verification Password: house>en Password: house#testattack [Connection to 10.100.100.1 closed by foreign host] !--- Telnet session has been reset due to the !--- signature "String.tcp" triggered. -
From the Dashboard of the IPS Event Viewer, the Red Alarm appears once the attack is launched.

Troubleshoot
This section provides information you can use to troubleshoot your configuration.
Tips
Use these troubleshooting tips:
-
Shunning works out of the command and control port to reprogram the router access control lists (ACLs). The TCP Resets are sent from the sniffing interface of the Sensor. When you set span in the switch, use the set span <src_mod/src_port><dest_mod/dest_port> command with both incoming packets enabled as shown here.
banana (enable)set span 2/12 3/6 both inpkts enable
Overwrote Port 3/6 to monitor transmit/receive traffic of Port 2/12
Incoming Packets enabled. Learning enabled. Multicast enabled.
banana (enable)
banana (enable)
banana (enable)show span

Destination     : Port 3/6
!--- connect to sniffing interface of the sensor
Admin Source    : Port 2/12
!--- connect to FastEthernet0/0 of Router House
Oper Source     : Port 2/12
Direction       : transmit/receive
Incoming Packets: enabled
Multicast       : enabled
-
If the TCP Resets are working, check if the alarm is triggered for action type TCP Reset. If the alarm appears, check that the signature type is set to TCP reset.
Login using the service account su to root and issue this command. This command assumes the sensing interface is set to eth0.
[root@sensor1 root]#tcpdump -i eth0 -n
Note: One-hundred tcp resets get sent to the victim/target then one-hundred get sent to the attacker/client.
This is example output:
03:06:00.598777 64.104.209.205.1409 >
 10.66.79.38.telnet: R 107:107(0) ack 72 win 0
03:06:00.598794 64.104.209.205.1409 >
 10.66.79.38.telnet: R 108:108(0) ack 72 win 0

03:06:00.599360 10.66.79.38.telnet >
 64.104.209.205.1409: R 72:72(0) ack 46 win 0
03:06:00.599377 10.66.79.38.telnet >
 64.104.209.205.1409: R 73:73(0) ack 46 win 0
Related Information
Revision History
| Revision | Publish Date | Comments |
|---|---|---|
1.0 |
08-Dec-2009 |
Initial Release |
 Feedback
Contact Cisco
- Open a Support Case

- (Requires a Cisco Service Contract)