IPS 5.x and later: Tuning the Signature with Event Action Filter Using CLI and IDM
Available Languages
Contents
Introduction
This document describes how to tune the signature with the Event Action Filter in the Cisco Intrusion Prevention System (IPS) with the Command Line Interface (CLI) and IDS Device Manager (IDM).
Prerequisites
Requirements
This document assumes that Cisco IPS is installed and works properly.
Components Used
The information in this document is based on the Cisco 4200 Series IDS/IPS Device which runs software version 5.0 and later.
The information in this document was created from the devices in a specific lab environment. All of the devices used in this document started with a cleared (default) configuration. If your network is live, make sure that you understand the potential impact of any command.
Conventions
Refer to Cisco Technical Tips Conventions for more information on document conventions.
Event Action Filters
Understanding Event Action Filters
Event action filters are processed as an ordered list and you can move filters up or down in the list.
Filters let the sensor perform certain actions in response to the event without requiring the sensor to perform all actions or remove the entire event. Filters work by the removal of actions from an event. A filter that removes all actions from an event effectively consumes the event.
Note: When you filter sweep signatures, Cisco recommends that you do not filter the destination addresses. If there are multiple destination addresses, only the last address is used to match the filter.
You can configure event action filters to remove specific actions from an event or to discard an entire event and prevent further processing by the sensor. You can use event action variables that you defined to group addresses for your filters. For the procedure on how to configure event action variables, see the Adding, Editing, and Deleting Event Action Variables section.
Note: You must preface the variable with a dollar sign ($) in order to indicate that you use a variable rather than a string. Otherwise, you receive the Bad source and destination error.
Event Action Filters Configuration Using CLI
Complete these steps in order to configure event action filters:
-
Log in to the CLI with an account that has administrator privileges.
-
Enter event action rules submode:
sensor#configure terminal
sensor(config)#service event-action-rules rules1
sensor(config-eve)#
-
Create the filter name:
sensor(config-eve)#filters insert name1 begin
Use name1, name2, and so forth in order to name your event action filters. Use the begin | end | inactive | before | after keywords in order to specify where you want to insert the filter.
-
Specify the values for this filter:
-
Specify the signature ID range:
sensor(config-eve-fil)#signature-id-range 1000-1005
The default is 900 to 65535.
-
Specify the subsignature ID range:
sensor(config-eve-fil)#subsignature-id-range 1-5
The default is 0 to 255.
-
Specify the attacker address range:
sensor(config-eve-fil)#attacker-address-range 10.89.10.10-10.89.10.23
The default is 0.0.0.0 to 255.255.255.255.
-
Specify the victim address range:
sensor(config-eve-fil)#victim-address-range 192.56.10.1-192.56.10.255
The default is 0.0.0.0 to 255.255.255.255.
-
Specify the victim port range:
sensor(config-eve-fil)#victim-port-range 0-434
The default is 0 to 65535.
-
Specify the OS relevance:
sensor(config-eve-fil)#os-relevance relevant
The default is 0 to 100.
-
Specify the risk rating range.
sensor(config-eve-fil)#risk-rating-range 85-100
The default is 0 to 100.
-
Specify the actions to remove:
sensor(config-eve-fil)#actions-to-remove reset-tcp-connection
-
If you filter a deny action, set the percentage of deny actions you want:
sensor(config-eve-fil)#deny-attacker-percentage 90
The default is 100.
-
Specify the status of the filter to either disabled or enabled.
sensor(config-eve-fil)#filter-item-status {enabled | disabled}The default is enabled.
-
Specify the stop on match parameter.
sensor(config-eve-fil)#stop-on-match {true | false}True tells the sensor to stop processing filters if this item matches. False tells the sensor to continue to process filters even if this item matches.
-
Add any comments you want to use in order to explain this filter:
sensor(config-eve-fil)#user-comment NEW FILTER
-
-
Verify the settings for the filter:
sensor(config-eve-fil)#show settings NAME: name1 ----------------------------------------------- signature-id-range: 1000-10005 default: 900-65535 subsignature-id-range: 1-5 default: 0-255 attacker-address-range: 10.89.10.10-10.89.10.23 default: 0.0.0.0-255.255.255.255 victim-address-range: 192.56.10.1-192.56.10.255 default: 0.0.0.0-255.255.255.255 attacker-port-range: 0-65535 <defaulted> victim-port-range: 1-343 default: 0-65535 risk-rating-range: 85-100 default: 0-100 actions-to-remove: reset-tcp-connection default: deny-attacker-percentage: 90 default: 100 filter-item-status: Enabled default: Enabled stop-on-match: True default: False user-comment: NEW FILTER default: os-relevance: relevant default: relevant|not-relevant|unknown ------------------------------------------------ senor(config-eve-fil)# -
In order to edit an existing filter:
sensor(config-eve)#filters edit name1
-
Edit the parameters and see Steps 4a through 4l for more information.
-
In order to move a filter up or down in the filter list:
sensor(config-eve-fil)#exit
sensor(config-eve)#filters move name5 before name1
-
Verify that you have moved the filters:
sensor(config-eve-fil)#exit sensor(config-eve)#show settings ----------------------------------------------- filters (min: 0, max: 4096, current: 5 - 4 active, 1 inactive) ----------------------------------------------- ACTIVE list-contents ----------------------------------------------- NAME: name5 ----------------------------------------------- signature-id-range: 900-65535 <defaulted> subsignature-id-range: 0-255 <defaulted> attacker-address-range: 0.0.0.0-255.255.255.255 <defaulted> victim-address-range: 0.0.0.0-255.255.255.255 <defaulted> attacker-port-range: 0-65535 <defaulted> victim-port-range: 0-65535 <defaulted> risk-rating-range: 0-100 <defaulted> actions-to-remove: <defaulted> filter-item-status: Enabled <defaulted> stop-on-match: False <defaulted> user-comment: <defaulted> ----------------------------------------------- ----------------------------------------------- NAME: name1 ----------------------------------------------- signature-id-range: 900-65535 <defaulted> subsignature-id-range: 0-255 <defaulted> attacker-address-range: 0.0.0.0-255.255.255.255 <defaulted> victim-address-range: 0.0.0.0-255.255.255.255 <defaulted> attacker-port-range: 0-65535 <defaulted> victim-port-range: 0-65535 <defaulted> risk-rating-range: 0-100 <defaulted> actions-to-remove: <defaulted> filter-item-status: Enabled <defaulted> stop-on-match: False <defaulted> user-comment: <defaulted> ----------------------------------------------- ----------------------------------------------- NAME: name2 ----------------------------------------------- signature-id-range: 900-65535 <defaulted> subsignature-id-range: 0-255 <defaulted> attacker-address-range: 0.0.0.0-255.255.255.255 <defaulted> victim-address-range: 0.0.0.0-255.255.255.255 <defaulted> attacker-port-range: 0-65535 <defaulted> victim-port-range: 0-65535 <defaulted> risk-rating-range: 0-100 <defaulted> actions-to-remove: <defaulted> filter-item-status: Enabled <defaulted> stop-on-match: False <defaulted> user-comment: <defaulted> ----------------------------------------------- ----------------------------------------------- ----------------------------------------------- INACTIVE list-contents ----------------------------------------------- ----------------------------------------------- sensor(config-eve)# -
In order to move a filter to the inactive list:
sensor(config-eve)#filters move name1 inactive
-
Verify that the filter has moved to the inactive list:
sensor(config-eve-fil)#exit sensor(config-eve)#show settings ----------------------------------------------- INACTIVE list-contents ----------------------------------------------- ----------------------------------------------- NAME: name1 ----------------------------------------------- signature-id-range: 900-65535 <defaulted> subsignature-id-range: 0-255 <defaulted> attacker-address-range: 0.0.0.0-255.255.255.255 <defaulted> victim-address-range: 0.0.0.0-255.255.255.255 <defaulted> attacker-port-range: 0-65535 <defaulted> victim-port-range: 0-65535 <defaulted> risk-rating-range: 0-100 <defaulted> actions-to-remove: <defaulted> filter-item-status: Enabled <defaulted> stop-on-match: False <defaulted> user-comment: <defaulted> ----------------------------------------------- ----------------------------------------------- sensor(config-eve)# -
Exit event action rules submode:
sensor(config-eve)#exit
Apply Changes:?[yes]:
-
Press Enter in order to apply your changes or enter no in order to discard them.
Event Action Filters Configuration Using IDM
Complete these steps in order to add, edit, delete, enable, disable, and move event action filters:
-
Log in to IDM with an account that has administrator or operator privileges.
-
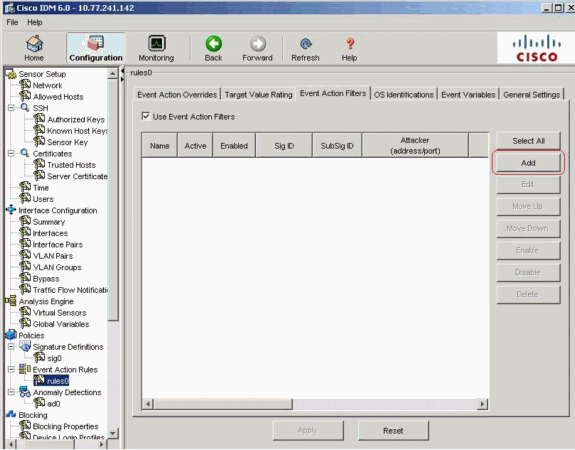
Choose Configuration > Policies > Event Action Rules > rules0 > Event Action Filters if the software version is 6.x. For the software version 5.x, choose Configuration > Event Action Rules > Event Action Filters.
The Event Action Filters tab appears as shown.
-
Click Add in order to add an event action filter.
The Add Event Action Filter dialog box appears.
-
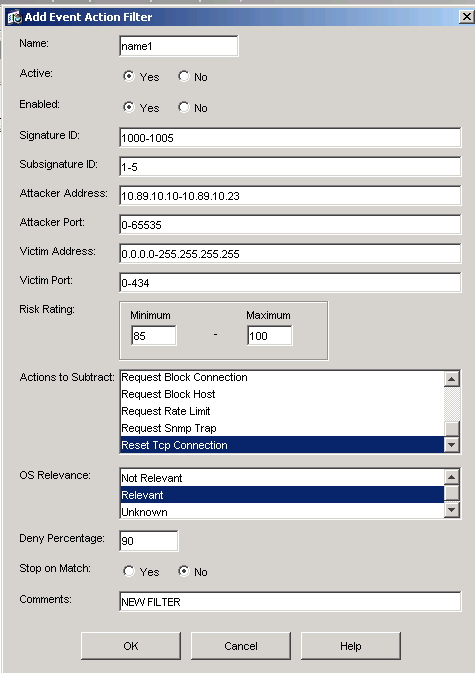
In the Name field, enter a name as name1 for the event action filter.
A default name is supplied, but you can change it to a more meaningful name.
-
In the Active field, click the Yes radio button in order to add this filter to the list so that it takes effect on filtering events.
-
In the Enabled field, click the Yes radio button in order to enable the filter.
Note: You must also check the Use Event Action Filters check box on the Event Action Filters tab or none of the event action filters become enabled regardless of whether you check the Yes check box in the Add Event Action Filter dialog box.
-
In the Signature ID field, enter the signature IDs of all signatures to which this filter should be applied.
You can use a list, for example, 1000, 1005, or a range, for example, 1000-1005 or one of the SIG variables if you defined them on the Event Variables tab. Preface the variable with $.
-
In the SubSignature ID field, enter the subsignature IDs of the subsignatures to which this filter should be applied. For example, 1-5.
-
In the Attacker Address field, enter the IP address of the source host.
You can use one of the variables if you defined them on the Event Variables tab. Preface the variable with $. You can also enter a range of addresses, for example, 10.89.10.10-10.89.10.23. Default is 0.0.0.0-255.255.255.255.
-
In the Attacker Port field, enter the port number used by the attacker in order to send the offending packet.
-
In the Victim Address field, enter the IP address of the recipient host.
You can use one of the variables if you defined them on the Event Variables tab. Preface the variable with $. You can also enter a range of addresses, for example, 192.56.10.1-192.56.10.255. Default is 0.0.0.0-255.255.255.255.
-
In the Victim Port field, enter the port number used by the victim host in order to receive the offending packet. For example, 0-434.
-
In the Risk Rating field, enter an RR range for this filter. For example, 85-100.
If the RR for an event falls within the range you specify, the event is processed against the criteria of this filter.
-
From the Actions to Subtract drop-down list, choose the actions you want this filter to remove from the event. For example, choose Reset TCP connection.
Tip: Hold down the Ctrl key in order to choose more than one event action in the list.
-
In the OS Relevance drop-down list, choose whether you want to know if the alert is relevant to the OS that has been identified for the victim. For example, choose Relevant.
-
In the Deny Percentage field, enter the percentage of packets in order to deny for deny attacker features. For instance, 90.
The default is 100 percent.
-
In the Stop on Match field, choose one of these radio buttons:
-
Yes—If you want the Event Action Filters component to stop processing after the actions of this particular filter are removed
Any filters that remain are not processed; therefore, no additional actions can be removed from the event.
-
No—If you want to continue to process additional filters
-
-
In the Comments field, enter any comments that you want to store with this filter, such as the purpose of this filter or why you have configured this filter in a particular way. For example, NEW FILTER.
Tip: Click Cancel in order to undo your changes and close the Add Event Action Filter dialog box.
-
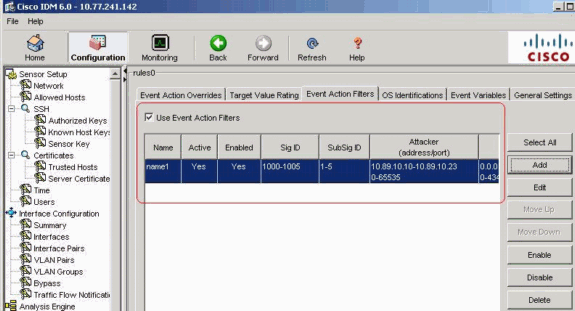
Click OK.
The new event action filter now appears in the list on the Event Action Filters tab as shown.
-
Check the Use Event Action Overrides check box as shown.
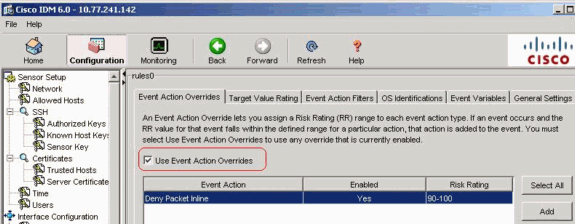
Note: You must check the Use Event Action Overrides check box on the Event Action Overrides tab or none of the event action overrides become enabled regardless of the value you set in the Add Event Action Filter dialog box.
-
Choose an existing event action filter in the list in order to edit it, and then click Edit.
The Edit Event Action Filter dialog box appears.

-
Change any values in the fields that you need to alter.
See steps 4 through 18 for information on how to complete the fields.
Tip: Click Cancel in order to undo your changes and close the Edit Event Action Filter dialog box.
-
Click OK.
The edited event action filter now appears in the list on the Event Action Filters tab.
-
Check the Use Event Action Overrides check box.
Note: You must check the Use Event Action Overrides check box on the Event Action Overrides tab or none of the event action overrides are enabled regardless of the value you set in the Edit Event Action Filter dialog box.
-
Choose an event action filter in the list in order to delete it, and then click Delete.
The event action filter no longer appears in the list on the Event Action Filters tab.
-
Filter up or down in the list in order to move an event action, choose it, and then click Move Up or Move Down.
Tip: Click Reset in order to remove your changes.
-
Click Apply in order to apply your changes and save the revised configuration.


Event Variable Configuration
Complete these steps in order to add, edit, and delete event variables:
-
Log in. For example, use an account with administrator or operator privileges.
-
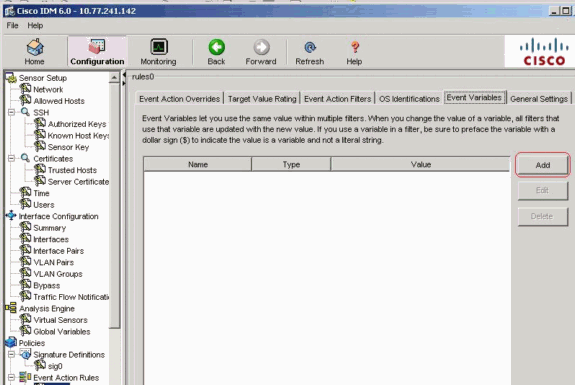
Choose Configuration > Policies > Event Action Rules > rules0 > Event Variables if the software version is 6.x. For the software version 5.x, choose Configuration > Event Action Rules > Event Variables.
The Event Variables tab appears.
-
Click Add in order to create a variable.
The Add Variable dialog box appears.
-
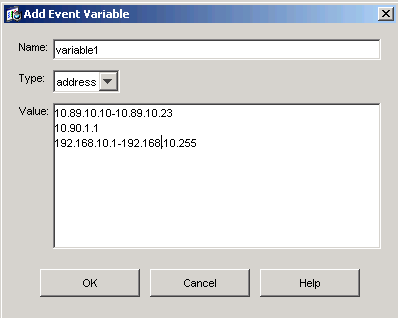
In the Name field, enter a name for this variable.
Note: The valid name can only contain numbers or letters. You can also use a hyphen (-) or an underscore (_).
-
In the Value field, enter the values for this variable.
Specify the full IP address or ranges or set of ranges. For example:
-
10.89.10.10-10.89.10.23
-
10.90.1.1
-
192.168.10.1-192.168.10.255
Note: You can use commas as delimiters. Make sure there are no trailing spaces after the comma. Otherwise, you receive a Validation failed error message.
Tip: Click Cancel in order to undo your changes and close the Add Event Variable dialog box.
-
-
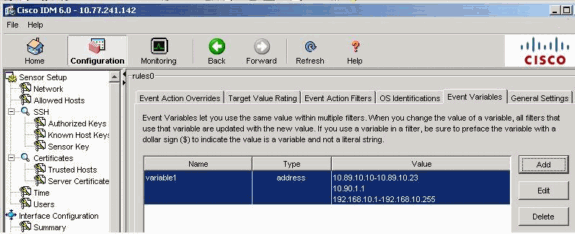
Click OK.
The new variable appears in the list on the Event Variables tab.
-
Choose the existing variable in the list in order to edit it, and then click Edit.
The Edit Event Variable dialog box appears.
-
In the Value field, enter your changes to the value.
-
Click OK.
The edited event variable now appears in the list on the Event Variables tab.
Tip: Choose Reset in order to remove your changes.
-
Click Apply in order to apply your changes and save the revised configuration.


Related Information
Revision History
| Revision | Publish Date | Comments |
|---|---|---|
1.0 |
16-May-2007 |
Initial Release |
 Feedback
Contact Cisco
- Open a Support Case

- (Requires a Cisco Service Contract)