Configuring TCP Reset Using IDS Director
Available Languages
Contents
Introduction
This document describes how to configure an Intrusion Detection System (IDS, formerly NetRanger) Director and Sensor to send TCP resets on an attempted Telnet to a range of addresses which include the managed router if the sent string is "testattack".
Prerequisites
Requirements
When considering this configuration, please remember to:
-
Install the Sensor and verify that it works properly before you perform this configuration.
-
Ensure that the sniffing interface spans to the managed router's outside interface.
Components Used
The information in this document is based on these software and hardware versions:
-
Cisco IDS Director 2.2.3
-
Cisco IDS Sensor 3.0.5
-
Cisco IOS® Router running Software Release 12.2.6
The information in this document was created from the devices in a specific lab environment. All of the devices used in this document started with a cleared (default) configuration. If your network is live, make sure that you understand the potential impact of any command.
Conventions
For more information on document conventions, refer to the Cisco Technical Tips Conventions.
Configure
In this section, you are presented with the information to configure the features described in this document.
Note: To find additional information on the commands used in this document, use the Command Lookup Tool (registered customers only) .
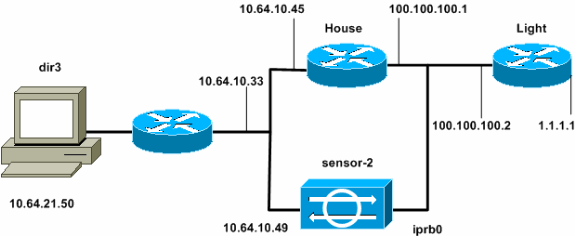
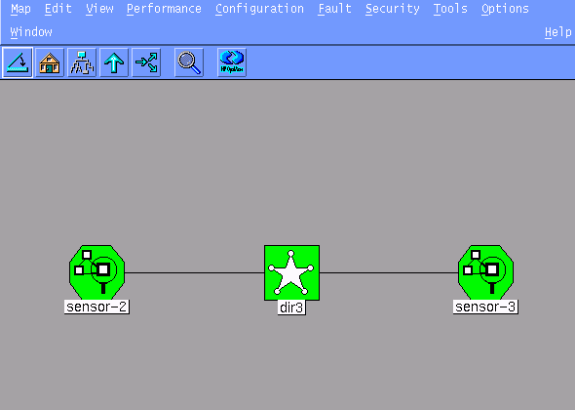
Network Diagram
This document uses the network setup shown in this diagram.
Configurations
This document uses these configurations.
| Router Light |
|---|
Current configuration : 906 bytes ! version 12.2 service timestamps debug uptime service timestamps log uptime no service password-encryption ! hostname light ! enable password cisco ! username cisco password 0 cisco ip subnet-zero ! ! ! ip ssh time-out 120 ip ssh authentication-retries 3 ! call rsvp-sync ! ! ! fax interface-type modem mta receive maximum-recipients 0 ! controller E1 2/0 ! ! ! interface FastEthernet0/0 ip address 100.100.100.2 255.255.255.0 duplex auto speed auto ! interface FastEthernet0/1 ip address 1.1.1.1 255.255.255.0 duplex auto speed auto ! interface BRI4/0 no ip address shutdown ! interface BRI4/1 no ip address shutdown ! interface BRI4/2 no ip address shutdown ! interface BRI4/3 no ip address shutdown ! ip classless ip route 0.0.0.0 0.0.0.0 100.100.100.1 ip http server ip pim bidir-enable ! ! dial-peer cor custom ! ! line con 0 line 97 108 line aux 0 line vty 0 4 login ! end |
| Router House |
|---|
Current configuration : 2187 bytes ! version 12.2 service timestamps debug uptime service timestamps log uptime no service password-encryption ! hostname house ! enable password cisco ! ! ! ip subnet-zero ! ! fax interface-type modem mta receive maximum-recipients 0 ! ! ! ! interface FastEthernet0/0 ip address 100.100.100.1 255.255.255.0 duplex auto speed auto ! interface FastEthernet0/1 ip address 10.64.10.45 255.255.255.224 duplex auto speed auto ! ! ! interface FastEthernet4/0 no ip address shutdown duplex auto speed auto ! ip classless ip route 0.0.0.0 0.0.0.0 10.64.10.33 ip route 1.1.1.0 255.255.255.0 100.100.100.2 ip http server ip pim bidir-enable ! ! ! snmp-server manager ! call rsvp-sync ! ! mgcp profile default ! dial-peer cor custom ! ! ! ! line con 0 line aux 0 line vty 0 4 password cisco login ! ! end house# |
Configure the Sensor
Complete these steps to configure the Sensor.
-
Telnet to 10.64.10.49 (the IDS Sensor) with the username root and the password attack.
-
Type sysconfig-sensor.
-
When prompted, enter the configuration information, as shown in this example:
1 - IP Address: 10.64.10.49 2 - IP Netmask: 255.255.255.224 3 - IP Host Name: sensor-2 4 - Default Route: 10.64.10.33 5 - Network Access Control 64. 10. 6 - Communications Infrastructure Sensor Host ID: 49 Sensor Organization ID: 900 Sensor Host Name: sensor-2 Sensor Organization Name: cisco Sensor IP Address: 10.64.10.49 IDS Manager Host ID: 50 IDS Manager Organization ID: 900 IDS Manager Host Name: dir3 IDS Manager Organization Name: cisco IDS Manager IP Address: 10.64.21.50 -
When prompted, save the configuration and allow the Sensor to reboot.
Add the Sensor into the Director
Complete these steps to add the Sensor into the Director.
-
Telnet to 10.64.21.50 (the IDS Director) with the username netrangr and the password attack.
-
Type ovw& to launch HP OpenView.
-
From the Main Menu, go to Security > Configure.
-
In the Configuration File Management Utility, go to file > Add Host and click Next.
-
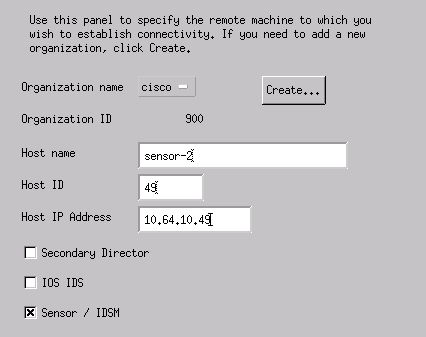
Complete the Sensor host information, as shown in this example. Click Next.
-
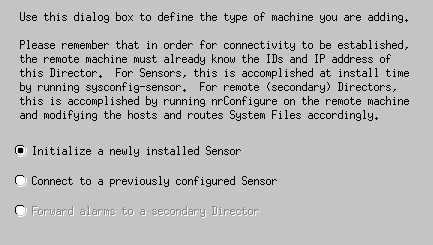
Accept the default settings for the type of machine, and click Next, as shown in this example.
-
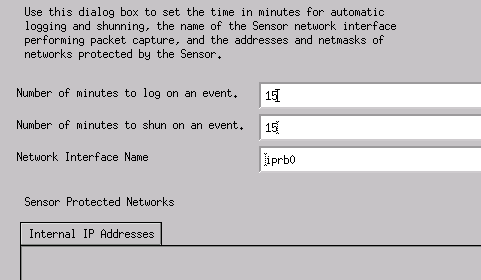
You may either change the log and shun minutes or you may accept the default values. However, you must change the Network Interface name to the name of your sniffing interface. In this example, it is "iprb0". It can be "spwr0" or anything else depending on the Sensor type and how you connect your Sensor.
-
Continue to click Next and then click Finish to add the Sensor into the Director. From the main menu, you should now see sensor-2, as in this example.


Configure TCP Reset for the Cisco IOS Router
Complete these steps to configure TCP reset for the Cisco IOS router.
-
In the Main Menu, go to Security > Configure.
-
In the Configuration File Management Utility, highlight sensor-2 and double-click it.
-
Open Device Management.
-
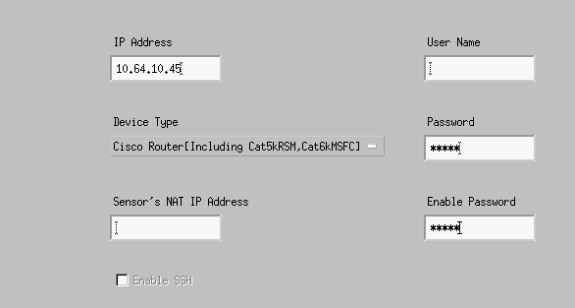
Click Devices > Add. Enter the device information, as shown in the following example. Click OK to continue. Both the Telnet and enable passwords are Cisco.
-
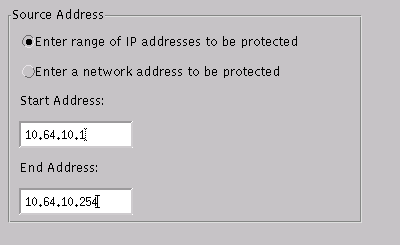
Open the Intrusion Detection window and click Protected Networks. Add the range of addresses from 10.64.10.1 to 10.64.10.254 into the protected network.
-
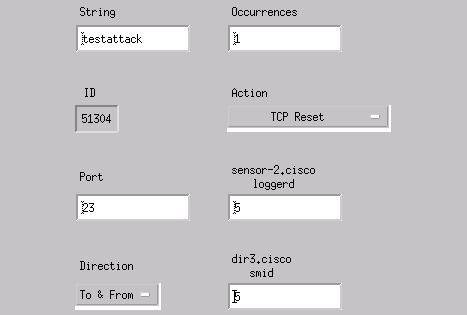
Click Profile and select Manual Configuration. Next, click Modify Signatures. Choose Matched Strings with an ID of 8000. Click Expand > Add to add a new string called testattack. Enter the string information, as shown in this example, and click OK to continue.
-
You have finished this part of the configuration. Click OK to close the Intrusion Detection window.
-
Open the System Files folder, then the Daemons window. Make sure you have these daemons enabled:
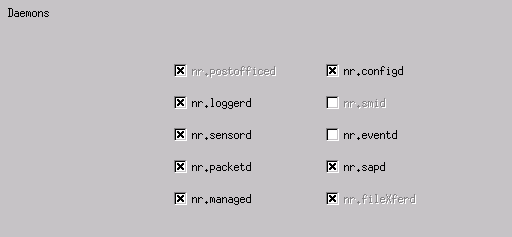
-
Click OK to continue.
-
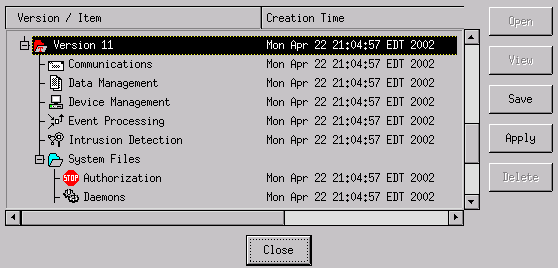
Choose the version you just modified, click Save and then Apply. Wait for the system to tell you that the Sensor has finished restarting services, then close all the windows for the Director Configuration.


Launch the Attack and TCP Reset
Telnet from Router Light to Router House and type testattack. As soon as you hit the Space or Enter key, your Telnet session resets. You will connect to Router House.
light#telnet 10.64.10.45
Trying 10.64.10.45 ... Open

User Access Verification
Password:
house>en
Password:
house#testattack
[Connection to 10.64.10.45 closed by foreign host]

!--- Telnet session has been reset because the !--- signature testattack was triggered.
Verify
There is currently no verification procedure available for this configuration.
Troubleshoot
This section provides information you can use to troubleshoot your configuration.
Telnet to 10.64.10.49, the Sensor, using the username root and the password attack. Type cd /usr/nr/etc. Type cat packetd.conf. If you correctly set TCP reset for testattack, you should see a four (4) in the Action Codes field. This indicates TCP reset as shown in this example.
netrangr@sensor-2:/usr/nr/etc
>cat packetd.conf | grep "testattack"
RecordOfStringName 51304 23 3 1 "testattack"
SigOfStringMatch 51304 4 5 5 # "testattack"
If you accidentally set the action to "none" in the signature, you will see a zero (0) in the Action Codes field. This indicates no action as seen in this example.
netrangr@sensor-2:/usr/nr/etc
>cat packetd.conf | grep "testattack"
RecordOfStringName 51304 23 3 1 "testattack"
SigOfStringMatch 51304 0 5 5 # "testattack"
The TCP resets are sent from the sniffing interface of the Sensor. If there is a switch connecting the Sensor interface to the outside interface of the managed router, when you configure using the set span command in the switch, use this syntax:
set span <src_mod/src_port><dest_mod/dest_port> both inpkts enable
banana (enable) set span 2/12 3/6 both inpkts enable
Overwrote Port 3/6 to monitor transmit/receive traffic of Port 2/12
Incoming Packets enabled. Learning enabled. Multicast enabled.
banana (enable)
banana (enable)
banana (enable) show span

Destination     : Port 3/6

!--- Connect to sniffing interface of the Sensor.

Admin Source    : Port 2/12

!--- Connect to FastEthernet0/0 of Router House.

Oper Source     : Port 2/12
Direction       : transmit/receive
Incoming Packets: enabled
Learning        : enabled
Multicast       : enabled
Related Information
Revision History
| Revision | Publish Date | Comments |
|---|---|---|
1.0 |
08-Oct-2018 |
Initial Release |
 Feedback
Contact Cisco
- Open a Support Case

- (Requires a Cisco Service Contract)