ASA 8.x: Renew and Install the SSL Certificate with ASDM
Available Languages
Contents
Introduction
The procedure in this document is an example and can be used as a guideline with any certificate vendor or your own root certificate server. Special certificate parameter requirements are sometimes required by your certificate vendor, but this document is intended to provide the general steps required to renew an SSL certificate and install it on an ASA that uses 8.0 software.
Prerequisites
Requirements
There are no specific requirements for this document.
Components Used
This procedure pertains to ASA versions 8.x with ASDM version 6.0(2) or later.
The procedure in this document is based on a valid configuration with a certificate installed and used for SSL VPN access. This procedure does not impact your network as long as the current certificate is not deleted. This procedure is a step-by-step process on how to issue a new CSR for a current certificate with the same root certificate that issued the original root CA.
The information in this document was created from the devices in a specific lab environment. If your network is live, make sure that you understand the potential impact of any command.
Conventions
Refer to the Cisco Technical Tips Conventions for more information on document conventions.
Procedure
Complete these steps:
-
Select the certificate you want to renew beneath Configuration > Device Management > Identity Certificates, and then click Add.
Figure 1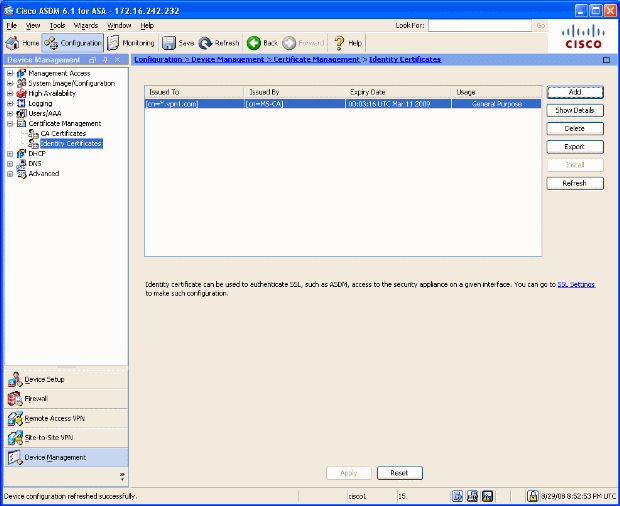
-
Under Add Identity Certificate, select the Add a new identity certificate radio button, and choose your key pair from the drop-down menu.
Note: It is not recommended to use <Default-RSA-Key> because if you regenerate your SSH key, you invalidate your certificate. If you do not have an RSA key, complete Steps a and b. Otherwise continue to Step 3.
Figure 2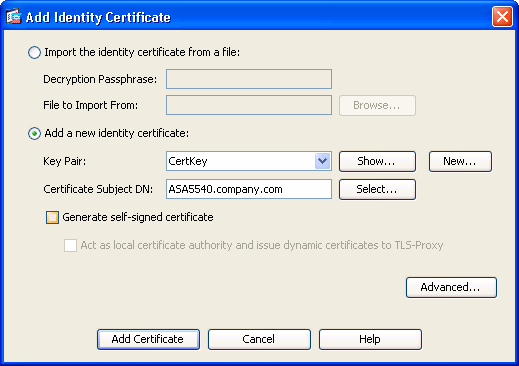
-
(Optional) Complete these steps if you do not have an RSA key configured yet, otherwise skip to Step 3.
Click New....
-
Enter the key pair name in the Enter new key pair name field, and click Generate Now.
Figure 3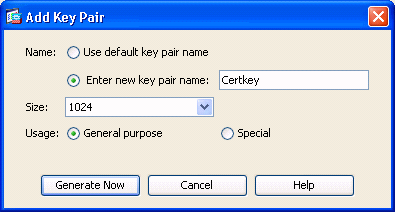
-
-
Click Select.
-
Enter the appropriate certificate attributes as shown in Figure 4. Once completed, click OK. Then click Add Certificate.
Figure 4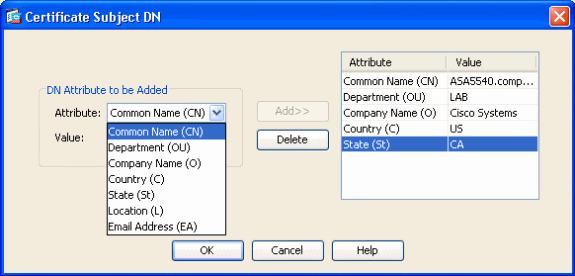
CLI output:
crypto ca trustpoint ASDM_TrustPoint0 keypair CertKey id-usage ssl-ipsec fqdn 5540-uwe subject-name CN=ASA5540.company.com,OU=LAB,O=Cisco ystems,C=US,St=CA enrollment terminal crypto ca enroll ASDM_TrustPoint0 -
In the Identity Certificate Request popup window, save your Certificate Signing Request (CSR) to a text file, and click OK.
Figure 5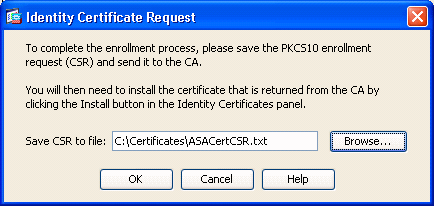
-
(Optional) Verify in ASDM that the CSR is pending, as shown in Figure 6.
Figure 6
-
Submit the certificate request to the certificate administrator, who issues the certificate on the server. This can either be through a web interface, e-mail, or directly to the root CA server for certificate issue process.
-
Complete these steps in order to install the renewed certificate.
-
Select the pending certificate request under Configuration > Device Management > Identity Certificates, as shown in Figure 6, and click Install.
-
In the Install Identity Certificate window, select the Paste the certificate data in base-64 format radio button, and click Install Certificate.
Note: Alternatively, if the certificate is issued in a .cer file rather then a text based file or e-mail, you can also select Install from a file, browse to the appropriate file on your PC, click Install ID certificate file and then click Install Certificate.
Figure 7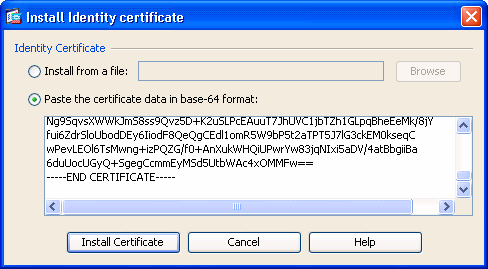
CLI output:
crypto ca import ASDM_TrustPoint0 certificate WIID2DCCAsCgAwIBAgIKYb9wewAAAAAAJzANBgkqhkiG9w0BAQUFADAQMQ !--- output truncated wPevLEOl6TsMwng+izPQZG/f0+AnXukWHQiUPwrYw83jqNIxi5aDV/4atBbgiiBa 6duUocUGyQ+SgegCcmmEyMSd5UtbWAc4xOMMFw== quit -
-
A window appears that confirms the certificate is successfully installed. Click “OK” to confirm.
Figure 8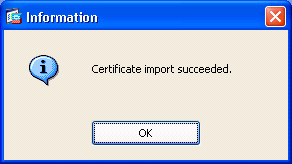
-
Ensure your new certificate appears under Identity Certificates.
Figure 9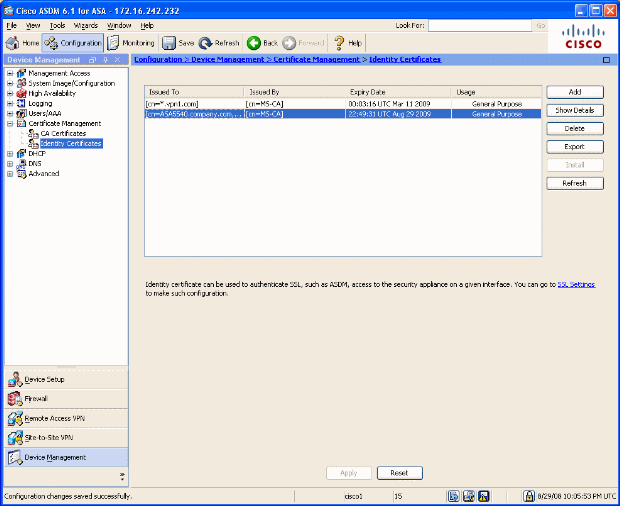
-
Complete these steps in order to bind the new certificate to the interface:
-
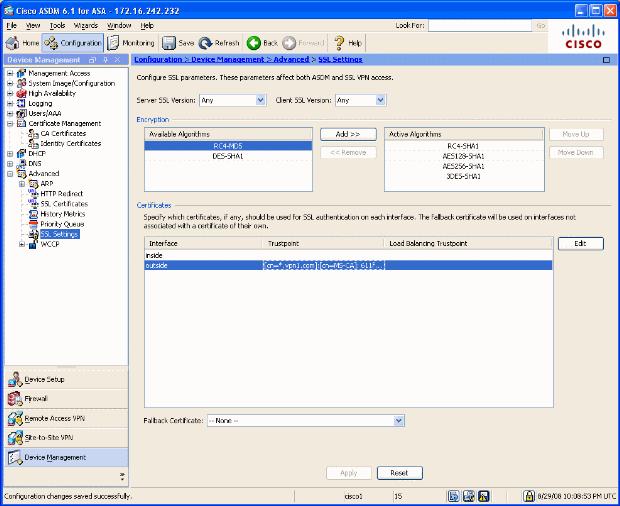
Choose Configuration > Device Management > Advanced > SSL Settings, as shown in Figure 10.
-
Select your interface under Certificates, and click Edit.
-
-
Choose your new certificate from the drop-down menu, click OK, and click Apply.
Figure 11ssl encryption rc4-sha1 aes128-sha1 aes256-sha1 3des-sha1 ssl trust-point ASDM_TrustPoint0 outside

-
Save your configuration in either ASDM or on the CLI.


Verify
You can use the CLI interface in order to verify that the new certificate is installed to the ASA correctly, as shown in this sample output:
ASA(config)#show crypto ca certificates
Certificate
  Status: Available
  Certificate Serial Number: 61bf707b000000000027
  Certificate Usage: General Purpose
  Public Key Type: RSA (1024 bits)
  Issuer Name:
    cn=MS-CA
  Subject Name:
    cn=ASA5540.company.com
!---new certificate

    ou=LAB
    o=Cisco Systems
    st=CA
    c=US
  CRL Distribution Points:
    [1]  http://win2k3-base1/CertEnroll/MS-CA.crl
    [2]  file://\\win2k3-base1\CertEnroll\MS-CA.crl
  Validity Date:
    start date: 22:39:31 UTC Aug 29 2008
    end   date: 22:49:31 UTC Aug 29 2009
  Associated Trustpoints: ASDM_TrustPoint0

CA Certificate
  Status: Available
  Certificate Serial Number: 211020a79cfd96b34ba93f3145d8e571
  Certificate Usage: Signature
  Public Key Type: RSA (2048 bits)
  Issuer Name:
    cn=MS-CA
  Subject Name:
    cn=MS-CA
!---’old’ certificate

  CRL Distribution Points:
    [1]  http://win2k3-base1/CertEnroll/MS-CA.crl
    [2]  file://\\win2k3-base1\CertEnroll\MS-CA.crl
  Validity Date:
    start date: 00:26:08 UTC Jun 8 2006
    end   date: 00:34:01 UTC Jun 8 2011
  Associated Trustpoints: test

Certificate
  Status: Available
  Certificate Serial Number: 611f8630000000000026
  Certificate Usage: General Purpose
  Public Key Type: RSA (1024 bits)
  Issuer Name:
    cn=MS-CA
  Subject Name:
    cn=*.vpn1.com
  CRL Distribution Points:
    [1]  http://win2k3-base1/CertEnroll/MS-CA.crl
    [2]  file://\\win2k3-base1\CertEnroll\MS-CA.crl
  Validity Date:
    start date: 23:53:16 UTC Mar 10 2008
    end   date: 00:03:16 UTC Mar 11 2009
  Associated Trustpoints: test

ASA(config)#
Troubleshoot
(Optional) Verify on the CLI that the correct certificate is applied to the interface:
ASA(config)#show running-config ssl
ssl trust-point ASDM_TrustPoint0 outside

!--- Shows that the correct trustpoint is tied to the outside interface that terminates SSL VPN.

ASA(config)#
How to copy SSL certificates from one ASA to another
This can be done if you had generated exportable keys. You need to export the certificate to a PKCS file. This includes exporting all of the associated keys.
Use this command to export your certificate via CLI:
ASA(config)#crypto ca export <trust-point-name> pkcs12 <passphrase>
Note: Passphrase - used to protect pkcs12 file.
Use this command to import your certificate via CLI:
SA(config)#crypto ca import <trust-point-name> pkcs12 <passphrase>
Note: This passphrase should be the same as used when exporting the file.
This can also be done through ASDM for an ASA failover pair. Complete these steps to perform this:
-
Login to the primary ASA via ASDM and choose Tools--> Backup Configuration.
-
You can backup everything or just the certificates.
-
On the standby, open ASDM and choose Tools --> Restore Configuration.
Related Information
Revision History
| Revision | Publish Date | Comments |
|---|---|---|
1.0 |
02-Sep-2008 |
Initial Release |
 Feedback
Contact Cisco
- Open a Support Case

- (Requires a Cisco Service Contract)