Einleitung
Dieses Dokument beschreibt die Schritte zum Erfassen von Support-Snapshots und zum Aktivieren von Live-Support-Sitzungen über die Private Cloud-Appliance Cisco AMP (Advanced Malware Protection) für Untersuchungszwecke.
Support-Snapshots
Erstellen von Support-Snapshots vom Verwaltungsportal
Führen Sie die folgenden Schritte aus, um eine Support-Snapshot vom Verwaltungsportal zu sammeln:
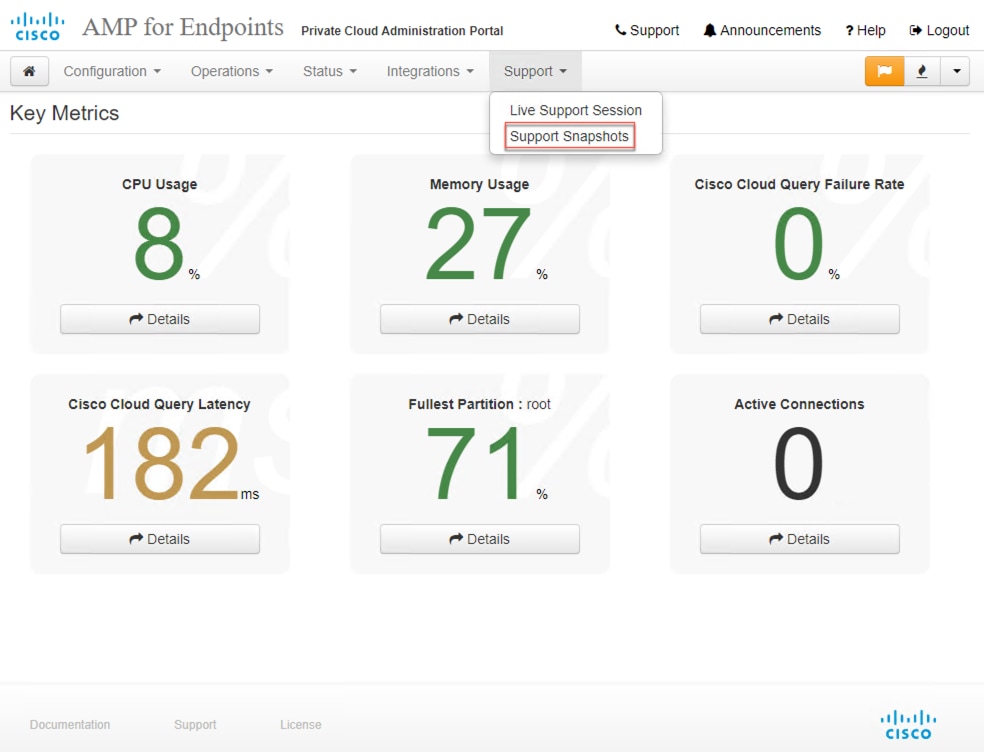
Schritt 1: Melden Sie sich beim Verwaltungsportal an.
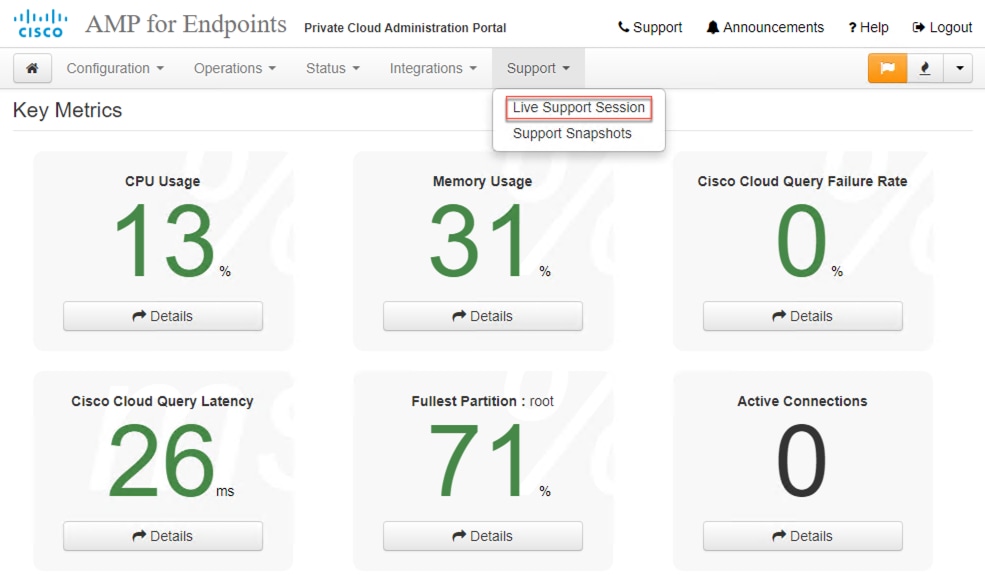
Schritt 2: Wählen Sie Support und anschließend Support Snapshots aus, wie im Bild gezeigt.
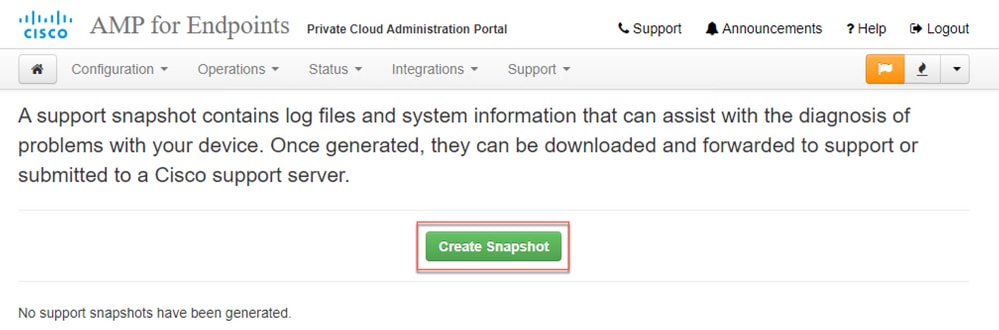
Schritt 3: Klicken Sie auf Snapshot erstellen.
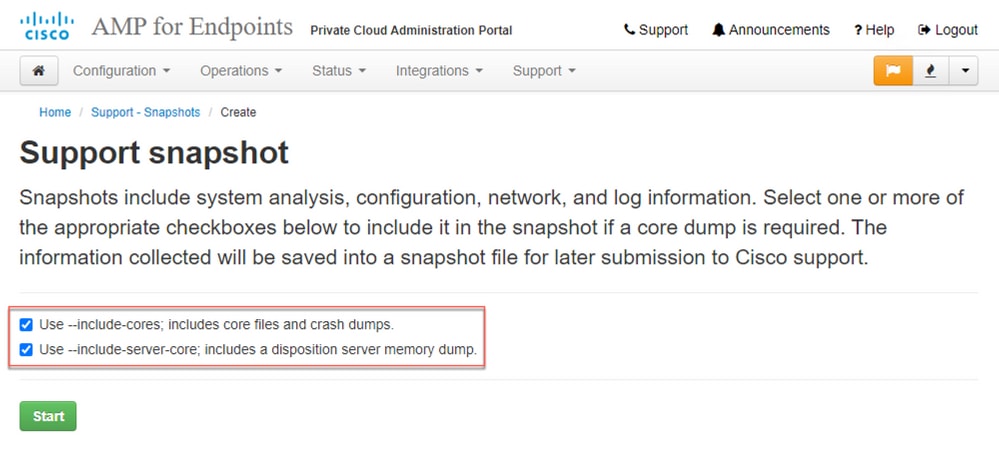
Schritt 4: Sie können die Option Core Files und andere Memory Dumps einschließen sowie die Snapshot-Einstellungen auswählen, die nicht standardmäßig ausgewählt sind, wie im Bild gezeigt.
Schritt 5: Sie werden feststellen, dass Snapshot gestartet wurde und dies kann eine Weile dauern. Um den Fortschritt zu überwachen, klicken Sie auf Details, wie im Bild gezeigt.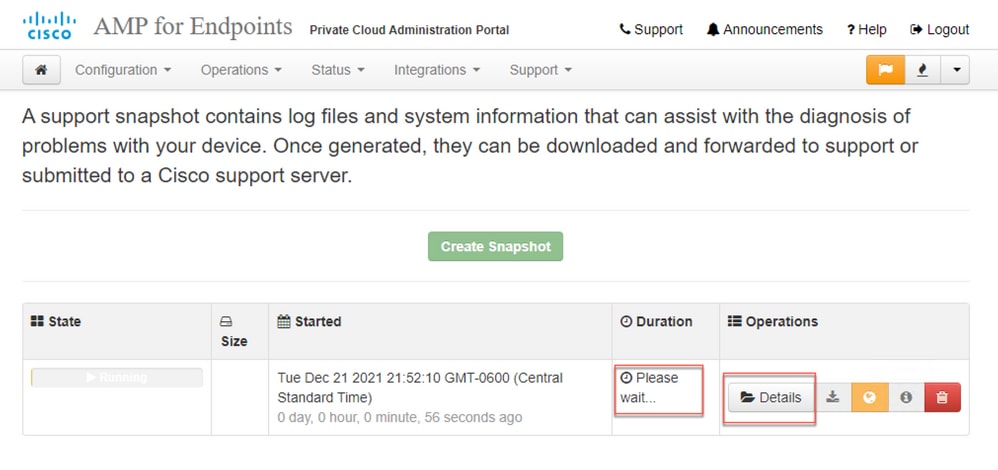
Schritt 6: Sobald die Snapshot-Generierung abgeschlossen ist, müssen Sie die  um den Snapshot auf Ihrem lokalen Rechner herunterzuladen, von dem aus Sie auf das Portal zugreifen.
Erstellen von Support-Snapshots vom Verwaltungsportal SSH
Um einen Support Snapshot vom Verwaltungsportal SSH zu erstellen, gehen Sie wie folgt vor:
Schritt 1: SSH zum Verwaltungsportal.
Schritt 2: Dies ist die verfügbare CLI zum Generieren des Snapshots.
[root@fireamp ~]# amp-support snapshot -A


       usage: /opt/opadmin/embedded/bin/amp-support snapshot [options]

        Create a snapshot of the current system; this includes log files, system status, run processes, crash dumps, and other information that can be used by a support engineer to diagnose problems with your system. If no explicit options are provided the default ones are assumed. The default options are: include-configs, include-logs, include-network, include-cores, and include-status -A, --all Include everything. -a, --include-analysis Include system analysis. (SLOW!) -C, --include-configs Include configuration files. -c, --include-cores Include core files. -F, --include-firehose-cassandra Include firehose-cassandra status. -i, --include-inodes Include filesystem inode usage. -I, --include-integrations Include appliance integration information. -k, --include_kafka Include Kafka status. -L, --include-flink Include Flink status. -l, --include-logs Include log files. -m, --include-mongo Include MongoDB status. -N, --include-cassandra Include Cassandra status. -n, --include-network Include network analysis. -r, --include-redis Include Redis status. -S, --include-server-core Include a disposition server memory dump. -s, --include-status Include system status. -d, --include-docker Include docker status. -z, --include_zookeeper Include Zookeeper status. -f, --fs-check FILE Include filesystem check results from file. -v, --verbose Increase output verbosity.
Snapshot der Unterstützung von der Appliance-Konsole erstellen
IUm einen Support-Snapshot von der Private Cloud Appliance Console zu erstellen, gehen Sie wie folgt vor:
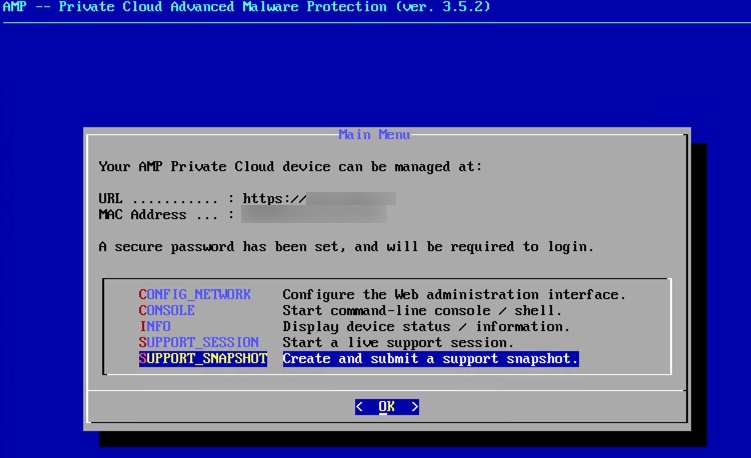
Schritt 1: Melden Sie sich bei der Private Cloud Appliance Console an.
Schritt 2: Wählen Sie SUPPORT_SNAPSHOT.
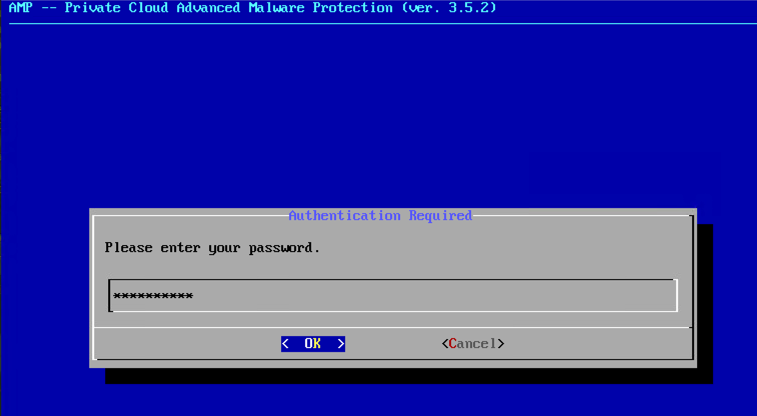
Schritt 3: Geben Sie das Administratorportal-Passwort ein, wie im Bild gezeigt.
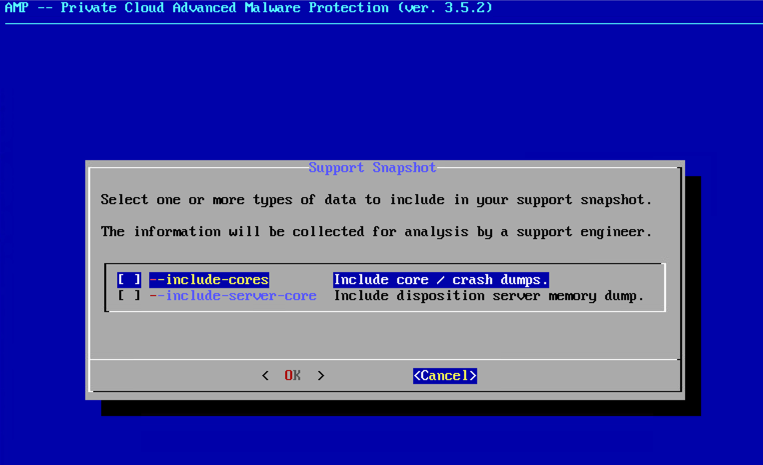
Schritt 4: Sie können unter Core-Dateien und andere Speicher-Dumps einschließen auch die Snapshots auswählen, die nicht standardmäßig ausgewählt sind, wie im Bild gezeigt.
Schritt 5: Danach wählen Sie OK und der Snapshot wird gestartet.
Live-Support-Sitzung
Live-Support-Sitzung über das Administrations-Portal aktivieren
Führen Sie die folgenden Schritte aus, um eine Live-Support-Sitzung vom Verwaltungsportal zu aktivieren:
Schritt 1: Melden Sie sich beim Verwaltungsportal an.
Schritt 2: auf oder wählen Sie Support und dann Live Support Session aus.
Schritt 3: Klicken Sie auf oder wählen Sie Download aus, um die SSH-Identität abzurufen, die vom TAC für die Remote-Verbindung mit der Appliance erforderlich ist. Klicken Sie anschließend auf oder wählen Sie Start, um die Live-Unterstützungssitzung zu starten, wie im Bild gezeigt.

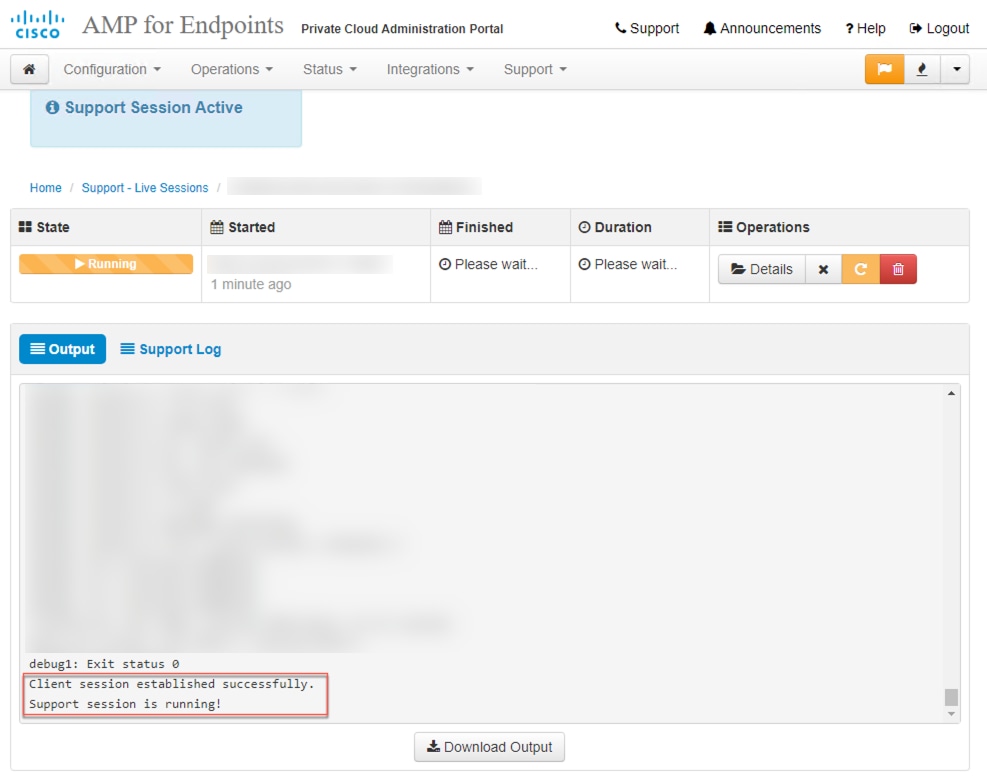
Schritt 4: Sie werden die Protokolle, wie im dargestellt, bemerken, nachdem die Appliance erfolgreich für die Live-Unterstützungssitzung eine Verbindung hergestellt hat, wie im Bild gezeigt.
Live-Support-Sitzung über das Verwaltungsportal SSH aktivieren
IFühren Sie die folgenden Schritte aus, um Live Support Session vom Verwaltungsportal SSH zu aktivieren:
Schritt 1: Melden Sie sich beim Verwaltungsportal SSH an.
Schritt 2: Dies ist die CLI, über die Live-Support-Sitzung über SSH aktiviert werden kann.
[root@fireamp ~]# amp-support session -l support.log -s support-sessions.amp.cisco.com -p 22


       usage: /opt/opadmin/embedded/bin/amp-support session [options]

        Manage a support session with a remote server; this facilitates a secure method of provide unrestricted shell access to your machine to an engineer on a remote system. Note that when restart a session, the same parameters as the previous session are used unless new parameters are supplied. The UUID is expected to be version 4. Note that the `--log` option provides an optional log file for the support engineer to log their shell activity to. A script is provided to the remote user to collect this log data, but it is not and cannot be enforced by the support script. OPTIONS -b, --batch Use batch (non-interactive) mode. -d, --delete Delete a support session and all files. -l, --log FILE Log remote shell commands to file. -p, --port PORT Connect to an alternative port. -s, --support-server SERVER Set the server of a session. -t, --terminate Terminate an active session. -v, --verbose Increase output verbosity. NOTE: UUID can be any random string as long as it has the format: xxxxxxxx-xxxx-xxxx-xxxx-xxxxxxxxxxxx. Also, you can keep the Port as default to 22 EXAMPLES /opt/opadmin/embedded/bin/amp-support session -l support.log -s support.example.com -p 2222 xxxxxxxx-xxxx-xxxx-xxxx-xxxxxxxxxxxx /opt/opadmin/embedded/bin/amp-support session xxxxxxxx-xxxx-xxxx-xxxx-xxxxxxxxxxxx /opt/opadmin/embedded/bin/amp-support session -t -d xxxxxxxx-xxxx-xxxx-xxxx-xxxxxxxxxxxx
Live-Unterstützungssitzung über die Appliance-Konsole aktivieren
Führen Sie die folgenden Schritte aus, um die Live-Unterstützungssitzung von der Private Cloud Appliance Console zu aktivieren:
Schritt 1: Melden Sie sich bei der Private Cloud Appliance Console an.
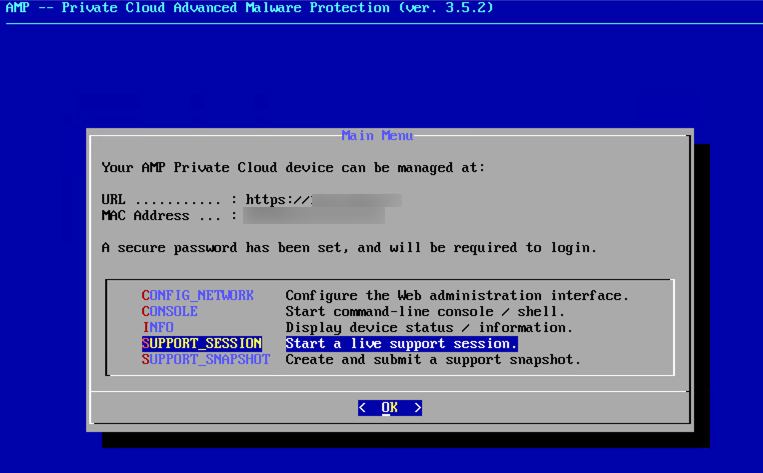
Schritt 2: Wählen Sie SUPPORT_SESSION, um die Live-Unterstützungssitzung zu aktivieren, wie im Bild gezeigt.
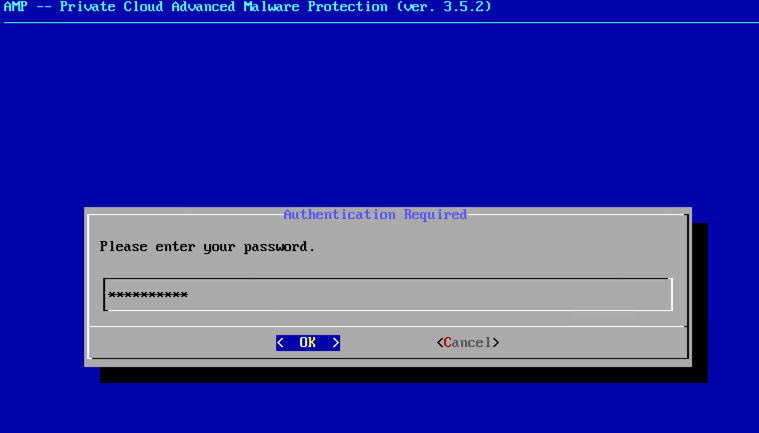
Schritt 3: Geben Sie das Administratorportal-Passwort ein, wie im Bild gezeigt.
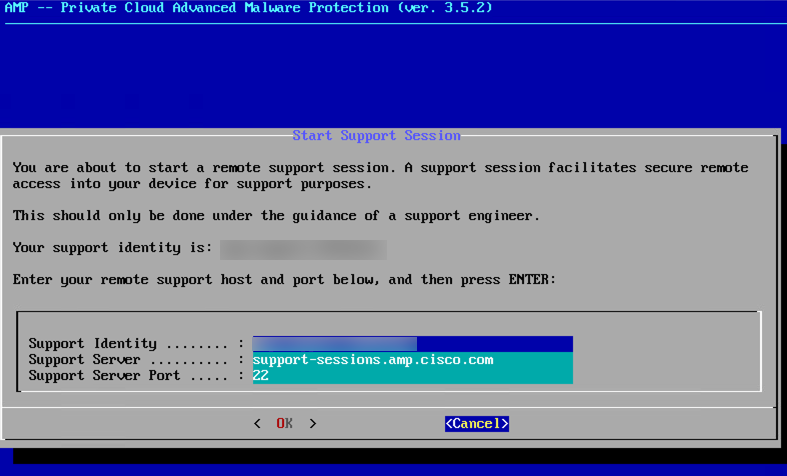
Schritt 4: Sie können alle Standardeinstellungen unverändert lassen. Wählen Sie OK, um die Live-Unterstützungssitzung zu aktivieren, wie im Bild gezeigt.
 Feedback