|
|
|
| Home: Configuring/Enabling
MAC Authentication Using RADIUS Server |
| |
You must first configure the SSID. Complete the
following steps to configure the SSID.
- From the navigation menu, click Security
to go to the Security Summary page.
- From the expanded Security menu, click
SSID Manager to go the SSID Manager
page.

- In the Current SSID list, select the SSID
for which MAC authentication will be used. If you need to create
a new SSID, continue to Step 4. Otherwise, skip to Step 7.
- Select <NEW>
from the Current SSID List.
- Provide the SSID name in the SSID text field.
- At the VLAN list, select the VLAN to be used
for this SSID. Select <NONE>
if VLANs are not enabled.
- Under Authentication Methods Accepted, select
the authentication type to use on this SSID.
- Use the drop-down menu to choose MAC authentication
only, or you can also select MAC and EAP authentication
or MAC or EAP authentication.
- Determine how you are going to use specific
RADIUS servers on this SSID. In the EAP and MAC Authentication
Server sections, you can choose to use the defaults or customize
the priority by using the drop-down menu. If you click to enable
the use of the defaults, click the Define Defaults link to move
into the Server Manager window.
- Click Apply to
create the SSID.
Now that the SSID is
configured, you can add the RADIUS or TACACS+ server. Complete
the following steps to add the RADIUS server.
- From the navigation menu, click Security
to go the Security Summary page.
- From the expanded Security menu, click Server
Manager to go to the Server Manager window.
- In the Current Server List, select the server
to be used for MAC authentication. If you need to create a new
server, continue to Step 4. Otherwise, skip to Step 10.
- Select <NEW>
from the Current Server List.
- Enter the server host name or IP address in
the Server text field.
- Use the drop-down menu to select RADIUS server
as the server type.
- In the Shared Secret text field, enter the
shared secret used by your specified server that matches the
one on the device.
- Enter the port number your server uses for
authentication in the Authentication Port parameter. The port
setting for the Cisco RADIUS server (the Access Control Server
[ACS]) is 1645, and the port setting for many RADIUS servers
is 1812.
- Use drop-down menus in the Default Server
Priorities section to determine which level of priority you
want to assign to each server. Select Priority 1, 2, or 3 for
this server.
- Click the Apply
button to add the server.
- Steps 11 through 16 are optional tasks and
can be skipped to expedite setup. Click the Global
Properties tab. Specify the interval at which the accounting
updates should be performed in the Accounting Updates Interval
field.
- In the TACACS+ Server Timeout field, specify
the number of seconds an access point waits for a reply to a
TACACS+ request before resending the request.
- In the RADIUS Server Timeout field, specify
the number of seconds an access point waits for a reply to a
RADIUS request before resending the request.
- In the RADIUS Server Retransmit Retries field,
specify the number of times the access point sends each RADIUS
request to the server before giving up.
- If more than one RADIUS server is configured
for MAC authentication, enable the Dead Server List option.
Specify how long unresponsive RADIUS servers should be skipped
over when the access point is attempting RADIUS server authentication.
Enter this amount in the Server remains on list for text field.
- Click Apply in
the Global Server Properties section.
Setting the MAC authentication
method
After the RADIUS server is added, you can set
the MAC authentication method. Complete the following steps to
set the MAC authentication method.
- From the navigation menu, click Security
to go to the Security Summary window.
- From the expanded Security menu, click Advanced
Security to go to the Advanced Security window.
- Click the MAC Address Authentication
tab to go to the MAC Address Authentication window.
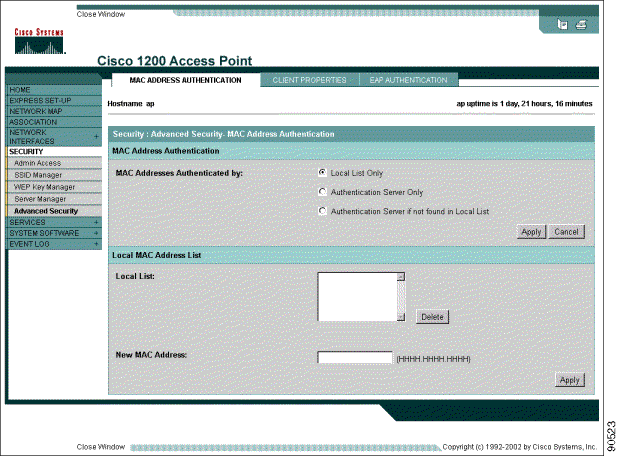
- If you want to use the RADIUS server in conjunction
with a local list, select Authentication Server if not found
in Local List and click Apply in the MAC Address Authentication
section. Then complete Step 5 through Step 8. Otherwise, choose
Authentication Server Only at the MAC Addresses authenticated
by parameter and skip to Step 8.
- In the Local MAC Address list section, enter
the authorized MAC address in the New MAC Address parameter.
- Click Apply on
the Local MAC Address List portion of the window to add this
MAC address to the local list.
- If you need to add more than one MAC address
to the local list, repeat Steps 5 and 6 until the list is complete.
- Click Apply in
the MAC Address Authentication section.
|
|