Synchronizing Mobility Services Engines

Table Of Contents

Synchronizing Mobility Services Engines

Synchronizing Cisco WCS and Mobility Services Engines

Configuring Automatic Database Synchronization and Out of Sync Alerts

Out-of-Sync Alarms

Viewing Mobility Services Engine Synchronization Status

Viewing Synchronization History


Synchronizing Mobility Services Engines


This chapter describes how to synchronize Cisco wireless LAN controllers and Cisco WCS with mobility services engines.

This chapter contains the following sections:

Synchronizing Cisco WCS and Mobility Services Engines

Viewing Mobility Services Engine Synchronization Status

Synchronizing Cisco WCS and Mobility Services Engines

This section describes how to synchronize Cisco WCS and mobility services engines manually and automatically.

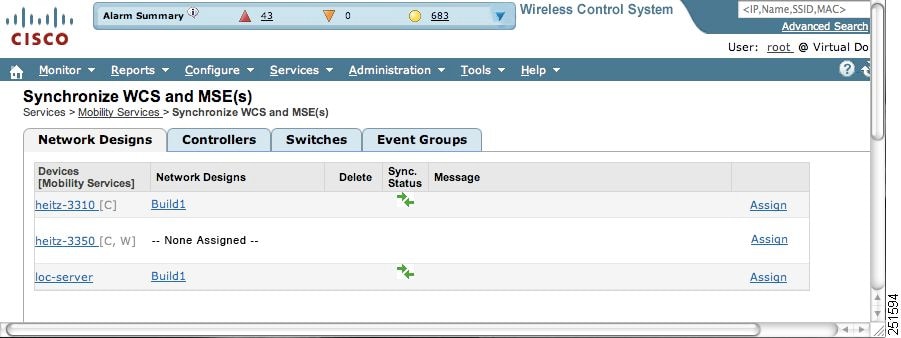
After adding a mobility services engine to Cisco WCS, you can synchronize network designs (campus, building, and outdoor maps), controllers (name and IP address), specific Catalyst Series 3000 and 4000 switches, and event groups with the mobility services engine.

Network Design— is a logical mapping of the physical placement of access points throughout facilities. A hierarchy of a single campus, the buildings that comprise that campus, and the floors of each building constitute a single network design.

Controller—is a selected controller that is associated and regularly exchanges location information with a mobility services engine. Regular synchronization ensures location accuracy.

Switches (wired)—are wired Catalyst switches that provide an interface to wired clients on the network. Regular synchronization ensures that location tracking of wired clients in the network is accurate.

The mobility services engine can be synchronized with Catalyst stackable switches (3750, 3750-E, 3560, 2960, IE-3000 switches), switch blades (3110, 3120, 3130, 3040, 3030, 3020), and switch ports.

The mobility services engine can also be synchronized with the following Catalyst 4000 series: WS-C4948, WS-C4948-10GE, ME-4924-10GE, WS-4928-10GE, WS-C4900M, WS-X4515, WS-X4516, WS-X4013+, WS-X4013+TS, WS-X4516-10GE, WS-X4013+10GE, WS-X45-SUP6-E, and WS-X45-SUP6-LE

Event Groups—are a group of predefined events that define triggers that generate an event. Regular synchronization ensures that the latest defined events are tracked.


Note Be sure to verify software compatibility between the controller, Cisco WCS, and the mobility services engine before synchronizing. Refer to the latest mobility services engine release note at the following link: http://www.cisco.com/en/US/products/ps9742/tsd_products_support_series_home.html.


Note Communication between the mobility services engine and Cisco WCS and the controller is in universal time code (UTC). Configuring NTP on each system provides devices with the UTC time. The mobility services engine and its associated controllers must be mapped to the same NTP server and the same Cisco WCS server. An NTP server is required to automatically synchronize time between the controller, Cisco WCS, and the mobility services engine.


To synchronize network designs, a controller, a Catalyst switch, or event group with the mobility services engine, follow these steps:


Step 1 Choose Services > Synchronize Services to display the Mobility Services > Synchronize WCS and MSE(s) window.

A four-tabbed panel appears with the following headings: Network Designs, Controllers, Switches, and Event Groups.


Note A Devices column appears on all four tabs and lists the name of the mobility services engine and the active services on that device. Services are noted in brackets next to the device name. Services supported are Context-Aware Software [C], and Wireless Intrusion Prevention System [W].


Step 2 Select the appropriate tab (network designs, controllers, switches, or event groups).

a. To assign a network design to a mobility services engine, click the Network Designs tab (see Figure 3-1).

Figure 3-1 Services > Synchronize Services > Network Designs Window

1. Click the Assign link for the appropriate network design.


Note A network design might comprise a large campus with several buildings, each monitored by a different mobility services engine. Therefore, you might need to assign a single network design to multiple mobility services engines.


2. In the Network Designs window that appears, check the check box of each network design that you want to applyto the mobility services engine. Click OK when the selection is complete.

A red asterisk (*) appears next to the Assign link (see Figure 3-2).

To undo assignments, click Reset. To go back to the Synchronize WCS and MSE(s) window without making any changes, click Cancel.

Figure 3-2 Services > Synchronize Services > Network Designs Window

3. Click Synchronize to update the mobility services database.

When items are synchronized, a green two-arrow icon appears in the Sync. Status column for each synchronized entry.

b. To associate a mobility services engine with a controller, click the Controllers tab.

1. In the Controllers window that appears click the Assign link for that mobility services engine.

2. In the window that appears (see Figure 3-3), check the check box next to the appropriate controller. Click OK.

The window in Figure 3-4 appears. A red asterisk (*) appears next to the Assign link


Note The selected controller must support the service that is configured on the mobility services engine (as noted in the supported services column). If it does not, a warning message appears when you click OK.


Note Controller names must be unique for synchronizing with a mobility services engine. If you have two controllers with the same name, only one controller synchronizes.


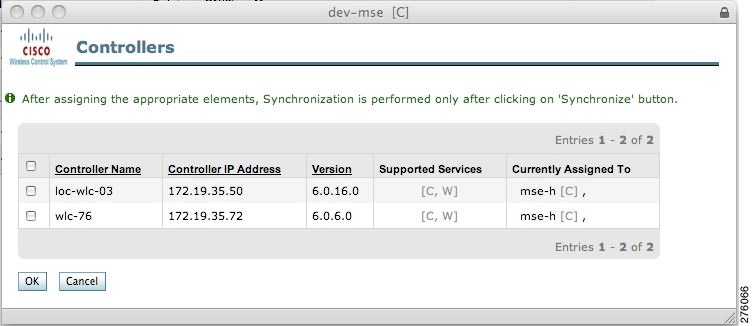
Figure 3-3 Controller Selection Window

Figure 3-4 Services > Synchronize Services > Controllers Window

3. Click Synchronize to update the mobility services database.

To undo assignments prior to synchronization, click Reset. To go back to the Synchronize WCS and MSE(s) window without making any changes, click Cancel.

When items are synchronized, a green two-arrow icon appears in the Sync. Status column for each synchronized entry.

c. To assign a Catalyst switch to a mobility services engine, click the Switches tab (see Figure 3-5).

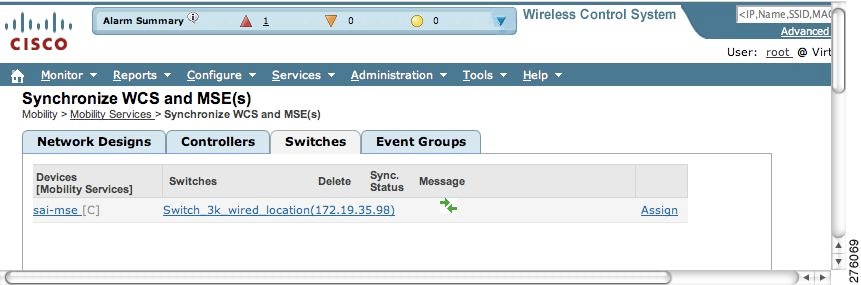
After adding a Catalyst switch to Cisco WCS, you need to assign it to a mobility services engine and then synchronize the two systems. Once they are synchronized, an NMSP connection between Cisco WCS and the mobility services engine is established.

All information (such as IP address, MAC, and civic address) on the wired switches and the wired clients connected to them downloads to the mobility services engine.


Note A switch can only be synchronized with one mobility services engine. However, a mobility services engine can have many switches attached to it.


1. To assign a Catalyst switch to a mobility services engine, click its corresponding Assign link.

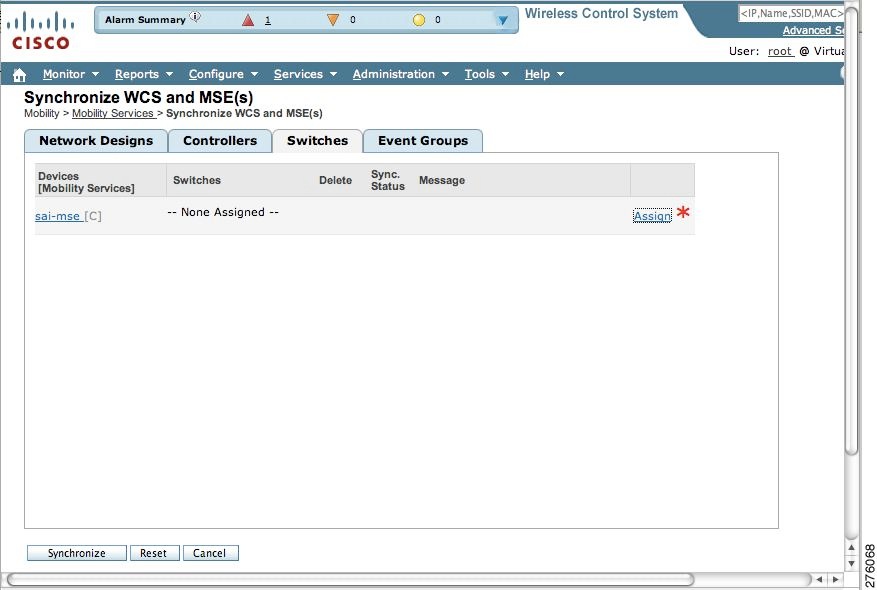
Figure 3-5 Services > Synchronize Services > Switches Window

2. In the Switch panel that appears, check the check box next to each wired switch to which you want the mobility services engine associated. Click OK.

A red asterisk (*) appears next to the Assign link (see Figure 3-6).

Figure 3-6 Services > Synchronize Services > Switches Window

3. Click Synchronize to update the mobility services database.

To undo assignments prior to synchronization, click Reset. To go back to the Synchronize WCS and MSE(s) window without making any changes, click Cancel.

When items are synchronized, a green two-arrow icon appears in the Sync. Status column for each synchronized entry (see Figure 3-7).

Figure 3-7 Synchronize WCS and MSE Confirmation Window

d. To assign an Event Group to a mobility services engine, click the Event Groups tab.

1. In the Event Groups panel that appears, check the check box for each event group that you want to assign to the mobility services engine. Click OK.

A red asterisk (*) appears next to the Assign link. To undo assignments, click Reset. To go back to the Synchronize WCS and Server(s) window without making any changes, click Cancel.

2. Click Synchronize to update the mobility services database.

To undo assignments prior to synchronization, click Reset. To go back to the Synchronize WCS and MSE(s) window without making any changes, click Cancel.

When items are synchronized, a green two-arrow icon appears in the Sync. Status column for each synchronized entry.


Note To unassign a network design, controller, switch, or event group from a mobility services engine, click the Assign link next to the system. In the panel that appears, uncheck the check box for the corresponding network design, controller, switch, or event group. Click OK. Then, click Synchronize. The name of the removed network design, controller or event group is replaced with None Assigned.


Configuring Automatic Database Synchronization and Out of Sync Alerts

Manual synchronization of Cisco WCS and mobility services engine databases is immediate. However, future deployment changes (such as changes to maps and access point positions) can yield incorrect location calculations and asset tracking until resynchronization.

To prevent out-of-sync conditions, use Cisco WCS to enable automatic synchronization. This policy ensures that synchronization between Cisco WCS and mobility services engine databases is triggered periodically and any related alarms are cleared.

To configure automatic synchronization, follow these steps:


Step 1 In Cisco WCS, choose Administration > Background Tasks.

Step 2 Check the Mobility Service Synchronization check box. Select Enable Task from the Select a command drop-down menu if it is not already enabled. Click Go.

Step 3 Click the Mobility Service Synchronization link. The Task > Mobility Service Synchronization window appears.

Step 4 To set the mobility services engine to send out-of-sync alerts, check the Out of Sync Alerts Enabled check box. By default, out-of-sync alarms are enabled.


Note Uncheck the Out of Sync Alerts Enabled check box to disable forwarding of out-of-sync alarms.


Note For a summary of out of sync alerts that are sent, refer to the "Out-of-Sync Alarms" section.


Step 5 To enable automatic synchronization, check the Auto Synchronization Enabled check box.


Note Automatic synchronization does not apply to network designs, controllers, or event groups that are not assigned to a mobility services engine. However, out-of-sync alarms will still be generated for these unassigned elements. For automatic synchronization to apply to network designs, controllers, or event groups, you need to manually assign them to a mobility services engine.


Step 6 Enter the time interval in hours at which the automatic synchronization is to be occur.

By default, auto-sync is disabled.

Step 7 Click Submit. You are returned to the Administration > Background Tasks screen and the Mobility Service Synchronization task displays an enabled state.


Out-of-Sync Alarms

Out-of-sync alarms are of minor severity (yellow), and are raised in response to the following conditions:

Elements are modified in Cisco WCS (the auto-sync policy pushes these elements)

Elements are modified in the mobility services engine (the auto-sync policy pulls these elements)

Elements other than controllers exist in the mobility services engine database but not in Cisco WCS (the auto-sync policy pulls these elements)

Elements are not assigned to any mobility services engine (the auto-sync policy does not apply)

Out-of-sync alarms are cleared when the following occurs:

Mobility services engine is deleted


Note When you delete a mobility services engine, the out-of-sync alarms for that system are also deleted. In addition, if you delete the last available mobility services engine, the alarms for the following event: elements not assigned to any server will also be deleted.


Elements are synchronized manually or automatically

User manually clears the alarms (although the alarms may reappear in the future when the scheduled task is next executed)

Viewing Mobility Services Engine Synchronization Status

You can use the Synchronize Services feature in Cisco WCS to view the status of network design, controller, switch, and event group synchronization with a mobility services engine.

To view synchronization status, follow these steps:


Step 1 In Cisco WCS, choose Services > Synchronize Services.

Step 2 Select either the Network Designs, Controllers, Switches, or Event Groups tab.

In the panel that appears, check the Sync. Status column for the synchronization status. A green two-arrow icon indicates that the mobility services engine is synchronized with the specified network design, controller, wired Catalyst switch, or event group. A gray two-arrow icon with a red circle indicates that its corresponding item is not synchronized with a given mobility services engine.


Viewing Synchronization History

You can view the synchronization history for the last 30 days for a mobility services engine. This is especially useful when automatic synchronization is enabled as alarms are automatically cleared. Synchronization history provides a summary of those cleared alarms.

To view synchronization history, follow these steps:


Step 1 In Cisco WCS, choose Services > Synchronization History. The Synchronization History window appears (see Figure 3-8).

Figure 3-8 Mobility > Synchronization History

Step 2 Click the column headers to sort the entries.

In the Synchronization History window, the Sync Direction column indicates whether information is pushed into the mobility services engine or pulled by the mobility services engine. The Generated By column indicates whether the synchronization was manual or automatic.