Feedback
Table Of Contents
Requirements for Setting Up Digital Networking
Task List: Setting up Digital Networking
Procedures for Setting Up Cisco Unity to Use Digital Networking
Enabling Messaging Among Cisco Unity Servers in Different Exchange 5.5 Sites
Customizing the Primary Location
Setting the Addressing, Directory Handler, and Automated Attendant Search Scopes
Setting the Addressing Search Scope
Setting the Directory Handler Search Scope
Setting the Automated Attendant Search Scope
Enabling Identified Subscriber Messaging Between Networked Cisco Unity Subscribers
Setting Permissions on Active Directory Containers Used for Importing Subscribers
Enabling Identified Subscriber Messaging on Each Cisco Unity Server
Modifying the All Subscribers Public Distribution List
Testing the Digital Networking Setup
Digital Networking Concepts and Definitions
Locations and Digital Networking
Identified Subscriber Messaging with Networked Cisco Unity Subscribers
Addressing Options for Subscribers in a Dialing Domain
Dialing Domains Shield Against Overlapping Numbering Plans
Addressing Options for Non-Networked Phone Systems
When Numbering Plans Do Not Overlap
Cisco Unity Administrator Scope
Browsing to Another Cisco Unity Administrator from the Local Cisco Unity Administrator
Searching for Subscriber Accounts Created on Another Cisco Unity Server
Using Global Subscriber Manager to Browse to Another Cisco Unity Administrator
Granting Administrative Rights to Other Cisco Unity Servers
Digital Networking in an Exchange Mixed-Mode Environment
Limitations Subscribers Can Encounter
Mapping Subscribers to Cisco Unity Servers
Digital Networking
Overview: Digital Networking
Each Cisco Unity server has a maximum number of subscribers that it can serve. When the voice messaging needs of your organizations require more than one Cisco Unity server, the servers can be networked together such that they access a single, global directory, while at the same time, each Cisco Unity installation in the network continues to serve only those subscribers that were created on the server. Digital Networking is the Cisco Unity feature that allows subscribers associated with one Cisco Unity server to exchange messages with subscribers associated with other Cisco Unity servers. With Digital Networking, subscribers can use the phone to log on to Cisco Unity and send voice messages to subscribers associated with other Cisco Unity servers ("To send a message, press 2"). After listening to messages, subscribers can reply to messages sent from subscribers on other Cisco Unity servers.
When the networked Cisco Unity servers are integrated with the same phone system, the servers can be grouped into a dialing domain and configured such that:
•
Calls are transferred from the automated attendant or directory assistance to subscribers who are not associated with the local server.
•
Subscribers use the same Cisco Unity tools for messaging with subscribers on other networked Cisco Unity servers that they use for messaging with subscribers on the same server. If your organization also has the FaxMail and Text to Speech e-mail features, subscribers can use the phone to forward fax and e-mail messages to any subscriber in the organization.
Although Cisco Unity stores information about subscribers (and other Cisco Unity objects such as call handlers) in a SQL database on the Cisco Unity server, a small subset of information about subscribers, distribution lists, and locations is also stored in the directory to enable Digital Networking. When subscriber and location data from other Cisco Unity servers replicates in the directory, Cisco Unity detects the data and updates the SQL database. Because of directory replication, each Cisco Unity server has the information that it needs to address voice messages to subscribers associated with the other Cisco Unity servers.
The directory in which Cisco Unity stores data is determined when Cisco Unity is set up. During setup, you specify one Exchange server (the partner Exchange server) through which Cisco Unity communicates with other Exchange servers in the network. If the partner server is Exchange 2000 or Exchange 2003, Cisco Unity uses Active Directory. If the partner server is Exchange 5.5, Cisco Unity uses the Exchange 5.5 directory.
Requirements for Setting Up Digital Networking
The key to Digital Networking is that all of the Cisco Unity servers access a common directory. To use Digital Networking, the Cisco Unity servers must be in one of the following configurations:
•
•
•
Additionally:
•
•
Note that Cisco Unity servers licensed for Unified Messaging (UM) and Cisco Unity servers licensed for Voice Messaging (VM) can use Digital Networking to exchange messages, as long as the above requirements are met. There are no licensing issues associated with VM and UM existing in the same Exchange organization or Active Directory forest, as long as the VM subscribers access voice and fax messages only over the phone interface or with the separately licensed Cisco Personal Communications Assistant (PCA).
Licenses
Digital Networking is enabled on every Cisco Unity server. There are no additional licenses that you need to obtain to set up Digital Networking.
License Pooling
Though you do not need a license for Digital Networking, you may want to add a licensed feature called license pooling. License pooling allows Cisco Unity servers that are set up for Digital Networking to pool licenses for subscribers and for the Cisco Unity Inbox. With license pooling, if total utilization across all of the Cisco Unity servers does not exceed total licenses for the feature, the Cisco Unity server is in compliance with licensing restrictions. For example, suppose two Cisco Unity servers each have 500 licenses for subscribers. With license pooling, one of the servers can use 501 or more licenses as long as the total used by both servers does not exceed 1,000.
For all licensed features other than subscriber licenses, licensing is on a per-machine basis. Licensing information is stored with the primary location for each Cisco Unity server. Because location data is stored in the directory, each Cisco Unity server has the information that it needs to keep track of license usage in the pool.
For more information about license pooling and obtaining licenses for Cisco Unity features, refer to the following:
•
•
In This Chapter
In this chapter, you will find information about procedures for setting up and upgrading Digital Networking, followed by detailed discussions of the concepts and terminology you need to understand. See the following sections:
•
•
•
•
Related Documentation
•
•
•
Setting Up Digital Networking
Prerequisites
•
•
•
Task List: Setting up Digital Networking
Use this task list to set up Digital Networking on each Cisco Unity server. The cross-references take you to detailed procedures. If a system is using failover, do the tasks only on the primary server unless a task requires changing the registry, which must be done on both the primary and secondary servers. (The instructions will note this.)
1.
2.
3.
4.
5.
6.
7.
8.
Note
Procedures for Setting Up Cisco Unity to Use Digital Networking
This section contains all of the procedures necessary to set up each Cisco Unity server for Digital Networking.
Enabling License Pooling
For each Cisco Unity server, you can choose whether it will participate in the license pool. To place a Cisco Unity server in the pool, obtain a license file with license pooling enabled, and then install the license file on the Cisco Unity server. If a license file on a Cisco Unity server does not have the license pooling feature enabled, the server does not participate in the pool, and compliance for licenses on that server is measured on a per-machine basis.
You obtain the license file by completing registration information on Cisco.com. Shortly after registration, Cisco e-mails the license file. The e-mail from Cisco contains instructions on how to save and store the files.
Note
The following information is required during registration:
•
•
Do the following procedures in the order listed.
To Get the MAC Address of the Cisco Unity Computer
Step 1
Step 2
Step 3
If the server contains more than one NIC, one value will appear for each NIC. Use the value for the primary NIC.
Step 4
To Register and Obtain the License Files
Step 1
Step 2
Step 3
Step 4
If license files are lost, it can take up to one business day to get another copy.
If you do not receive the license files within 1 hour or to get another copy of a license file, call the Cisco Technical Assistance Center (TAC) and ask for the Licensing Team:
800 553-2447.
the U.S.For your local Cisco TAC phone number, refer to the website http://www.cisco.com/warp/public/687/Directory/DirTAC.shtml.
Or send e-mail to licensing@cisco.com.
You will need to provide information to verify Cisco Unity ownership—for example, the purchase order number or the PAK (which appears on the sticker located on the front of the sleeve for Cisco Unity DVD 1 or CD 1).
To View the License Pooling Information
Step 1
Step 2
Step 3
Step 4
Step 5
Step 6
Enabling Messaging Among Cisco Unity Servers in Different Exchange 5.5 Sites
If the partner Exchange servers are in different sites within the same Exchange 5.5 organization, Exchange message and directory replication connectors (also called site connectors) must be installed. If the site connectors are not already installed, install them now according to the instructions in your Microsoft documentation. Verify that the site connectors function properly before proceeding.
Do the following procedure only if the partner Exchange servers are in separate sites in an Exchange 5.5 organization. Skip this procedure if the partner Exchange servers are in the same Exchange 5.5 site, or if the partner Exchange server is running Exchange 2000 or Exchange 2003.
Note
To Allow Messaging Among Cisco Unity Servers in the Entire Exchange 5.5 Organization
Step 1
Step 2
Caution
Step 3
Step 4
HKEY_LOCAL_MACHINE\Software\ActiveVoice\Directory Connectors\DirSynchEx55\1.00\Locations
Step 5
Step 6
o=OrganizationName
Substitute the name of your Exchange organization for OrganizationName.
Step 7
Step 8
HKEY_LOCAL_MACHINE\Software\ActiveVoice\Directory Connectors\DirSynchEx55\1.00\MailUsers
Step 9
Step 10
o=OrganizationName
Substitute the name of your Exchange organization for OrganizationName. Verify that o=OrganizationName is the only value in the box.
Step 11
Step 12
HKEY_LOCAL_MACHINE\Software\ActiveVoice\Directory Connectors\DirSynchEx55\1.00\DistributionLists
Step 13
Step 14
o=OrganizationName
Substitute the name of your Exchange organization for OrganizationName. Verify that o=OrganizationName is the only value in the box.
Step 15
Step 16
HKEY_LOCAL_MACHINE\Software\ActiveVoice\Directory Connectors\DirSynchEx55\1.00
Step 17
Step 18
Step 19
Step 20
Customizing the Primary Location
See Table 7-1 on page 7-3 for detailed information about the primary location profile settings.
To Customize the Primary Location
Step 1
Step 2
Step 3
Step 4
Step 5
•
•
Note that the dialing domain name is case sensitive and must be entered exactly the same on all of the servers. To ensure that all servers are correctly added to the same dialing domain, enter the dialing domain name on one Cisco Unity server and wait for the name to replicate to the other Cisco Unity servers. By doing so, you also confirm that replication is working correctly among the servers. The time that it takes for the primary location data from other Cisco Unity servers to be reflected on the local server depends on your network configuration and replication schedule.
Step 6
Setting the Addressing, Directory Handler, and Automated Attendant Search Scopes
Do the procedures in the following sections to set up the search scopes:
•
•
•
Setting the Addressing Search Scope
For detailed information about the addressing search options, see the "Primary Location Addressing Option Settings" section on page 7-6.
To Set the Addressing Search Scope
Step 1
•
•
Step 2
Step 3
Setting the Directory Handler Search Scope
For detailed information about directory handler search options, refer to the "Directory Handler Search Options Settings" section in the "Directory Handler Settings" chapter of the Cisco Unity System Administration Guide. (The Cisco Unity System Administration Guide is available at http://www.cisco.com/univercd/cc/td/doc/product/voice/c_unity/unity40/sag/sag404/ex/index.htm.)
To Set the Directory Handler Search Scope
Step 1
Step 2
Step 3
Setting the Automated Attendant Search Scope
By default, callers who reach the opening greeting for your organization can be transferred only to subscribers associated with the local Cisco Unity server. If you want to set up the automated attendant so that callers can be transferred to subscribers associated with other Cisco Unity servers in the same dialing domain, change a registry setting as described in the following procedure.
The automated attendant search scope must be set to search the dialing domain in order for the following features to work:
•
•
Note
To Set the Automated Attendant Search Scope
Step 1
Step 2
Step 3
Step 4
Step 5
You do not need to restart Cisco Unity to enable the change.
Step 6
Enabling Identified Subscriber Messaging Between Networked Cisco Unity Subscribers
Enabling identified subscriber messaging between networked Cisco Unity subscribers requires the following:
•
•
•
•
•
Setting Permissions on Active Directory Containers Used for Importing Subscribers
If for all of the Cisco Unity servers combined, you will be importing users from two or more containers, the Cisco Unity message store services account on each Cisco Unity server must be granted SendAs permission on every container from which users will be imported on every Cisco Unity server in the forest, or identified subscriber messaging may not work between Cisco Unity servers. For example, if CiscoUnityServer1 will import users from Container1 and Container2, and if CiscoUnityServer2 will import users from Container3 and Container4, Cisco Unity message store services account on each Cisco Unity server must have SendAs permission for all four containers.
To Set Applicable Permissions
Step 1
Step 2
Step 3
Step 4
•
–
–
•
–
–
•
–
–
Step 5
Enabling Identified Subscriber Messaging on Each Cisco Unity Server
Note
To Enable Identified Subscriber Messaging on Each Cisco Unity Server
Step 1
Step 2
Identified subscriber messaging for subscribers on the same Cisco Unity server is enabled when the check box is unchecked. By default, the box is unchecked.
Step 3
Modifying the All Subscribers Public Distribution List
By default, the predefined All Subscribers public distribution list on each Cisco Unity server has the same recorded voice name and extension. If you do not modify the recorded voice name and extension, subscribers will hear a confusing list of choices when they address messages to an All Subscribers distribution list, and errors will be logged to the Windows Event Viewer on the Cisco Unity server.
To Modify the All Subscribers Public Distribution List
Step 1
Step 2
Step 3
Step 4
Step 5
Step 6
Step 7
Step 8
Testing the Digital Networking Setup
To test the Digital Networking setup, create test subscriber accounts or use existing subscriber accounts on each Cisco Unity server. When setting up subscriber accounts in the Cisco Unity Administrator to be used in the tests, be sure to:
•
•
•
•
Do the following tests to make sure Digital Networking is functioning properly:
•
•
•
•
To Verify Messaging Between Subscribers on Different Cisco Unity Servers
Verify that messaging between subscribers on different Cisco Unity servers works in both directions (for example, from server A to server B and from server B to server A).
Step 1
Step 2
Step 3
Step 4
To Verify Call Transfers from the Automated Attendant to Subscribers on Other Cisco Unity Servers
If the automated attendant search scope is set to search the dialing domain, verify that outside callers are transferred to subscribers associated with other Cisco Unity servers.
Step 1
Step 2
To Verify Call Transfers from a Directory Handler to Subscribers on Other Cisco Unity Servers
If the directory handler search scope is set to search the dialing domain, verify that outside callers can find subscribers associated with other Cisco Unity servers in the phone directory.
Step 1
Step 2
To Verify Identified Subscriber Messaging Between Networked Subscribers
Do this test if the Cisco Unity servers have been configured for identified subscriber messaging between networked subscribers.
Step 1
a.
b.
c.
Step 2
a.
b.
c.
Digital Networking Concepts and Definitions
The following sections explain Digital Networking concepts in detail:
•
•
•
•
Locations and Digital Networking
Central to how Digital Networking works is a Cisco Unity object called a location. Each Cisco Unity server is associated with one location, referred to as the default or primary location, which is created during installation and which cannot be deleted. With the exception of public distribution lists, all subscribers and other Cisco Unity objects (such as call handlers) created on your Cisco Unity server are associated with the primary location.
Each primary location contains the addressing information that Cisco Unity needs to route messages between Cisco Unity servers. Because Cisco Unity stores location and subscriber addressing information in the directory, the addressing information replicates to other Cisco Unity servers on the network.
The primary location also contains a Dial ID, which Cisco Unity uses as an identifier for the location. Carefully plan the numbers that you choose as Dial IDs for the primary location (and for any delivery locations that you create). Without careful planning, it is possible to inadvertently assign Dial IDs that will cause problems in locating message recipients at another location. See the "Assigning Dial IDs" section on page 7-1 and the "Location Addressing Options Settings" section on page 7-12 for more information.
Dialing Domains
A dialing domain is a collection of Cisco Unity servers that access the same directory and that are integrated with the same phone system or phone system network. (Note this includes Cisco Unity servers configured for dual integrations.) A dialing domain is a grouping scheme that allows Cisco Unity to handle call transfers from one Cisco Unity server to another. Within the dialing domain, subscriber extensions in Cisco Unity must be unique just as the phone extensions in the phone system must be unique. (Typically, a subscriber extension and phone extension are the same number.) With a networked phone system, subscribers dial a phone extension without having to dial a trunk access code or prefix when calling someone who is at another location on the phone network. In the same way, when grouped in a dialing domain, subscribers associated with one Cisco Unity server enter a subscriber extension when sending messages to subscribers associated with another Cisco Unity server.
To be in a dialing domain, all of the Cisco Unity servers must access the same directory; a dialing domain cannot span directories. Dialing domains can encompass multiple Exchange 5.5 sites or Exchange 2000 or Exchange 2003 routing groups.
To group the Cisco Unity servers in a dialing domain, you enter information on the primary location page of each Cisco Unity server, as described in the "Customizing the Primary Location" section.
The following sections describe the functionality that can be provided when the Cisco Unity servers are in the same dialing domain.
•
•
Release to Switch Transfers from the Automated Attendant or a Directory Handler to Subscribers on Other Cisco Unity Servers
By default, when a caller enters the extension of a subscriber from the automated attendant (for example, from the opening greeting), or a caller spells the name of a subscriber from a directory handler, Cisco Unity searches only the local server for a matching subscriber. For calls to be transferred from the auto attendant or a directory handler on one Cisco Unity server to a subscriber on another Cisco Unity server, the servers must be configured to be in the same dialing domain.
To enable this functionality, you set search scopes so that Cisco Unity searches for a matching extension or name among subscribers on other Cisco Unity servers in the dialing domain. There are separate search scopes, one for the automated attendant and one for each directory handler. See the "Setting the Directory Handler Search Scope" section and the "Setting the Automated Attendant Search Scope" section for details on how to set the search scopes.
Subscriber call transfer settings are not stored in the directory. Because the directory is the means by which Cisco Unity servers share subscriber data, Cisco Unity servers do not have access to the call transfer settings of subscribers on other Cisco Unity servers. By default, when calls are transferred from the automated attendant or a directory handler to subscribers who are not associated with the local server, the transfers are automatically handled by the phone system (release to switch)—rather than by Cisco Unity (supervised transfer)—even if these subscribers are set up for supervised transfers. Note the following limitations:
•
•
Identified Subscriber Messaging with Networked Cisco Unity Subscribers
When a subscriber calls another subscriber, and the call is forwarded to the greeting of the called subscriber, the ability of Cisco Unity to identify that it is a subscriber who is leaving a message is referred to as identified subscriber messaging. Because Cisco Unity is able to identify the caller as a subscriber:
•
•
•
For identified subscriber messaging to work when a subscriber on one Cisco Unity server calls a subscriber on another networked Cisco Unity server, the servers must be in the same dialing domain. Note that identified subscriber messaging between Cisco Unity servers is by default not enabled. See the "Enabling Identified Subscriber Messaging Between Networked Cisco Unity Subscribers" section for details.
It is important to note the difference between the following two circumstances:
•
•
When the subscriber has logged on to Cisco Unity, Cisco Unity can identify the message as being from the subscriber, regardless of which Cisco Unity server the message recipient is homed on. In this case, the phone system is not involved and the recipient phone does not ring. Instead, the message is sent via Digital Networking.
For identified subscriber messaging to work, all of the Cisco Unity servers in the dialing domain must be running Cisco Unity 3.1(6), 4.0(3), or a later version.
Note also that identified subscriber messaging has been enhanced to allow Cisco Unity subscribers to identify messages left from users of other voice messaging systems who have corresponding AMIS, Bridge, or VPIM subscriber accounts in Cisco Unity.
Addressing Search Scopes
In addition to the automated attendant and directory handler search scopes mentioned above, a dialing domain provides a means to set the scope for searches that Cisco Unity performs in the following cases:
•
•
By default, the addressing search scope used for the above searches is set to search only among subscribers on the local Cisco Unity server. You must expand the addressing search scope on each Cisco Unity server to either the dialing domain or the global directory to enable messaging between subscribers on different Cisco Unity servers. See the "Setting the Addressing Search Scope" section for information on how to expand the Addressing search scope.
Addressing Options for Subscribers in a Dialing Domain
After expanding the addressing search scope to either the dialing domain or the global directory, subscribers address messages to subscribers on other Cisco Unity servers the same way that they address messages to subscribers on the same Cisco Unity server: either by extension or by spelling the name.
Dialing Domains Shield Against Overlapping Numbering Plans
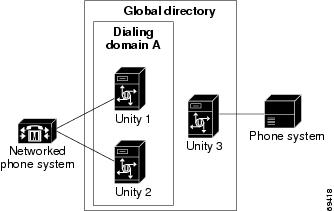
The two requirements for grouping Cisco Unity servers into a dialing domain are that the servers access the same global directory and are integrated with the same phone system. However, the minimum requirement for the basic messaging functionality provided by Digital Networking is that all of the Cisco Unity servers access the same global directory, as Figure 2-1 illustrates.
Figure 2-1 Multiple Phone Systems But One Global Directory
Subscribers on the Cisco Unity servers in the dialing domain can use the phone to send messages to and reply to messages from the subscribers on Unity 3, and vice-versa. However, identified subscriber messaging is not available between the subscribers on Unity 3 and the subscribers on the Cisco Unity servers in dialing domain A.
Although subscriber extensions must be unique within a dialing domain, it is possible that subscribers associated with a Cisco Unity server outside of the dialing domain could have extensions that are the same as extensions used by subscribers associated with the servers within the dialing domain. In other words, it is possible that extensions may overlap in the global directory when there are Cisco Unity servers that are integrated with different phone systems.
Grouping the Cisco Unity servers into a dialing domain allows Cisco Unity to handle overlapping numbering plans. The dialing domain allows the subscribers within the dialing domain to use extensions to address messages without conflicting with the extensions of the subscribers on the other phone system. See the "How Cisco Unity Searches for a Matching Name" section on page 7-7 and the "How Cisco Unity Searches for a Matching Number" section on page 7-7 for a detailed description of how dialing domains shield against overlapping numbering plans.
Addressing Options for Non-Networked Phone Systems
If your organization has a separate phone system for each location, subscribers at one location dial a complete phone number, not just an extension, when calling someone at another location. When subscribers log on to Cisco Unity to send messages to subscribers on another Cisco Unity server, the number they enter when addressing the message depends on whether the Cisco Unity numbering plans overlap across locations, as described in the following sections.
When Numbering Plans Do Not Overlap
When Cisco Unity numbering plans do not overlap across locations—that is, when subscriber extensions are unique across locations—subscribers enter an extension when addressing a message to a subscriber who is associated with another Cisco Unity server.
As a convenience for subscribers, you may choose to add alternate extensions to each subscriber account. With alternate extensions, the number that a subscriber enters when addressing a message to someone at another location can be the same number that the subscriber dials when calling. When set up this way, subscribers do not need to remember two different numbers—one for calling a subscriber directly, and one for addressing a message.
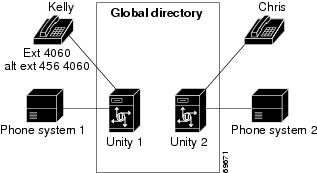
For example, a subscriber, Kelly Bader, has subscriber extension 4060, as illustrated in Figure 2-2. Suppose that Chris, a subscriber at a remote location, dials 456-4060 to reach Kelly by phone. When Chris logs on to Cisco Unity to send a message to Kelly, he has to remember just to dial the extension (4060) and not dial the prefix (456) when addressing the message, rather than using the same number he dials to call Kelly. However, you could assign to Kelly the alternate extension 4564060. If this alternate extension has been set up, Chris can enter either 4060 or 4564060 when addressing a message to Kelly.
Figure 2-2 No Overlapping Extensions
If the numbering plans for each location do not overlap, setting up alternate extensions is optional because they are simply a convenience for subscribers. However, if you do not set up alternate extensions, be sure to tell subscribers to use the extension instead of the full phone number when addressing messages to subscribers associated with another location.
Note that alternate extensions have other purposes beyond their use in Digital Networking, such as handling multiple line appearances on subscriber phones. Subscribers can have up to nine alternate extensions. For more information, refer to the "Subscriber Alternate Extension Settings" section in the "Subscriber Settings" chapter of the Cisco Unity System Administration Guide. (The Cisco Unity System Administration Guide is available at http://www.cisco.com/univercd/cc/td/doc/product/voice/c_unity/unity40/sag/sag404/ex/index.htm.)
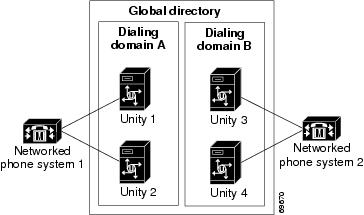
When Numbering Plans Overlap
Assume that subscriber extensions on Unity 3 in Figure 2-3 overlap with extensions in dialing domain A. To allow subscribers associated with Unity 3 to use the phone to address messages to subscribers in dialing domain A, and vice-versa, you have the following choices:
•
•
•
When a subscriber addresses a message, Cisco Unity searches for a matching extension on the local Cisco Unity server first. If a match is found, Cisco Unity ends the search and never looks for a matching extension at another location. Therefore, if a local subscriber and a subscriber on another Cisco Unity server have the same extension, Cisco Unity will find only the subscriber on the local Cisco Unity server. However, when one of the options described above is set up, subscribers on the local server will be able to address messages to subscribers on other Cisco Unity servers.
Figure 2-3 Numbering Plans Overlap
Cisco Unity Administrator Scope
With the exception of public distribution lists, all subscribers and other Cisco Unity objects (such as call handlers) created on your Cisco Unity server are associated with the primary location of your server. Because of this association, if you want to access the subscriber accounts and other objects created on another server, you need to run the Cisco Unity Administrator of the server that the object was created on. Note that you can view information about the primary locations of other servers and the delivery locations created on other servers, but you cannot modify or delete them.
The following sections provide information about accessing the Cisco Unity Administrator on other servers:
•
•
•
Browsing to Another Cisco Unity Administrator from the Local Cisco Unity Administrator
The Cisco Unity Administrator on the local server provides links to the Cisco Unity Administrator of other servers. To access the data of any object that was created on another Cisco Unity server, you need to know the name of the server on which the object was created.
To Browse to Another Cisco Unity Administrator on a Networked Cisco Unity Server
Step 1
Step 2
Step 3
Another instance of the Cisco Unity Administrator appears in a separate browser window. This is the Cisco Unity Administrator of the server that you selected.
Searching for Subscriber Accounts Created on Another Cisco Unity Server
Within the local Cisco Unity Administrator, you can search for subscribers on other Cisco Unity servers, and when you select a subscriber account to edit settings, the applicable Cisco Unity Administrator is launched. Do the following procedure to use the Cisco Unity Administrator on your local Cisco Unity server to search for subscriber accounts on other Cisco Unity servers in the network.
To Search for Subscriber Accounts Created on a Cisco Unity Server Other than Your Local Cisco Unity Server
Step 1
Step 2
Step 3
Step 4
Step 5
Step 6
Step 7
Step 8
Another instance of the Cisco Unity Administrator appears in a separate browser window. This is the Cisco Unity Administrator website of the Cisco Unity server on which the subscriber account was created. The subscriber profile page is displayed in the new browser window.
Using Global Subscriber Manager to Browse to Another Cisco Unity Administrator
You can also use the Global Subscriber Manager (GSM) from Tools Depot to launch the Cisco Unity Administrator on another server. The GSM shows your entire Cisco Unity network broken down by dialing domains and servers. The GSM allows you to quickly locate individual subscribers and launch the Cisco Unity Administrator for the subscribers regardless of which server they are homed on. You can select any scope you want and see all of the subscribers at that level. Searching can be done by dialing domain, by server, or globally across the entire Cisco Unity network.
To Use the GSM
Step 1
Step 2
Double-click the subscriber account that you want to edit. The applicable Cisco Unity Administrator will be displayed in a browser window. Refer to the GSM Help file for more information.
Granting Administrative Rights to Other Cisco Unity Servers
To access the Cisco Unity Administrator on another server, the administrators on the local Cisco Unity server need the applicable class of service (COS) rights. The easiest way to set this up is to run the GrantUnityAccess utility. Refer to the "Granting Administrative Rights to Other Cisco Unity Servers" section in the "Accessing the Cisco Unity Administrator" chapter in the Cisco Unity System Administration Guide for instructions. (The Cisco Unity System Administration Guide is available at http://www.cisco.com/univercd/cc/td/doc/product/voice/c_unity/unity40/sag/sag404/ex/index.htm.)
Distribution Lists
Public distribution lists are not associated with a specific Cisco Unity server. If a list has a recorded voice name, an extension, or both, subscribers can address messages to it—if allowed by their class of service—regardless of which location created the list.
New Lists
When you create a new public distribution list, keep in mind the following:
•
•
•
Predefined Public Distribution Lists
Cisco Unity includes the following predefined public distribution lists: All Subscribers, Unaddressed Messages, and System Event Messages. Each Cisco Unity server in your organization has a distinct version of each of these lists. When you view these lists in the Cisco Unity Administrator, the Cisco Unity server name is appended to the list name.
By default, the predefined All Subscribers public distribution list on each Cisco Unity server has the same recorded voice name ("all subscribers") and extension. When setting up Digital Networking, you should modify the recorded voice name and extension of each All Subscribers list; if you do not, subscribers will hear a confusing list of choices when they address messages to an All Subscribers distribution list, and errors will be logged to the Windows Event Viewer on the Cisco Unity server because of the non-unique extensions.
Tip
By default, each Unaddressed Messages and System Event Messages distribution list has the same recorded voice name, but they are not assigned an extension because subscribers typically do not address messages to these lists.
Private Lists
When creating private lists, subscribers can add members from other locations if allowed by the Addressing Options settings for your default location. The location addressing options allow you to control the search that Cisco Unity performs when a subscriber adds members to a private list and when a subscriber addresses a message. For more information, see the "Primary Location Addressing Option Settings" section on page 7-6.
Notable Behavior
This section provides information about notable expected behavior associated with Digital Networking. See the following sections for more information:
•
•
Digital Networking in an Exchange Mixed-Mode Environment
To use Digital Networking in an Exchange mixed-mode environment, all of the Cisco Unity servers must use Exchange 2000 or Exchange 2003 for a partner server. When migrating from Exchange 5.5 to Exchange 2000 or Exchange 2003 in stages, all Cisco Unity servers must be reconfigured to use an Exchange 2000 or Exchange 2003 partner server. Digital Networking is not supported between a Cisco Unity server with a partner Exchange 5.5 server and a Cisco Unity server with a partner Exchange 2000 or Exchange 2003 server.
Limitations Subscribers Can Encounter
When a Cisco Unity/Exchange 5.5 server is networked with a Cisco Unity/Exchange 2000 or Exchange 2003 server, primary locations, delivery locations, and other Cisco Unity-specific attributes needed for messaging do not replicate correctly through the Microsoft Active Directory Connector (ADC). Therefore, subscribers with mailboxes on Exchange 5.5 servers are not able to send messages to subscribers with mailboxes on Exchange 2000 or Exchange 2003 servers and vice versa. However, when all of the Cisco Unity servers have Exchange 2000 or Exchange 2003 for a partner server, subscriber messaging in an Exchange mixed-mode environment functions properly.
This limitation also exists when Digital Networking is combined with AMIS, Bridge, SMTP, and VPIM Networking because delivery locations do not replicate through the ADC. For example, if AMIS delivery locations are created in Cisco Unity/Exchange 5.5, only those subscribers on Cisco Unity/Exchange 5.5 are able to send messages to the remote voice messaging system represented by the AMIS delivery location. Similarly, if the AMIS delivery locations are created in Cisco Unity/Exchange 2000 or Exchange 2003, only those subscribers on Cisco Unity/Exchange 2000 or Exchange 2003 are able to send messages to the remote voice messaging system represented by the AMIS delivery location. However, when all of the Cisco Unity servers have Exchange 2000 or Exchange 2003 for a partner server, AMIS messaging in an Exchange mixed-mode environment functions properly.
Mapping Subscribers to Cisco Unity Servers
Each Cisco Unity server handles a distinct group of subscribers. In large organizations, it is possible that more than one Cisco Unity server will be in use at the same physical location. In this case, you need to determine which subscriber accounts to create on each of the Cisco Unity servers (the "home" Cisco Unity server for each subscriber), and keep a record of the mapping. This record is needed for the following reasons:
•
•
•
To create a record of the mapping, run the Subscribers report on each Cisco Unity server. The information in this report includes the subscriber name and primary location. Refer to the "Subscribers Report" section in the "Reports" chapter of the Cisco Unity System Administration Guide for more information. (The Cisco Unity System Administration Guide is available at http://www.cisco.com/univercd/cc/td/doc/product/voice/c_unity/unity40/sag/sag404/ex/index.htm.)