-
Administrator Guide for Cisco Unified MeetingPlace Audio Server Release 5.3
-
Preface
-
Introducing Cisco Unified MeetingPlace Audio Server
-
Setting Up Cisco Unified MeetingPlace Audio Server
-
Scheduling and Attending Meetings
-
Running Reports
-
Managing and Maintaining Cisco Unified MeetingPlace Audio Server
-
Troubleshooting the Cisco Unified MeetingPlace Audio Server System
-
Installing MeetingTime
-
File Import Specifications
-
Raw Data Export Specifications
-
Cisco Unified MeetingPlace SNMP
-
Cisco Unified MeetingPlace DCTS Addin
-
Creating, Uploading, and Deleting Custom Voice Prompts
-
Custom Voice Prompts
-
 Feedback
Table Of Contents
Troubleshooting the Cisco Unified MeetingPlace Audio Server System
Viewing the Alarm Table (Cisco Unified MeetingPlace 8106 and Cisco Unified MeetingPlace 8112)
Interpreting LEDs on the Cisco Unified MeetingPlace 8106
Interpreting Alarm LEDs on the Cisco Unified MeetingPlace 8112
Resolving Sound Quality Problems
Cisco Unified MeetingPlace Server Failure
Using the Shadow Server to Recover Site Disaster
Importing Meetings to Recover Site Disaster
Procedure 1: Generate a Report
Procedure 2: Import Meeting Details into a Target Server
Importing and Deleting Meetings in Batch Mode
Importing Meetings in Batch Mode
Deleting Meetings in Batch Mode
About Administering Cisco Unified MeetingPlace During Network Outages
Administering Cisco Unified MeetingPlace Through Modem Interface
Administering Cisco Unified MeetingPlace Using a Crossover LAN Cable Connection
Handling System Problems that Affect Users
Problem: Problems with Meeting IDs
Problem: User Reports Poor Sound Quality
Problem: User Cannot Schedule a Meeting
Problem: Requests for More Time or Ports
Troubleshooting the Cisco Unified MeetingPlace Audio Server System
This chapter describes the following topics:
•
About Administering Cisco Unified MeetingPlace During Network Outages
•
About Alarms
As the system administrator, you must detect system hardware and software malfunctions, unauthorized access, toll fraud, and other error conditions in the Cisco Unified MeetingPlace system. This section describes the Alarm Table and how to use it.
When a problem occurs, you are notified in the following ways:
•
•
•
Understanding the Alarm Table
In addition to reporting abnormal events, the Alarm Table shows you how many times the alarm condition occurred, the date of its first and last occurrences, the server number where the alarm occurred, and a brief description of the alarm condition.
When an alarm occurs, Cisco Unified MeetingPlace assigns it an alarm code that identifies the type of alarm. If you want to be notified in case of an alarm, configure the system to outdial to a specific destination.
The Alarm Table reports five types of alarms:
•
•
•
•
•
As the system administrator, you deal directly with only some of the first two alarm types. Other alarm types require assistance from Cisco NCE (see "Obtaining Technical Assistance" in the Guide to Cisco Conferencing Documentation and Support).
We recommend that you check the Alarm Table weekly. You can save the information from the Alarm Table in a file for future reference, and then clear the alarms in the table. If the alarms are not cleared, the table overflows and you cannot view new alarm entries.
Caution
Table 6-1 describes various alarms you might see.
Table 6-1 Alarms
Code[40728] Too many attempts to log in to profile
A login error alarm that means a user tried unsuccessfully to log in more than the number of attempts specified in the Usage Parameters.
The Alarm Table reports the last user who unsuccessfully attempted login since you last cleared the alarm.
(For information on clearing alarms, see the "Viewing the Alarm Table (Cisco Unified MeetingPlace 8106 and Cisco Unified MeetingPlace 8112)" section.)
Code[4916105] Red Alarm detected on this T1 span
A failure alarm that appears when a T1 line is down, such as during a power failure. Call your telephony service provider for reactivation.
IP failure alarm
Server-related IP failures can cause an alarm or generate a log. If you experience a server-related IP failure, see "Obtaining Technical Assistance" in the Guide to Cisco Conferencing Documentation and Support for assistance.
If the IP Gateway fails, see the Administrator Guide for Cisco Unified MeetingPlace H.323/SIP IP Gateway Software, or "Obtaining Technical Assistance" in the Guide to Cisco Conferencing Documentation and Support for assistance.
Code [1048593] DB disk backup is disabled. Run 'save' to enable
A minor alarm that is posted when, during a system restart, the system detects that the internal disk-to-disk database backup is disabled. The disk-to-disk database backup is disabled by several maintenance procedures, notably any software upgrade.
To prevent this alarm condition, system administrators can run the save command, making the upgrade permanent.
System administrators can allow attendants to view alarms but not clear them. For more information on configuring this function, see the "About Help Desk Privileges for Attendants" section.
Viewing the Alarm Table (Cisco Unified MeetingPlace 8106 and Cisco Unified MeetingPlace 8112)
To check the Alarm Table, in the MeetingTime System tab:
Step 1
You can also check the Alarm Table by choosing Administration menu > View Alarms.
The Alarm Viewer window shows the alarm table. Each alarm is listed by server with a corresponding alarm number.
Step 2
Step 3
Important Alarm Codes
Table 6-2 shows ranges of alarm codes that represent unusual conditions in the system. Report any of these codes to a Cisco NCE representative (see "Obtaining Technical Assistance" in the Guide to Cisco Conferencing Documentation and Support for assistance).
Table 6-2 Important Alarm Codes
Interpreting LEDs on the Cisco Unified MeetingPlace 8106
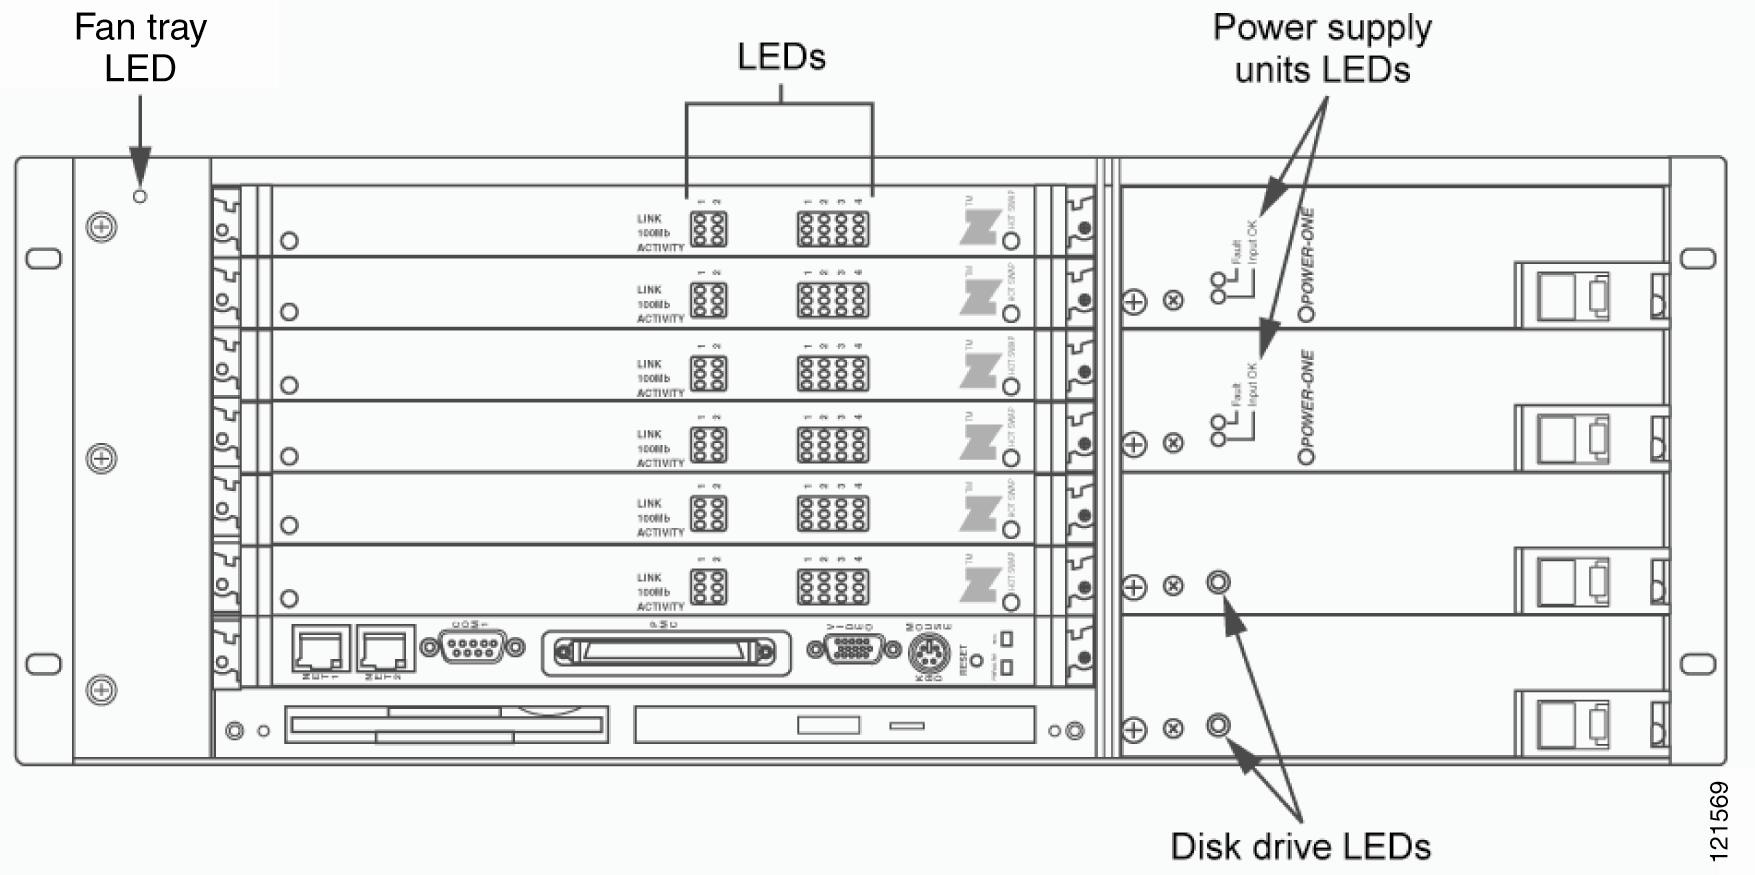
The Cisco Unified MeetingPlace 8106 has three types of LEDs, as shown in Figure 6-1.
Figure 6-1 LEDs on Front of Cisco Unified MeetingPlace 8106
The LEDs are described in Table 6-3.
Table 6-3 LEDs on Cisco Unified MeetingPlace 8106
Fan tray
(For information about replacing the fan tray, see Fan Tray Replacement Procedure for the Cisco Unified MeetingPlace 8106.)
None
Fan tray is working properly or is not properly inserted.
Red
Fan tray is not working properly.
Power supply units
(For information about replacing the power supply units, see Power Supply Replacement Procedure for the Cisco Unified MeetingPlace 8106.)
Green on both
Power supply units are working properly.
Red on both
Neither power supply unit is working properly. Shut off the server as soon as possible and remove all cards, the floppy drive and CD-ROM drive housing unit, and the disk drives.
None on both
Either the server is powered off or the power supply units are not properly inserted.
Green on one, red on other
One power supply unit is working properly and the other is either bad or not properly inserted.
Green on one, none on other
One power supply unit is working properly and the other is either bad or not properly inserted.
Red on one, none on other
One power supply unit is bad and the other is not properly inserted.
Disk drives
(For information about replacing disk drives, see Hard Disk Replacement Procedure for the Cisco Unified MeetingPlace 8106.)
Green
Server is accessing the disk drive.
None
Server is not accessing the disk drive.
Note
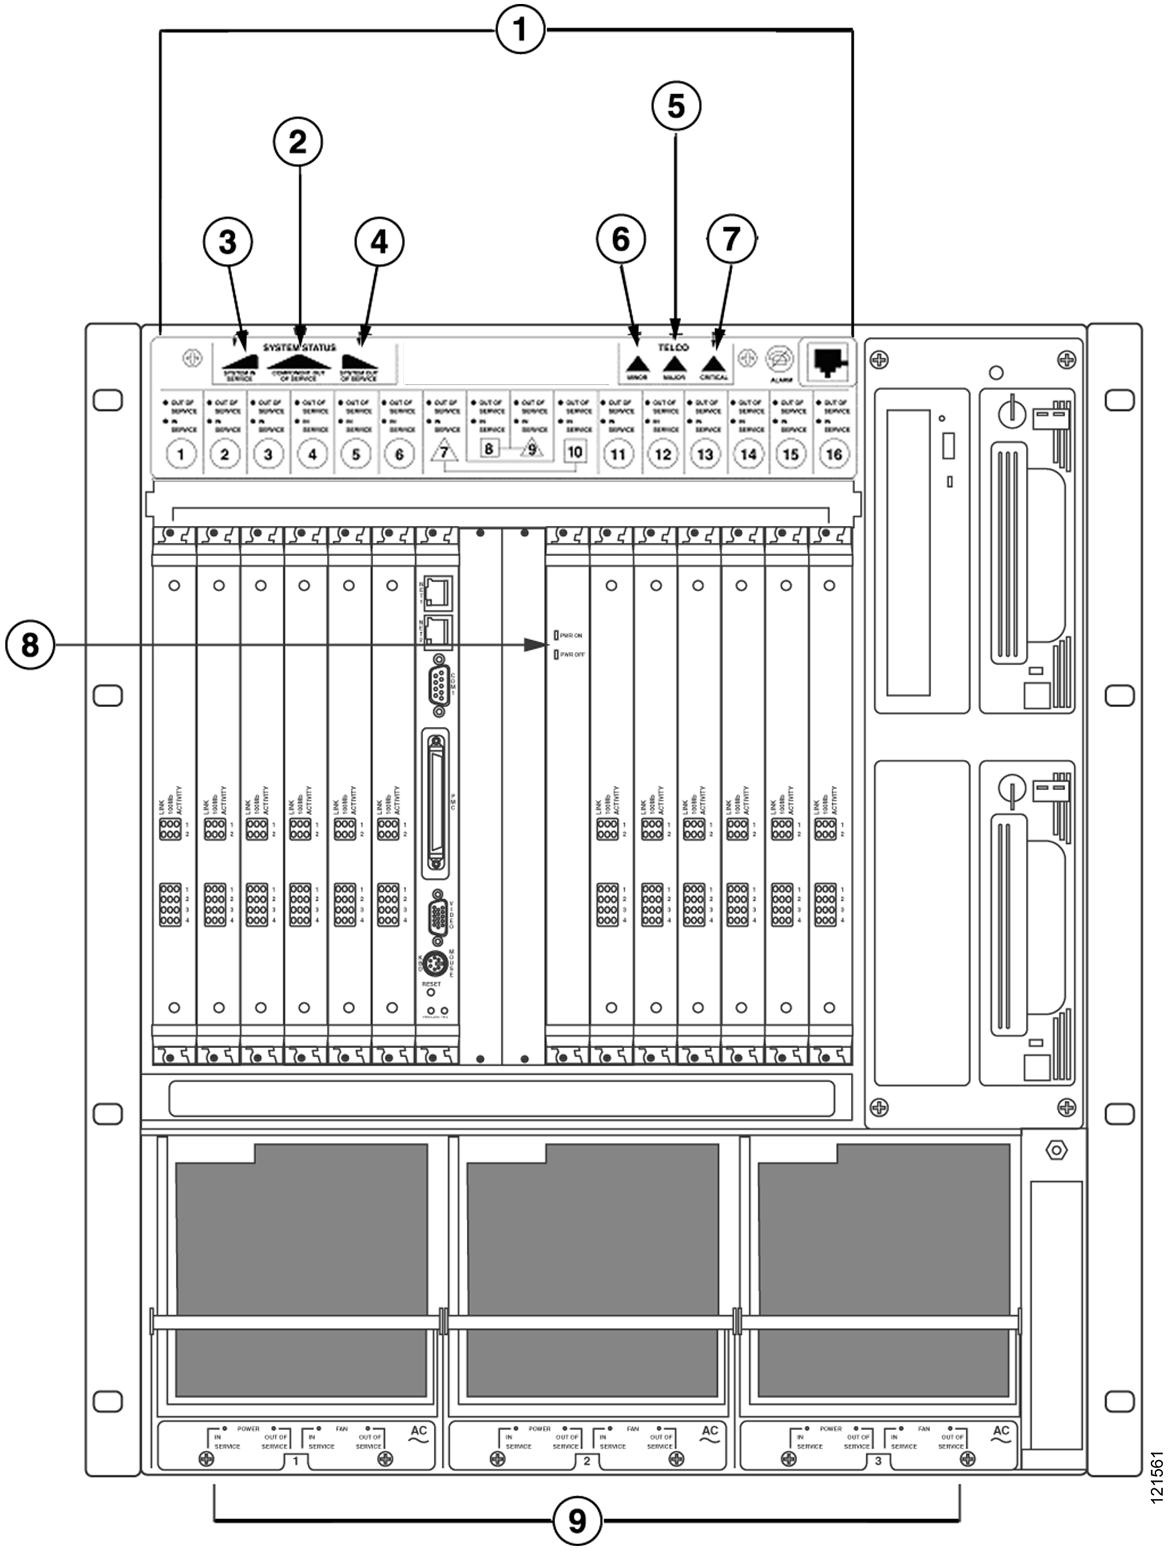
Interpreting Alarm LEDs on the Cisco Unified MeetingPlace 8112
The Cisco Unified MeetingPlace 8112 has System Status and Alarm LEDs on the upper part of the front panel. It also has System Status LEDs on each Smart Blade, and System Status LEDs on the Hot Swap Controller (HSC).
Figure 6-2 shows the location of specific LEDs on the front of the Cisco Unified MeetingPlace 8112.
Figure 6-2 LEDs on Front of Cisco Unified MeetingPlace 8112
When the Cisco Unified MeetingPlace Audio Server system is functioning properly, the LEDs on the Cisco Unified MeetingPlace 8112 are green. When the system detects a problem, one or more LEDs are either red or yellow. For assistance, see the "Understanding the Alarm Table" section or contact Cisco NCE (see "Obtaining Technical Assistance" in the Guide to Cisco Conferencing Documentation and Support).
Table 6-4 describes each alarm LED on the Cisco Unified MeetingPlace 8112.
Table 6-4 Alarm LEDs on Front of Cisco Unified MeetingPlace 8112
System In Service
Green
The system is fully in service.
Component Out of Service
Yellow
Something is wrong with a server component, such as a disk drive or disk.
For assistance, see the "Troubleshooting" chapter in the Installation and Upgrade Guide for Cisco Unified MeetingPlace Audio Server Release 5.3, or contact Cisco NCE.
For information about replacing hardware units, see Cisco Unified MeetingPlace Audio Server Field Replaceable Units.
System Out of Service
Red
The system is out of service.
For assistance, see the "Troubleshooting" chapter in the Installation and Upgrade Guide for Cisco Unified MeetingPlace Audio Server Release 5.3, or contact Cisco NCE.
Minor Alarm
Yellow
A problem has occurred in the system that is not affecting the system functions. (Although this condition might not affect system operation immediately, address it quickly.)
For information about alarms, see the "Understanding the Alarm Table" section.
Major Alarm
Red
A serious problem exists with the system. Because this kind of condition usually interrupts system operations, you should address it immediately.
For assistance, see the "Troubleshooting" chapter in the Installation and Upgrade Guide for Cisco Unified MeetingPlace Audio Server Release 5.3, or contact Cisco NCE.
Critical Alarm
—
Disregard this LED; it is currently not in use.
Hot Swap Controller (HSC) power LED
(For information about replacing the HSC, see Hot Swap Controller Replacement Procedure for the Cisco Unified MeetingPlace 8112.)
Green on one, none on the other
There is power to the board, which means there is power to the system.
The HSC board has two LEDs, one for power (PWR) and the other errors (ERROR). To indicate normal operation, the PWR LED is green and the ERROR LED is not lit. Any other combination of LED status indicates an HSC board malfunction. (For assistance, see the "Troubleshooting" chapter in the Installation and Upgrade Guide for Cisco Unified MeetingPlace Audio Server Release 5.3, or contact Cisco NCE.)
In case of HSC malfunction, you can perform a system power cycle to clear the problem. If power cycling the system does not clear the HSC problem, replace the HSC as soon as possible.
Caution
Note
About Sound Quality
Excellent sound quality is essential to Cisco Unified MeetingPlace conferences. Improving the sound quality depends on understanding and adjusting for several "real-world" factors:
•
•
•
•
Cisco Unified MeetingPlace considers all these factors, and its Digital Signal Processing algorithms provide the best overall sound quality for a wide range of operating conditions.
Resolving Sound Quality Problems
Problems with sound quality can be caused by various factors and conditions, including the configuration of trunk types and conference room acoustics. Table 6-5 describes common sound quality problems and solutions.
Table 6-5 Sound Quality Problems and Solutions
Line termination types
Cisco Unified MeetingPlace can work with several trunk types and configurations, but minimizing the equipment between the network and the system is ideal.
For example, direct T1 digital connections to the PSTN often produce the cleanest sound quality. If the system is separated from the network by a PBX, or is separated from the PSTN by additional gear, sound quality can be increasingly compromised.
Conference room acoustics
•
•
•
•
Room calibration
Even if a room has been equipped for improved acoustics, operating conditions can change significantly from day to day. Room temperature, participant movement, and line connections can all change the acoustic performance of echo canceler gear.
We recommend performing room calibration before starting a conference call if the room has previously suffered from bad sound quality. For details or assistance, see "Obtaining Technical Assistance" in the Guide to Cisco Conferencing Documentation and Support.
Background noise
The meeting intelligibility and overall experience may be enhanced if a low background noise level is maintained.
To prevent background noise from entering the meeting, participants can use the mute feature when they are not speaking. To activate muting, participants press #5 on their touch-tone telephone. When they want to contribute to the meeting again, muting can be turned off by pressing #5 again.
Varied line levels
For conferences in which attendees consistently complain about audio volume levels that are too high or too low, Cisco Unified MeetingPlace can be adjusted to help line level mismatches. This problem may occur when rural locations are called and the overall conference audio level is very low. Conversely, loud connections can occur if a short-distance, all-digital connection is provided.
A Cisco NCE representative can remotely adjust the conference target levels that are too high or too low.
Remember the following information:
•
•
The sound quality of Cisco Unified MeetingPlace meetings depends on the type of telephone used, the type of telephone network called on, and the amount and type of ambient noise in the environment from which the call comes.
Telephone Type
The telephone from which the user speaks to the conference significantly influences sound quality. Table 6-6 describes how different types of telephones affect sound quality.
Table 6-6 Telephone Types
Room Setting
The room from which individual participants call during a conference affects the sound quality. Table 6-7 describes how various room environments affect sound quality.
Table 6-7 Room Conditions
About Disaster Recovery
The Cisco Unified MeetingPlace server is a carrier-class conferencing platform with several built-in redundancy and reliability features. This section describes such features and provides recommendations for disaster recovery planning when the following conditions occur:
•
•
•
Data Network Failure
When a data network failure occurs, assuming that the voice network is still in operation, the Cisco Unified MeetingPlace server continues to operate. This means that previously scheduled meetings can start and meetings that are taking place can continue.
Scheduling future or immediate meetings, however, is limited to the voice user interface only, and no notifications are available until the data network is backed up. Web conferences are affected because the data network is critical to web conferencing. This functions similarly to the Continuous Service Mode currently available in the PCI platform.
Cisco Unified MeetingPlace Server Failure
The Cisco Unified MeetingPlace server can handle several critical component failures without affecting service. Table 6-8 describes the types of redundancy features.
Table 6-8 Server Redundancy Features
N+1 hot swappable redundant power supply/fans
If a power supply fails, the system continues to operate with no experienced downtime. In addition, a new replacement power supply can be hot swapped (inserted while the system is up and running).
Duplicate databases
The server database is stored on two separate disk drives (Disk 1 and Disk 2). One is established as the primary drive, the other as a backup. Assuming that the database on Disk 1 is the active one, the system copies all database contents to the database on Disk 2. This process occurs in the background, while the system is operating. It does not affect system performance.
If Disk 1 fails, the system can be restarted using Disk 2 with the latest copy of the database. If Disk 2 fails, the system continues to operate. However, voice files on Disk 2 can be lost in this case.
Note
We recommend that network backups be performed once each night, in addition to available disaster recovery mechanisms. (For more information about backing up the database, see the Administrator Guide for Cisco Unified MeetingPlace Network Backup Release 5.3.
Caution
Using the Shadow Server to Recover Site Disaster
One site disaster recovery method is the Cisco Unified MeetingPlace Shadow Server. The Shadow Server is a backup system that can replace the conference server in case of system or site failure. Switching over to the shadow server ensures that complete functionality can be returned with minimal loss of time and disruption in service.
For more information about the shadow server, see the Installation and Upgrade Guide for Cisco Unified MeetingPlace Audio Server Release 5.3.
Importing Meetings to Recover Site Disaster
The Import Meeting feature allows a Raw Meeting Details report containing all meeting information—including the scheduler, date, time, the Meeting ID and number of reserved ports—to be imported into a spare conference server in a separate location. The import process is handled through MeetingTime (Release 4.3 or later).
After the information is imported, the system creates a meeting with the same meeting ID and sends notifications to the meeting scheduler with the correct phone number.
To prepare for disaster recovery, generate the Raw Meeting Details report at least once a day and store it on the network in a location different from the physical server location.
This feature supports importing meetings from a Cisco MeetingPlace 2001 (4.3) system to a Cisco Unified MeetingPlace Audio Server 5.0 system and later, but the reverse is not true.
User profiles and meeting categories must be synchronized on the active and target servers before attempting to import meetings. If a meeting is imported onto the target server without a corresponding scheduler profile, the meeting schedules using the user ID in the Scheduler User ID field, which defaults to the user ID of the system administrator running the import.
For information about best results when importing, see the "Importing User Profile and Group Information" section.
The following sections describe how to import meetings in two parts:
•
•
Procedure 1: Generate a Report
We recommend that you establish a folder into which to import these reports.
Step 1
Step 2
Details for all meetings scheduled to start between these dates are exported.
Step 3
Step 4
Step 5
The Import Meetings feature only imports meetings scheduled to start within 30 minutes of import meeting completion and after. To import details of all future meetings scheduled beyond the current date, you must set the End Date with the following parameter in mind: Max adv days to schedule determines how many days before a proposed meeting you can schedule the meeting (in the Configure tab, Scheduling Parameters topic). To include all future scheduled meetings, make the end date equal to the current date plus the Max adv days to schedule parameter.
For example, if today is June 1, 2005 and your Max Adv Days to Schedule parameter is set to 20, your End Date will be June 21, 2005 to ensure that all scheduled meetings are captured.
Procedure 2: Import Meeting Details into a Target Server
Step 1
If the target server is a network server rather than a standalone server (as with PCI systems), the system administrator has access to four additional fields: Preferred server, Force on preferred server, Preferred site, and Force on preferred site.
Recurring meetings are imported as separate, one-time meetings rather than chains of meetings. Continuous meetings are imported as continuous meetings with the import meeting date as the start date.
Step 2
Step 3
Step 4
•
•
Step 5
Step 6
Step 7
If the number of errors encountered exceeds the number indicated in the Error Threshold field, the system stops importing meetings.
Step 8
The target server generates meetings and sends e-mail notifications to meeting organizers affected by the import. These notifications are standard meeting notifications containing the name of the meeting organizer, the meeting ID, and the phone number of the target server so that participants can access their meeting.
Step 9
Remember the following information:
•
•
•
•
--------------------------------------------------------------------------
481684) MAJ 0f0088 1 Aug 3 00:28 Aug 3 00:28 0 SW MODULE=18 PO mailbox full! Mbox 2, NumMsgs 10000, MaxMsgs 10000
477777) MAJ 0f0089 1 Aug 2 23:53 Aug 2 23:53 0 SW MODULE=18 PO mailbox 90 percent full! Mbox 2, NumMsgs 9000, MaxMsgs 10000•
Importing and Deleting Meetings in Batch Mode
To avoid tying up your machine, import and delete meetings overnight in batch mode. You can perform all import operations in batch mode using command line options.
Importing Meetings in Batch Mode
Step 1
The import file is the output from the Raw Meeting Details Report. For information about generating the Raw Meeting Details Report in batch mode, see the "Generating Batch Reports in Windows Batch Mode" section. The only required field for importing is StartDateTimeOfConfGMT, the date and time of the meeting:
Any fields not included in the import file derive their value from the default meeting preferences of the scheduler's profile.
Step 2
Begin the command line string with your login information, unless you have stored this information in the MeetingTime Settings. Use the following syntax:
C:\Program Files\Latitude\Mtgtime\mtgtime.exe [user ID][user password][hostname]For example: C:\Program Files\Latitude\Mtgtime\ mtgtime.exe tsmith MyPassword Server-CAOr, enter a command line using Windows 95, 98 or Windows 2000 (choose Windows Start menu > Run).
Table 6-9 shows the command line options. Variable information is explained after the table.
Remember the following information:
•
•
Table 6-9 Batch Mode Import Options
Caution
Use Table 6-10 when replacing variables with values.
Table 6-10 Batch Mode Import Variables
Deleting Meetings in Batch Mode
When deleting meetings, the import file must have been generated from the same system. The following fields are required when performing a delete:
•
•
•
About Administering Cisco Unified MeetingPlace During Network Outages
The MeetingTime client must always have connectivity to the Cisco Unified MeetingPlace server in order to communicate information. Whenever your company experiences a network outage, the Cisco Unified MeetingPlace 8106 or 8112 continues to work. However, the MeetingTime client cannot connect to the server using the normal means. To connect a MeetingTime client to the server during a network outage, you can use either of the following methods:
•
•
Administering Cisco Unified MeetingPlace Through Modem Interface
The Cisco Unified MeetingPlace server comes with a modem with which you can connect to the system remotely. This interface also allows you to administer the Cisco Unified MeetingPlace 8100 series server through MeetingTime. To do this, you need a computer with the following:
•
•
•
Configure the dial-up connection that is provided with each operating system to dial up the Cisco Unified MeetingPlace server. For example, in Windows NT, do the following:
Step 1
Step 2
Step 3
Step 4
•
•
•
Step 5
•
•
•
Step 6
After configuring the dialup networking connection, from this point on you only need to select the phonebook entry that corresponds to your Cisco Unified MeetingPlace server. After you are connected to the server, you can start MeetingTime.
Step 7
Using this configuration, you can connect to the server using the MeetingTime client through the modem connection. However, you cannot append or retrieve any attachment when connected using this method.
Administering Cisco Unified MeetingPlace Using a Crossover LAN Cable Connection
You can also connect a computer directly to the Cisco Unified MeetingPlace server with a crossover LAN cable. (You can purchase an Ethernet 10 Base-T/100Base-TX crossover cable in most electronics stores.)
To construct an Ethernet cable, instead of purchasing one, use the following wiring information.
If your server is connected to the LAN, and you want to access the server using the crossover cable while network connectivity is down, do the following:
Step 1
Step 2
Step 3
Your computer must be configured to have a static IP address in the same subnet as the Cisco Unified MeetingPlace server. For example, if the Cisco Unified MeetingPlace 8100 series has an IP address of 192.168.1.2 with a subnet mask of 255.255.255.0 and a default of 192.168.1.1, the IP address for the computer must be between 192.168.1.3 and 192.168.1.254, with a subnet mask of 255.255.255.0.
After the connection is established between the computer and the Cisco Unified MeetingPlace server, you can use MeetingTime to administer Cisco Unified MeetingPlace, just as you would over the LAN. Because you may not have access to the DNS or WINS server, you may need to use the IP address instead of the hostname of the server in the Address field of MeetingTime.
About Assisting Users
Occasionally, users need assistance before entering a meeting or have questions about Cisco Unified MeetingPlace features while a meeting is in progress. The person who provides telephone assistance is the system attendant. Users can reach the attendant before or during a meeting by pressing 0 (zero). (While connected to the attendant from within a meeting, users can either press #2 to disconnect the attendant or press #1 to return to the meeting with the attendant.)
Depending on how your system is trunked, callers are connected to the attendant in different ways.
•
•
You, the system administrator, might receive questions from users. For information on end-user and attendant topics, see "Scheduling and Attending Meetings." Also see the Quick Start Guide for Cisco Unified MeetingPlace Audio Server Release 5.3, online Cisco Unified MeetingPlace Reference Center, and online Help. If you cannot resolve a problem using these resources or this guide, see "Obtaining Technical Assistance" in the Guide to Cisco Conferencing Documentation and Support.
Handling System Problems that Affect Users
System problems can affect the quality of meetings or a user's ability to use Cisco Unified MeetingPlace features. Table 6-11 describes some common user problems.
Table 6-11 Common User Problems
System is out of voice space
Users cannot record meeting names, profile names, agendas, or entire meetings. To determine how many meeting recordings are on the Cisco Unified MeetingPlace system and how much disk space is available, check the View Disk Usage parameter in the System tab.
Also, check to see that the Max Recording Space (min) setting (Configure tab, Server Configuration) is configured properly. This setting separates voice storage space into two parts: Meeting Recordings and Other. Other includes profile names, guest participant names, meeting names, and recorded agendas.
You can ask users to delete outdated meeting recordings by clicking the Delete MeetingNotes button in the Review tab.
DID/DNIS or DDI numbers are not available
If users cannot use a DID/DNIS or DDI number, or if no meeting ID numbers are available, either all DID/DNIS or DDI numbers are being used or there is a scheduling conflict with that number.
In the Configure tab, select Telephony Access to assign different port access types to blocks of telephone numbers and reserve the numbers in each block for certain uses. If Cisco Unified MeetingPlace is to receive dialed number information, you decide how many numbers to reserve for each use.
Note
Ports are not disconnecting from meetings
Normally, when a meeting participant hangs up the phone, disconnect signals pass through the network and are recognized by the system. Cisco Unified MeetingPlace then removes the corresponding port from the meeting and plays a prompt to remaining meeting participants to notify them of the departing party.
If disconnect supervision is not conveyed through the network, noise or tones can interfere with the meeting when the far-end party hangs up. If this occurs, see "Obtaining Technical Assistance" in the Guide to Cisco Conferencing Documentation and Support for assistance. In most cases, the PBX or telephone service provider must be involved to isolate the trunk that is not conveying disconnect signals.
Problem: User Cannot Log In
User forgets telephone password
Issue a new password using the MeetingTime Preferences tab (User Profile, Profile Password field).
User forgets MeetingTime password
Assign a new password using either the Preferences tab or Configure tab (User Profiles, Workstation Password field).
User forgets meeting password
In the Schedule tab, determine the password.
User cannot log in
There may be several causes and solutions.
•
•
•
1.
2.
3.
Remember the following information:
•
•
•
•
Problem: Problems with Meeting IDs
Problem: User Reports Poor Sound Quality
If a meeting participants call from within a meeting to report an audio quality problem (such as static, echo, random noise, or music-on-hold), you can tell them how to mute lines.
If participants contact you from within the meeting by entering 0, either:
•
•
If you join a meeting by phone, enter the MeetingTime In Session tab at the same time. When you are in the meeting, follow these steps to troubleshoot an audio quality problem:
•
•
You can then move that participant to a breakout session, join the session, and explain how and when to mute. If the participant is a primary speaker for the meeting, they can use a hand set instead of a speaker phone, or call back (if the problem is a noisy network line). Then the participant can move back into the main meeting, either with your help, using the In Session tab, or by pressing #10 on their touch-tone phone.
Problem: User Cannot Schedule a Meeting
If users report they cannot schedule a meeting, you can do the following:
•
•
•
•
Problem: Requests for More Time or Ports
Occasionally, you are asked to provide solutions to problems concerning meeting resources.