Feedback
Contents
Deploy Golden Templates at customer site
Automation tools
Download and then install the following tools on the client from which the automation will be run.
Software
Version
Download
GoldenTemplateTool zip file
10.0(1)
Go to http://cisco.com/en/US/products/ps12586/tsd_products_support_series_home.html.
Click Download Software.
Then select Packaged Contact Center Enterprise Deployment Scripts.
PowerCLI
5.0, 32-bit
http://downloads.vmware.com/d/details/pcli50/dHRAYnQlKmpiZHAlJQ==
OVF tool
32-bit
https://my.vmware.com/group/vmware/details?downloadGroup=OVFTOOL350&productId=353
Note WinImage is shareware. If you choose to not purchase a licensed copy, you will see pop-ups when you run this tool. Clicking No at the pop-ups allows you to proceed.
WinImage
8.5, 32-bit
Microsoft Excel
Release 2003 or later
--
Complete automation spreadsheet for export
Complete the automation spreadsheet for export, filling in only the columns in each row that the export automation script requires to create export OVFs in the OVF subfolder of the GoldenTemplate_10 directory. Leave all other columns blank.
Fill in rows for only the following VM_TYPEs:During the import phase, these templates can be used to create the VMs for the remaining servers including those that are subscribers and those that reside on side B.
Table 1 Required columns for automation spreadsheet for export Column
Description
Example
OPERATION
Select ExportServer to specify the operation you are performing with the script.
Exports a compressed OVF file from the VMware environment where the template systems were installed.ExportServer
SOURCE_HOST_IP
The IP address or the DNS name of the ESXi hosting the VM to be exported.
xx.xx.xxx.xxx
SOURCE_DATASTORE_NAME
The name of the Datastore defined in VMware.
datastore1(3)
SOURCE_VMNAME
The name of the VM. Cannot contain spaces or special characters. Maximum of 32 characters.
CallServerSideA
GOLDEN_TEMPLATE_NAME
The name of the Golden Template that will be exported. Cannot contain spaces or special characters. Maximum of 32 characters.
My_CallServerA
Run automation script for export
ProcedureThe disk space required for the exported servers is from 50GB - 70GB, depending on what servers are exported.
Transport to customer
During import, the operation mode is set to ImportServer, so that the golden template process imports the exported OVF templates at the customer site.
Bring your laptop to the customer site; then complete the import spreadsheet and run the import script from your local directory.
You can also transfer the directory to a USB device and run the import script from the USB drive.
Ensure readiness of customer site
Before completing the import spreadsheet and running the import script, the customer environment must be set up with ESXi hosts on which the datastores have been configured.
Complete the spreadsheet for import
Complete all rows of the spreadsheet for import. The same template can be used to import multiple VMs. For example, the GOLDEN_TEMPATE_NAME can be the same for both UCCE_DataServer_SideA and UCCE_DataServer_SideB, though other columns such as the NEW_VM_NAME must be unique.
Table 2 Complete automation spreadsheet columns for import Column
Description
Example
CREATEVM
Select YES to create a VM.
YES
CUSTOMIZATION
Note Selecting Yes creates Publishers and Subscribers for the VOS products.
Set this to NO only if you do not have the values at the time you complete the spreadsheet and plan to create the VOS publishers and subscribers manually
YES
OPERATION
Select ImportServer .
Imports the OVF templates into the end customer's VMware environment.ImportServer
SOURCE_HOST_IP
Leave blank.
Leave blank.
SOURCE_DATASTORE_NAME
Leave blank.
Leave blank.
SOURCE_VMNAME
Leave blank.
Leave blank.
GOLDEN_TEMPLATE_NAME
Enter the name of the exported Golden Template.
My_CallServerA
NEW_VM_NAME
Required. The name for the new VM. Cannot contain spaces or special characters. Maximum of 32 characters.
CallServerSideA
DEST_HOST_IP
Required. The IP address or the DNS name of the ESXi Host for the new VM.
xx.xx.xxx.xxx
DEST_DATASTORE_NAME
Required. The name of the Datastore for the new VM.
datastore2(1)
PRODUCT_VERSION
This field is applicable for all VOS platforms.
COMPUTER_NAME
Required. The NET BIOS name for the new computer. 15-character maximum. Do not use special characters /, \, ?,:,*,",<,>,.,.
Demo-CallSrvA
WORK_GROUP
Dropdown:
YES adds the VM to a WorkGroup and enables WORK_GROUP_NAME.
NO
WORK_GROUP_NAME
Enter the Workgroup name if WORK_GROUP is set to YES.
NA
DOMAIN_NAME
The name of the domain.
Used only if WORK_GROUP is set to NO.
mydomain.com
TIME_ZONE_LINUX_AREA
Required. Drop-down selection of the timezone area to be set Unified CM. For the United States of America, select America.
America
TIME_ZONE_LINUX_LOCATION
Required. Drop-down selection of the timezone location to be set for Unified CM, CUIC, or Finesse.
New York
TIME_ZONE_WINDOWS
Required. Drop-down selection of the timezone to be set for the Unified CVP and Unified CCE VMs.
(GMT-05:00) Eastern Time (US & Canada)
DOMAIN_USER
Required. The user name for a domain user with privileges to add the new computer to the domain. Enabled only if WORK_GROUP is set to NO.
Do not specify user name in the DOMAIN\username or the username@ format.
Username
DOMAIN_PASSWORD
Required. The password for the domain user. Enabled only if WORK_GROUP is set to NO.
package123
PRODUCT_KEY
Required. The valid Windows OS product key in the format xxxxx-xxxxx-xxxxx-xxxxx-xxxxx.
ZZZM2-Y330L-HH123-99Y1B-GJ20B
OWNER_NAME
Required. The full name of the owner.
Administrator and Guestare not allowable names.
This is a mandatory field for Windows.
LabAdmin
ORGANIZATION_NAME
Required. The Organization Name to be set for Unified CM, CUIC, or Finesse.
MyName
ORGANIZATION_UNIT
Required. The Organization Unit to be set for Unified CM, CUIC, or Finesse.
MyUnit
ORGANIZATION_LOCATION
Required. The Organization Location to be set for Unified CM, CUIC, or Finesse.
MyCity
ORGANIZATION_STATE
Required. The Organization State to be set for Unified CM, CUIC, or Finesse.
MyState
ORGANIZATION_COUNTRY
Required. Drop-down selection of the Organization Country to be set for Unified CM, CUIC, or Finesse.
United States of America
NTP_SERVER
Required. The IP Address of the NTP server.
xx.xx.xxx.xxx
IP_ADDRESS_NIC1
Required. A valid IPv4 address for NIC1.
xx.xx.xxx.xxx
SUB_NET_MASK_NIC1
Required. A valid subnet mask (IPv4 address) for NIC 1.
xx.xx.xxx.xxx
NIC_NUM
Values in the field are pre-populated based on VM_TYPE field and are protected. Values are"1"or"2".
This value indicates the number of NICs to be configured for the VMs.
2
DEFAULT_GATEWAY_NIC1
Required. A valid Default gateway (IPv4 address) for NIC1.
xx.xx.xxx.xxx
DNS_IP_NIC1
Required. A valid IPv4 address for the primary DNS for NIC1.
xx.xx.xxx.xxx
DNS_ALTERNATE_NIC2
Optional. A valid IPv4 address for the alternate DNS for NIC1. For Unified CCE VMs only. Must differ from the address of the primary DNS for NIC1.
xx.xx.xxx.xxx
IP_ADDRESS_NIC2
Required. A valid IPv4 address for NIC 2.
Valid only if the value in the NIC_NUM fields is 2.
xx.xx.xxx.xxx
SUB_NET_MASK_NIC2
Required. A valid subnet mask (IPv4 address) for NIC 2. For Unified CCE VMs only.
255.255.255.255
DEFAULT_GATEWAY_NIC2
Required. A valid Default gateway (IPv4 address) for NIC2.
This will be removed later but is required during the customization.
xx.xx.xxx.xxx
DNS_IP_NIC2
Required. A valid IPv4 address for the primary DNS for NIC2. For Unified CCE VMs only.
This will be removed later but is required during the customization.
xx.xx.xxx.xxx
DNS_ALTERNATE_NIC2
Optional. A valid IPv4 address for the alternate DNS for NIC2. For Unified CCE VMs only. Must differ from the address of the primary DNS for NIC2.
xx.xx.xxx.xxx
VM_NETWORK
Required. Primary network for this server
UCCE Public
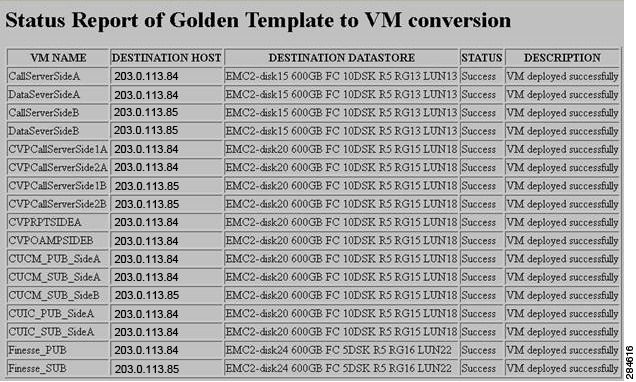
Run automation script for import
ProcedureThe script imports the templates and creates new VMs
Note
If you import any of the VOS VMs and have an un-licensed copy of WinImage, you will see one pop-up dialog for each VOS platform. Click OK to continue the import process.
Step 1 From the GoldenTemplate_V10-pcce directory, launch VMware vSphere PowerCLI (32-Bit) to run the automation script. Step 2 Enter this command to change the execution policy so you can run unsigned scripts that you write locally as well as signed scripts from other users: Set-ExecutionPolicy Unrestricted -Force. Step 3 Enter this command so that the VMware vSphere PowerCLI does not use a proxy server to connect to the vSphere server: Set-PowerCLIConfiguration -ProxyPolicy NoProxy -Confirm:$false. Step 4 Enter a command using the following syntax:
Syntax:
Example: <Path to the script> <Full Path of the spread sheet> <vCenter IP / Hostname> <vCenter User> <Password to connect to vCenter>
\scripts\DeployVM.PS1 c:\GoldenTemplate_VMDataSheet_V10.xls testvCenter testuser testpassword
The script will typically complete in several hours. If there are errors, the script will fail but will keep running. The errors display on the screen and are stored in the log file. Completion of the script generates a status report in the Report folder. The status report has a link to the Log file.