Feedback
Table Of Contents
Using the Cisco 7920 Configuration Utility
How to Install the Cisco 7920 Configuration Utility
Installing the Cisco 7920 Configuration Utility
Uninstalling the Cisco 7920 Configuration Utility
How to Use the Cisco 7920 Configuration Utility
Cisco 7920 Configuration Utility Overview
Connecting the Cisco 7920 Configuration Utility to a Phone
Activating the USB Port on the Phone
Connecting to the Cisco Wireless IP Phone
Overview of the Application Windows
Connection Status Bar Information
Using the Configuration Utility Menus
Using the Configuration Wizard
Using the Phone Profile Window
Setting the Phone Lock Password
Configuring Speed-Dial Hot Keys
Creating a Configuration Template
Troubleshooting the Network Connection for the
Cisco 7920 Configuration Utility
Using the Cisco 7920 Configuration Utility
This chapter describes how to install and use the Cisco 7920 Configuration Utility, Version 2.0 to configure network and phone settings for the Cisco Wireless IP Phone 7920. The following sections describe how to install and use the utility:
•
How to Install the Cisco 7920 Configuration Utility
•
•
You can also use the Network Configuration menu on the Cisco Wireless IP Phone 7920 to configure network settings. See Chapter 5 "Configuring Network Profiles on the Cisco Wireless IP Phone 7920".
How to Install the Cisco 7920 Configuration Utility
This section describes how to install the Cisco 7920 Configuration Utility, Version 2.0 and its components:
•
•
System Requirements
To install and run the Cisco 7920 Configuration Utility, your computer must meet these hardware and software requirements:
Hardware Requirements
•
•
•
•
Note
Software Requirements
Use one of these operating systems on the PC:
•
•
•
•
In addition, you need to install the following software:
•
•
Note
Related Topics
•
•
Installing the Cisco 7920 Configuration Utility
You can install the Cisco 7920 Configuration Utility by using a CD or by downloading the software from the Cisco Software Download Center.
To install the Cisco 7920 Configuration Utility, follow these steps:
Procedure
Step 1
Step 2
Step 3
Step 4
During installation, the following files are copied to your specified location:
•
•
•
Note
C:\Program Files\Cisco\Cisco7920ConfigurationUtility\Cisco 7920 USB.
Uninstalling the Cisco 7920 Configuration Utility
To uninstall the Cisco 7920 Configuration Utility, use the Add/Remove Programs application in Windows Control Panel.
Related Topic
•
How to Use the Cisco 7920 Configuration Utility
This section provides the following information about using the Cisco 7920 Configuration Utility:
•
•
Cisco 7920 Configuration Utility Overview
You can use the Cisco 7920 Configuration Utility to configure all the settings that are available for a Cisco Wireless IP Phone. To get started using the Cisco 7920 Configuration Utility, you must complete these tasks:
•
•
•
•
•
Connecting the Cisco 7920 Configuration Utility to a Phone
Use a USB cable to connect the phone to the computer that is running Cisco 7920 Configuration Utility. You can use the proprietary USB cable that ships with the software or the desktop charger with a standard type 2 USB cable.
Note
To activate the USB port in the phone, you must access the Phone Settings menu on the phone. The following sections provide information to help you connect to a phone.
•
•
Activating the USB Port on the Phone
To use the Cisco 7920 Configuration Utility with the phone, you must activate the USB port before you can connect to the phone.
Procedure
Step 1
Step 2
Step 3
Connecting to the Cisco Wireless IP Phone
After enabling the USB port, you can log in to the phone by following these steps:
Note
Procedure
Step 1
The Configuration Utility executes Connection > Login automatically to connect the Cisco Wireless IP Phone 7920 with the PC.
Step 2
Note
After a moment, the 7920 Configuration Utility loads the phone configuration data into the Current Phone Settings window.
Step 3
Note
Overview of the Application Windows
The Cisco 7920 Configuration Utility graphical user interface provides the following windows to assist with adding new phones or modifying existing phones:
•
•
•
•
This section describes the user interface and menu options of the Configuration Utility and includes these topics:
•
•
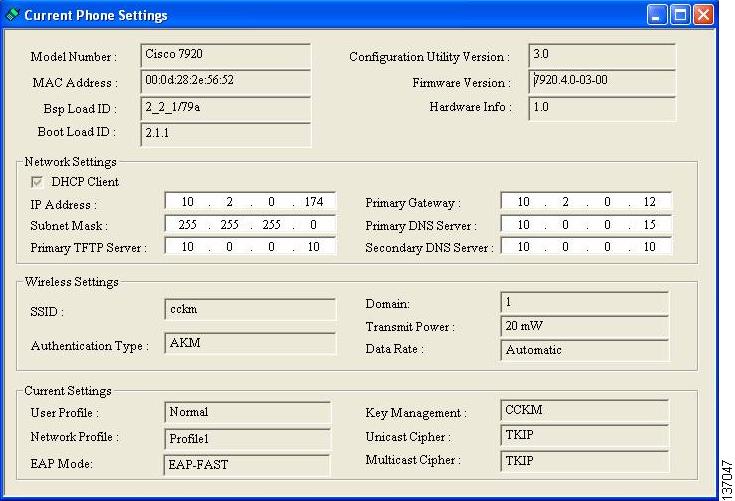
Current Phone Settings Window
Figure 4-1 shows the Current Phone Settings window that displays when the Configuration Utility connects to a phone. The field values in the phone configuration are view-only; to make changes to the configuration file, you must use the Configuration Wizard or Phone Profile windows.
Figure 4-1 Cisco 7920 Configuration Utility - Current Phone Settings Window
Connection Status Bar Information
When you use the Connection menu option to log in to the phone, the LED indicator at the bottom left shows the current connection status as described in Table 4-1.
Using the Configuration Utility Menus
The Configuration Utility includes these menu options:
File Menu Options
The File menu provides the following standard Windows options:
•
•
•
•
•
Edit Menu Options
The Edit menu provides these standard Windows editing options:
•
•
•
The Edit menu provides access to these options:
•
•
View Menu Options
When the Configuration Utility is started, the Current Phone Settings window and the Log History window appear automatically. You can use the View menu to toggle between these windows and to display or hide the Toolbar and Status Bar.
•
•
•
•
Using the Connection Menu
The Connection Menu enables you to perform these tasks with the Configuration Utility:
•
Logging In
You must log in to the phone to import, export, or upload firmware.
To log in to the phone, follow these steps:
Procedure
Step 1
The Login window appears.
Step 2
Table 4-2 Default Username and Passwords
cisco
By Configuration Utility
12345
By Cisco Wireless IP Phone 7920
Note
Changing the Administrator Password
You should change the Cisco 7920 Configuration Utility password for your local computer when you start the Configuration Utility for the first time. You need to log in with administrator privileges before you can change the administrator password.
To change the administrator password, follow these steps:
Procedure
Step 1
Step 2
Step 3
Step 4
Logging Out
Logging out disconnects the Cisco Wireless IP Phone 7920 from the PC and prevents you from importing configuration files, exporting configuration files, or uploading the firmware image to the phone.
When you disconnect the USB cable, you are logged out automatically. If you switch to another phone in the On-Line mode, you are logged out of the Configuration Utility automatically.
To log out, follow these steps:
Procedure
Step 1
The Logout window appears.
Step 2
Uploading the Firmware Image
The Upload Firmware Image window allows you to specify a firmware image filename and to upload the file to the Cisco Wireless IP Phone 7920.
To upload firmware, follow these steps:
Procedure
Step 1
Step 2
Step 3
Step 4
Step 5
Step 6
Caution
If the firmware version is different in the Cisco CallManager server, the next time the phone connects to Cisco CallManager, the phone gets that firmware version downloaded from Cisco CallManager.
Resetting to Factory Default
When you restore the settings to factory default values, all the settings in the Cisco Wireless IP Phone 7920 are changed to the original settings, including Call History, and Profiles settings. All Speed Dial settings are removed; however, the data stored in the Phone Book is preserved.
To restore the default settings, follow these steps:
Procedure
Step 1
Step 2
Step 3
Step 4
Related Topics
•
Using the Configuration Wizard
For administrators who are new to configuring Cisco Wireless IP Phones, the Configuration Wizard provides step-by-step guidance and additional information about the various network and phone settings.
To begin using the wizard, follow these steps:
Procedure
Step 1
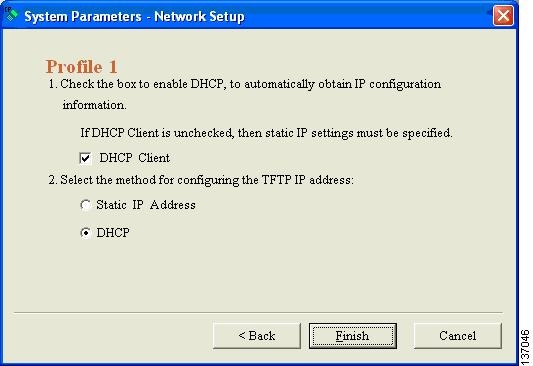
The Configuration Wizard window displays on top of the Phone Profile window, as shown in Figure 4-2.
Step 2
•
•
•
•
•
•
The Configuration Wizard guides you through the settings category and provides descriptions for the entry fields.
Step 3
Step 4
Figure 4-2 Configuration Wizard Step for a Network Profile
Related Topics
•
Phone Profile Window
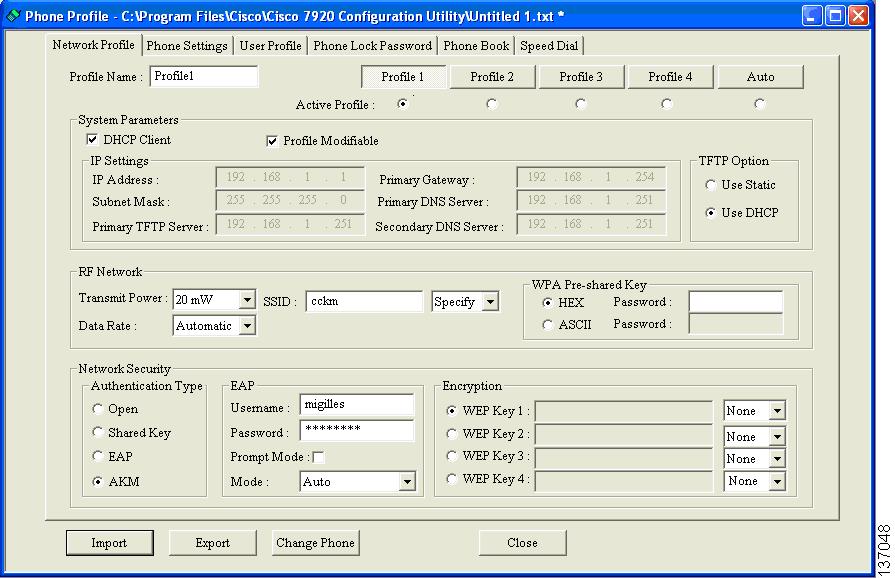
For more experienced users, you can use the Phone Profile window that is shown in Figure 4-3. To open the Phone Profile window, choose Edit > Configuration Wizard or File > New.
Figure 4-3 Phone Profile Window
Task Buttons
The Phone Profile window has task buttons at the bottom that provide easy access to these configuration functions:
Importing Phone Settings
Click the Import button to obtain the settings from a Cisco Wireless IP Phone 7920 connected through a USB port. The imported settings are applied to the associated configuration tabs in the Phone Profile window.
Exporting Phone Settings
Click the Export button to update the settings of the connected Cisco Wireless IP Phone 7920. Be aware that all phone settings are overwritten with the settings in the configuration file.
Note
Changing to Another Phone
The administrator can use the Change Phone button to switch to another phone without having to log in again.
To change to another phone, follow these steps:
Procedure
Step 1
Step 2
Note
) on the Windows status bar before you unplug the USB cable from the phone.
Step 3
Step 4
Step 5
Related Topics
•
•
Using the Phone Profile Window
The Phone Profile window tabs provide access to configuration windows that allow you to perform the following tasks:
•
•
•
Configuring a Network Profile
The Network Profile tab page allows you to configure up to four network profiles for a phone. You can give each profile a name and enter settings for a specific SSID. For example, configure Profile 1 for the most frequently accessed SSID and WLAN location. You can configure other profiles for access to WLANs in other locations or offices in your network.
A network profile contains the following types of parameters and settings:
•
•
•
Naming a Profile and Setting Profile Attributes
You can give profiles unique names to make them easy to identify.
In addition, you can set the phone to automatically select a profile or you can specify the active profile. You can control whether users can modify the network profiles.
To configure these options, follow these steps:
Procedure
Step 1
Step 2
Step 3
Step 4
Note
Step 5
Leaving the checkbox blank restricts the user from making changes to this profile. You can reset this field only by using the Configuration Utility.
System Parameter Settings
The system Parameter section provides options to enable or disable DHCP and set the TFTP option.
If you use DHCP in the network, enable the DHCP client for allocating IP addresses dynamically to the Cisco Wireless IP Phone. can automatically obtain information from the DHCP server. If you disable the DHCP client , you must specify the static IP settings for IP address, subnet mask, and other IP configuration.
You can also choose to have DHCP determine the TFTP server or assign a specific TFTP server IP address.
Enabling or Disabling the DHCP Client
To enable or disable the DHCP client, follow these steps:
Procedure
Step 1
Step 2
•
The Static IP Settings options are not accessible.
•
The Static IP Settings options are now accessible.
Step 3
•
•
•
•
•
•
Setting the TFTP Option
To set how the phone accesses the TFTP server, follow these steps:
Procedure
Step 1
Step 2
•
•
Step 3
Configuring RF Network Settings
Use the (radio frequency) RF Network section in the Network Profiles window to configure the following wireless network settings for the phone:
•
•
•
•
To configure RF network settings, follow these steps:
Procedure
Step 1
Step 2
Note
Dynamic transmit power control (DTPC) is available with firmware release 1.08 and later.Step 3
Note
When set for Automatic, the phone uses the data rates specified in the access point configuration.Step 4
•
•
Step 5
Note
Step 6
•
•
Note
Configuring Network Security Settings
Use the Network Security section in the Network Profile window to select the authentication type and encryption for the security settings. For more details about configuring these options, see the "Choosing Authentication and Encryption Settings" section.
Authentication Type
You can configure the following types of authentication:
•
•
•
•
To configure the authentication type, follow these steps:
Procedure
Step 1
Step 2
•
•
•
•
Note
Step 3
Encryption Type
You can also use WEP encryption with Open or Shared key authentication. Before you select the Shared Key authentication type, you must set up the Wired Equivalent Privacy (WEP) keys. You can configure up to four WEP keys on the Cisco Wireless IP Phone 7920. The encryption keys can be 40-bit and 128-bit keys that use hexadecimal characters.
If you do not use WEP encryption in the network, then choose None.
To configure WEP, follow these steps:
Procedure
Step 1
Step 2
Step 3
•
Example: ABCD123456
•
Example: AB123456789CD123456789EF12
Related Topics
•
•
Configuring Phone Settings
Use the Phone Settings tab in the Phone Profile window to configure the following items:
•
•
•
–
–
–
–
Editing Messages and Selecting the Ring Tone
To configure messages and ring tone, follow these steps:
Procedure
Step 1
Step 2
Step 3
Step 4
•
•
•
To add the louder ring tones to the ring tone list, see the "Downloading Loud Ring Tones" section.
Configuring Advanced Settings
Use the Advanced Settings section in the Phone Settings page to select options that control the phone:
Setting CDP Parameters
Cisco Discovery Protocol (CDP) is a device-discovery protocol that runs on all Cisco network equipment. Each device sends identifying messages to a broadcast address, and each device monitors the messages sent by other devices.
If you use CDP in your network, use the following steps to configure CDP parameters for the phone.
Note
Procedure
Step 1
Step 2
Step 3
Choosing Softkey Settings
Under Softkey Settings, you can set which softkey displays when the phone is idle: PhBook or Services (Svcs represents Services on the phone)
Use the Call Up option to determine which softkeys display when the phone is connected to a call. You can have Mute display or you can assign a customized softkey template and order the keys as you like. Because the Cisco Wireless IP Phone has only two softkeys, you must choose whether to display the Mute softkey before the Cisco CallManager softkeys or after the softkeys as listed in the softkey template.
You can also choose these settings when configuring the phones in Cisco CallManager Administration. In the Phone Configuration page, you can use the Product Specific Configuration Options. The settings in the Cisco CallManager configuration file override the settings from the Configuration Utility. For more information, see the "Configuring Softkey Templates" section.
Note
To modify these settings, follow these steps:
Procedure
Step 1
Step 2
Step 3
Choosing the Language and Backlight Settings
You can choose the language for the phone screen display and turn the backlight option on or off.
To modify these settings, follow these steps:
Procedure
Step 1
Step 2
Related Topics
•
•
Configuring User Profiles
The User Profile tab in the Phone Profile window allows you to configure personal profile settings for each phone.
Predefined user profiles allow the user to quickly change rings and tones on the phone. The following profiles are available for different work environments.
•
•
•
•
For example, when you are working outside, choosing the Outdoors profile automatically increases the ring volume and speaker volume. When you choose the Meeting profile, the ring volume is decreased to the lowest level, or you can choose the Silent profile and turn off the ringer.
Table 4-3 lists the default settings for the user profiles.
Options for User Profile Settings
You can use the default settings for profiles, or you can adjust the settings to meet users needs.
For example, you can choose the Normal profile and change the Warning Tone from Tone to Vibrate.
Modifying Personal Profiles
To modify the default settings for a personal profile, follow these steps:
Procedure
Step 1
Step 2
Step 3
Step 4
Step 5
Step 6
Step 7
Step 8
•
•
•
Related Topics
•
•
•
Setting the Phone Lock Password
For added security, you can set password protection for the phone. When the user enables the phone lock by using the Settings menu and Phone Lock option, the user must enter the password before the phone can associate with the access point.
Use the Phone Lock Password tab in the Phone Profile window to work with the following settings:
•
•
•
Setting the Phone Lock and Password
To enable the Phone Lock feature, follow these steps:
Procedure
Step 1
Step 2
Step 3
Step 4
Step 5
Resetting the Phone Lock Password to Default
When you need to clear a password from a phone, you can reset the password to the default password (12345). All phone configuration data is retained when you reset the password by using this procedure.
To reset the password, follow these steps:
Procedure
Step 1
Step 2
Note
Resetting the Phone Lock Password for a Locked Phone
When a user has locked the phone and forgets their password, you can disable the Phone Lock feature and password only when the phone is powered on and associated with an access point. If you cannot unlock the phone by using the default password (12345), then you must call the Cisco Technical Assistance Center (TAC) to have the phone reset to factory defaults.
Caution
Related Topics
•
•
Configuring the Phone Book
The Cisco Wireless IP Phone 7920 comes with a local phone book feature. Users add their own Phone Book entries by using the Directory menu on their phone. They can use their Phone Book entries to place calls by pressing the PhBook softkey, locating the name of the entry, and pressing the Call button.
By accessing the Phone Book tab in the Phone Profile window, you use the Cisco 7920 Configuration Utility to add, modify, and delete Phone Book entries. In addition, you can create a list of common phone book entries and save them as a comma-separated-values (CSV) file. You can import the CSV file into the Phone Book on the phone or you can save the existing Phone Book entries on a phone into a CSV file.
To work with Phone Book entries, follow these steps:
Procedure
Step 1
The Phone Book window displays configured phone book entries in the lower section.
Step 2
•
•
•
•
•
Step 3
Step 4
Step 5
Step 6
Step 7
Related Topics
•
•
•
Configuring Speed-Dial Hot Keys
Cisco Wireless IP Phone 7920 users can program eight speed-dial numbers that are stored locally on their phone. Users access their speed-dial numbers by using the numeric keys (2-9) on the keypad. The number 1 key is reserved for accessing the voice messaging system. Users program their speed-dial numbers by choosing Menu > Directory > Phone Book> Speed Dial.
The Speed Dial tab in the Phone Profile window allows you to configure speed-dial hot keys for the phone. You can also choose speed-dial numbers from the Phone Book entries.
Use the following steps to configure or modify speed-dial hot keys.
Procedure
Step 1
Step 2
Step 3
Step 4
Related Topics
•
•
Creating a Configuration Template
You can import the current phone configuration into a Phone Profile window and save the data as a configuration file template. To set up phones with a similar configuration, you can export the configuration file template to other Cisco Wireless IP Phones.
To create a configuration file template, follow these steps:
Step 1
Step 2
Step 3
Step 4
a.
b.
Note
Step 5
a.
b.
c.
Step 6
Log History Window
When you start the Cisco 7920 Configuration Utility, the Log History window opens and is empty. As you perform operations on the phone, each type of even is captured and immediately appears in the Log History window.
The history log is saved to the computer disk when you exit the Configuration Utility. Upon exiting, you are prompted to choose a log filename instead of the default filename, logHistory.txt.
You can read a log file by using a simple ASCII text editor. Log History files contain the items that are listed in Table 4-4.
Note
Troubleshooting the Network Connection for the
Cisco 7920 Configuration UtilityIf you have problems when using the Cisco 7920 Configuration Utility and connecting to the Cisco Wireless IP Phones, use these suggestions:
Close Other TFTP Applications
The Configuration Utility uses port 69 for TFTP, so if any application is using this port, then you must close the application before the Configuration Utility can operate correctly.
Disable the PC Firewall
If you are using a firewall on your computer, you need to disable it in order to connect to the phone.
Check the Network IP Addresses
When you launch the Cisco 7920 Configuration Utility from your PC, the utility tries to connect to the 192.168.1.x network through the USB interface. If your wireless network is utilizing the 192.168.1.x network, the USB adapter fails to load the Cisco Wireless IP Phone 7920 configuration after you enable the USB port on the phone.
To ensure there is no network connectivity between the PC and the 192.168.1.x network, follow these steps:
Procedure
Step 1
Step 2
Step 3
Step 4
Step 5
Step 6
Related Topics
•