Feedback
Contents
- Overview of VN-Link in Cisco UCS
- Virtualization with a Virtual Interface Card Adapter
- Cisco VN-Link
- VN-Link in Hardware
- Extension File for Communication with VMware vCenter
- Distributed Virtual Switches
- Port Profiles
- Port Profile Clients
- VN-Link in Hardware Considerations
- Configuring Cisco UCS for VN-Link in Hardware
Overview of VN-Link in Cisco UCS
This chapter includes the following sections:
Virtualization with a Virtual Interface Card Adapter
Virtual interface card (VIC) adapters support virtualized environments with VMware. These environments support the standard VMware integration with ESX installed on the server and all virtual machine management performed through the VMware vCenter.
This virtualized adapter supports the following:
Dynamic vNICs in a virtualized environment with VM software, such as vSphere. This solution enables you to divide a single physical blade server into multiple logical PCIE instances.
Static vNICs in a single operating system installed on a server.
With a VIC adapter, the solution you choose determines how communication works. This type of adapter supports the following communication solutions:
Cisco VN-Link in hardware, which is a hardware-based method of handling traffic to and from a virtual machine. Details of how to configure this solution are available in this document.
Cisco VN-Link in software, which is a software-based method of handling traffic to and from a virtual machine and uses the Nexus 1000v virtual switch. Details of how to configure this solution are available in the Nexus 1000v documentation.
Single operating system installed on the server without virtualization, which uses the same methods of handling traffic as the other Cisco UCS adapters.
Cisco VN-Link
Cisco Virtual Network Link (VN-Link) is a set of features and capabilities that enable you to individually identify, configure, monitor, migrate, and diagnose virtual machine interfaces in a way that is consistent with the current network operation models for physical servers. VN-Link literally indicates the creation of a logical link between a vNIC on a virtual machine and a Cisco UCS fabric interconnect. This mapping is the logical equivalent of using a cable to connect a NIC with a network port on an access-layer switch.
VN-Link in Hardware
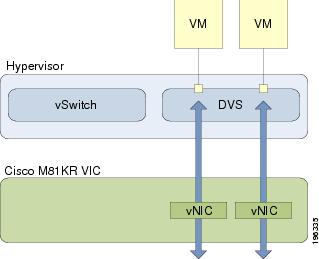
Cisco VN-Link in hardware is a hardware-based method of handling traffic to and from a virtual machine on a server with a VIC adapter. This method is sometimes referred to as pass-through switching. This solution replaces software-based switching with ASIC-based hardware switching and improves performance.
The distributed virtual switch (DVS) framework delivers VN-Link in hardware features and capabilities for virtual machines on Cisco UCS servers with VIC adapters. This approach provides an end-to-end network solution to meet the new requirements created by server virtualization.
With VN-Link in hardware, all traffic to and from a virtual machine passes through the DVS and the hypervisor. and then returns to the virtual machine on the server. Switching occurs in the fabric interconnect (hardware). As a result, network policies can be applied to traffic between virtual machines. This capability provides consistency between physical and virtual servers.
The following figure shows the traffic paths taken by VM traffic on a Cisco UCS server with a VIC adapter:
- Extension File for Communication with VMware vCenter
- Distributed Virtual Switches
- Port Profiles
- Port Profile Clients
Extension File for Communication with VMware vCenter
For Cisco UCS instances that use VIC adapters to implement VN-Link in hardware, you must create and install an extension file to establish the relationship and communications between Cisco UCS Manager and the VMware vCenter. This extension file is an XML file that contains vital information, including the following:
If you need to have two Cisco UCS instances share the same set of distributed virtual switches in a vCenter, you can create a custom extension key and import the same SSL certificate in the Cisco UCS Manager for each Cisco UCS instance.
Extension Key
The extension key includes the identity of the Cisco UCS instance. By default, this key has the value Cisco UCS GUID, as this value is identical across both fabric interconnects in a cluster configuration.
When you install the extension, vCenter uses the extension key to create a distributed virtual switch (DVS).
Public SSL Certificate
Cisco UCS Manager generates a default, self-signed SSL certificate to support communication with vCenter. You can also provide your own custom certificate.
Custom Extension Files
You can create a custom extension file for a Cisco UCS instance that does not use either or both of the default extension key or SSL certificate. For example, you can create the same custom key in two different Cisco UCS instances when they are managed by the same VMware vCenter instance.
Important:You cannot change an extension key that is being used by a DVS or vCenter. If you want to use a custom extension key, we recommend that you create and register the custom key before you create the DVS in Cisco UCS Manager to avoid any possibility of having to delete and recreate the associated DVS.
Distributed Virtual Switches
Each VMware ESX host has its own software-based virtual switch (vSwitch) in its hypervisor that performs the switching operations between its virtual machines (VMs). The Cisco UCS distributed virtual switch (DVS) is a software-based virtual switch that runs alongside the vSwitch in the ESX hypervisor, and can be distributed across multiple ESX hosts. Unlike vSwitch, which uses its own local port configuration, a DVS associated with multiple ESX hosts uses the same port configuration across all ESX hosts.
After associating an ESX host to a DVS, you can migrate existing VMs from the vSwitch to the DVS, and you can create VMs to use the DVS instead of the vSwitch. With the hardware-based VN-Link implementation, when a VM uses the DVS, all VM traffic passes through the DVS and ASIC-based switching is performed by the fabric interconnect.
In Cisco UCS Manager, DVSes are organized in the following hierarchy:
vCenter
    Folder (optional)
        Datacenter
            Folder (required)
                DVS
At the top of the hierarchy is the vCenter, which represents a VMware vCenter instance. Each vCenter contains one or more datacenters, and optionally vCenter folders with which you can organize the datacenters. Each datacenter contains one or more required datacenter folders. Datacenter folders contain the DVSes.
Port Profiles
Port profiles contain the properties and settings used to configure virtual interfaces in Cisco UCS for VN-Link in hardware. The port profiles are created and administered in Cisco UCS Manager. There is no clear visibility into the properties of a port profile from VMware vCenter.
In VMware vCenter, a port profile is represented as a port group. Cisco UCS Manager pushes the port profile names to vCenter, which displays the names as port groups. None of the specific networking properties or settings in the port profile are visible in VMware vCenter.
After a port profile is created, assigned to, and actively used by one or more DVSes, any changes made to the networking properties of the port profile in Cisco UCS Manager are immediately applied to those DVSes.
You must configure at least one port profile client for a port profile, if you want Cisco UCS Manager to push the port profile to VMware vCenter.
Port Profile Clients
The port profile client determines the DVSes to which a port profile is applied. By default, the port profile client specifies that the associated port profile applies to all DVSes in the vCenter. However, you can configure the client to apply the port profile to all DVSes in a specific datacenter or datacenter folder, or only to one DVS.
Configuring Cisco UCS for VN-Link in Hardware
ProcedureYou must perform some of the following high-level steps in the VMware Virtual Center (vCenter). For more information about those steps, see the VMware documentation.
Command or Action Purpose Step 1 Configure the VN-Link components and connectivity. For more information, see the following chapter: Configuring VN-Link Components and Connectivity.
Step 2 In VMware vCenter, create a vCenter and datacenter. For more information, see the VMware documentation.
Step 3 In Cisco UCS Manager create distributed virtual switches. To create a distributed virtual switch (DVS), you must first create a vCenter, a datacenter under the vCenter, and a datacenter folder under the datacenter. You can then create a DVS in the datacenter folder. The vCenter name you specify in Cisco UCS Manager does not need to match the vCenter name specified in VMware vCenter; however, the datacenter name you specify in Cisco UCS Manager must match the datacenter name specified in VMware vCenter. The datacenter folder and DVS you create in Cisco UCS Manager are pushed to VMware vCenter. For more information, see the following chapter: Configuring Distributed Virtual Switches in Cisco UCS.
Step 4 In Cisco UCS Manager, create the port profile and profile clients. The port profiles are pushed to their clients in VMware vCenter. They appear in VMware vCenter as port groups, not port profiles. For more information, see the following chapter: Configuring Port Profiles.
Step 5 In VMware vCenter, add an ESX host to the DVS. Configure the ESX host with the option to migrate to PTS/DVS.
Step 6 In vCenter, create the virtual machines required for the VMs on the server. As part of this configuration, ensure you select the port profiles (port groups) configured in Cisco UCS Manager.