Feedback
Contents
- Configuring Call Home
- Call Home
- Call Home Considerations and Guidelines
- Cisco UCS Faults and Call Home Severity Levels
- Cisco Smart Call Home
- Configuring Call Home
- Disabling Call Home
- Enabling Call Home
- Configuring System Inventory Messages
- Configuring System Inventory Messages
- Sending a System Inventory Message
- Configuring Call Home Profiles
- Call Home Profiles
- Configuring a Call Home Profile
- Deleting a Call Home Profile
- Sending a Test Call Home Alert
- Configuring Call Home Policies
- Call Home Policies
- Configuring a Call Home Policy
- Disabling a Call Home Policy
- Enabling a Call Home Policy
- Deleting a Call Home Policy
- Example: Configuring Call Home for Smart Call Home
- Configuring Smart Call Home
- Configuring the Default Cisco TAC-1 Profile
- Configuring a System Inventory Message for Smart Call Home
- Registering Smart Call Home
Configuring Call Home
This chapter includes the following sections:
- Call Home
- Call Home Considerations and Guidelines
- Cisco UCS Faults and Call Home Severity Levels
- Cisco Smart Call Home
- Configuring Call Home
- Disabling Call Home
- Enabling Call Home
- Configuring System Inventory Messages
- Configuring Call Home Profiles
- Sending a Test Call Home Alert
- Configuring Call Home Policies
- Example: Configuring Call Home for Smart Call Home
Call Home
Call Home provides an email-based notification for critical system policies. A range of message formats are available for compatibility with pager services or XML-based automated parsing applications. You can use this feature to page a network support engineer, email a Network Operations Center, or use Cisco Smart Call Home services to generate a case with the Technical Assistance Center.
The Call Home feature can deliver alert messages containing information about diagnostics and environmental faults and events.
The Call Home feature can deliver alerts to multiple recipients, referred to as Call Home destination profiles. Each profile includes configurable message formats and content categories. A predefined destination profile is provided for sending alerts to the Cisco TAC, but you also can define your own destination profiles.
When you configure Call Home to send messages, Cisco UCS Manager executes the appropriate CLI show command and attaches the command output to the message.
Cisco UCS delivers Call Home messages in the following formats:
Short text format which provides a one or two line description of the fault that is suitable for pagers or printed reports.
Full text format which provides fully formatted message with detailed information that is suitable for human reading.
XML machine readable format that uses Extensible Markup Language (XML) and Adaptive Messaging Language (AML) XML schema definition (XSD). The AML XSD is published on the Cisco.com website at http://www.cisco.com/. The XML format enables communication with the Cisco Systems Technical Assistance Center.
For information about the faults that can trigger Call Home email alerts, see the Cisco UCS Faults Reference.
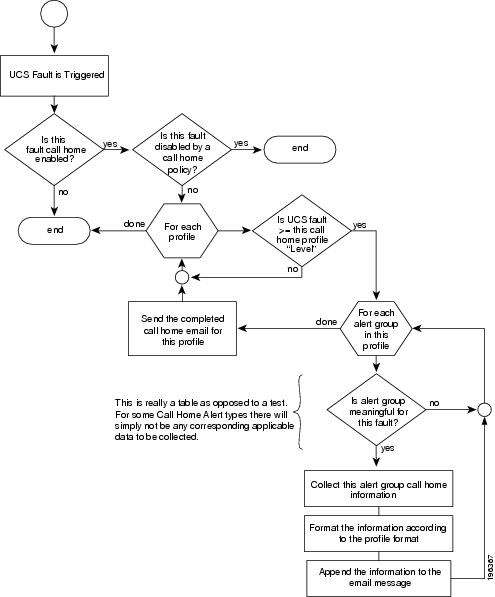
The following figure shows the flow of events after a Cisco UCS is triggered in a system with Call Home configured:
Call Home Considerations and Guidelines
How you configure Call Home depends on how you intend to use the feature. The information you need to consider before you configure Call Home includes the following:
Destination Profile
You must configure at least one destination profile. The destination profile or profiles that you use depend upon whether the receiving entity is a pager, email, or automated service such as Cisco Smart Call Home.
If the destination profile uses email message delivery, you must specify a Simple Mail Transfer Protocol (SMTP) server when you configure Call Home.
Contact Information
The contact email, phone, and street address information should be configured so that the receiver can determine the origin of messages received.
IP Connectivity to Email Server or HTTP Server
The fabric interconnect must have IP connectivity to an email server or the destination HTTP server. In a cluster configuration, both fabric interconnects must have IP connectivity. This connectivity ensures that the current, active fabric interconnect can send Call Home email messages. The source of these email messages is always the IP address of a fabric interconnect. The virtual IP address assigned Cisco UCS Manager in a cluster configuration is never the source of the email.
Cisco UCS Faults and Call Home Severity Levels
Because Call Home is present across several Cisco product lines, Call Home has developed its own standardized severity levels. The following table describes how the underlying Cisco UCS fault levels map to the Call Home severity levels. You need to understand this mapping when you configure the Level setting for Call Home profiles.
Table 1 Mapping of Faults and Call Home Severity Levels Call Home Severity
Cisco UCS Fault
Call Home Meaning
(9) Catastrophic
N/A
Network-wide catastrophic failure.
(8) Disaster
N/A
Significant network impact.
(7) Fatal
N/A
System is unusable.
(6) Critical
Critical
Critical conditions, immediate attention needed.
(5) Major
Major
Major conditions.
(4) Minor
Minor
Minor conditions.
(3) Warning
Warning
Warning conditions.
(2) Notification
Info
Basic notifications and informational messages. Possibly independently insignificant.
(1) Normal
Clear
Normal event, signifying a return to normal state.
(0) debug
N/A
Debugging messages.
Cisco Smart Call Home
Cisco Smart Call Home is a web application which leverages the Call Home feature of Cisco UCS. Smart Call Home offers proactive diagnostics and real-time email alerts of critical system events, which results in higher network availability and increased operational efficiency. Smart Call Home is a secure connected service offered by Cisco Unified Computing Support Service and Cisco Unified Computing Mission Critical Support Service for Cisco UCS.
You can configure and register Cisco UCS Manager to send Smart Call Home email alerts to either the Smart Call Home System or the secure Transport Gateway. Email alerts sent to the secure Transport Gateway are forwarded to the Smart Call Home System using HTTPS.
Note
For security reasons, we recommend using the Transport Gateway option. The Transport Gateway can be downloaded from Cisco.
To configure Smart Call Home, you must do the following:
Enable the Smart Call Home feature.
Configure the contact information.
Configure the email information.
Configure the SMTP server information.
Configure the default CiscoTAC-1 profile.
Send a Smart Call Home inventory message to start the registration process.
Ensure that the CCO ID you plan to use as the Call Home Customer ID for the Cisco UCS instance has the contract numbers from the registration added to its entitlements. You can update the ID in the account properties under Additional Access in the Profile Manager on CCO.
Configuring Call Home
ProcedureThe following example configures Call Home and commits the transaction:
UCS-A# scope monitoring
UCS-A /monitoring* # scope callhome
UCS-A /monitoring/callhome* # enable
UCS-A /monitoring/callhome* # set contact "Steve Jones"
UCS-A /monitoring/callhome* # set email admin@MyCompany.com
UCS-A /monitoring/callhome* # set phone-contact +1-001-408-555-1234
UCS-A /monitoring/callhome* # set street-address "123 N. Main Street, Anytown, CA, 99885"
UCS-A /monitoring/callhome* # set customer-id 1234567
UCS-A /monitoring/callhome* # set contract-id 99887766
UCS-A /monitoring/callhome* # set site-id 5432112
UCS-A /monitoring/callhome* # set from-email person@MyCompany.com
UCS-A /monitoring/callhome* # set reply-to-email person@MyCompany.com
UCS-A /monitoring/callhome* # set hostname 192.168.100.12
UCS-A /monitoring/callhome* # set port 25
UCS-A /monitoring/callhome* # set throttling on
UCS-A /monitoring/callhome* # set urgency information
UCS-A /monitoring/callhome* # commit-buffer
UCS-A /monitoring/callhome #
Disabling Call Home
ProcedureEnabling Call Home
ProcedureConfiguring System Inventory Messages
ProcedureThe following example configures Call Home system inventory messages and commits the transaction:
UCS-A# scope monitoring
UCS-A /monitoring* # scope callhome
UCS-A /monitoring/callhome* # scope inventory
UCS-A /monitoring/callhome/inventory* # set send-periodically on
UCS-A /monitoring/callhome/inventory* # set interval-days 15
UCS-A /monitoring/callhome/inventory* # set timeofday-hour 21
UCS-A /monitoring/callhome/inventory* # set timeofday-minute 30
UCS-A /monitoring/callhome/inventory* # commit-buffer
UCS-A /monitoring/callhome/inventory #
Sending a System Inventory Message
ProcedureUse this procedure if you need to manually send a system inventory message outside of the scheduled messages.
Note
The system inventory message is sent only to those recipients defined in CiscoTAC-1 profile.
Call Home Profiles
Call Home profiles determine which alert groups and recipients receive email alerts for events that occur at a specific severity. You can also use these profiles to specify the format of the alert for a specific set of recipients and alert groups.
By default, you must configure the Cisco TAC-1 profile. However, you can also create additional profiles to send email alerts to one or more specified groups when events occur at the level that you specify.
For example, you may want to configure two profiles for faults with a major severity:
A profile that sends an alert to the Supervisor alert group in the short text format. Members of this group receive a one- or two-line description of the fault that they can use to track the issue.
A profile that sends an alert to the CiscoTAC alert group in the XML format. Members of this group receive a detailed message in the machine readable format preferred by the Cisco Systems Technical Assistance Center.
Configuring a Call Home Profile
By default, you must configure the Cisco TAC-1 profile, However, you can also create additional profiles to send email alerts to one or more specified groups when events occur at the level that you specify.ProcedureThe following example configures a Call Home profile and commits the transaction:
UCS-A# scope monitoring
UCS-A /monitoring* # scope callhome
UCS-A /monitoring/callhome* # create profile TestProfile
UCS-A /monitoring/callhome/profile* # set level normal
UCS-A /monitoring/callhome/profile* # set alertgroups test diagnostic
UCS-A /monitoring/callhome/profile* # set format xml
UCS-A /monitoring/callhome/profile* # set maxsize 100000
UCS-A /monitoring/callhome/profile* # create destination admin@MyCompany.com
UCS-A /monitoring/callhome/profile/destination* # commit-buffer
UCS-A /monitoring/callhome/profile/destination #
Deleting a Call Home Profile
Procedure
Command or Action Purpose Step 1 UCS-A# scope monitoring Enters monitoring mode.
Step 2 UCS-A /monitoring # scope callhome Enters monitoring call home mode.
Step 3 UCS-A /monitoring/callhome # delete profile profile-name Deletes the specified profile.
Step 4 UCS-A /monitoring/callhome # commit-buffer Commits the transaction to the system configuration.
Sending a Test Call Home Alert
Procedure
Command or Action Purpose Step 1 UCS-A# scope monitoring Enters monitoring mode.
Step 2 UCS-A /monitoring # scope callhome Enters monitoring call home mode.
Step 3 UCS-A /monitoring/callhome # send-test-alert {[alert-description description] [alert-group {diagnostic | environmental}] [alert-level {critical | debug | fatal | major | minor | normal | notify | warning}] [alert-message-subtype {delta | full | goldmajor | goldminor | goldnormal | major | minor | nosubtype | test}] [alert-message-type {conf | diag | env | inventory | syslog | test}]} Sends a test Call Home alert using one or more of the following alert parameters:
When a test Call Home alert is sent, Call Home responds as it would to any other alert and delivers it to the configured destination email addresses.
Call Home Policies
Call Home policies determine whether or not Call Home alerts are sent for a specific type of fault or system event. By default, Call Home is enabled to send alerts for certain types of faults and system events. However, you can configure Cisco UCS not to process certain types.
To disable alerts for a type of fault or events, you must create a Call Home policy for that type, and you must first create a policy for that type and then disable the policy.
By default, Cisco UCS sends Call Home alerts for each of the following types of faults and system events:
association-failed
configuration-failure
connectivity-problem
election-failure
equipment-inaccessible
equipment-inoperable
equipment-problem
fru-problem
identity-unestablishable
link-down
management-services-failure
management-services-unresponsive
power-problem
thermal-problem
unspecified
version-incompatible
voltage-problem
Configuring a Call Home Policy
Procedure
Tip
By default, email alerts are sent for all critical system events. However, you can optionally configure Call Home policies to enable or disable sending email alerts for other critical system events.
Command or Action Purpose Step 1 UCS-A# scope monitoring Enters monitoring mode.
Step 2 UCS-A /monitoring # scope callhome Enters monitoring call home mode.
Step 3 UCS-A /monitoring/callhome # create policy {equipment-inoperable | fru-problem | identity-unestablishable | thermal-problem | voltage-problem} Creates the specified policy and enters monitoring call home policy mode.
Step 4 UCS-A /monitoring/callhome/policy # {disabled | enabled} Disables or enables the sending of email alerts for the specified policy.
Step 5 UCS-A /monitoring/callhome/policy # commit-buffer Commits the transaction to the system configuration.
The following example creates a Call Home policy that disables the sending of email alerts for system events pertaining to voltage problems and commits the transaction:
UCS-A# scope monitoring
UCS-A /monitoring* # scope callhome
UCS-A /monitoring/callhome* # create policy voltage-problem
UCS-A /monitoring/callhome/policy* # disabled
UCS-A /monitoring/callhome/policy* # commit-buffer
UCS-A /monitoring/callhome/policy #
Disabling a Call Home Policy
Procedure
Command or Action Purpose Step 1 UCS-A# scope monitoring Enters monitoring mode.
Step 2 UCS-A /monitoring # scope callhome Enters monitoring call home mode.
Step 3 UCS-A /monitoring/callhome # scope policy {equipment-inoperable | fru-problem | identity-unestablishable | thermal-problem | voltage-problem} Enters monitoring call home policy mode for the specified policy.
Step 4 UCS-A /monitoring/callhome/policy # disable Disables the specified policy.
Step 5 UCS-A /monitoring/callhome/policy # commit-buffer Commits the transaction to the system configuration.
The following example disables the Call Home policy named voltage-problem and commits the transaction:
UCS-A# scope monitoring
UCS-A /monitoring # scope callhome
UCS-A /monitoring/callhome # scope policy voltage-problem
UCS-A /monitoring/callhome/policy # disable
UCS-A /monitoring/callhome/policy* # commit-buffer
UCS-A /monitoring/callhome/policy #
Enabling a Call Home Policy
Procedure
Command or Action Purpose Step 1 UCS-A# scope monitoring Enters monitoring mode.
Step 2 UCS-A /monitoring # scope callhome Enters monitoring call home mode.
Step 3 UCS-A /monitoring/callhome # scope policy {equipment-inoperable | fru-problem | identity-unestablishable | thermal-problem | voltage-problem} Enters monitoring call home policy mode for the specified policy.
Step 4 UCS-A /monitoring/callhome/policy # enable Enables the specified policy.
Step 5 UCS-A /monitoring/callhome/policy # commit-buffer Commits the transaction to the system configuration.
The following example enables the Call Home policy named voltage-problem and commits the transaction:
UCS-A# scope monitoring
UCS-A /monitoring # scope callhome
UCS-A /monitoring/callhome # scope policy voltage-problem
UCS-A /monitoring/callhome/policy # enable
UCS-A /monitoring/callhome/policy* # commit-buffer
UCS-A /monitoring/callhome/policy #
Deleting a Call Home Policy
Procedure
Command or Action Purpose Step 1 UCS-A# scope monitoring Enters monitoring mode.
Step 2 UCS-A /monitoring # scope callhome Enters monitoring call home mode.
Step 3 UCS-A /monitoring/callhome # delete policy {equipment-inoperable | fru-problem | identity-unestablishable | thermal-problem | voltage-problem} Deletes the specified policy
Step 4 UCS-A /monitoring/callhome # commit-buffer Commits the transaction to the system configuration.
Configuring Smart Call Home
Procedure
Command or Action Purpose Step 1 UCS-A# scope monitoring Enters monitoring mode.
Step 2 UCS-A /monitoring # scope callhome Enters monitoring call home mode.
Step 3 UCS-A /monitoring/callhome # enable Enables Call Home.
Step 4 UCS-A /monitoring/callhome # set contact name Specifies the name of the main Call Home contact person.
Step 5 UCS-A /monitoring/callhome # set email email-addr Specifies the email address of the main Call Home contact person.
Step 6 UCS-A /monitoring/callhome # set phone-contact phone-num Specifies the phone number of the main Call Home contact person. The phone number must be in international format, starting with a + (plus sign) and a country code.
Step 7 UCS-A /monitoring/callhome # set street-address street-addr Specifies the street address of the main Call Home contact person.
Step 8 UCS-A /monitoring/callhome # set customer-id id-num Specifies the CCO identification number that includes the contract numbers for the support contract in its entitlements. The number can be up to 255 alphanumeric characters in free format.
Step 9 UCS-A /monitoring/callhome # set contract-id id-num Specifies the contract identification number from the service agreement. The number can be up to 255 alphanumeric characters in free format.
Step 10 UCS-A /monitoring/callhome # set site-id id-num Specifies the site identification number from the service agreement. The number can be up to 255 alphanumeric characters in free format.
Step 11 UCS-A /monitoring/callhome # set from-email email-addr Specifies the email address to use for the From field in Call Home messages.
Step 12 UCS-A /monitoring/callhome # set reply-to-email email-addr Specifies the email address to use for the Reply To field in Call Home messages.
Step 13 UCS-A /monitoring/callhome # set hostname {hostname | ip-addr} Specifies the hostname or IP address of the SMTP server that Call Home uses to send email messages.
Step 14 UCS-A /monitoring/callhome # set port port-num Specifies the SMTP server port that Call Home uses to send email messages. Valid port numbers are 1 to 65535.
Step 15 UCS-A /monitoring/callhome # set throttling {off | on} Enables or disables Call Home throttling. When enabled, throttling prevents too many Call Home email messages from being sent for the same event. By default, throttling is enabled.
Step 16 UCS-A /monitoring/callhome # set urgency {alerts | critical | debugging | emergencies | errors | information | notifications | warnings} Specifies the urgency level for Call Home email messages.
Step 17 UCS-A /monitoring/callhome # commit-buffer Commits the transaction to the system configuration.
What to Do NextThe following example configures Call Home and commits the transaction:
UCS-A# scope monitoring
UCS-A /monitoring* # scope callhome
UCS-A /monitoring/callhome* # enable
UCS-A /monitoring/callhome* # set contact "Steve Jones"
UCS-A /monitoring/callhome* # set email admin@MyCompany.com
UCS-A /monitoring/callhome* # set phone-contact +1-001-408-555-1234
UCS-A /monitoring/callhome* # set street-address "123 N. Main Street, Anytown, CA, 99885"
UCS-A /monitoring/callhome* # set customer-id 1234567
UCS-A /monitoring/callhome* # set contract-id 99887766
UCS-A /monitoring/callhome* # set site-id 5432112
UCS-A /monitoring/callhome* # set from-email person@MyCompany.com
UCS-A /monitoring/callhome* # set reply-to-email person@MyCompany.com
UCS-A /monitoring/callhome* # set hostname 192.168.100.12
UCS-A /monitoring/callhome* # set port 25
UCS-A /monitoring/callhome* # set throttling on
UCS-A /monitoring/callhome* # set urgency information
UCS-A /monitoring/callhome* # commit-buffer
UCS-A /monitoring/callhome #
Continue to "Configuring the Default Cisco TAC-1 Profile" to configure a Call Home profile for use with Smart Call Home.
Configuring the Default Cisco TAC-1 Profile
Procedure
Command or Action Purpose Step 1 UCS-A /monitoring/callhome # scope profile CiscoTac-1 Enters monitoring call home profile mode for the default Cisco TAC-1 profile.
Step 2 UCS-A /monitoring/callhome/profile # set level normal Specifies the normal event level for the profile.
Step 3 UCS-A /monitoring/callhome/profile # set alertgroups ciscotac Specifies the ciscotac alert group for the profile.
Step 4 UCS-A /monitoring/callhome/profile # set format xml Specifies the e-mail message format to xml .
Step 5 UCS-A /monitoring/callhome/profile # set maxsize 5000000 Specifies the maximum size of 5000000 for email messages.
Step 6 UCS-A /monitoring/callhome/profile # create destination callhome@cisco.com Specifies the email recipient to callhome@cisco.com .
Step 7 UCS-A /monitoring/callhome/profile/destination # exit Exits to monitoring call home profile mode.
Step 8 UCS-A /monitoring/callhome/profile # exit Exits to monitoring call home mode.
What to Do NextThe following example configures the default Cisco TAC-1 profile for use with Smart Call Home:
UCS-A /monitoring/callhome* # scope profile CiscoTac-1
UCS-A /monitoring/callhome/profile* # set level normal
UCS-A /monitoring/callhome/profile* # set alertgroups ciscotac
UCS-A /monitoring/callhome/profile* # set format xml
UCS-A /monitoring/callhome/profile* # set maxsize 5000000
UCS-A /monitoring/callhome/profile* # create destination callhome@cisco.com
UCS-A /monitoring/callhome/profile/destination* # exit
UCS-A /monitoring/callhome/profile* # exit
UCS-A /monitoring/callhome* #
Continue to "Configuring a System Inventory Message for Smart Call Home" to configure system inventory messages for use with Smart Call Home.
Configuring a System Inventory Message for Smart Call Home
Procedure
Command or Action Purpose Step 1 UCS-A /monitoring/callhome # scope inventory Enters monitoring call home inventory mode.
Step 2 UCS-A /monitoring/callhome/inventory # set send-periodically {off | on} Enables or disables the sending of inventory messages. When the on keyword is specified, inventory messages are automatically sent to the Call Home database.
Step 3 UCS-A /monitoring/callhome/inventory # set interval-days interval-num Specifies the the time interval (in days) at which inventory messages will be sent.
Step 4 UCS-A /monitoring/callhome/inventory # set timeofday-hour hour Specifies the hour (using 24-hour format) that inventory messages are sent.
Step 5 UCS-A /monitoring/callhome/inventory # set timeofday-minute minute Specifies the number of minutes after the hour that inventory messages are sent.
Step 6 UCS-A /monitoring/callhome/inventory # commit-buffer Commits the transaction to the system configuration.
What to Do NextThe following example configures Call Home system inventory messages and commits the transaction:
UCS-A /monitoring/callhome* # scope inventory
UCS-A /monitoring/callhome/inventory* # set send-periodically on
UCS-A /monitoring/callhome/inventory* # set interval-days 15
UCS-A /monitoring/callhome/inventory* # set timeofday-hour 21
UCS-A /monitoring/callhome/inventory* # set timeofday-minute 30
UCS-A /monitoring/callhome/inventory* # commit-buffer
UCS-A /monitoring/callhome/inventory #
Continue to "Registering Smart Call Home" to send an inventory message that starts the Smart Call Home registration process.
Registering Smart Call Home
Procedure
Command or Action Purpose Step 1 UCS-A /monitoring/callhome/inventory # send Sends the system inventory message to the Smart Call Home database.
You will receive an email from Cisco that describes how to complete the registration process.
What to Do NextThe following example sends the system inventory message to the Smart Call Home database:
UCS-A /monitoring/callhome/inventory # send
Follow the link in the email message to complete the SmartCall Home registration.