Feedback
Contents
- Configuring IEEE 802.1x Port-Based Authentication
- Finding Feature Information
- Information About 802.1x Port-Based Authentication
- Port-Based Authentication Process
- Port-Based Authentication Initiation and Message Exchange
- Authentication Manager for Port-Based Authentication
- Port-Based Authentication Methods
- Per-User ACLs and Filter-Ids
- Port-Based Authentication Manager CLI Commands
- Ports in Authorized and Unauthorized States
- Port-Based Authentication and Switch Stacks
- 802.1x Host Mode
- 802.1x Multiple Authentication Mode
- MAC Move
- MAC Replace
- 802.1x Accounting
- 802.1x Accounting Attribute-Value Pairs
- 802.1x Readiness Check
- Switch-to-RADIUS-Server Communication
- 802.1x Authentication with VLAN Assignment
- 802.1x Authentication with Per-User ACLs
- 802.1x Authentication with Downloadable ACLs and Redirect URLs
- Cisco Secure ACS and Attribute-Value Pairs for the Redirect URL
- Cisco Secure ACS and Attribute-Value Pairs for Downloadable ACLs
- VLAN ID-based MAC Authentication
- 802.1x Authentication with Guest VLAN
- 802.1x Authentication with Restricted VLAN
- 802.1x Authentication with Inaccessible Authentication Bypass
- Inaccessible Authentication Bypass Support on Multiple-Authentication Ports
- Inaccessible Authentication Bypass Authentication Results
- Inaccessible Authentication Bypass Feature Interactions
- 802.1x User Distribution
- 802.1x User Distribution Configuration Guidelines
- IEEE 802.1x Authentication with Voice VLAN Ports
- IEEE 802.1x Authentication with Port Security
- IEEE 802.1x Authentication with Wake-on-LAN
- IEEE 802.1x Authentication with MAC Authentication Bypass
- Network Admission Control Layer 2 IEEE 802.1x Validation
- Flexible Authentication Ordering
- Open1x Authentication
- Multidomain Authentication
- 802.1x Supplicant and Authenticator Switches with Network Edge Access Topology (NEAT)
- Voice Aware 802.1x Security
- Common Session ID
- How to Configure 802.1x Port-Based Authentication
- Default 802.1x Authentication Configuration
- 802.1x Authentication Configuration Guidelines
- 802.1x Authentication
- VLAN Assignment, Guest VLAN, Restricted VLAN, and Inaccessible Authentication Bypass
- MAC Authentication Bypass
- Maximum Number of Allowed Devices Per Port
- Configuring 802.1x Readiness Check
- Configuring Voice Aware 802.1x Security
- Configuring 802.1x Violation Modes
- Configuring 802.1x Authentication
- Configuring 802.1x Port-Based Authentication
- Configuring the Switch-to-RADIUS-Server Communication
- Configuring the Host Mode
- Configuring Periodic Re-Authentication
- Changing the Quiet Period
- Changing the Switch-to-Client Retransmission Time
- Setting the Switch-to-Client Frame-Retransmission Number
- Setting the Re-Authentication Number
- Enabling MAC Move
- Enabling MAC Replace
- Configuring 802.1x Accounting
- Configuring a Guest VLAN
- Configuring a Restricted VLAN
- Configuring Number of Authentication Attempts on a Restricted VLAN
- Configuring the Inaccessible Authentication Bypass Feature
- Example of Configuring Inaccessible Authentication Bypass
- Configuring 802.1x Authentication with WoL
- Configuring MAC Authentication Bypass
- Configuring 802.1x User Distribution
- Example of Configuring VLAN Groups
- Configuring NAC Layer 2 802.1x Validation
- Configuring an Authenticator Switch with NEAT
- Configuring a Supplicant Switch with NEAT
- Configuring 802.1x Authentication with Downloadable ACLs and Redirect URLs
- Configuring Downloadable ACLs
- Configuring a Downloadable Policy
- Configuring VLAN ID-based MAC Authentication
- Configuring Flexible Authentication Ordering
- Configuring Open1x
- Configuring a Web Authentication Local Banner
- Disabling 802.1x Authentication on the Port
- Resetting the 802.1x Authentication Configuration to the Default Values
- Monitoring 802.1x Statistics and Status
Configuring IEEE 802.1x Port-Based Authentication
This chapter describes how to configure IEEE 802.1x port-based authentication. IEEE 802.1x authentication prevents unauthorized devices (clients) from gaining access to the network. Unless otherwise noted, the term switch refers to a standalone switch or a switch stack.
- Finding Feature Information
- Information About 802.1x Port-Based Authentication
- How to Configure 802.1x Port-Based Authentication
- Monitoring 802.1x Statistics and Status
Finding Feature Information
Your software release may not support all the features documented in this module. For the latest feature information and caveats, see the release notes for your platform and software release.
Use Cisco Feature Navigator to find information about platform support and Cisco software image support. To access Cisco Feature Navigator, go to http://www.cisco.com/go/cfn. An account on Cisco.com is not required.
Related References
Information About 802.1x Port-Based Authentication
The 802.1x standard defines a client-server-based access control and authentication protocol that prevents unauthorized clients from connecting to a LAN through publicly accessible ports unless they are properly authenticated. The authentication server authenticates each client connected to a switch port before making available any services offered by the switch or the LAN.
Until the client is authenticated, 802.1x access control allows only Extensible Authentication Protocol over LAN (EAPOL), Cisco Discovery Protocol (CDP), and Spanning Tree Protocol (STP) traffic through the port to which the client is connected. After authentication is successful, normal traffic can pass through the port.
- Port-Based Authentication Process
- Port-Based Authentication Initiation and Message Exchange
- Authentication Manager for Port-Based Authentication
- Ports in Authorized and Unauthorized States
- Port-Based Authentication and Switch Stacks
- 802.1x Host Mode
- 802.1x Multiple Authentication Mode
- MAC Move
- MAC Replace
- 802.1x Accounting
- 802.1x Accounting Attribute-Value Pairs
- 802.1x Readiness Check
- Switch-to-RADIUS-Server Communication
- 802.1x Authentication with VLAN Assignment
- 802.1x Authentication with Per-User ACLs
- 802.1x Authentication with Downloadable ACLs and Redirect URLs
- VLAN ID-based MAC Authentication
- 802.1x Authentication with Guest VLAN
- 802.1x Authentication with Restricted VLAN
- 802.1x Authentication with Inaccessible Authentication Bypass
- 802.1x User Distribution
- IEEE 802.1x Authentication with Voice VLAN Ports
- IEEE 802.1x Authentication with Port Security
- IEEE 802.1x Authentication with Wake-on-LAN
- IEEE 802.1x Authentication with MAC Authentication Bypass
- Network Admission Control Layer 2 IEEE 802.1x Validation
- Flexible Authentication Ordering
- Open1x Authentication
- Multidomain Authentication
- 802.1x Supplicant and Authenticator Switches with Network Edge Access Topology (NEAT)
- Voice Aware 802.1x Security
- Common Session ID
Port-Based Authentication Process
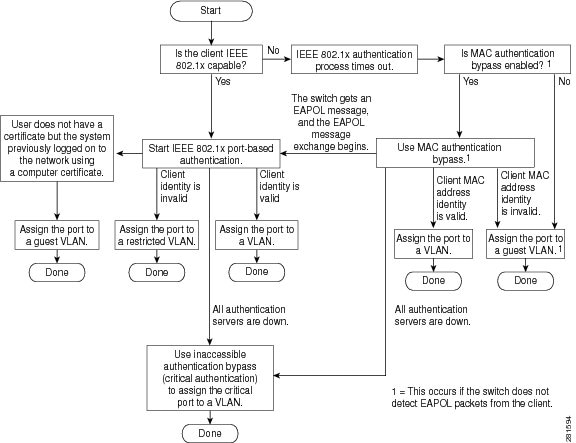
When 802.1x port-based authentication is enabled and the client supports 802.1x-compliant client software, these events occur:
- If the client identity is valid and the 802.1x authentication succeeds, the switch grants the client access to the network.
- If 802.1x authentication times out while waiting for an EAPOL message exchange and MAC authentication bypass is enabled, the switch can use the client MAC address for authorization. If the client MAC address is valid and the authorization succeeds, the switch grants the client access to the network. If the client MAC address is invalid and the authorization fails, the switch assigns the client to a guest VLAN that provides limited services if a guest VLAN is configured.
- If the switch gets an invalid identity from an 802.1x-capable client and a restricted VLAN is specified, the switch can assign the client to a restricted VLAN that provides limited services.
- If the RADIUS authentication server is unavailable (down) and inaccessible authentication bypass is enabled, the switch grants the client access to the network by putting the port in the critical-authentication state in the RADIUS-configured or the user-specified access VLAN.
NoteInaccessible authentication bypass is also referred to as critical authentication or the AAA fail policy.
If Multi Domain Authentication (MDA) is enabled on a port, this flow can be used with some exceptions that are applicable to voice authorization.
The switch re-authenticates a client when one of these situations occurs:
- Periodic re-authentication is enabled, and the re-authentication timer expires. You can configure the re-authentication timer to use a switch-specific value or to be based on values from the RADIUS server. After 802.1x authentication using a RADIUS server is configured, the switch uses timers based on the Session-Timeout RADIUS attribute (Attribute[27]) and the Termination-Action RADIUS attribute (Attribute [29]). The Session-Timeout RADIUS attribute (Attribute[27]) specifies the time after which re-authentication occurs. The Termination-Action RADIUS attribute (Attribute [29]) specifies the action to take during re-authentication. The actions are Initialize and ReAuthenticate. When the Initialize action is set (the attribute value is DEFAULT), the 802.1x session ends, and connectivity is lost during re-authentication. When the ReAuthenticate action is set (the attribute value is RADIUS-Request), the session is not affected during re-authentication.
- You manually re-authenticate the client by entering the dot1x re-authenticate interface interface-id privileged EXEC command.
Port-Based Authentication Initiation and Message Exchange
During 802.1x authentication, the switch or the client can initiate authentication. If you enable authentication on a port by using the authentication port-control auto interface configuration command, the switch initiates authentication when the link state changes from down to up or periodically as long as the port remains up and unauthenticated. The switch sends an EAP-request/identity frame to the client to request its identity. Upon receipt of the frame, the client responds with an EAP-response/identity frame.
However, if during bootup, the client does not receive an EAP-request/identity frame from the switch, the client can initiate authentication by sending an EAPOL-start frame, which prompts the switch to request the client’s identity.
When the client supplies its identity, the switch begins its role as the intermediary, passing EAP frames between the client and the authentication server until authentication succeeds or fails. If the authentication succeeds, the switch port becomes authorized. If the authentication fails, authentication can be retried, the port might be assigned to a VLAN that provides limited services, or network access is not granted.
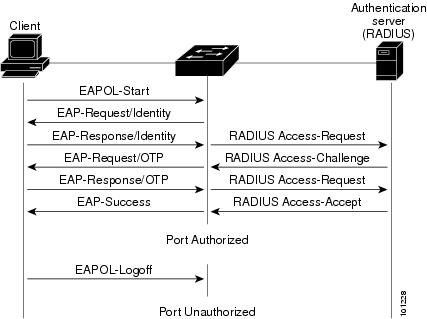
The specific exchange of EAP frames depends on the authentication method being used.
Figure 2. Message Exchange. This figure shows a message exchange initiated by the client when the client uses the One-Time-Password (OTP) authentication method with a RADIUS server.If 802.1x authentication times out while waiting for an EAPOL message exchange and MAC authentication bypass is enabled, the switch can authorize the client when the switch detects an Ethernet packet from the client. The switch uses the MAC address of the client as its identity and includes this information in the RADIUS-access/request frame that is sent to the RADIUS server. After the server sends the switch the RADIUS-access/accept frame (authorization is successful), the port becomes authorized. If authorization fails and a guest VLAN is specified, the switch assigns the port to the guest VLAN. If the switch detects an EAPOL packet while waiting for an Ethernet packet, the switch stops the MAC authentication bypass process and starts 802.1x authentication.
Authentication Manager for Port-Based Authentication
In Cisco IOS Release 12.2(46)SE and earlier, you could not use the same authorization methods, including CLI commands and messages, on this switch and also on other network devices, such as a Catalyst 6000. You had to use separate authentication configurations. Cisco IOS Release 12.2(50)SE and later supports the same authorization methods on all Catalyst switches in a network.
Cisco IOS Release 12.2(55)SE supports filtering verbose system messages from the authentication manager.
- Port-Based Authentication Methods
- Per-User ACLs and Filter-Ids
- Port-Based Authentication Manager CLI Commands
Port-Based Authentication Methods
Port-Based Authentication Manager CLI Commands
The authentication-manager interface-configuration commands control all the authentication methods, such as 802.1x, MAC authentication bypass, and web authentication. The authentication manager commands determine the priority and order of authentication methods applied to a connected host.
The authentication manager commands control generic authentication features, such as host-mode, violation mode, and the authentication timer. Generic authentication commands include the authentication host-mode, authentication violation, and authentication timer interface configuration commands.
802.1x-specific commands begin with the dot1x keyword. For example, the authentication port-control auto interface configuration command enables authentication on an interface. However, the dot1x system-authentication control global configuration command only globally enables or disables 802.1x authentication.
NoteIf 802.1x authentication is globally disabled, other authentication methods are still enabled on that port, such as web authentication.
The authentication manager commands provide the same functionality as earlier 802.1x commands.
Beginning with Cisco IOS Release 12.2(55)SE, you can filter out verbose system messages generated by the authentication manager. The filtered content typically relates to authentication success. You can also filter verbose messages for 802.1x authentication and MAB authentication. There is a separate command for each authentication method:
- The no authentication logging verbose global configuration command filters verbose messages from the authentication manager.
- The no dot1x logging verbose global configuration command filters 802.1x authentication verbose messages.
- The no mab logging verbose global configuration command filters MAC authentication bypass (MAB) verbose messages
Ports in Authorized and Unauthorized States
During 802.1x authentication, depending on the switch port state, the switch can grant a client access to the network. The port starts in the unauthorized state. While in this state, the port that is not configured as a voice VLAN port disallows all ingress and egress traffic except for 802.1x authentication, CDP, and STP packets. When a client is successfully authenticated, the port changes to the authorized state, allowing all traffic for the client to flow normally. If the port is configured as a voice VLAN port, the port allows VoIP traffic and 802.1x protocol packets before the client is successfully authenticated.
If a client that does not support 802.1x authentication connects to an unauthorized 802.1x port, the switch requests the client’s identity. In this situation, the client does not respond to the request, the port remains in the unauthorized state, and the client is not granted access to the network.
In contrast, when an 802.1x-enabled client connects to a port that is not running the 802.1x standard, the client initiates the authentication process by sending the EAPOL-start frame. When no response is received, the client sends the request for a fixed number of times. Because no response is received, the client begins sending frames as if the port is in the authorized state.
You control the port authorization state by using the authentication port-control interface configuration command and these keywords:
- force-authorized—disables 802.1x authentication and causes the port to change to the authorized state without any authentication exchange required. The port sends and receives normal traffic without 802.1x-based authentication of the client. This is the default setting.
- force-unauthorized—causes the port to remain in the unauthorized state, ignoring all attempts by the client to authenticate. The switch cannot provide authentication services to the client through the port.
- auto—enables 802.1x authentication and causes the port to begin in the unauthorized state, allowing only EAPOL frames to be sent and received through the port. The authentication process begins when the link state of the port changes from down to up or when an EAPOL-start frame is received. The switch requests the identity of the client and begins relaying authentication messages between the client and the authentication server. Each client attempting to access the network is uniquely identified by the switch by using the client MAC address.
NoteIn Session Aware Networking mode, the authentication port-control command is access-session port-control.
If the client is successfully authenticated (receives an Accept frame from the authentication server), the port state changes to authorized, and all frames from the authenticated client are allowed through the port. If the authentication fails, the port remains in the unauthorized state, but authentication can be retried. If the authentication server cannot be reached, the switch can resend the request. If no response is received from the server after the specified number of attempts, authentication fails, and network access is not granted.
When a client logs off, it sends an EAPOL-logoff message, causing the switch port to change to the unauthorized state.
If the link state of a port changes from up to down, or if an EAPOL-logoff frame is received, the port returns to the unauthorized state.
Port-Based Authentication and Switch Stacks
If a switch is added to or removed from a switch stack, 802.1x authentication is not affected as long as the IP connectivity between the RADIUS server and the stack remains intact. This statement also applies if the stack master is removed from the switch stack. Note that if the stack master fails, a stack member becomes the new stack master by using the election process, and the 802.1x authentication process continues as usual.
If IP connectivity to the RADIUS server is interrupted because the switch that was connected to the server is removed or fails, these events occur:
- Ports that are already authenticated and that do not have periodic re-authentication enabled remain in the authenticated state. Communication with the RADIUS server is not required.
- Ports that are already authenticated and that have periodic re-authentication enabled (with the authentication periodic global configuration command) fail the authentication process when the re-authentication occurs. Ports return to the unauthenticated state during the re-authentication process. Communication with the RADIUS server is required. For an ongoing authentication, the authentication fails immediately because there is no server connectivity.
If the switch that failed comes up and rejoins the switch stack, the authentications might or might not fail depending on the boot-up time and whether the connectivity to the RADIUS server is re-established by the time the authentication is attempted.
To avoid loss of connectivity to the RADIUS server, you should ensure that there is a redundant connection to it. For example, you can have a redundant connection to the stack master and another to a stack member, and if the stack master fails, the switch stack still has connectivity to the RADIUS server.
802.1x Host Mode
You can configure an 802.1x port for single-host or for multiple-hosts mode. In single-host mode, only one client can be connected to the 802.1x-enabled switch port. The switch detects the client by sending an EAPOL frame when the port link state changes to the up state. If a client leaves or is replaced with another client, the switch changes the port link state to down, and the port returns to the unauthorized state.
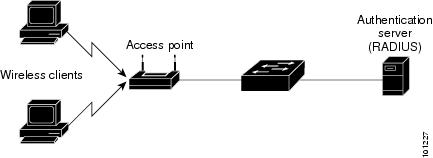
In multiple-hosts mode, you can attach multiple hosts to a single 802.1x-enabled port. In this mode, only one of the attached clients must be authorized for all clients to be granted network access. If the port becomes unauthorized (re-authentication fails or an EAPOL-logoff message is received), the switch denies network access to all of the attached clients. In this topology, the wireless access point is responsible for authenticating the clients attached to it, and it also acts as a client to the switch.
802.1x Multiple Authentication Mode
Multiple-authentication (multiauth) mode allows one client on the voice VLAN and multiple authenticated clients on the data VLAN. When a hub or access point is connected to an 802.1x-enabled port, multiple-authentication mode provides enhanced security over multiple-hosts mode by requiring authentication of each connected client. For non-802.1x devices, you can use MAC authentication bypass or web authentication as the fallback method for individual host authentications to authenticate different hosts through by different methods on a single port.
Multiple-authentication mode also supports MDA functionality on the voice VLAN by assigning authenticated devices to either a data or voice VLAN, depending on the VSAs received from the authentication server.
NoteGuest VLAN and authentication-failed VLAN features are supported for ports configured in multiple-authentication mode.
Beginning with Cisco IOS Release 12.2(55)SE, you can assign a RADIUS-server-supplied VLAN in multi-auth mode, under these conditions:
MAC Move
When a MAC address is authenticated on one switch port, that address is not allowed on another authentication manager-enabled port of the switch. If the switch detects that same MAC address on another authentication manager-enabled port, the address is not allowed.
There are situations where a MAC address might need to move from one port to another on the same switch. For example, when there is another device (for example a hub or an IP phone) between an authenticated host and a switch port, you might want to disconnect the host from the device and connect it directly to another port on the same switch.
You can globally enable MAC move so the device is reauthenticated on the new port. When a host moves to a second port, the session on the first port is deleted, and the host is reauthenticated on the new port.
MAC move is supported on all host modes. (The authenticated host can move to any port on the switch, no matter which host mode is enabled on the that port.)
When a MAC address moves from one port to another, the switch terminates the authenticated session on the original port and initiates a new authentication sequence on the new port.
The MAC move feature applies to both voice and data hosts.
NoteIn open authentication mode, a MAC address is immediately moved from the original port to the new port, with no requirement for authorization on the new port.
MAC Replace
Beginning with Cisco IOS Release 12.2(55)SE, the MAC replace feature can be configured to address the violation that occurs when a host attempts to connect to a port where another host was previously authenticated.
If you configure the authentication violation interface configuration command with the replace keyword, the authentication process on a port in multi-domain mode is:
- A new MAC address is received on a port with an existing authenticated MAC address.
- The authentication manager replaces the MAC address of the current data host on the port with the new MAC address.
- The authentication manager initiates the authentication process for the new MAC address.
- If the authentication manager determines that the new host is a voice host, the original voice host is removed.
If a port is in open authentication mode, any new MAC address is immediately added to the MAC address table.
802.1x Accounting
The 802.1x standard defines how users are authorized and authenticated for network access but does not keep track of network usage. 802.1x accounting is disabled by default. You can enable 802.1x accounting to monitor this activity on 802.1x-enabled ports:
- User successfully authenticates.
- User logs off.
- Link-down occurs.
- Re-authentication successfully occurs.
- Re-authentication fails.
The switch does not log 802.1x accounting information. Instead, it sends this information to the RADIUS server, which must be configured to log accounting messages.
802.1x Accounting Attribute-Value Pairs
The information sent to the RADIUS server is represented in the form of Attribute-Value (AV) pairs. These AV pairs provide data for different applications. (For example, a billing application might require information that is in the Acct-Input-Octets or the Acct-Output-Octets attributes of a RADIUS packet.)
AV pairs are automatically sent by a switch that is configured for 802.1x accounting. Three types of RADIUS accounting packets are sent by a switch:
- START–sent when a new user session starts
- INTERIM–sent during an existing session for updates
- STOP–sent when a session terminates
You can view the AV pairs that are being sent by the switch by entering the debug radius accounting privileged EXEC command. For more information about this command, see the Cisco IOS Debug Command Reference, Release 12.4.
This table lists the AV pairs and when they are sent are sent by the switch.
Table 3 Accounting AV PairsSometimes3
802.1x Readiness Check
The 802.1x readiness check monitors 802.1x activity on all the switch ports and displays information about the devices connected to the ports that support 802.1x. You can use this feature to determine if the devices connected to the switch ports are 802.1x-capable. You use an alternate authentication such as MAC authentication bypass or web authentication for the devices that do not support 802.1x functionality.
This feature only works if the supplicant on the client supports a query with the NOTIFY EAP notification packet. The client must respond within the 802.1x timeout value.
The 802.1x readiness check is allowed on all ports that can be configured for 802.1x. The readiness check is not available on a port that is configured as dot1x force-unauthorized.
Follow these guidelines to enable the readiness check on the switch:
- The readiness check is typically used before 802.1x is enabled on the switch.
- If you use the dot1x test eapol-capable privileged EXEC command without specifying an interface, all the ports on the switch stack are tested.
- When you configure the dot1x test eapol-capable command on an 802.1x-enabled port, and the link comes up, the port queries the connected client about its 802.1x capability. When the client responds with a notification packet, it is 802.1x-capable. A syslog message is generated if the client responds within the timeout period. If the client does not respond to the query, the client is not 802.1x-capable. No syslog message is generated.
- The readiness check can be sent on a port that handles multiple hosts (for example, a PC that is connected to an IP phone). A syslog message is generated for each of the clients that respond to the readiness check within the timer period.
Related Tasks
Switch-to-RADIUS-Server Communication
RADIUS security servers are identified by their hostname or IP address, hostname and specific UDP port numbers, or IP address and specific UDP port numbers. The combination of the IP address and UDP port number creates a unique identifier, which enables RADIUS requests to be sent to multiple UDP ports on a server at the same IP address. If two different host entries on the same RADIUS server are configured for the same service—for example, authentication—the second host entry configured acts as the fail-over backup to the first one. The RADIUS host entries are tried in the order that they were configured.
Related Tasks
802.1x Authentication with VLAN Assignment
The switch supports 802.1x authentication with VLAN assignment. After successful 802.1x authentication of a port, the RADIUS server sends the VLAN assignment to configure the switch port. The RADIUS server database maintains the username-to-VLAN mappings, assigning the VLAN based on the username of the client connected to the switch port. You can use this feature to limit network access for certain users.
Voice device authentication is supported with multidomain host mode. When a voice device is authorized and the RADIUS server returned an authorized VLAN, the voice VLAN on the port is configured to send and receive packets on the assigned voice VLAN. Voice VLAN assignment behaves the same as data VLAN assignment on multidomain authentication (MDA)-enabled ports.
When configured on the switch and the RADIUS server, 802.1x authentication with VLAN assignment has these characteristics:
- If no VLAN is supplied by the RADIUS server or if 802.1x authentication is disabled, the port is configured in its access VLAN after successful authentication. Recall that an access VLAN is a VLAN assigned to an access port. All packets sent from or received on this port belong to this VLAN.
- If 802.1x authentication is enabled but the VLAN information from the RADIUS server is not valid, authorization fails and configured VLAN remains in use. This prevents ports from appearing unexpectedly in an inappropriate VLAN because of a configuration error. Configuration errors could include specifying a VLAN for a routed port, a malformed VLAN ID, a nonexistent or internal (routed port) VLAN ID, an RSPAN VLAN, a shut down or suspended VLAN. In the case of a multidomain host port, configuration errors can also be due to an attempted assignment of a data VLAN that matches the configured or assigned voice VLAN ID (or the reverse).
- If 802.1x authentication is enabled and all information from the RADIUS server is valid, the authorized device is placed in the specified VLAN after authentication.
- If the multiple-hosts mode is enabled on an 802.1x port, all hosts are placed in the same VLAN (specified by the RADIUS server) as the first authenticated host.
- Enabling port security does not impact the RADIUS server-assigned VLAN behavior.
- If 802.1x authentication is disabled on the port, it is returned to the configured access VLAN and configured voice VLAN.
When the port is in the force authorized, force unauthorized, unauthorized, or shutdown state, it is put into the configured access VLAN.
If an 802.1x port is authenticated and put in the RADIUS server-assigned VLAN, any change to the port access VLAN configuration does not take effect. In the case of a multidomain host, the same applies to voice devices when the port is fully authorized with these exceptions:
- If the VLAN configuration change of one device results in matching the other device configured or assigned VLAN, authorization of all devices on the port is terminated and multidomain host mode is disabled until a valid configuration is restored where data and voice device configured VLANs no longer match.
- If a voice device is authorized and is using a downloaded voice VLAN, the removal of the voice VLAN configuration, or modifying the configuration value to dot1p or untagged results in voice device un-authorization and the disablement of multi-domain host mode.
The 802.1x authentication with VLAN assignment feature is not supported on trunk ports, dynamic ports, or with dynamic-access port assignment through a VLAN Membership Policy Server (VMPS).
To configure VLAN assignment you need to perform these tasks:
- Enable AAA authorization by using the network keyword to allow interface configuration from the RADIUS server.
- Enable 802.1x authentication. (The VLAN assignment feature is automatically enabled when you configure 802.1x authentication on an access port).
- Assign vendor-specific tunnel attributes in the RADIUS server. The RADIUS server must return these attributes to the switch:
Attribute [64] must contain the value VLAN (type 13). Attribute [65] must contain the value 802 (type 6). Attribute [81] specifies the VLAN name or VLAN ID assigned to the IEEE 802.1x-authenticated user.
- [64] Tunnel-Type = VLAN
- [65] Tunnel-Medium-Type = 802
- [81] Tunnel-Private-Group-ID = VLAN name or VLAN ID
802.1x Authentication with Per-User ACLs
You can enable per-user access control lists (ACLs) to provide different levels of network access and service to an 802.1x-authenticated user. When the RADIUS server authenticates a user connected to an 802.1x port, it retrieves the ACL attributes based on the user identity and sends them to the switch. The switch applies the attributes to the 802.1x port for the duration of the user session. The switch removes the per-user ACL configuration when the session is over, if authentication fails, or if a link-down condition occurs. The switch does not save RADIUS-specified ACLs in the running configuration. When the port is unauthorized, the switch removes the ACL from the port.
You can configure router ACLs and input port ACLs on the same switch. However, a port ACL takes precedence over a router ACL. If you apply input port ACL to an interface that belongs to a VLAN, the port ACL takes precedence over an input router ACL applied to the VLAN interface. Incoming packets received on the port to which a port ACL is applied are filtered by the port ACL. Incoming routed packets received on other ports are filtered by the router ACL. Outgoing routed packets are filtered by the router ACL. To avoid configuration conflicts, you should carefully plan the user profiles stored on the RADIUS server.
RADIUS supports per-user attributes, including vendor-specific attributes. These vendor-specific attributes (VSAs) are in octet-string format and are passed to the switch during the authentication process. The VSAs used for per-user ACLs are inacl#<n> for the ingress direction and outacl#<n> for the egress direction. MAC ACLs are supported only in the ingress direction. The switch supports VSAs only in the ingress direction. It does not support port ACLs in the egress direction on Layer 2 ports.
Use only the extended ACL syntax style to define the per-user configuration stored on the RADIUS server. When the definitions are passed from the RADIUS server, they are created by using the extended naming convention. However, if you use the Filter-Id attribute, it can point to a standard ACL.
You can use the Filter-Id attribute to specify an inbound or outbound ACL that is already configured on the switch. The attribute contains the ACL number followed by .in for ingress filtering or .out for egress filtering. If the RADIUS server does not allow the .in or .out syntax, the access list is applied to the outbound ACL by default. Because of limited support of Cisco IOS access lists on the switch, the Filter-Id attribute is supported only for IP ACLs numbered 1 to 199 and 1300 to 2699 (IP standard and IP extended ACLs).
Only one 802.1x-authenticated user is supported on a port. If the multiple-hosts mode is enabled on the port, the per-user ACL attribute is disabled for the associated port.
The maximum size of the per-user ACL is 4000 ASCII characters but is limited by the maximum size of RADIUS-server per-user ACLs.
- Enable AAA authentication.
- Enable AAA authorization by using the network keyword to allow interface configuration from the RADIUS server.
- Enable 802.1x authentication.
- Configure the user profile and VSAs on the RADIUS server.
- Configure the 802.1x port for single-host mode.
NotePer-user ACLs are supported only in single-host mode.
802.1x Authentication with Downloadable ACLs and Redirect URLs
You can download ACLs and redirect URLs from a RADIUS server to the switch during 802.1x authentication or MAC authentication bypass of the host. You can also download ACLs during web authentication.
NoteA downloadable ACL is also referred to as a dACL.
If more than one host is authenticated and the host is in single-host, MDA, or multiple-authentication mode, the switch changes the source address of the ACL to the host IP address.
You can apply the ACLs and redirect URLs to all the devices connected to the 802.1x-enabled port.
If no ACLs are downloaded during 802.1x authentication, the switch applies the static default ACL on the port to the host. On a voice VLAN port configured in multi-auth or MDA mode, the switch applies the ACL only to the phone as part of the authorization policies.
Beginning with Cisco IOS Release 12.2(55)SE, if there is no static ACL on a port, a dynamic auth-default ACL is created, and policies are enforced before dACLs are downloaded and applied.
NoteThe auth-default-ACL does not appear in the running configuration.
The auth-default ACL is created when at least one host with an authorization policy is detected on the port. The auth-default ACL is removed from the port when the last authenticated session ends. You can configure the auth-default ACL by using the ip access-list extended auth-default-acl global configuration command.
NoteThe auth-default-ACL does not support Cisco Discovery Protocol (CDP) bypass in the single host mode. You must configure a static ACL on the interface to support CDP bypass.
The 802.1x and MAB authentication methods support two authentication modes, open and closed. If there is no static ACL on a port in closed authentication mode:
- An auth-default-ACL is created.
- The auth-default-ACL allows only DHCP traffic until policies are enforced.
- When the first host authenticates, the authorization policy is applied without IP address insertion.
- When a second host is detected, the policies for the first host are refreshed, and policies for the first and subsequent sessions are enforced with IP address insertion.
If there is no static ACL on a port in open authentication mode:
- An auth-default-ACL-OPEN is created and allows all traffic.
- Policies are enforced with IP address insertion to prevent security breaches.
- Web authentication is subject to the auth-default-ACL-OPEN.
To control access for hosts with no authorization policy, you can configure a directive. The supported values for the directive are open and default. When you configure the open directive, all traffic is allowed. The default directive subjects traffic to the access provided by the port. You can configure the directive either in the user profile on the AAA server or on the switch. To configure the directive on the AAA server, use the authz-directive =<open/default> global command. To configure the directive on the switch, use the epm access-control open global configuration command.
NoteThe default value of the directive is default.
If a host falls back to web authentication on a port without a configured ACL:
- If the port is in open authentication mode, the auth-default-ACL-OPEN is created.
- If the port is in closed authentication mode, the auth-default-ACL is created.
The access control entries (ACEs) in the fallback ACL are converted to per-user entries. If the configured fallback profile does not include a fallback ACL, the host is subject to the auth-default-ACL associated with the port.
- Cisco Secure ACS and Attribute-Value Pairs for the Redirect URL
- Cisco Secure ACS and Attribute-Value Pairs for Downloadable ACLs
Cisco Secure ACS and Attribute-Value Pairs for the Redirect URL
The switch uses these cisco-av-pair VSAs:
The switch uses the CiscoSecure-defined-ACL attribute value pair to intercept an HTTP or HTTPS request from the end point. The switch then forwards the client web browser to the specified redirect address. The url-redirect AV pair on the Cisco Secure ACS contains the URL to which the web browser is redirected. The url-redirect-acl attribute value pair contains the name or number of an ACL that specifies the HTTP or HTTPS traffic to redirect.
Note
- Traffic that matches a permit ACE in the ACL is redirected.
- Define the URL redirect ACL and the default port ACL on the switch.
If a redirect URL is configured for a client on the authentication server, a default port ACL on the connected client switch port must also be configured
Cisco Secure ACS and Attribute-Value Pairs for Downloadable ACLs
You can set the CiscoSecure-Defined-ACL Attribute-Value (AV) pair on the Cisco Secure ACS with the RADIUS cisco-av-pair vendor-specific attributes (VSAs). This pair specifies the names of the downloadable ACLs on the Cisco Secure ACS with the #ACL#-IP-name-number attribute.
If a downloadable ACL is configured for a client on the authentication server, a default port ACL on the connected client switch port must also be configured.
If the default ACL is configured on the switch and the Cisco Secure ACS sends a host-access-policy to the switch, it applies the policy to traffic from the host connected to a switch port. If the policy does not apply, the switch applies the default ACL. If the Cisco Secure ACS sends the switch a downloadable ACL, this ACL takes precedence over the default ACL that is configured on the switch port. However, if the switch receives an host access policy from the Cisco Secure ACS but the default ACL is not configured, the authorization failure is declared.
VLAN ID-based MAC Authentication
You can use VLAN ID-based MAC authentication if you wish to authenticate hosts based on a static VLAN ID instead of a downloadable VLAN. When you have a static VLAN policy configured on your switch, VLAN information is sent to an IAS (Microsoft) RADIUS server along with the MAC address of each host for authentication. The VLAN ID configured on the connected port is used for MAC authentication. By using VLAN ID-based MAC authentication with an IAS server, you can have a fixed number of VLANs in the network.
The feature also limits the number of VLANs monitored and handled by STP. The network can be managed as a fixed VLAN.
NoteThis feature is not supported on Cisco ACS Server. (The ACS server ignores the sent VLAN-IDs for new hosts and only authenticates based on the MAC address.)
802.1x Authentication with Guest VLAN
You can configure a guest VLAN for each 802.1x port on the switch to provide limited services to clients, such as downloading the 802.1x client. These clients might be upgrading their system for 802.1x authentication, and some hosts, such as Windows 98 systems, might not be IEEE 802.1x-capable.
When you enable a guest VLAN on an 802.1x port, the switch assigns clients to a guest VLAN when the switch does not receive a response to its EAP request/identity frame or when EAPOL packets are not sent by the client.
The switch maintains the EAPOL packet history. If an EAPOL packet is detected on the interface during the lifetime of the link, the switch determines that the device connected to that interface is an IEEE 802.1x-capable supplicant, and the interface does not change to the guest VLAN state. EAPOL history is cleared if the interface link status goes down. If no EAPOL packet is detected on the interface, the interface changes to the guest VLAN state.
If the switch is trying to authorize an 802.1x-capable voice device and the AAA server is unavailable, the authorization attempt fails, but the detection of the EAPOL packet is saved in the EAPOL history. When the AAA server becomes available, the switch authorizes the voice device. However, the switch no longer allows other devices access to the guest VLAN. To prevent this situation, use one of these command sequences:
- Enter the authentication event no-response action authorize vlan vlan-id interface configuration command to allow access to the guest VLAN.
- Enter the shutdown interface configuration command followed by the no shutdown interface configuration command to restart the port.
Use a restricted VLAN to allow clients that failed authentication access to the network by entering the dot1x auth-fail vlan vlan-id interface configuration command.
If devices send EAPOL packets to the switch during the lifetime of the link, the switch no longer allows clients that fail authentication access to the guest VLAN.
NoteIf an EAPOL packet is detected after the interface has changed to the guest VLAN, the interface reverts to an unauthorized state, and 802.1x authentication restarts.
When the switch port is moved to the guest VLAN, the number of allowed 802.1x-incapable hosts is determined by the configured host-mode. If an 802.1x-capable client joins the same port on which the guest VLAN is configured, the port is put into the unauthorized state in the user-configured access VLAN, and authentication is restarted.
Guest VLANs are supported on 802.1x ports in single host, multiple host, multi-auth and multi-domain modes.
You can configure any active VLAN except an RSPAN VLAN, a private VLAN, or a voice VLAN as an 802.1x guest VLAN. The guest VLAN feature is not supported on internal VLANs (routed ports) or trunk ports; it is supported only on access ports.
The switch supports MAC authentication bypass. When MAC authentication bypass is enabled on an 802.1x port, the switch can authorize clients based on the client MAC address when IEEE 802.1x authentication times out while waiting for an EAPOL message exchange. After detecting a client on an 802.1x port, the switch waits for an Ethernet packet from the client. The switch sends the authentication server a RADIUS-access/request frame with a username and password based on the MAC address. If authorization succeeds, the switch grants the client access to the network. If authorization fails, the switch assigns the port to the guest VLAN if one is specified.
802.1x Authentication with Restricted VLAN
You can configure a restricted VLAN (also referred to as an authentication failed VLAN) for each IEEE 802.1x port on a switch stack or a switch to provide limited services to clients that cannot access the guest VLAN. These clients are 802.1x-compliant and cannot access another VLAN because they fail the authentication process. A restricted VLAN allows users without valid credentials in an authentication server (typically, visitors to an enterprise) to access a limited set of services. The administrator can control the services available to the restricted VLAN.
NoteYou can configure a VLAN to be both the guest VLAN and the restricted VLAN if you want to provide the same services to both types of users.
Without this feature, the client attempts and fails authentication indefinitely, and the switch port remains in the spanning-tree blocking state. With this feature, you can configure the switch port to be in the restricted VLAN after a specified number of authentication attempts (the default value is 3 attempts).
The authenticator counts the failed authentication attempts for the client. When this count exceeds the configured maximum number of authentication attempts, the port moves to the restricted VLAN. The failed attempt count increments when the RADIUS server replies with either an EAP failure or an empty response without an EAP packet. When the port moves into the restricted VLAN, the failed attempt counter resets.
Users who fail authentication remain in the restricted VLAN until the next re-authentication attempt. A port in the restricted VLAN tries to re-authenticate at configured intervals (the default is 60 seconds). If re-authentication fails, the port remains in the restricted VLAN. If re-authentication is successful, the port moves either to the configured VLAN or to a VLAN sent by the RADIUS server. You can disable re-authentication. If you do this, the only way to restart the authentication process is for the port to receive a link down or EAP logoff event. We recommend that you keep re-authentication enabled if a client might connect through a hub. When a client disconnects from the hub, the port might not receive the link down or EAP logoff event.
After a port moves to the restricted VLAN, a simulated EAP success message is sent to the client. This prevents clients from indefinitely attempting authentication. Some clients (for example, devices running Windows XP) cannot implement DHCP without EAP success.
Restricted VLANs are supported on 802.1x ports in all host modes and on Layer 2 ports.
You can configure any active VLAN except an RSPAN VLAN, a primary private VLAN, or a voice VLAN as an 802.1x restricted VLAN. The restricted VLAN feature is not supported on internal VLANs (routed ports) or trunk ports; it is supported only on access ports.
Other security port features such as dynamic ARP Inspection, DHCP snooping, and IP source guard can be configured independently on a restricted VLAN.
802.1x Authentication with Inaccessible Authentication Bypass
Use the inaccessible authentication bypass feature, also referred to as critical authentication or the AAA fail policy, when the switch cannot reach the configured RADIUS servers and new hosts cannot be authenticated. You can configure the switch to connect those hosts to critical ports.
When a new host tries to connect to the critical port, that host is moved to a user-specified access VLAN, the critical VLAN. The administrator gives limited authentication to the hosts.
When the switch tries to authenticate a host connected to a critical port, the switch checks the status of the configured RADIUS server. If a server is available, the switch can authenticate the host. However, if all the RADIUS servers are unavailable, the switch grants network access to the host and puts the port in the critical-authentication state, which is a special case of the authentication state.
- Inaccessible Authentication Bypass Support on Multiple-Authentication Ports
- Inaccessible Authentication Bypass Authentication Results
- Inaccessible Authentication Bypass Feature Interactions
Inaccessible Authentication Bypass Support on Multiple-Authentication Ports
When a port is configured on any host mode and the AAA server is unavailable, the port is then configured to multi-host mode and moved to the critical VLAN. To support this inaccessible bypass on multiple-authentication (multiauth) ports, use the authentication event server dead action reinitialize vlan vlan-id command. When a new host tries to connect to the critical port, that port is reinitialized and all the connected hosts are moved to the user-specified access VLAN.
Inaccessible Authentication Bypass Authentication Results
The behavior of the inaccessible authentication bypass feature depends on the authorization state of the port:
- If the port is unauthorized when a host connected to a critical port tries to authenticate and all servers are unavailable, the switch puts the port in the critical-authentication state in the RADIUS-configured or user-specified access VLAN.
- If the port is already authorized and reauthentication occurs, the switch puts the critical port in the critical-authentication state in the current VLAN, which might be the one previously assigned by the RADIUS server.
- If the RADIUS server becomes unavailable during an authentication exchange, the current exchange times out, and the switch puts the critical port in the critical-authentication state during the next authentication attempt.
You can configure the critical port to reinitialize hosts and move them out of the critical VLAN when the RADIUS server is again available. When this is configured, all critical ports in the critical-authentication state are automatically re-authenticated.
Inaccessible Authentication Bypass Feature Interactions
Inaccessible authentication bypass interacts with these features:
- Guest VLAN—Inaccessible authentication bypass is compatible with guest VLAN. When a guest VLAN is enabled on 8021.x port, the features interact as follows:
- If at least one RADIUS server is available, the switch assigns a client to a guest VLAN when the switch does not receive a response to its EAP request/identity frame or when EAPOL packets are not sent by the client.
- If all the RADIUS servers are not available and the client is connected to a critical port, the switch authenticates the client and puts the critical port in the critical-authentication state in the RADIUS-configured or user-specified access VLAN.
- If all the RADIUS servers are not available and the client is not connected to a critical port, the switch might not assign clients to the guest VLAN if one is configured.
- If all the RADIUS servers are not available and if a client is connected to a critical port and was previously assigned to a guest VLAN, the switch keeps the port in the guest VLAN.
- Restricted VLAN—If the port is already authorized in a restricted VLAN and the RADIUS servers are unavailable, the switch puts the critical port in the critical-authentication state in the restricted VLAN.
- 802.1x accounting—Accounting is not affected if the RADIUS servers are unavailable.
- Voice VLAN—Inaccessible authentication bypass is compatible with voice VLAN, but the RADIUS-configured or user-specified access VLAN and the voice VLAN must be different.
- Remote Switched Port Analyzer (RSPAN)—Do not configure an RSPAN VLAN as the RADIUS-configured or user-specified access VLAN for inaccessible authentication bypass.
In a switch stack, the stack master checks the status of the RADIUS servers by sending keepalive packets. When the status of a RADIUS server changes, the stack master sends the information to the stack members. The stack members can then check the status of RADIUS servers when re-authenticating critical ports.
If the new stack master is elected, the link between the switch stack and RADIUS server might change, and the new stack immediately sends keepalive packets to update the status of the RADIUS servers. If the server status changes from dead to alive, the switch re-authenticates all switch ports in the critical-authentication state.
When a member is added to the stack, the stack master sends the member the server status.
802.1x User Distribution
You can configure 802.1x user distribution to load-balance users with the same group name across multiple different VLANs.
The VLANs are either supplied by the RADIUS server or configured through the switch CLI under a VLAN group name.
- Configure the RADIUS server to send more than one VLAN name for a user. The multiple VLAN names can be sent as part of the response to the user. The 802.1x user distribution tracks all the users in a particular VLAN and achieves load balancing by moving the authorized user to the least populated VLAN.
- Configure the RADIUS server to send a VLAN group name for a user. The VLAN group name can be sent as part of the response to the user. You can search for the selected VLAN group name among the VLAN group names that you configured by using the switch CLI. If the VLAN group name is found, the corresponding VLANs under this VLAN group name are searched to find the least populated VLAN. Load balancing is achieved by moving the corresponding authorized user to that VLAN.
NoteThe RADIUS server can send the VLAN information in any combination of VLAN-IDs, VLAN names, or VLAN groups.
802.1x User Distribution Configuration Guidelines
- Confirm that at least one VLAN is mapped to the VLAN group.
- You can map more than one VLAN to a VLAN group.
- You can modify the VLAN group by adding or deleting a VLAN.
- When you clear an existing VLAN from the VLAN group name, none of the authenticated ports in the VLAN are cleared, but the mappings are removed from the existing VLAN group.
- If you clear the last VLAN from the VLAN group name, the VLAN group is cleared.
- You can clear a VLAN group even when the active VLANs are mapped to the group. When you clear a VLAN group, none of the ports or users that are in the authenticated state in any VLAN within the group are cleared, but the VLAN mappings to the VLAN group are cleared.
IEEE 802.1x Authentication with Voice VLAN Ports
A voice VLAN port is a special access port associated with two VLAN identifiers:
- VVID to carry voice traffic to and from the IP phone. The VVID is used to configure the IP phone connected to the port.
- PVID to carry the data traffic to and from the workstation connected to the switch through the IP phone. The PVID is the native VLAN of the port.
The IP phone uses the VVID for its voice traffic, regardless of the authorization state of the port. This allows the phone to work independently of IEEE 802.1x authentication.
In single-host mode, only the IP phone is allowed on the voice VLAN. In multiple-hosts mode, additional clients can send traffic on the voice VLAN after a supplicant is authenticated on the PVID. When multiple-hosts mode is enabled, the supplicant authentication affects both the PVID and the VVID.
A voice VLAN port becomes active when there is a link, and the device MAC address appears after the first CDP message from the IP phone. Cisco IP phones do not relay CDP messages from other devices. As a result, if several IP phones are connected in series, the switch recognizes only the one directly connected to it. When IEEE 802.1x authentication is enabled on a voice VLAN port, the switch drops packets from unrecognized IP phones more than one hop away.
When IEEE 802.1x authentication is enabled on a Catalyst 3850 series switch port, you can configure an access port VLAN that is also a voice VLAN.
IEEE 802.1x Authentication with Wake-on-LAN
The IEEE 802.1x authentication with wake-on-LAN (WoL) feature allows dormant PCs to be powered when the switch receives a specific Ethernet frame, known as the magic packet. You can use this feature in environments where administrators need to connect to systems that have been powered down.
When a host that uses WoL is attached through an IEEE 802.1x port and the host powers off, the IEEE 802.1x port becomes unauthorized. The port can only receive and send EAPOL packets, and WoL magic packets cannot reach the host. When the PC is powered off, it is not authorized, and the switch port is not opened.
When the switch uses IEEE 802.1x authentication with WoL, the switch forwards traffic to unauthorized IEEE 802.1x ports, including magic packets. While the port is unauthorized, the switch continues to block ingress traffic other than EAPOL packets. The host can receive packets but cannot send packets to other devices in the network.
NoteIf PortFast is not enabled on the port, the port is forced to the bidirectional state.
When you configure a port as unidirectional by using the authentication control-direction in interface configuration command, the port changes to the spanning-tree forwarding state. The port can send packets to the host but cannot receive packets from the host.
When you configure a port as bidirectional by using the authentication control-direction both interface configuration command, the port is access-controlled in both directions. The port does not receive packets from or send packets to the host.
IEEE 802.1x Authentication with MAC Authentication Bypass
You can configure the switch to authorize clients based on the client MAC address by using the MAC authentication bypass feature. For example, you can enable this feature on IEEE 802.1x ports connected to devices such as printers.
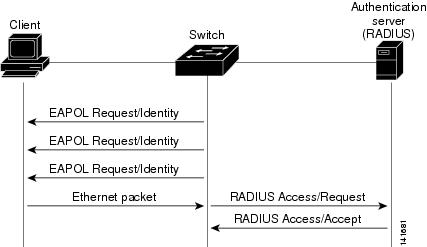
If IEEE 802.1x authentication times out while waiting for an EAPOL response from the client, the switch tries to authorize the client by using MAC authentication bypass.
When the MAC authentication bypass feature is enabled on an IEEE 802.1x port, the switch uses the MAC address as the client identity. The authentication server has a database of client MAC addresses that are allowed network access. After detecting a client on an IEEE 802.1x port, the switch waits for an Ethernet packet from the client. The switch sends the authentication server a RADIUS-access/request frame with a username and password based on the MAC address. If authorization succeeds, the switch grants the client access to the network. If authorization fails, the switch assigns the port to the guest VLAN if one is configured.
If the switch already authorized a port by using MAC authentication bypass and detects an IEEE 802.1x supplicant, the switch does not unauthorize the client connected to the port. When re-authentication occurs, the switch uses the authentication or re-authentication methods configured on the port, if the previous session ended because the Termination-Action RADIUS attribute value is DEFAULT.
Clients that were authorized with MAC authentication bypass can be re-authenticated. The re-authentication process is the same as that for clients that were authenticated with IEEE 802.1x. During re-authentication, the port remains in the previously assigned VLAN. If re-authentication is successful, the switch keeps the port in the same VLAN. If re-authentication fails, the switch assigns the port to the guest VLAN, if one is configured.
If re-authentication is based on the Session-Timeout RADIUS attribute (Attribute[27]) and the Termination-Action RADIUS attribute (Attribute [29]) and if the Termination-Action RADIUS attribute (Attribute [29]) action is Initialize (the attribute value is DEFAULT), the MAC authentication bypass session ends, and connectivity is lost during re-authentication. If MAC authentication bypass is enabled and the IEEE 802.1x authentication times out, the switch uses the MAC authentication bypass feature to initiate re-authorization. For more information about these AV pairs, see RFC 3580, “IEEE 802.1X Remote Authentication Dial In User Service (RADIUS) Usage Guidelines.”
MAC authentication bypass interacts with the features:
- IEEE 802.1x authentication—MAC authentication bypass and IEEE 802.1x authentication are configured independently on the port.
- Guest VLAN—If a client has an invalid MAC address identity, the switch assigns the client to a guest VLAN if one is configured.
- Restricted VLAN—This feature is not supported when the client connected to an IEEE 802.lx port is authenticated with MAC authentication bypass.
- Port security
- Voice VLAN
- VLAN Membership Policy Server (VMPS)—IEEE802.1x and VMPS are mutually exclusive.
- Private VLAN—You can assign a client to a private VLAN.
- Network admission control (NAC) Layer 2 IP validation—This feature takes effect after an IEEE 802.1x port is authenticated with MAC authentication bypass, including hosts in the exception list.
- Network Edge Access Topology (NEAT)—MAB and NEAT are mutually exclusive. You cannot enable MAB when NEAT is enabled on an interface, and you cannot enable NEAT when MAB is enabled on an interface.
Network Admission Control Layer 2 IEEE 802.1x Validation
The switch supports the Network Admission Control (NAC) Layer 2 IEEE 802.1x validation, which checks the antivirus condition or posture of endpoint systems or clients before granting the devices network access. With NAC Layer 2 IEEE 802.1x validation, you can do these tasks:
- Download the Session-Timeout RADIUS attribute (Attribute[27]) and the Termination-Action RADIUS attribute (Attribute[29]) from the authentication server.
- Set the number of seconds between re-authentication attempts as the value of the Session-Timeout RADIUS attribute (Attribute[27]) and get an access policy against the client from the RADIUS server.
- Set the action to be taken when the switch tries to re-authenticate the client by using the Termination-Action RADIUS attribute (Attribute[29]). If the value is the DEFAULT or is not set, the session ends. If the value is RADIUS-Request, the re-authentication process starts.
- View the NAC posture token, which shows the posture of the client, by using the show authentication privileged EXEC command.
- Configure secondary private VLANs as guest VLANs.
Configuring NAC Layer 2 IEEE 802.1x validation is similar to configuring IEEE 802.1x port-based authentication except that you must configure a posture token on the RADIUS server.
Flexible Authentication Ordering
You can use flexible authentication ordering to configure the order of methods that a port uses to authenticate a new host. MAC authentication bypass and 802.1x can be the primary or secondary authentication methods, and web authentication can be the fallback method if either or both of those authentication attempts fail.
Related Tasks
Open1x Authentication
Open1x authentication allows a device access to a port before that device is authenticated. When open authentication is configured, a new host can pass traffic according to the access control list (ACL) defined on the port. After the host is authenticated, the policies configured on the RADIUS server are applied to that host.
You can configure open authentication with these scenarios:
- Single-host mode with open authentication–Only one user is allowed network access before and after authentication.
- MDA mode with open authentication–Only one user in the voice domain and one user in the data domain are allowed.
- Multiple-hosts mode with open authentication–Any host can access the network.
- Multiple-authentication mode with open authentication–Similar to MDA, except multiple hosts can be authenticated.
Related Tasks
Multidomain Authentication
The switch supports multidomain authentication (MDA), which allows both a data device and voice device, such as an IP phone (Cisco or non-Cisco), to authenticate on the same switch port. The port is divided into a data domain and a voice domain.
MDA does not enforce the order of device authentication. However, for best results, we recommend that a voice device is authenticated before a data device on an MDA-enabled port.
Follow these guidelines for configuring MDA:
- You must configure a switch port for MDA.
- You must configure the voice VLAN for the IP phone when the host mode is set to multidomain.
- Voice VLAN assignment on an MDA-enabled port is supported.
- To authorize a voice device, the AAA server must be configured to send a Cisco Attribute-Value (AV) pair attribute with a value of device-traffic-class=voice. Without this value, the switch treats the voice device as a data device.
- The guest VLAN and restricted VLAN features only apply to the data devices on an MDA-enabled port. The switch treats a voice device that fails authorization as a data device.
- If more than one device attempts authorization on either the voice or the data domain of a port, it is error disabled.
- Until a device is authorized, the port drops its traffic. Non-Cisco IP phones or voice devices are allowed into both the data and voice VLANs. The data VLAN allows the voice device to contact a DHCP server to obtain an IP address and acquire the voice VLAN information. After the voice device starts sending on the voice VLAN, its access to the data VLAN is blocked.
- A voice device MAC address that is binding on the data VLAN is not counted towards the port security MAC address limit.
- You can use dynamic VLAN assignment from a RADIUS server only for data devices.
- MDA can use MAC authentication bypass as a fallback mechanism to allow the switch port to connect to devices that do not support IEEE 802.1x authentication.
- When a data or a voice device is detected on a port, its MAC address is blocked until authorization succeeds. If the authorization fails, the MAC address remains blocked for 5 minutes.
- If more than five devices are detected on the data VLAN or more than one voice device is detected on the voice VLAN while a port is unauthorized, the port is error disabled.
- When a port host mode is changed from single- or multihost to multidomain mode, an authorized data device remains authorized on the port. However, a Cisco IP phone that has been allowed on the port voice VLAN is automatically removed and must be reauthenticated on that port.
- Active fallback mechanisms such as guest VLAN and restricted VLAN remain configured after a port changes from single- or multihost mode to multidomain mode.
- Switching a port host mode from multidomain to single- or multihost mode removes all authorized devices from the port.
- If a data domain is authorized first and placed in the guest VLAN, non-IEEE 802.1x-capable voice devices need to tag their packets on the voice VLAN to trigger authentication.
- We do not recommend per-user ACLs with an MDA-enabled port. An authorized device with a per-user ACL policy might impact traffic on both the voice and data VLANs of the port. If used, only one device on the port should enforce per-user ACLs.
802.1x Supplicant and Authenticator Switches with Network Edge Access Topology (NEAT)
The Network Edge Access Topology (NEAT) feature extends identity to areas outside the wiring closet (such as conference rooms). This allows any type of device to authenticate on the port.
- 802.1x switch supplicant: You can configure a switch to act as a supplicant to another switch by using the 802.1x supplicant feature. This configuration is helpful in a scenario, where, for example, a switch is outside a wiring closet and is connected to an upstream switch through a trunk port. A switch configured with the 802.1x switch supplicant feature authenticates with the upstream switch for secure connectivity. Once the supplicant switch authenticates successfully the port mode changes from access to trunk.
- If the access VLAN is configured on the authenticator switch, it becomes the native VLAN for the trunk port after successful authentication.
You can enable MDA or multiauth mode on the authenticator switch interface that connects to one more supplicant switches. Multihost mode is not supported on the authenticator switch interface.
Use the dot1x supplicant force-multicast global configuration command on the supplicant switch for Network Edge Access Topology (NEAT) to work in all host modes.
- Host Authorization: Ensures that only traffic from authorized hosts (connecting to the switch with supplicant) is allowed on the network. The switches use Client Information Signalling Protocol (CISP) to send the MAC addresses connecting to the supplicant switch to the authenticator switch.
- Auto enablement: Automatically enables trunk configuration on the authenticator switch, allowing user traffic from multiple VLANs coming from supplicant switches. Configure the cisco-av-pair as device-traffic-class=switch at the ACS. (You can configure this under the group or the user settings.)
Voice Aware 802.1x Security
You use the voice aware 802.1x security feature to configure the switch to disable only the VLAN on which a security violation occurs, whether it is a data or voice VLAN. In previous releases, when an attempt to authenticate the data client caused a security violation, the entire port shut down, resulting in a complete loss of connectivity.
You can use this feature in IP phone deployments where a PC is connected to the IP phone. A security violation found on the data VLAN results in the shutdown of only the data VLAN. The traffic on the voice VLAN flows through the switch without interruption.
Related Tasks
Common Session ID
Authentication manager uses a single session ID (referred to as a common session ID) for a client no matter which authentication method is used. This ID is used for all reporting purposes, such as the show commands and MIBs. The session ID appears with all per-session syslog messages.
- The IP address of the Network Access Device (NAD)
- A monotonically increasing unique 32 bit integer
- The session start time stamp (a 32 bit integer)
This example shows how the session ID appears in the output of the show authentication command. The session ID in this example is 160000050000000B288508E5:
Switch# show authentication sessions
Interface  MAC Address     Method   Domain   Status         Session ID
Fa4/0/4    0000.0000.0203  mab      DATA     Authz Success  160000050000000B288508E5
This is an example of how the session ID appears in the syslog output. The session ID in this example is also160000050000000B288508E5:
1w0d: %AUTHMGR-5-START: Starting 'mab' for client (0000.0000.0203) on Interface Fa4/0/4
AuditSessionID 160000050000000B288508E5
1w0d: %MAB-5-SUCCESS: Authentication successful for client (0000.0000.0203) on Interface
Fa4/0/4 AuditSessionID 160000050000000B288508E5
1w0d: %AUTHMGR-7-RESULT: Authentication result 'success' from 'mab' for client
(0000.0000.0203) on Interface Fa4/0/4 AuditSessionID 160000050000000B288508E5
The session ID is used by the NAD, the AAA server, and other report-analyzing applications to identify the client. The ID appears automatically. No configuration is required.
How to Configure 802.1x Port-Based Authentication
Default 802.1x Authentication Configuration
802.1x Authentication Configuration Guidelines
802.1x Authentication
These are the 802.1x authentication configuration guidelines:
- When 802.1x authentication is enabled, ports are authenticated before any other Layer 2 or Layer 3 features are enabled.
- If the VLAN to which an 802.1x-enabled port is assigned changes, this change is transparent and does not affect the switch. For example, this change occurs if a port is assigned to a RADIUS server-assigned VLAN and is then assigned to a different VLAN after re-authentication. If the VLAN to which an 802.1x port is assigned to shut down, disabled, or removed, the port becomes unauthorized. For example, the port is unauthorized after the access VLAN to which a port is assigned shuts down or is removed.
- The 802.1x protocol is supported on Layer 2 static-access ports, voice VLAN ports, and Layer 3 routed ports, but it is not supported on these port types:
- Trunk port—If you try to enable 802.1x authentication on a trunk port, an error message appears, and 802.1x authentication is not enabled. If you try to change the mode of an 802.1x-enabled port to trunk, an error message appears, and the port mode is not changed.
- Dynamic ports—A port in dynamic mode can negotiate with its neighbor to become a trunk port. If you try to enable 802.1x authentication on a dynamic port, an error message appears, and 802.1x authentication is not enabled. If you try to change the mode of an 802.1x-enabled port to dynamic, an error message appears, and the port mode is not changed.
- Dynamic-access ports—If you try to enable 802.1x authentication on a dynamic-access (VLAN Query Protocol [VQP]) port, an error message appears, and 802.1x authentication is not enabled. If you try to change an 802.1x-enabled port to dynamic VLAN assignment, an error message appears, and the VLAN configuration is not changed.
- EtherChannel port—Do not configure a port that is an active or a not-yet-active member of an EtherChannel as an 802.1x port. If you try to enable 802.1x authentication on an EtherChannel port, an error message appears, and 802.1x authentication is not enabled.
- Switched Port Analyzer (SPAN) and Remote SPAN (RSPAN) destination ports—You can enable 802.1x authentication on a port that is a SPAN or RSPAN destination port. However, 802.1x authentication is disabled until the port is removed as a SPAN or RSPAN destination port. You can enable 802.1x authentication on a SPAN or RSPAN source port.
- Before globally enabling 802.1x authentication on a switch by entering the dot1x system-auth-control global configuration command, remove the EtherChannel configuration from the interfaces on which 802.1x authentication and EtherChannel are configured.
- If you are using a device running the Cisco Access Control Server (ACS) application for IEEE 802.1x authentication with EAP-Transparent LAN Services (TLS) and EAP-MD5, make sure that the device is running ACS Version 3.2.1 or later.
- When IP phones are connected to an 802.1x-enabled switch port that is in single host mode, the switch grants the phones network access without authenticating them. We recommend that you use multidomain authentication (MDA) on the port to authenticate both a data device and a voice device, such as an IP phone.
NoteOnly Catalyst 3750, 3560, and 2960 switches support CDP bypass. The Catalyst 3750-X, 3560-X, 3750-E, and 3560-E switches do not support CDP bypass.
- Cisco IOS Release 12.2(55)SE and later supports filtering of system messages related to 802.1x authentication.
VLAN Assignment, Guest VLAN, Restricted VLAN, and Inaccessible Authentication Bypass
These are the configuration guidelines for VLAN assignment, guest VLAN, restricted VLAN, and inaccessible authentication bypass:
- When 802.1x authentication is enabled on a port, you cannot configure a port VLAN that is equal to a voice VLAN.
- The 802.1x authentication with VLAN assignment feature is not supported on trunk ports, dynamic ports, or with dynamic-access port assignment through a VMPS.
- You can configure 802.1x authentication on a private-VLAN port, but do not configure IEEE 802.1x authentication with port security, a voice VLAN, a guest VLAN, a restricted VLAN, or a per-user ACL on private-VLAN ports.
- You can configure any VLAN except an RSPAN VLAN, private VLAN, or a voice VLAN as an 802.1x guest VLAN. The guest VLAN feature is not supported on internal VLANs (routed ports) or trunk ports; it is supported only on access ports.
- After you configure a guest VLAN for an 802.1x port to which a DHCP client is connected, you might need to get a host IP address from a DHCP server. You can change the settings for restarting the 802.1x authentication process on the switch before the DHCP process on the client times out and tries to get a host IP address from the DHCP server. Decrease the settings for the 802.1x authentication process (authentication timer inactivity and authentication timer reauthentication interface configuration commands). The amount to decrease the settings depends on the connected 802.1x client type.
- When configuring the inaccessible authentication bypass feature, follow these guidelines:
- The feature is supported on 802.1x port in single-host mode and multihosts mode.
- If the client is running Windows XP and the port to which the client is connected is in the critical-authentication state, Windows XP might report that the interface is not authenticated.
- If the Windows XP client is configured for DHCP and has an IP address from the DHCP server, receiving an EAP-Success message on a critical port might not re-initiate the DHCP configuration process.
- You can configure the inaccessible authentication bypass feature and the restricted VLAN on an 802.1x port. If the switch tries to re-authenticate a critical port in a restricted VLAN and all the RADIUS servers are unavailable, switch changes the port state to the critical authentication state and remains in the restricted VLAN.
- You can configure any VLAN except an RSPAN VLAN or a voice VLAN as an 802.1x restricted VLAN. The restricted VLAN feature is not supported on internal VLANs (routed ports) or trunk ports; it is supported only on access ports.
MAC Authentication Bypass
These are the MAC authentication bypass configuration guidelines:
- Unless otherwise stated, the MAC authentication bypass guidelines are the same as the 802.1x authentication guidelines.
- If you disable MAC authentication bypass from a port after the port has been authorized with its MAC address, the port state is not affected.
- If the port is in the unauthorized state and the client MAC address is not the authentication-server database, the port remains in the unauthorized state. However, if the client MAC address is added to the database, the switch can use MAC authentication bypass to re-authorize the port.
- If the port is in the authorized state, the port remains in this state until re-authorization occurs.
Maximum Number of Allowed Devices Per Port
This is the maximum number of devices allowed on an 802.1x-enabled port:
- In single-host mode, only one device is allowed on the access VLAN. If the port is also configured with a voice VLAN, an unlimited number of Cisco IP phones can send and receive traffic through the voice VLAN.
- In multidomain authentication (MDA) mode, one device is allowed for the access VLAN, and one IP phone is allowed for the voice VLAN.
- In multihost mode, only one 802.1x supplicant is allowed on the port, but an unlimited number of non-802.1x hosts are allowed on the access VLAN. An unlimited number of devices are allowed on the voice VLAN.
Configuring 802.1x Readiness Check
SUMMARY STEPSBeginning in privileged EXEC mode, follow these steps to enable the 802.1x readiness check on the switch:
DETAILED STEPSRelated Concepts
Configuring Voice Aware 802.1x Security
SUMMARY STEPSFollow these guidelines to configure voice aware 802.1x voice security on the switch:
- You enable voice aware 802.1x security by entering the errdisable detect cause security-violation shutdown vlan global configuration command. You disable voice aware 802.1x security by entering the no version of this command. This command applies to all 802.1x-configured ports in the switch.
NoteIf you do not include the shutdown vlan keywords, the entire port is shut down when it enters the error-disabled state.
- If you use the errdisable recovery cause security-violation global configuration command to configure error-disabled recovery, the port is automatically re-enabled. If error-disabled recovery is not configured for the port, you re-enable it by using the shutdown and no shutdown interface configuration commands.
- You can re-enable individual VLANs by using the clear errdisable interface interface-id vlan [vlan-list] privileged EXEC command. If you do not specify a range, all VLANs on the port are enabled.
Beginning in privileged EXEC mode, follow these steps to enable voice aware 802.1x security:
2. errdisable detect cause security-violation shutdown vlan
3. errdisable recovery cause security-violation
DETAILED STEPS
Command or Action Purpose
Step 1 configure terminal
Example:Switch# configure terminalStep 2 errdisable detect cause security-violation shutdown vlan
Example:Switch(config)# errdisable detect cause security-violation shutdown vlanShuts down any VLAN on which a security violation error occurs.
Note If the shutdown vlan keywords are not included, the entire port enters the error-disabled state and shuts down.
Step 3 errdisable recovery cause security-violation
Example:Switch(config)# errdisable recovery cause security-violationStep 4 clear errdisable interface interface-id vlan [vlan-list]
Example:Switch(config)# clear errdisable interface GigabitEthernet4/0/2 vlan(Optional) Reenables individual VLANs that have been error disabled.
Step 5 Enter the following:
Example:Switch(config-if)# shutdown Switch(config-if)# no shutdown(Optional) Re-enables an error-disabled VLAN, and clear all error-disable indications.
Step 6 end
Example:Switch(config-if)# end
Configuring 802.1x Violation Modes
SUMMARY STEPSYou can configure an 802.1x port so that it shuts down, generates a syslog error, or discards packets from a new device when:
- a device connects to an 802.1x-enabled port
- the maximum number of allowed about devices have been authenticated on the port
Beginning in privileged EXEC mode, follow these steps to configure the security violation actions on the switch:
3. aaa authentication dot1x {default} method1
6. authentication violation {shutdown | restrict | protect | replace}
DETAILED STEPS
Command or Action Purpose
Step 1 configure terminal
Example:Switch# configure terminalStep 2 aaa new-model
Example:Switch(config)# aaa new-modelStep 3 aaa authentication dot1x {default} method1
Example:Switch(config)# aaa authentication dot1x default group radiusCreates an 802.1x authentication method list.
To create a default list that is used when a named list is not specified in the authentication command, use the default keyword followed by the method that is to be used in default situations. The default method list is automatically applied to all ports.
For method1, enter the group radius keywords to use the list of all RADIUS servers for authentication.
Note Though other keywords are visible in the command-line help string, only the group radius keywords are supported.
Step 4 interface interface-id
Example:Switch(config)# interface gigabitethernet1/0/4Specifies the port connected to the client that is to be enabled for IEEE 802.1x authentication, and enter interface configuration mode.
Step 5 switchport mode access
Example:Switch(config-if)# switchport mode accessStep 6 authentication violation {shutdown | restrict | protect | replace}
Example:Switch(config-if)# authentication violation restrictConfigures the violation mode. The keywords have these meanings:
Step 7 end
Example:Switch(config-if)# endConfiguring 802.1x Authentication
To allow per-user ACLs or VLAN assignment, you must enable AAA authorization to configure the switch for all network-related service requests.
Before You BeginSUMMARY STEPSTo configure 802.1x port-based authentication, you must enable authentication, authorization, and accounting (AAA) and specify the authentication method list. A method list describes the sequence and authentication method to be queried to authenticate a user.
1. A user connects to a port on the switch.
2. Authentication is performed.
3. VLAN assignment is enabled, as appropriate, based on the RADIUS server configuration.
4. The switch sends a start message to an accounting server.
5. Re-authentication is performed, as necessary.
6. The switch sends an interim accounting update to the accounting server that is based on the result of re-authentication.
7. The user disconnects from the port.
8. The switch sends a stop message to the accounting server.
DETAILED STEPS
Command or Action Purpose
Step 1 A user connects to a port on the switch. Step 2 Authentication is performed. Step 3 VLAN assignment is enabled, as appropriate, based on the RADIUS server configuration. Step 4 The switch sends a start message to an accounting server. Step 5 Re-authentication is performed, as necessary. Step 6 The switch sends an interim accounting update to the accounting server that is based on the result of re-authentication. Step 7 The user disconnects from the port. Step 8 The switch sends a stop message to the accounting server. Configuring 802.1x Port-Based Authentication
SUMMARY STEPSBeginning in privileged EXEC mode, follow these steps to configure 802.1x port-based authentication:
3. aaa authentication dot1x {default} method1
5. aaa authorization network {default} group radius
6. radius-server host ip-address
DETAILED STEPS
Command or Action Purpose
Step 1 configure terminal
Example:Switch# configure terminalStep 2 aaa new-model
Example:Switch(config)# aaa new-modelStep 3 aaa authentication dot1x {default} method1
Example:Switch(config)# aaa authentication dot1x default group radiusCreates an 802.1x authentication method list.
To create a default list that is used when a named list is not specified in the authentication command, use the default keyword followed by the method that is to be used in default situations. The default method list is automatically applied to all ports.
For method1, enter the group radius keywords to use the list of all RADIUS servers for authentication.
Note Though other keywords are visible in the command-line help string, only the group radius keywords are supported.
Step 4 dot1x system-auth-control
Example:Switch(config)# dot1x system-auth-controlStep 5 aaa authorization network {default} group radius
Example:Switch(config)# aaa authorization network default group radius(Optional) Configures the switch to use user-RADIUS authorization for all network-related service requests, such as per-user ACLs or VLAN assignment.
Note For per-user ACLs, single-host mode must be configured. This setting is the default.
Step 6 radius-server host ip-address
Example:Switch(config)# radius-server host 124.2.2.12Step 7 radius-server key string
Example:Switch(config)# radius-server key abc1234(Optional) Specifies the authentication and encryption key used between the switch and the RADIUS daemon running on the RADIUS server.
Step 8 interface interface-id
Example:Switch(config)# interface gigabitethernet1/0/2Specifies the port connected to the client that is to be enabled for IEEE 802.1x authentication, and enter interface configuration mode.
Step 9 switchport mode access
Example:Switch(config-if)# switchport mode access(Optional) Sets the port to access mode only if you configured the RADIUS server in Step 6 and Step 7.
Step 10 authentication port-control auto
Example:Switch(config-if)# authentication port-control autoStep 11 dot1x pae authenticator
Example:Switch(config-if)# dot1x pae authenticatorSets the interface Port Access Entity to act only as an authenticator and ignore messages meant for a supplicant.
Step 12 end
Example:Switch(config-if)# endConfiguring the Switch-to-RADIUS-Server Communication
You can globally configure the timeout, retransmission, and encryption key values for all RADIUS servers by using the radius-server host global configuration command. If you want to configure these options on a per-server basis, use the radius-server timeout, the radius-server retransmit, and the radius-server key global configuration commands.
You also need to configure some settings on the RADIUS server. These settings include the IP address of the switch and the key string to be shared by both the server and the switch. For more information, see the RADIUS server documentation.
Beginning in privileged EXEC mode, follow these steps to configure the RADIUS server parameters on the switch. This procedure is required.
Before You BeginSUMMARY STEPSYou must enable authentication, authorization, and accounting (AAA) and specify the authentication method list. A method list describes the sequence and authentication method to be queried to authenticate a user.
DETAILED STEPS
Command or Action Purpose
Step 1 configure terminal
Example:Switch# configure terminalStep 2 radius-server host {hostname | ip-address} auth-port port-number key string
Example:Switch(config)# radius-server host 125.5.5.43 auth-port 1812 key stringConfigures the RADIUS server parameters.
For hostname | ip-address, specify the hostname or IP address of the remote RADIUS server.
For auth-port port-number, specify the UDP destination port for authentication requests. The default is 1812. The range is 0 to 65536.
For key string, specify the authentication and encryption key used between the switch and the RADIUS daemon running on the RADIUS server. The key is a text string that must match the encryption key used on the RADIUS server.
Note Always configure the key as the last item in the radius-server host command syntax because leading spaces are ignored, but spaces within and at the end of the key are used. If you use spaces in the key, do not enclose the key in quotation marks unless the quotation marks are part of the key. This key must match the encryption used on the RADIUS daemon.
If you want to use multiple RADIUS servers, re-enter this command.
Step 3 end
Example:Switch(config)# end
Configuring the Host Mode
SUMMARY STEPSBeginning in privileged EXEC mode, follow these steps to allow multiple hosts (clients) on an IEEE 802.1x-authorized port that has the authentication port-control interface configuration command set to auto. Use the multi-domain keyword to configure and enable multidomain authentication (MDA), which allows both a host and a voice device, such as an IP phone (Cisco or non-Cisco), on the same switch port. This procedure is optional.
DETAILED STEPS
Command or Action Purpose
Step 1 configure terminal
Example:Switch# configure terminalStep 2 interface interface-id
Example:Switch(config)# interface gigabitethernet2/0/1Specifies the port to which multiple hosts are indirectly attached, and enter interface configuration mode.
Step 3 authentication host-mode [multi-auth | multi-domain | multi-host | single-host]
Example:Switch(config-if)# authentication host-mode multi-hostAllows multiple hosts (clients) on an 802.1x-authorized port.
The keywords have these meanings:
- multi-auth–Allow one client on the voice VLAN and multiple authenticated clients on the data VLAN.
Note The multi-auth keyword is only available with the authentication host-mode command.
- multi-host–Allow multiple hosts on an 802.1x-authorized port after a single host has been authenticated.
- multi-domain–Allow both a host and a voice device, such as an IP phone (Cisco or non-Cisco), to be authenticated on an IEEE 802.1x-authorized port.
Note You must configure the voice VLAN for the IP phone when the host mode is set to multi-domain.
Make sure that the authentication port-control interface configuration command is set to auto for the specified interface.
Step 4 end
Example:Switch(config-if)# endConfiguring Periodic Re-Authentication
SUMMARY STEPSYou can enable periodic 802.1x client re-authentication and specify how often it occurs. If you do not specify a time period before enabling re-authentication, the number of seconds between attempts is 3600.
Beginning in privileged EXEC mode, follow these steps to enable periodic re-authentication of the client and to configure the number of seconds between re-authentication attempts. This procedure is optional.
DETAILED STEPS
Command or Action Purpose
Step 1 configure terminal
Example:Switch# configure terminalStep 2 interface interface-id
Example:Switch(config)# interface gigabitethernet2/0/1Specifies the port to be configured, and enter interface configuration mode.
Step 3 authentication periodic
Example:Switch(config-if)# authentication periodicEnables periodic re-authentication of the client, which is disabled by default.
Note The default value is 3600 seconds. To change the value of the reauthentication timer or to have the switch use a RADIUS-provided session timeout, enter the authentication timer reauthenticate command.
Step 4 authentication timer {{[inactivity | reauthenticate | restart]} {value}}
Example:Switch(config-if)# authentication timer reauthenticate 180Sets the number of seconds between re-authentication attempts.
The authentication timer keywords have these meanings:
- inactivity—Interval in seconds after which if there is no activity from the client then it is unauthorized
- reauthenticate—Time in seconds after which an automatic re-authentication attempt is initiated
- restart value—Interval in seconds after which an attempt is made to authenticate an unauthorized port
This command affects the behavior of the switch only if periodic re-authentication is enabled.
Step 5 end
Example:Switch(config-if)# endChanging the Quiet Period
SUMMARY STEPSWhen the switch cannot authenticate the client, the switch remains idle for a set period of time and then tries again. The authentication timer inactivity interface configuration command controls the idle period. A failed authentication of the client might occur because the client provided an invalid password. You can provide a faster response time to the user by entering a number smaller than the default.
Beginning in privileged EXEC mode, follow these steps to change the quiet period. This procedure is optional.
DETAILED STEPS
Command or Action Purpose
Step 1 configure terminal
Example:Switch# configure terminalStep 2 interface interface-id
Example:Switch(config)# interface gigabitethernet2/0/1Specifies the port to be configured, and enter interface configuration mode.
Step 3 authentication timer inactivity seconds
Example:Switch(config-if)# authentication timer inactivity 30Sets the number of seconds that the switch remains in the quiet state following a failed authentication exchange with the client.
Step 4 end
Example:Switch(config-if)# endStep 5 show authentication sessions interface interface-id
Example:Switch# show authentication sessions interface gigabitethernet2/0/1Step 6 copy running-config startup-config
Example:Switch# copy running-config startup-configChanging the Switch-to-Client Retransmission Time
SUMMARY STEPSThe client responds to the EAP-request/identity frame from the switch with an EAP-response/identity frame. If the switch does not receive this response, it waits a set period of time (known as the retransmission time) and then resends the frame.
NoteYou should change the default value of this command only to adjust for unusual circumstances such as unreliable links or specific behavioral problems with certain clients and authentication servers.
Beginning in privileged EXEC mode, follow these steps to change the amount of time that the switch waits for client notification. This procedure is optional.
3. authentication timer reauthenticate seconds
DETAILED STEPS
Command or Action Purpose
Step 1 configure terminal
Example:Switch# configure terminalStep 2 interface interface-id
Example:Switch(config)# interface gigabitethernet2/0/1Specifies the port to be configured, and enter interface configuration mode.
Step 3 authentication timer reauthenticate seconds
Example:Switch(config-if)# authentication timer reauthenticate 60Sets the number of seconds that the switch waits for a response to an EAP-request/identity frame from the client before resending the request.
Step 4 end
Example:Switch(config-if)# endStep 5 show authentication sessions interface interface-id
Example:Switch# show authentication sessions interface gigabitethernet2/0/1Step 6 copy running-config startup-config
Example:Switch# copy running-config startup-configSetting the Switch-to-Client Frame-Retransmission Number
SUMMARY STEPSIn addition to changing the switch-to-client retransmission time, you can change the number of times that the switch sends an EAP-request/identity frame (assuming no response is received) to the client before restarting the authentication process.
NoteYou should change the default value of this command only to adjust for unusual circumstances such as unreliable links or specific behavioral problems with certain clients and authentication servers.
Beginning in privileged EXEC mode, follow these steps to set the switch-to-client frame-retransmission number. This procedure is optional.
DETAILED STEPS
Command or Action Purpose
Step 1 configure terminal
Example:Switch# configure terminalStep 2 interface interface-id
Example:Switch(config)# interface gigabitethernet2/0/1Specifies the port to be configured, and enter interface configuration mode.
Step 3 dot1x max-reauth-req count
Example:Switch(config-if)# dot1x max-reauth-req 5Sets the number of times that the switch sends an EAP-request/identity frame to the client before restarting the authentication process. The range is 1 to 10; the default is 2.
Step 4 end
Example:Switch(config-if)# endSetting the Re-Authentication Number
SUMMARY STEPSYou can also change the number of times that the switch restarts the authentication process before the port changes to the unauthorized state.
NoteYou should change the default value of this command only to adjust for unusual circumstances such as unreliable links or specific behavioral problems with certain clients and authentication servers.
Beginning in privileged EXEC mode, follow these steps to set the re-authentication number. This procedure is optional.
DETAILED STEPS
Command or Action Purpose
Step 1 configure terminal
Example:Switch# configure terminalStep 2 interface interface-id
Example:Switch# interface gigabitethernet2/0/1Specifies the port to be configured, and enter interface configuration mode.
Step 3 switchport mode access
Example:Switch(config-if)# switchport mode accessSets the port to access mode only if you previously configured the RADIUS server.
Step 4 dot1x max-req count
Example:Switch(config-if)# dot1x max-req 4Sets the number of times that the switch restarts the authentication process before the port changes to the unauthorized state. The range is 0 to 10; the default is 2.
Step 5 end
Example:Switch(config-if)# endEnabling MAC Move
SUMMARY STEPSMAC move allows an authenticated host to move from one port on the switch to another.
Beginning in privileged EXEC mode, follow these steps to globally enable MAC move on the switch. This procedure is optional.
DETAILED STEPS
Command or Action Purpose
Step 1 configure terminal
Example:Switch# configure terminalStep 2 authentication mac-move permit
Example:Switch(config)# authentication mac-move permitEnables MAC move on the switch. Default is deny.
In Session Aware Networking mode, the default CLI is access-session mac-move deny. To enable Mac Move in Session Aware Networking, use the no access-session mac-move global configuration command.
Step 3 end
Example:Switch(config)# endStep 4 show running-config
Example:Switch# show running-configStep 5 copy running-config startup-config
Example:Switch# copy running-config startup-configEnabling MAC Replace
SUMMARY STEPSMAC replace allows a host to replace an authenticated host on a port.
Beginning in privileged EXEC mode, follow these steps to enable MAC replace on an interface. This procedure is optional.
DETAILED STEPS
Command or Action Purpose
Step 1 configure terminal
Example:Switch# configure terminalStep 2 interface interface-id
Example:Switch(config)# interface gigabitethernet2/0/2Specifies the port to be configured, and enter interface configuration mode.
Step 3 authentication violation {protect | replace | restrict | shutdown}
Example:Switch(config-if)# authentication violation replaceUse the replace keyword to enable MAC replace on the interface. The port removes the current session and initiates authentication with the new host.
Step 4 end
Example:Switch(config-if)# endStep 5 show running-config
Example:Switch# show running-configStep 6 copy running-config startup-config
Example:Switch# copy running-config startup-configConfiguring 802.1x Accounting
SUMMARY STEPSEnabling AAA system accounting with 802.1x accounting allows system reload events to be sent to the accounting RADIUS server for logging. The server can then infer that all active 802.1x sessions are closed.
Because RADIUS uses the unreliable UDP transport protocol, accounting messages might be lost due to poor network conditions. If the switch does not receive the accounting response message from the RADIUS server after a configurable number of retransmissions of an accounting request, this system message appears:
Accounting message %s for session %s failed to receive Accounting Response.When the stop message is not sent successfully, this message appears:
00:09:55: %RADIUS-4-RADIUS_DEAD: RADIUS server 172.20.246.201:1645,1646 is not responding.
NoteYou must configure the RADIUS server to perform accounting tasks, such as logging start, stop, and interim-update messages and time stamps. To turn on these functions, enable logging of “Update/Watchdog packets from this AAA client” in your RADIUS server Network Configuration tab. Next, enable “CVS RADIUS Accounting” in your RADIUS server System Configuration tab.
Beginning in privileged EXEC mode, follow these steps to configure 802.1x accounting after AAA is enabled on your switch. This procedure is optional.
3. aaa accounting dot1x default start-stop group radius
DETAILED STEPS
Command or Action Purpose
Step 1 configure terminal
Example:Switch# configure terminalStep 2 interface interface-id
Example:Switch(config)# interface gigabitethernet1/0/3Specifies the port to be configured, and enter interface configuration mode.
Step 3 aaa accounting dot1x default start-stop group radius
Example:Switch(config-if)# aaa accounting dot1x default start-stop group radiusEnables 802.1x accounting using the list of all RADIUS servers.
Step 4 aaa accounting system default start-stop group radius
Example:Switch(config-if)# aaa accounting system default start-stop group radius(Optional) Enables system accounting (using the list of all RADIUS servers) and generates system accounting reload event messages when the switch reloads.
Step 5 end
Example:Switch(config-if)# endStep 6 show running-config
Example:Switch# show running-configStep 7 copy running-config startup-config
Example:Switch# copy running-config startup-configConfiguring a Guest VLAN
SUMMARY STEPSWhen you configure a guest VLAN, clients that are not 802.1x-capable are put into the guest VLAN when the server does not receive a response to its EAP request/identity frame. Clients that are 802.1x-capable but that fail authentication are not granted network access. The switch supports guest VLANs in single-host or multiple-hosts mode.
Beginning in privileged EXEC mode, follow these steps to configure a guest VLAN. This procedure is optional.
DETAILED STEPS
Command or Action Purpose
Step 1 configure terminal
Example:Switch# configure terminalStep 2 interface interface-id
Example:Switch(config)# interface gigabitethernet2/0/2Specifies the port to be configured, and enter interface configuration mode.
Step 3 Use one of the following:
Example:Switch(config-if)# switchport mode private-vlan hostStep 4 authentication event no-response action authorize vlan vlan-id
Example:Switch(config-if)# authentication event no-response action authorize vlan 2Specifies an active VLAN as an 802.1x guest VLAN. The range is 1 to 4094.
You can configure any active VLAN except an internal VLAN (routed port), an RSPAN VLAN, a primary private VLAN, or a voice VLAN as an 802.1x guest VLAN.
Step 5 end
Example:Switch(config-if)# endConfiguring a Restricted VLAN
SUMMARY STEPSWhen you configure a restricted VLAN on a switch stack or a switch, clients that are IEEE 802.1x-compliant are moved into the restricted VLAN when the authentication server does not receive a valid username and password. The switch supports restricted VLANs only in single-host mode.
Beginning in privileged EXEC mode, follow these steps to configure a restricted VLAN. This procedure is optional.
DETAILED STEPS
Command or Action Purpose
Step 1 configure terminal
Example:Switch# configure terminalStep 2 interface interface-id
Example:Switch(config)# interface gigabitethernet2/0/2Specifies the port to be configured, and enter interface configuration mode.
Step 3 Use one of the following:
Example:Switch(config-if)# switchport mode accessStep 4 authentication port-control auto
Example:Switch(config-if)# authentication port-control autoStep 5 authentication event fail action authorize vlan vlan-id
Example:Switch(config-if)# authentication event fail action authorize vlan 2Specifies an active VLAN as an 802.1x restricted VLAN. The range is 1 to 4094.
You can configure any active VLAN except an internal VLAN (routed port), an RSPAN VLAN, a primary private VLAN, or a voice VLAN as an 802.1x restricted VLAN.
Step 6 end
Example:Switch(config-if)# endConfiguring Number of Authentication Attempts on a Restricted VLAN
SUMMARY STEPSYou can configure the maximum number of authentication attempts allowed before a user is assigned to the restricted VLAN by using the authentication event retry retry count interface configuration command. The range of allowable authentication attempts is 1 to 3. The default is 3 attempts.
Beginning in privileged EXEC mode, follow these steps to configure the maximum number of allowed authentication attempts. This procedure is optional.
4. authentication port-control auto
5. authentication event fail action authorize vlan vlan-id
DETAILED STEPS
Command or Action Purpose
Step 1 configure terminal
Example:Switch# configure terminalStep 2 interface interface-id
Example:Switch(config)# interface gigabitethernet2/0/3Specifies the port to be configured, and enter interface configuration mode.
Step 3 Use one of the following:
Example: orSwitch(config-if)# switchport mode accessStep 4 authentication port-control auto
Example:Switch(config-if)# authentication port-control autoStep 5 authentication event fail action authorize vlan vlan-id
Example:Switch(config-if)# authentication event fail action authorize vlan 8Specifies an active VLAN as an 802.1x restricted VLAN. The range is 1 to 4094.
You can configure any active VLAN except an internal VLAN (routed port), an RSPAN VLAN, a primary private VLAN, or a voice VLAN as an 802.1x restricted VLAN.
Step 6 authentication event retry retry count
Example:Switch(config-if)# authentication event retry 2Specifies a number of authentication attempts to allow before a port moves to the restricted VLAN. The range is 1 to 3, and the default is 3.
Step 7 end
Example:Switch(config-if)# endConfiguring the Inaccessible Authentication Bypass Feature
SUMMARY STEPSYou can configure the inaccessible bypass feature, also referred to as critical authentication or the AAA fail policy.
Beginning in privileged EXEC mode, follow these steps to configure the port as a critical port and enable the inaccessible authentication bypass feature. This procedure is optional.
2. radius-server dead-criteria time time tries tries
3. radius-server deadtime minutes
4. radius-server host ip-address [acct-port udp-port] [auth-port udp-port][ test username name [idle-time time] [ignore-acct-port] [ignore-auth-port]] [key string]
5. dot1x critical {eapol | recovery delay milliseconds}
7. authentication event server dead action {authorize | reinitialize} vlan vlan-id]
8. dot1x critical [recovery action reinitialize | vlan vlan-id]
DETAILED STEPS
Command or Action Purpose
Step 1 configure terminal
Example:Switch# configure terminalStep 2 radius-server dead-criteria time time tries tries
Example:Switch(config)# radius-server dead-criteria time 30 tries 20(Optional) Sets the conditions that are used to decide when a RADIUS server is considered unavailable or dead.
The range for time is from 1 to 120 seconds. The switch dynamically determines the default seconds value that is 10 to 60 seconds.
The range for tries is from 1 to 100. The switch dynamically determines the default tries parameter that is 10 to 100.
Step 3 radius-server deadtime minutes
Example:Switch(config)# radius-server deadtime 60(Optional) Sets the number of minutes that a RADIUS server is not sent requests. The range is from 0 to 1440 minutes (24 hours). The default is 0 minutes.
Step 4 radius-server host ip-address [acct-port udp-port] [auth-port udp-port][ test username name [idle-time time] [ignore-acct-port] [ignore-auth-port]] [key string]
Example:Switch(config)# radius-server host 1.1.1.2 acct-port 1550 auth-port 1560 test username user1 idle-time 30 key abc1234(Optional) Configures the RADIUS server parameters by using these keywords:
- acct-port udp-port—Specifies the UDP port for the RADIUS accounting server. The range for the UDP port number is from 0 to 65536. The default is 1646.
- auth-port udp-port—Specifies the UDP port for the RADIUS authentication server. The range for the UDP port number is from 0 to 65536. The default is 1645.
Note You should configure the UDP port for the RADIUS accounting server and the UDP port for the RADIUS authentication server to nondefault values.
- test username name—Enables automated testing of the RADIUS server status, and specify the username to be used.
- idle-time time—Sets the interval of time in minutes after which the switch sends test packets to the server. The range is from 1 to 35791 minutes. The default is 60 minutes (1 hour).
- ignore-acct-port—Disables testing on the RADIUS-server accounting port.
- ignore-auth-port—Disables testing on the RADIUS-server authentication port.
- For key string, specify the authentication and encryption key used between the switch and the RADIUS daemon running on the RADIUS server. The key is a text string that must match the encryption key used on the RADIUS server.
Note Always configure the key as the last item in the radius-server host command syntax because leading spaces are ignored, but spaces within and at the end of the key are used. If you use spaces in the key, do not enclose the key in quotation marks unless the quotation marks are part of the key. This key must match the encryption used on the RADIUS daemon.
You can also configure the authentication and encryption key by using the radius-server key {0 string| 7 string | string} global configuration command.
Step 5 dot1x critical {eapol | recovery delay milliseconds}
Example:Switch(config)# dot1x critical eapol recovery delay 2000(Optional) Configures the parameters for inaccessible authentication bypass:
eapol—Specifies that the switch sends an EAPOL-Success message when the switch successfully authenticates the critical port.
recovery delay milliseconds—Sets the recovery delay period during which the switch waits to re-initialize a critical port when a RADIUS server that was unavailable becomes available. The range is from 1 to 10000 milliseconds. The default is 1000 milliseconds (a port can be re-initialized every second).
Step 6 interface interface-id
Example:Switch(config)# interface gigabitethernet 1/0/1Specify the port to be configured, and enter interface configuration mode.
Step 7 authentication event server dead action {authorize | reinitialize} vlan vlan-id]
Example:Switch(config-if)# authentication event server dead action reinitialize vlan 5Moves hosts on the port if the RADIUS server is unreachable:
Step 8 dot1x critical [recovery action reinitialize | vlan vlan-id]
Example:Switch(config-if)# dot1x critical recovery action reinitializeEnables the inaccessible authentication bypass feature, and use these keywords to configure the feature:
Step 9 end
Example:Switch(config-if)# endExample of Configuring Inaccessible Authentication Bypass
This example shows how to configure the inaccessible authentication bypass feature:
Switch(config)# radius-server dead-criteria time 30 tries 20
Switch(config)# radius-server deadtime 60
Switch(config)# radius-server host 1.1.1.2 acct-port 1550 auth-port 1560 test username user1 idle-time 30 key abc1234
Switch(config)# dot1x critical eapol
Switch(config)# dot1x critical recovery delay 2000
Switch(config)# interface gigabitethernet 1/0/1
Switch(config-if)# dot1x critical
Switch(config-if)# dot1x critical recovery action reinitialize
Switch(config-if)# dot1x critical vlan 20
Switch(config-if)# end
Configuring 802.1x Authentication with WoL
SUMMARY STEPSBeginning in privileged EXEC mode, follow these steps to enable 802.1x authentication with WoL. This procedure is optional.
3. authentication control-direction {both | in}
DETAILED STEPS
Command or Action Purpose
Step 1 configure terminal
Example:Switch# configure terminalStep 2 interface interface-id
Example:Switch(config)# interface gigabitethernet2/0/3Specifies the port to be configured, and enter interface configuration mode.
Step 3 authentication control-direction {both | in}
Example:Switch(config-if)# authentication control-direction bothEnables 802.1x authentication with WoL on the port, and use these keywords to configure the port as bidirectional or unidirectional.
Step 4 end
Example:Switch(config-if)# endStep 5 show authentication sessions interface interface-id
Example:Switch# show authentication sessions interface gigabitethernet2/0/3Step 6 copy running-config startup-config
Example:Switch# copy running-config startup-configConfiguring MAC Authentication Bypass
SUMMARY STEPSBeginning in privileged EXEC mode, follow these steps to enable MAC authentication bypass. This procedure is optional.
DETAILED STEPS
Command or Action Purpose
Step 1 configure terminal
Example:Switch# configure terminalStep 2 interface interface-id
Example:Switch(config)# interface gigabitethernet2/0/1Specifies the port to be configured, and enter interface configuration mode.
Step 3 authentication port-control auto
Example:Switch(config-if)# authentication port-control autoStep 4 mab [eap]
Example:Switch(config-if)# mabEnables MAC authentication bypass.
(Optional) Use the eap keyword to configure the switch to use EAP for authorization.
Step 5 end
Example:Switch(config-if)# endConfiguring 802.1x User Distribution
SUMMARY STEPSBeginning in privileged EXEC mode, follow these steps to configure a VLAN group and to map a VLAN to it:
DETAILED STEPS
Command or Action Purpose
Step 1 configure terminal
Example:Switch# configure terminalStep 2 vlan group vlan-group-name vlan-list vlan-list
Example:Switch(config)# vlan group eng-dept vlan-list 10Configures a VLAN group, and maps a single VLAN or a range of VLANs to it.
Step 3 end
Example:Switch(config)# endStep 4 no vlan group vlan-group-name vlan-list vlan-list
Example:Switch(config)# no vlan group eng-dept vlan-list 10Clears the VLAN group configuration or elements of the VLAN group configuration.
Example of Configuring VLAN Groups
This example shows how to configure the VLAN groups, to map the VLANs to the groups, to and verify the VLAN group configurations and mapping to the specified VLANs:
Switch(config)# vlan group eng-dept vlan-list 10

Switch(config)# show vlan group group-name eng-dept
Group Name                      Vlans Mapped
-------------                   --------------
eng-dept                        10

Switch(config)# show dot1x vlan-group all
Group Name                      Vlans Mapped
-------------                   --------------
eng-dept                        10
hr-dept                         20
This example shows how to add a VLAN to an existing VLAN group and to verify that the VLAN was added:
Switch(config)# vlan group eng-dept vlan-list 30
Switch(config)# show vlan group eng-dept
Group Name                      Vlans Mapped
-------------                   --------------
eng-dept                        10,30
This example shows how to remove a VLAN from a VLAN group:
Switch# no vlan group eng-dept vlan-list 10This example shows that when all the VLANs are cleared from a VLAN group, the VLAN group is cleared:
Switch(config)# no vlan group eng-dept vlan-list 30
Vlan 30 is successfully cleared from vlan group eng-dept.

Switch(config)# show vlan group group-name eng-dept
This example shows how to clear all the VLAN groups:
Switch(config)# no vlan group end-dept vlan-list all
Switch(config)# show vlan-group all
For more information about these commands, see the Cisco IOS Security Command Reference.
Configuring NAC Layer 2 802.1x Validation
SUMMARY STEPSYou can configure NAC Layer 2 802.1x validation, which is also referred to as 802.1x authentication with a RADIUS server.
Beginning in privileged EXEC mode, follow these steps to configure NAC Layer 2 802.1x validation. The procedure is optional.
4. authentication event no-response action authorize vlan vlan-id
6. authentication timer reauthenticate
DETAILED STEPS
Command or Action Purpose
Step 1 configure terminal
Example:Switch# configure terminalStep 2 interface interface-id
Example:Switch(config)# interface gigabitethernet2/0/3Specifies the port to be configured, and enter interface configuration mode.
Step 3 switchport mode access
Example:Switch(config-if)# switchport mode accessSets the port to access mode only if you configured the RADIUS server.
Step 4 authentication event no-response action authorize vlan vlan-id
Example:Switch(config-if)# authentication event no-response action authorize vlan 8Specifies an active VLAN as an 802.1x guest VLAN. The range is 1 to 4094.
You can configure any active VLAN except an internal VLAN (routed port), an RSPAN VLAN, or a voice VLAN as an 802.1x guest VLAN.
Step 5 authentication periodic
Example:Switch(config-if)# authentication periodicEnables periodic re-authentication of the client, which is disabled by default.
Step 6 authentication timer reauthenticate
Example:Switch(config-if)# authentication timer reauthenticateSets re-authentication attempt for the client (set to one hour).
This command affects the behavior of the switch only if periodic re-authentication is enabled.
Step 7 end
Example:Switch(config-if)# endStep 8 show authentication sessions interface interface-id
Example:Switch# show authentication sessions interface gigabitethernet2/0/3Step 9 copy running-config startup-config
Example:Switch# copy running-config startup-configConfiguring an Authenticator Switch with NEAT
SUMMARY STEPSConfiguring this feature requires that one switch outside a wiring closet is configured as a supplicant and is connected to an authenticator switch.
NoteThe cisco-av-pairs must be configured as device-traffic-class=switch on the ACS, which sets the interface as a trunk after the supplicant is successfully authenticated.
Beginning in privileged EXEC mode, follow these steps to configure a switch as an authenticator:
DETAILED STEPS
Command or Action Purpose
Step 1 configure terminal
Example:Switch# configure terminalStep 2 cisp enable
Example:Switch(config)# cisp enableStep 3 interface interface-id
Example:Switch(config)# interface gigabitethernet2/0/1Specifies the port to be configured, and enter interface configuration mode.
Step 4 switchport mode access
Example:Switch(config-if)# switchport mode accessStep 5 authentication port-control auto
Example:Switch(config-if)# authentication port-control autoStep 6 dot1x pae authenticator
Example:Switch(config-if)# dot1x pae authenticatorConfigures the interface as a port access entity (PAE) authenticator.
Step 7 spanning-tree portfast
Example:Switch(config-if)# spanning-tree portfast trunkEnables Port Fast on an access port connected to a single workstation or server..
Step 8 end
Example:Switch(config-if)# endStep 9 show running-config interface interface-id
Example:Switch# show running-config interface gigabitethernet2/0/1Step 10 copy running-config startup-config
Example:Switch# copy running-config startup-configConfiguring a Supplicant Switch with NEAT
SUMMARY STEPS
6. dot1x supplicant force-multicast
8. switchport trunk encapsulation dot1q
11. dot1x credentials profile-name
13. show running-config interface interface-id
14. copy running-config startup-config
15. Configuring NEAT with Auto Smartports Macros
DETAILED STEPS
Command or Action Purpose
Step 1 configure terminal
Example:Switch# configure terminalStep 2 cisp enable
Example:Switch(config)# cisp enableStep 3 dot1x credentials profile
Example:Switch(config)# dot1x credentials testCreates 802.1x credentials profile. This must be attached to the port that is configured as supplicant.
Step 4 username suppswitch
Example:Switch(config)# username suppswitchStep 5 password password
Example:Switch(config)# password myswitchStep 6 dot1x supplicant force-multicast
Example:Switch(config)# dot1x supplicant force-multicastForces the switch to send only multicast EAPOL packets when it receives either unicast or multicast packets.
This also allows NEAT to work on the supplicant switch in all host modes.
Step 7 interface interface-id
Example:Switch(config)# interface gigabitethernet1/0/1Specifies the port to be configured, and enter interface configuration mode.
Step 8 switchport trunk encapsulation dot1q
Example:Switch(config-if)# switchport trunk encapsulation dot1qStep 9 switchport mode trunk
Example:Switch(config-if)# switchport mode trunkStep 10 dot1x pae supplicant
Example:Switch(config-if)# dot1x pae supplicantConfigures the interface as a port access entity (PAE) supplicant.
Step 11 dot1x credentials profile-name
Example:Switch(config-if)# dot1x credentials testStep 12 end
Example:Switch(config-if)# endStep 13 show running-config interface interface-id
Example:Switch# show running-config interface gigabitethernet1/0/1Step 14 copy running-config startup-config
Example:Switch# copy running-config startup-configStep 15 Configuring NEAT with Auto Smartports Macros You can also use an Auto Smartports user-defined macro instead of the switch VSA to configure the authenticator switch. For more information, see the Auto Smartports Configuration Guide for this release.
Configuring 802.1x Authentication with Downloadable ACLs and Redirect URLs
In addition to configuring 802.1x authentication on the switch, you need to configure the ACS. For more information, see the Configuration Guide for Cisco Secure ACS 4.2: http://www.cisco.com/en/US/docs/net_mgmt/cisco_secure_access_control_server_for_windows/4.2/configuration/guide/acs_config.pdf
NoteYou must configure a downloadable ACL on the ACS before downloading it to the switch.
After authentication on the port, you can use the show ip access-list privileged EXEC command to display the downloaded ACLs on the port.
Configuring Downloadable ACLs
SUMMARY STEPSThe policies take effect after client authentication and the client IP address addition to the IP device tracking table. The switch then applies the downloadable ACL to the port.
4. aaa authorization network default local group radius
5. radius-server vsa send authentication
DETAILED STEPS
Command or Action Purpose
Step 1 configure terminal
Example:Switch# configure terminalStep 2 ip device tracking
Example:Switch(config)# ip device trackingStep 3 aaa new-model
Example:Switch(config)# aaa new-modelStep 4 aaa authorization network default local group radius
Example:Switch(config)# aaa authorization network default local group radiusSets the authorization method to local. To remove the authorization method, use the no aaa authorization network default local group radius command.
Step 5 radius-server vsa send authentication
Example:Switch(config)# radius-server vsa send authenticationStep 6 interface interface-id
Example:Switch(config)# interface gigabitethernet2/0/4Specifies the port to be configured, and enter interface configuration mode.
Step 7 ip access-group acl-id in
Example:Switch(config-if)# ip access-group default_acl inConfigures the default ACL on the port in the input direction.
Note Step 8 show running-config interface interface-id
Example:Switch(config-if)# show running-config interface gigabitethernet2/0/4Step 9 copy running-config startup-config
Example:Switch# copy running-config startup-configConfiguring a Downloadable Policy
SUMMARY STEPS
2. access-list access-list-number { deny | permit } { hostname | any | host } log
7. aaa authorization network default group radius
9. ip device tracking probe [count | interval | use-svi]
DETAILED STEPS
Command or Action Purpose
Step 1 configure terminal
Example:Switch# configure terminalStep 2 access-list access-list-number { deny | permit } { hostname | any | host } log
Example:Switch(config)# access-list 1 deny any logThe access-list-number is a decimal number from 1 to 99 or 1300 to 1999.
Enter deny or permit to specify whether to deny or permit access if conditions are matched.
The source is the source address of the network or host that sends a packet, such as this:
- hostname: The 32-bit quantity in dotted-decimal format.
- any: The keyword any as an abbreviation for source and source-wildcard value of 0.0.0.0 255.255.255.255. You do not need to enter a source-wildcard value.
- host: The keyword host as an abbreviation for source and source-wildcard of source 0.0.0.0.
(Optional) Applies the source-wildcard wildcard bits to the source.
(Optional) Enters log to cause an informational logging message about the packet that matches the entry to be sent to the console.
Step 3 interface interface-id
Example:Switch(config)# interface gigabitethernet2/0/2Step 4 ip access-group acl-id in
Example:Switch(config-if)# ip access-group default_acl inConfigures the default ACL on the port in the input direction.
Note Step 5 exit
Example:Switch(config-if)# exitStep 6 aaa new-model
Example:Switch(config)# aaa new-modelStep 7 aaa authorization network default group radius
Example:Switch(config)# aaa authorization network default group radiusSets the authorization method to local. To remove the authorization method, use the no aaa authorization network default group radius command.
Step 8 ip device tracking
Example:Switch(config)# ip device trackingEnables the IP device tracking table.
To disable the IP device tracking table, use the no ip device tracking global configuration commands.
Step 9 ip device tracking probe [count | interval | use-svi]
Example:Switch(config)# ip device tracking probe count(Optional) Configures the IP device tracking table:
- count count—Sets the number of times that the switch sends the ARP probe. The range is from 1 to 5. The default is 3.
- interval interval—Sets the number of seconds that the switch waits for a response before resending the ARP probe. The range is from 30 to 300 seconds. The default is 30 seconds.
- use-svi—Uses the switch virtual interface (SVI) IP address as source of ARP probes.
Step 10 radius-server vsa send authentication
Example:Switch(config)# radius-server vsa send authenticationConfigures the network access server to recognize and use vendor-specific attributes.
Note Step 11 end
Example:Switch(config)# endConfiguring VLAN ID-based MAC Authentication
SUMMARY STEPS
DETAILED STEPS
Command or Action Purpose Configuring Flexible Authentication Ordering
SUMMARY STEPSThe examples used in the instructions below changes the order of Flexible Authentication Ordering so that MAB is attempted before IEEE 802.1X authentication (dot1x). MAB is configured as the first authentication method, so MAB will have priority over all other authentication methods.
NoteBefore changing the default order and priority of these authentication methods, however, you should understand the potential consequences of those changes. See http://www.cisco.com/en/US/prod/collateral/iosswrel/ps6537/ps6586/ps6638/application_note_c27-573287_ps6638_Products_White_Paper.html for details.
4. authentication order [ dot1x | mab ] | {webauth}
DETAILED STEPS
Command or Action Purpose
Step 1 configure terminal
Example:Switch# configure terminalStep 2 interface interface-id
Example:Switch(config)# interface gigabitethernet 1/0/1Specifies the port to be configured, and enter interface configuration mode.
Step 3 switchport mode access
Example:Switch(config-if)# switchport mode accessSets the port to access mode only if you previously configured the RADIUS server.
Step 4 authentication order [ dot1x | mab ] | {webauth}
Example:Switch(config-if)# authentication order mab dot1x(Optional) Sets the order of authentication methods used on a port.
Step 5 authentication priority [ dot1x | mab ] | {webauth}
Example:Switch(config-if)# authentication priority mab dot1x(Optional) Adds an authentication method to the port-priority list.
Step 6 end
Example:Switch(config-if)# end
Configuring Open1x
SUMMARY STEPSBeginning in privileged EXEC mode, follow these steps to enable manual control of the port authorization state:
4. authentication control-direction {both | in}
5. authentication fallback name
6. authentication host-mode [multi-auth | multi-domain | multi-host | single-host]
8. authentication order [ dot1x | mab ] | {webauth}
10. authentication port-control {auto | force-authorized | force-un authorized}
DETAILED STEPS
Command or Action Purpose
Step 1 configure terminal
Example:Switch# configure terminalStep 2 interface interface-id
Example:Switch(config)# interface gigabitethernet 1/0/1Specifies the port to be configured, and enter interface configuration mode.
Step 3 switchport mode access
Example:Switch(config-if)# switchport mode accessSets the port to access mode only if you configured the RADIUS server.
Step 4 authentication control-direction {both | in}
Example:Switch(config-if)# authentication control-direction both(Optional) Configures the port control as unidirectional or bidirectional.
Step 5 authentication fallback name
Example:Switch(config-if)# authentication fallback profile1(Optional) Configures a port to use web authentication as a fallback method for clients that do not support 802.1x authentication.
Step 6 authentication host-mode [multi-auth | multi-domain | multi-host | single-host]
Example:Switch(config-if)# authentication host-mode multi-authStep 7 authentication open
Example:Switch(config-if)# authentication openStep 8 authentication order [ dot1x | mab ] | {webauth}
Example:Switch(config-if)# authentication order dot1x webauth(Optional) Sets the order of authentication methods used on a port.
Step 9 authentication periodic
Example:Switch(config-if)# authentication periodicStep 10 authentication port-control {auto | force-authorized | force-un authorized}
Example:Switch(config-if)# authentication port-control auto(Optional) Enables manual control of the port authorization state.
Step 11 end
Example:Switch(config-if)# end
Configuring a Web Authentication Local Banner
SUMMARY STEPSBeginning in privileged EXEC mode, follow these steps to configure a local banner on a switch that has web authentication configured.
DETAILED STEPS
Command or Action Purpose
Step 1 configure terminal
Example:Switch# configure terminalStep 2 ip admission auth-proxy-banner http [banner-text | file-path]
Example:Switch(config)# ip admission auth-proxy-banner http C My Switch C(Optional) Create a custom banner by entering C banner-text C (where C is a delimiting character), or file-path that indicates a file (for example, a logo or text file) that appears in the banner.
Step 3 end
Example:Switch(config)# endDisabling 802.1x Authentication on the Port
SUMMARY STEPSYou can disable 802.1x authentication on the port by using the no dot1x pae interface configuration command.
Beginning in privileged EXEC mode, follow these steps to disable 802.1x authentication on the port. This procedure is optional.
DETAILED STEPS
Command or Action Purpose
Step 1 configure terminal
Example:Switch# configure terminalStep 2 interface interface-id
Example:Switch(config)# interface gigabitethernet2/0/1Specifies the port to be configured, and enter interface configuration mode.
Step 3 switchport mode access
Example:Switch(config-if)# switchport mode access(Optional) Sets the port to access mode only if you configured the RADIUS server.
Step 4 no dot1x pae authenticator
Example:Switch(config-if)# no dot1x pae authenticatorStep 5 end
Example:Switch(config-if)# endResetting the 802.1x Authentication Configuration to the Default Values
SUMMARY STEPSBeginning in privileged EXEC mode, follow these steps to reset the 802.1x authentication configuration to the default values. This procedure is optional.
DETAILED STEPS
Command or Action Purpose
Step 1 configure terminal
Example:Switch# configure terminalStep 2 interface interface-id
Example:Switch(config)# interface gigabitethernet1/0/2Enters interface configuration mode, and specify the port to be configured.
Step 3 dot1x default
Example:Switch(config-if)# dot1x defaultStep 4 end
Example:Switch(config-if)# endMonitoring 802.1x Statistics and Status
Table 5 Privileged EXEC show Commands Command
Purpose
Displays 802.1x statistics for all ports
Displays 802.1x statistics for a specific port
Displays the 802.1x administrative and operational status for a switch
Displays the 802.1x administrative and operational status for a specific port
Table 6 Global Configuration Commands Command
Purpose
Filters verbose 802.1x authentication messages (beginning with Cisco IOS Release 12.2(55)SE)
For detailed information about the fields in these displays, see the command reference for this release.