Feedback
Contents
- Configuring Access and Trunk Interfaces
- Understanding Access and Trunk Interfaces
- Understanding IEEE 802.1Q Encapsulation
- Understanding Access VLANs
- Understanding the Native VLAN ID for Trunk Ports
- Understanding Allowed VLANs
- Understanding Native 802.1Q VLANs
- Configuring a LAN Interface as an Ethernet Access Port
- Configuring Access Host Ports
- Configuring Trunk Ports
- Configuring the Native VLAN for 802.1Q Trunking Ports
- Configuring the Allowed VLANs for Trunking Ports
- Configuring Native 802.1Q VLANs
- Verifying Interface Configuration
Configuring Access and Trunk Interfaces
Ethernet interfaces can be configured either as access ports or trunk ports. Trunks carry the traffic of multiple VLANs over a single link and allow you to extend VLANs across the network.
Note
Cisco NX-OS supports only IEEE 802.1Q-type VLAN trunk encapsulation.
This chapter describes the configuration of access or trunk ports on Cisco Nexus 5000 Series switches. It includes the following sections:
- Verifying Interface Configuration
- Understanding Access and Trunk Interfaces
- Understanding IEEE 802.1Q Encapsulation
- Understanding Access VLANs
- Understanding the Native VLAN ID for Trunk Ports
- Understanding Allowed VLANs
- Understanding Native 802.1Q VLANs
- Configuring a LAN Interface as an Ethernet Access Port
- Configuring Access Host Ports
- Configuring Trunk Ports
- Configuring the Native VLAN for 802.1Q Trunking Ports
- Configuring the Allowed VLANs for Trunking Ports
- Configuring Native 802.1Q VLANs
Information About Access and Trunk Interfaces
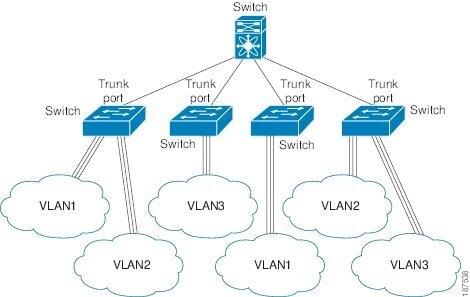
Understanding Access and Trunk Interfaces
Ethernet interfaces can be configured either as access ports or a trunk ports, as follows:
An access port can have only one VLAN configured on the interface; it can carry traffic for only one VLAN.
A trunk port can have two or more VLANs configured on the interface; it can carry traffic for several VLANs simultaneously.
The following figure shows how you can use trunk ports in the network. The trunk port carries traffic for two or more VLANs.
In order to correctly deliver the traffic on a trunk port with several VLANs, the device uses the IEEE 802.1Q encapsulation or tagging method.
To optimize the performance on access ports, you can configure the port as a host port. Once the port is configured as a host port, it is automatically set as an access port, and channel grouping is disabled. Use the host designation to decrease the time it takes the designated port to begin to forward packets.
Note
Only an end station can be set as a host port; you will receive an error message if you attempt to configure other ports as hosts.
If an access port receives a packet with an 802.1Q tag in the header other than the access VLAN value, that port drops the packet without learning its MAC source address.
Note
An Ethernet interface can function as either an access port or a trunk port; it cannot function as both port types simultaneously.
Understanding IEEE 802.1Q Encapsulation
A trunk is a point-to-point link between the device and another networking device. Trunks carry the traffic of multiple VLANs over a single link and allow you to extend VLANs across an entire network.
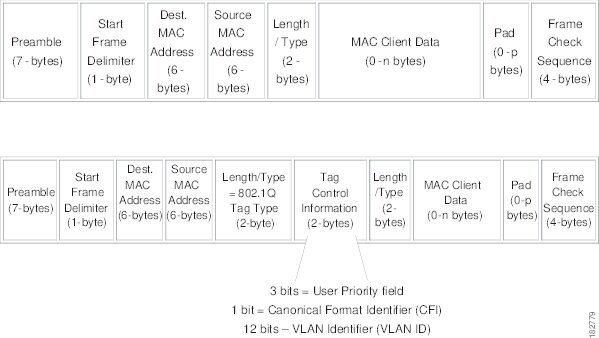
To correctly deliver the traffic on a trunk port with several VLANs, the device uses the IEEE 802.1Q encapsulation (tagging) method that uses a tag that is inserted into the frame header. This tag carries information about the specific VLAN to which the frame and packet belong. This method allows packets that are encapsulated for several different VLANs to traverse the same port and maintain traffic separation between the VLANs. The encapsulated VLAN tag also allows the trunk to move traffic end-to-end through the network on the same VLAN.
Understanding Access VLANs
When you configure a port in access mode, you can specify which VLAN will carry the traffic for that interface. If you do not configure the VLAN for a port in access mode, or an access port, the interface carries traffic for the default VLAN (VLAN1).
You can change the access port membership in a VLAN by specifying the new VLAN. You must create the VLAN before you can assign it as an access VLAN for an access port. If you change the access VLAN on an access port to a VLAN that is not yet created, the system will shut that access port down.
If an access port receives a packet with an 802.1Q tag in the header other than the access VLAN value, that port drops the packet without learning its MAC source address.
Note
If you assign an access VLAN that is also a primary VLAN for a private VLAN, all access ports with that access VLAN will also receive all the broadcast traffic for the primary VLAN in the private VLAN mode.
Understanding the Native VLAN ID for Trunk Ports
A trunk port can carry untagged packets simultaneously with the 802.1Q tagged packets. When you assign a default port VLAN ID to the trunk port, all untagged traffic travels on the default port VLAN ID for the trunk port, and all untagged traffic is assumed to belong to this VLAN. This VLAN is referred to as the native VLAN ID for a trunk port. The native VLAN ID is the VLAN that carries untagged traffic on trunk ports.
The trunk port sends an egressing packet with a VLAN that is equal to the default port VLAN ID as untagged; all the other egressing packets are tagged by the trunk port. If you do not configure a native VLAN ID, the trunk port uses the default VLAN.
Note
Native VLAN ID numbers must match on both ends of the trunk.
Understanding Allowed VLANs
By default, a trunk port sends traffic to and receives traffic from all VLANs. All VLAN IDs are allowed on each trunk. However, you can remove VLANs from this inclusive list to prevent traffic from the specified VLANs from passing over the trunk. You can add any specific VLANs later that you may want the trunk to carry traffic for back to the list.
To partition spanning tree protocol (STP) topology for the default VLAN, you can remove VLAN1 from the list of allowed VLANs. Otherwise, VLAN1, which is enabled on all ports by default, will have a very big STP topology, which can result in problems during STP convergence. When you remove VLAN1, all data traffic for VLAN1 on this port is blocked, but the control traffic continues to move on the port.
Understanding Native 802.1Q VLANs
To provide additional security for traffic passing through an 802.1Q trunk port, the vlan dot1q tag native command was introduced. This feature provides a means to ensure that all packets going out of a 802.1Q trunk port are tagged and to prevent reception of untagged packets on the 802.1Q trunk port.
Without this feature, all tagged ingress frames received on a 802.1Q trunk port are accepted as long as they fall inside the allowed VLAN list and their tags are preserved. Untagged frames are tagged with the native VLAN ID of the trunk port before further processing. Only those egress frames whose VLAN tags are inside the allowed range for that 802.1Q trunk port are received. If the VLAN tag on a frame happens to match that of the native VLAN on the trunk port, the tag is stripped off and the frame is sent untagged.
This behavior will cause "VLAN hopping" in which it is possible for frames to jump to a different VLAN. It is also possible for traffic to become part of the native VLAN by sending untagged packets into an 802.1Q trunk port.
To address the above issues, the vlan dot1q tag native command performs the following functions:
On the ingress side, all untagged data traffic is dropped.
On the egress side, all traffic is tagged. If traffic belongs to native VLAN then it is tagged with the native VLAN ID.
This feature is supported on all the directly connected Ethernet and EtherChannel interfaces of the Cisco Nexus 5000 Series switch. It is also supported on all the host interface ports of any attached Cisco Nexus 2000 Series Fabric Extender.
Note
The vlan dot1q tag native command is enabled on global basis.
Configuring Access and Trunk Interfaces
Configuring a LAN Interface as an Ethernet Access Port
SUMMARY STEPSYou can configure an Ethernet interface as an access port. An access port transmits packets on only one, untagged VLAN. You specify which VLAN traffic that the interface carries. If you do not specify a VLAN for an access port, the interface carries traffic only on the default VLAN. The default VLAN is VLAN1.
The VLAN must exist before you can specify that VLAN as an access VLAN. The system shuts down an access port that is assigned to an access VLAN that does not exist.
2. switch(config)# interface {{type slot/port} | {port-channel number}}
3. switch(config-if)# switchport mode {access | trunk}
4. switch(config-if)# switchport access vlan vlan-id
DETAILED STEPSConfiguring Access Host Ports
You can optimize performance on access ports that are connected to end stations by simultaneously setting that port as an access port. An access host port handles the Spanning Tree Protocol (STP) like an edge port and immediately moves to the forwarding state without passing through the blocking and learning states. Configuring an interface as an access host port also disables EtherChannel on that interface.
Before You BeginSUMMARY STEPSEnsure that you are configuring the correct interface; it must be an interface that is connnected to an end station.
2. switch(config)# interface type slot/port
3. switch(config-if)# switchport host
DETAILED STEPSConfiguring Trunk Ports
SUMMARY STEPSYou can configure an Ethernet port as a trunk port; a trunk port transmits untagged packets for the native VLAN plus encapsulated, tagged, packets for multiple VLANs.
Note
Cisco NX-OS supports only 802.1Q encapsulation.
To configure a trunk port, perform this task:
2. switch(config)# interface {type slot/port | port-channel number}
3. switch(config-if)# switchport mode {access | trunk}
DETAILED STEPS
Command or Action Purpose Step 1 switch# configure terminal
Enters configuration mode.
Step 2 switch(config)# interface {type slot/port | port-channel number}
Specifies an interface to configure, and enters interface configuration mode.
Step 3 switch(config-if)# switchport mode {access | trunk}
Sets the interface as an Ethernet trunk port. A trunk port can carry traffic in one or more VLANs on the same physical link (VLANs are based on the trunk-allowed VLANs list). By default, a trunk interface can carry traffic for all VLANs. To specify that only certain VLANs are allowed on the specified trunk, use the switchport trunk allowed vlan command.
Configuring the Native VLAN for 802.1Q Trunking Ports
SUMMARY STEPS2. switch(config)# interface {type slot/port | port-channel number}
3. switch(config-if)# switchport trunk native vlan vlan-id
DETAILED STEPS
Command or Action Purpose Step 1 switch# configure terminal
Enters configuration mode.
Step 2 switch(config)# interface {type slot/port | port-channel number}
Specifies an interface to configure, and enters interface configuration mode.
Step 3 switch(config-if)# switchport trunk native vlan vlan-id
Sets the native VLAN for the 802.1Q trunk. Valid values are from 1 to 4094, except those VLANs reserved for internal use. The default value is VLAN1.
Configuring the Allowed VLANs for Trunking Ports
SUMMARY STEPSYou can specify the IDs for the VLANs that are allowed on the specific trunk port.
Before you configure the allowed VLANs for the specified trunk ports, ensure that you are configuring the correct interfaces and that the interfaces are trunks.
2. switch(config)# interface {type slot/port | port-channel number}
3. switch(config-if)# switchport trunk allowed vlan {vlan-list all | none [add |except | none | remove {vlan-list}]}
DETAILED STEPS
Command or Action Purpose Step 1 switch# configure terminal
Enters configuration mode.
Step 2 switch(config)# interface {type slot/port | port-channel number}
Specifies an interface to configure, and enters interface configuration mode.
Step 3 switch(config-if)# switchport trunk allowed vlan {vlan-list all | none [add |except | none | remove {vlan-list}]}
Sets allowed VLANs for the trunk interface. The default is to allow all VLANs on the trunk interface: 1 to 3967 and 4048 to 4094. VLANs 3968 to 4047 are the default VLANs reserved for internal use by default; this group of VLANs is configurable. By default, all VLANs are allowed on all trunk interfaces.
Note You cannot add internally allocated VLANs as allowed VLANs on trunk ports. The system returns a message if you attempt to list an internally allocated VLAN as an allowed VLAN.
Configuring Native 802.1Q VLANs
SUMMARY STEPSTypically, you configure 802.1Q trunks with a native VLAN ID, which strips tagging from all packets on that VLAN. This configuration allows all untagged traffic and control traffic to transit the Cisco Nexus 5000 Series switch. Packets that enter the switch with 802.1Q tags that match the native VLAN ID value are similarly stripped of tagging.
To maintain the tagging on the native VLAN and drop untagged traffic, enter the vlan dot1q tag native command. The switch will tag the traffic received on the native VLAN and admit only 802.1Q-tagged frames, dropping any untagged traffic, including untagged traffic in the native VLAN.
Control traffic continues to be accepted untagged on the native VLAN on a trunked port, even when the vlan dot1q tag native command is enabled.
Note
The vlan dot1q tag native command is enabled on global basis.
2. switch(config)# vlan dot1q tag native
3. (Optional) switch(config)# no vlan dot1q tag native
4. (Optional) switch# show vlan dot1q tag native
DETAILED STEPS
Command or Action Purpose Step 1 switch# configure terminal
Enters configuration mode.
Step 2 switch(config)# vlan dot1q tag native
Enables dot1q (IEEE 802.1Q) tagging for all native VLANs on all trunked ports on the Cisco Nexus 5000 Series switch. By default, this feature is disabled.
Step 3 switch(config)# no vlan dot1q tag native
(Optional) Disables dot1q (IEEE 802.1Q) tagging for all native VLANs on all trunked ports on the switch.
Step 4 switch# show vlan dot1q tag native
(Optional) Displays the status of tagging on the native VLANs.