Cisco Nexus 1000V VEM Software Installation and Upgrade Guide, Release 4.2(1) SV1(4b)
Available Languages
Table Of Contents
Cisco Nexus 1000V VEM Software Installation and Upgrade Guide, Release 4.2(1)SV1(4b)
Information About the Virtual Ethernet Module
Introduction to Cisco Nexus 1000V and the Virtual Ethernet Module
Prerequisites for Installing VEM Software
Choosing a VEM Software Upgrade or Installation Procedure
Upgrading the ESX/ESXi Host With VEM Software Installed Using VUM
Upgrading from VMware Release 4.0/4.1 to VMware Release 5.0.0
Upgrading the vCenter Update Manager
Verification After the Upgrade
Upgrading to VMware ESXi 5.0 Patch 01
Upgrading a VMware ESXi 5.0 Stateful Host to VMware ESXi 5.0 Patch 01
Upgrading a VMware ESXi 5.0 Stateless Host to VMware ESXi 5.0 Patch 01
Installing ESXi 5.0.0 Host Software Using the CLI
Installing or Upgrading the VEM Software Using the VUM
Installing or Upgrading the VEM Software Using the CLI
Installing a VEM on a Stateless ESXi Host
Information About a Stateless ESXi Host
Adding the Cisco Nexus 1000V to an ESXi Image Profile
Installing the VEM Software on an ESXi Stateless Host Using esxcli
Uninstalling the VEM Software on an ESXi Stateless Host Using esxcli
Installing the VEM Software on an ESXi Stateless Host Using VUM
Uninstalling the VEM Software on a Stateful Host
Obtaining Documentation and Submitting a Service Request
Cisco Nexus 1000V VEM Software Installation and Upgrade Guide, Release 4.2(1)SV1(4b)
Revised: April 7, 2012OL-26693-01This document describes how to install and upgrade the Cisco Nexus 1000V Virtual Ethernet Module (VEM) software on a VMware ESX/ESXi 4.0.0, ESX/ESXi 4.1.0, or ESXi 5.0.0 server.
This document includes the following sections:
•
Information About the Virtual Ethernet Module
•
•
•
•
•
•
•
•
•
•
Audience
This document is intended for use by experienced server administrators who configure and maintain server software. Table 1 compares the roles of the network administrator and server administrator.
This document includes instructions for installing new VEM software as a fresh install or after upgrading the VSM software to a new version.
To install the Virtual Supervisor Module (VSM), see the following document:
Cisco Nexus 1000V Software Installation Guide, Release 4.2(1)SV1(4b)
For detailed information about upgrading the software on the VSM and VEM, see the following document:
Cisco Nexus 1000V Software Upgrade Guide, Release 4.2(1)SV1(4b)
Information About the Virtual Ethernet Module
This section provides information about the VEM and includes the following topics:
•
Introduction to Cisco Nexus 1000V and the Virtual Ethernet Module
The Cisco Nexus 1000V is compatible with any upstream physical access layer switch that is Ethernet standard compliant, including the Catalyst 6500 series switch, Cisco Nexus switches, and switches from other network vendors. The Cisco Nexus 1000V is compatible with any server hardware listed in the VMware Hardware Compatibility List (HCL).
Cisco and VMware jointly designed APIs that produced the Cisco Nexus 1000V. The Cisco Nexus 1000V is a distributed virtual switch solution that is fully integrated within the VMware virtual infrastructure, including VMware vCenter for the virtualization administrator. This solution offloads the configuration of the virtual switch and port groups to the network administrator to enforce a consistent data center network policy.
The Cisco Nexus 1000V has the following components that can virtually emulate a 66-slot modular Ethernet switch with redundant supervisor functions:
•
–
–
–

Note
•
Note
–
–
A single VSM can manage up to 64 VEMs.
–
–
–
Active-standby VSMs increase high availability
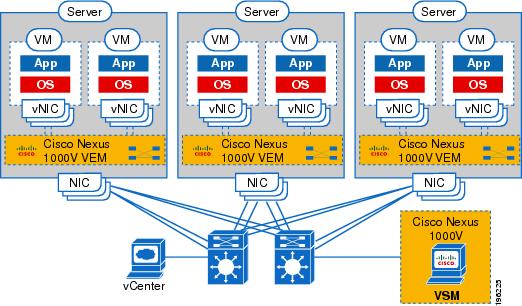
In the Cisco Nexus 1000V, traffic is switched between virtual machines locally at each VEM instance. Each VEM also interconnects the local virtual machine with the rest of the network through the upstream access-layer network switch (blade, top-of-rack, end-of-row, and so forth). The VSM runs the control plane protocols and configures the state of each VEM accordingly, but it never forwards packets.
In the Cisco Nexus 1000V, the module slots are for the primary module 1 and secondary module 2. Either module can act as active or standby. The first server or host is automatically assigned to Module 3. The Network Interface Card (NIC) ports are 3/1 and 3/2 (vmnic0 and vmnic1 on the ESX/ESXi host). The ports to which the virtual NIC interfaces connect are virtual ports on the Cisco Nexus 1000V where they are assigned a global number.
Figure 1 shows an example of the Cisco Nexus 1000V distributed architecture.
Figure 1 Cisco Nexus 1000V Distributed Switching Architecture
Obtaining the VEM Software
You can obtain the VEM software from the sources listed in Table 2.
Table 2 Obtaining VEM Software
VUM
The VMware vCenter Update Manager (VUM) obtains the VEM software from the VSM or from the VMware online portal. See the VMware and Cisco Nexus 1000V Software Compatibility table in the Cisco Nexus 1000V Compatibility Information, Release 4.2(1)SV1(4b), to identify which VEM bits are available on the VSM or posted on the VMware online portal.1
VSM
After the VSM has been installed as a VM, copy the file containing the VEM software from the VSM home page located at the following url:
http://VSM_IP_Address/
VMware
Download the ESXi and VC software from the VMware website.
Click Download Vmware vSphere 4 Enterprise Plus > Download
Download the VMware patches if you are utilizing VMware releases with patches.
Cisco
Download the VEM software from Cisco.com.
1 VMware vCenter Update Manager 4.0 does not list Cisco Nexus 1000V patches or updates, but you can add a Cisco Nexus 1000V patch source using the VMware knowledge base procedure located at the following url:
http://kb.vmware.com/selfservice/microsites/search.do?language=en_US&cmd=displayKC&externalId=1013134
VMware vCenter Server 4.0 Update 1 with VUM P02 and later versions do not have this limitation.
VMware Patch Releases
The Cisco Nexus 1000V VEM software is updated to support VMware patch releases and is available on both the VMware and Cisco software download websites. The Cisco Nexus 1000V software posted on these websites can be used for both installation and upgrade of the VEM for both the VMware Classic and VMware Embedded platforms.
For information about installing software on an ESX/ESXi host, see your VMware documentation.
For information about VEM software packages and compatibility, see the Cisco Nexus 1000V Compatibility Information, Release 4.2(1)SV1(4b).
Prerequisites for Installing VEM Software
Before installing the Cisco Nexus 1000V VEM software, you must know or do the following:

Caution
Note
•
•
•
•
•
•
•
•
•
•
–
(config-if) portfast trunk
or
(config-if) portfast edge trunk–
(config-if) spanning-tree port type edge trunk•
–
–
•
–
–
•
Choosing a VEM Software Upgrade or Installation Procedure
This section describes how you can upgrade the ESX/ESXi host with the VEM software installed or install or upgrade the VEM software:
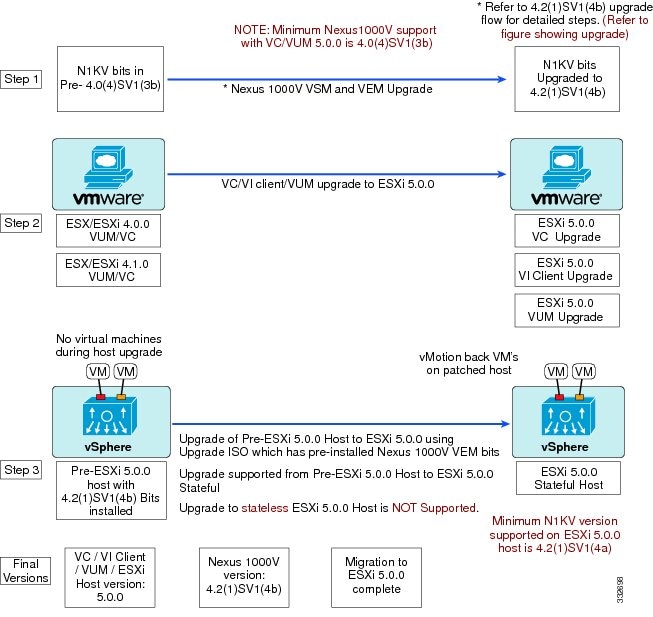
The following three diagrams depict the recommended workflows depending on the version of Cisco Nexus 1000V software you have installed. These workflows are for stateful ESXi hosts. For information on stateless ESXi hosts, see Installing a VEM on a Stateless ESXi Host.
Figure 2 Workflow with Cisco Nexus 1000V 4.2(1)SV1(4b) Installed

Figure 3 Workflow with Cisco Nexus 1000V 4.0(4)SV1(3b/3c/3d) or 4.2(1)SV1(4,4a) Installed
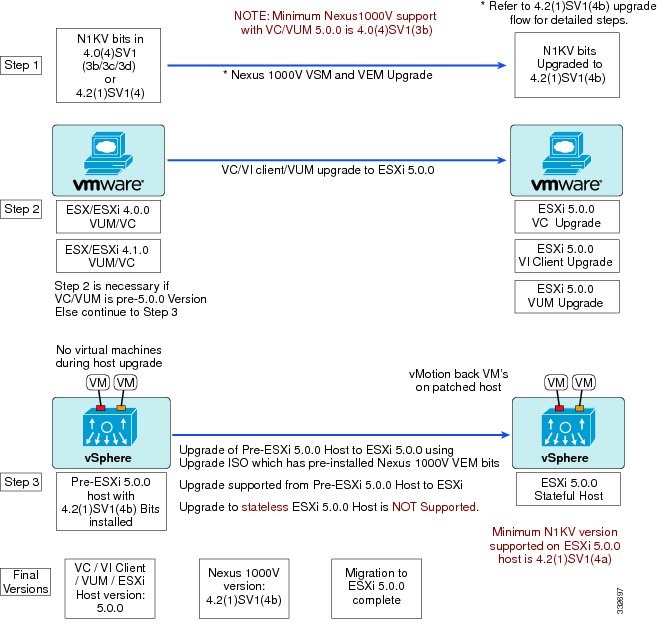
Figure 4 Workflow with a Cisco Nexus 1000V Version Prior to 4.0(4)SV1(3b) Installed
There are two possible use cases:
•
–
–
•
–
–
Upgrading the ESX/ESXi Host With VEM Software Installed Using VUM
Caution
This section describes the procedures for installing and upgrading from, VMware Release 4.0.0/4.1.0 to VMware Release 5.0.0.
•
Upgrading from VMware Release 4.0/4.1 to VMware Release 5.0.0
You can use this procedure to upgrade from VMware Release 4.0/4.1 to VMware Release 5.0.0.
Upgrading your ESX infrastructure to VMware Release 5.0.0 when Cisco Nexus 1000 is installed requires you to upgrade in the following order:
1.
2.
3.
4.
BEFORE YOU BEGIN
Before beginning this procedure, you must know or do the following:
•
•
•
•
–
–
Upgrading the vCenter Server
This procedure shows you how to upgrade the vCenter Server to VMware ESXi 5.0.0.
Note
Step 1
Note
Figure 5 Autorun Window

Step 2
Step 3
Step 4
The Installation Wizard opens.
Step 5
Step 6
The License Agreement window opens. See Figure 6.
Figure 6 License Agreement Window
Step 7
Step 8
Step 9
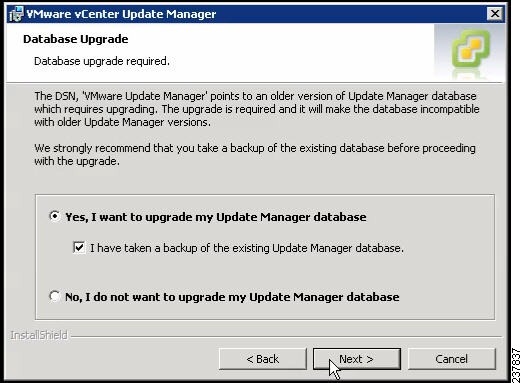
The Database Upgrade Warning screen opens. See Figure 7.
Figure 7 Database Upgrade Warning Screen

Step 10
Step 11
The Run dialog box opens.
Step 12
Step 13
Step 14
Step 15
Step 16
Step 17
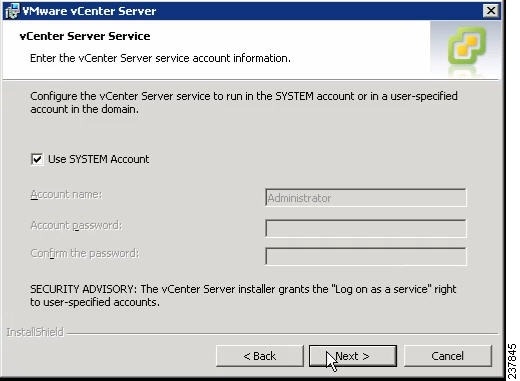
The vCenter Server Service screen opens. See Figure 8.
Figure 8 VMware vCenter Server Service Screen
Step 18
Step 19
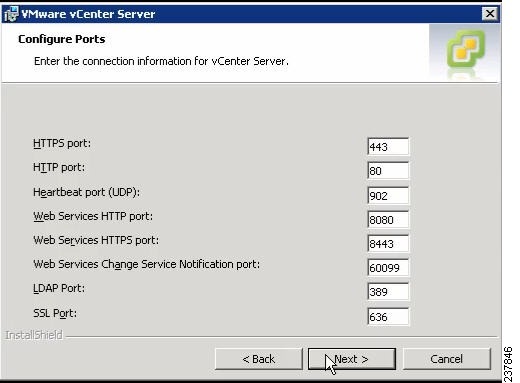
The Configure Ports screen opens. See Figure 9.
Figure 9 Configure Ports Screen
Step 20
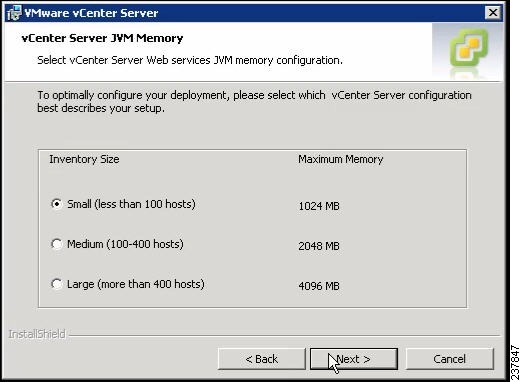
The vCenter Server JVM Memory screen opens. See Figure 10.
Figure 10 vCenter Server JVM Memory Screen
Step 21
Step 22
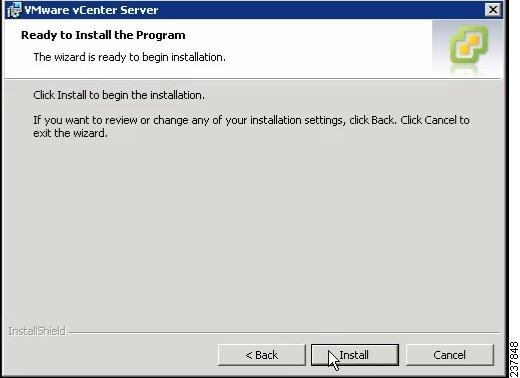
The Ready to Install the Program screen opens. See Figure 11.
Figure 11 Ready to Install the Program Screen
Step 23
The Installation Completed screen appears. See Figure 12.
Figure 12 Installation Completed Screen
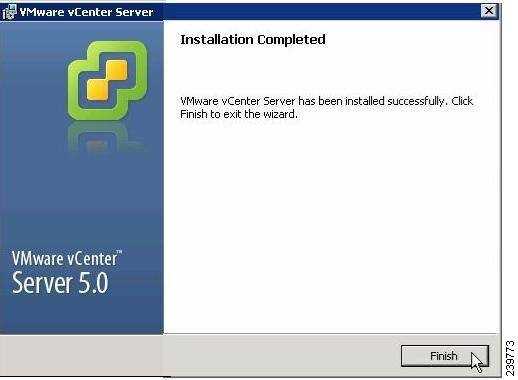
Step 24
This completes the upgrade of the vCenter Server.
Step 25
Step 26
Step 27
Step 28
Step 29
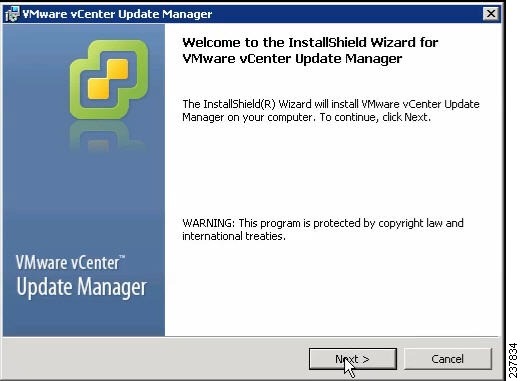
Upgrading the vCenter Update Manager
Step 1
Step 2
The Update Manager Installer opens.
Step 3
Figure 13 Welcome
Step 4
Step 5
Step 6
Step 7
The vCenter Server Information screen opens. See Figure 14.
Figure 14 vCenter Server Information Screen
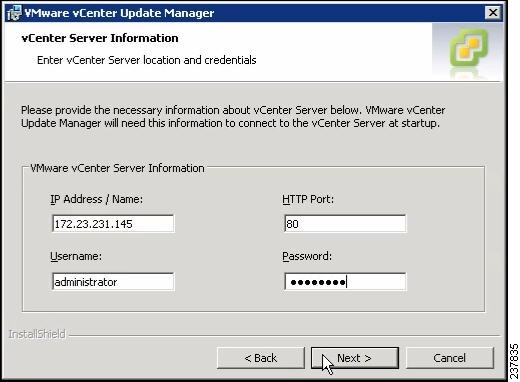
Step 8
Step 9
Step 10
The Database Information screen opens. See Figure 15.
Figure 15 Database Information Screen
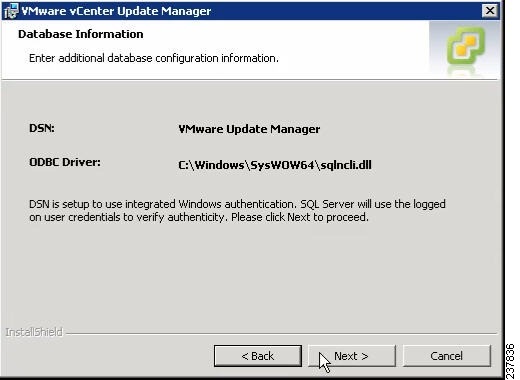
Step 11
The Database Upgrade screen opens. See Figure 16.
Figure 16 Database Upgrade Screen
Step 12
Step 13
Step 14
Step 15
Step 16
Step 17
Step 18
Step 19
Step 20
Step 21
Step 22
Step 23
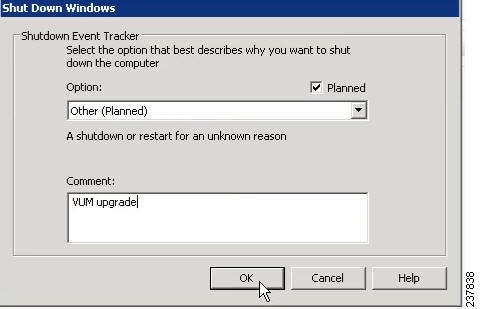
The Shut Down Windows dialog box opens. See Figure 17
Figure 17 Shut Down Windows Dialog Box
Step 24
Step 25
Step 26
Step 27
Step 28
The update of the VMware Update Manager is complete.
Augmenting the Customized ISO
If the ESXi host that is being upgrade to VMware 5.0.0 needs any Async drivers that are not already in VMware 5.0.0, refer to the respective vendor's documentation for the drivers and the procedure to update the customized ISO.
If you are using a QLogic NIC, download the driver to include in the customized ISO for that specific NIC.
Upgrading the ESXi Hosts
Step 1
Step 2
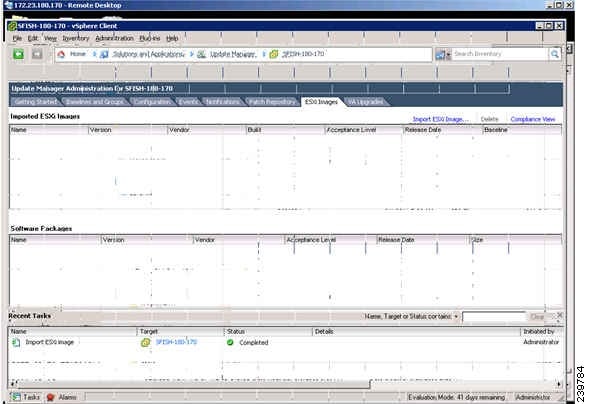
Figure 18 ESXi Images Tab
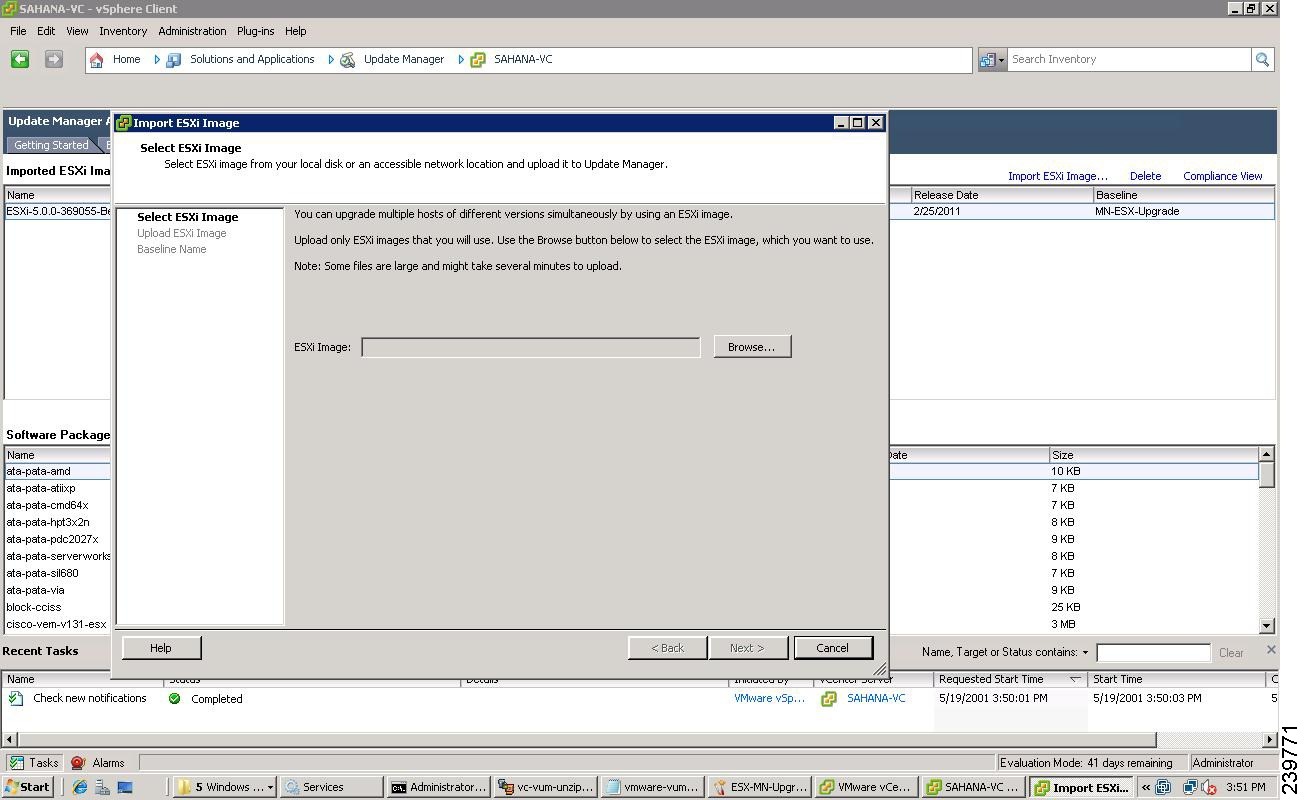
Step 3
Figure 19 Select ESXi Image Window
Step 4
Step 5
Step 6
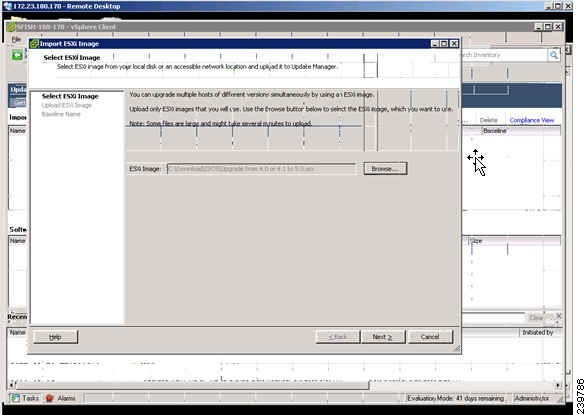
The Select ESXi Image screen opens. See Figure 20.
Figure 20 Select ESXi Image Screen
Step 7
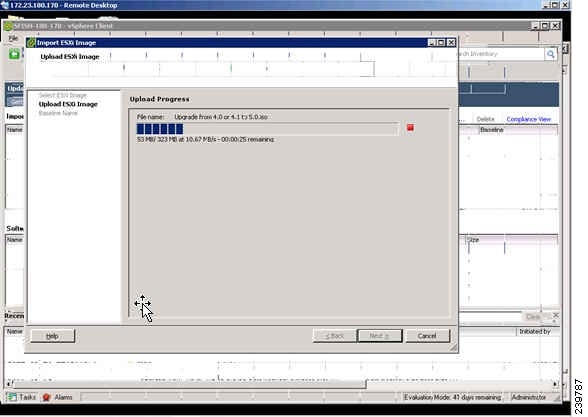
The Upload Progress opens. See Figure 21.
Figure 21 Upload Progress Screen
Step 8
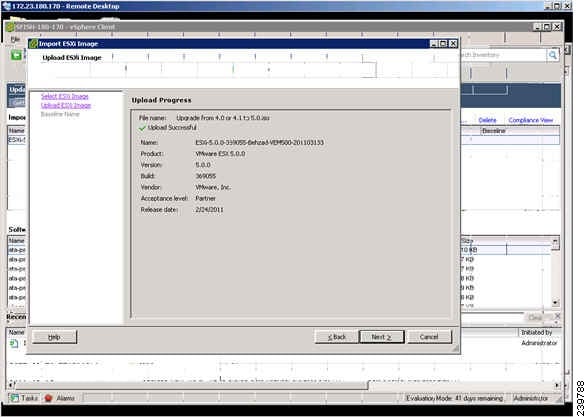
The Upload Complete screen opens. See Figure 22.
Figure 22 Upload Complete Screen
Step 9
The Baseline Name screen opens. See Figure 23.
Figure 23 Baseline Name Screen

Step 10
Step 11
Figure 24 Update Manager Window
Step 12
Step 13
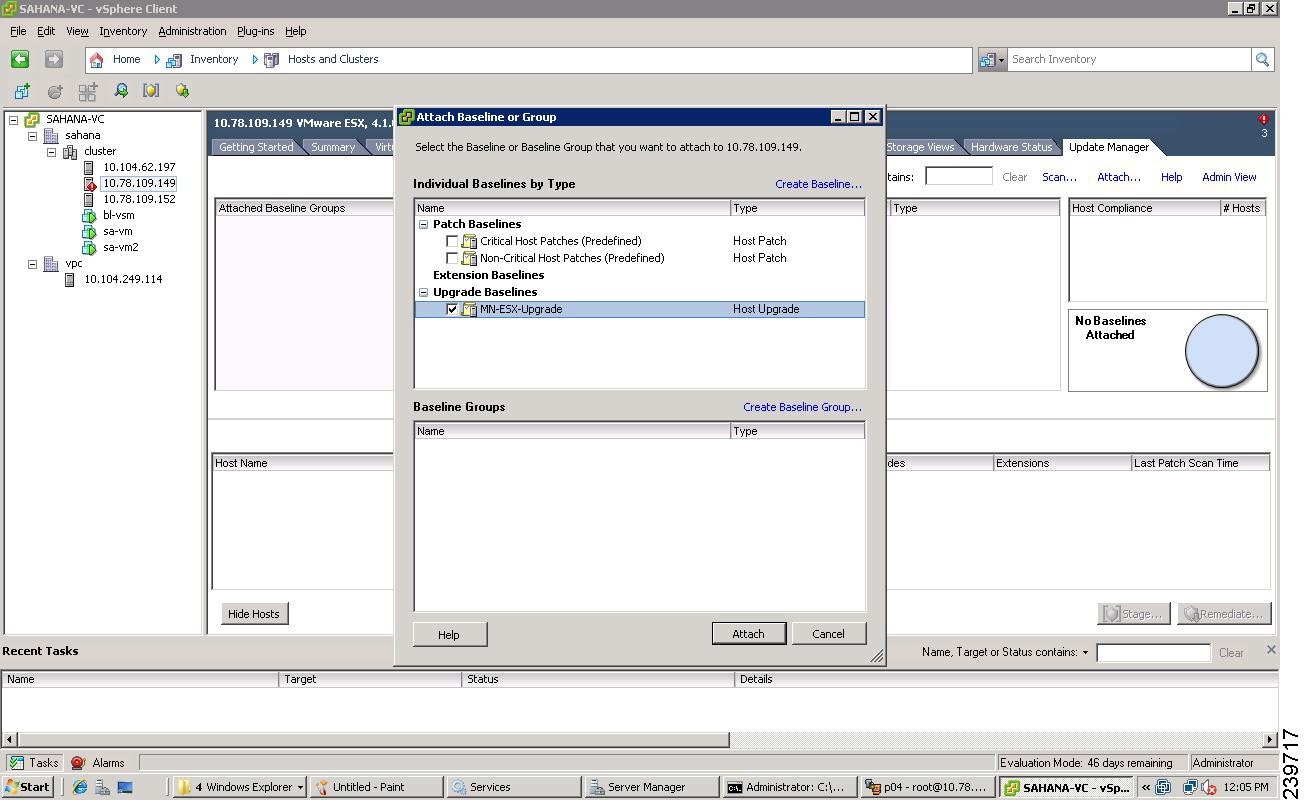
The Attach Baseline or Group window opens. See Figure 25.
Figure 25 Attach Baseline or Group Window
Step 14
Step 15
The Confirm Scan window opens. See Figure 26.
Figure 26 Confirm Scan Window
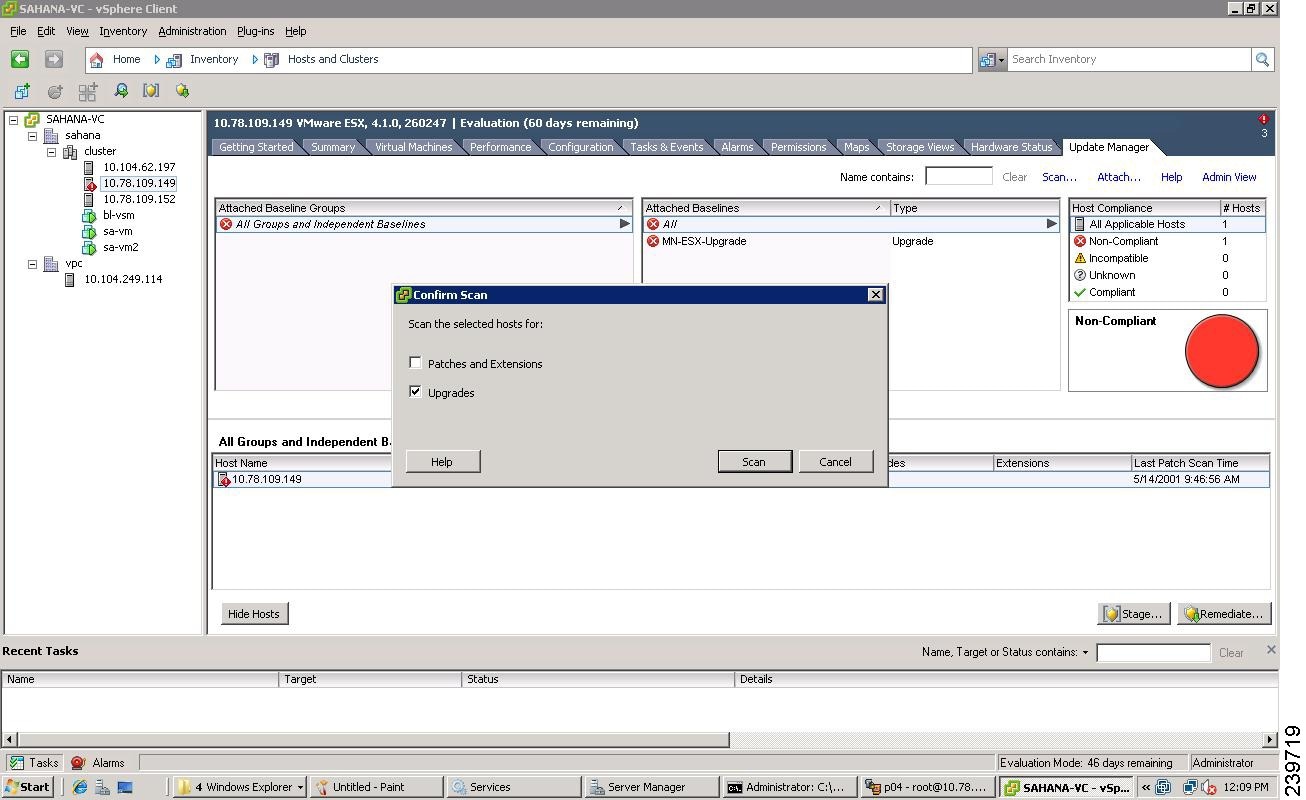
Step 16
After the scan, the baseline will display non-compliant.
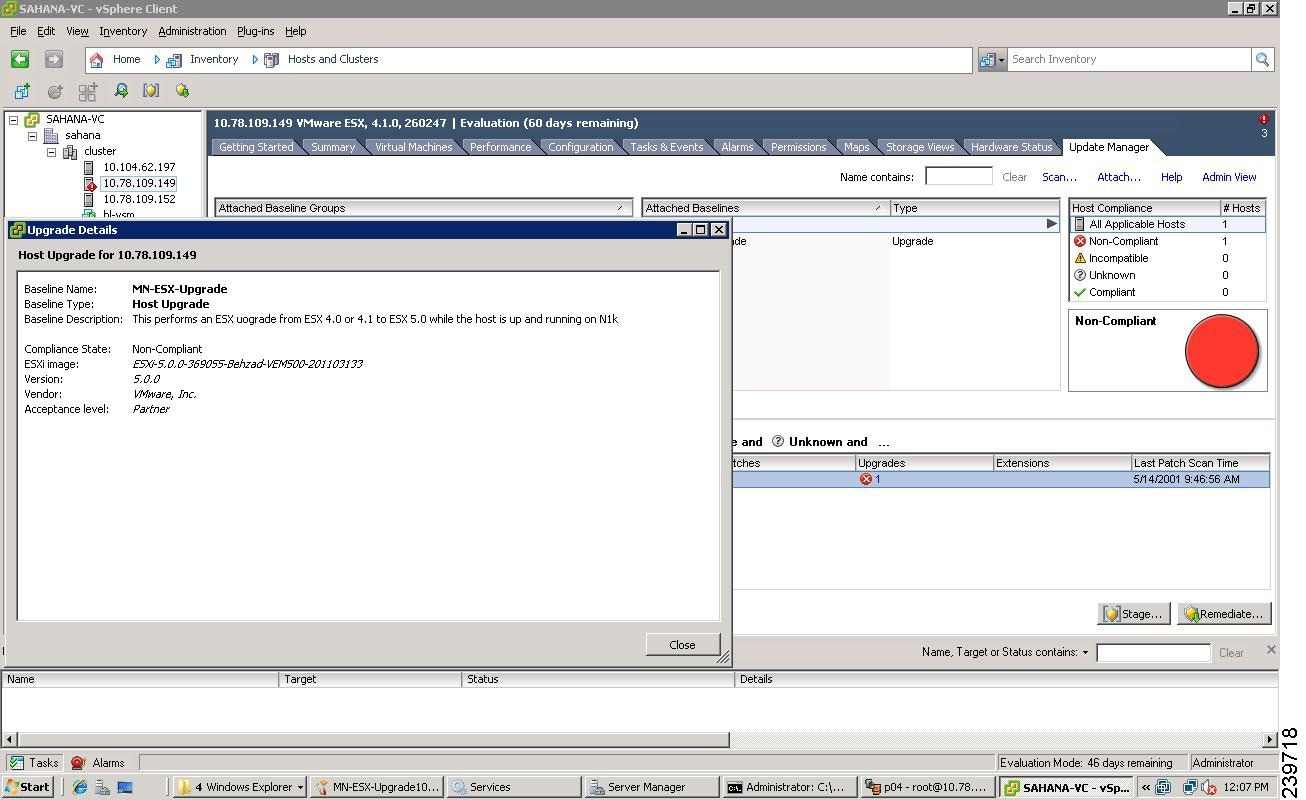
Figure 27 Upgrade Details Window

Step 17
After the reboot, the Compliance State will have a value of Non-Compliant.
Figure 28 Upgrade Details Window
Step 18
Step 19
Step 20
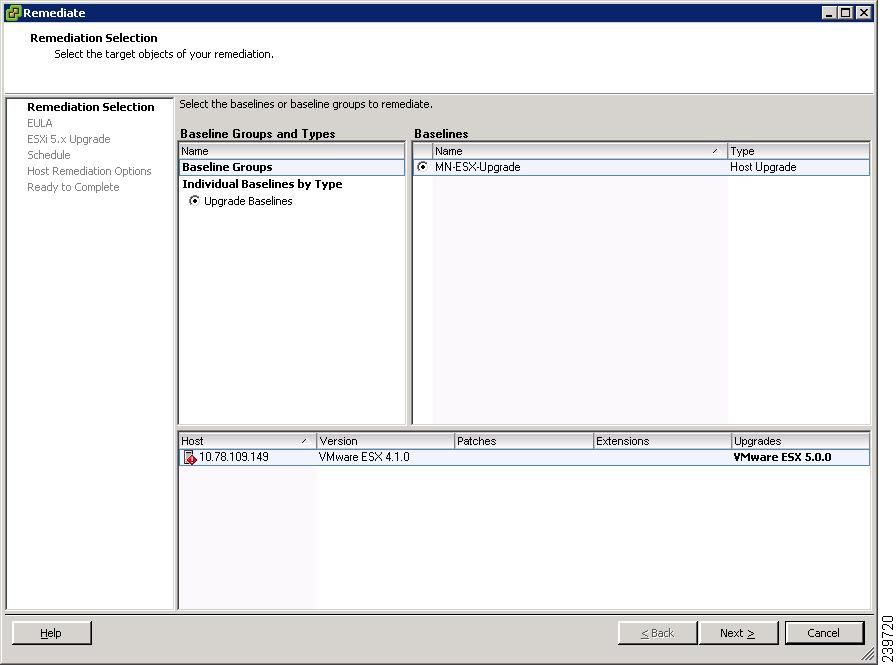
The Remediate Selection screen opens. See Figure 29.
Figure 29 Remediate Selection Screen
Step 21
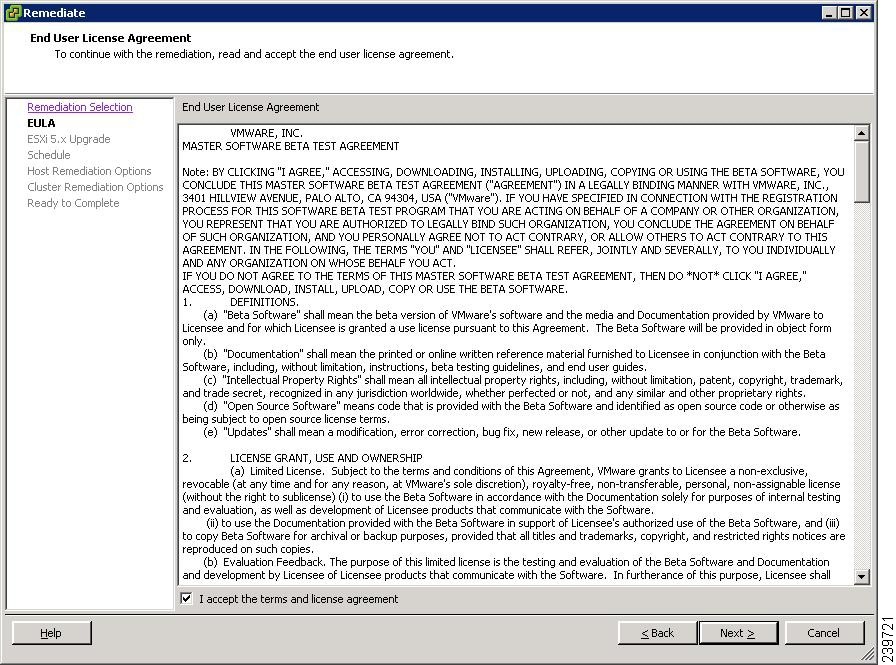
The EULA screen opens. See Figure 30.
Figure 30 EULA Screen
Step 22
Step 23
Step 24
Figure 31 Schedule Window
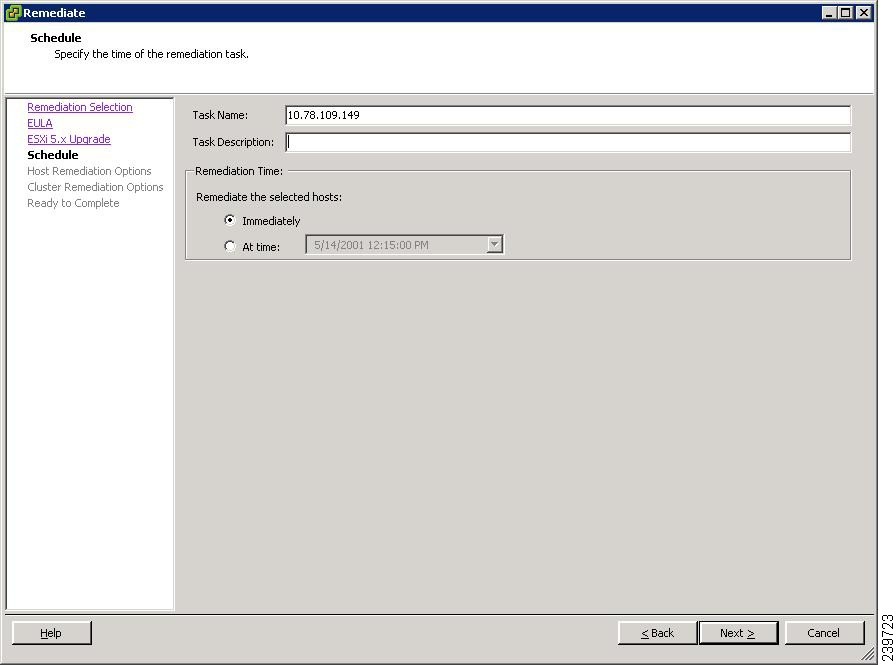
Step 25
The Host Remediation Options screen opens. See Figure 32.
Figure 32 Host Remediation Options Window
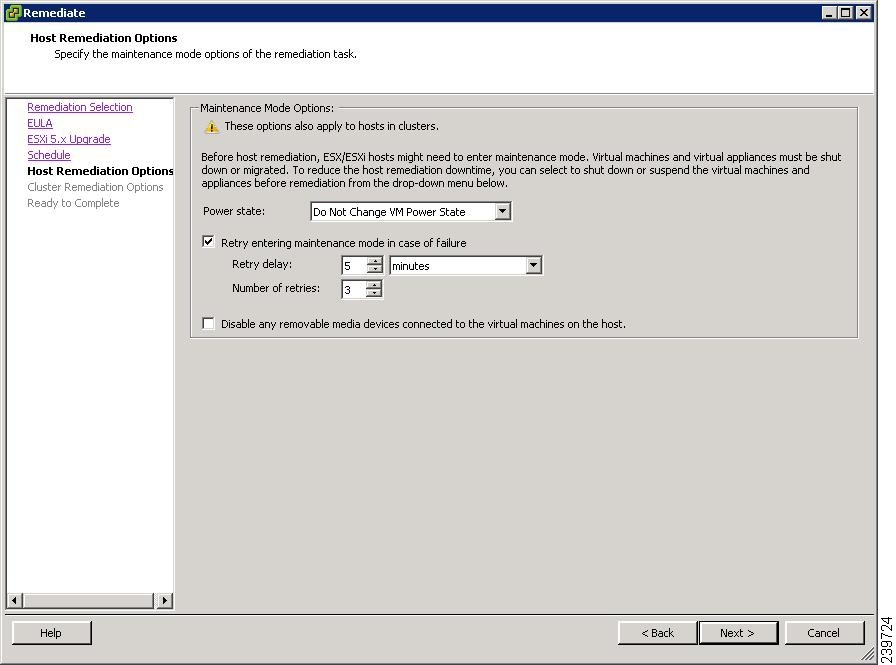
Step 26
Step 27
The Cluster Remediation Options screen opens. See Figure 33.
Figure 33 Cluster Remediation Options Screen

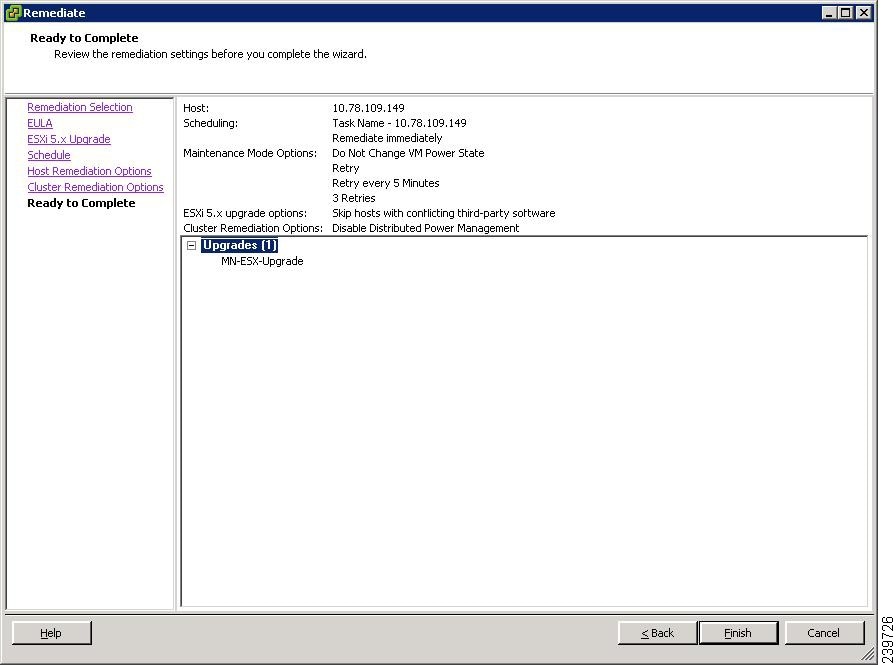
Step 28
Step 29
The Ready to Complete screen opens. See Figure 34.
Figure 34 Ready to Complete Screen
Step 30
Step 31
Step 32
The upgrade is complete.
Verification After the Upgrade
Step 1
~ # vmware -vVMware ESXi 5.0.0 build-469512Step 2
switch# show moduleN1KV-VSM# show modMod Ports Module-Type Model Status--- ----- -------------------------------- ------------------ ------------1 0 Virtual Supervisor Module Nexus1000V active *2 0 Virtual Supervisor Module Nexus1000V ha-standby3 248 Virtual Ethernet Module NA okMod Sw Hw--- --------------- ------1 4.2(1)SV1(4b) 0.02 4.2(1)SV1(4b) 0.03 4.2(1)SV1(4b) 3.0Mod MAC-Address(es) Serial-Num--- -------------------------------------- ----------1 00-19-07-6c-5a-a8 to 00-19-07-6c-62-a8 NA2 00-19-07-6c-5a-a8 to 00-19-07-6c-62-a8 NA3 02-00-0c-00-09-00 to 02-00-0c-00-09-80 NAMod Server-IP Server-UUID Server-Name--- --------------- ------------------------------------ --------------------1 10.104.245.152 NA NA2 10.104.245.152 NA NA3 10.104.245.140 42064d20-4e52-62d1-e0ee-0b14be4388d6 mn-esxi-5.0-statefull* this terminal session
Upgrading to VMware ESXi 5.0 Patch 01
You can use the following procedures to upgrade a stateful or stateless host to ESXi 5.0 Patch 01.
This section includes the following topics:
•
•
Upgrading a VMware ESXi 5.0 Stateful Host to VMware ESXi 5.0 Patch 01
You can use this procedure to upgrade a VMware ESXi 5.0 GA stateful host connected to a Cisco Nexus 1000, Release 4.2(1)SV1(4b) DVS to VMware ESXi 5.0 Patch 01 by using the esxcli command.
Step 1
~ # esxcli software vib update -d /vmfs/volumes/newnfs/MN-patch01/ESXi500-201109001.zipInstallation ResultMessage: The update completed successfully, but the system needs to be rebooted for the changes to be effective.Reboot Required: trueVIBs Installed: VMware_bootbank_esx-base_5.0.0-0.3.474610, VMware_locker_tools-light_5.0.0-0.3.474610VIBs Removed: VMware_bootbank_esx-base_5.0.0-0.0.469512, VMware_locker_tools-light_5.0.0-0.0.469512VIBs Skipped: VMware_bootbank_ata-pata-amd_0.3.10-3vmw.500.0.0.469512, VMware_bootbank_ata-pata-atiixp_0.4.6-3vmw.500.0.0.469512,<========================================================================================= ===================>VMware_bootbank_scsi-qla4xxx_5.01.03.2-3vmw.500.0.0.469512, VMware_bootbank_uhci-usb-uhci_1.0-3vmw.500.0.0.469512
Upgrading a VMware ESXi 5.0 Stateless Host to VMware ESXi 5.0 Patch 01
You can use this procedure to upgrade a VMware ESXi 5.0 stateless host connected to a Cisco Nexus 1000, Release 4.2(1)SV1(4b) DVS to VMware ESXi 5.0 Patch 01 by using the vSphere Auto Deploy PowerCLI.
BEFORE YOU BEGIN
Before beginning this procedure, you must know or do the following:
•
•
•
For this example, the host has a rule defined with the following values in the PowerCLI:
Name : sans2-216
PatternList : {mac=c4:7d:4f:7c:a4:64}
ItemList : {mn-ga-n1k-bl1}
Where mn-ga-n1k-bl1 is an image profile containing the VMware ESXi 5.0 GA package,the VMware-fdm vib, and the Cisco Nexus 1000V vib :
VMware ESXi 5.0 GA package : ESXi-5.0.0-469512-standard
VMware-fdm vib : vSphere-HA-depot.zip
Cisco Nexus 1000V vib : VEM500-201108271.zip
Step 1
The ItemList mn-patch01-n1k-bl1 should contain the following:
–
–
–
–
Step 2
PowerCLI C:\> $image1 = Get-EsxImageProfile -Name mn-patch01-n1k-bl1Step 3
PowerCLI C:\> Copy-DeployRule sans2-216 -ReplaceItem $image1Downloading esx-base 5.0.0-0.3.474610Download finished, uploading to AutoDeploy...Upload finished.Downloading tools-light 5.0.0-0.3.474610Download finished, uploading to AutoDeploy...Upload finished.Warning: Image Profile mn-patch01-n1k-bl1 contains one or more software packages that are not stateless-ready. You may experience problems when usingthis profile with Auto Deploy.Name : sans2-216PatternList : {mac=c4:7d:4f:7c:a4:64}ItemList : {mn-patch01-n1k-bl1}Step 4
PowerCLI C:\> Test-DeployRuleSetCompliance sans2-216.cisco.comVMHost ItemList------ --------sans2-216.cisco.com {Non-compliant: mn-ga-n1k-bl1 != mn-patch01-n1k...The image is non-compliant.
Step 5
PowerCLI C:\> $tr = Test-DeployRuleSetCompliance sans2-216.cisco.com------------------------------------------------------------------------------------------Step 6
PowerCLI C:\> Repair-DeployRuleSetCompliance $trStep 7
PowerCLI C:\> Test-DeployRuleSetCompliance sans2-216.cisco.comVMHost ItemList------ --------sans2-216.cisco.com {}Step 8
The host is upgraded to VMware ESXi 5.0 Patch 01.
Installing ESXi 5.0.0 Host Software Using the CLI
You can use this procedure to upgrade an ESXi host by installing a VMware patch or update with the compatible Cisco Nexus 1000V VEM software.
BEFORE YOU BEGIN
Before beginning this procedure, you must know or do the following:
•
–
–
Note
•
–
•
•
•
DETAILED STEPS
Step 1
Step 2
•
Note
esxcli software vib install -v full-path-to-vibExample:# esxcli software vib install -v /tmp/cross_cisco-vem-v131-4.2.1.1.4.1.0-3.0.5.vibInstallation ResultMessage: Operation finished successfully.Reboot Required: falseVIBs Installed: Cisco_bootbank_cisco-vem-v131-esx_4.2.1.1.4.1.0-3.0.5VIBs Removed:VIBs Skipped:This command loads the software manually onto the host, loads the kernel modules, and starts the VEM Agent on the running system.
Step 3
[root@serialport tmp]# vmware -vVMware ESXi 5.0.0 build-469512# esxcli software vib list | grep ciscocisco-vem-v131-esx 4.2.1.1.4.1.0-3.0.5 Cisco PartnerSupported 2011-08-20~ # vem status -vPackage vssnet-esx4.1.2-00000-releaseVersion 4.2.1.1.4.1.0-1.11.1Build 1Date Wed Jul 27 04:42:14 PDT 2011Number of PassThru NICs are 0VEM modules are loadedSwitch Name Num Ports Used Ports Configured Ports MTU UplinksvSwitch0 128 2 128 1500 vmnic4DVS Name Num Ports Used Ports Configured Ports MTU Uplinksvsm-tec-mn-p 256 15 256 1500 vmnic5,vmnic2Number of PassThru NICs are 0VEM Agent (vemdpa) is running# vem version -vNumber of PassThru NICs are 0Running esx version -236512 x86_64VEM Version: 4.2.1.1.4.1.0-1.11.1VSM Version: 4.2(1)SV1(4b)System Version: VMware ESXi 5.0.0 Releasebuild-469512
Note
Step 4
switch# show moduleMod Ports Module-Type Model Status--- ----- -------------------------------- ------------------ ------------1 0 Virtual Supervisor Module Nexus1000V active *2 0 Virtual Supervisor Module Nexus1000V ha-standby3 248 Virtual Ethernet Module NA ok4 248 Virtual Ethernet Module NA okMod Sw Hw--- ---------------- ------------------------------------------------1 4.2(1)SV1(4b) 0.02 4.2(1)SV1(4b) S0.03 4.2(1)SV1(4b) VMware ESXi 5.0.0 Releasebuild-381646 (3.0)4 4.2(1)SV1(4b) VMware ESXi 5.0.0 Releasebuild-381646 (3.0)Mod MAC-Address(es) Serial-Num--- -------------------------------------- ----------1 0
Note
Step 5
•
•
You have completed this procedure.
Installing or Upgrading the VEM Software Using the VUM
Caution
When installing or upgrading the VEM software, VMware Update Manager (VUM) automatically selects the correct VEM software to be installed on the host.
VEM software is installed on the host in one of the following procedures:
•
•
Note
–
Installing or Upgrading the VEM Software Using the CLI
You can use this procedure to install the Cisco Nexus 1000V VEM software on an ESXi host.
BEFORE YOU BEGIN
Before beginning this procedure, you must know or do the following:
•
–
–
Note
•
–
•
•
•
PROCEDURE
Step 1
[root@serialport -]# cd tmp[root@serialport tmp]#Step 2
•
•
vihostupdate --install --bundle [path to Cisco updated VEM offline bundle]" --server
[vsphere host IP address]
Note
[root@serialport tmp]# vihostupdate --install --bundle VEM400-201107401.zip --server
192.0.2.0
Enter username: rootEnter password:Please wait installation in progress ...The update completed successfully, but the system needs to be rebooted for the changes to be effective.[root@serialport tmp]#•
Note
esxupdate -b [VMware offline update bundle] updateThis command loads the software manually onto the host, loads the kernel modules, and starts the VEM Agent on the running system.
Step 3
[root@serialport tmp]# vmware -vVMware ESXi 5.0.0 build-469512The highlighted text shows the upgraded Cisco VEM.
root@serialport tmp]# esxupdate query-----Bulletin ID----- -----Installed----- ----------Summary----------ESXi400-Update01 2011-07-28T14:30:58 VMware ESXi 4.0 Update 1VEM400-201107273451115-BG 2011-07-28T14:48:36 Cisco Nexus 1000V 4.2(1)SV1(4b)[root@host212 ~]# vem status -vPackage vssnet-esx4.1.0-00000-releaseVersion 4.2.1.1.4.1.0-1.9.1Build 1Date Wed Jul 27 04:42:14 PDT 2011Number of PassThru NICs are 0VEM modules are loadedSwitch Name Num Ports Used Ports Configured Ports MTU UplinksvSwitch0 32 2 32 1500 vmnic0DVS Name Num Ports Used Ports Configured Ports Uplinksbyru-215 256 56 256 vmnic2,vmnic1Number of PassThru NICs are 0VEM Agent (vemdpa) is running[root@host212 ~]# vem version -vNumber of PassThru NICs are 0Running esx version -208167 x86_64VEM Version: 4.2.1.1.4.1.0-1.9.1VSM Version: 4.2(1)SV1(4b)System Version: VMware ESX 4.0.0 Releasebuild-208167Step 4
switch# show moduleMod Ports Module-Type Model Status--- ----- -------------------------------- ------------------ ------------1 0 Virtual Supervisor Module Nexus1000V active *2 0 Virtual Supervisor Module Nexus1000V standby3 248 Virtual Ethernet Module NA okMod Sw Hw--- --------------- ------1 4.0(4)SV1(4b) 0.02 4.0(4)SV1(4b) 0.03 4.2(1)SV1(4b) VMware ESXi 4.0.0 build-208167 (1.9)Mod MAC-Address(es) Serial-Num--- -------------------------------------- ----------1 00-19-07-6c-5a-a8 to 00-19-07-6c-62-a8 NA4 02-00-0c-00-04-00 to 02-00-0c-00-04-80 NAMod Server-IP Server-UUID Server-Name--- --------------- ------------------------------------ --------------------1 10.104.62.220 NA NA4 10.104.62.217 3fa746d4-de2f-11de-bd5d-c47d4f7ca460 visor
Note
Step 5
•
•
You have completed this procedure.
Installing a VEM on a Stateless ESXi Host
This section includes the following topics:
•
•
•
•
•
Information About a Stateless ESXi Host
Note
VMware vSphere 5.0.0 introduces the VMware Auto Deploy feature which provides the infrastructure for loading the ESXi image directly into the host's memory. If a host is configured for Auto Deploy, it does not store the image state. Instead, the image is loaded from the Auto Deploy server for every boot. A host that gets its image from an Auto Deploy server is defined as a stateless host. In this context, the image with which the host boots is identified as the image profile.
An image profile is a collection of vSphere Installation Bundles (VIBs) required for the host to operate and the image profile includes base VIBs from VMware and additional VIBs from partners.
On a stateless host, VEM software can be installed or upgraded using either the VUM or CLI.
In addition, the new or modified VEM module should also be bundled in the Image Profile from which the stateless host boots. Without this, the VEM module will not be persisted across reboot of the stateless host.
When entering the esxcli software vib install command on an ESXi 5.0.0 host, the following message displays:
Message: WARNING: Only live system was updated, the change is not persistent.
The following procedure describes how to bundle the VEM into the Image Profile and how to upgrade existing VEMs in the image profile.
For a more detailed description of the VMware Auto Deploy Infrastructure and Stateless boot process, see the "Installing ESXi using VMware Auto Deploy" chapter of the vSphere Installation and Setup, vSphere 5.0.0 document.
Adding the Cisco Nexus 1000V to an ESXi Image Profile
This section describes how to add a Cisco Nexus 1000V to an ESXi Image Profile.
BEFORE YOU BEGIN
Before beginning this procedure, you must know or do the following:
•
•
•
–
–
Note
Step 1
Step 2
[vSphere PowerCLI] > Connect-VIServer 192.0.2.1 -User Administrator -Password XXXXXStep 3
Note
[vSphere PowerCLI] > Add-ESXSoftwareDepot c:\vmware-ESXi-5.0.0-depot.zipStep 4
[vSphere PowerCLI] > Get-EsxImageProfileName Vendor Last Modified---- ------ -------------ESXi-5.0.0-standard VMware, Inc. 2/25/2011 9:42:21 PMESXi-5.0.0-no-tools VMware, Inc. 2/25/2011 9:42:21 PMStep 5
Note
[vSphere PowerCLI] > New-EsxImageProfile -CloneProfile ESXi-5.0.0-standard -Name
n1kv-Image
Note
Step 6
Note
[vSphere PowerCLI] > Add-EsxSoftwareDepot C:\VEM500-20110822140-BG.zipStep 7
[vSphere PowerCLI] > Get-EsxSoftwarePackage -Name cisco*Name Version Vendor Release---- ------- ------ -----------cisco-vem-v131-esx 4.2.1.1.3.24.0-3.0.8 Cisco 8/22/2011.Step 8
[vSphere PowerCLI] > Add-EsxSoftwarePackage -ImageProfile n1kv-Image -SoftwarePackage
cisco-vem-v131-esx
Step 9
[vSphere PowerCLI]> $img = Get-EsxImageProfile n1kv-Image[vSphere PowerCLI]> $img.vibListName Version Vendor Release Date---- ------- ------ ------------scsi-bnx2i 1.9.1d.v50.1-3vmw.500.0.0.4... VMware 6/22/2011...net-s2io 2.1.4.13427-3vmw.500.0.0.43... VMware 6/22/2011...net-nx-nic 4.0.557-3vmw.500.0.0.434219 VMware 6/22/2011...scsi-aic79xx 3.1-5vmw.500.0.0.434219 VMware 6/22/2011...sata-ata-piix 2.12-4vmw.500.0.0.434219 VMware 6/22/2011...net-e1000e 1.1.2-3vmw.500.0.0.434219 VMware 6/22/2011...net-forcedeth 0.61-2vmw.500.0.0.434219 VMware 6/22/2011...tools-light 5.0.0-0.0.434219 VMware 6/22/2011...ipmi-ipmi-msghandler 39.1-4vmw.500.0.0.434219 VMware 6/22/2011...scsi-aacraid 1.1.5.1-9vmw.500.0.0.434219 VMware 6/22/2011...net-be2net 4.0.88.0-1vmw.500.0.0.434219 VMware 6/22/2011...sata-ahci 3.0-6vmw.500.0.0.434219 VMware 6/22/2011...ima-qla4xxx 2.01.07-1vmw.500.0.0.434219 VMware 6/22/2011...ata-pata-sil680 0.4.8-3vmw.500.0.0.434219 VMware 6/22/2011...scsi-ips 7.12.05-4vmw.500.0.0.434219 VMware 6/22/2011...scsi-megaraid-sas 4.32-1vmw.500.0.0.434219 VMware 6/22/2011...scsi-mpt2sas 06.00.00.00-5vmw.500.0.0.43... VMware 6/22/2011...net-cnic 1.10.2j.v50.7-2vmw.500.0.0.... VMware 6/22/2011...ipmi-ipmi-si-drv 39.1-4vmw.500.0.0.434219 VMware 6/22/2011...esx-base 5.0.0-0.0.434219 VMware 6/22/2011...ata-pata-serverworks 0.4.3-3vmw.500.0.0.434219 VMware 6/22/2011...scsi-mptspi 4.23.01.00-5vmw.500.0.0.434219 VMware 6/22/2011...net-bnx2x 1.61.15.v50.1-1vmw.500.0.0.... VMware 6/22/2011...ata-pata-hpt3x2n 0.3.4-3vmw.500.0.0.434219 VMware 6/22/2011...sata-sata-sil 2.3-3vmw.500.0.0.434219 VMware 6/22/2011...scsi-hpsa 5.0.0-17vmw.500.0.0.434219 VMware 6/22/2011...block-cciss 3.6.14-10vmw.500.0.0.434219 VMware 6/22/2011...net-tg3 3.110h.v50.4-4vmw.500.0.0.4... VMware 6/22/2011...net-igb 2.1.11.1-3vmw.500.0.0.434219 VMware 6/22/2011...ata-pata-amd 0.3.10-3vmw.500.0.0.434219 VMware 6/22/2011...ata-pata-via 0.3.3-2vmw.500.0.0.434219 VMware 6/22/2011...net-e1000 8.0.3.1-2vmw.500.0.0.434219 VMware 6/22/2011...scsi-adp94xx 1.0.8.12-6vmw.500.0.0.434219 VMware 6/22/2011...scsi-lpfc820 8.2.2.1-18vmw.500.0.0.434219 VMware 6/22/2011...scsi-mptsas 4.23.01.00-5vmw.500.0.0.434219 VMware 6/22/2011...ata-pata-cmd64x 0.2.5-3vmw.500.0.0.434219 VMware 6/22/2011...sata-sata-svw 2.3-3vmw.500.0.0.434219 VMware 6/22/2011...misc-cnic-register 1.1-1vmw.500.0.0.434219 VMware 6/22/2011...ipmi-ipmi-devintf 39.1-4vmw.500.0.0.434219 VMware 6/22/2011...sata-sata-promise 2.12-3vmw.500.0.0.434219 VMware 6/22/2011...sata-sata-nv 3.5-3vmw.500.0.0.434219 VMware 6/22/2011...cisco-vem-v131-esx 4.2.1.1.3.24.0-3.0.8 Cisco 6/30/2011...Step 10
[vSphere PowerCLI] > Export-EsxImageProfile -ImageProfile n1kv-Image -FilePath
C:\n1kv-Image.zip -ExportToBundle.
Step 11
Note
[vSphere PowerCLI] > New-deployrule -item $img -name rule-test -Pattern
"mac=00:50:56:b6:03:c1"
[vSphere PowerCLI] > Add-DeployRule -DeployRule rule-testStep 12
[vSphere PowerCLI] > Get-DeployRuleSetName : rule-testPatternList : {mac=00:50:56:b6:03:c1}ItemList : {n1kv-Image}Step 13
The host contacts the Auto-Deploy server and presents the host boot parameters. The Auto Deploy server checks the rules to find the image profile associated with this host. The Auto Deploy server loads the image to the host's memory and the host boots from it.
Installing the VEM Software on an ESXi Stateless Host Using esxcli
The following procedure shows you how to install the VEM software by using the esxcli command.
Step 1
~ # vmware -vVMware ESXi 5.0.0 build-441354~ #~ # vmware -lVMware ESXi 5.0.0 GAStep 2
Step 3
~ # esxcli software vib install -d
/vmfs/volumes/newnfs/MN-VEM/VEM500-20110728153-BG-release.zip
Installation ResultMessage: WARNING: Only live system was updated, the change is not persistent.Reboot Required: falseVIBs Installed: Cisco_bootbank_cisco-vem-v131-esx_4.2.1.1.4.1.0-3.0.5VIBs Removed:VIBs Skipped:
Note
Step 4
~ # esxcli software vib list | grep ciscocisco-vem-v131-esx 4.2.1.1.4.1.0-3.0.5 Cisco PartnerSupported 2011-08-18Step 5
~ # vem status -vPackage vssnet-esxmn-ga-releaseVersion 4.2.1.1.4.1.0-3.0.5Build 5Date Thu Jul 28 01:37:10 PDT 2011Number of PassThru NICs are 0VEM modules are loadedSwitch Name Num Ports Used Ports Configured Ports MTU UplinksvSwitch0 128 4 128 1500 vmnic4Number of PassThru NICs are 0VEM Agent (vemdpa) is runningStep 6
~ # vemcmd show versionVEM Version: 4.2.1.1.4.1.0-3.0.5VSM Version:System Version: VMware ESXi 5.0.0 Releasebuild-441354Step 7
~ # vem version -vNumber of PassThru NICs are 0Running esx version -441354 x86_64VEM Version: 4.2.1.1.4.1.0-3.0.5VSM Version:System Version: VMware ESXi 5.0.0 Releasebuild-441354Step 8
Step 9
switch# show moduleMod Ports Module-Type Model Status--- ----- -------------------------------- ------------------ ------------1 0 Virtual Supervisor Module Nexus1000V active *2 0 Virtual Supervisor Module Nexus1000V ha-standby3 248 Virtual Ethernet Module NA okMod Sw Hw--- ---------------- ------------------------------------------------1 4.2(1)SV1(4b) 0.02 4.2(1)SV1(4b) 0.03 4.2(1)SV1(4b) VMware ESXi 5.0.0 Releasebuild-441354 (3.0)Mod MAC-Address(es) Serial-Num--- -------------------------------------- ----------1 00-19-07-6c-5a-a8 to 00-19-07-6c-62-a8 NA2 00-19-07-6c-5a-a8 to 00-19-07-6c-62-a8 NA3 02-00-0c-00-03-00 to 02-00-0c-00-03-80 NAMod Server-IP Server-UUID Server-Name--- --------------- ------------------------------------ --------------------1 10.104.62.227 NA NA2 10.104.62.227 NA NA3 10.104.62.216 3fa746d4-de2f-11de-bd5d-c47d4f7ca460 sans2-216.cisco.com
Uninstalling the VEM Software on an ESXi Stateless Host Using esxcli
The following procedure shows you how to uninstall the VEM software by using the esxcli command.
BEFORE YOU BEGIN
Before beginning this procedure, you must know or do the following:
•
–
–
–
· You are logged in to the ESXi host remotely by using secure shell (SSH).
Step 1
Step 2
~ # esxcli software vib remove -n cisco-vem-v131-esxRemoval ResultMessage: WARNING: Only live system was updated, the change is not persistent.Reboot Required: falseVIBs Installed:VIBs Removed: Cisco_bootbank_cisco-vem-v131-esx_4.2.1.1.4.1.0-3.0.5VIBs Skipped:
Note
Installing the VEM Software on an ESXi Stateless Host Using VUM
The following procedure shows you how to install the VEM software using VUM.
BEFORE YOU BEGIN
•
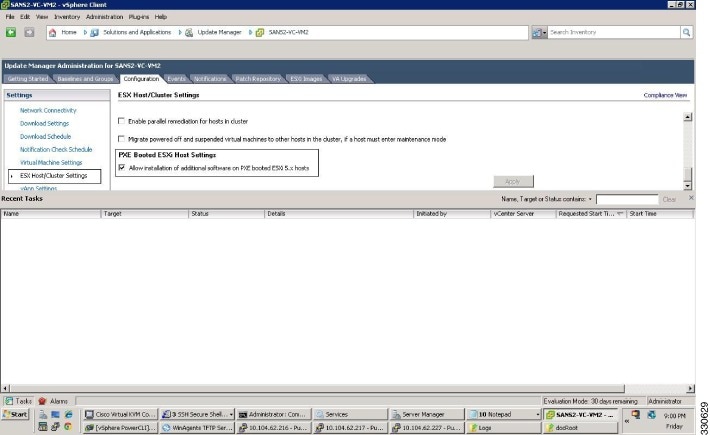
Step 1
The ESX Host/Cluster Settings window opens. See Figure 35.
Figure 35 ESX Host/Cluster Settings WIndow
Step 2
Step 3
Uninstalling the VEM Software on a Stateful Host
You can use this procedure to uninstall the Cisco Nexus 1000V software from a VEM.
BEFORE YOU BEGIN
Before beginning this procedure, you must know or do the following:
•
–
–
–
•
DETAILED STEPS
Step 1
•
•
Step 2
This command removes the software from the host, removes the kernel modules, and stops the VEM Agent on the running system.
Note
[root@fcs-cos2 ~]# vem-remove -dwatchdog-vemdpa: Terminating watchdog with PID 14574Module vem-v130-stun being unloaded..Module vem-v130-stun unloaded..Module vem-v130-vssnet being unloaded..Module vem-v130-vssnet unloaded..Module vem-v130-n1kv being unloaded..Module vem-v130-n1kv unloaded..Module vem-v130-l2device being unloaded..Module vem-v130-l2device unloaded..Removing CIsco VEM VIB from COS systemRemoving VIB cross_cisco-vem-v130-esx_4.2.1.1.3.9.0-1.11.3Removing cisco-vem-v130-esx ########################################################################################## # [100%]Running [/usr/sbin/vmkmod-install.sh]...ok.root@fcs-cos2 ~]#
Note
~ # vem-remove -dwatchdog-vemdpa: Terminating watchdog with PID 14574Module vem-v130-stun being unloaded..Module vem-v130-stun unloaded..Module vem-v130-vssnet being unloaded..Module vem-v130-vssnet unloaded..Module vem-v130-n1kv being unloaded..Module vem-v130-n1kv unloaded..Module vem-v130-l2device being unloaded..Module vem-v130-l2device unloaded..Removing CIsco VEM VIB from visor systemRemoving VIB cross_cisco-vem-v130-esx_4.2.1.1.3.9.0-1.11.3Removing cisco-vem-v130-esx ########################################################################################## # [100%]Running [/usr/sbin/vmkmod-install.sh]...ok.
Note
~ # esxcli software vib list | grep ciscocisco-vem-v140-esx 4.2.1.1.5.0.153-3.0.3 Cisco PartnerSupported 2011-10-21~ # esxcli software vib remove -n cisco-vem-v140-esx --maintenance-modeRemoval ResultMessage: Operation finished successfully.Reboot Required: falseVIBs Installed:VIBs Removed: Cisco_bootbank_cisco-vem-v140-esx_4.2.1.1.5.0.153-3.0.3VIBs Skipped:Step 3
[root@fcs-cos2 -]# esxupdate --vib-view query~ # esxupdate --vib-view query | grep cisco | grep retired------------------VIB ID------------------ Package State -----------Timestamp------------cross_cisco-vem-v130-4.2.1.1.3.12.0-2.0.3.vib retired 2009-07-02T15:26:45.994264-05:00root@fcs-cos2 -]#Step 4
•
•
You have completed this procedure.
Available Documents
This section lists the documents used with the Cisco Nexus 1000 and available on Cisco.com at the following url:
http://www.cisco.com/en/US/products/ps9902/tsd_products_support_series_home.html
General Information
Cisco Nexus 1000V Documentation Roadmap, Release 4.2(1)SV1(4a)
Cisco Nexus 1000V Release Notes, Release 4.2(1)SV1(4b)
Cisco Nexus 1000V Compatibility Information, Release 4.2(1)SV1(4b)
Cisco Nexus 1010 Management Software Release Notes, Release 4.2(1)SP1(4)
Install and Upgrade
Cisco Nexus 1000V Software Installation Guide, Release 4.2(1)SV1(4b)
Cisco Nexus 1000V Software Upgrade Guide, Release 4.2(1)SV1(4b)
Cisco Nexus 1000V VEM Software Installation and Upgrade Guide, Release 4.2(1)SV1(4b)
Cisco Nexus 1010 Virtual Services Appliance Hardware Installation Guide
Cisco Nexus 1010 Software Installation and Upgrade Guide, Release 4.2(1)SP1(4)
Configuration Guides
Cisco Nexus 1000V License Configuration Guide, Release 4.2(1)SV1(4a)
Cisco Nexus 1000V Getting Started Guide, Release 4.2(1)SV1(4b)
Cisco Nexus 1000V High Availability and Redundancy Configuration Guide, Release 4.2(1)SV1(4b)
Cisco Nexus 1000V Interface Configuration Guide, Release 4.2(1)SV1(4a)
Cisco Nexus 1000V Layer 2 Switching Configuration Guide, Release 4.2(1)SV1(4)
Cisco Nexus 1000V Port Profile Configuration Guide, Release 4.2(1)SV1(4a)
Cisco Nexus 1000V Quality of Service Configuration Guide, Release 4.2(1)SV1(4)
Cisco Nexus 1000V Security Configuration Guide, Release 4.2(1)SV1(4b)
Cisco Nexus 1000V System Management Configuration Guide, Release 4.2(1)SV1(4b)
Cisco Nexus 1010 Software Configuration Guide, Release 4.2(1)SP1(4)
Programming Guide
Cisco Nexus 1000V XML API User Guide, Release 4.2(1)SV1(4)
Reference Guides
Cisco Nexus 1000V Command Reference, Release 4.2(1)SV1(4)
Cisco Nexus 1000V MIB Quick Reference
Cisco Nexus 1010 Command Reference, Release 4.2(1)SP1(4)
Troubleshooting and Alerts
Cisco Nexus 1000V Troubleshooting Guide, Release 4.2(1)SV1(4a)
Cisco Nexus 1000V Password Recovery Guide
Cisco NX-OS System Messages Reference
Virtual Security Gateway Documentation
Cisco Virtual Security Gateway for Nexus 1000V Series Switch
Virtual Network Management Center
Cisco Virtual Network Management Center
Network Analysis Module Documentation
Cisco Prime Network Analysis Module Software Documentation Guide, 5.1
Cisco Prime Network Analysis Module (NAM) for Nexus 1010 Installation and Configuration Guide, 5.1
Cisco Prime Network Analysis Module Command Reference Guide 5.1
Cisco Prime Network Analysis Module Software 5.1 Release Notes
Cisco Prime Network Analysis Module Software 5.1 User Guide
Obtaining Documentation and Submitting a Service Request
For information on obtaining documentation, submitting a service request, and gathering additional information, see the monthly What's New in Cisco Product Documentation, which also lists all new and revised Cisco technical documentation, at:
http://www.cisco.com/en/US/docs/general/whatsnew/whatsnew.html
Subscribe to the What's New in Cisco Product Documentation as a Really Simple Syndication (RSS) feed and set content to be delivered directly to your desktop using a reader application. The RSS feeds are a free service and Cisco currently supports RSS Version 2.0.
This document is to be used in conjunction with the documents listed in the section.
Cisco and the Cisco logo are trademarks or registered trademarks of Cisco and/or its affiliates in the U.S. and other countries. To view a list of Cisco trademarks, go to this URL: www.cisco.com/go/trademarks. Third-party trademarks mentioned are the property of their respective owners. The use of the word partner does not imply a partnership relationship between Cisco and any other company. (1110R)
Internet Protocol (IP) addresses used in this document are for illustration only. Examples, command display output, and figures are for illustration only. If an actual IP address appears in this document, it is coincidental.
© 2009-2012 Cisco Systems, Inc. All rights reserved.
 Feedback
Contact Cisco
- Open a Support Case

- (Requires a Cisco Service Contract)