-
Cisco MDS 9000 Family Fabric Manager Configuration Guide, Release 3.4(1a)
-
Index
-
New and Changed Information
-
Preface
- Getting Started
- Installation and Switch Management
- Switch Configuration
-
Fabric Configuration
-
Configuring and Managing VSANs
-
SAN Device Virtualization
-
Creating Dynamic VSANs
-
Configuring Inter-VSAN Routing
-
Configuring and Managing Zones
-
Distributing Device Alias Services
-
Configuring Fibre Channel Routing Services and Protocols
-
Dense Wavelength Division Multiplexing
-
Managing FLOGI, Name Server, FDMI, and RSCN Databases
-
Discovering SCSI Targets
-
Configuring FICON
-
Advanced Features and Concepts
-
-
Security
-
Configuring FIPS
-
Configuring Users and Common Roles
-
Configuring SNMP
-
Configuring RADIUS and TACACS+
-
Configuring IPv4 Access Control Lists
-
Configuring Certificate Authorities and Digital Certificates
-
Configuring IPsec Network Security
-
Configuring FC-SP and DHCHAP
-
Configuring Port Security
-
Configuring Fabric Binding
-
- IP Services
- Intelligent Storage Services
- Network and Switch Monitoring
- Traffic Management
- Troubleshooting
-
Launching Fabric Manager in Cisco SAN-OS Releases Prior to 3.2(1)
-
Cisco Fabric Manager Unsupported Feature List
-
Interface Nonoperational Reason Codes
-
Managing Cisco FabricWare
-
Configuration Limits for Cisco MDS SAN-OS Release 3.1(x) and 3.2(x)
-
 Feedback
Table Of Contents
Installation of Cisco MDS SAN-OS and Fabric Manager
Starting a Switch in the Cisco MDS 9000 Family
Preparing to Configure the Switch
Configuring Out-of-Band Management
Configuring In-Band Management
Fabric Manager Server Proxy Services
Cisco MDS 9000 Switch Management
Storage Management Solutions Architecture
In-Band Management and Out-of-Band Management
Installing the Management Software
Upgrading Fabric Manager in Cisco SAN-OS Releases Prior to 3.1(2b)
Upgrading Fabric Manager in Cisco SAN-OS Releases 3.1(2b) and Later to 3.2(1)
Database Backup and Restore-Postgres
Importing PM Statitics Data to Fabric Manager
Creating Startup Files in Solaris
Creating FM/DM Shortcut Manually
Upgrading the Management Software
Integrating Cisco Fabric Manager with Other Management Tools
Running Fabric Manager Behind a Firewall
Uninstalling the Management Software
Installation of Cisco MDS SAN-OS and Fabric Manager
The Cisco Fabric Manager is a set of network management tools that supports Secure Simple Network Management Protocol version 3 (SNMPv3). It provides a graphical user interface (GUI) that displays real-time views of your network fabrics, and lets you manage the configuration of Cisco MDS 9000 Family devices and third-party switches.
This chapter contains the following sections:
•
Starting a Switch in the Cisco MDS 9000 Family
•
•
•
•
•
Starting a Switch in the Cisco MDS 9000 Family
The following procedure is a review of the tasks you should have completed during hardware installation, including starting up the switch. These tasks must be completed before you can configure the switch.
Note
Before you can configure a switch, follow these steps:
Step 1
•
•
Refer to the Cisco MDS 9000 Family Hardware Installation Guide (for the required product) for more information.
Tip
Step 2
•
•
•
•
Step 3
Initial Setup Routine
The first time that you access a switch in the Cisco MDS 9000 Family using the CLI, it runs a setup program that prompts you for the IP address and other configuration information necessary for the switch to communicate over the supervisor module Ethernet interface. This information is required to configure and manage the switch.
Note
Preparing to Configure the Switch
Before you configure a switch in the Cisco MDS 9000 Family for the first time, you need the following information:
•
–
–
•
•
•
–
–
•
•
•
•
•
•
Note
Note
Default Login
All Cisco MDS 9000 Family switches have the network administrator as a default user (admin). You cannot change the default user at any time (see the "Role-Based Authorization" section on page 39-1).
You must explicitly configure a strong password for any switch in the Cisco MDS 9000 Family. If a password is trivial (short, easy-to-decipher), your password configuration is rejected. Be sure to configure a strong password (see the "User Accounts" section on page 39-10). If you configure and subsequently forget this new password, you have the option to recover this password (see the "Recovering the Administrator Password" section on page 39-19).
Setup Options
The setup scenario differs based on the subnet to which you are adding the new switch. You must configure a Cisco MDS 9000 Family switch with an IP address to enable management connections from outside of the switch.
Note
•
•
Figure 2-1 Management Access to Switches
Assigning Setup Information
This section describes how to initially configure the switch for both out-of-band and in-band management.
Note
Tip
Configuring Out-of-Band Management
Note
To configure the switch for first time out-of-band access, follow these steps:
Step 1
Step 2
Enter the password for admin: 2004asdf*lkjh18
Tip
Step 3
This setup utility will guide you through the basic configuration of the system. Setup
configures only enough connectivity for management of the system.
Please register Cisco MDS 9000 Family devices promptly with your supplier. Failure to register may affect response times for initial service calls. MDS devices must be registered to receive entitled support services.Press Enter incase you want to skip any dialog. Use ctrl-c at anytime to skip away remaining dialogs.Would you like to enter the basic configuration dialog (yes/no): yesThe setup utility guides you through the basic configuration process. Press Ctrl-C at any prompt to end the configuration process.
Step 4
Enter the password for admin: adminStep 5
Create another login account (yes/no) [n]: yesWhile configuring your initial setup, you can create an additional user account (in the network-admin role) besides the administrator's account. See the "Role-Based Authorization" section on page 39-1 for information on default roles and permissions.
Note
a.
Enter the user login ID: user_nameb.
Enter the password for user_name: user-passwordStep 6
Configure SNMPv3 Management parameters (yes/no) [y]: yesa.
SNMPv3 user name [admin]: adminb.
SNMPv3 user authentication password: admin_passStep 7
Configure read-only SNMP community string (yes/no) [n]: yesa.
SNMP community string: snmp_communityStep 8
Note
Enter the switch name: switch_nameStep 9
Continue with Out-of-band (mgmt0) management configuration? [yes/no]: yesa.
Mgmt0 IP address: ip_addressb.
Mgmt0 IP netmask: subnet_maskStep 10
Configure the default-gateway: (yes/no) [y]: yesa.
IP address of the default-gateway: default_gatewayStep 11
Configure Advanced IP options (yes/no)? [n]: yesa.
Continue with in-band (VSAN1) management configuration? (yes/no) [no]: nob.
Enable the ip routing? (yes/no) [y]: yesc.
Configure static route: (yes/no) [y]: yesEnter the destination prefix.
Destination prefix: dest_prefixType the destination prefix mask.
Destination prefix mask: dest_maskType the next hop IP address.
Next hop ip address: next_hop_address
Note
d.
Configure the default network: (yes/no) [y]: yesEnter the default network IP address.
Note
Default network IP address [dest_prefix]: dest_prefixe.
Configure the DNS IP address? (yes/no) [y]: yesEnter the DNS IP address.
DNS IP address: name_serverf.
Configure the default domain name? (yes/no) [n]: yesEnter the default domain name.
Default domain name: domain_nameStep 12
Enable the telnet service? (yes/no) [y]: yesStep 13
Enabled SSH service? (yes/no) [n]: yesStep 14
Type the SSH key you would like to generate (dsa/rsa/rsa1)? dsaStep 15
Enter the number of key bits? (768 to 2048): 768Step 16
Configure NTP server? (yes/no) [n]: yesa.
NTP server IP address: ntp_server_IP_addressStep 17
Configure default switchport interface state (shut/noshut) [shut]: noshutStep 18
Configure default switchport trunk mode (on/off/auto) [on]: onStep 19
Configure default port-channel auto-create state (on/off) [off]: onStep 20
Configure default zone policy (permit/deny) [deny]: permitPermits traffic flow to all members of the default zone.
Step 21
Enable full zoneset distribution (yes/no) [n]: yesDisables the switch-wide default for the full zone set distribution feature.
You see the new configuration. Review and edit the configuration that you have just entered.
Step 22
The following configuration will be applied:username admin password admin_pass role network-adminusername user_name password user_pass role network-adminsnmp-server community snmp_community roswitchname switchinterface mgmt0ip address ip_address subnet_maskno shutdownip routingip route dest_prefix dest_mask dest_addressip default-network dest_prefixip default-gateway default_gatewayip name-server name_serverip domain-name domain_nametelnet server enablessh key dsa 768 forcessh server enablentp server ipaddr ntp_serversystem default switchport shutdownsystem default switchport trunk mode onsystem default port-channel auto-createzone default-zone permit vsan 1-4093zoneset distribute full vsan 1-4093Would you like to edit the configuration? (yes/no) [n]: noStep 23
Use this configuration and save it? (yes/no) [y]: yes
Caution
Configuring In-Band Management
The in-band management logical interface is VSAN 1. This management interface uses the Fibre Channel infrastructure to transport IP traffic. An interface for VSAN 1 is created on every switch in the fabric. Each switch should have its VSAN 1 interface configured with an IP address in the same subnetwork. A default route that points to the switch providing access to the IP network should be configured on every switch in the Fibre Channel fabric (see Chapter 1, "Configuring and Managing VSANs").
Note
To configure a switch for first time in-band access, follow these steps:
Step 1
Step 2
Enter the password for admin: 2004asdf*lkjh18
Tip
Step 3
This setup utility will guide you through the basic configuration of the system. Setup
configures only enough connectivity for management of the system.
Please register Cisco MDS 9000 Family devices promptly with your supplier. Failure to register may affect response times for initial service calls. MDS devices must be registered to receive entitled support services.Press Enter incase you want to skip any dialog. Use ctrl-c at anytime to skip away remaining dialogs.Would you like to enter the basic configuration dialog (yes/no): yesThe setup utility guides you through the basic configuration process. Press Ctrl-C at any prompt to end the configuration process.
Step 4
Create another login account (yes/no) [no]: noStep 5
a.
Configure read-only SNMP community string (yes/no) [n]: nob.
Configure read-only SNMP community string (yes/no) [n]: yesc.
SNMP community string: snmp_communityStep 6
Note
Enter the switch name: switch_nameStep 7
Continue with Out-of-band (mgmt0) management configuration? [yes/no]: noStep 8
Configure the default-gateway: (yes/no) [y]: yesa.
IP address of the default gateway: default_gatewayStep 9
Configure Advanced IP options (yes/no)? [n]: yesa.
Continue with in-band (VSAN1) management configuration? (yes/no) [no]: yesEnter the VSAN 1 IP address.
VSAN1 IP address: ip_addressEnter the subnet mask.
VSAN1 IP net mask: subnet_maskb.
Enable ip routing capabilities? (yes/no) [y]: noc.
Configure static route: (yes/no) [y]: nod.
Configure the default-network: (yes/no) [y]: noe.
Configure the DNS IP address? (yes/no) [y]: nof.
Configure the default domain name? (yes/no) [n]: noStep 10
Enable the telnet service? (yes/no) [y]: noStep 11
Enabled SSH service? (yes/no) [n]: yesStep 12
Type the SSH key you would like to generate (dsa/rsa/rsa1)? rsaStep 13
Enter the number of key bits? (768 to 1024): 1024Step 14
Configure NTP server? (yes/no) [n]: noStep 15
Configure default switchport interface state (shut/noshut) [shut]: shut
Note
Step 16
Configure default switchport trunk mode (on/off/auto) [off]: autoStep 17
Configure default port-channel auto-create state (on/off) [off]: offStep 18
Configure default zone policy (permit/deny) [deny]: denyDenies traffic flow to all members of the default zone.
Step 19
Enable full zoneset distribution (yes/no) [n]: noDisables the switch-wide default for the full zone set distribution feature.
You see the new configuration. Review and edit the configuration that you have just entered.
Step 20
The following configuration will be applied:username admin password admin_pass role network-adminsnmp-server community snmp_community rwswitchname switchinterface vsan1ip address ip_address subnet_maskno shutdownip default-gateway default_gatewayno telnet server enablessh key rsa 1024 forcessh server enableno system default switchport shutdownsystem default switchport trunk mode autono zone default-zone permit vsan 1-4093no zoneset distribute full vsan 1-4093Would you like to edit the configuration? (yes/no) [n]: noStep 21
Use this configuration and save it? (yes/no) [y]: yes
Caution
Using the setup Command
To make changes to the initial configuration at a later time, you can issue the setup command in EXEC mode.
switch# setup---- Basic System Configuration Dialog ----This setup utility will guide you through the basic configuration ofthe system. Setup configures only enough connectivity for managementof the system.*Note: setup always assumes a predefined defaults irrespectiveof the current system configuration when invoked from CLI.Press Enter incase you want to skip any dialog. Use ctrl-c at anytimeto skip away remaining dialogs.Would you like to enter the basic configuration dialog (yes/no): yesThe setup utility guides you through the basic configuration process.
Accessing the Switch
After initial configuration, you can access the switch in one of three ways (see Figure 2-2):
•
•
•
Figure 2-2 Switch Access Options
Where Do You Go Next?
After reviewing the default configuration, you can change it or perform other configuration or management tasks. The initial setup can only be performed at the CLI. However, you can continue to configure other software features, or access the switch after initial configuration by using either the CLI or the Device Manager and Fabric Manager applications.
To use the CLI, refer to the Cisco MDS 9000 Family CLI Configuration Guide.
About Cisco Fabric Manager
The Cisco Fabric Manager provides an alternative to the command-line interface (CLI) for most switch configuration commands. For information on using the CLI to configure a Cisco MDS 9000 Family switch, refer to the Cisco MDS 9000 Family CLI Configuration Guide or the Cisco MDS 9020 Switch Configuration Guide and Command Reference Guide. For details on managing switches running Cisco FabricWare, see the "Managing Cisco FabricWare with Fabric Manager" section on page D-3.
In addition to complete configuration and status monitoring capabilities for Cisco MDS 9000 switches, Fabric Manager provides powerful Fibre Channel troubleshooting tools. These in-depth health and configuration analysis capabilities leverage unique MDS 9000 switch capabilities: Fibre Channel Ping and Traceroute.
The Cisco Fabric Manager includes these management applications:
•
•
•
•
Fabric Manager Server
The Fabric Manager Server component must be started before running Fabric Manager. On a Windows PC, the Fabric Manager Server is installed as a service. This service can then be administered using the Windows Services in the Control Panel. Fabric Manager Server is responsible for discovery of the physical and logical fabric, and for listening for SNMP traps, syslog messages, and Performance Manager threshold events. For more information, see Chapter 3, "Fabric Manager Server."
Fabric Manager Client
The Fabric Manager Client component displays a map of your network fabrics, including Cisco MDS 9000 Family switches, third-party switches, hosts, and storage devices. The Fabric Manager Client provides multiple menus for accessing the features of the Fabric Manager Server. For more information, see Chapter 5, "Fabric Manager Client."
Fabric Manager Server Proxy Services
The Fabric Manager Client and Device Manager use SNMP to communicate with the Fabric Manager Server. In typical configurations, the Fabric Manager Server may be installed behind a firewall. The SNMP proxy service available in Cisco Fabric Manager Release 2.1(1a) or later provides a TCP-based transport proxy for these SNMP requests. The SNMP proxy service allows you to block all UDP traffic at the firewall and configure Fabric Manager Client to communicate over a configured TCP port.
Fabric Manager uses the CLI for managing some features on the switches. These management tasks are used by Fabric Manager and do not use the proxy services. Your firewall must remain open for CLI access for the following:
•
•
•
•
•
•
•
•
•
If you are using the SNMP proxy service and another application on your server is using port 9198, you need to modify your workstation settings.
Note
To modify a Windows workstation, follow these steps:
Step 1
You see the Internet Options dialog box.
Step 2
You see the LAN Settings dialog box.
Step 3
Step 4
Step 5
See the "Running Fabric Manager Behind a Firewall" section.
Device Manager
The Device Manager presents two views of a single switch.
•
•
Performance Manager
Performance Manager provides detailed traffic analysis by capturing data with SNMP. This data is compiled into various graphs and charts that can be viewed with any web browser. See Chapter 60, "Performance Monitoring."
Fabric Manager Web Server
The Fabric Manager Web Server allows operators to monitor and obtain reports for MDS events, performance, and inventory from a remote location using a web browser. For information on installing and using Fabric Manager Web Server, see Chapter 7, "Fabric Manager Web Server."
Cisco MDS 9000 Switch Management
The Cisco MDS 9000 Family of switches can be accessed and configured in many different ways and supports standard management protocols. Table 2-1 lists the management protocols that Fabric Manager supports to access, monitor, and configure the Cisco MDS 9000 Family of switches.
Storage Management Solutions Architecture
Management services required for the storage environment can be divided into five layers, with the bottom layer being closest to the physical storage network equipment, and the top layer managing the interface between applications and storage resources.
Of these five layers of storage network management, Cisco Fabric Manager provides tools for device (element) management and fabric management. In general, the Device Manager is most useful for device management (a single switch), while Fabric Manager is more efficient for performing fabric management operations involving multiple switches.
Tools for upper-layer management tasks can be provided by Cisco or by third-party storage and network management applications. The following summarizes the goals and function of each layer of storage network management:
•
•
•
•
•
In-Band Management and Out-of-Band Management
Cisco Fabric Manager requires an out-of-band (Ethernet) connection to at least one Cisco MDS 9000 Family switch. You need either mgmt0 or IP over Fibre Channel (IPFC) to manage the fabric.
mgmt0
The out-of-band management connection is a 10/100 Mbps Ethernet interface on the supervisor module, labeled mgmt0. The mgmt0 interface can be connected to a management network to access the switch through IP over Ethernet. You must connect to at least one Cisco MDS 9000 Family switch in the fabric through its Ethernet management port. You can then use this connection to manage the other switches using in-band (Fibre Channel) connectivity. Otherwise, you need to connect the mgmt0 port on each switch to your Ethernet network.
Each supervisor module has its own Ethernet connection; however, the two Ethernet connections in a redundant supervisor system operate in active or standby mode. The active supervisor module also hosts the active mgmt0 connection. When a failover event occurs to the standby supervisor module, the IP address and media access control (MAC) address of the active Ethernet connection are moved to the standby Ethernet connection.
IPFC
You can also manage switches on a Fibre Channel network using an in-band IP connection. The Cisco MDS 9000 Family supports RFC 2625 IP over Fibre Channel, which defines an encapsulation method to transport IP over a Fibre Channel network.
IPFC encapsulates IP packets into Fibre Channel frames so that management information can cross the Fibre Channel network without requiring a dedicated Ethernet connection to each switch. This feature allows you to build a completely in-band management solution.
Installing the Management Software
To install the software for the first time, or if you want to update or reinstall the software, access the supervisor module with a web browser. Click the Install links on the web page that is displayed. The software running on your workstation is verified to make sure you are running the most current version of the software. If it is not current, the most recent version is downloaded and installed on your workstation.
Note
Installation options include:
•
•
Note
Before You Install
Before you can access the Cisco Fabric Manager, you must complete the following tasks:
•
•
–
–
Cisco MDS SAN-OS Release 2.1(1a) or later supports AAA authentication using RADIUS, TACACS, or local SNMP users.
The Cisco Fabric Manager software executable files reside on each supervisor module of each Cisco MDS 9000 Family switch running Cisco MDS SAN-OS software in your network. The supervisor module provides an HTTP server that responds to browser requests and distributes the software to Windows or UNIX network management stations. You can also find Cisco Fabric Manager software on Cisco.com at the following website:
http://cisco.com/cgi-bin/tablebuild.pl/mds-fm
Supported Software
Note
Cisco Fabric Manager has been tested with the following software:
•
–
–
–
–
Table 2-2 VMWare Server
Windows 2000 SP4
Windows XP SP2
Windows 2000 SP4
Windows 2000 SP4
•
–
–
•
–
Note
–
–
•
–
–
–
•
–
–
–
–
–
–
Minimum Hardware Requirements
For a PC running Fabric Manager Server on large fabrics (1000 or more end devices), we recommend you use a Dual Core/Dual CPU high-speed system with 2 GB of RAM and 10 GB of free disk space.
Upgrading Fabric Manager in Cisco SAN-OS Releases Prior to 3.1(2b)
When you install Cisco SAN-OS 3.2(1), data is migrated from the Hypersonic HSQL database to either the PostgreSQL database or Oracle Database 10g Express during the installation. To install the PostgreSQL database on Windows, click the FM Installer link on the CD. To install Oracle Database 10g Express, follow the instructions in the "Installing Oracle" section.
Note
Upgrading Fabric Manager in Cisco SAN-OS Releases 3.1(2b) and Later to 3.2(1)
When you install Cisco SAN-OS 3.2(1), data is migrated from the Hypersonic HSQL database to either the PostgreSQL database or Oracle Database 10g Express during the installation. Data is also migrated from Oracle to Oracle.
Note
To install the PostgreSQL database on Windows, click the FM Installer link on the CD. To install Oracle Database 10g Express, follow the instructions in the "Installing Oracle" section.
Installing the Database
Before you install Fabric Manager, you must install a database. As of Cisco SAN-OS Release 3.1(2b), you can use Oracle Database 10g Express. Your other choice is PostgreSQL.Its a best practice to backup all the rrd file in $INSTALL/pm/db before upgrade.
Note
Installing Oracle
Note
Note
To install the Oracle database, follow these steps:
Step 1
http://www.oracle.com/technology/software/products/database/xe/index.html
Note
Step 2
Step 3
Step 4
C:\> cd c:\oraclexe\app\oracle\product\10.2.0\server\binC:\oraclexe\app\oracle\product\10.2.0\server\bin>sqlplus / as sysdbaSQL> exec dbms_xdb.sethttpport(8082);SQL> GRANT CONNECT,RESOURCE,UNLIMITED TABLESPACE TO SCOTT IDENTIFIED BYTIGER;SQL> EXIT;
Note
Note
Note
Installing PostgreSQL
Note
To install the PostgreSQL database on Windows, follow the instructions in the "Installing Fabric Manager" section.
Before installing PostgreSQL on Solaris 8, you might have to complete the following steps in order for PostgreSQL to install correctly:
Step 1
crle -c /var/ld/ld.config -l
/lib:/usr/lib/:/usr/local/lib:/{pg_install_dir}/usr/local/pgsql/lib:/{pg_install_dir}/usr/
local/lib
Step 2
set semsys:seminfo_semmni=512set semsys:seminfo_semmns=512Step 3
Step 4
./install.sh {pg_install_dir}
Note
Note
To install the PostgreSQL database on Solaris, follow these steps:
Step 1
cd /tmp/pginstall./install.shStep 2
Step 3
createuser -s -d -r -l -P -U postgres adminStep 4
Step 5
Step 6
Note
Increasing UDP Buffer Size
If the Fabric Manager SNMP packet log shows an SNMP VarBind decode error, the UDP buffer size is low and the buffer size needs to be increased.
To increase the UDP buffer size, do the following:
Step 1
ndd -set /dev/udp udp_recv_hiwat 65535ndd -set /dev/udp udp_xmit_hiwat 65535Step 2
set ndd:udp_recv_hiwat=65535set ndd:udp_xmit_hiwat=65535
Note
To install the PostgreSQL database on Linux, follow these steps:
Step 1
cd /tmp/pginstall./install.shStep 2
Step 3
createuser -s -d -r -l -P -U postgres adminStep 4
Step 5
The database user ID must be provided in the Fabric Manager Installer.
Step 6
/etc/init.d/postgresql [stop|start]Database Backup and Restore-Postgres
The Fabric Manager uses Postgres Database as the default database. The Fabric Manager backup utility uses Postgres pg_dump utility, to dump all database content to an ASCII dump file. Restore utility uses psql to re-create data using the dump file.
http://www.postgresql.org/docs/current/interactive/app-pgdump.html
Backup dump file represents a snapshot of database at the time of backup.
Backup
To perform a backup of the FM database, follow these command on Linux/Solaris. (assume INSTALLDIR is the top directory of Fabric Manager Installation). .
cd $INSTALLDIR/bin./pgbackup.sh 02252008.dataThe backup file 02252008.data will be created in $INSTALLDIR/bin directory. If you want to create it in a standard backup director provide the full path name of the dump file
Restore
To restore FM database, you must have a good backup file, and stop FMServer before restoration. Run restore, follow these commands on Linux Solaris. (assume INSTALLDIR is the top directory of Fabric Manager installation).
cd $INSTALLDIR/bin./FMServer.sh stop./pgrestore.sh 02252008.data./FMServer.sh startImporting PM Statitics Data to Fabric Manager
To manually import existing PM statistics data to Fabric Manager, follow these steps:
Step 1
Step 2
Step 3
Step 4
Step 5
The PM historic statistics shall be available on WebClient after an hour run.
Installing Fabric Manager
As of Cisco SAN-OS Release 3.2(1), Fabric Manager is no longer packaged with a Cisco MDS 9000 Family switch. You must install Fabric Manager from the CD-ROM or from Cisco.com.
Note
For switches running Cisco MDS 9000 FabricWare, you must install Fabric Manager from the CD-ROM included with your switch, or you can download Fabric Manager from Cisco.com.
To download the software from Cisco.com, go to the following website:
http://cisco.com/cgi-bin/tablebuild.pl/mds-fm
To install Fabric Manager on Solaris, follow these steps:
Step 1
Step 2
Step 3
Step 4
java -Xms512m-Xmx512m -jar m9000-fm-3.2.0.136 -jarStep 5
When you connect to the server for the first time, Fabric Manager checks to see if you have the correct Sun Java Virtual Machine version installed on your workstation. Fabric Manager looks for version 1.5(x) during installation. If required, install the Sun Java Virtual Machine software.
Note
Note
To install Fabric Manager on Windows, follow these steps:
Step 1
Step 2
Step 3
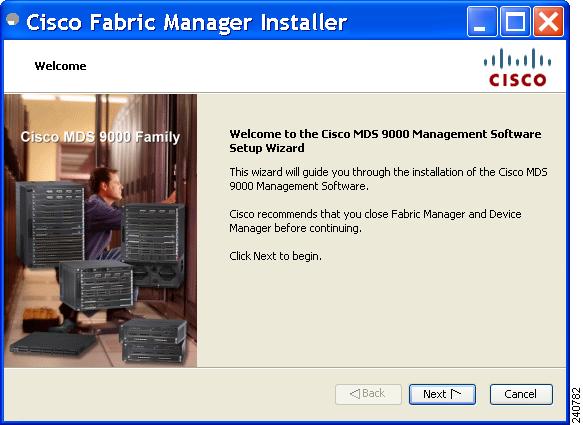
Step 4
You see the welcome to the management software setup wizard message in the Cisco Fabric Manager Installer window shown in Figure 2-3.
Figure 2-3 Welcome to the Management Software Setup Wizard
Step 5
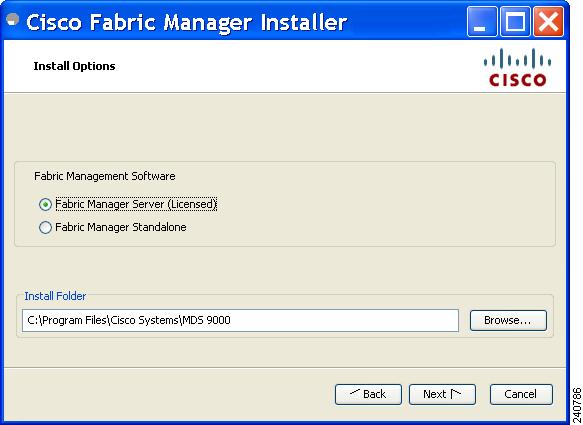
Step 6
You see the Install Options dialog box shown in Figure 2-4.
Figure 2-4 Install Options Dialog Box
Step 7
a.
b.
Note
Note
Step 8
Step 9
You see the Database Options dialog box shown in Figure 2-5.
Figure 2-5 Database Options Dialog Box
Step 10
If you choose Install PostgreSQL, accept the defaults and enter a password. The PostgreSQL database will be installed.
Note
Note
Step 11
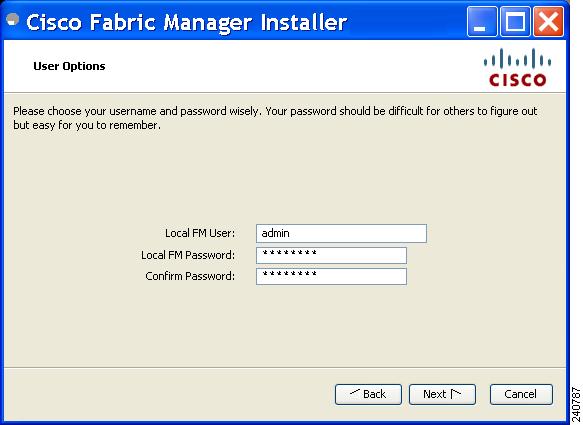
Step 12
You see the User Options dialog box shown in Figure 2-6.
Figure 2-6 User Options Dialog Box
Step 13
You see the Authentication Options dialog box shown in Figure 2-7.
Figure 2-7 Authentication Options Dialog Box
Step 14
Note
Step 15
You see the Configuration Options dialog box for Fabric Manager Standalone shown in Figure 2-8.
Figure 2-8 Configuration Options Dialog Box for Fabric Manager Standalone
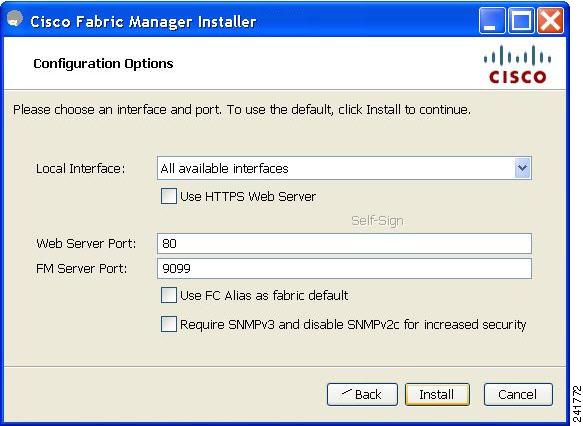
Step 16
You see the Configuration Options dialog box for Fabric Manager Server shown in Figure 2-9.
Figure 2-9 Configuration Options Dialog Box for Fabric Manager Server
Step 17
Note
Note
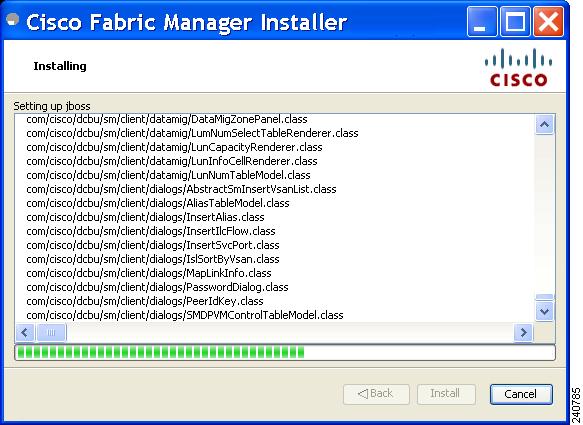
Note
Note
Figure 2-10 Progress of Installation
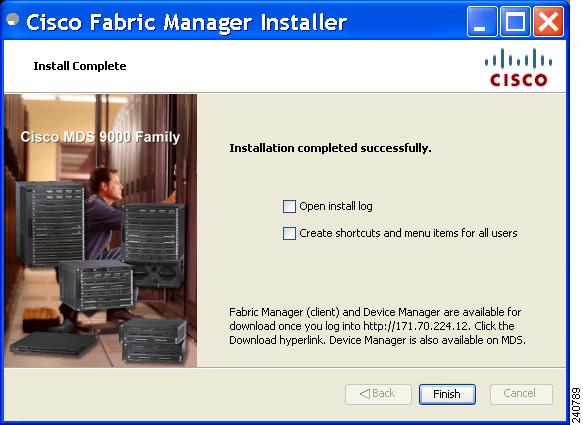
Once the installation is finished, you see an installation completed message in the Cisco Fabric Manager Installer window shown in Figure 2-11.
Figure 2-11 Install Complete
Note
Step 18
If you installed Fabric Manager Server, icons for Fabric Manager and Device Manager are not created on the desktop until you launch Fabric Manager Client. Follow the instructions in the "Launching Fabric Manager Client in Cisco SAN-OS Release 3.2(1) and Later" section on page 5-2 to launch Fabric Manager Client.
If you checked the Create shortcuts check box, a Cisco MDS 9000 program group is created under Start > Programs on Windows. This program group contains shortcuts to batch files in the install directory. Three services are started: Fabric Manager Server, Database, and Web Server. The Performance Manager server is installed but the service is not started upon installation, as certain setup steps must be completed first.
On a UNIX (Solaris or Linux) machine, shell scripts are created in the install directory. The shell scripts that run the programs equivalent to the Windows services are: FMServer.sh, All server-side data and Performance Manager data are stored in the install directory.
Fabric Manager Client cannot run without Fabric Manager Server. The server component is downloaded and installed when you download and install Fabric Manager. On a Windows machine you install the Fabric Manager Server as a service. This service can then be administered using Services in the Microsoft Windows Control Panel. The default setting for the Fabric Manager Server service is that the server is automatically started when the machine is rebooted. You can change this behavior by modifying the properties in Services.
Creating Startup Files in Solaris
The Postgre SQL and Fabric Manager does not automatically start-up in Solaris after the installation. The init files should be created in /etc/init.d, and the following commands should be included in the files.
To start Postgre SQL and FM:
•
•
To stop Postgre SQL and FM:
•
•
Installing Device Manager
To install Device Manager on your workstation, follow these steps:
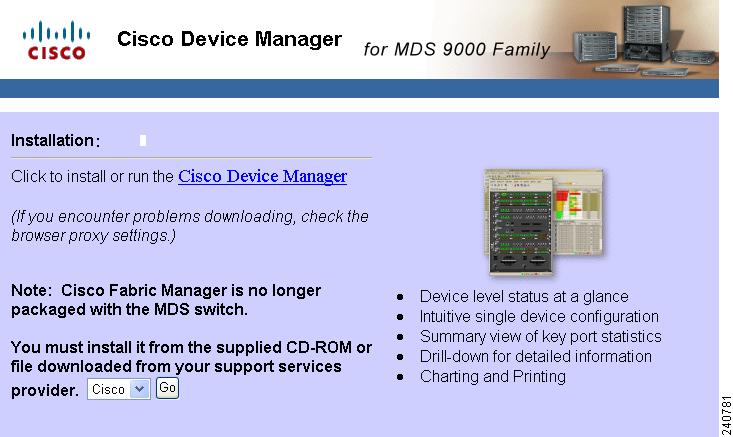
Step 1
You see the Installation window for Device Manager shown in Figure 2-12.
Figure 2-12 Device Manager Installation Window
Step 2
You see the welcome to the management software setup wizard message in the Cisco Device Manager Installer window shown in Figure 2-13.
Figure 2-13 Welcome to the Management Software Setup Wizard Window
Step 3
Step 4
Step 5
Step 6
You see the installation progress in the Cisco Device Manager Installer window shown in Figure 2-14.
Figure 2-14 Progress of Installation
Once the installation is finished, you see an installation completed message in the Cisco Device Manager Installer window shown in Figure 2-15.
Figure 2-15 Install Complete
Step 7
Creating FM/DM Shortcut Manually
The FM/DM shortcut on the desktop is available only when launching the application for the first time. Also, the shortcut is not offered when you lauche Fabric Manager from the FM download page.
To create FM/DM shortcut on desktop follow these steps:
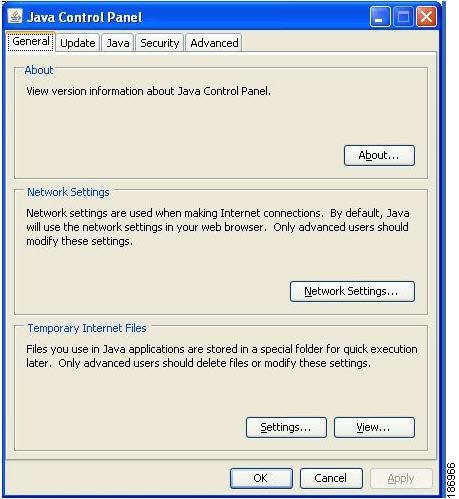
Step 1
Double click Java.
The Java Control Panel displays as shown in the Figure 2-16
Figure 2-16 Java Control Panel Dialog Box
Step 2
The Java Cache Viewer dialog box displays..
Figure 2-17 Java Cache Viewer Dialog Box
Step 3
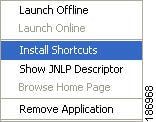
Figure 2-18 Shortcut Menu
Upgrading the Management Software
If you log into a switch running Cisco MDS SAN-OS with Device Manager and that switch has a later version of the management software, you are prompted to install the later version. To upgrade the Cisco MDS Fabric Manager software, follow the instructions described in the "Installing the Management Software" section. You can also upgrade Device Manager at any time by entering the IP address or host name of the supervisor module with the later version of software in the Address field of your browser. You will need a new CD to upgrade Fabric Manager.
Note
Upgrading Fabric Manager Server and Fabric Manager Standalone Version Using the Fabric Manager Update Installer
As of Release 3.3.1a, the Cisco MDS 9000 Fabric Manager Update Installer can be used to:
•
•
The Fabric Manager Update Installer is smaller in size than the larger Fabric Manager installer which makes it easier to download. It has limited capability to upgrade Fabric Manager Server or the Fabric Manager Standalone version and it does not have the capability to install a database or the Fabric Manager Server infrastructure (JBoss). Table 2-3 shows the recommended Fabric Manager upgrade paths.
Table 2-3 Fabric Manager Upgrade Path using java -Xmx512m -jar jar_file_name
3.0(x)1
3.3(1a) or above
1.
2.
3.
Note
3.1(x)1
3.3(1a) or above
1.
2.
Note
3.2(x)
3.3(1a) or above
1.
Note
1 The gateway upgrade needs to be performed as the HSQL database data cannot be migrated to the new database.
Integrating Cisco Fabric Manager with Other Management Tools
You can use Fabric Manager, Device Manager, and Performance Manager with other management tools. Here is a brief description of these tools. For more information on these tools and how they work together with the Cisco Fabric Manager management applications, see Chapter 68, "Troubleshooting Your Fabric."
•
•
•
Running Fabric Manager Behind a Firewall
For Windows PCs running Fabric Manager, Device Manager, and Performance Manager behind a firewall, certain ports need to be available.
By default, Fabric Manager Client and Device Manager use the first available UDP port for sending and receiving SNMP responses. The UDP SNMP trap local ports are 1162 for Fabric Manager, and 1163 or 1164 for Device Manager. Fabric Manager Server also opens TCP RMI port 9099.
In Fabric Manager Release 2.1(2) or later, you can select the UDP port that Fabric Manager Client or Device Manager uses for SNMP responses by uncommenting the following statement:
•
rem JVMARGS=%JVMARGS% -Dsnmp.localport=9001•
# JVMARGS=$JVMARGS -Dsnmp.localport=9001In Fabric Manager Release 3.2(1) or later, Fabric Manager Client initiates communication with Fabric Manager Server on the port 9099 for Java Naming Directory and Interface (JNDI) lookup. Fabric Manager Server redirects client to 1098 and JBoss directs the request to the appropriate service.
Fabric Manager Server proxy services uses a configurable TCP port (9198 by default) for SNMP communications between the Fabric Manager Client or Device Manager and Fabric Manager Server.
The Fabric Manager Server component requires two predictable TCP ports to be opened on the firewall for an incoming connection:
•
•
As long as these two ports are open, Fabric Manager Client can connect to the server. Other TCP ports connected to Fabric Manager Client are initiated by the server, which is behind the firewall.
The following table lists all ports used by Fabric Manager applications:
Uninstalling the Management Software
To uninstall the Fabric Manager applications on a Windows PC, follow these steps:
Step 1
Step 2
You can also run the batch file (located in the C:\Program Files\Cisco Systems\MDS 9000 folder by default) directly from the command line.
Note
On a Windows PC, this folder is created under the Documents and Settings folder (for example, d:\Documents and Settings\Administrator\.cisco_mds9000 if you had installed it as user Administrator). On a UNIX machine, the default installation folder is /usr/bin.
Note
To uninstall the Fabric Manager applications on a UNIX machine, follow these steps:
Step 1
$HOME/cisco_mds9000/Uninstall.sh or /usr/local/cisco_mds9000/uninstall.sh, depending on where Fabric Manager was installed.Step 2
$HOME/.cisco_mds9000/Uninstall.sh or /usr/local/.cisco_mds9000/uninstall.sh, depending on where Fabric Manager was installed.Step 3