Downloads |
 Feedback Feedback
|
Table Of Contents
CS-MARS FIPS PCI CARD Quick Install
Procedure for Installing the FIPS Card
Procedure to Initialize the FIPS Card
CS-MARS FIPS PCI CARD Quick Install
Published: October 7, 2009This document ships with the Cisco Security MARS FIPS PCI Card, part number CS-MARS-FIPS-K9=, which can be installed only in the Cisco Security MARS 110R running software release 6.0.5.
FIPS Card Overview
The Cisco Security MARS FIPS PCI Card is also called the FIPS Card in this document.
With the FIPS Card installed and initialized, the CS-MARS is Federal Information Processing Standards (FIPS) 140-2 Level-2 compliant. The FIPS Card itself is certified at FIPS 140-2 Level-3.
The FIPS Card is an 8-lane PCI-Express-based host bus adapter (HBA) that combines IPsec and SSL cryptographic acceleration with hardware security module (HSM) features. It implements most of the cryptographic functions used by SSL/TLS and SSH processing. All crytographic functions of CS-MARS SSH, SSL, TLS, and Java Security operations are offloaded to the FIPS Card.
When the FIPS PCI Card is installed and intialized in a CS-MARS-110R, the MARS model becomes a CS-MARS-110RF.
The Smart Card Reader and Smart Cards shipped with the FIPS PCI Card are used in the initialization procedure, but neither play a role in any subsequent MARS 110RF operations, except reinitializing FIPS.
All CS-MARS-110RF Local Controller operations are identical to CS-MARS-110R Local Controller operations, except for the sslcert CLI command. After generating a new security certificate for the CS-MARS-110RF with the ssllcert command, you must reboot.
Important Note
After enabling the FIPS on on a Windows XP system, the user interface on a CS-MARS-110R running csmars-6.0.5.3361-FIPS becomes significantly slower. Enabling the Windows XP Local Security Policy: "System cryptography: Use FIPS compliant algorithms for encryption, hashing, and signing" causes the delay in managing CS-MARS with a FIPS Card.
You can opt to use Windows 7 or Vista to avoid this issue. Alternatively, you can disable the FIPS setting in Windows XP. (CS-MARS will still enforce the https connection to use FIPS compliant crypto suites.)
Restrictions
The following restrictions for the MARS 110RF are valid as of the date of this document:
•
Cannot interoperate with a CS-MARS Global Controller
•
Shipping Contents
The following items are shipped with the CS-MARS-FIPS-K9= :
•
•
•
•
•
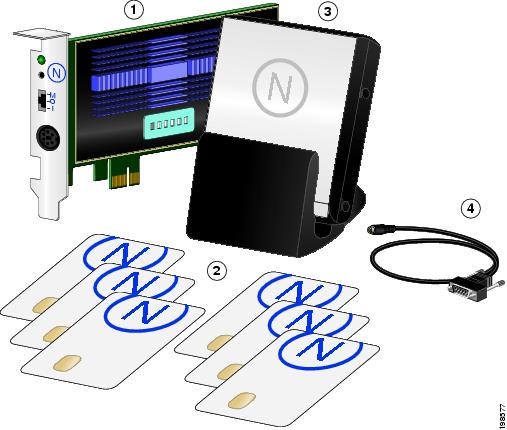
Figure 1 CS-MARS-110RF-K9 Hardware Contents
CS-MARS FIPS PCI Card
Smart Card Reader
Smart Cards
Mini-DIN to DB-9 adapter cable
(connects FIPS Card to Card Reader)
Figure 2 FIPS Card Panel Description
Procedure for Installing the FIPS Card
The FIPS PCI Card installation procedure can be summarized as follows:
1.
2.
3.
4.
5.
6.
7.
8.
Note
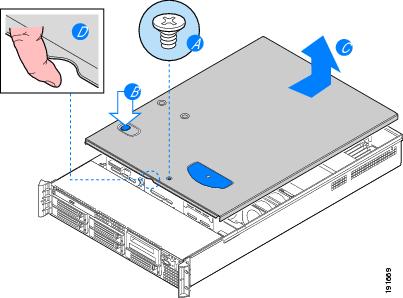
Remove the Chassis Cover
Step 1
Review the Regulatory Compliance and Safety Information for the Cisco Security MARS Appliances, 25R, 25, 55, 110R, 110, 210, GC2R, and GC2 available at the following URL:
http://www.cisco.com/en/US/docs/security/security_management/cs-mars/6.0/regulatory/compliance/rcsi_mars_gen2.htmlStep 2
Step 3
Step 4
Figure 3 Removing the MARS Appliance Cover
a.
b.
c.
d.
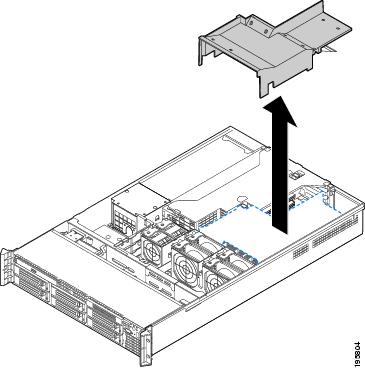
Remove the Processor Air Duct
Always operate your MARS Appliance with the processor air duct in place. The air duct is required for proper airflow within the system.
Step 5
Figure 4 Removing the Processor Air Duct
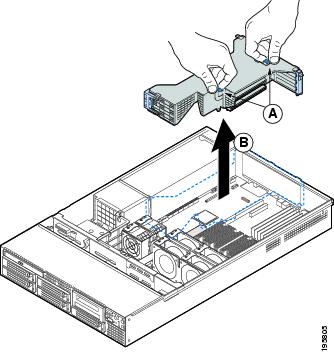
Remove the PCI Riser Assembly
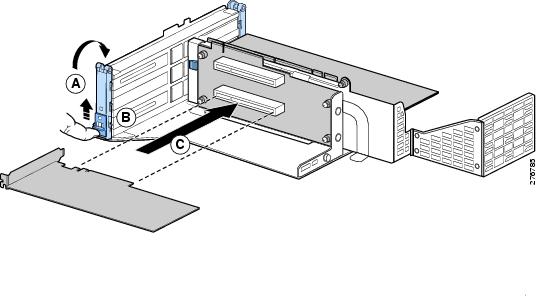
Step 6
Figure 5 Removing PCI Riser Assembly
a.
b.
Install the CS-MARS FIPS Card
Step 7
The PCI Riser assembly has two sides, one side has three Full-height PCI Card slots, two of which are populated. The other side has two Low-profile PCI card slots. Both Low-profile PCI slots are empty.
Note
Warning
Figure 6 Installing the FIPS Card in the PCI Riser Assembly
a.
b.
c.
Step 8
Note
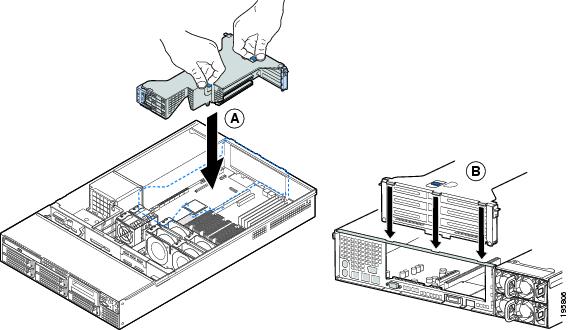
Replacing the PCI Riser Assembly
Step 9
Figure 7 Replacing the PCI Riser Assembly
a.
b.
Step 10
Replace the Processor Air Duct
Step 11
Replace the Chassis Cover
Step 12
MARS Appliance sidewalls.Step 13
Step 14
Step 15
Step 16
Step 17
Procedure to Initialize the FIPS Card
General considerations when initializing the FIPS Card are as follows:
•
•
•
Step 1
Step 2
Step 3
[pnadmin]$ show inventoryNAME: "Chassis", DESCR: "CS-MARS-110 Local Controller"PID: CS-MARS-110, VID: V01, SN: M1100000011FIPS HSM: nCipher nShield 500e, SN: 4F06-81E7-8838<snip>Step 4
[pnadmin]$ version6.0.5 (3351) 34
Note
http://www.cisco.com/en/US/docs/security/security_management/cs-mars/6.0/release/notes/rnote605.html#wp37930Step 5
[pnadmin]$ fips initFIPS init will initialize the FIPS card and cause the system to reboot.Do you want to proceed?The MARS appliance prompts you to insert a Smart Card into the Card Reader
Insert/change card in module (or change module mode)Step 6
Note
You are prompted to enter another Smart Card.
Step 7
Card writing complete.security world generated on module #1; hknso = 7b40de6d7fcebec5cce73a750508d055bf9ff1ffSwitch to "O" mode and press ENTERStep 8
The FIPS Card is initialized.FIPS Card has been initialized successfully. Press Enter to reboot the machine.Step 9
Step 10
[pnadmin]$ fips statusServer:enquiry reply flags noneenquiry reply level Sixserial number 4F06-81E7-8838mode operationalversion 2.36.16<snip . . .)Module #1:enquiry reply flags noneenquiry reply level Sixserial number 4F06-81E7-8838mode operationalversion 2.33.82<snip . . .)
Note
Step 11
(FIPS 140-2 Level-2 compliant MARS Appliance).pnadmin]$ modelCS-MARS-110RFEnd of Procedure
Related Documentation
Cisco Security MARS Command Reference, 6.X
http://www.cisco.com/en/US/docs/security/security_management/cs-mars/6.0/command/reference/cref1.html#wp1166676Regulatory Compliance and Safety Information for the Cisco Security MARS Appliances, 25R, 25, 55, 110R, 110, 210, GC2R, and GC2
This document is to be used in conjunction with the documents listed in the "Related Documentation" section.
CCDE, CCENT, CCSI, Cisco Eos, Cisco HealthPresence, Cisco IronPort, the Cisco logo, Cisco Nurse Connect, Cisco Pulse, Cisco SensorBase, Cisco StackPower, Cisco StadiumVision, Cisco TelePresence, Cisco Unified Computing System, Cisco WebEx, DCE, Flip Channels, Flip for Good, Flip Mino, Flipshare (Design), Flip Ultra, Flip Video, Flip Video (Design), Instant Broadband, and Welcome to the Human Network are trademarks; Changing the Way We Work, Live, Play, and Learn, Cisco Capital, Cisco Capital (Design), Cisco:Financed (Stylized), Cisco Store, Flip Gift Card, and One Million Acts of Green are service marks; and Access Registrar, Aironet, AllTouch, AsyncOS, Bringing the Meeting To You, Catalyst, CCDA, CCDP, CCIE, CCIP, CCNA, CCNP, CCSP, CCVP, Cisco, the Cisco Certified Internetwork Expert logo, Cisco IOS, Cisco Lumin, Cisco Nexus, Cisco Press, Cisco Systems, Cisco Systems Capital, the Cisco Systems logo, Cisco Unity, Collaboration Without Limitation, Continuum, EtherFast, EtherSwitch, Event Center, Explorer, Follow Me Browsing, GainMaker, iLYNX, IOS, iPhone, IronPort, the IronPort logo, Laser Link, LightStream, Linksys, MeetingPlace, MeetingPlace Chime Sound, MGX, Networkers, Networking Academy, PCNow, PIX, PowerKEY, PowerPanels, PowerTV, PowerTV (Design), PowerVu, Prisma, ProConnect, ROSA, SenderBase, SMARTnet, Spectrum Expert, StackWise, WebEx, and the WebEx logo are registered trademarks of Cisco Systems, Inc. and/or its affiliates in the United States and certain other countries.
All other trademarks mentioned in this document or website are the property of their respective owners. The use of the word partner does not imply a partnership relationship between Cisco and any other company. (0910R)
Any Internet Protocol (IP) addresses and phone numbers used in this document are not intended to be actual addresses and phone numbers. Any examples, command display output, network topology diagrams, and other figures included in the document are shown for illustrative purposes only. Any use of actual IP addresses or phone numbers in illustrative content is unintentional and coincidental.
© 2009 Cisco Systems, Inc. All rights reserved.