-
Cisco NAC Appliance - Clean Access Server Installation and Configuration Guide, Release 4.6(1)
-
About This Guide
-
Introduction
-
Planning Your Deployment
-
Configuring Layer 3 Out-of-Band
-
Installing the Clean Access Server NAC Appliance
-
Configuring the CAS Managed Network
-
Configuring DHCP
-
Integrating with Cisco VPN Concentrators
-
Local Traffic Control Policies
-
Configuring Active Directory Single Sign-On
-
Local Authentication Settings
-
Local Certified and Floating Devices
-
Administering the CAS
-
Configuring High Availability
-
Open Source License Acknowledgements
-
Index
-
Table Of Contents
Administering CAS Certificates, Time, and Support Logs
Clean Access Server Direct Access Web Console
Web Console Pages for SSL Certificate Management
Certificates for High Availability (HA) Pairs
Regenerating Certificates for DNS Name Instead of IP
Typical SSL Certificate Setup on the CAS
Phase 1: Establish SSL Communication Between the CAS and CAM
Phase 2: Set Up Your CAS and CAM For Production Deployment
Phase 3: Adding a New CAM or CAS to an Existing Production Deployment
Generate Temporary Certificate
Generate and Export a Certification Request
Manage Signed Certificate/Private Key
Import Signed Certificate/Private Key
Export Certificate and/or Private Key
Manage Trusted Certificate Authorities
Import/Export Trusted Certificate Authorities
View Current Private Key/Certificate and Certificate Authority Information
SSL Requirements for Mac OS X/CAS Communication
CAS Temporary Certificate Requirements for SSL Connection to Mac OS X Agent
Installing the Root Certificate for Mac OS 10.4.x
Installing the Root Certificate for Mac OS 10.5
Enable the Root User on Mac OS X
Obtaining the Root Certificate from the CAS
Troubleshooting Certificate Issues
CAS Cannot Establish Secure Connection to CAM
Private Key in Clean Access Server Does Not Match the CA-Signed Certificate
Support Logs and LogLevel Settings
Administering CAS Certificates, Time, and Support Logs
This chapter describes Clean Access Server (CAS) administration. Topics include:
•
Clean Access Server Direct Access Web Console
•
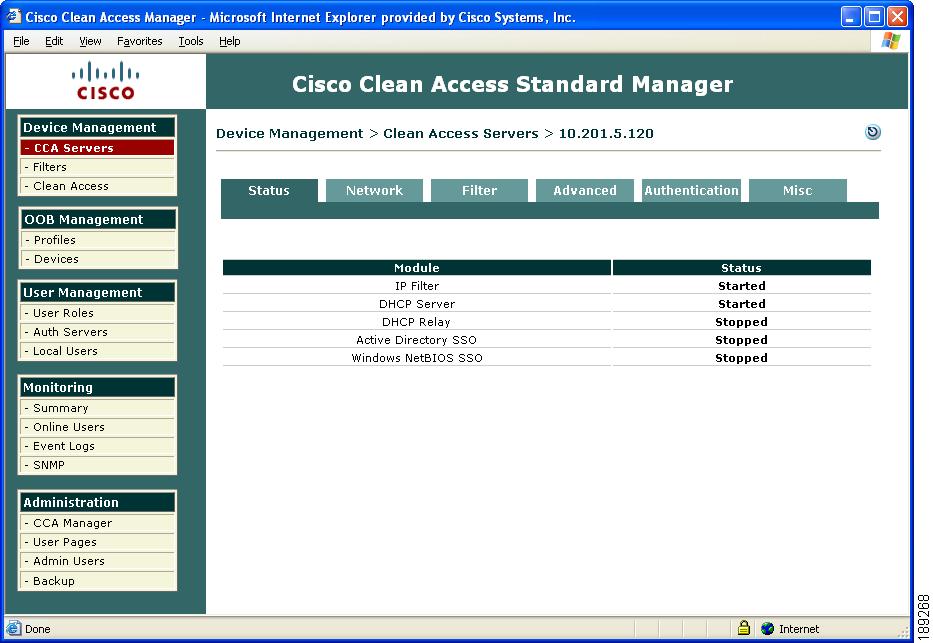
Status Tab
The Status tab of the CAS management pages displays high-level status information on which modules are running in the Clean Access Server.
Figure 12-1 CAS Management Pages Status Tab
•
•
•
•
•
•
Clean Access Server Direct Access Web Console
The CAS management pages of the CAM web admin console (Figure 12-1) are the primary configuration interface for the Clean Access Server(s). However, each Clean Access Server has its own web admin console that allows configuration of certain limited Administration and Monitoring settings directly on the CAS (Figure 12-4). The CAS direct access web console is primarily used to download CAS support logs or r configure pairs of Clean Access Servers for High Availability. See Chapter 13, "Configuring High Availability (HA)" for details. If the CAS management pages become unavailable, you can also use the direct console interface for other functions such as managing SSL certificates for the CAS or performing system upgrade.
To access the Clean Access Server's direct access web admin console:
Step 1
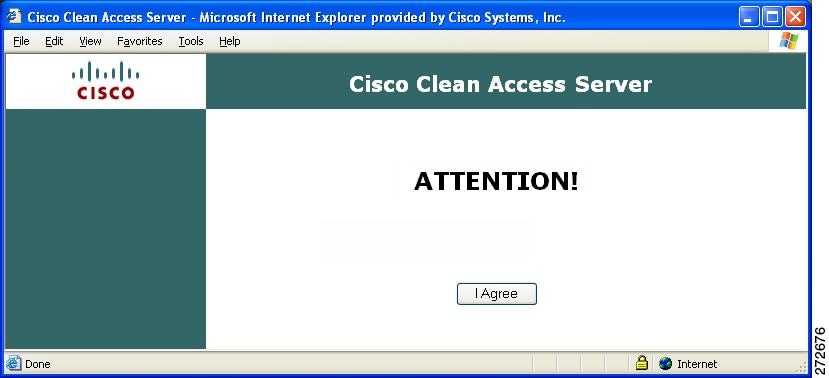
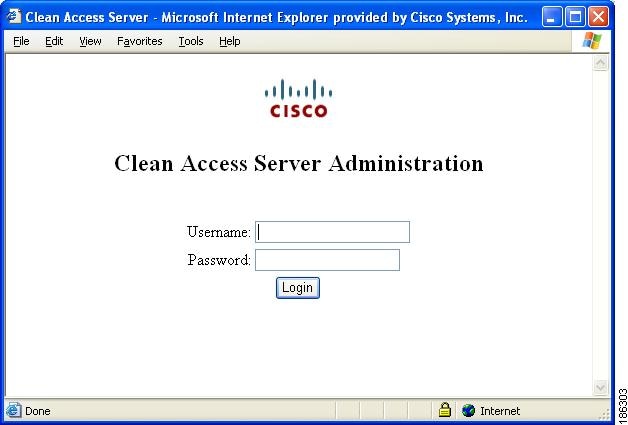
If you have chosen to enable the customizable Pre-login Banner for the CAS during initial configuration, the CAS admin web console displays in introductory Pre-login Banner (Figure 12-2). Otherwise, the CAS administrator credential entry page (Figure 12-3) appears.
Figure 12-2 CAS Pre-Login Banner Example
The Pre-login Banner enables you to present a broad range of messages, including warnings, system/network status, access requirements, etc., to administrator users before they enter authentication credentials in the CAM/CAS. Administrators can specify the text of the Pre-login Banner by enabling this feature on the appliance, logging into the command-line console, and editing the /root/banner.pre file. The text of the Pre-login Banner appears in both the web console interface and the command-line interface when admin users are logging into the CAM/CAS.
You can enable or disable the Pre-login Banner during the initial CAM/CAS configuration CLI session and whenever you choose to alter your base CAM/CAS configuration with the service perfigo config CLI command.
Figure 12-3 CAS Direct Access Web Admin Console Login Page
Step 2
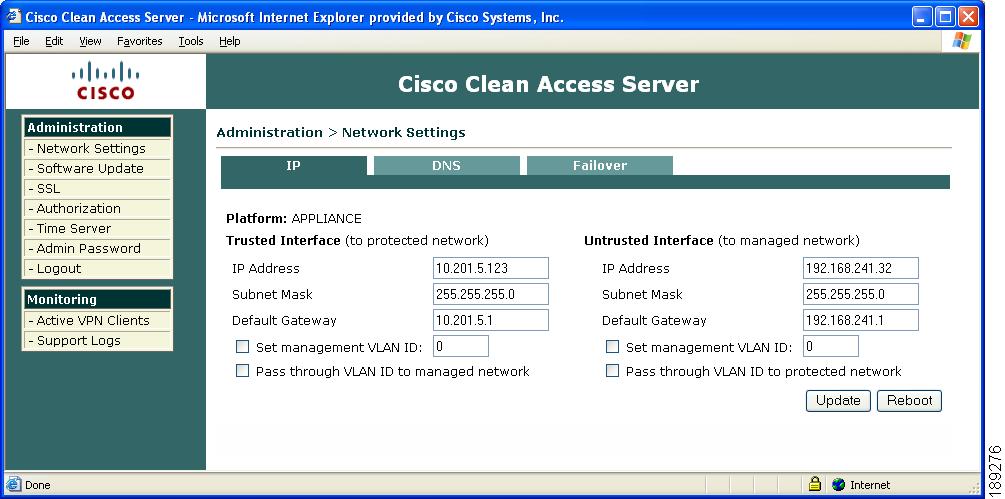
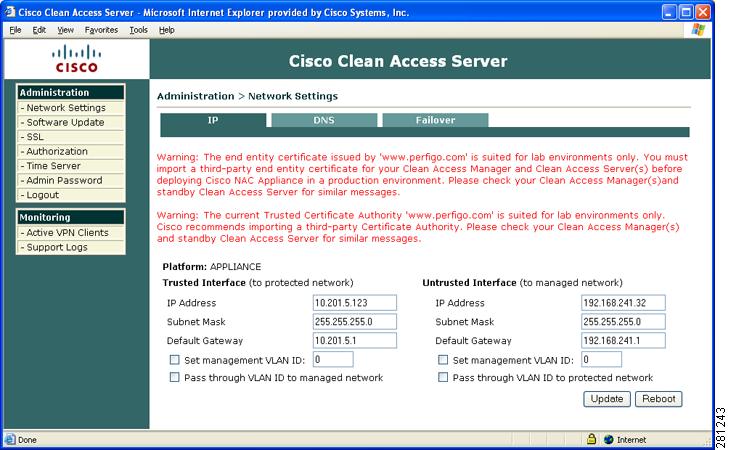
Figure 12-4 CAS Direct Access Web Admin Console—Cisco NAC-3300 Series
Note
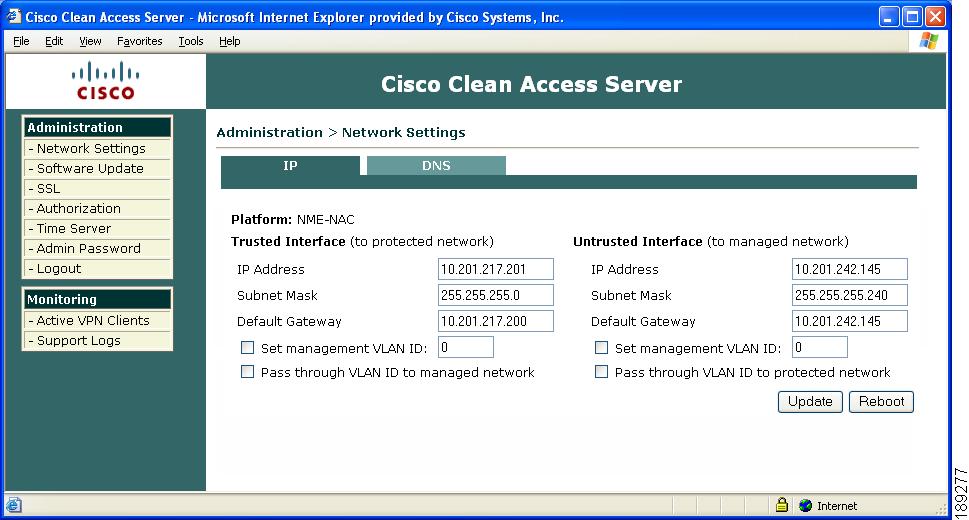
Figure 12-5 CAS Direct Access Web Admin Console—Cisco NAC Network Module
Note
•
Note that almost all of the settings in the CAS web console can be configured via the CAS management pages in the CAM web admin console, with the exception of the Failover, SSL, Admin Password, and Support Logs. The CAS direct access web console provides the following Administration pages for the local CAS:
•
•
•
•
•
The Monitoring module of the CAS direct access console provides the following pages:
•
•
Note
Manage CAS SSL Certificates
This section describes the following:
•
•
•
•
•
•
•
•
SSL Certificate Overview
The elements of Cisco NAC Appliance communicate securely over Secure Socket Layer (SSL) connections. Cisco NAC Appliance uses SSL connections for a number of purposes, including the following:
•
•
•
•
•
During installation, the configuration utility script for both the CAM and CAS requires you to generate a temporary SSL certificate for the appliance being installed (CAM or CAS). A corresponding Private Key is also generated with the temporary certificate.
For the Clean Access Manager and Clean Access Servers operating strictly in a lab environment, it is not necessary to use a CA-signed certificate and you can continue to use a temporary certificate, if desired. For security reasons in a production deployment, however, you must replace the temporary certificate for the CAM and CAS with a third-party CA-signed SSL certificate.
For details on managing SSL certificates for the CAM, see the Cisco NAC Appliance - Clean Access Manager Installation and Configuration Guide, Release 4.6(1).
Note
This Overview section discusses the following topics:
•
•
•
Web Console Pages for SSL Certificate Management
CAM SSL certificate files are kept on the CAM machine, and CAS SSL certificate files are kept on the CAS machine. The CAS certificate can be managed from:
•
•
•
For additional web console access information, refer to Clean Access Server Direct Access Web Console.
Note
CA-Signed Certificates
The CAS SSL certificate is used for communication between the CAS and the user's web browser and/or Agent, and for communication between the CAM and CAS. In a production deployment, you must replace the temporary certificate for the Clean Access Server with a third-party CA-signed SSL certificate. Cisco NAC Appliance provides a tool to generate and export a Certificate Signing Request (CSR) that you can send to your Certificate Authority on the Administration > SSL > X509 Certification Request page. The following reasons highlight the need to obtain and import a third-party CA-signed certificate on the CAS:
•
•
Note
•
•
•
•
Note
Figure 12-6 Administrator Web Console Messages Warning to Obtain Trusted Certificate Authority and Remove Existing "www.perfigo.com" Certificate
In a strictly lab environment, it is not necessary to use a CA-signed certificate and you can continue to use a temporary certificate for the CAM and CAS, if desired. If you deploy your CAM and CAS in a production environment, however, you must use a third-party Trusted CA. For details on managing SSL certificates for the CAM, see the Cisco NAC Appliance - Clean Access Manager Installation and Configuration Guide, Release 4.6(1).
Note
Any certificate that is not provided by a public CA or that is not the self-signed certificate is considered a non-standard certificate by the CAS.
Certification Authorities
A Certification Authority (CA) can be public (e.g. Thawte, Verisign) or private.
With a Public CA:
•
•
•
•
With a Private CA:
•
•
•
Intermediary Certificates
When one or more Intermediary CAs are involved, you will have multiple root certificates or public keys. Each CA has its own root. The root/public key information of all certification authorities in the chain needs to be combined into one single file (for example, root.cer) before it can be uploaded into the CAS. To do this, open the root certificate of each CA and copy the information from each root cert into Wordpad or a similar text editor. Include the "Begin Certificate" and "End Certificate' lines for each CA cert, and put each certificate one right after the other in the text file. Save this compiled root.cer file, then import it into the CAS.
Certificates for High Availability (HA) Pairs
If you are running HA-CAS pairs, you must generate the CSR for the Service IP of the HA pair and import the CA-signed certificate into one of the HA pairs (e.g. CAS-1). After that, the certificate information, i.e. the Private Key, Certificate, and Root, will need to be exported from the HA-Primary CAS and imported into the HA-Secondary CAS. Refer to Chapter 13, "Configuring High Availability (HA)" for more information.
Regenerating Certificates for DNS Name Instead of IP
If planning to regenerate certificates based on the DNS name instead of the IP address of your servers:
•
•
•
•
•
•
Typical SSL Certificate Setup on the CAS
The typical steps for managing CAS certificates are as follows:
Phase 1: Establish SSL Communication Between the CAS and CAM
Step 1
After CAM and CAS installation, make sure the time on the CAM and CAS is synchronized (within 3-5 minutes) before regenerating the temporary certificate on which the Certificate Signing Request will be based. See the next section, Synchronize System Time, for details.
Step 2
If planning to use the DNS name instead of the IP address of your servers for CA-signed certificates, you will need to verify the CAS settings and regenerate a temporary certificate. See Regenerating Certificates for DNS Name Instead of IP for details. For HA systems, you'll need to regenerate the certificates based on Service IP (see Generate Temporary Certificate).
Step 3
During initial CAS installation/configuration, a temporary certificate and Private Key are automatically generated. If changing time or DNS settings on the CAM, regenerate the temporary certificate and Private Key.
Phase 2: Set Up Your CAS and CAM For Production Deployment
Warning
Step 4
If you are altering your Cisco NAC Appliance SSL configuration, it is always a good idea to back up the certificate and Private Key corresponding to the current certificate to a local hard drive for safekeeping. See Generate and Export a Certification Request.
Step 5
Step 6
Step 7
When the CA-signed certificate is received from the CA, upload it as PEM-encoded file to the CAS temporary store. See Manage Signed Certificate/Private Key.
Step 8
Note
Note
Step 9
Step 10
Phase 3: Adding a New CAM or CAS to an Existing Production Deployment
In production deployments, CA-signed certificates are used exclusively and the "www.perfigo.com" Certificate Authority is completely removed. Because the temporary "www.perfigo.com" CA is needed for initial installation, use the following steps when introducing new appliances (CAM or CAS) to a production deployment. The new appliance should not be added to the deployment until you have requested and are able to import a new third-party CA-signed certificate.
Step 1
Step 2
Step 3
Step 4
Step 5
Step 6
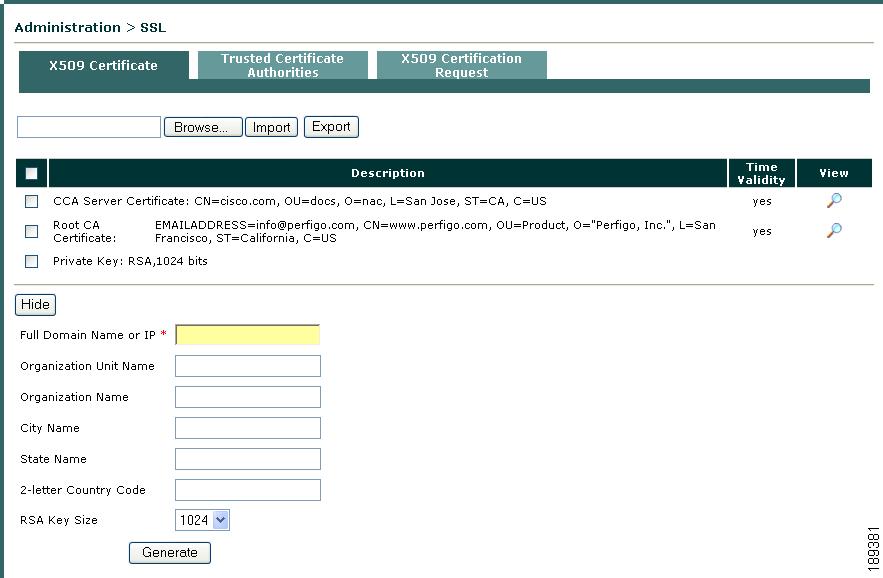
Generate Temporary Certificate
The following procedure describes how to generate a new temporary certificate for the CAS. Any time you change basic configuration settings on the CAM (date, time, associated DNS server, etc.) you should generate a new temporary certificate. See Regenerating Certificates for DNS Name Instead of IP for additional details.
Note
Caution
Step 1
Step 2
Figure 12-7 Administration > SSL > X509 Certificate—Generate Temporary Certificate
Step 3
•
–
Note
–
Note
•
•
•
•
•
Step 4
Step 5
Note
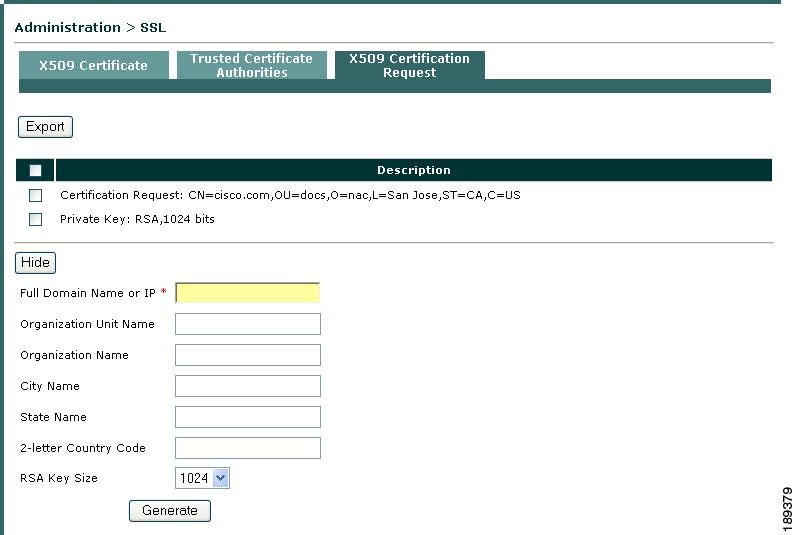
Generate and Export a Certification Request
Generating a CSR creates a PEM-encoded PKCS#10-formatted Certificate Signing Request (CSR) suitable for submission to a certificate authority. Before you send the CSR, make sure to export the existing certificate and Private Key to a local machine to back it up for safekeeping.
To export he CSR/Private Key and create a certificate request from the CAS web console:
Step 1
Figure 12-8 Administration > SSL > X509 Certification Request
Step 2
Step 3
•
camanager.<your_domain_name>
Note
•
•
•
•
•
Step 4
Note
Step 5
Step 6
Alternatively, you can immediately Open the CSR in Wordpad or a similar text editor if you are ready to fill out the certificate request form, but Cisco strongly recommends you also save a local copy of the CSR and Private Key to ensure you have them should the request process suffer some sort of mishap or your CAM basic configuration change between submitting the CSR and receiving your CA-signed certificate.
When you receive the CA-signed certificate back from the certification authority, you can import it into the Clean Access Server as described in Manage Signed Certificate/Private Key. After the CA-signed cert is imported, the "currently installed certificate" is the CA-signed certificate. You can always optionally Export the currently installed certificate if you need to access a backup of this certificate later.
Default File Names for Exported Files
The default file names for SSL Certificate files that can be exported from the CAS are as follows. When you actually save the file to your local machine, you can specify a different name for the file. For example, to keep from overwriting your chain.pem file containing your certificate chain information, you can specify your Private Key filename to be a more appropriate name like priv_key.pem or something similar.
cert_request.pem
CAS Certificate Signing Request (CSR)
chain.pem2
CAS Currently Installed Private Key and/or Certificate
1 For release 3.6.0.1 and below filename extensions are .csr instead of .pem.
2 For release 3.6(1) only, the filename is secsmart_crt.pem.
Manage Signed Certificate/Private Key
Import Signed Certificate/Private Key
You can import CA-signed PEM-encoded X.509 Certificates and Private Keys using the CAS web console. (Typically, you only need to re-import the Private Key if the current Private Key does not match the one used to create the original CSR on which the CA-Signed certificate is based.) There are two methods administrators can use to import CA-signed certificates, Private Keys, and associated Certificate Authority information into Cisco NAC Appliance:
1.
a.
b.
2.
If you have received a CA-signed PEM-encoded X.509 certificate for the Clean Access Server, you can also import it into the Clean Access Server as described here.
Before starting, make sure that the root and CA-signed certificate files are in an accessible file directory location and that you have obtained third-party certificates for both your CAM and CASs. If using a Certificate Authority for which intermediate CA certificates are necessary, make sure these files are also present and accessible if not already present on the CAS.
Note
Note
To import a certificate and/or Private Key for the CAS:
Step 1
Figure 12-9 Administration > SSL > X509 Certificate—Import Certificate
Step 2
Note
Step 3
Note
If you already have other members of the certificate chain in the CAS trust store, you do not need to re-import them. The CAS can build the certificate chain from a combination of newly-imported and existing parts.If you try to upload a root/intermediate CA certificate for the CAM that is already in the list, you may see an error message reading "This intermediate CA is not necessary." In this case, you must delete the uploaded Root/Intermediate CA in order to remove any duplicate files.
Export Certificate and/or Private Key
To backup your certificate and/or Private Key in case of system failure or other loss, you can export your certificate and/or Private Key information and save a copy on your local machine. This practice also helps you manage certificate/Private Key information for a CAS HA-Pair. By simply exporting the certificate information from the HA-Primary CAS and importing it on the HA-Secondary CAS, you are able to push an exact duplicate of the certificate info required for CAM/CAS communication to the standby CAS.
Step 1
Step 2
a.
b.
Manage Trusted Certificate Authorities
You can locate and remove Trusted CAs from the CAS database using the Administration > SSL > Trusted Certificate Authorities CAS web console page. To keep your collection of trusted certificate authority Cisco recommends keeping only trusted certificate authority information critical to Cisco NAC Appliance operations in the CAM trust store.
Caution
To view and/or remove Trusted CAs from the CAS:
Step 1
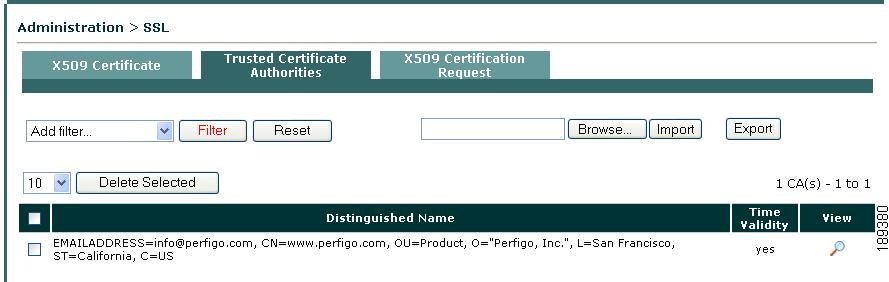
Figure 12-10 Administration > SSL > Trusted Certificate Authorities
Viewing Trusted CAs
Step 2
a.
–
–
You can also combine these two options to refine the Trusted CAs display.
b.
You can click Reset to negate any of the optional search criteria from the filter dropdown menu and return the Trusted CA display to default settings.
c.
d.
Figure 12-11 Trusted Certificate Authority Information
Removing Trusted CAs
Step 3
Step 4
Once the CAS removes the selected Trusted CAs from the database, the CAS automatically restarts services to complete the update.
Import/Export Trusted Certificate Authorities
You can also use the Trusted Certificate Authorities web console page to import and export certificate information for the CAS.
Note
Step 1
Step 2
a.
b.
c.
Step 3
a.
b.
View Current Private Key/Certificate and Certificate Authority Information
You can verify the following files by viewing them under Administration > SSL > X509 Certificate (see Figure 12-8):
•
•
•
Note
View Currently Installed Private Key
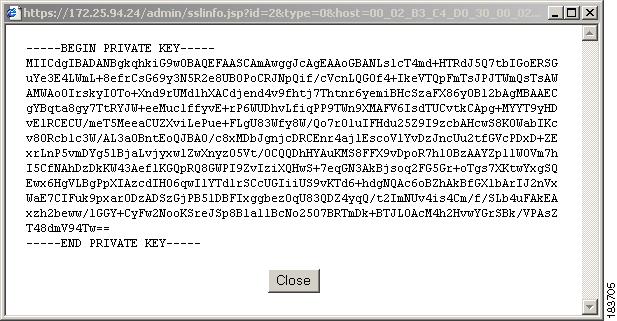
You can view the CAM Private Key by exporting and opening the exported Private Key file in Wordpad or a similar text editor tool to bring up a dialog like the one in Figure 12-12 (BEGIN PRIVATE KEY/END PRIVATE KEY).
Figure 12-12 View Currently Installed Private Key
You can also use this method to view uploaded Private Keys before importing them into your CAM.
View Currently Certificate or Certificate Chain
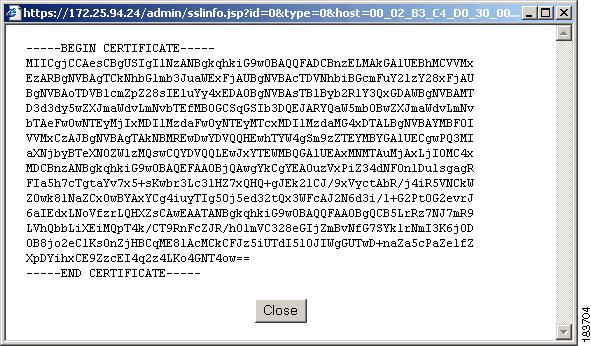
You can view CAS Private Key and End Entity, Root CA, and Intermediate CA certificates by exporting and opening the saved file in Wordpad or a similar text editor tool to bring up a dialog like the one in Figure 12-13 (BEGIN CERTIFICATE/END CERTIFICATE).
Figure 12-13 View Currently Installed Certificate
You can also use this method to view uploaded certificates before importing them into your CAM.
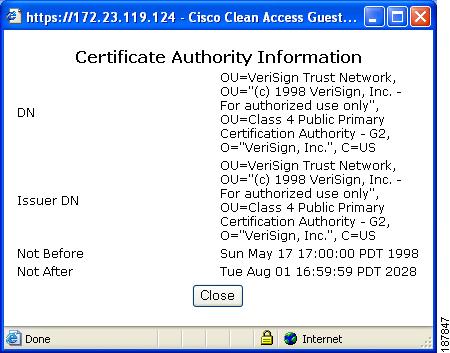
View Certificate Authority Information
You can view Certificate Authority information for CAM End Entity, Root, and Intermediate CA Certificates by clicking on the respective View icon (magnifying glass) in the right hand column to bring up a dialog like the one in Figure 12-14.
Figure 12-14 View Certificate Authority Information
SSL Requirements for Mac OS X/CAS Communication
For the Mac OS X Agent to communicate with the Clean Access Server, the SSL communication between the Agent and CAS must meet certain requirements. The CAS must have one of the following:
•
•
Note
CAS Temporary Certificate Requirements for SSL Connection to Mac OS X Agent
If using a temporary certificate for the CAS, make sure the following are in place:
Step 1
Step 2
•
•
Step 3
a.
b.
1.
2.
sudo vi /etc/hosts to add a new domain lookup entry.
Caution
Caution
Installing the Root Certificate for Mac OS 10.4.x
Note
Step 1
Step 2
Step 3
Step 4
Step 5
Step 6
Step 7
Step 8
Figure 12-15 Root Certificate Added on Mac OS 10.4.x
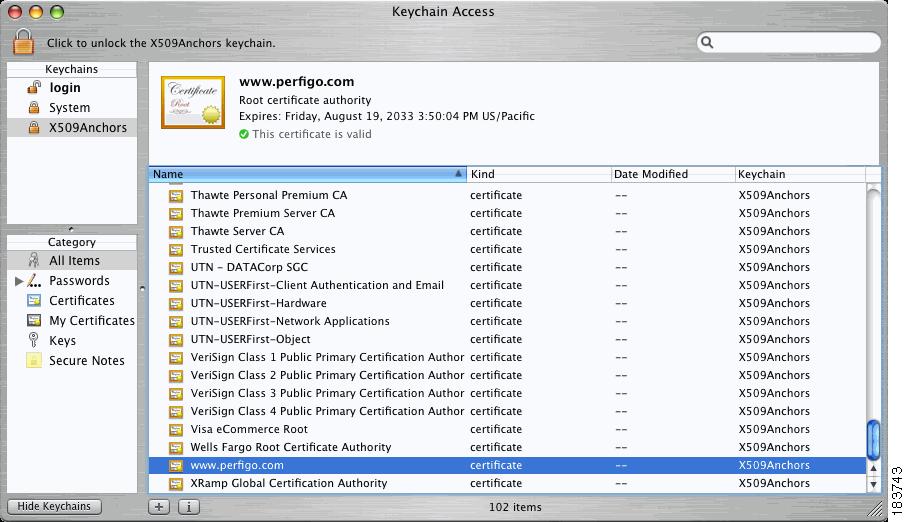
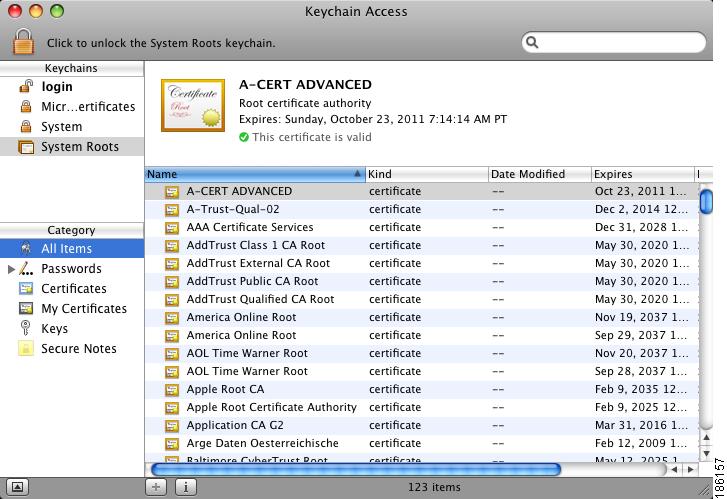
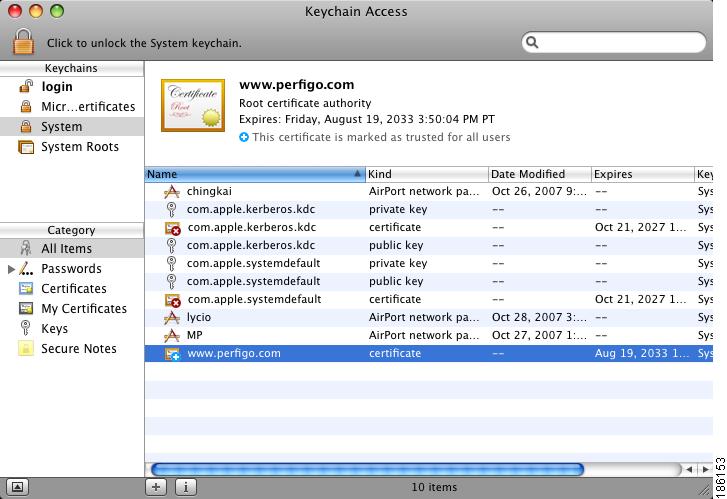
Installing the Root Certificate for Mac OS 10.5
Note
Step 1
Step 2
Step 3
Step 4
Step 5
Figure 12-16 Launch Keychain Access Application on Mac OS 10.5
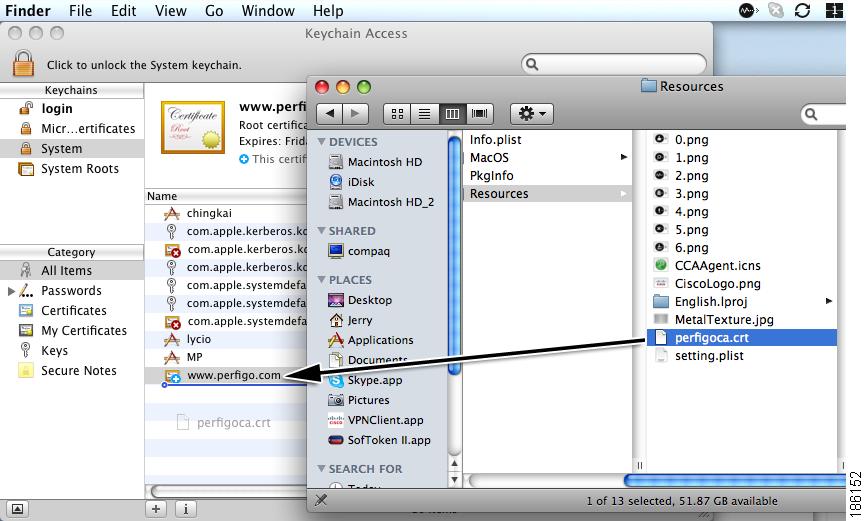
Step 6
Figure 12-17 Drag and Drop the Certificate Into the Keychain Access Application on Mac OS 10.5
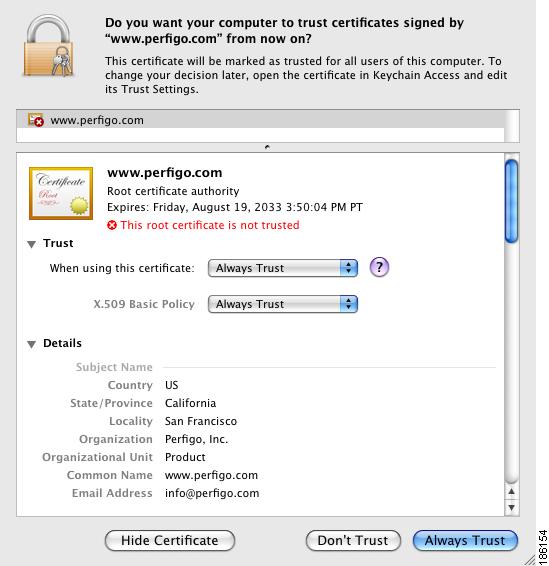
Step 7
Figure 12-18 Certificate Dialog on Mac OS 10.5
Step 8
Figure 12-19 Display the New Root Certificate on Mac OS 10.5
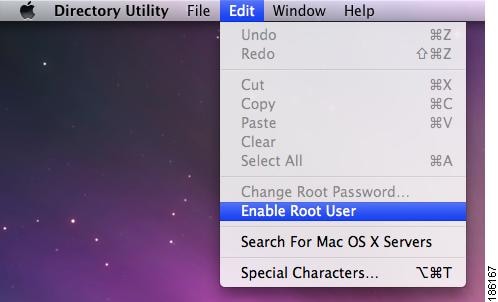
Enable the Root User on Mac OS X
Note
Step 1
Step 2
Step 3
Step 4
Step 5
Step 6
Step 7
Figure 12-20 Enable Root User (Mac OS 10.4.x)
For Mac OS 10.5, launch Applications > Utilities > Directory Utility.app (Figure 12-21) and choose Enable Root User from the Edit menu (Figure 12-22).
Figure 12-21 Enable Root User > (Mac OS 10.5)
Figure 12-22 Enable Root User > Edit (Mac OS 10.5)
Step 8
Step 9
Step 10
Step 11
Step 12
Note
For more information on the Mac OS X Agent, see the "Mac OS X Agent Dialogs" section of the Cisco NAC Appliance - Clean Access Manager Installation and Configuration Guide, Release 4.6(1).
Obtaining the Root Certificate from the CAS
Because Internet Explorer allows exporting of the CAS certificate, this section describes how to obtain the root certificate on a Windows system. Administrators can then transfer the certificate to their Mac via email as an attachment, FTP, or USB storage device.
There are three ways to retrieve the root certificate:
•
•
•
Get the Root Certificate From the Mac OS X Agent Bundle
Step 1
Step 2
Step 3
Step 4
For more information, see SSL Requirements for Mac OS X/CAS Communication.
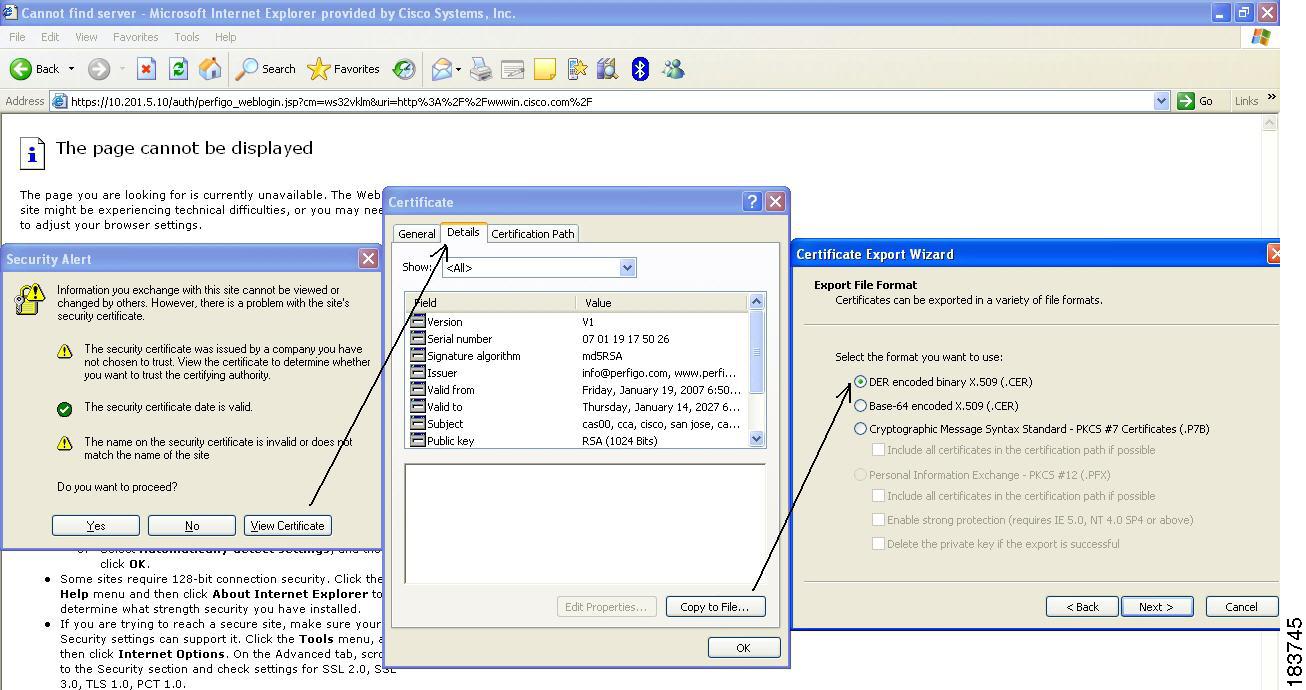
Transfer the Root Certificate from Windows Using Internet Explorer
If the temporary certificate has not yet been installed on the Windows system:
Figure 12-23 illustrates the steps to initially download the temporary certificate.
1.
2.
3.
4.
5.
6.
Figure 12-23 Download Certificate Option 1
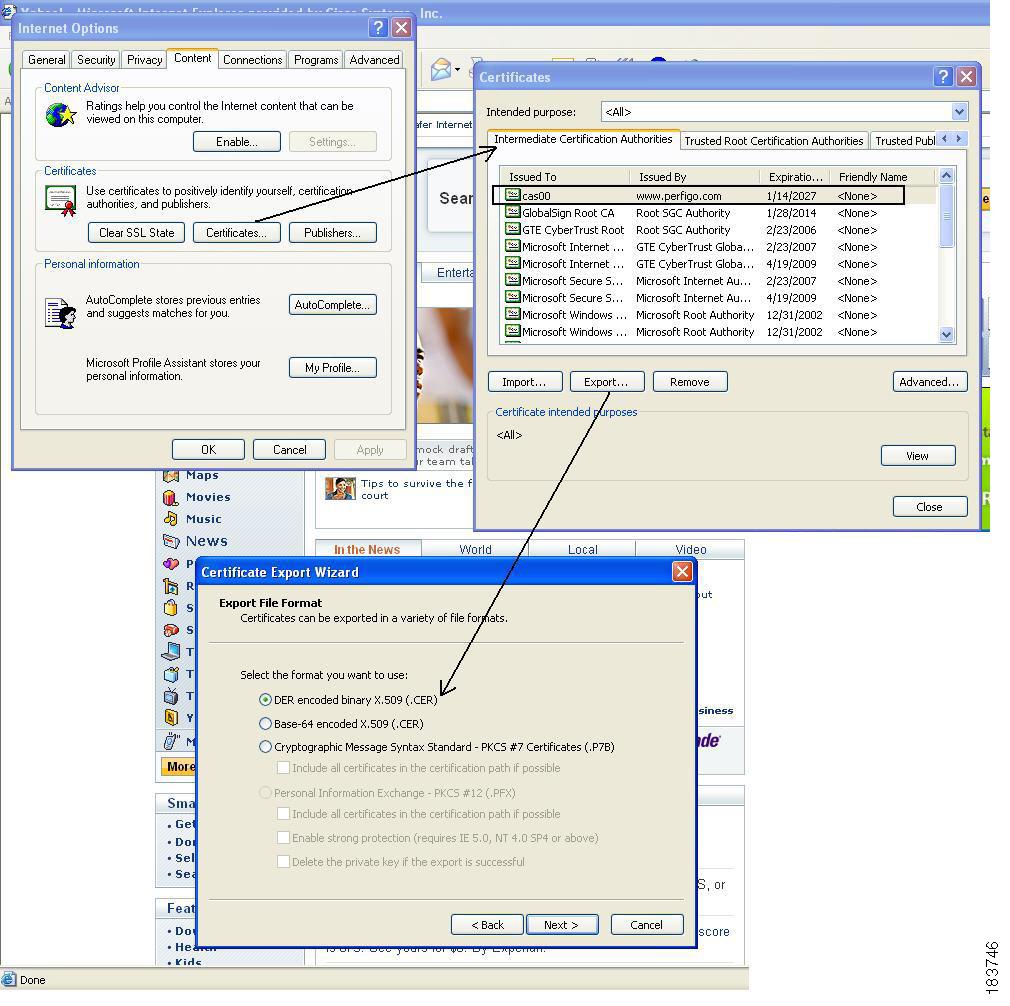
If the browser already has the temporary certificate installed:
Figure 12-24 illustrates the steps to download the certificate if already installed on the system.
1.
2.
3.
4.
5.
6.
Figure 12-24 Download Certificate Option 2
Use Web Login to Get the Root Certificate
Step 1
Step 2
Step 3
For more information, see the guidelines "Administering the CAM" chapter in the Cisco NAC Appliance - Clean Access Manager Installation and Configuration Guide, Release 4.6(1).
Troubleshooting Certificate Issues
There can be issues with Cisco NAC Appliance certificate management if there are mismatched SSL certificates somewhere along the certificate chain. Common problems on SSL certificates can be time-oriented (if the clocks are not synchronized on the CAM and CAS, authentication fails), IP-oriented (certificates are created for the wrong interface) or information-oriented (wrong or mistyped certificate information is imported). This section describes the following troubleshooting topics:
•
•
Warning
CAS Cannot Establish Secure Connection to CAM
If clients attempting login get the following error message, "Clean Access Server could not establish a secure connection to the Clean Access Manager at <IPaddress or domain> (see Figure 12-25), this commonly indicates one of the following issues:
•
•
•
•
The time set on the CAM and the CAS must be 5 minutes apart or less. To resolve this issue:
1.
2.
3.
4.
5.
Figure 12-25 Troubleshooting: "CAS Cannot Establish Secure Connection to CAM"
Note
Private Key in Clean Access Server Does Not Match the CA-Signed Certificate
This issue can arise if a new temporary certificate is generated but a CA-signed certificate is returned for the CSR (certificate signing request) generated from a previous temporary certificate and Private Key pair.
For example, an administrator generates a CSR, backs up the Private Key, and then sends the CSR to a CA authority, such as VeriSign.
Subsequently, another administrator regenerates a temporary certificate after the CSR has been sent. When the CA-signed certificate is returned from the CA authority, the Private Key on which the CA-certificate is based no longer matches the one in the Clean Access Server.
To resolve this issue, re-import the old Private Key and then install the CA-signed certificate.
Certificate-Related Files
For troubleshooting purposes, Table 12-1 lists certificate-related files on the Clean Access Server. For example, if the admin console becomes unreachable due to a mismatch of the CA-certificate/Private Key combination, these files may need to be modified directly in the file system of the Clean Access Server.
System Upgrade
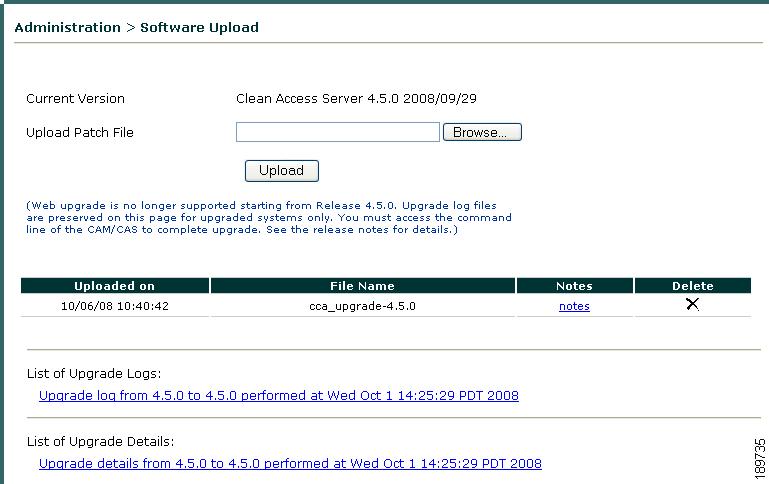
You can use the CAS web console to upload software upgrade images before extracting and installing the upgrade files via console/SSH. You must upgrade your Clean Access Manager and all your Clean Access Servers (including NAC Network Modules) concurrently. The Cisco NAC Appliance architecture is not designed for heterogeneous support (i.e., some Clean Access Servers running 4.6(1) software and some running release 4.5, 4.1(x), or 4.0(x) software).
Once a release is installed on the CAM and CAS, minor release upgrades to a more recent release can be performed on the CAS when patch upgrade images become available.
For complete upgrade details, including instructions for upgrading HA CASs and upgrades via SSH, refer to the "Upgrading to a New Software Release" section of the Release Notes for Cisco NAC Appliance, Version 4.6(1).
Step 1
•
Figure 12-26 CAS Web Console Software Upload
Step 2
Step 3
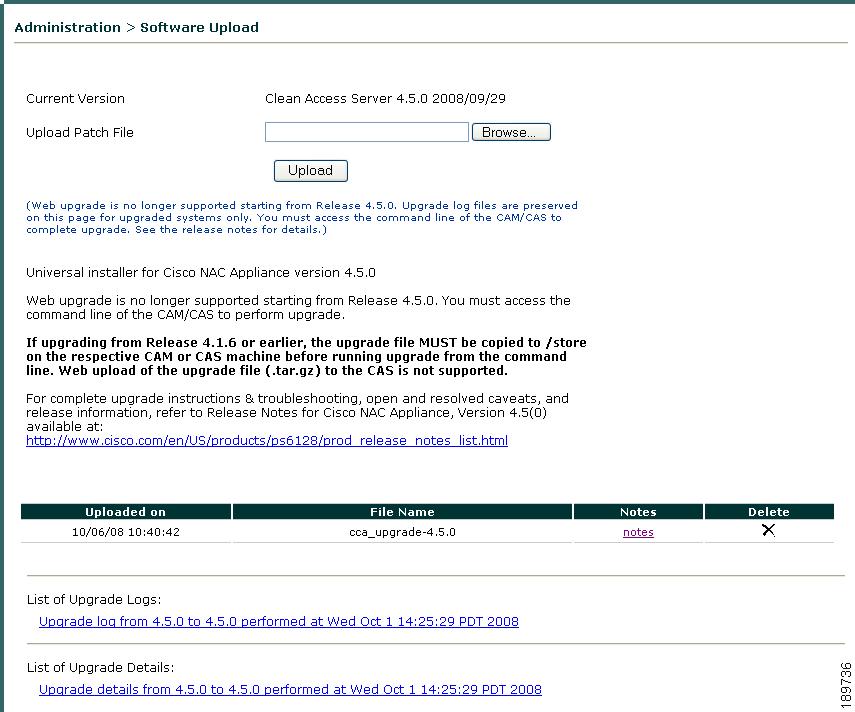
Step 4
Figure 12-27 CAS Web Console Software Update—Notes
Step 5
Step 6
•
•
•
It is normal for the "state before upgrade" to contain several warning/error messages (e.g. "INCORRECT"). The "state after upgrade" should be free of any warning or error messages.
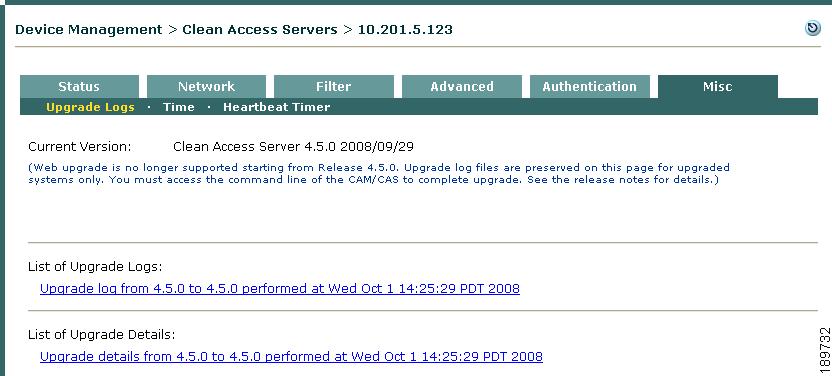
You can also use the CAM web console Device Management > CCA Servers > Manage [CAS_IP] > Misc > Upgrade Logs page (Figure 12-28) to view the CAS software upgrade notes:
•
•
Figure 12-28 CAS Upgrade Logs from CAM Web Console
Synchronize System Time
For logging purposes and other time-sensitive tasks (such as SSL certificate generation), the time on the Clean Access Manager and Clean Access Servers needs to be correctly synchronized. The Time form lets you set the time on the Clean Access Server and modify the time zone setting for the CAS operating system.
After CAM and CAS installation, you should synchronize the time on the CAM and CAS before regenerating a temporary certificate on which a Certificate Signing Request (CSR) will be based. The easiest way to ensure this is to automatically synchronize time with the time server (Sync Current Time button).
Note
Note
The time can be modified on the CAM under Administration > CCA Manager > System Time. See the Cisco NAC Appliance - Clean Access Manager Installation and Configuration Guide, Release 4.6(1) for details.
To view the current time:
Step 1
Step 2
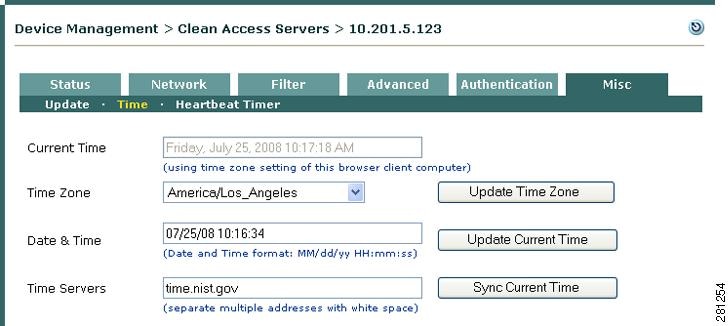
Figure 12-29 Time Form
There are two ways to adjust the system time—manually, by typing in the new time, or automatically, by synchronizing from an external time server.
To manually modify the system time:
Go to the Time form of the Misc tab and perform one of the following steps:
•
•
To automatically synchronize with the time server:
The default time server is the server managed by the National Institute of Standards and Technology (NIST), at time.nist.gov. To specify another time server:
1.
2.
If more than one time server is listed, the CAS tries to contact the first server in the list when synchronizing. If available, the time is updated from that server. If it is not available, the CAS tries the next one, and so on, until a server is reached.
The CAS then automatically synchronizes the time with the configured NTP server at periodic intervals.
To change the time zone of the server system time:
1.
2.
Support Logs and LogLevel Settings
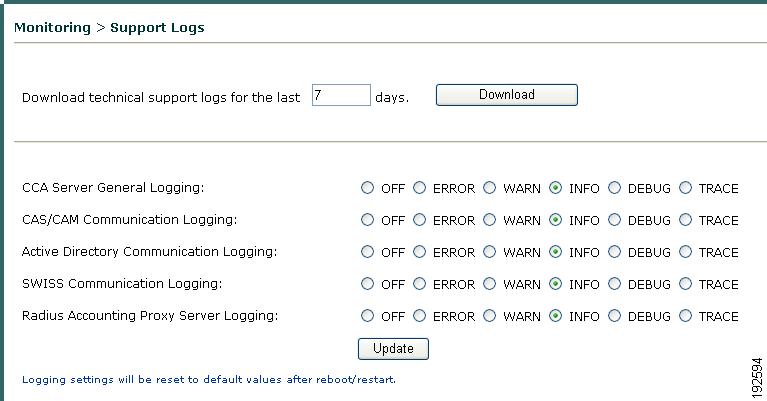
The Support Logs page on the Clean Access Server is intended to facilitate TAC support of customer issues. The Support Logs page allows administrators to combine a variety of system logs (such as information on open files, open handles, and packages) into one tarball that can be sent to TAC to be included in the support case. Administrators should download these support logs when sending their customer support request.
The Support Logs pages on the CAM web console and CAS direct access web console (Figure 12-30) allow you to configure the level of log detail recorded for troubleshooting purposes in /perfigo/access/tomcat/logs/nac_server.log. These web controls are intended as alternatives to using the CLI loglevel command to gather system information when troubleshooting.
For normal operation, the log level should always remain at the default setting (INFO). The log level is only changed temporarily for a specific troubleshooting time period—typically at the request of the customer support/TAC engineer. In most cases, the setting is switched from INFO to DEBUG for a specific interval, then reset to INFO after data is collected. Note that once you reboot the CAM/CAS, or perform the service perfigo restart command, the log level will return to the default setting (INFO).
Note
Note
Downloading CAS Support Logs
Step 1
Step 2
Figure 12-30 CAS Support Logs
Step 3
Step 4
Step 5
Note
If requested to do so by the TAC engineer, you can temporarily change the loglevel to obtain more troubleshooting details prior to downloading the support logs.
To changing the LogLevel for CAS logs:
Step 1
Step 2
Step 3
•
•
•
•
Note
•
Step 4
•
•
–
–
–
•
•
•
•
Note